Flask 教程:在 PyCharm 中创建 Flask 应用程序

如果您想使用 Python 构建一款简单的 Web 应用程序,Flask 微框架可能是最佳选择之一。 借助 Flask,只用一个 Python 文件就可以构建出完整的 Web 应用程序并根据需要进行扩展。
在 PyCharm 中构建 Flask 应用程序更加简单。 PyCharm 负责创建特定(适宜)目录结构和设置,确保正确安装 Flask、Jinja 和 Werkzeug WSGI 工具包。

在这篇 Flask 快速教程中,Nafiul Islam 在一分钟内设置了一个简单的 Flask 应用程序,并展示了实用的 PyCharm 工具包。这篇教程将展示的内容包括:
- 在 PyCharm 中创建 Flask 项目。
- 设置虚拟环境以处理项目。
- 为 Flask 应用程序设置运行配置。
- 在 PyCharm 中使用模板高效工作。
如何在 PyCharm 中创建新的 Flask 项目
您可以通过两种方式在 PyCharm 中创建新的 Flask 项目:
导航到主菜单,选择 File | New Project(文件 | 新建项目)。

或者,在欢迎屏幕上点击 New Project(新建项目)。

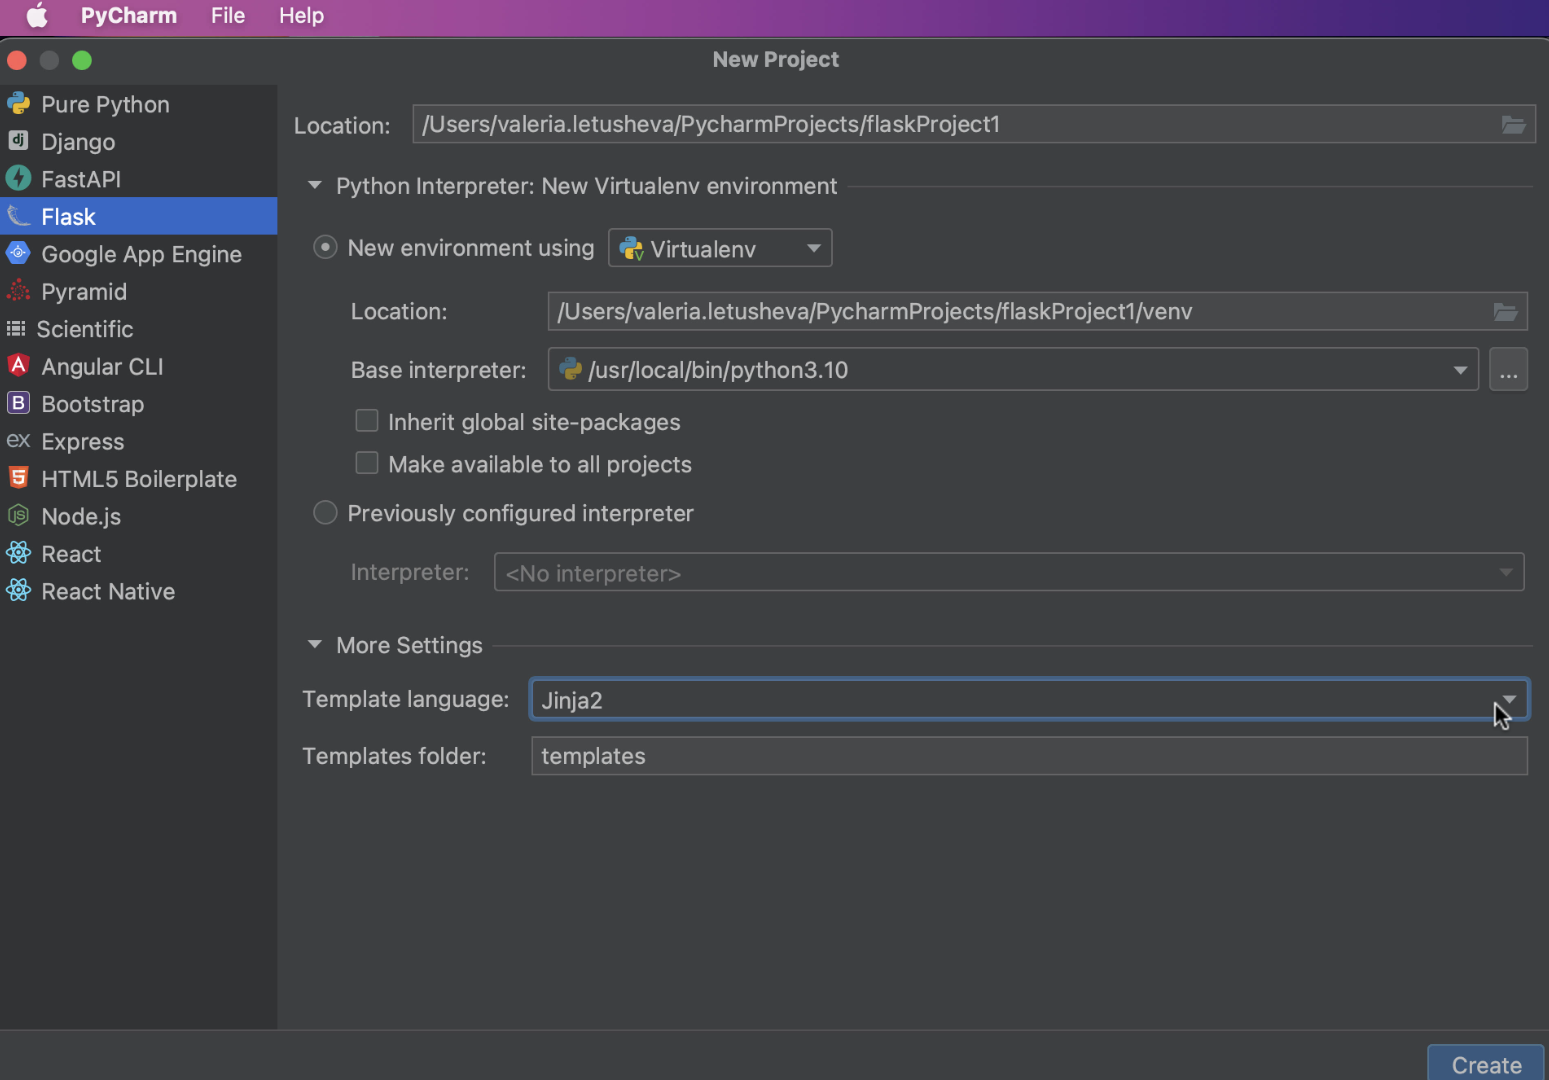
通过这两种方式,PyCharm 都会将您带到 New Project(新建项目)对话框,在其中左侧面板的 Project types(项目类型)列表中可以选择 Flask。

在 New Project(新建项目)对话框中,您需要在 Location(位置)中指定项目位置路径。
如何为项目设置环境
下一步是选择用于此特定项目的解释器。 您可以使用已经为其他项目设置的现有解释器,也可以创建新解释器。 设置新解释器时,您可以自选环境,例如虚拟环境、Pipenv、Poetry 或 Conda。

您还需要为新虚拟环境指定所需位置和基础解释器。
如果您想将机器上全局 Python 中已安装的所有软件包添加到虚拟环境,请选中 Inherit global site-packages(继承全局站点软件包)复选框。
如果要将此环境用于其他项目,请勾选 Make available to all projects(可用于所有项目)复选框,下次为新项目设置 Python 解释器时即可选择此环境。
如何设置模板语言
设置环境后,您可能需要指定模板语言和模板文件夹名称。 这可以从 New Project(新建项目)对话框完成。 PyCharm 默认将 Jinja 设置为模板语言并将模板文件夹命名为“templates”。
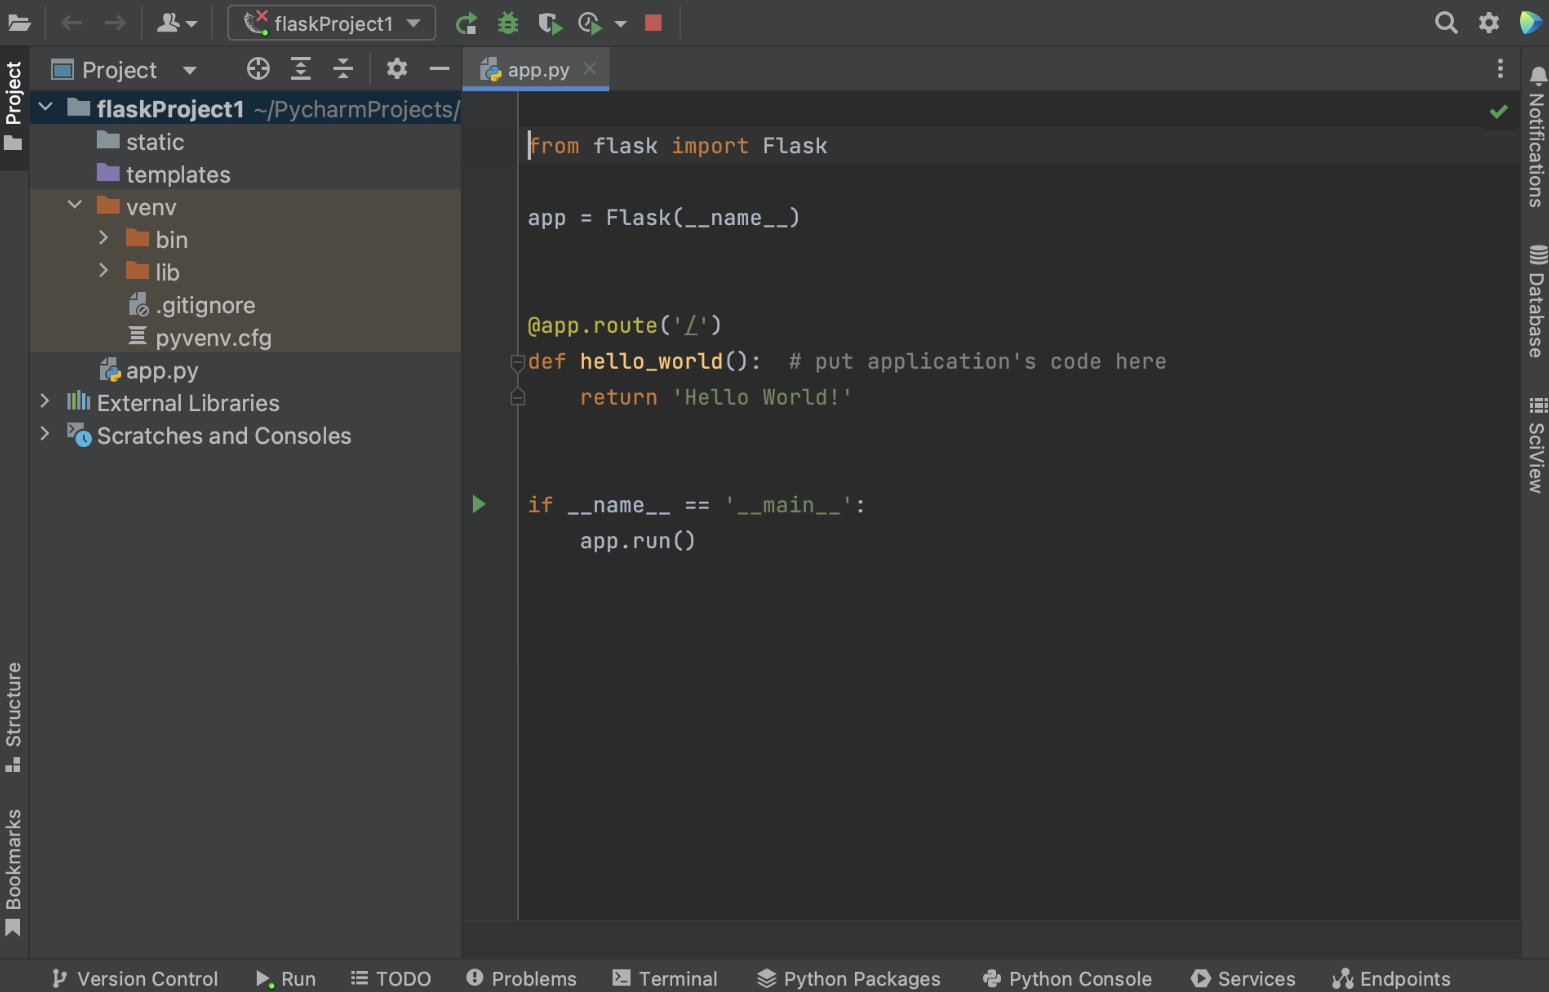
现在就可以开始新 Flask 项目了! 记得点击对话框右下角的 Create(创建)按钮。 PyCharm 将创建具有特定目录结构和专用模板文件夹的 Flask 应用程序,并在您的机器上安装 Flask(如果尚未安装)。
如何为 Flask 应用程序设置运行配置
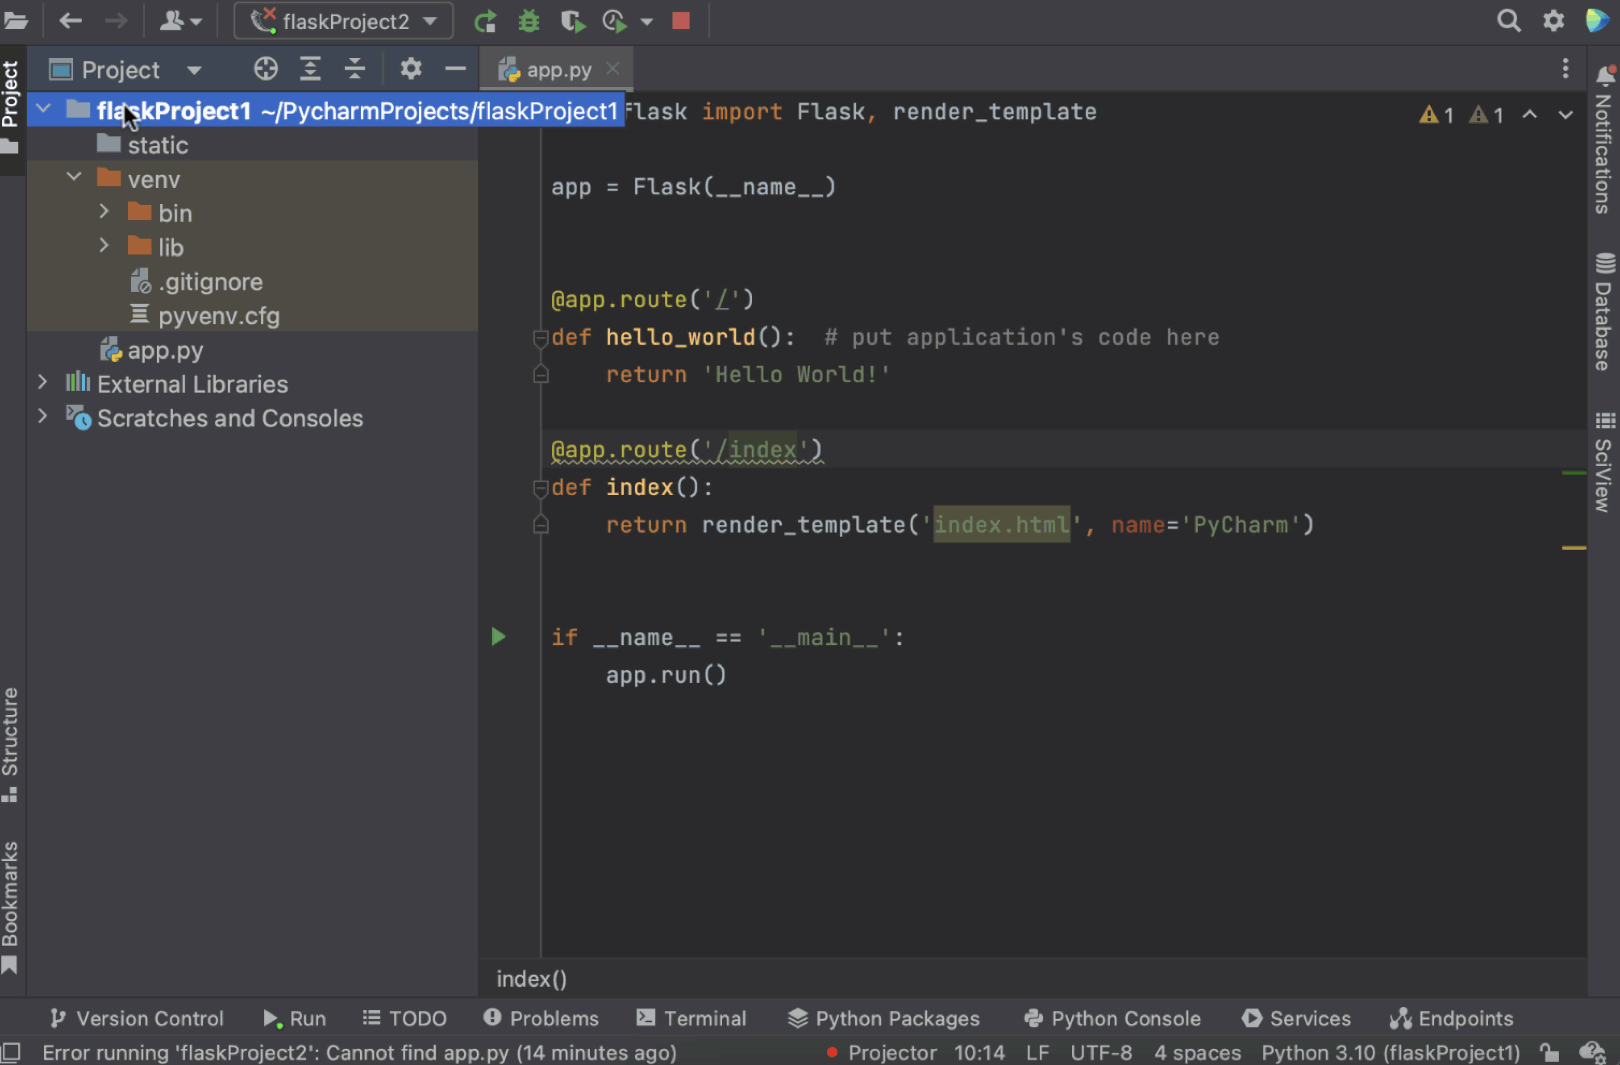
在 PyCharm 预配置新的 Flask 应用程序后,将出现一个打开的 app.py 文件,这是一个存根 Python 脚本,可用于测试应用程序是否运行正常以及设置是否正确。

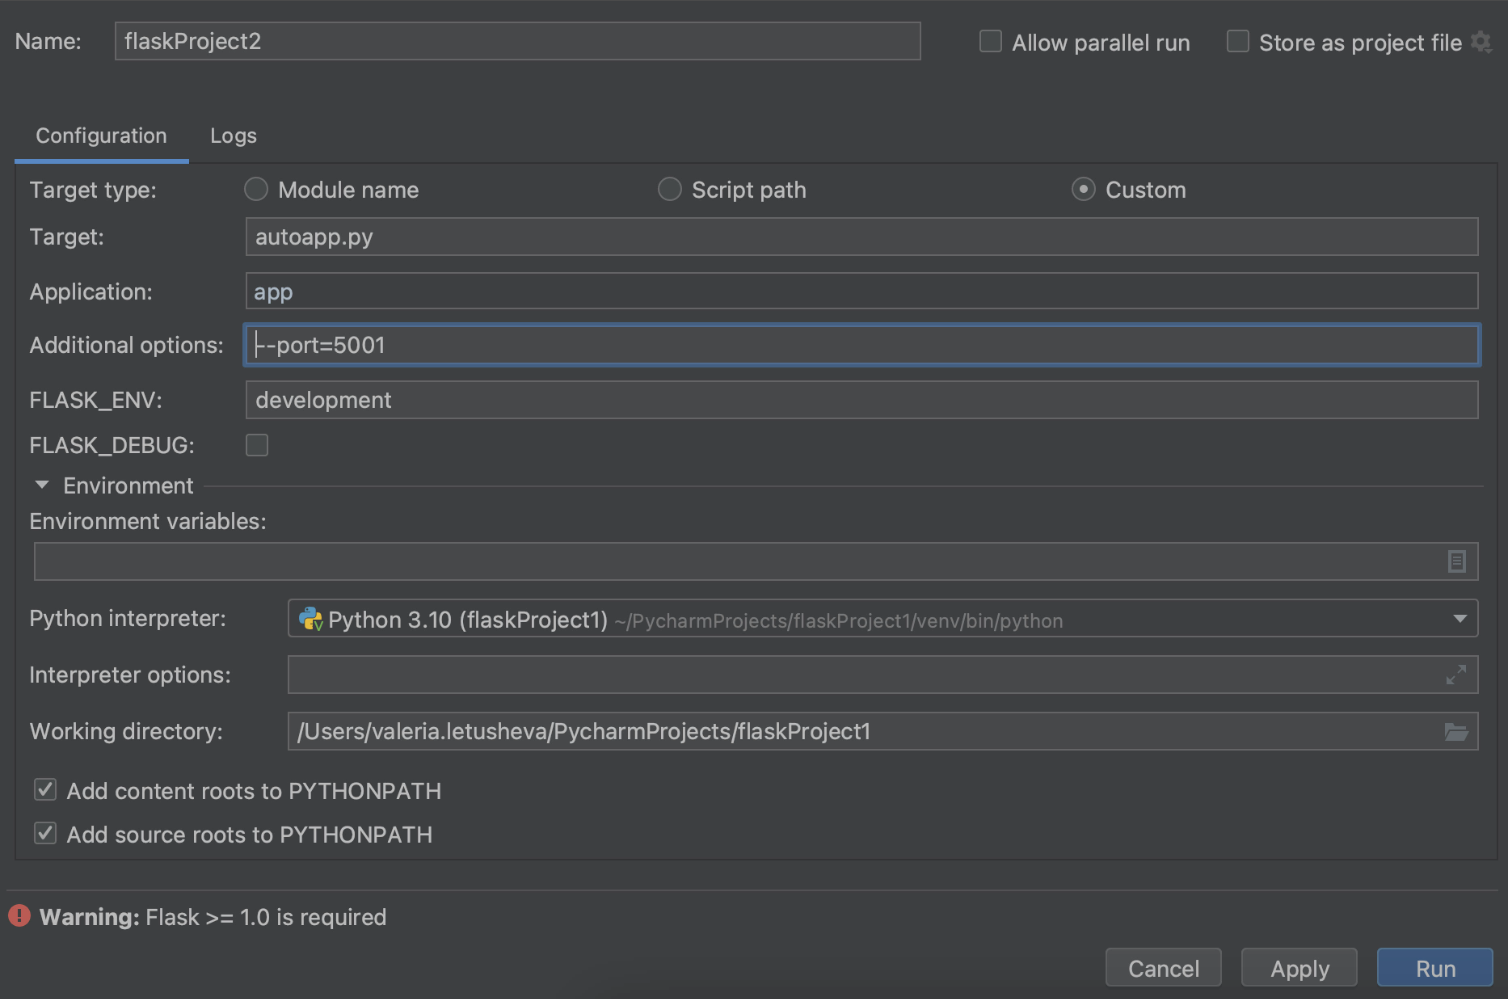
请注意,如果您使用的是 macOS Monterey,可能需要更改默认端口才能运行 app.py,否则会出现错误。 下文将介绍如何更改端口。
要手动配置运行配置,您可以在间距中 Run(运行)按钮旁边的下拉菜单中选择 Edit run configuration(编辑运行配置)。

在 Run/Debug Configurations(运行/调试配置)对话框中,您需要点击 Add new run configuration(添加新的运行配置)(或按对话框窗口左上角的加号)并从配置列表中选择 Flask server(Flask 服务器)。
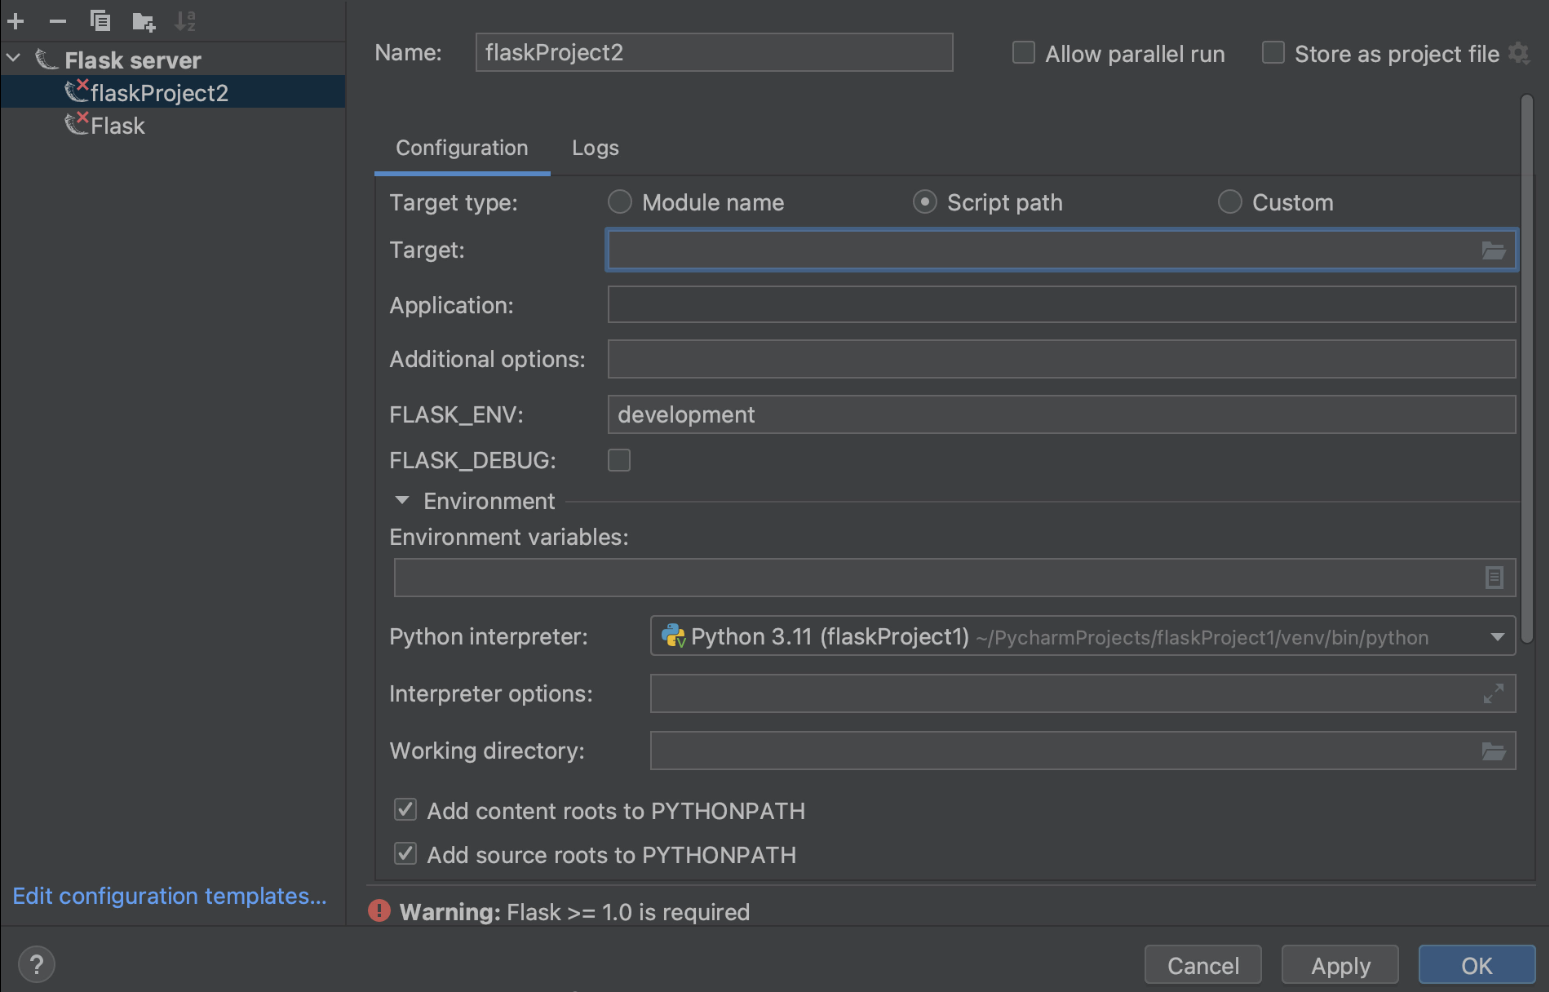
您需要指定 Target(目标)和 Application(应用程序)字段的值。
您可以在 Target(目标)字段中指定不同的目标类型,具体取决于运行的内容:Python 文件的路径、Flask 项目中的模块,甚至是模块、脚本和 Flask 实例的自定义组合。 对于我们的示例,我们将运行名为 autoapp.py 的文件。
在 Application(应用程序)字段中,需要定义待执行的应用程序的名称。 在本例中为 app。

如需详细了解运行配置设置,请访问专属帮助页面。
如何更改默认端口
您可以在 Run/Debug Configurations(运行/调试配置)对话框中更改默认端口。 在 Additional options(其他选项)字段中打印 --port=[number of port] 。
使用模板
如何从用法创建模板文件
作为 Flask 支持的一部分,PyCharm 提供了处理代码期间自动创建模板文件的功能。 因此,在路由中提及不存在的模板时,PyCharm 会高亮显示模板文件的名称。 在高亮显示的模板名称处放置文本光标,使用快速修复 Create template <name>(创建模板<名称>),按 ⌥ ⏎,然后从可用意图操作列表中选择 Create template <name>(创建模板<名称>)。
或者,您可以点击黄色灯泡并选择 Create template <name>(创建模板<名称>)。

在 Create Template(创建模板)对话框中,选择将在其中创建新模板的模板目录。 请注意,此快速修复将创建一个空模板。

如果右键点击项目视图中的 templates 文件夹并选择 New/HTML file(新建/HTML 文件)创建新模板,您将获得预填充通用 HTML 代码的文件。
您可以在帮助页面详细了解 PyCharm 如何使用模板提供帮助。
如何使用实时模板
为了优化工作,您可以创建实时模板,而不必重复编写相同的代码。 要展开代码段,请输入对应模板缩写并按 ⇥。 按住 ⇥ 从模板中的一个变量跳转到下一个变量。 按 ⇧ ⇥ 移动到上一个变量。
在示例中,我们将使用预构建的实时模板,输入 html: 5 并按 ⇥。 我们将获得可以进一步修改的基本 HTML 代码。

PyCharm 中有许多预定义的实时模板可供使用。 要查看和自定义,请转到 Settings | Preferences/Editor/Live Templates(设置 | 偏好设置/编辑器/实时模板)。 这里使用的实时模板位于 Zen HTML 下。 您可以点击查看模板详细信息,包括缩写和模板文本。 您可以根据需要修改模板。

回到模板文件,我们将 Hello {{ name }} 添加到 <body>,运行应用以检查模板是否正常运行。

我们在 localhost 上得到一个 url,我们可以将其粘贴到浏览器中。 将 /index 添加到 url 中,我们可以看到 Hello PyCharm 文本,这表示一切正常!

如何将模板文件夹添加到项目
如果您想拥有一个不同名称的 templates 文件夹(不是“templates”),可以从项目视图删除现有 templates 文件夹,然后右键点击项目名称,选择 New/Directory(新建/目录),在对话框窗口中定义文件夹名称。
记得右键点击文件夹并选择 Mark Directory as/Template Folder(将目录标记为/模板文件夹)将其标记为模板文件夹。 这样您就获得了自定义名称的模板文件夹!
如何将 SQL 数据库与 Flask 项目关联(以及可能这样做的原因)
如果项目有 SQL 数据库,您可以将其与 PyCharm 中的项目关联,只需将其从项目结构拖到右侧面板上的 Database(数据库)工具窗口中即可。

数据库与项目关联后将提供 SQL 语句和整个项目的对应代码洞察。 PyCharm 将能够内省整个项目,包括关联的数据库,并且当您在代码中需要数据库的表名时,PyCharm 可以识别它。

接下来您就可以在新的 Flask 应用程序上开始高效工作了。 如果您有其他问题,请发表评论或在 Twitter 上联系我们。
如果在这篇 Flask 教程后您还想学习更多内容,可以考虑以下实用资源:
延伸阅读:
观看视频
本博文英文原作者:

Subscribe to PyCharm Blog updates

Discover more


Flask tutorial: Create a Flask application in PyCharm

If you are looking into building a simple web application with Python, the Flask microframework is probably one of the best choices. With Flask you can build a real web application with just a single Python file and extend it if you need to.
It’s even easier to build a Flask application in PyCharm Professional. PyCharm takes care of creating the specific (proper) directory structure and settings, and makes sure that Flask, Jinja, and the Werkzeug WSGI toolkit are successfully installed.
Try PyCharm Professional for free
In this very short Flask tutorial, Nafiul Islam sets up a simple Flask application in just a minute and showcases the PyCharm toolkit you can benefit from.
This tutorial will show you how to:
- Create a Flask project in PyCharm.
- Set up a virtual environment to work with your project.
- Set up a run configuration for your Flask application.
- Work efficiently with templates in PyCharm.
How to create a new Flask project in PyCharm
There are two ways to create a new Flask project in PyCharm Professional:
You can navigate to the main menu and select File | New Project.
You can also click “New Project” on the Welcome screen.
In both cases, PyCharm will bring you to the New Project dialog, where you can select Flask from the list of Project types on the left panel.
In the New Project dialog, you need to specify the project location path in the Location.
How to set up an environment for your project
The next step is to choose the interpreter you want to use for this particular project. You can use an existing interpreter that you’ve already set up for another project or create a new one. When setting up a new interpreter, you can select an environment of your choice, whether a Virtual environment, Pipenv, Poetry, or Conda.
You also need to specify the desired location and base interpreter of a new virtual environment.
If you’d like to add all packages that are already installed in the global Python on your machine to your virtual environment, check the Inherit global site-packages checkbox.
If you are going to use this environment for other projects, tick the Make available to all projects checkbox and you will be able to select this environment the next time you set up a Python interpreter for your new project.
How to setup a template language
After you are done with the environment setup, you may want to specify the Template language and the name for your Templates folder. This can be done from the New Project dialog. By default, PyCharm sets Jinja as the template language and names the template folder “templates”.
Now you are all set to get started with your new Flask project! Don’t forget to click the “Create” button at the right bottom corner of the dialog. PyCharm will create a Flask application for you with a specific directory structure and dedicated templates folder, and install Flask on your machine if it is not already.
How to set up a run configuration for your Flask application
Once your new Flask application is preconfigured for you by PyCharm, you will see an open app.py file, which is a stub Python script that can be used to test whether your application is working and your settings are correct.
Note that if you are using macOS Monterey, you will likely need to change the default port to run app.py, otherwise you’ll get an error. Read on to see how you can change the port.
To configure a Run configuration manually, you can select Edit run configuration in the dropdown menu next to the run button in the gutter.
In the Run / Debug Configurations dialog, you need to click Add new run configuration (or just press plus in the left upper corner of the dialog window) and select Flask server from the list of Configurations.
You need to specify the values for Target and Application fields.
You can specify different Target types in the Target field, depending on what you would like to run: a path to the Python file, a module in your Flask project, or even a custom combination of modules, scripts, and Flask instances. For our example, we would like to run a file called autoapp.py.
In the Application field we will need to define the name of the application we are going to execute. In our case it will just be “app”.
If you want to learn more about these and other Run Configuration settings, please visit the dedicated Help page.
How you can change the default port
If you need to change the default port, you can also do it in the Run / Debug Configurations dialog. Print --port=[number of port] in the Additional options field.
Working with templates
How to create a template file from usage
As a part of Flask support, PyCharm provides the ability to automatically create a template file while you are working on the code. So if you happen to mention a non-existing template in your route, PyCharm will highlight the name of the template file. Use the quick-fix Create template <name> by placing a caret at the highlighted template name, press ⌥ ⏎, and choose Create template <name> from the list of available intention actions.
Alternatively, you can click the yellow light bulb and choose Create template <name> from there.
In the Create Template dialog, select the template directory, where the new template will be created. Note that this quick-fix will create an empty template.
On the contrary, if you create a new template by right-clicking on the templates folder in the project view and choosing New / HTML file, you will get a file prefilled with generic HTML code.
You can learn more about how PyCharm can help with templates on our Help page.
How to use a live template
To optimize your work, you can create live templates instead of writing the same pieces of code multiple times. To expand a code snippet, type the corresponding template abbreviation and press ⇥. Keep pressing ⇥ to jump from one variable in the template to the next one. Press ⇧ ⇥ to move to the previous variable.
In our case, we will use a pre-built live template with html: 5 typing and press ⇥. We will get basic HTML code that we can modify further.
There are many predefined live templates available for you in PyCharm. To view and customize the one you would like to use, go to Settings | Preferences / Editor / Live Templates. The live template that we used here is under Zen HTML. You can click on it and see detailed information about the template, including abbreviations and template text. You can modify the template according to your needs.
Coming back to our template file, we will add Hello {{ name }} to the <body> and run our app to check if the template is working.
We get a url on our localhost that we can paste into the browser. Add /index to the url and we see “Hello PyCharm” text – everything is working!
How to add a templates folder to your project
If you are willing to have a templates folder under a different name (not “templates”), you can delete the existing templates folder from the project view and then right-click on the project name, select New / Directory, and define the folder’s name in the dialog window.
Don’t forget to mark the folder as a Template folder by right-clicking on it and choosing Mark Directory as / Template Folder. Now you have a template folder with a name of your choice!
How to associate an SQL database with your Flask project (and why you might do so)
If your project has an SQL database, you can associate it with the project in PyCharm by simply dragging it from the project structure to the Database tool window on the right panel.
Associating a database with your project will provide you with proper code insight both for SQL statements and across the whole project. PyCharm will be able to introspect the whole project, including the associated database, and will recognize it when you need the table name from the database in your code.
Now you are all set for productive work on your new Flask application. If you have any further questions, please leave a comment or ping us on Twitter.
Try PyCharm Professional for free
If you’re in the mood to learn more than this Flask tutorial, here are some resources you might find useful:
To read:
- Tutorial on creating live templates in PyCharm
- Tutorial on creating a web application with Flask
- PyCharm Help pages on database management
To watch:
- Building Search Functionality with Python, Flask, and Elasticsearch
- Developing Flask Apps on Google Cloud
Subscribe to PyCharm Blog updates