

Django と MongoDB の接続方法

最も一般的なウェブフレームワークの 1 つである Django は「電池付属」の考えを採用しています。 つまり、拡張機能やその他のフレームワークを使用せずに普通の Django のみで本番対応のアプリケーションをビルドすることができます。 SQLite データベースでさえも、初期状態で使用できるほどです。 SQLite は学習用と小規模のアプリケーションの開発に最適なデータベースですが、プロジェクトの規模が大きくなるにつれて問題が発生しやすくなる特定の制限があります。
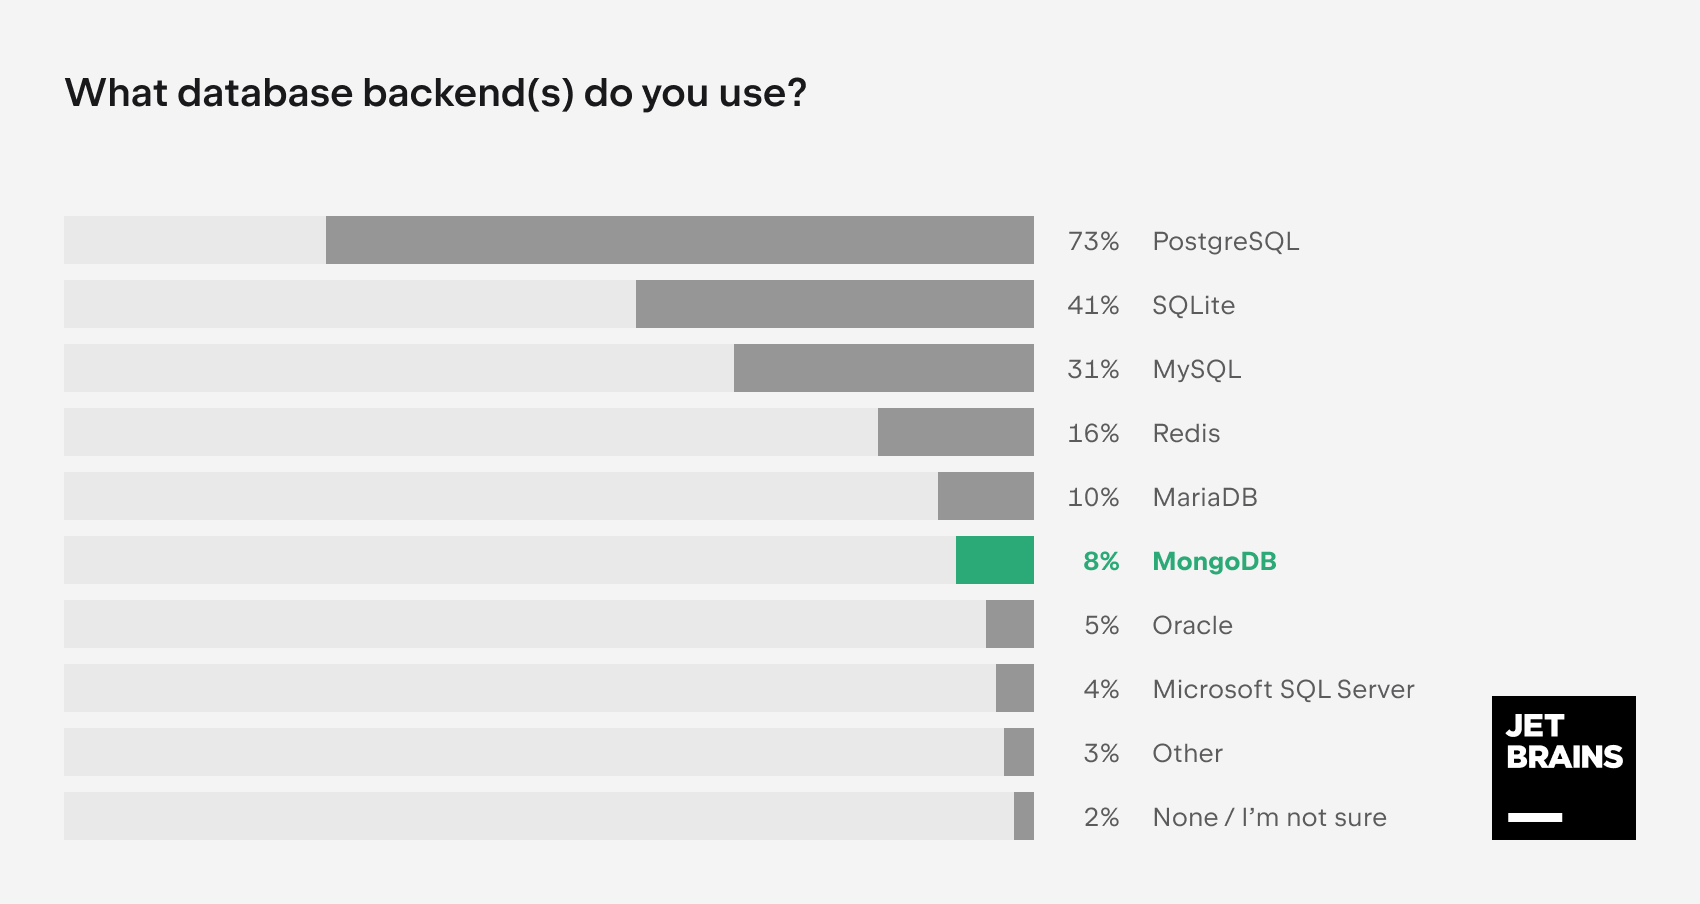
開発者はアプリを拡張して負荷の高い演算を実行できるようにする場合、SQLite ではなく他のデータベースを選択する傾向にあります。 Django は PostgreSQL、MariaDB、MySQL、Oracle、SQLite、一部のサードパーティデータベースバックエンドなどの多数のデータベースを公式にサポートしていますが、 MongoDB はサポート対象に含まれていません。ただし、2023 年に JetBrains が実施した Django 開発者アンケートによると、これは依然として Django 開発者の 8% が使用している非常に一般的な選択肢です。
MongoDB を必要とする開発者とその理由
Django プロジェクトに MongoDB を選択する理由とは何でしょうか?また、Django が正式にこのデータベースをサポートしていないことは実際にどのような意味があるのでしょうか? 確認していきましょう。
正式にサポートされているデータベースはどれもリレーショナルデータベース管理システム(RDBMS)です。つまり、データをテーブルに格納して、SQL(構造化クエリ言語)をサポートしています。 一方、MongoDB は非リレーショナルデータベースです。 このようなデータベースは往々にして NoSQL とも呼ばれており、 行と列のテーブルではなく、BSON という JSON に似た形式でデータを格納します。
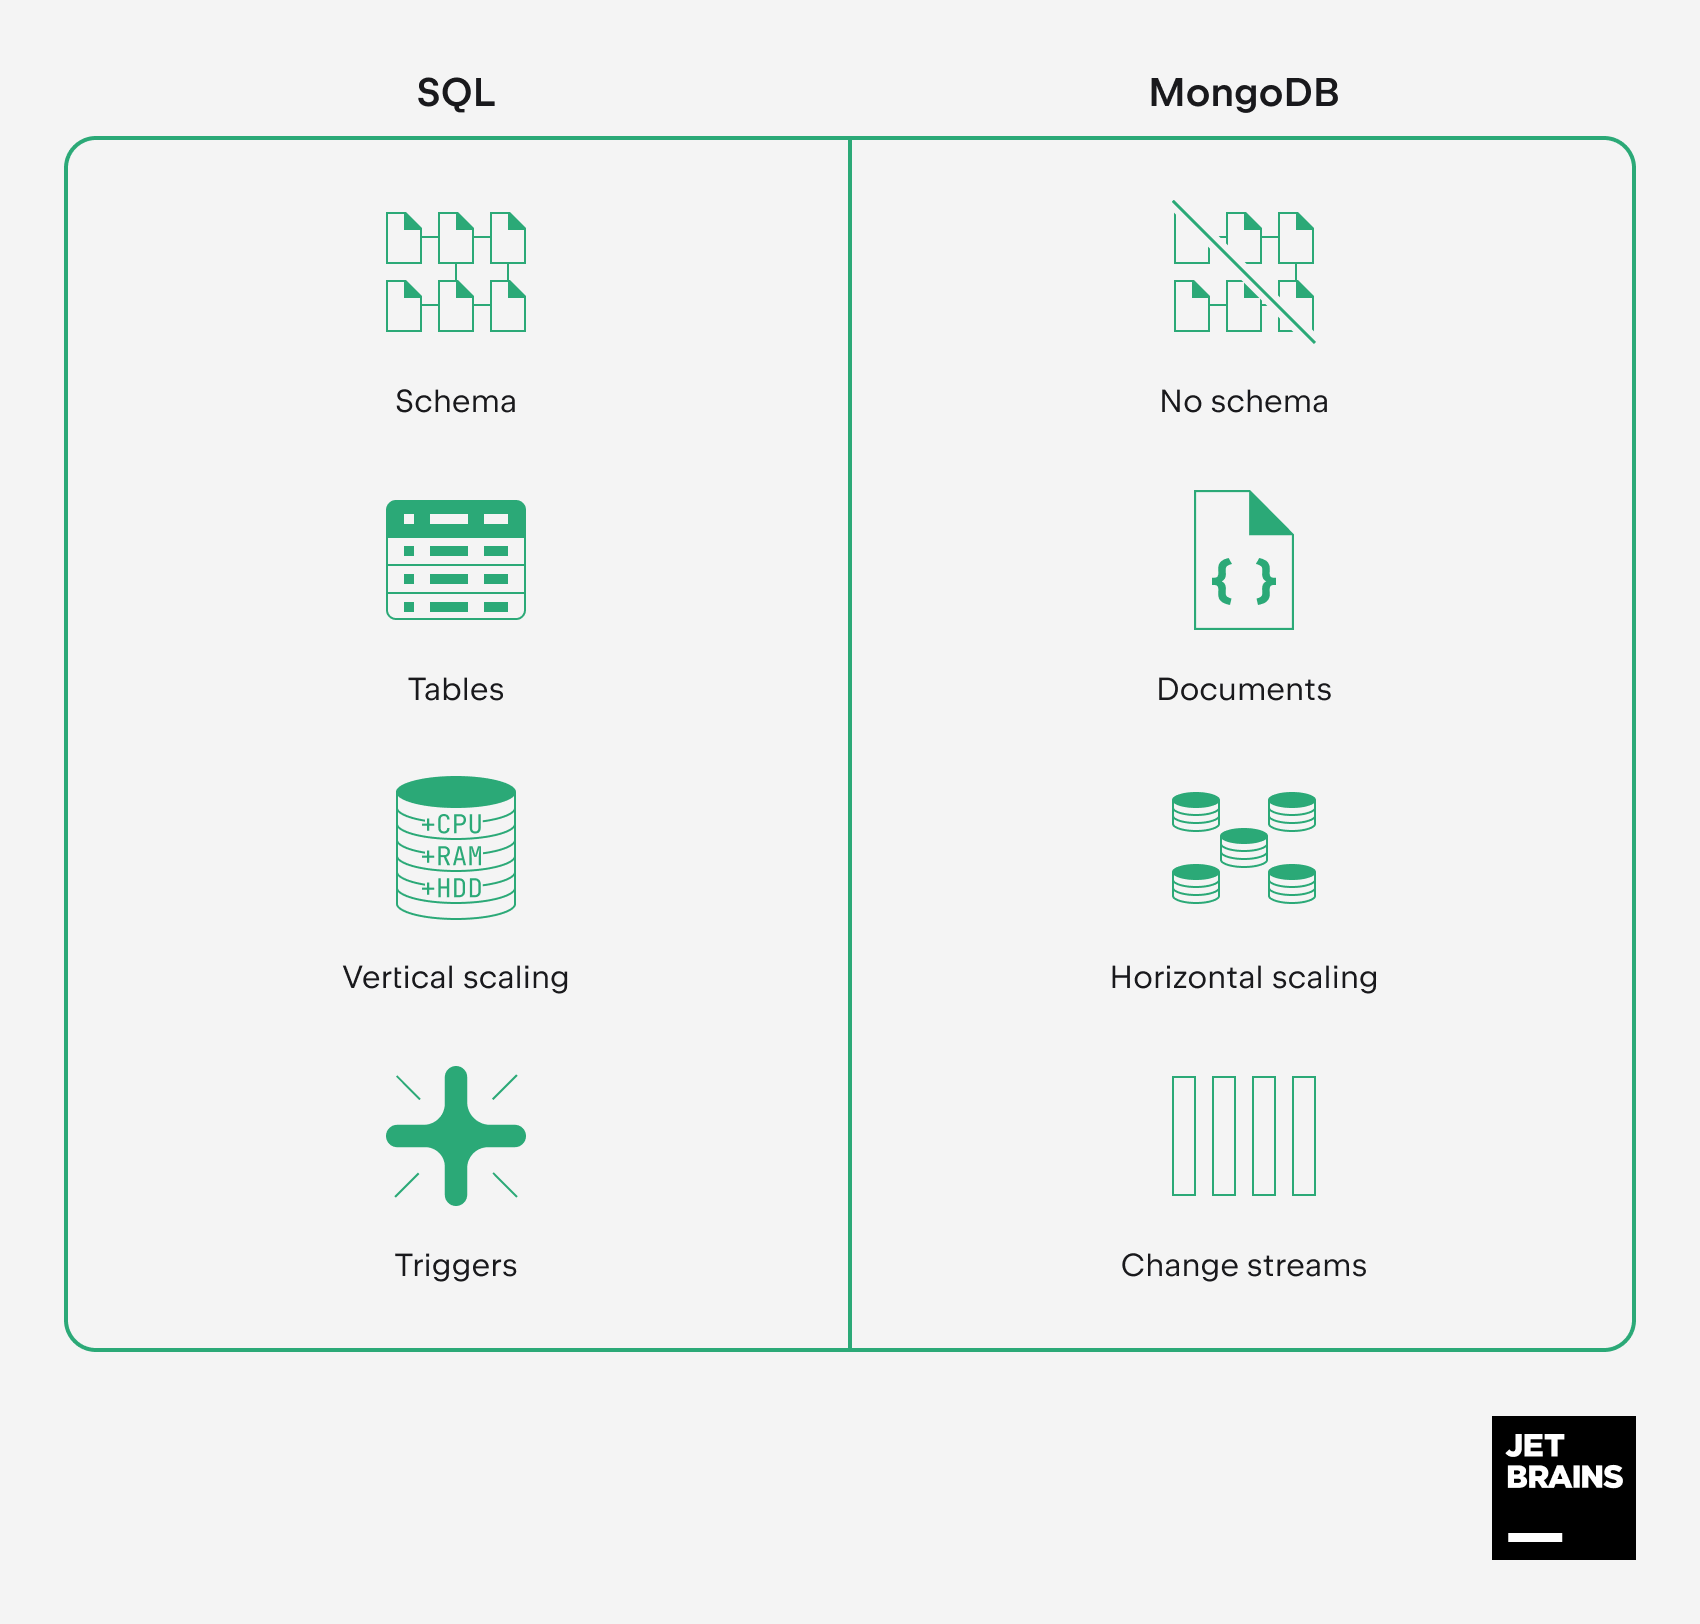
非リレーショナルデータベースである MongoDB には、主に以下の点で SQL データベースを使う以上のメリットがあります。
- スキーマがない: 時間が経つにつれて構造の変更が必要となる可能性のある複雑なデータを保存する必要がある場合、BSON の柔軟性が非常に役立ちます。
- ドキュメントモデル: データの形式をドキュメントごとに変更できるため、階層データの保管や多様な非構造化データに最適です。
- 拡張性: MongoDB は水平方向に拡張できるように設計されており、大量のデータと高負荷を処理できるシャーディングをサポートしています。
- リアルタイム処理: MongoDB では変更ストリームをサブスクライブすることで、アプリケーションがほぼ瞬時にデータの変更に反応できます。
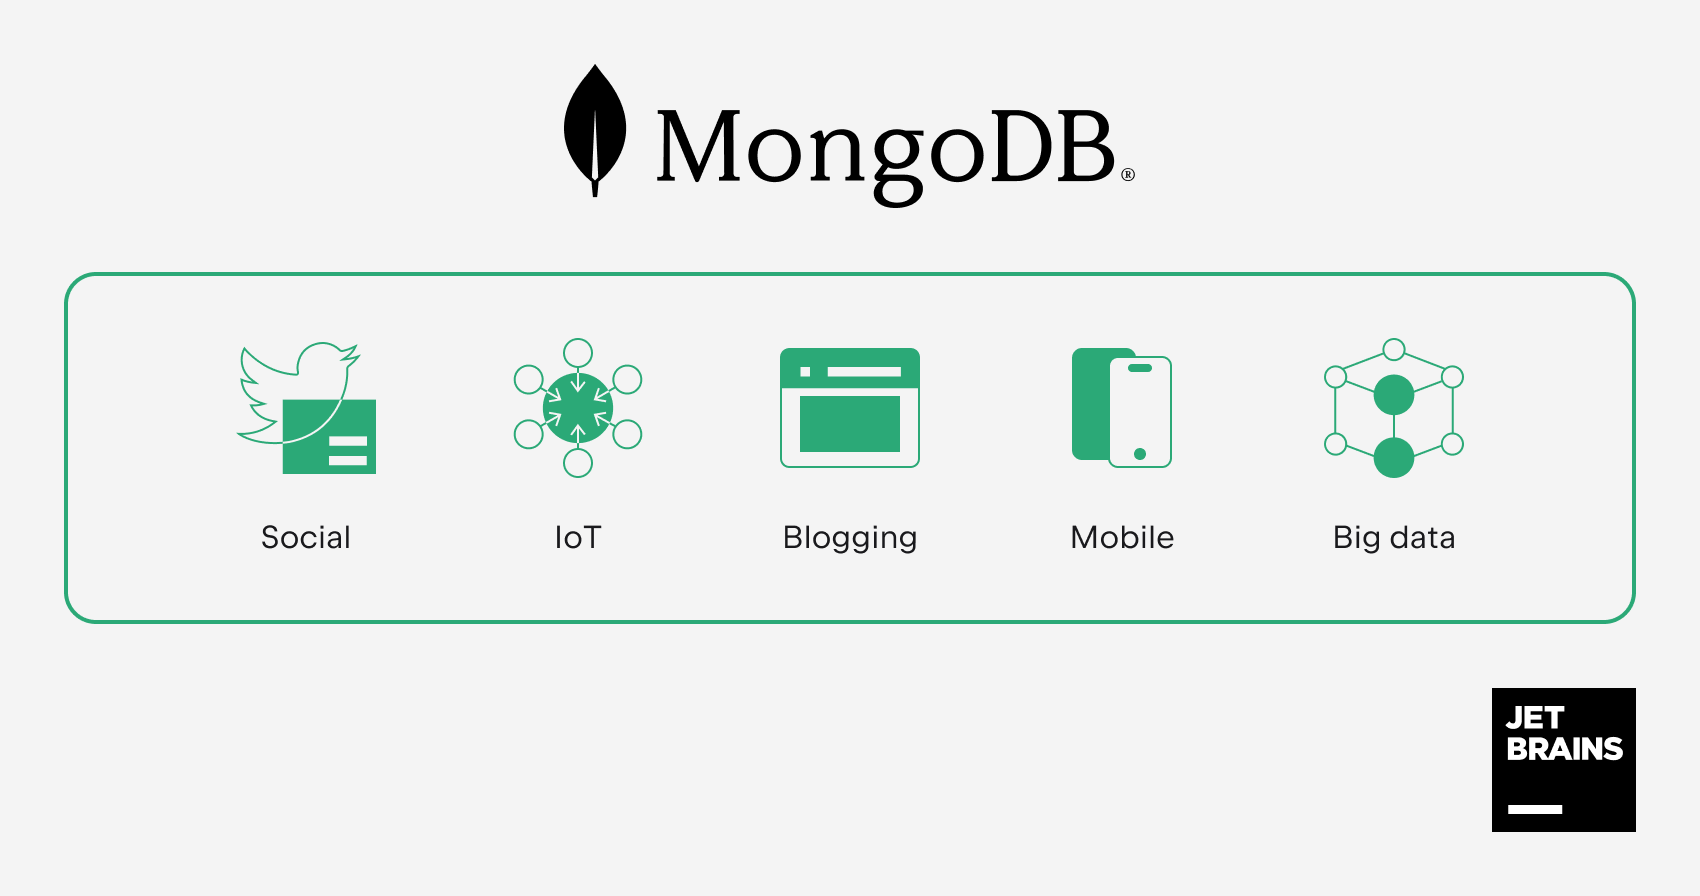
これらのメリットを考慮し、開発者はユーザー生成コンテンツを処理するブログプラットフォームやアプリケーション、IoT(モノのインターネット)、ビッグデータサービス、およびモバイルアプリケーションによく MongoDB を好んで使用しています。
ただし、MongoDB は SQL データベースを簡単に置き換えるものではなくことを理解しておくことが重要です。 Django は MongoDB をネイティブでサポートしていないため、サードパーティパッケージを統合してコードベースを適宜に調整する必要があります。 さらに、以下の制限を考慮して開発プロセス全体を整理する必要があります。
- Django に組み込まれている SQL 指向 ORM は MongoDB では使用できません。
- Django の管理インターフェースを通じてコンテンツを管理できなくなります。
- データベースと連携することを想定したその他多数の Django 機能を使用できなくなります。 MongoDB を使用すると「Django の流儀」から確実に離れてしまいます。
コードが多いほど、より多くの変更が必要となります。 このため、プロジェクトのライフサイクルの非常に早い段階で MongoDB に切り替える方が合理的と言えます。
このチュートリアルでは、非常に基本的な Django プロジェクトと MongoDB の接続を 2 つの方法で行います。
- MongoEngine を使用する方法(PyMongo を基盤とするエンジン)
- PyMongo のみを使用する方法
要件
作業を開始する前に、以下の項目をインストールする必要があります。
- PyCharm Professional 2023.3(無料 30 日間体験版を利用できます)
- Python
- Docker(コンテナーで MongoDB を実行する場合のみ)
以下の Python パッケージとソフトウェアのインストール手順はチュートリアルの中で提供されます。
- MongoDB Community(ローカルインストールの場合のみ)
- Django
- PyMongo
- MongoEngine
Django プロジェクトの準備
基本的な Django の ToDo リストアプリケーションを含むプロジェクトを使用します。 プロジェクトを新規に作成する場合は、PyCharm ドキュメントにあるこちらのチュートリアルをご覧ください。 そうでない場合は、以下のようにしてリポジトリをクローンしましょう。
- PyCharm を起動し、「ようこそ」画面の Get from VCS(VCS から取得)をクリックします。
- リポジトリの URL を挿入し、Clone(クローン)をクリックします。
PyCharm がプロジェクトをダウンロードし、システムインタープリターを構成します。 このチュートリアルでは、ローカルの virtualenv インタープリターを使用します。これもセットアップが必要です。
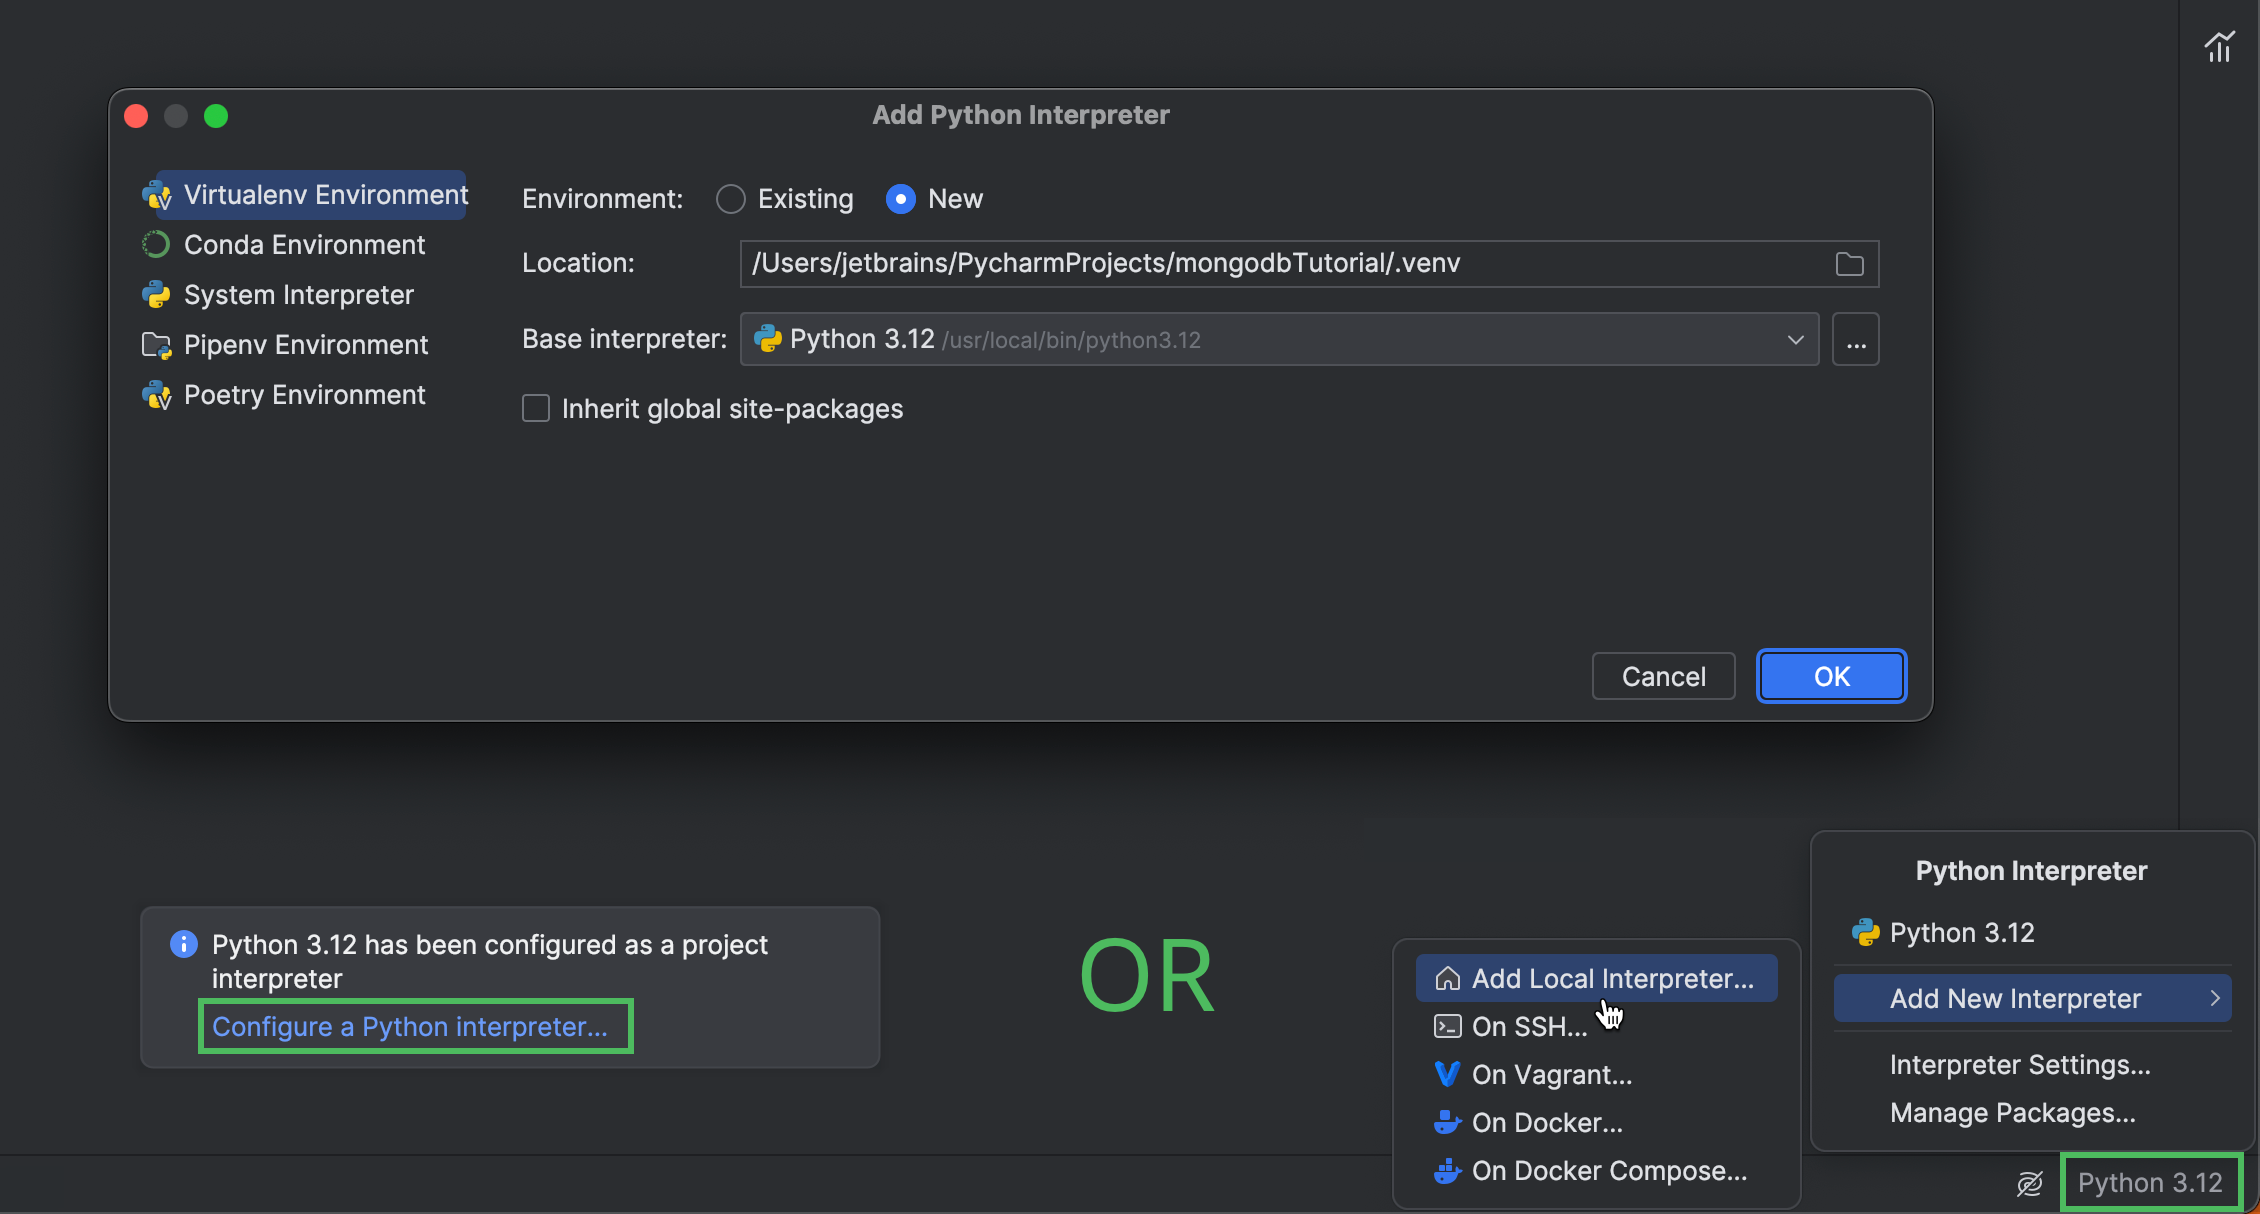
プロジェクトをクローンした直後に表示されるポップアップで、Configure a Python interpreter(Python インタープリターの構成)をクリックします。 または、右下のインタープリターセレクターをクリックして、Add New Interpreter(新規インタープリターの追加)| Add Local Interpreter(ローカルインタープリターの追加)を選択します。 PyCharm でのインタープリターの構成の詳細については、ドキュメントをご覧ください。
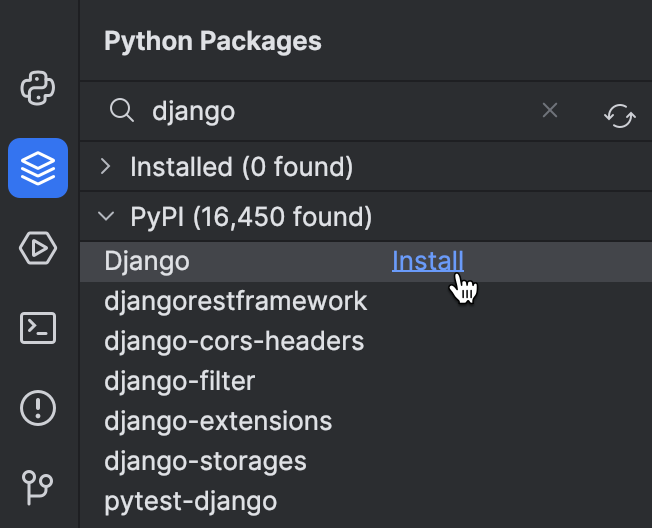
インタープリターを構成したら、Python Packages (Python パッケージ)ツールウィンドウを開いて Django をインストールします。
MongoDB のインストール
Django プロジェクトの準備ができたので、MongoDB データベースのプロビジョニングが必要です。 プロジェクトに最適な内容に合わせて以下の 3 つのオプションから 1 つを使用できます。
MongoDB Atlas のセットアップ
Django プロジェクトをクラウドの MongoDB データベースに接続する場合は、MongoDB Atlas に登録し、そこで無料のデータベースクラスターをデプロイします。 アプリケーションからこのクラスターにアクセスするには、接続 IP アドレスを IP アクセスリストに追加し、データベースユーザーを作成する必要もあります。 このチュートリアルの次の手順では、接続文字列が必要となります。 以下のようにして取得してください。
- データベースを選択します。
- Overview(概要)タブの Connect(接続)をクリックします。
- Drivers(ドライバー)を選択します。
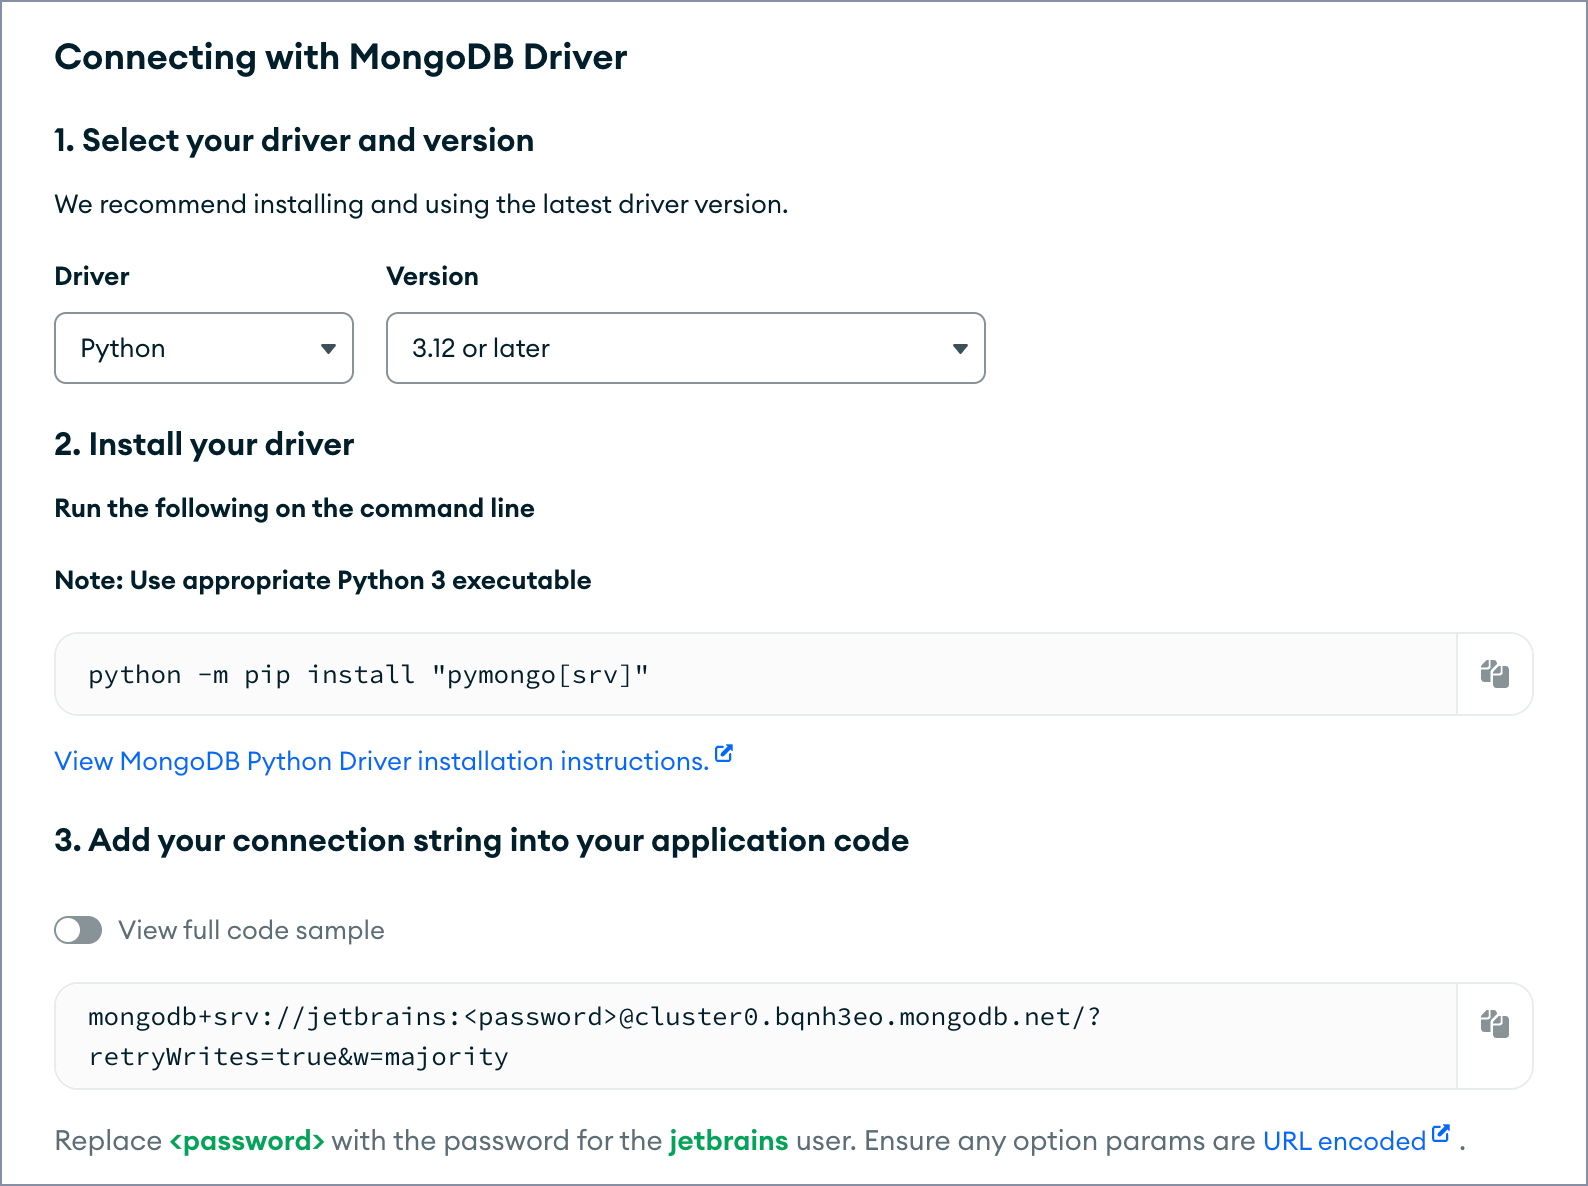
詳細については、MongoDB Atlas のドキュメントをご覧ください。
Docker コンテナーで MongoDB を実行する
コンテナーで MongoDB Community Edition を実行することにした場合は、以下の手順を実行します。
- MongoDB Docker イメージをプルします。
docker pull mongodb/mongodb-community-server
- イメージをコンテナーとして実行します。
docker run --name mongo -d -p 27017:27017 mongodb/mongodb-community-server:latest
詳細については、MongoDB ドキュメントをご覧ください。
MongoDB をローカルにインストールする
MongoDB をローカルデータベースとして実行することにした場合は、以下の手順を実行します。
- MongoDB Community Edition をインストールします。
- MongoDB シェルを起動してデータベースを作成します。
% mongosh
> use djangoTutorial
データソースの構成
この手順は必須ではありません。 データソースを構成すると、ソフトウェアを追加インストールしたり、MongoDB Atlas のウェブインターフェースを開いたりせずに、PyCharm でデータベースコレクションを直接表示して変更を追跡できます。
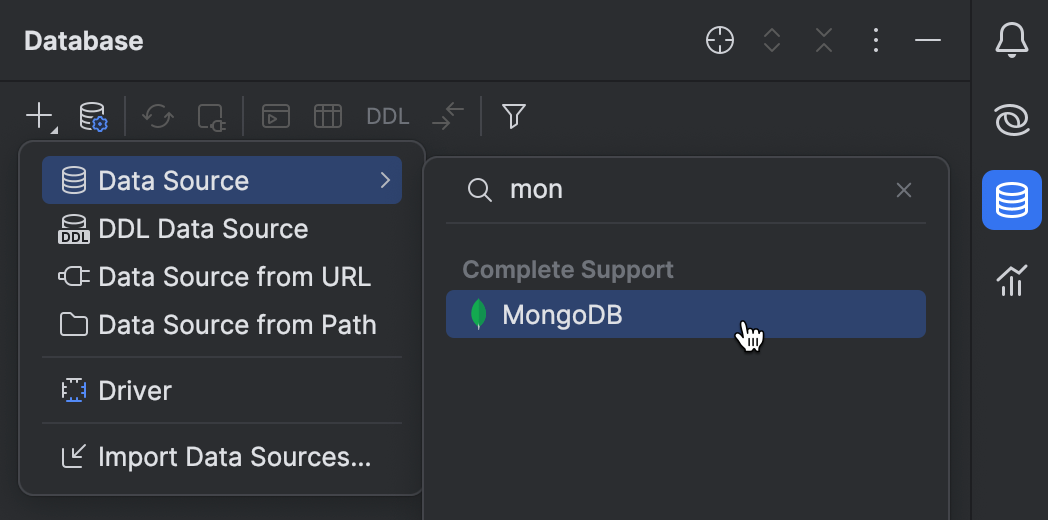
PyCharm に戻り、Database(データベース)ツールウィンドウを開き、「+」をクリックしてデータソースの作成を開始します。 データソースのタイプに MongoDB を選択します。
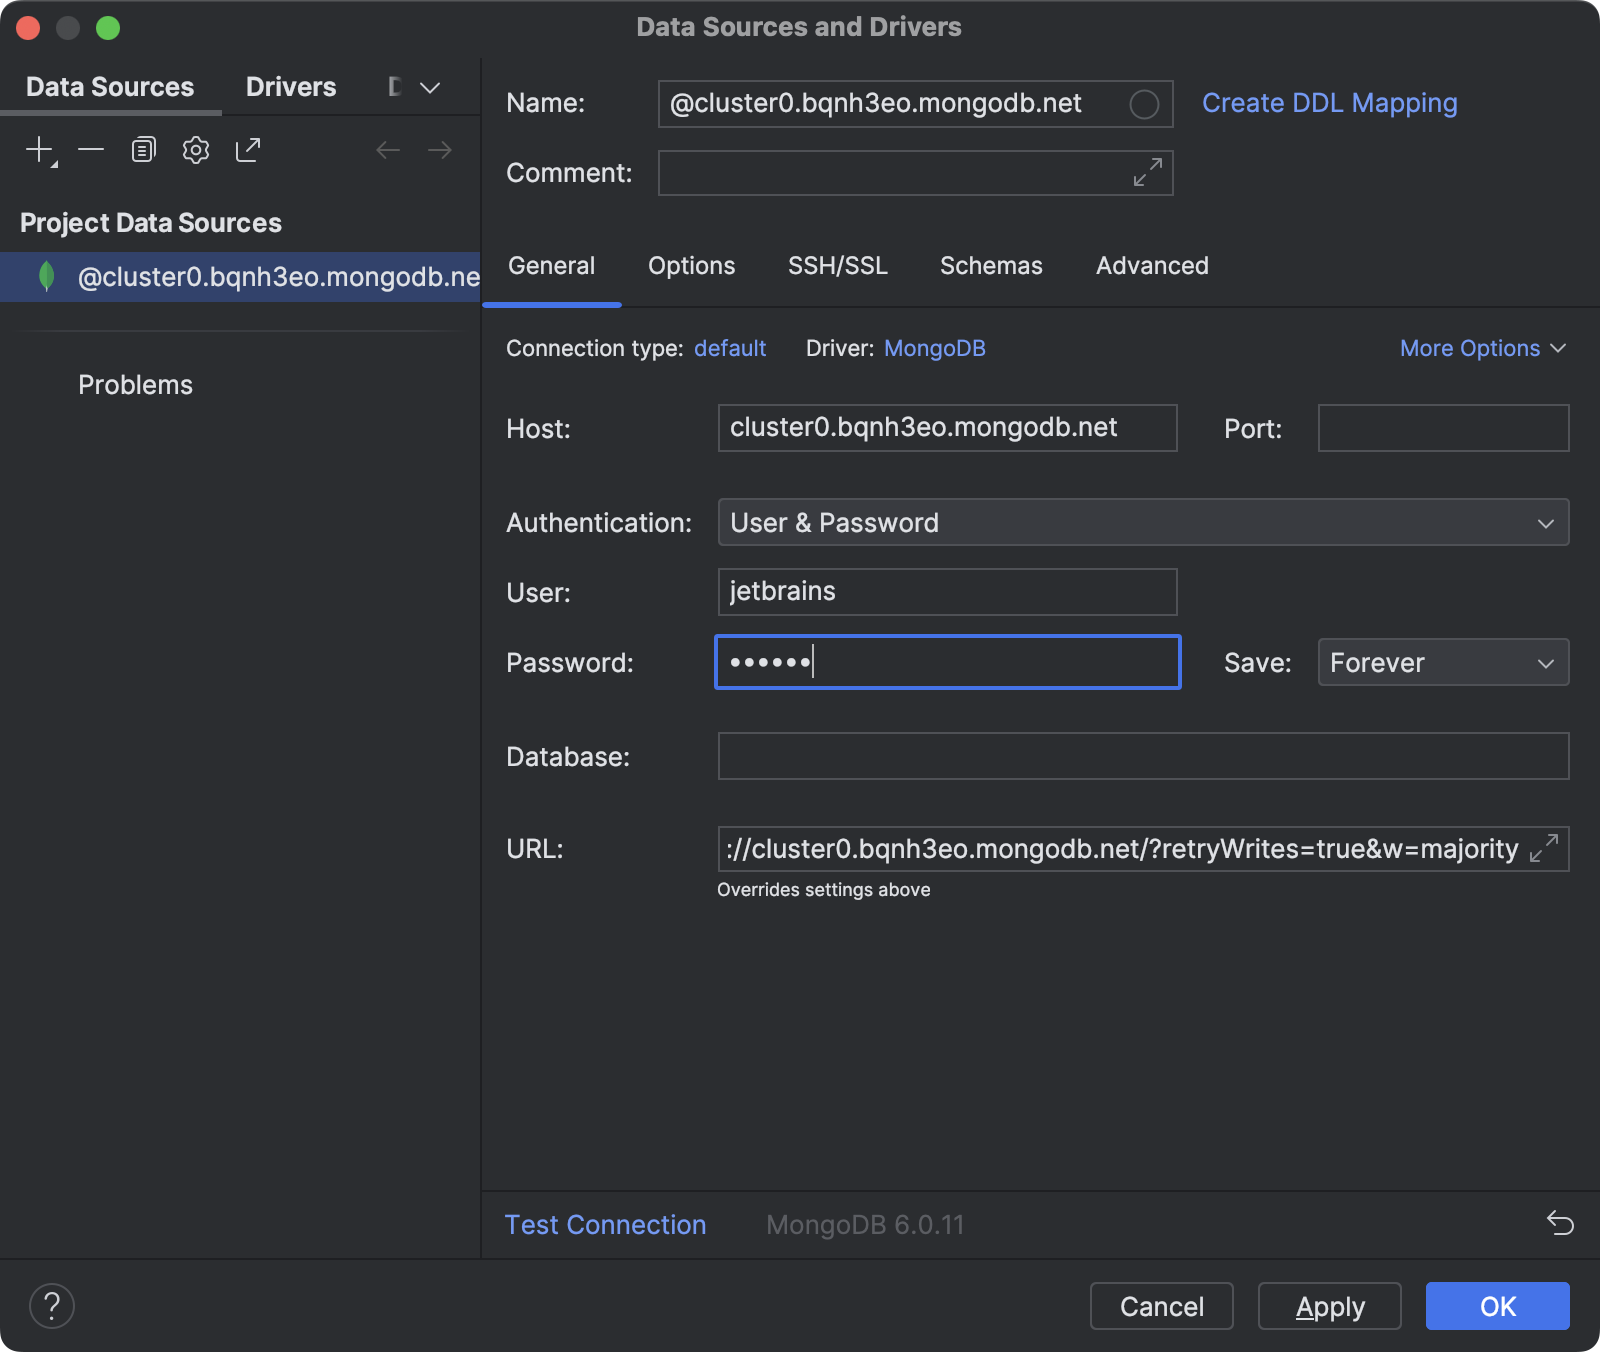
新しく作成されたデータソースを構成します。 MongoDB Atlas を使用している場合は、接続文字列を URL フィールドに入力し、データベースユーザーの資格情報を入力します。
MongoDB Community を使用している場合は、ローカルにインストールされているか Docker コンテナーで実行するかに関係なく、以下のようにしてデータソースを構成します。
- インストール中にデフォルト設定を変更した場合は、データベースホストアドレスとポート番号を入力します。 そうでない場合は、手順 2 に進みます。
- ユーザー名とパスワードを構成した場合は、対応するフィールドにそれらを入力します。 そうでない場合は、Authentication(認証)で No auth(認証なし)を選択します。
- Database(データベース)フィールドでデータベース名を指定します。
- Test Connection(接続のテスト)をクリックします。
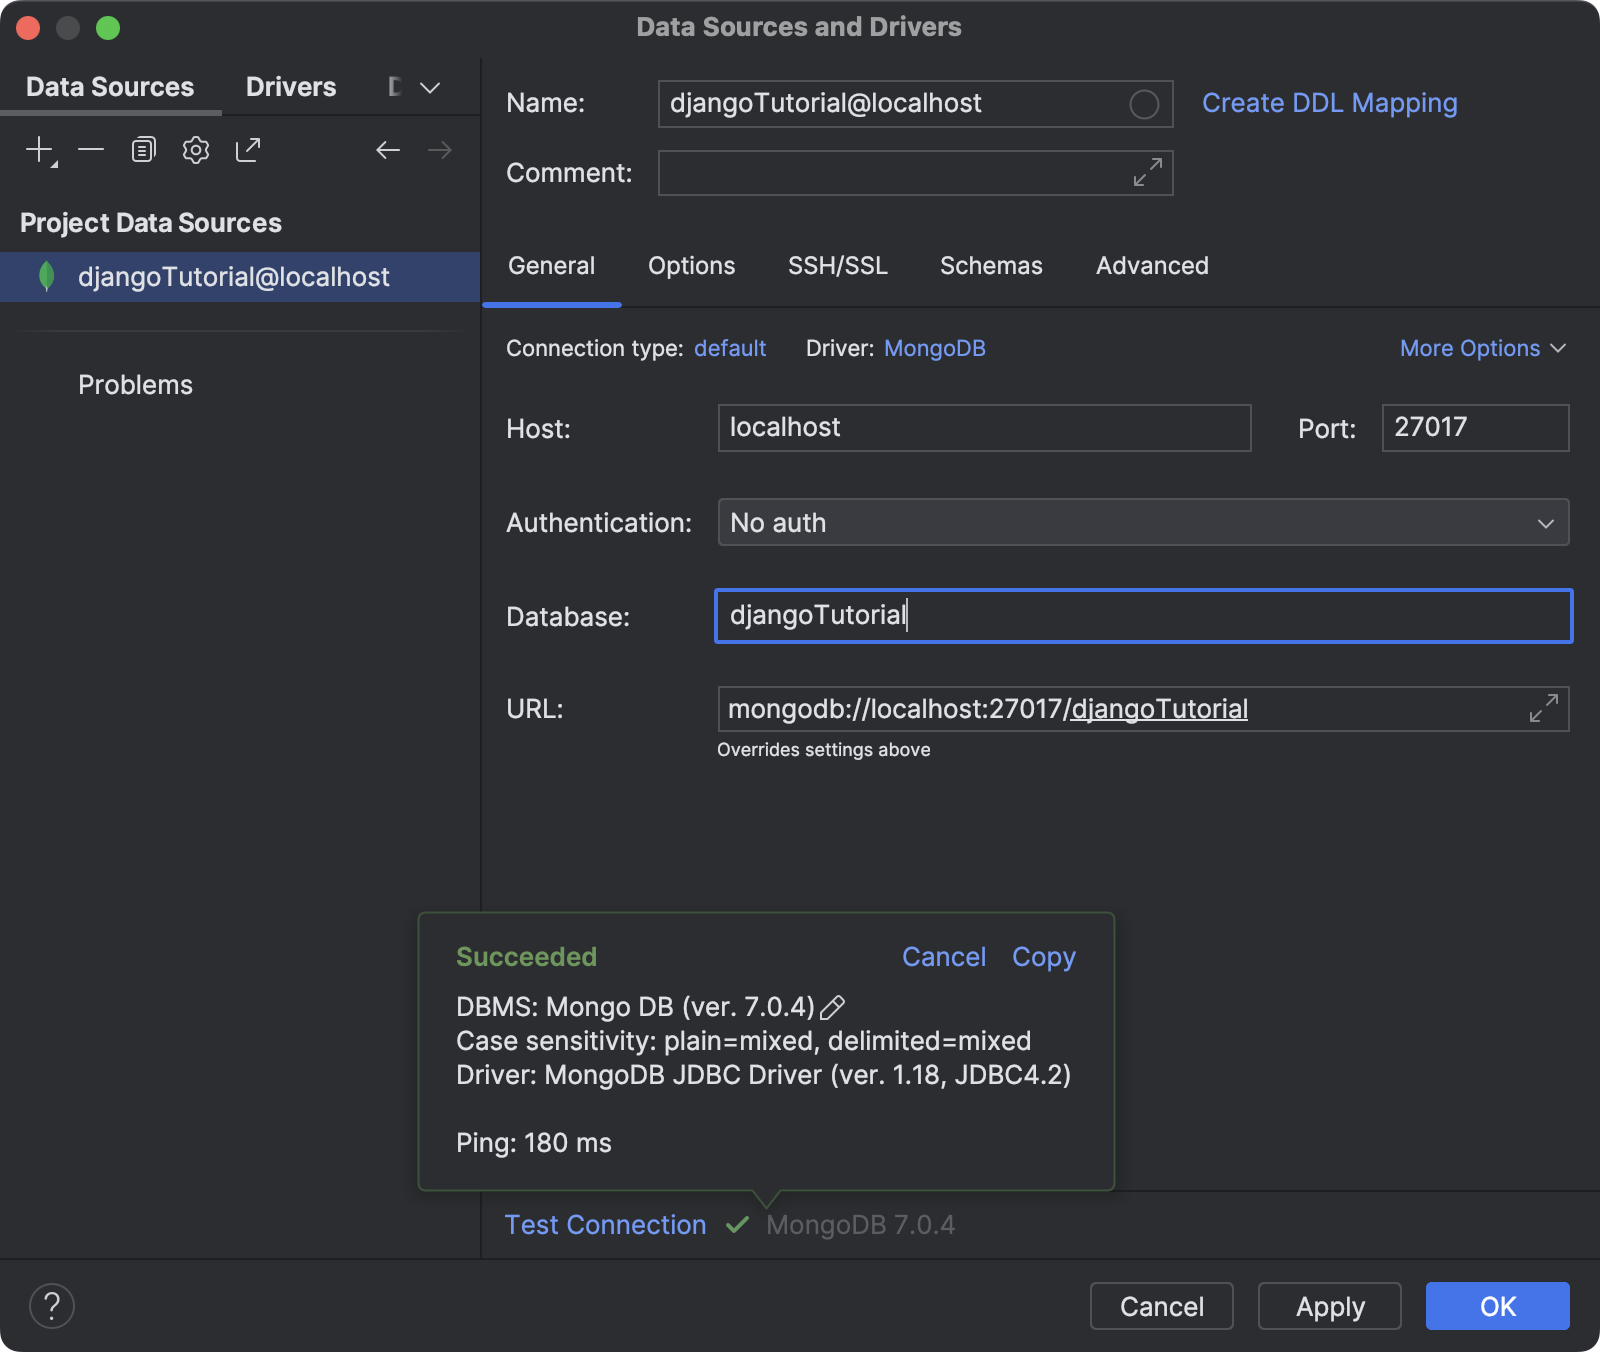
PyCharm での詳細な MongoDB データソースの構成方法については、ドキュメントをご覧ください。
環境変数の構成
ユーザー名とパスワードの認証で MongoDB Atlas またはローカルの MongoDB データベースを使用している場合は、環境変数を使って資格情報を保存する .env ファイルを作成する必要があります。 これは、プロジェクトをバージョン管理対象にする際に機密データの漏えいを防止するためのベストプラクティスです。
- プロジェクトのルートディレクトリを右クリックし、コンテキストメニューから New(新規)| File(ファイル)を選択します。
- ファイル名に .env を指定します。
- 新しく作成されたファイルがエディターで開きます。 環境変数と値を追加します。 以下のような例が挙げられます。
USERNAME=jetbrains
PASSWORD=czUfHKhGNxtGTsv
HOST=cluster0.bqnh3eo.mongodb.net
HOST は MongoDB Atlas のみに必要です。
- エディターの任意の場所を右クリックし、コンテキストメニューから Git | Add to .gitignore(.gitignore に追加)を選択します。
次に、新しく作成された .env ファイルが Django サーバーを起動するたびに読み込まれるように実行構成を構成する必要があります。
- 上部の Run(実行)ウィジェットをクリックし、メニューから Edit Configurations(構成の編集)を選択します。
- Paths to “.env” files(”.env” ファイルへのパス)フィールドに .env へのパスを指定します。
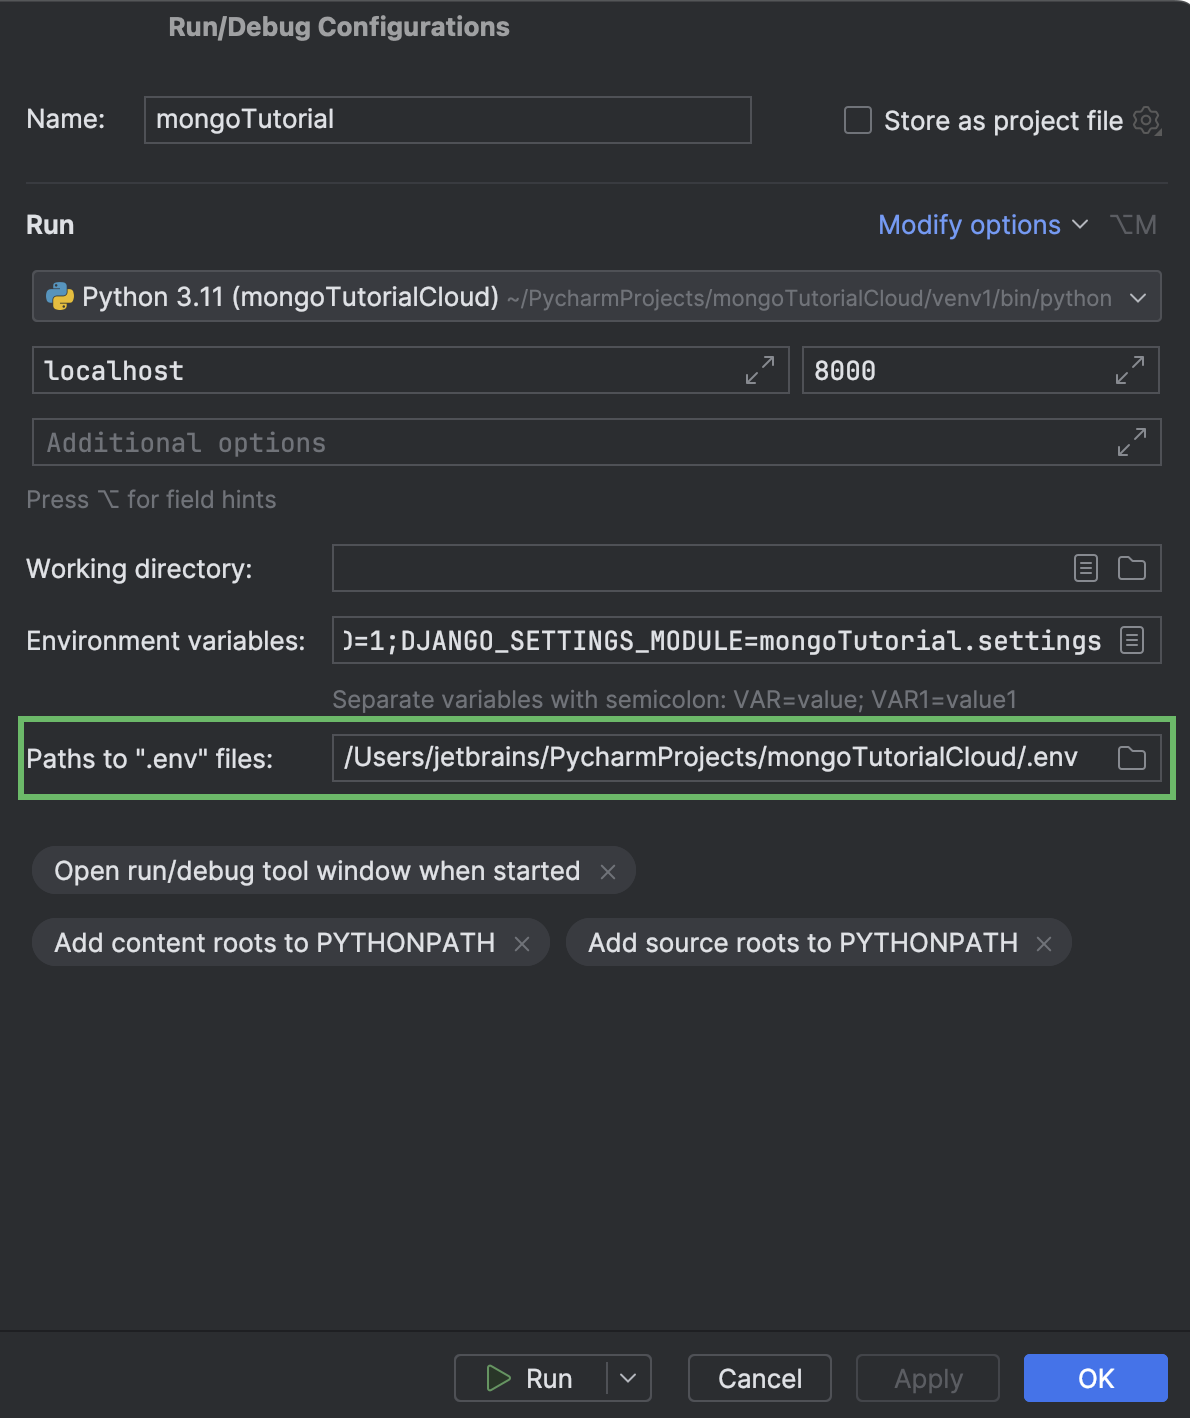
- 準備が完了したら、OK または Run(実行)をクリックします。
選択した Django と MongoDB の接続方法を使用できるようになりました(または両方を試すことができます)。
MongoEngine を使用した Django と MongoDB の接続
MongoEngine は Django プロジェクト用の Python Object-Document Mapper(ODM)です。 リレーショナルデータベースの ORM(オブジェクトリレーショナルマッピング)と同様に機能します。 MongoEngine による MongoDB と Django の接続には、主に以下のようなメリットがあります。
- ODM では使い慣れた構文でコード内にドキュメントのスキーマを定義できます(Django を SQL データベースで使用する際のモデルと同様)。
- データベースクエリに使用できる充実した「Python らしい」構文。
- Django フォームと Django Rest フレームワークのシリアライザーをサポート。
要するに、MongoEngine では Django プロジェクトで MongoDB を高いレベルで操作できるのです。 既存の Django プロジェクトを MongoDB を使用するプロジェクトに変換する必要がある場合に最適な選択肢とも言えます。
MongoEngine のインストールと有効化
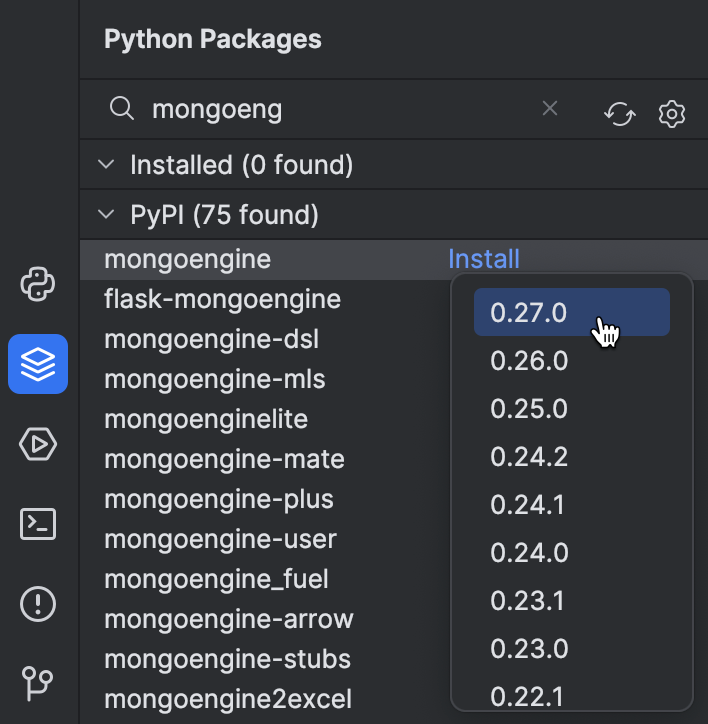
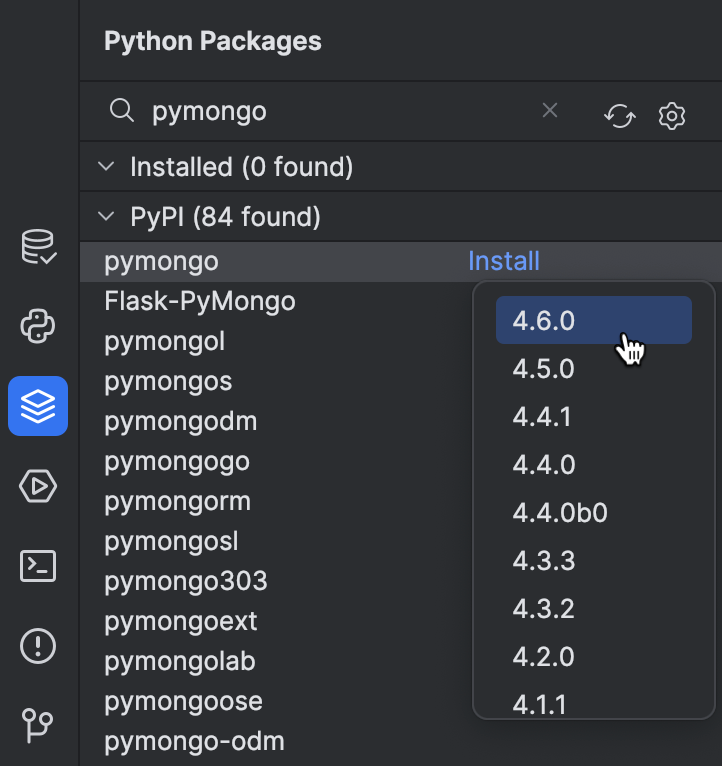
まずは、 Python Packages(Python パッケージ)ツールウィンドウで MongoEngine パッケージのインストールを始めましょう。 ツールウィンドウを開き、mongoengine と入力して、Install(インストール)をクリックし、バージョンを選択します。
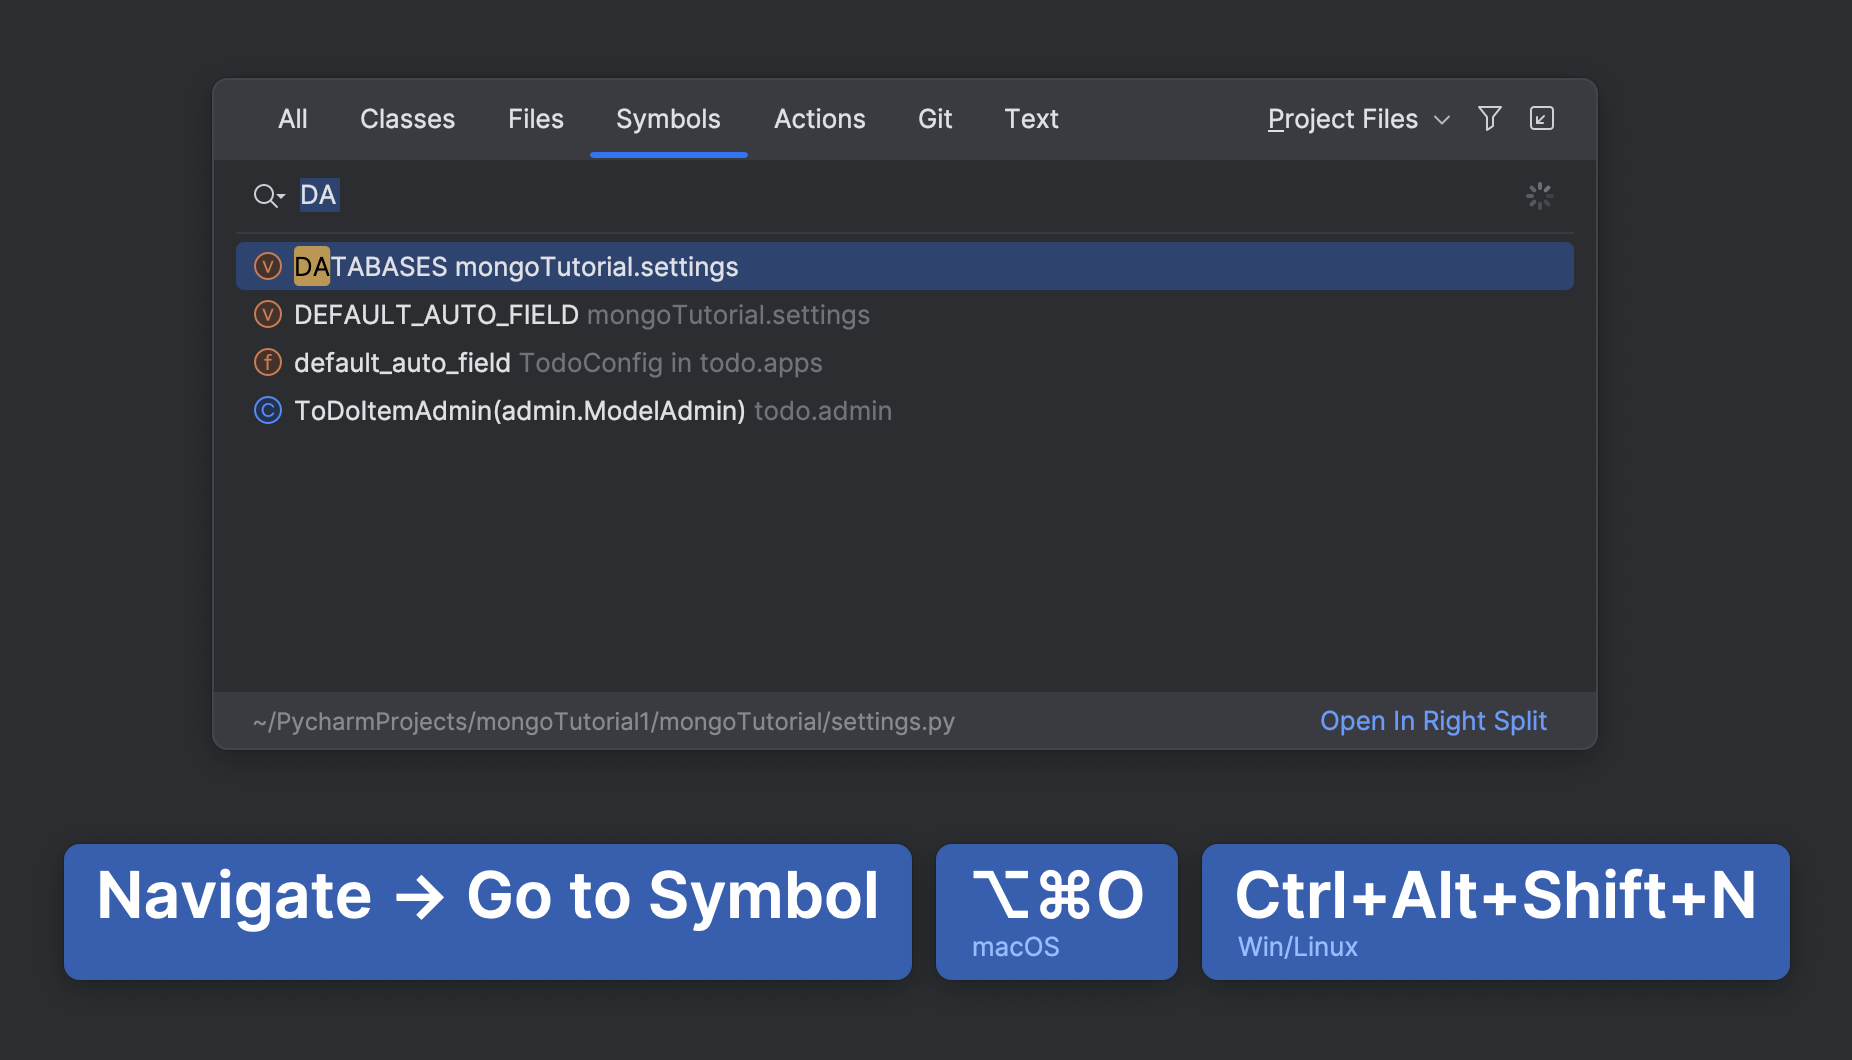
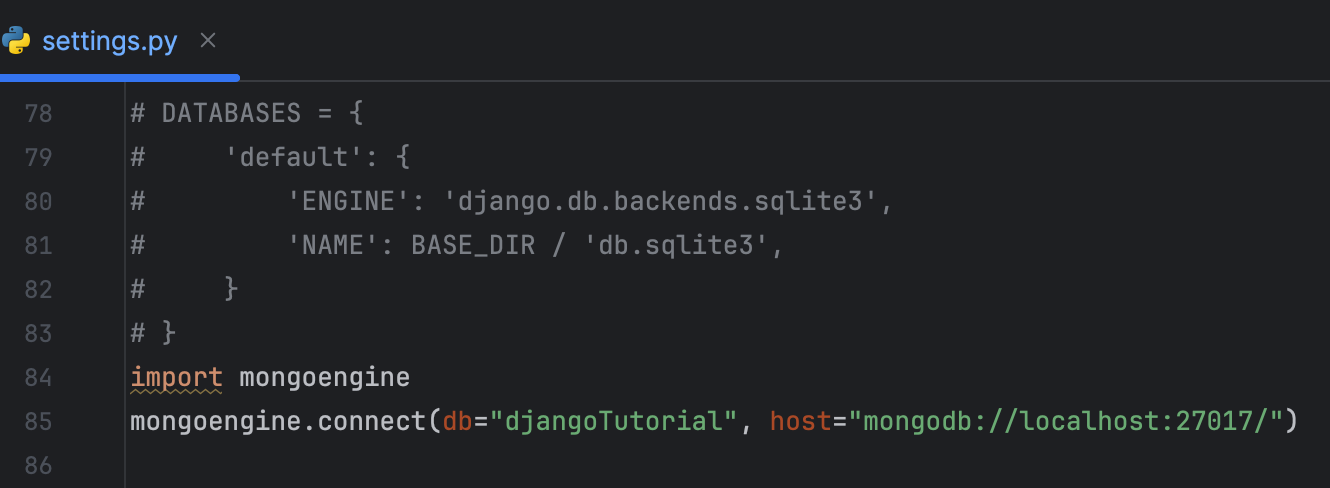
デフォルトでは、Django プロジェクトは SQLite データベースを使用して作成されます。 settings.py の DATABASES セクションをコメントアウト(または削除)して SQLite データベースを無効にする必要があります。 ⌥⌘O / Ctrl+Alt+Shift+N を押して DA… と入力し始めると、このセクションへすぐにアクセスできます。
代わりに、以下を settings.py に追加します。
import mongoengine
mongoengine.connect(db="djangoTutorial", host="mongodb://localhost:27017/")
MongoDB Atlas の場合は、.env ファイルからユーザー名とパスワードを読み込みます。 以下のような例が挙げられます。
import os
import mongoengine

USERNAME = os.getenv("USERNAME")
PASSWORD = os.getenv("PASSWORD")
HOST = os.getenv("HOST")


mongoengine.connect(db="djangoTutorial", host=f"mongodb+srv://{HOST}/",
                    username=USERNAME, password=PASSWORD)
モデルの編集
MongoDB はスキーマレスではありますが、MongoEngine ではアプリケーションレベルでスキーマを定義できます。 このようなスキーマはデータベースには渡されませんが、Django と MongoDB 間の連携に別のレベルの抽象化を追加することで、開発者がより簡潔で保守しやすいコードを書くことができます。
Django ORM とは異なり、MongoEngine はモデルの代わりにドキュメントを使用します。 残念ながら、MongoEngine ドキュメントは Django の管理インターフェースではサポートされていません。 Django サーバー起動時のエラーを回避するには、対応するクラスをコメントアウトまたは削除して admin.py の ToDoItem の登録を解除してください。
Django Structure(Django 構造)ツールウィンドウを使うと、モデルの管理クラスに素早くアクセスできます。
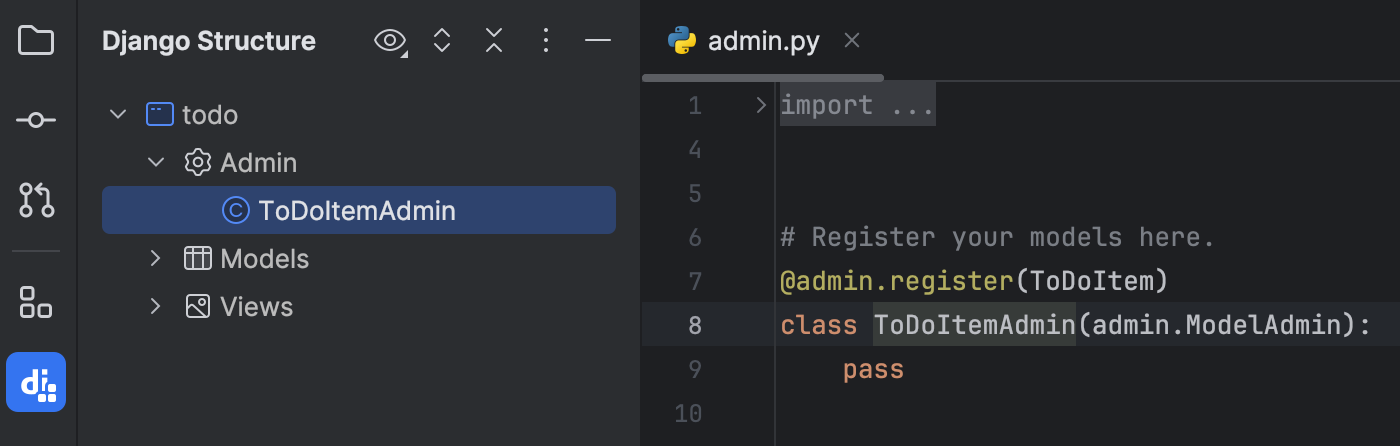
Django Structure (Django 構造)ツールウィンドウで Models に含まれる ToDoItem をダブルクリックし、エディターでモデルを開きます。 以下のように置換します。
| 元 | 置換 |
|---|---|
from django.db import models |
from mongoengine import Document, fieldsまたは
|
models.Model |
ドキュメント |
models.CharField |
fields.StringField() |
models.DateField |
fields.DateField |
以下のようになります。
from mongoengine import Document, fields
from django.utils import timezone


class ToDoItem(Document):
    text = fields.StringField(max_length=100)
    due_date = fields.DateField(default=timezone.now)

    def __str__(self):
        return f"{self.text}: due {self.due_date}"
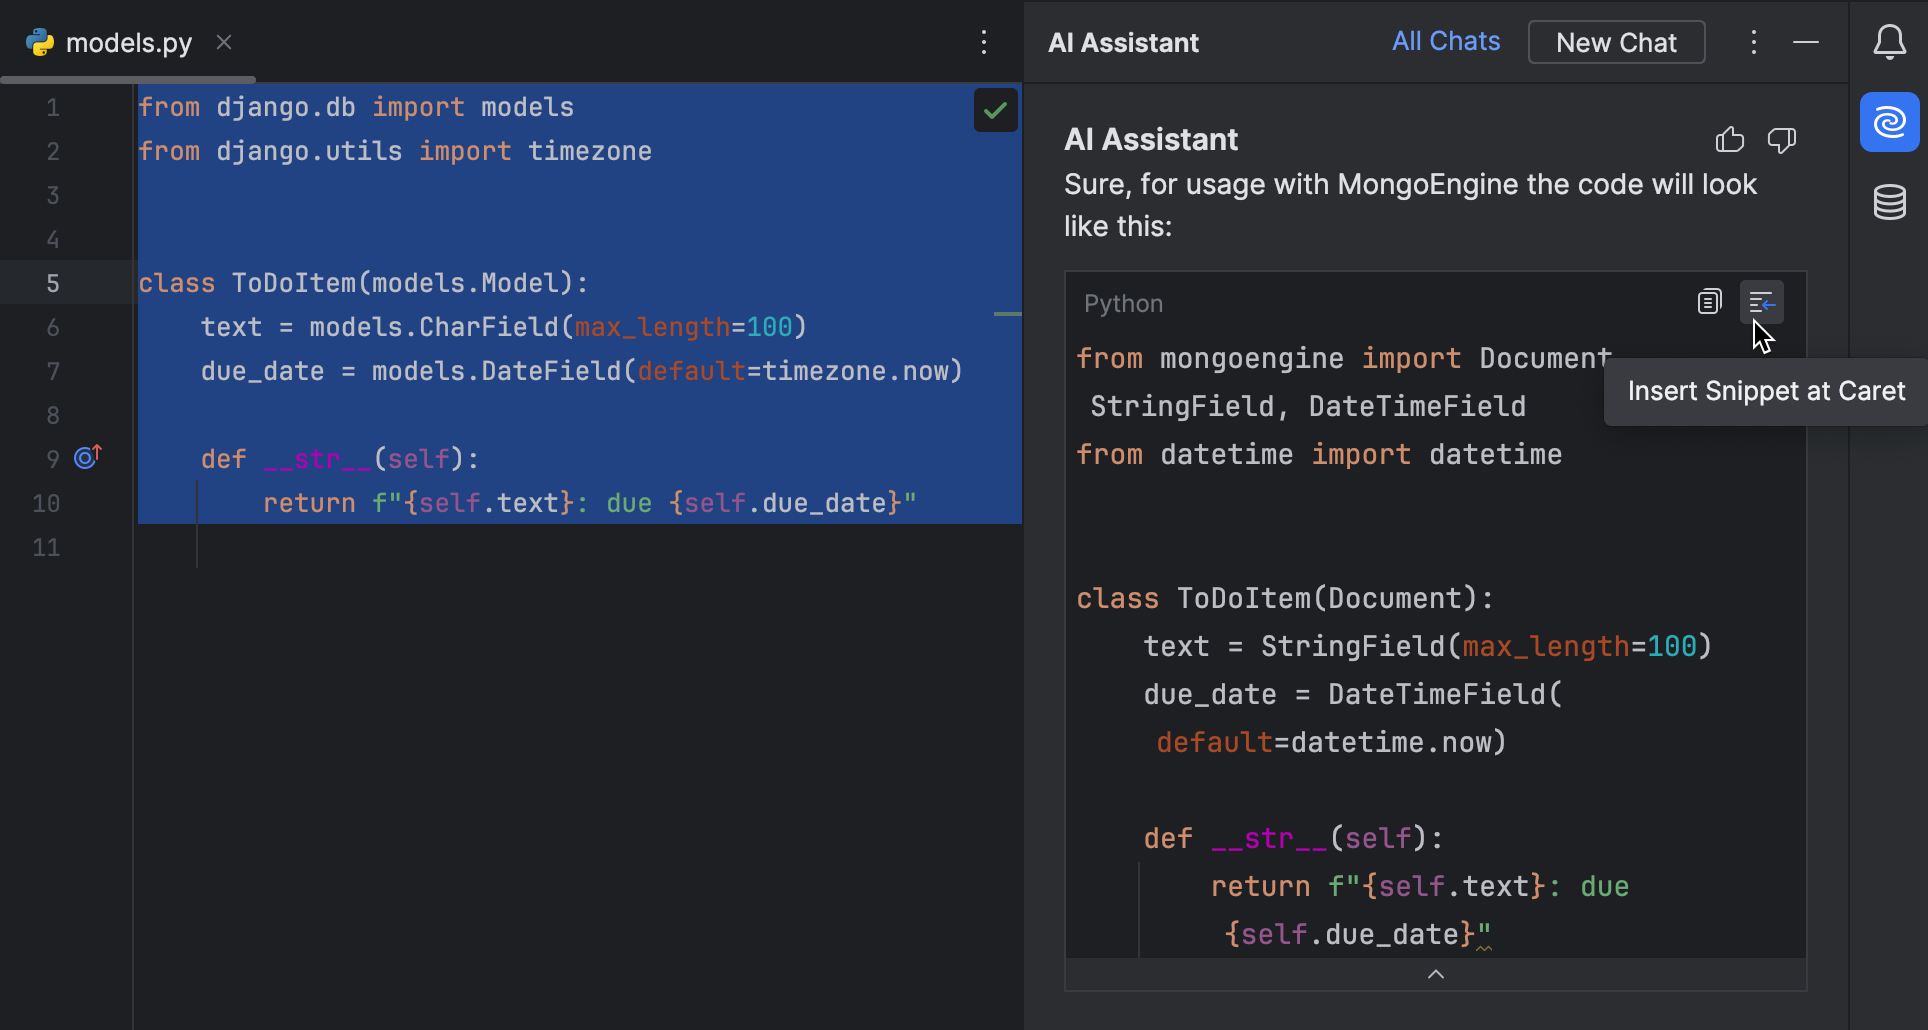
手動置換を避けるため、PyCharm の AI Assistant にこの作業を任せることができます。
- models.py でコードを選択します。
- コンテキストメニューから AI Actions(AI アクション)| New Chat Using Selection(選択項目を使用して新規チャットを開く)を選択します。
- たとえば、Modify the code for usage with MongoEngine(MongoEngine で使用できるようにコードを変更)のようにプロンプトを入力します。
AI Assistant の詳細な使用方法については、PyCharm ドキュメントをご覧ください。
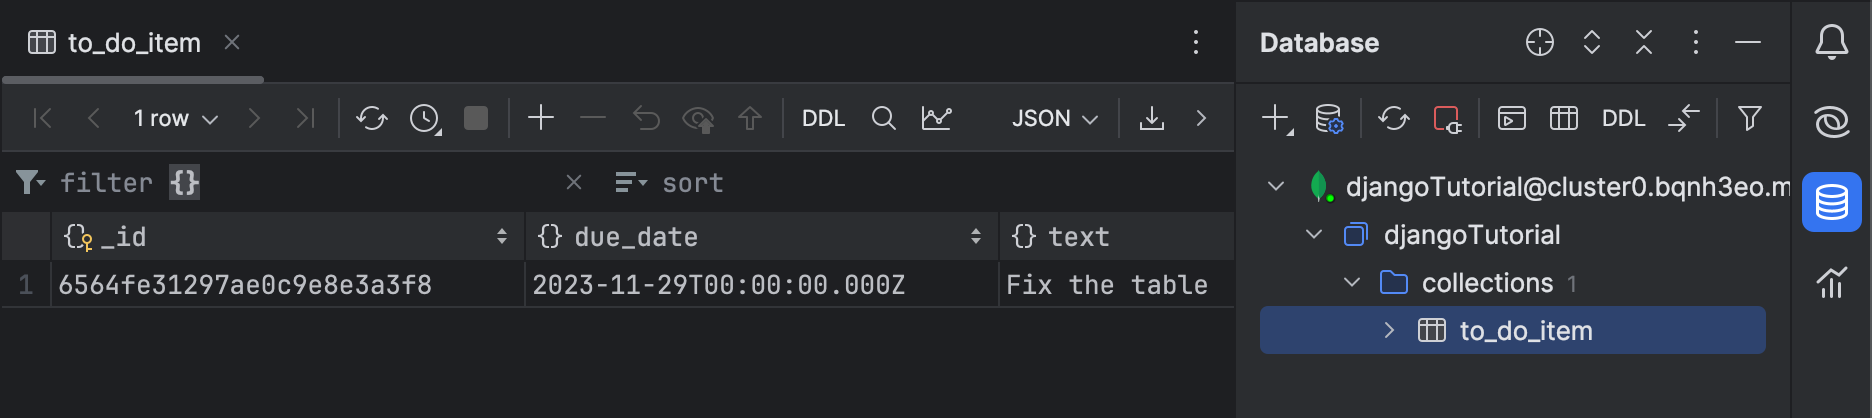
ToDoItem ドキュメントのインスタンスを作成し、それをデータベースに保存してソリューションをテストしてみましょう。 Python コンソールを開き、以下を実行します。
from todo.models import ToDoItem
from datetime import datetime
task = ToDoItem(text="Fix the table")
task.due_date = datetime(2023,11,29)
task.save()
クラウドデータベースを使用している場合、この操作にはしばらく時間がかかる場合があります。 [SSL: CERTIFICATE_VERIFY_FAILED] エラーが発生した場合は、トラブルシューティングに関する推奨事項をご覧ください。
Database(データベース)ツールウィンドウで to_do_item コレクションを開き、レコードが追加されていることを確認します。
この変更でアプリケーションが壊れていないことを確認しましょう。 PyCharm が自動的に作成した Django サーバー構成を起動します。
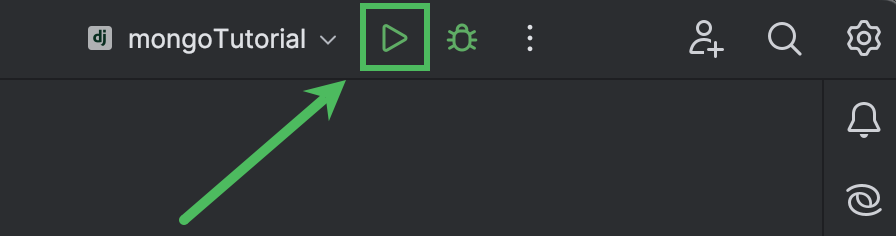
次に、ブラウザーで http://localhost:8000/todo/ にアクセスします。
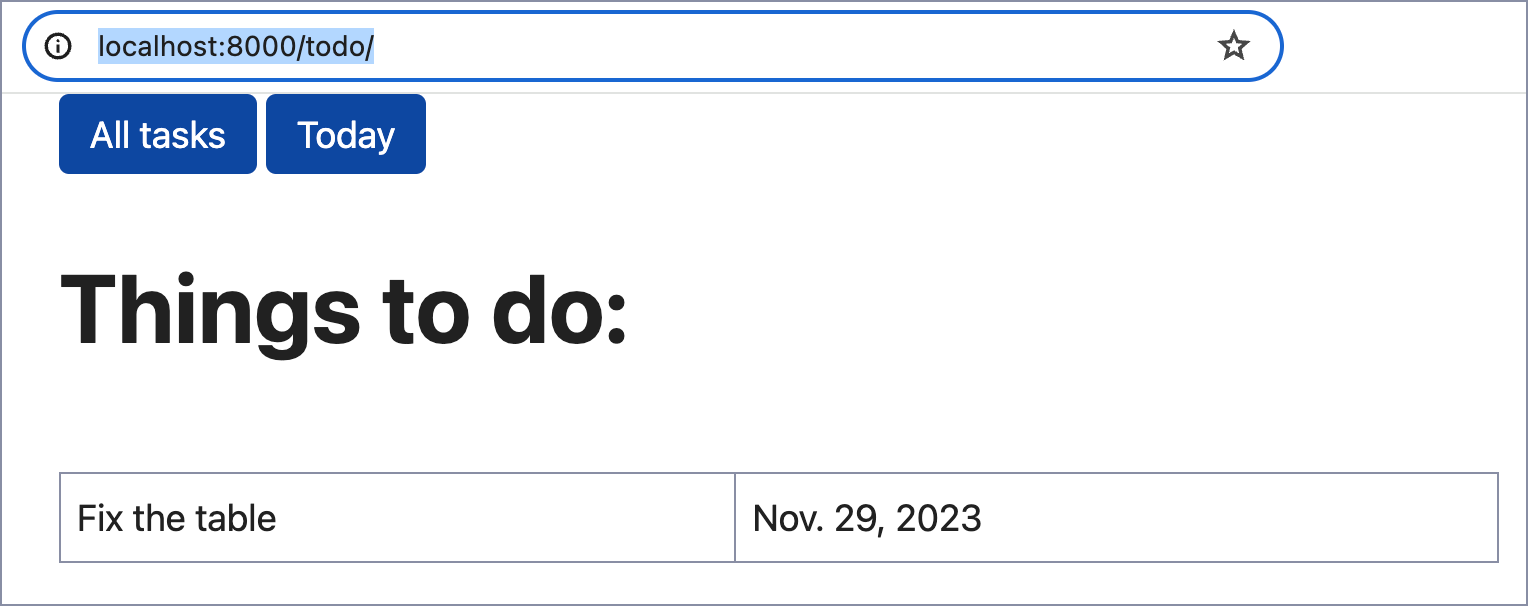
おめでとうございます! Django アプリが MongoDB を使用しています!
PyMongo を使用した Django と MongoDB の接続
PyMongo は MongoDB 用に正式に推奨されている低レベルドライバーです。 Django と MongoDB を直接的に詳細な方法で連携させます。 PyMongo はパフォーマンスを改善するためにデータベースクエリを作成する必要があり、コードベースで ORM のようなエクスペリエンスを必要としない場合に最適な選択肢です。
PyMongo のインストールとモデルの削除
MongoEngine は PyMongo を内部的に実行します。 そのため、このチュートリアルの前の部分を実行した場合はすでにプロジェクト環境に pymongo がインストールされています。 そうでない場合は、Python Packages(Python パッケージ)ツールウィンドウでインストールしてください。
settings.py の DATABASES セクションをコメントアウトして SQLite を無効にし、admin.py から ToDoItemAdmin を削除しましょう(まだ行ってない場合)。
最後に、models.py から ToDoItemAdmin を削除します。 Recent Files(最近のファイル)(⌘E / Ctrl+E)を使用すると、すぐにアクセスできます。
ビューの変換
Django モデルを使用しなくなったため、それに合わせてビュークラスを変更する必要があります。 views.py に移動し、MongoDB データベースへのアクセスに使用される関数を追加します。
from pymongo import MongoClient


def get_db_handle():
    client = MongoClient(host="mongodb://localhost", port=27017)
    db_handle = client.djangoTutorial.to_do_item
    return db_handle
MongoDB Atlas または認証付きのローカルデータベースの場合は、環境変数を読み込んで接続文字列を使用する必要があります。 以下のような例が挙げられます。
from pymongo import MongoClient
import os

USERNAME = os.getenv("USERNAME")
PASSWORD = os.getenv("PASSWORD")
HOST = os.getenv("HOST")


def get_db_handle():
    client = MongoClient(f"mongodb+srv://{USERNAME}:{PASSWORD}@{HOST}/?retryWrites=true&w=majority")
    db_handle = client.djangoTutorial.to_do_item
    return db_handle
この関数は to_do_item MongoDB コレクションを返します。 MongoDB のメリットの 1 つに、このコレクションが存在しない場合でも最初の挿入時に作成されるということがあります。
ToDoItem モデルがなくなってしまったため、ビューの AllToDos と TodayToDos クラスの get_queryset メソッドを更新しなければなりません。
class AllToDos(ListView):
template_name = "todo/index.html"
def get_queryset(self):
db = get_db_handle()
results = db.find()
return results
class TodayToDos(ListView):
template_name = "todo/today.html"
def get_queryset(self):
db = get_db_handle()
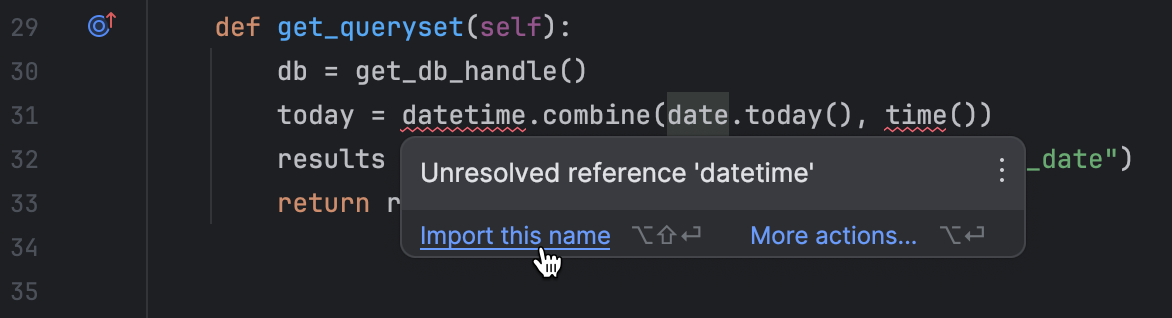
today = datetime.combine(date.today(), time())
results = db.find({"due_date": today}).sort("due_date")
return results
このようにコードを変更することで、Django の ListView クラスのデフォルトの get_queryset メソッドをオーバーライドしています。 このコードは以下を行います。
AllToDos クラス:
get_db_handleを呼び出してdjangoTutorialデータベースからto_do_itemコレクションを取得し、それをdbに割り当てます(5 行目)。- PyMongo のコレクションの
find()メソッドを適用し、コレクションのすべての項目をフェッチします(6 行目)。
TodayToDos クラス:
- 現在の日付とデフォルトの時間(午前 0 時)を組み合わせて
todayに設定します。 アプリケーションに時刻は必要ありませんが、BSON 形式の要件であるため、これを取り除くことはできません(15 行目)。 due_dateが today であるすべての項目をフェッチし、due_date順に並べ替えます(16 行目)。
インポートの更新も忘れないようにしましょう。 赤の波線がついた datetime と time() にマウスポインターを合わせ、Import this name(この名前をインポート)を選択します。 どちらの場合も datetime からインポートします。
Django サーバーが実行中でなければ起動し、ブラウザーで http://localhost:8000/todo/ にアクセスしてアプリケーションが動作していることを確認します。
開発を進める
この時点で Python コンソールを通じてデータベースにレコードを追加できますが、 アプリケーションのユーザーはコンソールを使用できません。 ブラウザーでデータベースに新しいレコードを追加できるビューを開発する必要があるようです。
ウェブフォームを書き始めましょう。 アプリケーションディレクトリ(todo)に forms.py ファイルを作成し、次のコードを挿入します。
from django import forms
from datetime import datetime


class ToDoItemForm(forms.Form):
    text = forms.CharField(max_length=100)
    due_date = forms.DateField(initial=datetime.now)
このフォームには、text と due_date の 2 つのフィールドがあります。 後者は現在の日付になります。
次に、views.py にビューを追加しましょう。 このチュートリアルの冒頭で、Django と MongoDB を使用する場合は多数の Django ショートカットが機能しなくなることを説明しました。 今回は関数ベースのビューを使用し、いくつかの基本的なロジックを手動で定義する必要があります(別のデータベースを使用していれば、単にクラスベースのビューを介して継承できていたロジック)。
PyMongo を使用して Django を MongoDB に接続している場合、関数コードは以下のようになります。
from django.shortcuts import redirect, render
from .forms import ToDoItemForm
...

def add_todo(request):
    if request.method == "POST":
        form = ToDoItemForm(request.POST)
        if form.is_valid():
            new_todo = {
                "text": form.cleaned_data["text"],
                "due_date": datetime.combine(form.cleaned_data["due_date"], time())
            }
            db = get_db_handle()
            db.insert_one(new_todo)
            return redirect('today')
    else:
        form = ToDoItemForm()

    return render(request, "todo/add.html", {"form": form})
詳細は以下のとおりです。
add_todoビューが POST リクエストを受け取ると、ToDoItemFormデータをformに割り当てます(6~7 行目)。- 最初に、投稿したフォームデータが有効であることを確認してから、フォームデータから辞書を作成します(8~12 行目)。
get_db_handleメソッドを通じて MongoDB に接続し、新しいレコードをデータベースに挿入します(13~14 行目)。- POST リクエストでない場合は、単に空のフォームが返されます(16 行目)。
MongoEngine を使用している場合は、MongoEngine ドキュメントに提供されている組み込みの save() メソッドを使用できるため、コードはより短くなります。
from django.shortcuts import redirect, render
from .forms import ToDoItemForm
...

def add_todo(request):
    if request.method == "POST":
        form = ToDoItemForm(request.POST)
        if form.is_valid():
            new_todo = ToDoItem(text=form.cleaned_data["text"], due_date=form.cleaned_data["due_date"])
            new_todo.save()
            return redirect("today")
    else:
        form = ToDoItemForm()

    return render(request, "todo/add.html", {"form": form})
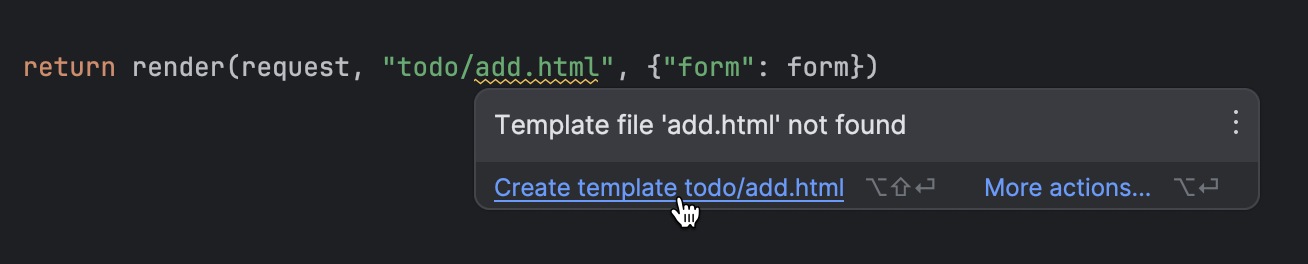
return ステートメントのテンプレートファイル add.html への参照が黄色い波線でハイライトされます。 そこにマウスポインターを合わせ、Create template todo/add.html(テンプレート todo/add.html の作成)を選択します。
エディターでテンプレートが開きます。 そのテンプレートに以下の HTML コードを入力します。
{% extends "base.html" %}
{% block content %}
Add new to-do:
{% endblock %}
新しいタスクを作成するためのボタンを追加して、base.html を更新します。
ブラウザーでページにアクセスしてタスクを追加できるように、todo/urls.py を更新します。
urlpatterns = [
    path("", views.AllToDos.as_view(), name="index"),
    path("today/", views.TodayToDos.as_view(), name="today"),
    path("add/", views.add_todo, name="add")
]
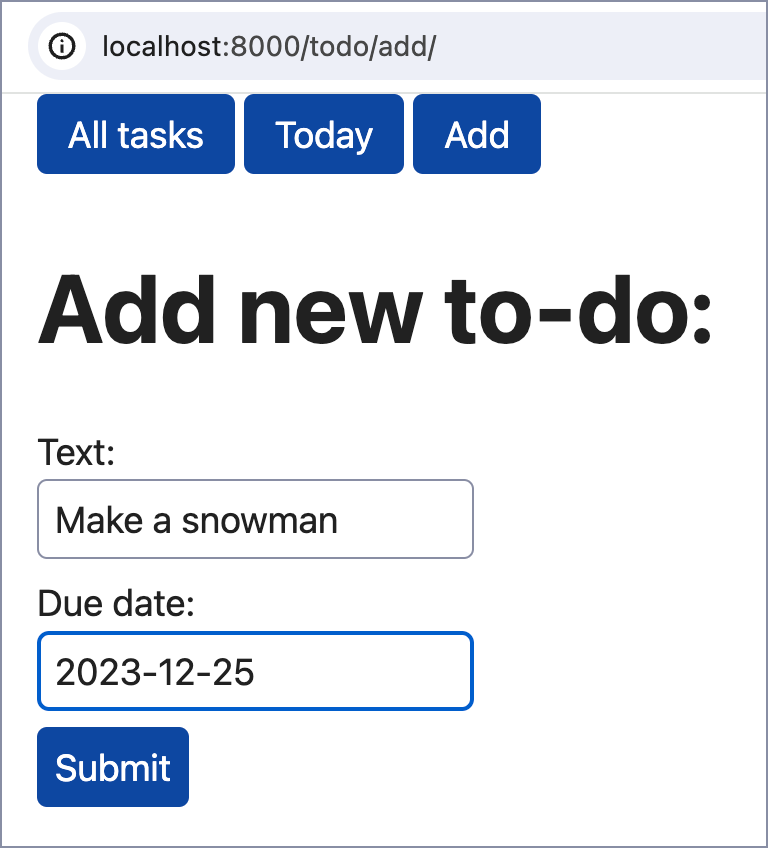
最後に、この新しい機能をブラウザーで試してみましょう! http://localhost:8000/todo/add/ にアクセスしてタスクを追加しましょう。
まとめ
このチュートリアルのすべての手順を実行した場合は、PyMongo と MongoEngine の 2 つのライブラリを使用して基本的な Django プロジェクトを MongoDB に正しく接続できたことでしょう。
すでにご存じのとおり、MongoEngine は実際に PyMongo をベースとしています。 では、その違いは何でしょうか。また、Django プロジェクトに適切な方法を選択するにはどうすればよいのでしょうか。 以下のテーブルに、それぞれのメソッドのメリットとデメリットをまとめました。
| MongoEngine | PyMongo | |
|---|---|---|
| コレクションへのアクセス | Document クラスがコレクションにマップされる |
コレクションは MongoClient を通じてアクセス可能 |
| クエリの実行 | 連鎖したクエリ: ToDoItem.objects.filter(due_date=date.today()) |
辞書式のクエリ: db.find({"due_date": today}).sort("due_date") |
| パフォーマンス | オブジェクトドキュメントマッピングによりやや遅め | Python 辞書をデータモデルとして使用しているため高速 |
| 使用難易度 | 追加の抽象化レベルと ORM のようなエクスペリエンスの提供によって容易に使用できるようになっている | MongoDB の内部形式をより深く理解する必要がある |
よくある質問
Django および MongoDB とは?
Django と MongoDB はどちらもウェブ開発で使用されますが、用途が異なります。 Django は MVT(モデルビューテンプレート)アーキテクチャパターンと DRY(「Don’t Repeat Yourself」)の原則に従う高レベルの Python ウェブフレームワークです。
MongoDB は Django に適していますか?
Django は SQL データベース向けに最適化されています。 NoSQL データベースである MongoDB は MongoEngine や PyMongo といったツールを介して統合することは可能ですが、複雑さが増し、一部のネイティブな Django の機能が制約されてしまいます。 その一方、MongoDB には柔軟なデータ構造や適度な水平方向の拡張性といったメリットが備わっています。 Django に MongoDB を使用するかどうかは、ユーザーの特定のプロジェクトのニーズと追加で発生しうる開発上の課題に対応する準備ができているかどうかによって決める必要があります。
Django と NoSQL を一緒に使用できますか?
はい。MongoDB などの NoSQL データベースを Django と一緒に使用することはできます。 ただし、これにより複雑さが増し、SQL データベース用に最適化された Django の機能が一部制限される可能性があります。 この選択は、特定のプロジェクトの要件とトレードオフに基づいて決定する必要があります。
PyMongo と MongoEngine ではどちらが優れていますか?
PyMongo はより高速であり、MongoDB により直接的にアクセスできますが、MongoDB の内部構造をより深く理解している必要があります。 MongoEngine はより高いレベルのインターフェースを提供し、Django に十分に適合しますが、すべての MongoDB 機能がサポートされていない可能性があるため、抽象化によって低速になる可能性があります。
SQL でなく MongoDB を Django と一緒に使用する理由は?
MongoDB のスキーマの柔軟性、大量のデータを処理できる能力、およびネストオブジェクトなどの独特の機能があるため、特定の Django プロジェクトでは MongoDB が適しています。 複数のサーバーで効率よく拡張することも可能です。 ただし、それを使用することで Django に組み込まれている SQL データベース用に最適化された機能が一部制限されてしまう可能性があります。
有益なリンク集
ドキュメント
- PyCharm での Django のサポート
- Django Structure ツールウィンドウ
- MongoDB のドキュメント
- MongoEngine のドキュメント
- PyMongo のドキュメント
チュートリアル
動画
ポッドキャスト
その他
- What is the Django Web Framework?(Django ウェブフレームワークとは?)
- NoSQL とは?
- Django と MongoDB を使用する前にこちらをお読みください
オリジナル(英語)ブログ記事の作者:

Subscribe to PyCharm Blog updates

Discover more


如何将 Django 与 MongoDB 连接

最流行的 Web 框架之一 Django 采用了“内置电池”理念, 使用普通 Django 即可构建可以用于生产的应用程序,无需扩展程序或其他框架。 甚至数据库 SQLite 也是开箱即用。 SQLite 非常适合学习和开发小型应用程序,但也有一定局限,随着项目发展,这些局限往往会导致问题。
开发者倾向于选择 SQLite 之外的数据库,使应用可以扩缩和执行高负载操作。 Django 官方支持多种数据库,包括 PostgreSQL、MariaDB、MySQL、Oracle 和 SQLite,以及一些第三方数据库后端。 MongoDB 虽然并不在此列,但仍然是一个非常受欢迎的选择:根据 JetBrains 2023 年进行的 Django 开发者调查,有 8% 的 Django 开发者使用它。
谁需要它?为什么?
为 Django 项目选择 MongoDB 的可能原因是什么?Django 缺乏对此数据库的官方支持在实践中又意味着什么? 我们来看看。
所有官方支持的数据库都是关系数据库管理系统 (RDBMS),这意味着它们将数据存储在表中并支持 SQL(结构化查询语言)。 MongoDB 则是非关系数据库, 此类数据库也常被称为 NoSQL。 它们不使用具有行和列的表,而是以类似于 JSON 的格式 BSON 存储数据。
作为非关系数据库,MongoDB 相对于 SQL 数据库主要有以下优势:
- 无架构:如需存储结构可能随时间变化的复杂数据,BSON 的灵活性非常适用。
- 文档模型:数据格式可以因文档而异,是分层数据存储和多种非结构化数据的理想选择。
- 可扩缩性:MongoDB 在设计上可水平扩缩,支持分片处理大容量数据和高负载。
- 实时处理:借助 MongoDB,应用程序可以通过订阅更改流几乎立即对数据更改做出反应。
基于这些优势,开发者通常更喜欢将 MongoDB 用于处理用户生成内容的博客平台与应用程序、IoT(物联网)、大数据服务和移动应用程序。
不过,值得注意的是 MongoDB 不能作为 SQL 数据库的直接替代品。 由于 Django 没有对 MongoDB 的原生支持,您必须集成第三方软件包并相应地调整代码库。 此外,您必须组织整个开发流程,将以下限制纳入考量:
- Django 内置的面向 SQL 的 ORM 对于 MongoDB 失去作用。
- 您将无法再通过 Django 管理界面管理内容。
- 许多其他专为处理数据库而设计的 Django 功能将无法实现。 使用 MongoDB 时,您注定要脱离“Django 之道”。
已有的代码越多,需要的更改就越多。 因此,应该在项目生命周期的早期阶段切换到 MongoDB。
在本教程中,我们以两种方式将一个非常基本的 Django 项目与 MongoDB 连接:
- 使用 MongoEngine(基于 PyMongo)
- 仅使用 PyMongo
设备需求
开始前,您需要安装以下软件:
- PyCharm Professional 2023.3(提供 30 天免费试用)
- Python
- Docker(仅用于在容器中运行 MongoDB)
本教程将提供以下 Python 软件包和软件的安装说明:
- MongoDB Community(仅用于本地安装)
- Django
- PyMongo
- MongoEngine
准备 Django 项目
我们将使用带有基本 Django 待办事项列表应用程序的项目。 如果您想从头创建项目,请参阅 PyCharm 文档中的这篇教程。 或者直接克隆仓库,如下所示:
- 启动 PyCharm,然后在欢迎屏幕上点击 Get from VCS(从 VCS 获取)。
- 插入仓库 URL,点击 Clone(克隆)。
PyCharm 将下载项目并配置系统解释器。 在本教程中,我们将使用本地 virtualenv 解释器(也需要设置)。
在克隆项目后立即出现的弹出窗口中点击 Configure a Python interpreter(配置 Python 解释器)。 或者,点击右下角的解释器选择器,然后选择 Add New Interpreter | Add Local Interpreter(添加新解释器 | 添加本地解释器)。 有关在 PyCharm 中配置解释器的详细信息,请参阅文档。
配置解释器后,打开 Python Packages(Python 软件包)工具窗口并安装 Django。
安装 MongoDB
Django 项目已经就绪,接下来需要配置 MongoDB 数据库。 您有三种选择,具体取决于您的项目:
设置 MongoDB Atlas
如果要将 Django 项目与云 MongoDB 数据库连接,请注册 MongoDB Atlas 并部署免费的数据库集群。 要从应用程序访问此集群,您还需要将连接 IP 地址添加到 IP 访问列表并创建数据库用户。 对于本教程的后续步骤,您将需要连接字符串。 获取方法如下:
- 选择您的数据库。
- 点击 Overview(概览)标签页上的 Connect(连接)。
- 选择 Drivers(驱动程序)。
如需更多详细信息,请参阅 MongoDB Atlas 文档。
在 Docker 容器中运行 MongoDB
如果您决定在容器中运行 MongoDB Community Edition,请遵循以下步骤:
- 拉取 MongoDB Docker 镜像:
docker pull mongodb/mongodb-community-server
- 将镜像作为容器运行:
docker run --name mongo -d -p 27017:27017 mongodb/mongodb-community-server:latest
有关更多详情,请参阅 MongoDB 文档。
本地安装 MongoDB
如果您选择将 MongoDB 作为本地数据库运行,请执行以下步骤:
- 安装 MongoDB Community Edition。
- 启动 MongoDB Shell 并创建数据库:
% mongosh
> use djangoTutorial
配置数据源
这一步非必选。 配置数据源将让您可以直接在 PyCharm 中查看数据库集合并跟踪其更改,无需安装额外软件或打开 MongoDB Atlas 的 Web 界面。
返回 PyCharm,打开 Database(数据库)工具窗口,点击“+”开始创建数据源。 选择 MongoDB 作为数据源类型。
配置新创建的数据源。 如果使用的是 MongoDB Atlas,首先将连接字符串插入 URL 字段,然后提供数据库用户的凭据。
如果您使用的是 MongoDB Community,无论是本地安装还是在 Docker 容器中运行,都请按如下方式配置数据源:
- 如果在安装过程中更改了默认设置,请输入数据库主机地址和端口号。 否则,请继续到第 2 步。
- 如果您已经配置用户名和密码,请在相应字段中输入。 否则,在 Authentication(验证)中选择 No auth(无身份验证)。
- 在 Database(数据库)字段中指定数据库名称。
- 点击 Test Connection(测试连接)。
如需详细了解如何在 PyCharm 中配置 MongoDB 数据源,请参阅文档。
配置环境变量
如果您使用的是 MongoDB Atlas 或采用用户名和密码身份验证的本地 MongoDB 数据库,则需要使用环境变量创建 .env 文件来存储凭据。 对项目进行版本控制时,这被视为防止机密数据泄露的最佳做法。
- 右键点击项目的根目录,然后从上下文菜单中选择 New | File(新建 | 文件)。
- 指定 .env 作为文件名。
- 新创建的文件将在编辑器中打开。 添加环境变量及其值。 例如:
USERNAME=jetbrains
PASSWORD=czUfHKhGNxtGTsv
HOST=cluster0.bqnh3eo.mongodb.net
仅 MongoDB Atlas 需要 HOST。
- 右键点击编辑器中的任意位置,然后从上下文菜单中选择 Git | Add to .gitignore(Git | 添加到 .gitignore)。
接下来,您需要配置运行配置,以便在每次启动 Django 服务器时都加载新创建的 .env 文件。
- 点击上方 Run(运行)微件,从菜单中选择 Edit Configurations(编辑配置)。
- 在 Paths to “.env” files(“.env” 文件的路径)字段中指定 .env 的路径。
- 准备好后,点击 OK(确定)或 Run(运行)。
现在,您可以使用所选方法来连接 Django 和 MongoDB(或两种都尝试)。
使用 MongoEngine 连接 Django 和 MongoDB
MongoEngine 是用于 Django 项目的 Python 对象文档映射器 (ODM)。 它的运作方式类似于关系数据库中的 ORM(对象关系映射)。 以下是通过 MongoEngine 将 MongoDB 连接到 Django 的主要优点:
- ODM 允许使用常用语法在代码中定义文档架构(类似于将 Django 与 SQL 数据库一起使用时的模型)。
- 用于数据库查询的富 Python 式语法。
- 对 Django 表单的支持和 Django Rest Framework 序列化器。
综上所述,MongoEngine 在 Django 项目中提供了与 MongoDB 交互的高级体验。 如需将现有 Django 项目转换为使用 MongoDB 的项目,这也是理想选择。
安装并启用 MongoEngine
首先,在 Python Packages(Python 软件包)工具窗口中安装 MongoEngine 软件包。 打开工具窗口,输入 mongoengine,点击 Install(安装),然后选择版本。
Django 项目默认使用 SQLite 数据库创建。 我们需要通过注释(或移除)settings.py 中的 DATABASES 部分将其禁用。 按 ⌥⌘O / Ctrl+Alt+Shift+N,输入 DA… 以快速访问。
将以下内容添加到 settings.py 中:
import mongoengine
mongoengine.connect(db="djangoTutorial", host="mongodb://localhost:27017/")
对于 MongoDB Atlas,从 .env 文件加载用户名和密码。 例如:
import os
import mongoengine

USERNAME = os.getenv("USERNAME")
PASSWORD = os.getenv("PASSWORD")
HOST = os.getenv("HOST")


mongoengine.connect(db="djangoTutorial", host=f"mongodb+srv://{HOST}/",
                    username=USERNAME, password=PASSWORD)
编辑模型
虽然 MongoDB 无架构,但 MongoEngine 允许在应用程序级别定义架构。 此类架构不会传递到数据库,但能够为 Django 和 MongoDB 之间的交互添加额外一层抽象,让开发者编写出更简洁且更易维护的代码。
与 Django ORM 不同,MongoEngine 使用文档而不是模型。 可惜,Django 管理界面不支持 MongoEngine 文档。 为了避免启动 Django 服务器时出现错误,请通过注释或移除相应的类在 admin.py 中取消注册 ToDoItem。
您可以使用 Django Structure(Django 结构) 工具窗口快速访问模型管理类:
双击 Django Structure (Django 结构)工具窗口中 ToDoItem 下的 Models(模型),在编辑器中打开模型。 进行以下替换:
| 原始 | 替换 |
|---|---|
from django.db import models |
from mongoengine import Document, fields或
|
models.Model |
文档 |
models.CharField |
fields.StringField() |
models.DateField |
fields.DateField |
应该得到:
from mongoengine import Document, fields
from django.utils import timezone


class ToDoItem(Document):
    text = fields.StringField(max_length=100)
    due_date = fields.DateField(default=timezone.now)

    def __str__(self):
        return f"{self.text}: due {self.due_date}"
要避免手动替换,您可以让 Pycharm 的 AI Assistant 为您执行操作:
- 在 models.py 中选择代码。
- 从上下文菜单中选择 AI Actions | New Chat Using Selection(AI 操作 | 使用选区新建聊天)。
- 编写提示词,例如 Modify the code for usage with MongoEngine。
有关使用 AI Assistant 的信息,请参阅 PyCharm 文档。
为了向用户提供高水准、多元化、本土化的 AI Assistant 服务,JetBrains 目前正在与阿里云通义大模型商洽未来的合作事宜,为中国开发者带来 AI Assistant 服务。
*由于服务提供商的限制,一些地区的用户目前无法访问 AI Assistant。
现在,创建 ToDoItem 文档的实例并将其保存到数据库来测试解决方案。 打开 Python 控制台并运行以下代码:
from todo.models import ToDoItem
from datetime import datetime
task = ToDoItem(text="Fix the table")
task.due_date = datetime(2023,11,29)
task.save()
如果您使用的是云数据库,这可能需要一段时间。 如果出现 [SSL: CERTIFICATE_VERIFY_FAILED] 错误,请参阅故障排除建议。
在 Database(数据库)工具窗口中打开 to_do_item 集合并确保已添加记录:
确保更改不会破坏应用程序。 启动由 PyCharm 自动创建的 Django 服务器配置。
然后,在浏览器中转到 http://localhost:8000/todo/:
恭喜! 您的 Django 应用已经在使用 MongoDB 了!
使用 PyMongo 连接 Django 和 MongoDB
PyMongo 是官方推荐的低级 MongoDB 驱动程序, 在 Django 与 MongoDB 之间提供了直接而详细的交互途径。 如需编写数据库查询以获得更好的性能,并且在代码库中不需要类似 ORM 的体验,那么 PyMongo 是一个理想选择。
安装 PyMongo 并移除模型
MongoEngine 在后台运行 PyMongo。 因此,如果您刚刚完成本教程的前一部分,那么您的项目环境中已经安装了 pymongo。 否则,在 Python Packages(Python 软件包)工具窗口中安装。
注释 settings.py 中的 DATABASES 部分禁用 SQLite,并从 admin.py 中移除 ToDoItemAdmin(如果尚未移除)。
最后,从 models.py 中移除 ToDoItem。 您可以使用 Recent Files(最近的文件)(⌘E / Ctrl+E) 快速访问。
转换视图
由于不再使用 Django 模型,我们应该适当更改视图类。 转到 views.py,添加一个将用于访问 MongoDB 数据库的函数:
from pymongo import MongoClient


def get_db_handle():
    client = MongoClient(host="mongodb://localhost", port=27017)
    db_handle = client.djangoTutorial.to_do_item
    return db_handle
对于 MongoDB Atlas 或采用身份验证的本地数据库,需要加载环境变量并使用连接字符串。 例如:
from pymongo import MongoClient
import os

USERNAME = os.getenv("USERNAME")
PASSWORD = os.getenv("PASSWORD")
HOST = os.getenv("HOST")


def get_db_handle():
    client = MongoClient(f"mongodb+srv://{USERNAME}:{PASSWORD}@{HOST}/?retryWrites=true&w=majority")
    db_handle = client.djangoTutorial.to_do_item
    return db_handle
函数返回 to_do_item MongoDB 集合。 MongoDB 的优点之一是,即使这个集合还不存在,它也会在第一次插入时创建。
由于我们不再拥有 ToDoItem 模型,需要更新视图类 AllToDos 和 TodayToDos 的 get_queryset 方法:
class AllToDos(ListView):
    template_name = "todo/index.html"

    def get_queryset(self):
        db = get_db_handle()
        results = db.find()
        return results


class TodayToDos(ListView):
    template_name = "todo/today.html"

    def get_queryset(self):
        db = get_db_handle()
        today = datetime.combine(date.today(), time())
        results = db.find({"due_date": today}).sort("due_date")
        return results
这样更改代码,我们会重写 Django 的 ListView 类的默认 get_queryset 方法。 这段代码的作用如下:
AllToDos 类:
- 调用
get_db_handle从djangoTutorial数据库获取to_do_item集合并将其指定给db(第 5 行)。 - 应用 PyMongo 集合的
find()方法获取集合中的所有条目(第 6 行)。
TodayToDos 类:
- 将当前日期与默认时间(午夜)组合设置为
today。 我们的应用程序不需要时间,但不能去掉它,因为 BSON 格式需要(第 15 行)。 - 获取
due_date为 today 的所有条目,并按due_date排序(第 16 行)。
不要忘记更新导入。 将鼠标悬停在 datetime 和 time() 上(应以红色波浪线高亮显示),然后选择 Import this name(导入此名称)。 在这两个位置都从 datetime 导入。
如果 Django 服务器未运行,则将其启动,然后在浏览器中转到 http://localhost:8000/todo/ 以确保应用程序正常运行。
继续开发
目前,我们可以通过 Python 控制台将记录添加到数据库中。 但是,应用程序的用户无法使用控制台。 看起来应该开发一个视图,允许在浏览器中向数据库添加新记录。
首先编写一个 Web 表单。 在应用程序目录 (todo) 下创建一个 forms.py 文件,并填充以下代码:
from django import forms
from datetime import datetime


class ToDoItemForm(forms.Form):
    text = forms.CharField(max_length=100)
    due_date = forms.DateField(initial=datetime.now)
表单由两个字段组成:text 和 due_date。 后者默认为当前日期。
现在,我们向 views.py 添加一个视图。 如本教程开头所述,如果您决定将 Django 与 MongoDB 一起使用,许多 Django 快捷键将不再有效。 您必须使用基于函数的视图并手动定义一些基本逻辑(如果使用不同的数据库,则可以通过基于类的视图直接继承)。
如果您使用 PyMongo 将 Django 连接到 MongoDB,函数代码应如下所示:
from django.shortcuts import redirect, render
from .forms import ToDoItemForm
...

def add_todo(request):
    if request.method == "POST":
        form = ToDoItemForm(request.POST)
        if form.is_valid():
            new_todo = {
                "text": form.cleaned_data["text"],
                "due_date": datetime.combine(form.cleaned_data["due_date"], time())
            }
            db = get_db_handle()
            db.insert_one(new_todo)
            return redirect('today')
    else:
        form = ToDoItemForm()

    return render(request, "todo/add.html", {"form": form})
详细情况如下:
- 如果
add_todo视图收到 POST 请求,它会将ToDoItemForm数据指定给form(第 6-7 行)。 - 它首先确保发布的表单数据有效,然后根据表单数据创建字典(第 8-12 行)。
- 它通过
get_db_handle方法连接到 MongoDB,并将新记录插入数据库(第 13-14 行)。 - 如果不是 POST 请求,它会返回一个空白表单(第 16 行)。
如果使用的是 MongoEngine,代码会更短,因为您可以使用 MongoEngine 文档中的内置 save() 方法:
from django.shortcuts import redirect, render
from .forms import ToDoItemForm
...

def add_todo(request):
    if request.method == "POST":
        form = ToDoItemForm(request.POST)
        if form.is_valid():
            new_todo = ToDoItem(text=form.cleaned_data["text"], due_date=form.cleaned_data["due_date"])
            new_todo.save()
            return redirect("today")
    else:
        form = ToDoItemForm()

    return render(request, "todo/add.html", {"form": form})
return 语句中对模板文件 add.html 的引用应使用黄色波浪线高亮显示。 将光标悬停在它上面并选择 Create template todo/add.html(创建模板 todo/add.html)。
模板将在编辑器中打开。 使用以下 HTML 代码填充:
{% extends "base.html" %}
{% block content %}
    <h1>Add new to-do:</h1>
    <form method="post">
        {% csrf_token %}
        {{ form.text.label_tag }} {{ form.text }}
        <br>
        {{ form.due_date.label_tag }} {{ form.due_date }}
        <br>
        <button type="submit">Submit</button>
    </form>
{% endblock %}
通过添加用于创建新任务的按钮来更新 base.html:
<div>
    <a class="button" href='{% url "index" %}'>All tasks</a>
    <a class="button" href='{% url "today" %}'>Today</a>
    <a class="button" href='{% url "add" %}'>Add</a>
</div>
更新 todo/urls.py 以允许您自己访问用于在浏览器中添加任务的页面:
urlpatterns = [
    path("", views.AllToDos.as_view(), name="index"),
    path("today/", views.TodayToDos.as_view(), name="today"),
    path("add/", views.add_todo, name="add")
]
最后,该在浏览器中测试新功能了! 转到 http://localhost:8000/todo/add/,添加任务:
结论
如果您已完成本教程中的所有步骤,那么您已经通过 PyMongo 和 MongoEngine 这两个库成功将基本 Django 项目与 MongoDB 连接。
MongoEngine 实际上基于 PyMongo。 那么,它们的区别是什么?又如何为 Django 项目选择正确的方式呢? 我们在下表中总结了每种方法的优点和缺点:
| MongoEngine | PyMongo | |
|---|---|---|
| 访问集合 | Document 类映射到集合 |
通过 MongoClient 访问集合 |
| 查询 | 链式查询:ToDoItem.objects.filter(due_date=date.today()) |
字典式查询:db.find({"due_date": today}).sort("due_date") |
| 性能 | 由于对象文档映射,速度稍慢 | 使用 Python 字典作为数据模型,速度更快 |
| 使用复杂度 | 通过添加额外一层抽象和提供类似 ORM 的体验来简化使用 | 需要更深入地理解 MondoDB 的内部格式 |
常见问题解答
什么是 Django 和 MongoDB?
Django 和 MongoDB 都用于 Web 开发,但目的不同。 Django 是高级 Python Web 框架,遵循 MVT(模型-视图-模板)架构模式和 DRY(“避免重复代码”)原则。
MongoDB 适合 Django 吗?
Django 针对 SQL 数据库进行了优化。 MongoDB 是 NoSQL 数据库,虽然可以通过 MongoEngine 或 PyMongo 等工具集成,但这会增加复杂度并限制一些原生 Django 功能。 另一方面,MongoDB 有其优势,例如灵活的数据结构和良好的水平可扩缩性。 为 Django 选择 MongoDB 时,应考虑您的具体项目需求以及管理潜在额外开发挑战的准备程度。
可以将 NoSQL 与 Django 一起使用吗?
是的,您可以将 MongoDB 等 NoSQL 数据库与 Django 结合使用。 但是,这会增加复杂度,并可能限制一些针对 SQL 数据库优化的 Django 功能。 选择应基于您的具体项目要求和权衡。
PyMongo 和 MongoEngine 哪个更好?
PyMongo 速度更快,提供了对 MongoDB 的更直接访问,但也需要对 MongoDB 有更深的理解。 MongoEngine 提供了更高级别的接口,非常适合 Django,但可能不支持所有 MongoDB 功能,并且由于抽象,速度可能较慢。
为什么选择 MongoDB 而不是 SQL 配合 Django?
MongoDB 因其架构灵活性、大容量数据处理能力以及嵌套对象等独特功能,非常适合某些 Django 项目。 它可以跨多个服务器有效扩缩。 但是,使用它可能会限制一些针对 SQL 数据库优化的 Django 内置功能。
实用链接
文档和演示
教程
视频
播客
其他
本博文英文原作者:
Subscribe to PyCharm Blog updates
Discover more
How to Connect Django With MongoDB

One of the most popular web frameworks, Django, has adopted the “batteries included” philosophy. This means that you can build a production-ready application using only the vanilla Django with no extensions or other frameworks. Even the database SQLite is available out of the box. SQLite is great for learning and developing small applications, but has certain limitations that often lead to issues as projects grow.
Developers tend to choose other databases over SQLite so that their apps can be scaled and perform high-load operations. Django officially supports a number of databases, including PostgreSQL, MariaDB, MySQL, Oracle, and SQLite, as well as some third-party database backends. MongoDB is not on the list, but it is still a very popular option: 8% of Django developers use it, according to the Django Developers Survey conducted by JetBrains in 2023.
Why choose MongoDB with Django
What are the possible reasons for choosing MongoDB for Django projects and what does Django’s lack of official support for this database mean in practice? Let’s see.
All of the officially supported databases are relational database management systems (RDBMS), meaning that they store data in tables and support SQL (Structured Query Language). MongoDB, however, is a non-relational database. Such databases are also often referred to as NoSQL. Instead of tables with rows and columns, they store data in a JSON-like format called BSON.
As a non-relational database, MongoDB has the following main advantages over SQL databases:
- No schema: The flexibility of BSON can be very helpful if you need to store complex data whose structure is likely to require changes over time.
- Document model: The format of data can vary from document to document, which is ideal for hierarchical data storage and various unstructured data.
- Scalability: MongoDB is horizontally scalable by design and supports sharding for handling large volumes of data and high loads.
- Real-time processing: With MongoDB, applications can react to data changes almost instantly by subscribing to change streams.
Considering these advantages, developers often prefer MongoDB for blogging platforms and applications that deal with user-generated content, IoT (Internet of Things), Big Data services, and mobile applications.
It’s important to understand, however, that MongoDB cannot serve as a drop-in replacement for SQL databases. Since there’s no native support for MongoDB in Django, you’ll have to integrate third-party packages and adjust the codebase accordingly. Moreover, you’ll have to organize the whole development process, taking into account the following limitations:
- Django’s built-in SQL-oriented ORM becomes useless with MongoDB.
- You will no longer be able to manage the content through the Django admin interface.
- Many other Django features designed for working with databases will be out of reach. By using MongoDB, you’ll definitely step off “the Django way”.
The more code you already have, the more changes will be required. For this reason, it makes sense to switch to MongoDB in the very early stages of your project’s lifecycle.
In this tutorial, we will connect a very basic Django project with MongoDB in two different ways:
- By using MongoEngine (which is based on PyMongo)
- By using only PyMongo
Requirements
Before your start, you need to install the following:
- PyCharm Professional (a free 30-day trial is available)
- Python
- Docker (only for running MongoDB in a container)
The installation instructions for the following Python packages and software will be provided in the course of the tutorial:
- MongoDB Community (only for local installation)
- Django
- PyMongo
- MongoEngine
Prepare your Django project
We will use a project with a basic Django to-do list application. If you want to create the project from scratch, you can follow this tutorial in PyCharm’s documentation. Otherwise, just clone the repository as follows:
- Launch PyCharm and then click Get from VCS on the Welcome screen.
- Insert the repository URL and click Clone.
PyCharm downloads the project and configures your system interpreter. In this tutorial, we will use a local virtualenv interpreter, which you’ll also need to set up.
Click Configure a Python interpreter in the popup that appears right after you clone the project. Alternatively, click the interpreter selector in the lower right-hand corner, and then select Add New Interpreter | Add Local Interpreter. For more information about configuring interpreters in PyCharm, refer to the documentation.
After you’ve configured the interpreter, open the Python Packages tool window and install Django.
Install MongoDB
Now that you have your Django project ready, you need to provision the MongoDB database. You can use one of three options, depending on what suits your project best:
Set up MongoDB Atlas
If you’re going to connect your Django project with a cloud MongoDB database, sign up for MongoDB Atlas and deploy a free database cluster there. To access this cluster from your application, you also need to add your connection IP address to the IP access list and create a database user. For the next steps of this tutorial, you’ll need the connection string. Here’s how you can get it:
- Select your database.
- Click Connect on the Overview tab.
- Select Drivers.
For more detailed information, see the MongoDB Atlas documentation.
Run MongoDB in a Docker container
If you decide to run MongoDB Community Edition in a container, follow these steps:
- Pull the MongoDB Docker image:
docker pull mongodb/mongodb-community-server
- Run the image as a container:
docker run --name mongo -d -p 27017:27017 mongodb/mongodb-community-server:latest
For further details, refer to the MongoDB documentation.
Install MongoDB locally
If you’re opting to run MongoDB as a local database, perform these steps:
- Install MongoDB Community Edition.
- Start the MongoDB Shell and create a database:
% mongosh
> use djangoTutorial
Configure the data source
This step is optional. Configuring a data source allows you to view the database collections and track changes to them right in PyCharm rather than install additional software or open the web interface of MongoDB Atlas.
Go back to PyCharm, open the Database tool window, and click “+” to start creating a data source. Select MongoDB as the data source type.
Configure the newly created data source. If you are using MongoDB Atlas, insert the connection string into the URL field, and then provide the credentials of the database user.
If you’re using MongoDB Community, either locally installed or running in a Docker container, configure the data source as follows:
- If you’ve changed the default settings during the installation, enter the database host address and port number. Otherwise, proceed to step 2.
- If you’ve configured the username and the password, enter them in the corresponding fields. Otherwise, select No auth in Authentication.
- Specify the database name in the Database field.
- Click Test Connection.
For more information about how to configure a MongoDB data source in PyCharm, refer to the documentation.
Configure environment variables
If you’re using MongoDB Atlas or a local MongoDB database with user and password authentication, you need to create an .env file with the environment variables to store your credentials. This is considered a best practice for preventing leaks of confidential data when putting projects under version control.
- Right-click the root directory of your project and select New | File from the context menu.
- Specify .env as the file name.
- The newly created file is opened in the editor. Add the environment variables and their values. For example:
USERNAME=jetbrains
PASSWORD=czUfHKhGNxtGTsv
HOST=cluster0.bqnh3eo.mongodb.net
HOST is required only for MongoDB Atlas.
- Right-click anywhere in the editor and select Git | Add to .gitignore from the context menu.
Next, you need to configure the run configuration so that the newly created .env file is loaded every time you start the Django server.
- Click the Run widget above and select Edit Configurations from the menu.
- Specify the path to .env in the Paths to “.env” files field.
- Click OK or Run when you’re ready.
Now you are all set to proceed with the selected method for connecting Django and MongoDB (or try both).
Connect Django with MongoDB using MongoEngine
MongoEngine is a Python Object-Document Mapper (ODM) for Django projects. It works similarly to ORM (Object-relational mapping) in relational databases. Here are the main advantages of connecting MongoDB to Django through MongoEngine:
- ODM allows defining schemas for documents in code with familiar syntax (similar to models when using Django with SQL databases).
- Rich “pythonic” syntax for database queries.
- Support for Django forms and Django Rest Framework serializers.
To sum up, MongoEngine provides a high-level experience of interaction with MongoDB in Django projects. It can also be a great choice if you need to convert an existing Django project to one using MongoDB.
Install and enable MongoEngine
Let’s start by installing the MongoEngine package in the Python Packages tool window. Open the tool window, type mongoengine, click Install, and select the version.
By default, Django projects are created with an SQLite database. We need to disable it by commenting (or removing) the DATABASES section in settings.py. Press ⌥⌘O / Ctrl+Alt+Shift+N and start typing DA… for quick access.
Instead, add the following to settings.py:
import mongoengine
mongoengine.connect(db="djangoTutorial", host="mongodb://localhost:27017/")
For MongoDB Atlas, load the username and the password from the .env file. For example:
import os
import mongoengine

USERNAME = os.getenv("USERNAME")
PASSWORD = os.getenv("PASSWORD")
HOST = os.getenv("HOST")


mongoengine.connect(db="djangoTutorial", host=f"mongodb+srv://{HOST}/",
                    username=USERNAME, password=PASSWORD)
Edit the model
Although MongoDB is schemaless, MongoEngine allows defining schemas at the application level. Such schemas are not passed to the database, but they let developers write more concise and maintainable code by adding an extra level of abstraction to the interaction between Django and MongoDB.
Unlike the Django ORM, MongoEngine uses documents instead of models. Unfortunately, MongoEngine documents are not supported by the Django admin interface. To avoid errors when launching the Django server, unregister ToDoItem in admin.py by commenting or removing the corresponding class.
You can use the Django Structure tool window for quick access to the model admin class:
Double-click ToDoItem under Models in the Django Structure tool window to open the model in the editor. Make the following replacements:
| Original | Replacement |
|---|---|
from django.db import models | from mongoengine import Document, fieldsor from mongoengine import * |
models.Model | Document |
models.CharField | fields.StringField() |
models.DateField | fields.DateField |
Here’s what you should get:
from mongoengine import Document, fields
from django.utils import timezone


class ToDoItem(Document):
    text = fields.StringField(max_length=100)
    due_date = fields.DateField(default=timezone.now)

    def __str__(self):
        return f"{self.text}: due {self.due_date}"
To avoid making replacements manually, you can ask Pycharm’s AI Assistant to do this for you:
- Select the code in models.py.
- From the context menu, select AI Actions | New Chat Using Selection.
- Write the prompt, for example, Modify the code for usage with MongoEngine.
For information about using AI Assistant, refer to the PyCharm documentation.
Now let’s test the solution by creating an instance of the ToDoItem document and saving it to the database. Open the Python console and run the following:
from todo.models import ToDoItem
from datetime import datetime
task = ToDoItem(text="Fix the table")
task.due_date = datetime(2023,11,29)
task.save()
If you are using a cloud database, this may take a while. In the event you get an [SSL: CERTIFICATE_VERIFY_FAILED] error, see the troubleshooting recommendations.
Open the to_do_item collection in the Database tool window and make sure that the record has been added:
Let’s make sure that our changes didn’t break the application. Launch the Django server configuration, which was automatically created by PyCharm.
Then, go to http://localhost:8000/todo/ in the browser:
Congratulations! Your Django app is using MongoDB now!
Connect Django with MongoDB using PyMongo
PyMongo is the officially recommended low-level driver for MongoDB. It provides a direct and detailed way of interaction between Django and MongoDB. PyMongo is a great choice if you need to craft database queries for better performance and can do without the ORM-like experience in your codebase.
Install PyMongo and remove the model
MongoEngine runs PyMongo under the hood. So, if you’ve just gone through the previous part of the tutorial, you already have pymongo installed in the project environment. Otherwise, install it in the Python Packages tool window.
Disable SQLite by commenting the DATABASES section in settings.py and remove ToDoItemAdmin from admin.py if you haven’t done so yet.
Finally, remove ToDoItem from models.py. You can use Recent Files (⌘E / Ctrl+E) for quick access.
Transform the views
As we are not using Django models anymore, we should change the view classes accordingly. Go to views.py and add a function that will be used to access the MongoDB database:
from pymongo import MongoClient


def get_db_handle():
    client = MongoClient(host="mongodb://localhost", port=27017)
    db_handle = client.djangoTutorial.to_do_item
    return db_handle
For MongoDB Atlas or a local database with authentication, you need to load environment variables and use the connection string. For example:
from pymongo import MongoClient
import os

USERNAME = os.getenv("USERNAME")
PASSWORD = os.getenv("PASSWORD")
HOST = os.getenv("HOST")


def get_db_handle():
    client = MongoClient(f"mongodb+srv://{USERNAME}:{PASSWORD}@{HOST}/?retryWrites=true&w=majority")
    db_handle = client.djangoTutorial.to_do_item
    return db_handle
The function returns the to_do_item MongoDB collection. One of MongoDB’s advantages is that even if this collection doesn’t exist yet, it will be created on the first insert.
As we don’t have the ToDoItem model anymore, we need to update the get_queryset methods of the view classes AllToDos and TodayToDos:
class AllToDos(ListView):
    template_name = "todo/index.html"

    def get_queryset(self):
        db = get_db_handle()
        results = db.find()
        return results


class TodayToDos(ListView):
    template_name = "todo/today.html"

    def get_queryset(self):
        db = get_db_handle()
        today = datetime.combine(date.today(), time())
        results = db.find({"due_date": today}).sort("due_date")
        return results
By changing the code in this way, we are overriding the default get_queryset method of Django’s ListView class. Here’s what this code does:
The AllToDos class:
- Calls
get_db_handleto get theto_do_itemcollection from thedjangoTutorialdatabase and assigns it todb(line 5). - Applies the
find()method of PyMongo’s collections to fetch all of the items in the collection (line 6).
The TodayToDos class:
- Sets the current date combined with the default time (midnight) as
today. We don’t need time in our application, but we can’t get rid of it because it is required by the BSON format (line 15). - Fetches all items whose
due_dateis today and sorts them bydue_date(line 16).
Don’t forget to update the imports. Hover over datetime and time(), which should be highlighted with a red squiggly line, and then select Import this name. Import from datetime in both cases.
If the Django server is not running, launch it, and then go to http://localhost:8000/todo/ in the browser to make sure that the application works.
Continue developing
At the moment we can add records to the database via the Python console. However, the console isn’t available for the users of our application. It looks like we should develop a view that will allow adding new records to the database in the browser.
Let’s start with writing a web form. Create a forms.py file in the application directory (todo) and fill it with the following code:
from django import forms
from datetime import datetime


class ToDoItemForm(forms.Form):
    text = forms.CharField(max_length=100)
    due_date = forms.DateField(initial=datetime.now)
The form consists of two fields: text and due_date. The latter defaults to the current date.
Now let’s add a view to views.py. At the beginning of this tutorial, we already mentioned that many Django shortcuts will no longer work if you decide to use Django with MongoDB. This time you’ll have to use a function-based view and manually define some basic logic (which would have been simply inherited via class-based views had we used a different database).
If you’ve connected Django to MongoDB with PyMongo, the function code should be as follows:
from django.shortcuts import redirect, render
from .forms import ToDoItemForm
...

def add_todo(request):
    if request.method == "POST":
        form = ToDoItemForm(request.POST)
        if form.is_valid():
            new_todo = {
                "text": form.cleaned_data["text"],
                "due_date": datetime.combine(form.cleaned_data["due_date"], time())
            }
            db = get_db_handle()
            db.insert_one(new_todo)
            return redirect('today')
    else:
        form = ToDoItemForm()

    return render(request, "todo/add.html", {"form": form})
Here’s the breakdown:
- If the
add_todoview receives a POST request, it assigns theToDoItemFormdata toform(lines 6–7). - It first ensures the posted form data is valid, and then creates a dictionary from the form data (lines 8–12).
- It connects to MongoDB via the
get_db_handlemethod, and inserts a new record into the database (lines 13–14). - If it’s not a POST request, it simply returns a blank form (line 16).
If you’re using MongoEngine, the code will be shorter as you can use the built-in save() method available in MongoEngine documents:
from django.shortcuts import redirect, render
from .forms import ToDoItemForm
...

def add_todo(request):
    if request.method == "POST":
        form = ToDoItemForm(request.POST)
        if form.is_valid():
            new_todo = ToDoItem(text=form.cleaned_data["text"], due_date=form.cleaned_data["due_date"])
            new_todo.save()
            return redirect("today")
    else:
        form = ToDoItemForm()

    return render(request, "todo/add.html", {"form": form})
The reference to the template file add.html in the return statement should be highlighted with a yellow squiggly line. Hover over it and select Create template todo/add.html.
The template will open in the editor. Fill it with the following HTML code:
{% extends "base.html" %}
{% block content %}
    <h1>Add new to-do:</h1>
    <form method="post">
        {% csrf_token %}
        {{ form.text.label_tag }} {{ form.text }}
        <br>
        {{ form.due_date.label_tag }} {{ form.due_date }}
        <br>
        <button type="submit">Submit</button>
    </form>
{% endblock %}
Update base.html by adding a button for creating new tasks:
<div>
    <a class="button" href='{% url "index" %}'>All tasks</a>
    <a class="button" href='{% url "today" %}'>Today</a>
    <a class="button" href='{% url "add" %}'>Add</a>
</div>
Update todo/urls.py to allow yourself to access the page for adding tasks in the browser:
urlpatterns = [
    path("", views.AllToDos.as_view(), name="index"),
    path("today/", views.TodayToDos.as_view(), name="today"),
    path("add/", views.add_todo, name="add")
]
Finally, it’s time to test the new feature in the browser! Go to http://localhost:8000/todo/add/ and add a task:
Conclusion
If you’ve followed all of the steps in this tutorial, you have successfully connected a basic Django project with MongoDB by using two libraries: PyMongo and MongoEngine.
As you already know, MongoEngine is actually based on PyMongo. So, what’s the difference, and how do you choose the right way for your Django project? We’ve summarized the advantages and disadvantages of each method in the following table:
| MongoEngine | PyMongo | |
|---|---|---|
| Access to collections | Document classes are mapped to collections | Collections are accessed through MongoClient |
| Querying | Chained queries: ToDoItem.objects.filter(due_date=date.today()) | Dictionary style queries: db.find({"due_date": today}).sort("due_date") |
| Performance | Slightly slower because of Object-Document Mapping | Faster thanks to using Python dictionaries as data models |
| Usage complexity | Simplifies usage by adding an extra level of abstraction and providing an ORM-like experience | Requires a deeper understanding of MondoDB’s internal formats |
FAQ
What are Django and MongoDB?
Django and MongoDB are both used in web development but serve different purposes. Django is a high-level Python Web framework that follows the MVT (Model-View-Template) architectural pattern and the DRY (“Don’t Repeat Yourself”) principle.
Is MongoDB good with Django?
Django is optimized for SQL databases. While MongoDB, a NoSQL database, can be integrated through tools like MongoEngine or PyMongo, this can add complexity and limit some native Django features. On the other hand, MongoDB can bring benefits, like flexible data structures and good horizontal scalability. Choosing MongoDB for Django should be based on your specific project needs and readiness to manage potential additional development challenges.
Can you use NoSQL with Django?
Yes, you can use NoSQL databases like MongoDB with Django. However, this can add complexity and might limit some Django features that are optimized for SQL databases. The choice should be based on your specific project requirements and trade-offs.
Which is better, PyMongo or MongoEngine?
PyMongo is faster and offers more direct access to MongoDB, but requires a deeper understanding of MongoDB’s internals. MongoEngine provides a higher-level interface and fits well with Django, but may not support all MongoDB features and can be slower because of abstraction.
Why choose MongoDB over SQL with Django?
MongoDB’s schema flexibility, ability to handle large volumes of data, and unique features like nested objects make it a good fit for certain Django projects. It can scale efficiently across multiple servers. However, using it might limit some of Django’s built-in features that are optimized for SQL databases.
Useful links
PyCharm for Django development
Documentation
- Django support in PyCharm
- Django Structure tool window
- MongoDB documentation
- MongoEngine documentation
- PyMongo documentation
Tutorials
- Python and MongoDB: Connecting to NoSQL Databases
- Python MongoDB at W3Schools
- Create a Django App in PyCharm
Videos
Podcasts
Other
Subscribe to PyCharm Blog updates