Introducing Source Templates

ReSharper’s Live Templates are a very powerful way of generating code. Type the name of a template, hit Tab or select the template from the code completion list, and the text template is expanded and inserted into the editor. Any using statements are automatically added, the code is reformatted and you can tab between interactive, editable fields. To make them even more powerful, each field can be bound to a macro that will provide a code completion list of items that are generated dynamically, or taken from the surrounding context.
For example, the nguid template expands to a newly generated GUID, shown in several formats in a completion list. Other macros will invoke smart completion, suggest a variable name, return the name of the file and so on. Add to this support for multi-file templates, surround templates and the ability to save your own templates to a shared solution settings file, and it’s easy to see how Live Templates can help speed up writing code.
And now ReSharper 9.1 introduces Source Templates, to make it even easier to create your own templates – a Source Template is a Live Template that is defined in your own source code.
But why would we want to do this? Why create templates in source, when we can also create them in the Live Templates editor?
There are a couple of reasons. First, it’s very easy – you just define a Source Template as normal code, in a source file in your solution. This will automatically get picked up by ReSharper when checked in, and you don’t have to touch the .sln.dotSettings file. It doesn’t get any easier than that!
Second, the big difference from traditional Live Templates is that Source Templates are also extension methods. This means that your Source Template will be strongly typed – both ReSharper and the compiler will verify that the code is correct, doesn’t have typos, includes the right using statements, and of course you get all the usual ReSharper goodness while editing your template – code completion, inspections, navigation and best of all, the template is updated if code is refactored.
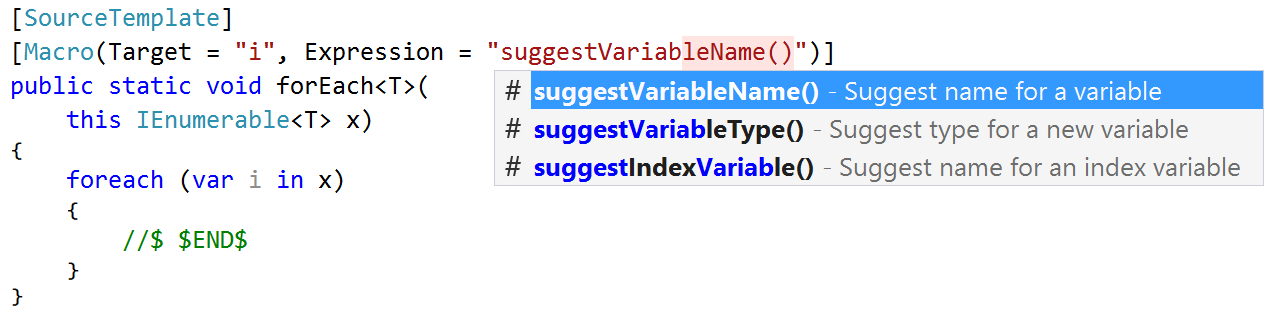
Making the Source Template an extension method has an interesting effect on how it’s invoked. Traditional Live Templates can only be invoked at certain places, usually at the start of a declaration, statement or expression. A Source Template is invoked as an extension method. That is, a Source Template will be available only after you press “.” on a compatible expression – similar to the way the PostFix plugin’s functionality is invoked. For example, the traditional foreach Live Template is available only where you would normally enter a foreach statement (but not in an if statement, or inside a call to Console.Write). In contrast, the example foreach Source Template shown above is available as though it were an extension method, and appears in the completion list after typing “.” following an expression or variable of type IEnumerable<T>. The expression used as the target of the extension method replaces all usages of the extension parameter in the template.
This opens up a very different use case for Source Templates as opposed to Live Templates. You can now create templates that are specific to a type – so the foreach template will only apply to objects or expressions that implement IEnumerable<T>. Other Source Templates can be targeted at other types, simply by changing the type that the extension method extends. Think of templates that only operate on strings, or objects that implement INotifyPropertyChanged or IObservable<T>, or make them available to all objects by extending System.Object.
So how do you create a Source Template? Once you’ve created an extension method, you’ll need to mark it with the [SourceTemplate] attribute. This is one of ReSharper’s annotation attributes, similar to [NotNull] and [CanBeNull] which ReSharper can use to to improve analysis inspections and suggestions.
The simplest way to get the annotations is to add a reference to the JetBrains.Annotations nuget package. This is the official JetBrains annotations package, and adds a .dll that contains all of the attributes that ReSharper understands. And don’t worry about adding extra binary dependencies! This package applies the [Conditional] attribute to the annotation attributes, which means that they don’t end up compiled into your assembly. You can deploy your code without copying JetBrains.Annotations.dll.
Once your extension method has been defined as a Source Template, you can also add fields and macros that you can edit and tab between. Fields can be defined as parameters on the extension method, and occurrences inside the method become editable when the template is invoked. You can bind a macro to the parameter with the [Macro] annotation attribute, using the Expression parameter to specify which macro to use (and of course ReSharper gives you code completion here). Alternatively, you can bind a macro to a variable in the extension method, which allows for a macro to suggest the name of a variable, for example, by specifying the Target parameter of the [Macro] attribute. And the Editable parameter allows control over which usage of the field in the method body is editable, even allowing the value to be marked as non-editable.
If you’re familiar with traditional Live Templates, you’ll be aware of the syntax of referring to fields (e.g. $value$) and the use of special predefined field names such as $END$ to specify the final location of the text caret after the template is fully expanded. Source Templates still support these special variables, and the field name syntax, as long as it remains valid C#. For example, you can set the final location of the text caret to be in a string literal: string.Format(“$END$”);. But to use the value of a field called foo in a variable name, you’d normally need to write var valueOf$foo$ = GetFoo();, which isn’t valid C#. In order to handle these cases, you can use an “expanding comment.” This is a special comment that begins with a dollar sign (//$ … or /*$ … */). Any text that is inside one of these comments is inserted into the template when it’s invoked, and anything in the standard field syntax ($foo$) is also expanded. For example, //$ var valueOf$foo$ = GetFoo();.
The help site contains more details on defining Source Templates, including how to specify which macro to bind to a field. And to help you get started writing your own templates, here are some samples:
using System;
using System.Collections.Generic;
using JetBrains.Annotations;

namespace SourceTemplates
{
  public static class Demo
  {
    [SourceTemplate]
    public static void argex(this object x)
    {
      if(x == null)
        throw new ArgumentNullException("$x$ is null");
    }

    [SourceTemplate]
    public static void ifnull(this object x)
    {
      if (x == null)
      {
        //$ $END$
      }
    }

    [SourceTemplate]
    [Macro(Target = "i", Expression = "suggestVariableName()")]
    public static void forEach<T>(this IEnumerable<T> x)
    {
      foreach (var i in x)
      {
        //$ $END$
      }
    }

    [SourceTemplate()]
    public static void EnumerateBoth<T1, T2>(this IEnumerable<T1> c1, IEnumerable<T2> c2)
    {
      var e1 = c1.GetEnumerator();
      var e2 = c2.GetEnumerator();
      while (e1.MoveNext() && e2.MoveNext())
      {
        var el1 = e1.Current;
        var el2 = e2.Current;
        //$ $END$
      }
    }

    [SourceTemplate]
    public static void something(this Entity x, [Macro(Expression="guid()", Editable = -1)] string newguid)
    {
      // Create a variable with a name based on the expression, of type Entity,
      // used to invoke the template.
      // The newguid parameter is a field that's bound to the "guid()" macro
      // that generates a new GUID. It's also marked as not editable. Any
      // usage of the newguid parameter is replaced with the GUID value,
      // as plain text (which will be invalid C#)
      // "$newguid$" inserts the contents of the newguid field into a string literal
      // E.g. person.something => expands to (with a different guid):
      //
      // var personId = "79D6D739-3079-45C9-A011-8A623AB61B86" + person.ToString();
      // person.DoSomething(personId);
      //
      // Note that these explaining comments would get expanded too!

      /*$ var $x$Id = "$newguid$" + x.ToString();
      x.DoSomething($x$Id); */
    }
  }
}
Subscribe to a monthly digest curated from the .NET Tools blog:


