

JetBrains AI
Supercharge your tools with AI-powered features inside many JetBrains products
Koog × A2A:使用 Kotlin 构建互联的 AI 智能体

如果您曾尝试过构建由多个 AI 智能体组成的系统,很可能会遇到难题。 一开始很简单:您有一个智能体负责撰写博文,另一个智能体负责校对博文,或许还有第三个智能体负责建议或生成图像。 单独来看,它们都很高效。 但要让它们协同工作呢? 往往这个时候就会开始出现问题。
每个智能体都有自己的一套“语言”:一个使用不同的 API 接口,另一个有自己的消息格式,而且它们可能都有特定的身份验证要求。 要让它们彼此通信,就意味着需要为每一个连接编写自定义的集成代码。 结果,您无法专注于让各个智能体变得更智能、更快速或更有用,而是被困在为它们搭建沟通桥梁上。
A2A 的作用:跨智能体通信层
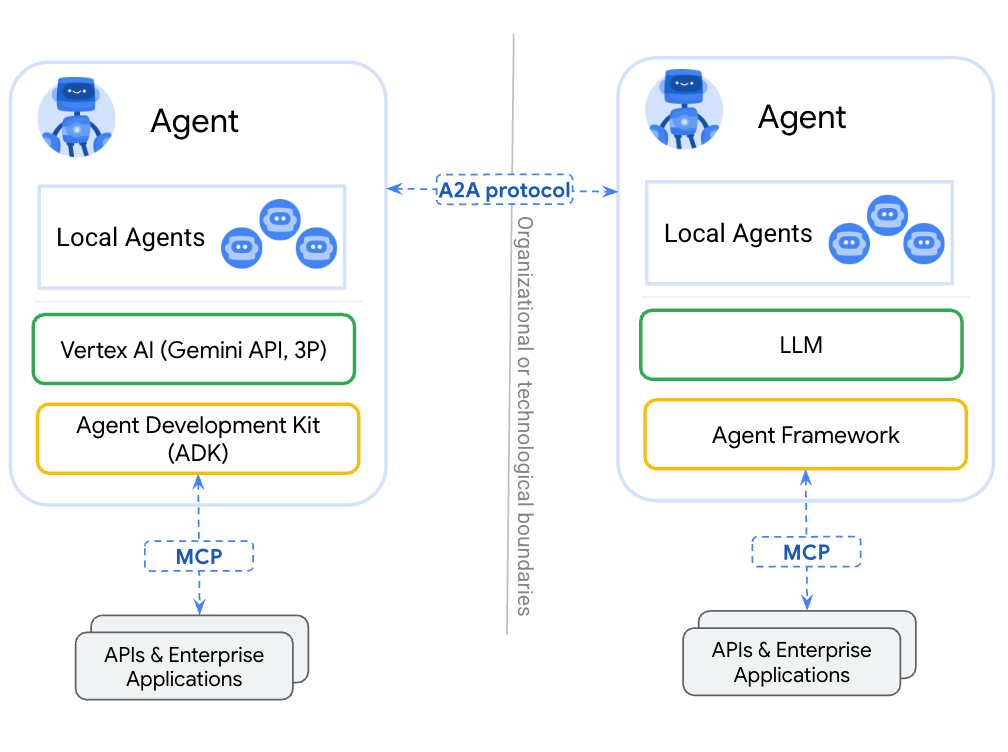
这就是 Agent2Agent (A2A) 协议发挥作用的地方。
借助 A2A,您的智能体可以通过标准化协议直接通信,相当于为您的 AI 生态系统提供了一个通用的翻译器。 您的博客撰写智能体可以无缝地将内容传递给校对智能体,校对智能体再触发图像生成智能体,而校对智能体可能会循环返回修正意见,图像生成智能体则可能会请求风格澄清。 所有这些都通过一个统一的通信层进行编排。
A2A 无需管理数十个点对点连接,它提供了以下功能:
- 即插即用连接:智能体可以自动发现彼此并建立连接。
- 标准化消息发送:统一的格式、清晰的协议,没有翻译难题。
- 内置编排:只需定义一次工作流,然后让 A2A 来处理协调工作。
- 不增加复杂度的可扩缩性:添加或重用智能体,无需重写现有连接。
结果是什么? 您可以将时间花在提升智能体的功能上,而不是调试它们之间的通信。 最棒的是,您可以使用任何喜欢的语言或框架来实现智能体。 对于 JVM 用户来说,Koog 是一个绝佳选择,从 0.5.0 版本开始,它与 A2A 生态系统无缝集成。
Koog 的作用:内部编排引擎
Koog 是一个基于 Kotlin 的框架,用于构建针对 JVM、Android、iOS、WebAssembly 和浏览器内应用程序的 AI 智能体。 它擅长以下方面:
- 复杂工作流管理:设计基于图的策略,支持循环、分支、回退和并行分支执行。
- 随时可用的组件:内置节点支持调用 LLM 和外部工具、总结消息历史记录以及执行完整策略。
- 工具编排:将代码中的任何函数转换为 AI 智能体可以使用的工具,支持顺序执行甚至并行执行。
- 原生 MCP 集成:使用 Kotlin MCP SDK 无缝连接到任何 MCP 服务器。
- 内存和存储支持:对智能体内存和 RAG(检索增强生成)工作流的内置支持,具备高效的上下文管理。
- 容错能力:内置重试、检查点设置、恢复机制和状态持久性,以确保可靠执行。
- 可观测性:完整的智能体事件处理、日志记录,以及对 OpenTelemetry 的支持,并具有与 Langfuse 和 W&B Weave 的内置集成。
简而言之,Koog 非常适合构建可靠的 AI 智能体。
为何将 Koog 与 A2A 结合使用
Koog 和 A2A 覆盖了 AI 智能体堆栈的不同层。 将两者结合使用时,它们可以相互补充,填补彼此的空白。
Koog 已经解决了现实企业应用中 AI 编排最复杂的部分。
A2A 则补上了缺失的一环:它使您的 Koog 智能体能够与生态系统中任何其他兼容 A2A 的智能体进行通信。 无需为每个外部服务构建自定义集成,Koog AI 工作流可以自动发现并使用其他智能体。
结果是完美匹配:Koog 的高级工作流成为任何智能体都可以请求的 A2A 任务,同时您的 Koog 智能体可以充分利用 A2A 生态系统的全部能力。 而且由于 Koog 可以在后端、设备端和浏览器内环境中运行,您能够以前所未有的广度和效率交付互联互通的 AI。
这是如何实现的? 我们来看看吧!
A2A 协议
A2A 协议定义了智能体间通信的基本要素:
- 通过标准化智能体卡片(描述其功能的 JSON 文档)实现智能体发现。
- 使用一致的架构进行请求和响应的消息格式。
- 具有清晰状态的任务生命周期管理:已提交 → 进行中 → 已完成/失败。
- 支持 JSON-RPC、gRPC 和 REST 等的传输层。
- 使用标准 OAuth2、API 密钥和 JWT 令牌的安全方案。
- 使用标准化错误代码的错误处理。
智能体卡片:数字名片
A2A 生态系统中的每个智能体都会通过一张“智能体卡片”来发布其功能。这种卡片是一个标准化 JSON 文件,托管在智能体域上的特定 URL 下,例如:/.well-known/agent-card.json。 智能体卡片相当于数字名片,能让其他智能体发现其提供的服务。
智能体卡片通常包含以下内容:
- 基本信息:比如智能体名称、描述和版本。
- 技能:智能体能做什么(例如,起草文档、校对文本、分析数据和生成图像)。
- 端点:如何联系该智能体。
- 其他可选信息:已启用的功能、身份验证等。
这种发现机制省去了手动集成工作的需要。 当一个智能体需要特定技能时,它只需检查相关的智能体卡片,就能了解如何与该服务进行交互。
在 Koog 中,智能体卡片使用 Kotlin 数据类进行定义:
val agentCard = AgentCard(
    name = "Blog Writer",
    description = "创建高质量博文和文章的 AI 智能体",
    url = "https://api.blog-writer.com/a2a/v1",
    version = "1.0.0",
    capabilities = AgentCapabilities(streaming = true),
    defaultInputModes = listOf("text/plain"),
    defaultOutputModes = listOf("text/markdown"),
    skills = listOf(
        AgentSkill(
            id = "write-post",
            name = "Blog Post Writing",
            description = "生成任何主题的精彩博文",
            tags = listOf("writing", "content", "blog"),
            examples = listOf("Write a post about AI trends")
        )
    )
)
通用消息传递:一个简单的模式
A2A 为所有智能体间通信使用单一的标准化消息格式。 这种简洁性非常强大,智能体无需学习数十种不同的 API,只需理解一种通信模式即可。
每次交互都遵循相同的流程:
- 发送带有任务请求和参数的消息。
- 接收即时结果或用于跟踪的任务。
- 对于较长时间的操作,通过实时通道获取动态。
这种通用方式意味着添加新的智能体功能时无需更改通信协议。 无论您是让智能体总结文本还是生成复杂报告,消息结构始终保持一致。
在 Koog 中,使用已实现的对象和协议创建和发送消息非常简单:
val message = Message(
    role = Role.User,
    parts = listOf(
        TextPart("撰写一篇关于 AI 智能体未来的博文")
    ),
    contextId = "blog-project-456"
)

val request = Request(
    data = MessageSendParams(
        message = message,
        configuration = MessageConfiguration(
            blocking = false, // 获得第一次回答
            historyLength = 5 // 包括上下文
        )
    )
)

val response = client.sendMessage(request)
消息格式通过不同的 Part 类型支持丰富内容,包括用于纯文本内容的 TextPart、用于文件附件的 FilePart,以及用于结构化 JSON 数据的 DataPart。
这种统一结构意味着您的 Koog 智能体能够与任何兼容 A2A 的智能体无缝通信,无论目标智能体用于文本处理、文件分析还是复杂的数据转换。
任务生命周期:智能工作流
A2A 会根据任务的复杂性和持续时间智能管理不同类型的工作:
即时消息:像文本格式设置或快速计算这样的简单操作会直接在 AI 的回答中返回结果。 无需等待或跟踪。
长时间运行的任务:文档分析或多步骤工作流之类的复杂操作会被调度并返回一个任务。 发出请求的智能体随后可以监控进度并在任务完成后检索结果。
实时动态:对于耗时较长的操作,服务器发送事件 (SSE) 会提供实时进度更新。 这使智能体能够随时了解最新情况,而无需持续进行轮询。
class BlogWriterExecutor : AgentExecutor {
    override suspend fun execute(
        context: RequestContext,
        eventProcessor: SessionEventProcessor
    ) {
        val task = Task(
            contextId = context.contextId,
            status = TaskStatus(
                state = TaskState.Submitted,
                message = Message(
                    role = Role.Agent,
                    parts = listOf(TextPart("已收到博文撰写请求")),
                    contextId = context.contextId,
    			taskId = context.taskId,
                )
            )
        )

        eventProcessor.sendTaskEvent(task)
	 ...
    }
}
内置安全性:仅采用行业标准
A2A 并未重新发明安全机制。 相反,它依赖于经过验证且被广泛采用的标准,如 OAuth2、API 密钥和标准 HTTPS。
这种方式意味着开发者无需学习新的身份验证方案。 如果您了解现代 Web API 的安全性,您就已经了解了 A2A 的安全性。 该系统继承了这些既定标准所带来的所有工具、最佳做法与安全审核。
"securitySchemes": {
   "google": {
       "openIdConnectUrl": "https://accounts.google.com/.well-known/openid-configuration",
       "type": "openIdConnect"
   }
}
class AuthorizedA2AServer(
    agentExecutor: AgentExecutor,
    agentCard: AgentCard,
    agentCardExtended: AgentCard? = null,
    taskStorage: TaskStorage = InMemoryTaskStorage(),
    messageStorage: MessageStorage = InMemoryMessageStorage(),
    private val authService: AuthService, // 负责身份验证的服务
) : A2AServer(
    agentExecutor = agentExecutor,
    agentCard = agentCard,
    agentCardExtended = agentCardExtended,
    taskStorage = taskStorage,
    messageStorage = messageStorage,
) {

    private suspend fun authenticateAndAuthorize(
        ctx: ServerCallContext,
        requiredPermission: String
    ): AuthenticatedUser {
        val token = ctx.headers["Authorization"]?.firstOrNull()
            ?: throw A2AInvalidParamsException("缺少授权令牌")

        val user = authService.authenticate(token)
            ?: throw A2AInvalidParamsException("授权令牌无效")

        if (requiredPermission !in user.permissions) {
            throw A2AUnsupportedOperationException("权限不足")
        }

        return user
    }

   override suspend fun onSendMessage(
        request: Request,
        ctx: ServerCallContext
    ): Response {
        val user = authenticateAndAuthorize(ctx, requiredPermission = "send_message")

        // 通过上下文状态将用户数据传递给智能体执行器
        val enrichedCtx = ctx.copy(
            state = ctx.state + (AuthStateKeys.USER to user)
        )

        // 委托给具有丰富上下文的父实现
        return super.onSendMessage(request, enrichedCtx)
    }

   // 其余的封装 A2A 方法
   // ...
}
如何将 Koog 智能体与 A2A 集成
Koog 框架内置了 A2A 客户端和服务器。 这意味着您的 Koog 智能体可以与其他支持 A2A 的智能体无缝通信,同时也能让自己被外界发现。 下面是一个简单的示例,展示了如何实现这一点。
如何将 Koog 智能体封装到 A2A 服务器中
第一步,为智能体定义一个策略。 Koog 提供了方便的转换器(toKoogMessage 和 toA2AMessage),可以在 Koog 消息格式与 A2A 消息格式之间进行无缝转换,而无需手动序列化。 专用节点(如 nodeA2ASendMessage)会处理消息交换过程,这就使通信工作流的实现变得简单直接:
fun blogpostWritingStrategy() = strategy("blogpost-writer-strategy") {
    val blogpostRequest by node { input ->
        val userMessage = input.toKoogMessage().content

        llm.writeSession {
            user {
                +"根据用户的要求撰写一篇博文"
                +xml {
                    tag("user_request") {
                        +userMessage
                    }
                }
            }

            requestLLM().toA2AMessage()
        }
    }

    val sendMessage by nodeA2ARespondMessage()

    nodeStart then blogpostRequest then sendMessage the nodeFinish
}
第二步,定义智能体本身。 安装 A2AServer 功能后,您的智能体就变得可被发现并且可被生态系统中的其他智能体访问,从而能够创建复杂的网络,让各种专用智能体进行无缝协作。
fun createBlogpostWritingAgent(
    requestContext: RequestContext,
    eventProcessor: SessionEventProcessor
): AIAgent {
     // 获取当前对话上下文中的现有消息
     val messageHistory = requestContext.messageStorage.getAll().map { it.toKoogMessage() }

     val agentConfig = AIAgentConfig(
        prompt = prompt("blogpost") {
            system("You are a blogpost writing agent")

            messages(messageHistory)
        },
        model = GoogleModels.Gemini2_5Flash,
        maxAgentIterations = 5
    )

    return agent = AIAgent(
        promptExecutor = MultiLLMPromptExecutor(
            LLMProvider.Google to GoogleLLMClient(System.getenv("GOOGLE_API_KEY")),
        ),
        strategy = blogpostWritingStrategy(),
        agentConfig = agentConfig
    ) {
        install(A2AAgentServer) {
            this.context = requestContext
            this.eventProcessor = eventProcessor
        }

        handleEvents {
            onAgentFinished { ctx ->
                // 使用来自智能体的回答更新当前对话上下文
                val resultMessge = ctx.result as A2AMessage
                requestContext.messageStorage.save(resultMessge)
            }
        }
    }
}
第三步,我们需要将智能体封装到执行器中,然后定义一个服务器。
class BlogpostAgentExecutor : AgentExecutor {
    override suspend fun execute(
        context: RequestContext,
        eventProcessor: SessionEventProcessor
    ) {
        createBlogpostWritingAgent(context, eventProcessor)
            .run(context.params.message)
    }
}

val a2aServer = A2AServer(
    agentExecutor = BlogpostAgentExecutor(),
    agentCard = agentCard,
)
最后一步是定义服务器传输并运行该服务器。
val transport = HttpJSONRPCServerTransport(
    requestHandler = a2aServer
)

transport.start(
    engineFactory = Netty,
    port = 8080,
    path = "/a2a",
    wait = true,
    agentCard = agentCard,
    agentCardPath = A2AConsts.AGENT_CARD_WELL_KNOWN_PATH
)
现在,您的智能体已准备好处理请求了!
如何从 Koog 智能体调用其他支持 A2A 的智能体
首先,您需要配置一个 A2A 客户端,并连接它以获取智能体卡片。
val agentUrl = "https://example.com"

val cardResolver = UrlAgentCardResolver(
    baseUrl = agentUrl,
    path = A2AConsts.AGENT_CARD_WELL_KNOWN_PATH,
)

val transport = HttpJSONRPCClientTransport(
    url = agentUrl,
)

val a2aClient = A2AClient(
    transport = transport,
    agentCardResolver = cardResolver
)

// 初始化客户端并获取卡片
a2aClient.connect()
然后,您可以在您的策略中使用 nodeA2ASendMessage 或 nodeA2ASendMessageStreaming 来调用这些客户端,并接收消息或任务响应。
val agentId = "agent_id"
val agent = AIAgent(
    promptExecutor = MultiLLMPromptExecutor(
        LLMProvider.Google to GoogleLLMClient(System.getenv("GOOGLE_API_KEY")),
    ),
    strategy = strategy("a2a") {
        val nodePrepareRequest by node<String, A2AClientRequest> { input ->
            A2AClientRequest(
                agentId = agentId,
                callContext = ClientCallContext.Default,
                params = MessageSendParams(
                    message = A2AMessage(
                        messageId = Uuid.random().toString(),
                        role = Role.User,
                        parts = listOf(
                            TextPart(input)
                        )
                    )
                )
            )
        }
        val nodeA2A by nodeA2AClientSendMessage(agentId)

        val nodeProcessResponse by node {
            // Process event
            when (it) {
                is A2AMessage -> it.parts
                    .filterIsInstance()
                    .joinToString(separator = "n") { it.text }

                is Task -> it.artifacts
                    .orEmpty()
                    .flatMap { it.parts }
                    .filterIsInstance()
                    .joinToString(separator = "n") { it.text }
            }
        }

        nodeStart then nodePrepareRequest then nodeA2A then nodeProcessResponse then nodeFinish

    },
    agentConfig = agentConfig
) {
   install(A2AAgentClient) {
        this.a2aClients = mapOf(agentId to client)
    }
}

agent.run("撰写关于 A2A 和 Koog 集成的博文")
后续步骤
如需深入了解 Koog 和 A2A,请查看以下实用资料:
本博文英文原作者:
Subscribe to JetBrains AI Blog updates

Discover more


Koog × A2A: Kotlin으로 구현하는 상호 연동되는 AI 에이전트

여러 AI 에이전트로 구성된 시스템을 구축해 보았다면, 아마도 문제를 겪어 보셨을 겁니다. 처음에는 꽤 단순하게 시작합니다. 한 에이전트는 블로그 게시물을 작성하고, 다른 에이전트는 이를 교정하며, 아마도 세 번째 에이전트는 이미지를 제안하거나 생성하도록 했다고 가정해 보겠습니다. 개별적으로 보면, 각 에이전트는 자기 일을 효과적으로 해냅니다. 하지만 함께라면 어떨까요? 여기서 문제가 생기기 시작합니다.
각 에이전트는 자신의 ‘언어’를 사용합니다. 한 에이전트는 상이한 API 인터페이스를 사용하고, 다른 에이전트는 고유한 메시지 형식을 가지고 있으며, 이 모두에 특정한 인증 요건이 있을 수 있습니다. 따라서 이들이 서로 소통하게 하려면 각 연결마다 그에 맞는 통합 코드를 작성해야 합니다. 하지만 가교를 만드는 일에 묶여 정작 에이전트를 더 지능적이고 빠르며 유용하게 만드는 데는 소홀하게 됩니다.
A2A의 역할: 에이전트 간 커뮤니케이션 계층
여기서 Agent2Agent(A2A) 프로토콜의 효용성이 발휘됩니다.
AI 에코시스템을 위한 범용 번역사 역할을 하는 A2A를 이용하면 에이전트가 표준화된 프로토콜을 통해 직접 소통할 수 있습니다. 블로그 작성 에이전트는 콘텐츠를 교정 에이전트에게 매끄럽게 전달하고, 이 과정에서 이미지 생성 에이전트가 트리거됩니다. 교정 에이전트는 수정 사항을 되돌려 보내며, 이미지 생성 에이전트는 스타일 관련 세부 지침을 요청합니다. 즉, 하나의 통합된 커뮤니케이션 계층을 통해 모든 작업이 조정됩니다.
A2A는 수십 개의 단일 연결을 관리하는 대신 다음을 제공합니다.
- 플러그앤플레이 연결: 에이전트가 서로를 자동으로 검색하고 연결
- 표준화된 메시징: 단일 형식, 명확한 프로토콜 및 변환 필요성 해소
- 오케스트레이션 내장: 워크플로만 정의하면 A2A가 알아서 조율
- 복잡성 없이 확장: 기존 연결을 수정하지 않고 에이전트를 추가하거나 재사용
결과는 어떨까요? 커뮤니케이션을 디버그하는 대신 에이전트의 기능을 개선하는 데 시간을 할애할 수 있습니다. 무엇보다 원하는 어떤 언어나 프레임워크로든 에이전트를 구현할 수 있습니다. JVM 사용자의 경우, Koog가 가장 많은 선택을 받으며 버전 0.5.0 기준으로 A2A 에코시스템과 원활하게 통합됩니다.
Koog의 역할: 내부 오케스트레이션 엔진
Koog는 JVM, Android, iOS, WebAssembly 및 브라우저 내 애플리케이션을 타깃으로 AI 에이전트를 구축하기 위한 Kotlin 기반 프레임워크입니다. 장점은 다음과 같습니다.
- 복잡한 워크플로 관리: 루프, 브랜치, 폴백 및 병렬 브랜치 실행의 도움을 받아 그래프 기반의 전략을 설계합니다.
- 바로 사용할 수 있는 구성 요소: LLM과 외부 도구를 호출하고, 메시지 내역을 요약하며 전체 전략을 실행하는 데 내장 노드를 활용할 수 있습니다.
- 도구 오케스트레이션: 코드의 어떤 함수든 AI 에이전트가 사용할 수 있는 도구로 전환합니다. 순차적으로, 또는 동시적으로도 가능합니다.
- 네이티브 MCP 통합: Kotlin MCP SDK를 사용하는 모든 MCP 서버에 원활하게 연결합니다.
- 메모리 및 스토리지 지원: 효율적인 컨텍스트 관리와 함께 에이전트 메모리와 RAG(Retrieval-Augmented Generation) 워크플로를 기본적으로 지원합니다.
- 내결함성: 재시도, 검사점 실행, 복구 메커니즘 및 상태 지속성이 기본 제공되어 안정적인 실행을 보장합니다.
- 관찰 가능성: 전체 에이전트 이벤트 처리, 로깅을 제공하며, Langfuse 및 W&B Weave와의 기본 통합을 통해 OpenTelemetry를 지원합니다.
간단히 말해서, Koog는 AI 에이전트를 안정적으로 구축하기에 매우 좋습니다.
Koog를 A2A와 함께 사용하는 이유
Koog와 A2A는 AI 에이전트 스택의 서로 다른 계층을 처리합니다. 따라서 함께 사용했을 때 서로를 보완하고 빈틈을 채웁니다.
Koog는 실제 엔터프라이즈 사용에 필요한 AI 오케스트레이션에서 가장 어려운 부분을 해결합니다.
A2A가 채워주는 부족한 부분: Koog 에이전트가 에코시스템의 다른 A2A 호환 에이전트와 소통할 수 있게 해줍니다. 각 외부 서비스에 대해 맞춤화된 통합을 구축하는 대신 Koog AI 워크플로는 다른 에이전트를 자동으로 찾아 사용할 수 있습니다.
결과는 완벽한 결합: Koog의 고급 워크플로는 모든 에이전트가 요청할 수 있는 A2A 작업이 되고, Koog 에이전트는 A2A 에코시스템을 완벽하게 활용할 수 있습니다. 또한 Koog는 백엔드, 기기 내 및 브라우저 내 환경에서 실행되므로 서로 연결된 AI를 이전보다 더 폭넓고 효과적으로 전달할 수 있습니다.
이것이 어떻게 가능할까요? 함께 살펴보겠습니다!
A2A 프로토콜
A2A 프로토콜은 에이전트 간 커뮤니케이션의 필수 구성 요소를 정의합니다.
- 표준화된 에이전트 카드(기능을 설명하는 JSON 문서)를 통한 에이전트 검색
- 일관된 스키마를 가진 요청 및 응답 메시지 형식
- 제출 → 작업 → 완료/실패의 명확한 상태를 통한 작업 수명 주기 관리
- JSON-RPC, gRPC, REST 등의 전송 계층
- 표준 OAuth2, API 키 및 JWT 토큰을 이용한 보안 체계
- 표준화된 오류 코드를 이용한 오류 처리
에이전트 카드: 디지털 명함
A2A 에코시스템의 모든 에이전트는 ‘에이전트 카드’로 자신의 기능을 게시합니다. 에이전트 카드는 에이전트 도메인의 일부 URL(예: /.well-known/agent-card.json)에서 호스팅되는 표준화된 JSON 파일입니다. 디지털 명함 역할을 하는 이 에이전트 카드를 통해 다른 에이전트가 해당 에이전트의 역할을 알 수 있습니다.
에이전트 카드에는 일반적으로 다음이 포함됩니다.
- 기본 정보: 에이전트 이름, 설명, 버전 등
- 능력: 에이전트가 제공할 수 있는 서비스(예: 문서 초안 작성, 텍스트 교정, 데이터 분석, 이미지 생성)
- 엔드포인트: 에이전트에 연결하는 방법
- 기타 선택적 정보: 사용 가능한 기능, 인증 등
이러한 검색 메커니즘이 있으므로 직접 통합하는 작업이 필요하지 않습니다. 어떤 특정한 스킬이 필요한 경우, 에이전트는 간단히 관련이 있는 에이전트 카드를 찾아 이 서비스와 상호 작용하는 방법을 파악합니다.
Koog에서 에이전트 카드는 Kotlin 데이터 클래스를 이용해 정의됩니다.
val agentCard = AgentCard(
    name = "Blog Writer",
    description = "AI agent that creates high-quality blog posts and articles",
    url = "https://api.blog-writer.com/a2a/v1",
    version = "1.0.0",
    capabilities = AgentCapabilities(streaming = true),
    defaultInputModes = listOf("text/plain"),
    defaultOutputModes = listOf("text/markdown"),
    skills = listOf(
        AgentSkill(
            id = "write-post",
            name = "Blog Post Writing",
            description = "Generate engaging blog posts on any topic",
            tags = listOf("writing", "content", "blog"),
            examples = listOf("Write a post about AI trends")
        )
    )
)
범용 메시징: 하나의 간단한 패턴
A2A는 에이전트와의 모든 커뮤니케이션에 하나의 표준화된 메시지 형식을 사용합니다. 이러한 단순성은 매우 강력한데, 에이전트는 수십 개의 API를 알 필요 없이 하나의 커뮤니케이션 패턴만 이해하면 되기 때문입니다.
각각의 상호 작용은 동일한 흐름을 따릅니다.
- 작업 요청과 매개변수를 포함한 메시지 보내기
- 즉각적인 결과 또는 추적할 수 있는 작업 수신
- 긴 작업의 경우 실시간 채널을 통해 업데이트 수신
이러한 범용적 접근 방식을 따르면 새로운 에이전트 기능을 추가해도 커뮤니케이션 프로토콜을 변경할 필요가 없습니다. 에이전트에게 텍스트를 요약하거나 복잡한 보고서를 생성하도록 요청하는 모든 경우에 메시지 구조는 일관되게 유지됩니다.
Koog에서는 이미 구현된 객체와 프로토콜을 이용하므로 메시지를 생성하고 보내는 과정이 단순합니다.
val message = Message(
    role = Role.User,
    parts = listOf(
        TextPart("Write a blog post about the future of AI agents")
    ),
    contextId = "blog-project-456"
)

val request = Request(
    data = MessageSendParams(
        message = message,
        configuration = MessageConfiguration(
            blocking = false, // 첫 번째 응답 가져오기
            historyLength = 5 // 컨텍스트 포함
        )
    )
)

val response = client.sendMessage(request)
다양한 Part 타입을 통해 메시지 형식에 풍부한 콘텐츠가 지원됩니다. 예를 들어, 일반 텍스트의 경우 TextPart, 첨부 파일의 경우 FilePart, 구조화된 JSON 데이터의 경우 DataPart가 이용됩니다.
이 통합적 구조에 기반하여 Koog 에이전트는 텍스트 처리, 파일 분석 또는 복잡한 데이터 변환 등 모든 작업에서 A2A 호환 에이전트와 원활하게 소통할 수 있습니다.
작업 수명 주기: 스마트 워크플로
A2A는 복잡도와 지속 기간에 따라 다양한 유형의 작업을 지능적으로 관리합니다.
즉각적인 메시지: 텍스트 서식 지정이나 빠른 계산과 같은 단순한 작업의 경우, AI 응답에 바로 결과가 반환됩니다. 기다리거나 추적할 필요가 없습니다.
장기 실행 작업: 문서 분석이나 다단계 워크플로와 같이 복잡한 작업은 일정 계획에 따라 결과가 반환됩니다. 그러면 요청한 에이전트가 진행 상황을 모니터링하고 작업 결과가 준비되면 가져옵니다.
실시간 업데이트: 시간이 많이 소요되는 작업의 경우, Server-Sent Events(SSE)가 실시간으로 진행 상황을 업데이트합니다. 따라서 계속해서 폴링하지 않아도 에이전트가 정보를 지속적으로 수신할 수 있습니다.
class BlogWriterExecutor : AgentExecutor {
    override suspend fun execute(
        context: RequestContext,
        eventProcessor: SessionEventProcessor
    ) {
        val task = Task(
            contextId = context.contextId,
            status = TaskStatus(
                state = TaskState.Submitted,
                message = Message(
                    role = Role.Agent,
                    parts = listOf(TextPart("Blog writing request received")),
                    contextId = context.contextId,
    			taskId = context.taskId,
                )
            )
        )

        eventProcessor.sendTaskEvent(task)
	 ...
    }
}
보안 기능 내장: 업계 표준만 이용
A2A는 보안을 자체적으로 만들지 않습니다. 대신 OAuth2, API 키, 표준 HTTPS 등 널리 수용되고 입증된 표준을 이용합니다.
따라서 개발자는 새로운 인증 체계에 대해 신경 쓸 필요가 없습니다. 현대적 웹 API 보안을 알고 있다면 A2A 보안도 알고 있는 것입니다. 이러한 기존 표준이 제공하는 모든 도구, 모범 사례 및 보안 감사가 시스템에 그대로 적용됩니다.
"securitySchemes": {
   "google": {
       "openIdConnectUrl": "https://accounts.google.com/.well-known/openid-configuration",
       "type": "openIdConnect"
   }
}
class AuthorizedA2AServer(
    agentExecutor: AgentExecutor,
    agentCard: AgentCard,
    agentCardExtended: AgentCard? = null,
    taskStorage: TaskStorage = InMemoryTaskStorage(),
    messageStorage: MessageStorage = InMemoryMessageStorage(),
    private val authService: AuthService, // 인증을 담당하는 서비스
) : A2AServer(
    agentExecutor = agentExecutor,
    agentCard = agentCard,
    agentCardExtended = agentCardExtended,
    taskStorage = taskStorage,
    messageStorage = messageStorage,
) {

    private suspend fun authenticateAndAuthorize(
        ctx: ServerCallContext,
        requiredPermission: String
    ): AuthenticatedUser {
        val token = ctx.headers["Authorization"]?.firstOrNull()
            ?: throw A2AInvalidParamsException("Missing Authorization token")

        val user = authService.authenticate(token)
            ?: throw A2AInvalidParamsException("Invalid Authorization token")

        if (requiredPermission !in user.permissions) {
            throw A2AUnsupportedOperationException("Insufficient permissions")
        }

        return user
    }

   override suspend fun onSendMessage(
        request: Request,
        ctx: ServerCallContext
    ): Response {
        val user = authenticateAndAuthorize(ctx, requiredPermission = "send_message")

        // 컨텍스트 상태를 통해 에이전트 실행자에게 사용자 데이터 전달
        val enrichedCtx = ctx.copy(
            state = ctx.state + (AuthStateKeys.USER to user)
        )

        // 풍부한 컨텍스트를 사용하여 상위 구현에 위임
        return super.onSendMessage(request, enrichedCtx)
    }

   // 나머지 래핑된 A2A 메서드
   // ...
}
Koog 에이전트를 A2A와 통합하는 방법
Koog 프레임워크에는 A2A 클라이언트와 서버가 기본적으로 내장되어 있습니다. 즉, Koog 에이전트는 다른 A2A 지원 에이전트와 원활하게 소통하면서 외부에서도 자신을 검색할 수 있도록 합니다. 이를 구현하는 방법을 보여주는 간단한 예를 들어보겠습니다.
Koog 에이전트를 A2A 서버에 래핑하는 방법
우선, 에이전트에 대한 전략을 정의합니다. Koog는 Koog와 A2A 사이의 원활한 변환을 위한 편리한 변환기(toKoogMessage, toA2AMessage)를 제공하므로 직접 직렬화할 필요가 없습니다. nodeA2ASendMessage와 같은 특수 노드가 메시지 교환 과정을 처리해 주므로 커뮤니케이션 워크플로의 구현이 간단합니다.
fun blogpostWritingStrategy() = strategy("blogpost-writer-strategy") {
    val blogpostRequest by node { input ->
        val userMessage = input.toKoogMessage().content

        llm.writeSession {
            user {
                +"Write a blogpost based on the user request"
                +xml {
                    tag("user_request") {
                        +userMessage
                    }
                }
            }

            requestLLM().toA2AMessage()
        }
    }

    val sendMessage by nodeA2ARespondMessage()

    nodeStart then blogpostRequest then sendMessage the nodeFinish
}
두 번째, 에이전트 자체를 정의합니다. A2AServer 기능을 설치하면 에코시스템의 다른 에이전트가 해당 에이전트를 검색하고 액세스할 수 있게 되어 다수의 특수 에이전트가 원활하게 협력하는 정교한 네트워크가 형성됩니다.
fun createBlogpostWritingAgent(
    requestContext: RequestContext,
    eventProcessor: SessionEventProcessor
): AIAgent {
     // 현재 대화 컨텍스트에 대한 기존 메시지 가져오기
     val messageHistory = requestContext.messageStorage.getAll().map { it.toKoogMessage() }

     val agentConfig = AIAgentConfig(
        prompt = prompt("blogpost") {
            system("You are a blogpost writing agent")

            messages(messageHistory)
        },
        model = GoogleModels.Gemini2_5Flash,
        maxAgentIterations = 5
    )

    return agent = AIAgent(
        promptExecutor = MultiLLMPromptExecutor(
            LLMProvider.Google to GoogleLLMClient(System.getenv("GOOGLE_API_KEY")),
        ),
        strategy = blogpostWritingStrategy(),
        agentConfig = agentConfig
    ) {
        install(A2AAgentServer) {
            this.context = requestContext
            this.eventProcessor = eventProcessor
        }

        handleEvents {
            onAgentFinished { ctx ->
                // 에이전트의 응답으로 현재 대화 컨텍스트 업데이트
                val resultMessge = ctx.result as A2AMessage
                requestContext.messageStorage.save(resultMessge)
            }
        }
    }
}
세 번째, 에이전트를 실행자에 래핑한 다음 서버를 정의해야 합니다.
class BlogpostAgentExecutor : AgentExecutor {
    override suspend fun execute(
        context: RequestContext,
        eventProcessor: SessionEventProcessor
    ) {
        createBlogpostWritingAgent(context, eventProcessor)
            .run(context.params.message)
    }
}

val a2aServer = A2AServer(
    agentExecutor = BlogpostAgentExecutor(),
    agentCard = agentCard,
)
마지막으로, 서버 전송을 정의하고 서버를 실행합니다.
val transport = HttpJSONRPCServerTransport(
    requestHandler = a2aServer
)

transport.start(
    engineFactory = Netty,
    port = 8080,
    path = "/a2a",
    wait = true,
    agentCard = agentCard,
    agentCardPath = A2AConsts.AGENT_CARD_WELL_KNOWN_PATH
)
이제 에이전트가 요청을 처리할 수 있습니다!
Koog 에이전트에서 다른 A2A 지원 에이전트를 호출하는 방법
먼저, A2A 클라이언트를 구성하고 이를 연결하여 에이전트 카드를 가져와야 합니다.
val agentUrl = "https://example.com"

val cardResolver = UrlAgentCardResolver(
    baseUrl = agentUrl,
    path = A2AConsts.AGENT_CARD_WELL_KNOWN_PATH,
)

val transport = HttpJSONRPCClientTransport(
    url = agentUrl,
)

val a2aClient = A2AClient(
    transport = transport,
    agentCardResolver = cardResolver
)

// 클라이언트를 초기화하고 카드를 가져옵니다
a2aClient.connect()
그런 다음, 해당 전략에서 nodeA2ASendMessage 또는 nodeA2ASendMessageStreaming을 사용하여 이러한 클라이언트를 호출하고 메시지 또는 작업 응답을 가져올 수 있습니다.
val agentId = "agent_id"
val agent = AIAgent(
    promptExecutor = MultiLLMPromptExecutor(
        LLMProvider.Google to GoogleLLMClient(System.getenv("GOOGLE_API_KEY")),
    ),
    strategy = strategy("a2a") {
        val nodePrepareRequest by node<String, A2AClientRequest> { input ->
            A2AClientRequest(
                agentId = agentId,
                callContext = ClientCallContext.Default,
                params = MessageSendParams(
                    message = A2AMessage(
                        messageId = Uuid.random().toString(),
                        role = Role.User,
                        parts = listOf(
                            TextPart(input)
                        )
                    )
                )
            )
        }
        val nodeA2A by nodeA2AClientSendMessage(agentId)

        val nodeProcessResponse by node {
            // 프로세스 이벤트
            when (it) {
                is A2AMessage -> it.parts
                    .filterIsInstance()
                    .joinToString(separator = "n") { it.text }

                is Task -> it.artifacts
                    .orEmpty()
                    .flatMap { it.parts }
                    .filterIsInstance()
                    .joinToString(separator = "n") { it.text }
            }
        }

        nodeStart then nodePrepareRequest then nodeA2A then nodeProcessResponse then nodeFinish

    },
    agentConfig = agentConfig
) {
   install(A2AAgentClient) {
        this.a2aClients = mapOf(agentId to client)
    }
}

agent.run("Write blog post about A2A and Koog integration")
다음 단계
Koog와 A2A에 대해 자세히 알아보려면 다음 유용한 자료를 살펴보세요.
게시물 원문 작성자
Subscribe to JetBrains AI Blog updates
Discover more

Koog × A2A: Kotlin으로 구현하는 상호 연동되는 AI 에이전트
여러 AI 에이전트로 구성된 시스템을 구축해 보았다면, 아마도 문제를 겪어 보셨을 겁니다. 처음에는 꽤 단순하게 시작합니다. 한 에이전트는 블로그 게시물을 작성하고, 다른 에이전트는 이를 교정하며, 아마도 세 번째 에이전트는 이미지를 제안하거나 생성하도록 했다고 가정해 보겠습니다. 개별적으로 보면, 각 에이전트는 자기 일을 효과적으로 해냅니다. 하지만 함께라면 어떨까요? 여기서 문제가 생기기 시작합니다.
각 에이전트는 자신의 ‘언어’를 사용합니다. 한 에이전트는 상이한 API 인터페이스를 사용하고, 다른 에이전트는 고유한 메시지 형식을 가지고 있으며, 이 모두에 특정한 인증 요건이 있을 수 있습니다. 따라서 이들이 서로 소통하게 하려면 각 연결마다 그에 맞는 통합 코드를 작성해야 합니다. 하지만 가교를 만드는 일에 묶여 정작 에이전트를 더 지능적이고 빠르며 유용하게 만드는 데는 소홀하게 됩니다.
A2A의 역할: 에이전트 간 커뮤니케이션 계층
여기서 Agent2Agent(A2A) 프로토콜의 효용성이 발휘됩니다.
AI 에코시스템을 위한 범용 번역사 역할을 하는 A2A를 이용하면 에이전트가 표준화된 프로토콜을 통해 직접 소통할 수 있습니다. 블로그 작성 에이전트는 콘텐츠를 교정 에이전트에게 매끄럽게 전달하고, 이 과정에서 이미지 생성 에이전트가 트리거됩니다. 교정 에이전트는 수정 사항을 되돌려 보내며, 이미지 생성 에이전트는 스타일 관련 세부 지침을 요청합니다. 즉, 하나의 통합된 커뮤니케이션 계층을 통해 모든 작업이 조정됩니다.
A2A는 수십 개의 단일 연결을 관리하는 대신 다음을 제공합니다.
- 플러그앤플레이 연결: 에이전트가 서로를 자동으로 검색하고 연결
- 표준화된 메시징: 단일 형식, 명확한 프로토콜 및 변환 필요성 해소
- 오케스트레이션 내장: 워크플로만 정의하면 A2A가 알아서 조율
- 복잡성 없이 확장: 기존 연결을 수정하지 않고 에이전트를 추가하거나 재사용
결과는 어떨까요? 커뮤니케이션을 디버그하는 대신 에이전트의 기능을 개선하는 데 시간을 할애할 수 있습니다. 무엇보다 원하는 어떤 언어나 프레임워크로든 에이전트를 구현할 수 있습니다. JVM 사용자의 경우, Koog가 가장 많은 선택을 받으며 버전 0.5.0 기준으로 A2A 에코시스템과 원활하게 통합됩니다.
Koog의 역할: 내부 오케스트레이션 엔진
Koog는 JVM, Android, iOS, WebAssembly 및 브라우저 내 애플리케이션을 타깃으로 AI 에이전트를 구축하기 위한 Kotlin 기반 프레임워크입니다. 장점은 다음과 같습니다.
- 복잡한 워크플로 관리: 루프, 브랜치, 폴백 및 병렬 브랜치 실행의 도움을 받아 그래프 기반의 전략을 설계합니다.
- 바로 사용할 수 있는 구성 요소: LLM과 외부 도구를 호출하고, 메시지 내역을 요약하며 전체 전략을 실행하는 데 내장 노드를 활용할 수 있습니다.
- 도구 오케스트레이션: 코드의 어떤 함수든 AI 에이전트가 사용할 수 있는 도구로 전환합니다. 순차적으로, 또는 동시적으로도 가능합니다.
- 네이티브 MCP 통합: Kotlin MCP SDK를 사용하는 모든 MCP 서버에 원활하게 연결합니다.
- 메모리 및 스토리지 지원: 효율적인 컨텍스트 관리와 함께 에이전트 메모리와 RAG(Retrieval-Augmented Generation) 워크플로를 기본적으로 지원합니다.
- 내결함성: 재시도, 검사점 실행, 복구 메커니즘 및 상태 지속성이 기본 제공되어 안정적인 실행을 보장합니다.
- 관찰 가능성: 전체 에이전트 이벤트 처리, 로깅을 제공하며, Langfuse 및 W&B Weave와의 기본 통합을 통해 OpenTelemetry를 지원합니다.
간단히 말해서, Koog는 AI 에이전트를 안정적으로 구축하기에 매우 좋습니다.
Koog를 A2A와 함께 사용하는 이유
Koog와 A2A는 AI 에이전트 스택의 서로 다른 계층을 처리합니다. 따라서 함께 사용했을 때 서로를 보완하고 빈틈을 채웁니다.
Koog는 실제 엔터프라이즈 사용에 필요한 AI 오케스트레이션에서 가장 어려운 부분을 해결합니다.
A2A가 채워주는 부족한 부분: Koog 에이전트가 에코시스템의 다른 A2A 호환 에이전트와 소통할 수 있게 해줍니다. 각 외부 서비스에 대해 맞춤화된 통합을 구축하는 대신 Koog AI 워크플로는 다른 에이전트를 자동으로 찾아 사용할 수 있습니다.
결과는 완벽한 결합: Koog의 고급 워크플로는 모든 에이전트가 요청할 수 있는 A2A 작업이 되고, Koog 에이전트는 A2A 에코시스템을 완벽하게 활용할 수 있습니다. 또한 Koog는 백엔드, 기기 내 및 브라우저 내 환경에서 실행되므로 서로 연결된 AI를 이전보다 더 폭넓고 효과적으로 전달할 수 있습니다.
이것이 어떻게 가능할까요? 함께 살펴보겠습니다!
A2A 프로토콜
A2A 프로토콜은 에이전트 간 커뮤니케이션의 필수 구성 요소를 정의합니다.
- 표준화된 에이전트 카드(기능을 설명하는 JSON 문서)를 통한 에이전트 검색
- 일관된 스키마를 가진 요청 및 응답 메시지 형식
- 제출 → 작업 → 완료/실패의 명확한 상태를 통한 작업 수명 주기 관리
- JSON-RPC, gRPC, REST 등의 전송 계층
- 표준 OAuth2, API 키 및 JWT 토큰을 이용한 보안 체계
- 표준화된 오류 코드를 이용한 오류 처리
에이전트 카드: 디지털 명함
A2A 에코시스템의 모든 에이전트는 ‘에이전트 카드’로 자신의 기능을 게시합니다. 에이전트 카드는 에이전트 도메인의 일부 URL(예: /.well-known/agent-card.json)에서 호스팅되는 표준화된 JSON 파일입니다. 디지털 명함 역할을 하는 이 에이전트 카드를 통해 다른 에이전트가 해당 에이전트의 역할을 알 수 있습니다.
에이전트 카드에는 일반적으로 다음이 포함됩니다.
- 기본 정보: 에이전트 이름, 설명, 버전 등
- 능력: 에이전트가 제공할 수 있는 서비스(예: 문서 초안 작성, 텍스트 교정, 데이터 분석, 이미지 생성)
- 엔드포인트: 에이전트에 연결하는 방법
- 기타 선택적 정보: 사용 가능한 기능, 인증 등
이러한 검색 메커니즘이 있으므로 직접 통합하는 작업이 필요하지 않습니다. 어떤 특정한 스킬이 필요한 경우, 에이전트는 간단히 관련이 있는 에이전트 카드를 찾아 이 서비스와 상호 작용하는 방법을 파악합니다.
Koog에서 에이전트 카드는 Kotlin 데이터 클래스를 이용해 정의됩니다.
val agentCard = AgentCard(
    name = "Blog Writer",
    description = "AI agent that creates high-quality blog posts and articles",
    url = "https://api.blog-writer.com/a2a/v1",
    version = "1.0.0",
    capabilities = AgentCapabilities(streaming = true),
    defaultInputModes = listOf("text/plain"),
    defaultOutputModes = listOf("text/markdown"),
    skills = listOf(
        AgentSkill(
            id = "write-post",
            name = "Blog Post Writing",
            description = "Generate engaging blog posts on any topic",
            tags = listOf("writing", "content", "blog"),
            examples = listOf("Write a post about AI trends")
        )
    )
)
범용 메시징: 하나의 간단한 패턴
A2A는 에이전트와의 모든 커뮤니케이션에 하나의 표준화된 메시지 형식을 사용합니다. 이러한 단순성은 매우 강력한데, 에이전트는 수십 개의 API를 알 필요 없이 하나의 커뮤니케이션 패턴만 이해하면 되기 때문입니다.
각각의 상호 작용은 동일한 흐름을 따릅니다.
- 작업 요청과 매개변수를 포함한 메시지 보내기
- 즉각적인 결과 또는 추적할 수 있는 작업 수신
- 긴 작업의 경우 실시간 채널을 통해 업데이트 수신
이러한 범용적 접근 방식을 따르면 새로운 에이전트 기능을 추가해도 커뮤니케이션 프로토콜을 변경할 필요가 없습니다. 에이전트에게 텍스트를 요약하거나 복잡한 보고서를 생성하도록 요청하는 모든 경우에 메시지 구조는 일관되게 유지됩니다.
Koog에서는 이미 구현된 객체와 프로토콜을 이용하므로 메시지를 생성하고 보내는 과정이 단순합니다.
val message = Message(
    role = Role.User,
    parts = listOf(
        TextPart("Write a blog post about the future of AI agents")
    ),
    contextId = "blog-project-456"
)

val request = Request(
    data = MessageSendParams(
        message = message,
        configuration = MessageConfiguration(
            blocking = false, // 첫 번째 응답 가져오기
            historyLength = 5 // 컨텍스트 포함
        )
    )
)

val response = client.sendMessage(request)
다양한 Part 타입을 통해 메시지 형식에 풍부한 콘텐츠가 지원됩니다. 예를 들어, 일반 텍스트의 경우 TextPart, 첨부 파일의 경우 FilePart, 구조화된 JSON 데이터의 경우 DataPart가 이용됩니다.
이 통합적 구조에 기반하여 Koog 에이전트는 텍스트 처리, 파일 분석 또는 복잡한 데이터 변환 등 모든 작업에서 A2A 호환 에이전트와 원활하게 소통할 수 있습니다.
작업 수명 주기: 스마트 워크플로
A2A는 복잡도와 지속 기간에 따라 다양한 유형의 작업을 지능적으로 관리합니다.
즉각적인 메시지: 텍스트 서식 지정이나 빠른 계산과 같은 단순한 작업의 경우, AI 응답에 바로 결과가 반환됩니다. 기다리거나 추적할 필요가 없습니다.
장기 실행 작업: 문서 분석이나 다단계 워크플로와 같이 복잡한 작업은 일정 계획에 따라 결과가 반환됩니다. 그러면 요청한 에이전트가 진행 상황을 모니터링하고 작업 결과가 준비되면 가져옵니다.
실시간 업데이트: 시간이 많이 소요되는 작업의 경우, Server-Sent Events(SSE)가 실시간으로 진행 상황을 업데이트합니다. 따라서 계속해서 폴링하지 않아도 에이전트가 정보를 지속적으로 수신할 수 있습니다.
class BlogWriterExecutor : AgentExecutor {
    override suspend fun execute(
        context: RequestContext,
        eventProcessor: SessionEventProcessor
    ) {
        val task = Task(
            contextId = context.contextId,
            status = TaskStatus(
                state = TaskState.Submitted,
                message = Message(
                    role = Role.Agent,
                    parts = listOf(TextPart("Blog writing request received")),
                    contextId = context.contextId,
    			taskId = context.taskId,
                )
            )
        )

        eventProcessor.sendTaskEvent(task)
	 ...
    }
}
보안 기능 내장: 업계 표준만 이용
A2A는 보안을 자체적으로 만들지 않습니다. 대신 OAuth2, API 키, 표준 HTTPS 등 널리 수용되고 입증된 표준을 이용합니다.
따라서 개발자는 새로운 인증 체계에 대해 신경 쓸 필요가 없습니다. 현대적 웹 API 보안을 알고 있다면 A2A 보안도 알고 있는 것입니다. 이러한 기존 표준이 제공하는 모든 도구, 모범 사례 및 보안 감사가 시스템에 그대로 적용됩니다.
"securitySchemes": {
   "google": {
       "openIdConnectUrl": "https://accounts.google.com/.well-known/openid-configuration",
       "type": "openIdConnect"
   }
}
class AuthorizedA2AServer(
    agentExecutor: AgentExecutor,
    agentCard: AgentCard,
    agentCardExtended: AgentCard? = null,
    taskStorage: TaskStorage = InMemoryTaskStorage(),
    messageStorage: MessageStorage = InMemoryMessageStorage(),
    private val authService: AuthService, // 인증을 담당하는 서비스
) : A2AServer(
    agentExecutor = agentExecutor,
    agentCard = agentCard,
    agentCardExtended = agentCardExtended,
    taskStorage = taskStorage,
    messageStorage = messageStorage,
) {

    private suspend fun authenticateAndAuthorize(
        ctx: ServerCallContext,
        requiredPermission: String
    ): AuthenticatedUser {
        val token = ctx.headers["Authorization"]?.firstOrNull()
            ?: throw A2AInvalidParamsException("Missing Authorization token")

        val user = authService.authenticate(token)
            ?: throw A2AInvalidParamsException("Invalid Authorization token")

        if (requiredPermission !in user.permissions) {
            throw A2AUnsupportedOperationException("Insufficient permissions")
        }

        return user
    }

   override suspend fun onSendMessage(
        request: Request,
        ctx: ServerCallContext
    ): Response {
        val user = authenticateAndAuthorize(ctx, requiredPermission = "send_message")

        // 컨텍스트 상태를 통해 에이전트 실행자에게 사용자 데이터 전달
        val enrichedCtx = ctx.copy(
            state = ctx.state + (AuthStateKeys.USER to user)
        )

        // 풍부한 컨텍스트를 사용하여 상위 구현에 위임
        return super.onSendMessage(request, enrichedCtx)
    }

   // 나머지 래핑된 A2A 메서드
   // ...
}
Koog 에이전트를 A2A와 통합하는 방법
Koog 프레임워크에는 A2A 클라이언트와 서버가 기본적으로 내장되어 있습니다. 즉, Koog 에이전트는 다른 A2A 지원 에이전트와 원활하게 소통하면서 외부에서도 자신을 검색할 수 있도록 합니다. 이를 구현하는 방법을 보여주는 간단한 예를 들어보겠습니다.
Koog 에이전트를 A2A 서버에 래핑하는 방법
우선, 에이전트에 대한 전략을 정의합니다. Koog는 Koog와 A2A 사이의 원활한 변환을 위한 편리한 변환기(toKoogMessage, toA2AMessage)를 제공하므로 직접 직렬화할 필요가 없습니다. nodeA2ASendMessage와 같은 특수 노드가 메시지 교환 과정을 처리해 주므로 커뮤니케이션 워크플로의 구현이 간단합니다.
fun blogpostWritingStrategy() = strategy("blogpost-writer-strategy") {
    val blogpostRequest by node { input ->
        val userMessage = input.toKoogMessage().content

        llm.writeSession {
            user {
                +"Write a blogpost based on the user request"
                +xml {
                    tag("user_request") {
                        +userMessage
                    }
                }
            }

            requestLLM().toA2AMessage()
        }
    }

    val sendMessage by nodeA2ARespondMessage()

    nodeStart then blogpostRequest then sendMessage the nodeFinish
}
두 번째, 에이전트 자체를 정의합니다. A2AServer 기능을 설치하면 에코시스템의 다른 에이전트가 해당 에이전트를 검색하고 액세스할 수 있게 되어 다수의 특수 에이전트가 원활하게 협력하는 정교한 네트워크가 형성됩니다.
fun createBlogpostWritingAgent(
    requestContext: RequestContext,
    eventProcessor: SessionEventProcessor
): AIAgent {
     // 현재 대화 컨텍스트에 대한 기존 메시지 가져오기
     val messageHistory = requestContext.messageStorage.getAll().map { it.toKoogMessage() }

     val agentConfig = AIAgentConfig(
        prompt = prompt("blogpost") {
            system("You are a blogpost writing agent")

            messages(messageHistory)
        },
        model = GoogleModels.Gemini2_5Flash,
        maxAgentIterations = 5
    )

    return agent = AIAgent(
        promptExecutor = MultiLLMPromptExecutor(
            LLMProvider.Google to GoogleLLMClient(System.getenv("GOOGLE_API_KEY")),
        ),
        strategy = blogpostWritingStrategy(),
        agentConfig = agentConfig
    ) {
        install(A2AAgentServer) {
            this.context = requestContext
            this.eventProcessor = eventProcessor
        }

        handleEvents {
            onAgentFinished { ctx ->
                // 에이전트의 응답으로 현재 대화 컨텍스트 업데이트
                val resultMessge = ctx.result as A2AMessage
                requestContext.messageStorage.save(resultMessge)
            }
        }
    }
}
세 번째, 에이전트를 실행자에 래핑한 다음 서버를 정의해야 합니다.
class BlogpostAgentExecutor : AgentExecutor {
    override suspend fun execute(
        context: RequestContext,
        eventProcessor: SessionEventProcessor
    ) {
        createBlogpostWritingAgent(context, eventProcessor)
            .run(context.params.message)
    }
}

val a2aServer = A2AServer(
    agentExecutor = BlogpostAgentExecutor(),
    agentCard = agentCard,
)
마지막으로, 서버 전송을 정의하고 서버를 실행합니다.
val transport = HttpJSONRPCServerTransport(
    requestHandler = a2aServer
)

transport.start(
    engineFactory = Netty,
    port = 8080,
    path = "/a2a",
    wait = true,
    agentCard = agentCard,
    agentCardPath = A2AConsts.AGENT_CARD_WELL_KNOWN_PATH
)
이제 에이전트가 요청을 처리할 수 있습니다!
Koog 에이전트에서 다른 A2A 지원 에이전트를 호출하는 방법
먼저, A2A 클라이언트를 구성하고 이를 연결하여 에이전트 카드를 가져와야 합니다.
val agentUrl = "https://example.com"

val cardResolver = UrlAgentCardResolver(
    baseUrl = agentUrl,
    path = A2AConsts.AGENT_CARD_WELL_KNOWN_PATH,
)

val transport = HttpJSONRPCClientTransport(
    url = agentUrl,
)

val a2aClient = A2AClient(
    transport = transport,
    agentCardResolver = cardResolver
)

// 클라이언트를 초기화하고 카드를 가져옵니다
a2aClient.connect()
그런 다음, 해당 전략에서 nodeA2ASendMessage 또는 nodeA2ASendMessageStreaming을 사용하여 이러한 클라이언트를 호출하고 메시지 또는 작업 응답을 가져올 수 있습니다.
val agentId = "agent_id"
val agent = AIAgent(
    promptExecutor = MultiLLMPromptExecutor(
        LLMProvider.Google to GoogleLLMClient(System.getenv("GOOGLE_API_KEY")),
    ),
    strategy = strategy("a2a") {
        val nodePrepareRequest by node<String, A2AClientRequest> { input ->
            A2AClientRequest(
                agentId = agentId,
                callContext = ClientCallContext.Default,
                params = MessageSendParams(
                    message = A2AMessage(
                        messageId = Uuid.random().toString(),
                        role = Role.User,
                        parts = listOf(
                            TextPart(input)
                        )
                    )
                )
            )
        }
        val nodeA2A by nodeA2AClientSendMessage(agentId)

        val nodeProcessResponse by node {
            // 프로세스 이벤트
            when (it) {
                is A2AMessage -> it.parts
                    .filterIsInstance()
                    .joinToString(separator = "n") { it.text }

                is Task -> it.artifacts
                    .orEmpty()
                    .flatMap { it.parts }
                    .filterIsInstance()
                    .joinToString(separator = "n") { it.text }
            }
        }

        nodeStart then nodePrepareRequest then nodeA2A then nodeProcessResponse then nodeFinish

    },
    agentConfig = agentConfig
) {
   install(A2AAgentClient) {
        this.a2aClients = mapOf(agentId to client)
    }
}

agent.run("Write blog post about A2A and Koog integration")
다음 단계
Koog와 A2A에 대해 자세히 알아보려면 다음 유용한 자료를 살펴보세요.
게시물 원문 작성자
Subscribe to JetBrains AI Blog updates
Discover more
Koog × A2A: Building Connected AI Agents in Kotlin

If you’ve ever tried building a system of multiple AI agents, you’ve probably run into the problem. It starts simple enough: You’ve got one agent writing blog posts, another proofreading them, and maybe a third suggesting or generating images. Individually, they’re effective. But getting them to work together? That’s where things might start falling apart.
Each agent speaks its own “language”: One uses a different API interface, another has its own message format, and they all might come with specific authentication requirements. Making them communicate means writing custom integration code for every single connection. Instead of focusing on making your agents smarter, faster, or more useful, you’re stuck building bridges between them.
What A2A does: The cross-agent communication layer
This is where the Agent2Agent (A2A) Protocol takes over.
With A2A, your agents can communicate directly through a standardized protocol, working as a universal translator for your AI ecosystem. Your blog-writing agent seamlessly passes content to your proofreader, which triggers your image generator, while the proofreader loops back with corrections and the image generator requests style clarifications. All orchestrated through a single, unified communication layer.
Instead of managing dozens of point-to-point connections, A2A provides:
- Plug-and-play connectivity: Agents automatically discover and connect with each other.
- Standardized messaging: Unified format, clear protocol, and zero translation headaches.
- Built-in orchestration: Define workflows once, and let A2A handle the coordination.
- Scalability without complexity: Add or reuse agents without rewriting existing connections.
What is the result? You spend time improving your agents’ capabilities, not debugging their conversations. And the best part – you can implement your agents using any language or framework you like. For JVM users, Koog is a top choice, and as of version 0.5.0, it integrates seamlessly with the A2A ecosystem.
What Koog does: The internal orchestration engine
Koog is a Kotlin-based framework for building AI agents targeting JVM, Android, iOS, WebAssembly, and in-browser applications. It excels at:
- Complex workflow management: Design graph-based strategies with support for loops, branches, fallbacks, and parallel branch execution.
- Ready-to-use components: Benefit from its built-in nodes for calling LLMs and external tools, summarizing message history, and executing entire strategies.
- Tool orchestration: Turn any function in your code into a tool your AI agent can use, whether sequentially or even in parallel
- Native MCP integration: Connect seamlessly to any MCP server using the Kotlin MCP SDK.
- Memory and storage support: Built-in support for agent memory and RAG (retrieval-augmented generation) workflows with efficient context management.
- Fault tolerance: Built-in retries, checkpointing, recovery mechanisms, and state persistence to ensure reliable execution.
- Observability: Full agent event handling, logging, and support for OpenTelemetry with built-in integrations with Langfuse and W&B Weave.
In short, Koog is great for building reliable AI agents.
Why pair Koog with A2A
Koog and A2A cover different layers of the AI agent stack. When used together, they complement each other and fill the gaps.
Koog already handles the hardest parts of AI orchestration needed for real-world enterprise use.
A2A adds the missing piece: It enables your Koog agents to communicate with any other A2A-compatible agents in your ecosystem. Instead of building custom integrations for each external service, your Koog AI workflows can automatically discover and use other agents.
The result is a perfect match: Koog’s advanced workflows become A2A tasks that any agent can request, while your Koog agents tap into the full power of the A2A ecosystem. And since Koog runs on backend, on-device, and in-browser environments, you can deliver inter-connected AI more broadly and effectively than ever before.
How is this possible? Let’s see!
A2A protocol
The A2A protocol defines the essential building blocks for agent-to-agent communication:
- Agent discovery through standardized agent cards (JSON documents that describe capabilities).
- Message formats for requests and responses with consistent schemas.
- Task lifecycle management with clear states: submitted → working → completed/failed.
- Transport layers such as JSON-RPC, gRPC, and REST.
- Security schemes using standard OAuth2, API keys, and JWT tokens.
- Error handling with standardized error codes.
Agent cards: Digital business cards
Every agent in the A2A ecosystem publishes its capabilities through an “agent card” – a standardized JSON file hosted at some URL, e.g. /.well-known/agent-card.json, on the agent’s domain. The agent card acts as a digital business card, allowing other agents to discover the services it provides.
An agent card typically contains:
- Basic information: Such as agent name, description, and version.
- Skills: What the agent can do (e.g. draft documents, proofread text, analyze data, and generate images).
- Endpoints: How to reach the agent.
- Other optional information: Enabled capabilities, authentication, and more.
This discovery mechanism eliminates the need for manual integration work. When an agent needs a specific skill, it simply checks the relevant agent card to understand how to interact with that service.
In Koog, agent cards are defined using Kotlin data classes:
val agentCard = AgentCard(
    name = "Blog Writer",
    description = "AI agent that creates high-quality blog posts and articles",
    url = "https://api.blog-writer.com/a2a/v1",
    version = "1.0.0",
    capabilities = AgentCapabilities(streaming = true),
    defaultInputModes = listOf("text/plain"),
    defaultOutputModes = listOf("text/markdown"),
    skills = listOf(
        AgentSkill(
            id = "write-post",
            name = "Blog Post Writing",
            description = "Generate engaging blog posts on any topic",
            tags = listOf("writing", "content", "blog"),
            examples = listOf("Write a post about AI trends")
        )
    )
)
Universal messaging: One simple pattern
A2A uses a single, standardized message format for all inter-agent communication. This simplicity is powerful – instead of learning dozens of different APIs, agents only need to understand one communication pattern.
Every interaction follows the same flow:
- Send a message with the task request and parameters.
- Receive either immediate results or a task for tracking.
- Get updates via real-time channels for longer operations.
This universal approach means adding new agent capabilities doesn’t require changing communication protocols. Whether you’re asking an agent to summarize text or generate a complex report, the message structure remains consistent.
In Koog, creating and sending a message is straightforward using already implemented objects and protocols:
val message = Message(
    role = Role.User,
    parts = listOf(
        TextPart("Write a blog post about the future of AI agents")
    ),
    contextId = "blog-project-456"
)

val request = Request(
    data = MessageSendParams(
        message = message,
        configuration = MessageConfiguration(
            blocking = false, // Get first response
            historyLength = 5 // Include context
        )
    )
)

val response = client.sendMessage(request)
The message format supports rich content through different Part types, including TextPart for plain text content, FilePart for file attachments and DataPart for structured JSON data.
This unified structure means your Koog agents can seamlessly communicate with any A2A-compatible agent, whether it’s for text processing, file analysis, or complex data transformations.
Task lifecycle: Smart workflows
A2A intelligently manages different types of work based on complexity and duration:
Immediate messages: Simple operations like text formatting or quick calculations return results directly in the AI’s response. No waiting, no tracking needed.
Long-running tasks: Complex operations like document analysis or multi-step workflows are scheduled and return a task. The requesting agent can then monitor progress and retrieve the task results once ready.
Real-time updates: For time-consuming operations, Server-Sent Events (SSE) provide live progress updates. This keeps agents informed without requiring constant polling.
class BlogWriterExecutor : AgentExecutor {
    override suspend fun execute(
        context: RequestContext<MessageSendParams>,
        eventProcessor: SessionEventProcessor
    ) {
        val task = Task(
            contextId = context.contextId,
            status = TaskStatus(
                state = TaskState.Submitted,
                message = Message(
                    role = Role.Agent,
                    parts = listOf(TextPart("Blog writing request received")),
                    contextId = context.contextId,
    			taskId = context.taskId,
                )
            )
        )

        eventProcessor.sendTaskEvent(task)
	 ...
    }
}
Built-in security: Industry standards only
A2A doesn’t reinvent security. Instead, it relies on proven, widely-adopted standards like OAuth2, API keys, and standard HTTPS.
This approach means developers don’t need to learn new authentication schemes. If you understand modern web API security, you already understand A2A security. The system inherits all the tooling, best practices, and security audits that come with these established standards.
"securitySchemes": {
   "google": {
       "openIdConnectUrl": "https://accounts.google.com/.well-known/openid-configuration",
       "type": "openIdConnect"
   }
}
class AuthorizedA2AServer(
    agentExecutor: AgentExecutor,
    agentCard: AgentCard,
    agentCardExtended: AgentCard? = null,
    taskStorage: TaskStorage = InMemoryTaskStorage(),
    messageStorage: MessageStorage = InMemoryMessageStorage(),
    private val authService: AuthService, // Service responsible for authentication
) : A2AServer(
    agentExecutor = agentExecutor,
    agentCard = agentCard,
    agentCardExtended = agentCardExtended,
    taskStorage = taskStorage,
    messageStorage = messageStorage,
) {

    private suspend fun authenticateAndAuthorize(
        ctx: ServerCallContext,
        requiredPermission: String
    ): AuthenticatedUser {
        val token = ctx.headers["Authorization"]?.firstOrNull()
            ?: throw A2AInvalidParamsException("Missing Authorization token")

        val user = authService.authenticate(token)
            ?: throw A2AInvalidParamsException("Invalid Authorization token")

        if (requiredPermission !in user.permissions) {
            throw A2AUnsupportedOperationException("Insufficient permissions")
        }

        return user
    }

   override suspend fun onSendMessage(
        request: Request<MessageSendParams>,
        ctx: ServerCallContext
    ): Response<CommunicationEvent> {
        val user = authenticateAndAuthorize(ctx, requiredPermission = "send_message")

        // Pass user data to the agent executor via context state
        val enrichedCtx = ctx.copy(
            state = ctx.state + (AuthStateKeys.USER to user)
        )

        // Delegate to parent implementation with enriched context
        return super.onSendMessage(request, enrichedCtx)
    }

   // the rest of wrapped A2A methods
   // ...
}
How to integrate Koog agents with A2A
The Koog framework comes with both the A2A client and server built right in. This means your Koog agents can seamlessly talk to other A2A-enabled agents while also making themselves discoverable to the outside world. Here’s a simple example demonstrating how you can implement this.
How to wrap Koog agents into A2A servers
First, define a strategy for the agent. Koog provides convenient converters (toKoogMessage, toA2AMessage) to seamlessly transform between Koog and A2A message formats, eliminating the need for manual serialization. Specialized nodes such as nodeA2ASendMessage handle the message exchange process, making communication workflows straightforward to implement:
fun blogpostWritingStrategy() = strategy<MessageSendParams, A2AMessage>("blogpost-writer-strategy") {
    val blogpostRequest by node<MessageSendParams, A2AMessage> { input ->
        val userMessage = input.toKoogMessage().content

        llm.writeSession {
            user {
                +"Write a blogpost based on the user request"
                +xml {
                    tag("user_request") {
                        +userMessage
                    }
                }
            }

            requestLLM().toA2AMessage()
        }
    }

    val sendMessage by nodeA2ARespondMessage()

    nodeStart then blogpostRequest then sendMessage then nodeFinish
}
Second, define the agent itself. Once you install the A2AServer feature, your agent becomes discoverable and accessible to others in the ecosystem, enabling the creation of sophisticated networks where specialized agents collaborate seamlessly.
fun createBlogpostWritingAgent(
    requestContext: RequestContext<MessageSendParams>,
    eventProcessor: SessionEventProcessor
): AIAgent<MessageSendParams, A2AMessage> {
     // Get existing messages for the current conversation context
     val messageHistory = requestContext.messageStorage.getAll().map { it.toKoogMessage() }

     val agentConfig = AIAgentConfig(
        prompt = prompt("blogpost") {
            system("You are a blogpost writing agent")

            messages(messageHistory)
        },
        model = GoogleModels.Gemini2_5Flash,
        maxAgentIterations = 5
    )

    return agent = AIAgent<FullWeatherForecastRequest, FullWeatherForecast>(
        promptExecutor = MultiLLMPromptExecutor(
            LLMProvider.Google to GoogleLLMClient(System.getenv("GOOGLE_API_KEY")),
        ),
        strategy = blogpostWritingStrategy(),
        agentConfig = agentConfig
    ) {
        install(A2AAgentServer) {
            this.context = requestContext
            this.eventProcessor = eventProcessor
        }

        handleEvents {
            onAgentFinished { ctx ->
                // Update current conversation context with response from the agent
                val resultMessge = ctx.result as A2AMessage
                requestContext.messageStorage.save(resultMessge)
            }
        }
    }
}
Third, we need to wrap the agent into the executor and then define a server.
class BlogpostAgentExecutor : AgentExecutor {
    override suspend fun execute(
        context: RequestContext<MessageSendParams>,
        eventProcessor: SessionEventProcessor
    ) {
        createBlogpostWritingAgent(context, eventProcessor)
            .run(context.params.message)
    }
}

val a2aServer = A2AServer(
    agentExecutor = BlogpostAgentExecutor(),
    agentCard = agentCard,
)
The final step is to define a server transport and run the server.
val transport = HttpJSONRPCServerTransport(
    requestHandler = a2aServer
)

transport.start(
    engineFactory = Netty,
    port = 8080,
    path = "/a2a",
    wait = true,
    agentCard = agentCard,
    agentCardPath = A2AConsts.AGENT_CARD_WELL_KNOWN_PATH
)
Now your agent is ready to handle requests!
How to call other A2A-enabled agents from a Koog agent
First, you need to configure an A2A client and connect it to fetch an Agent Card.
val agentUrl = "https://example.com"

val cardResolver = UrlAgentCardResolver(
    baseUrl = agentUrl,
    path = A2AConsts.AGENT_CARD_WELL_KNOWN_PATH,
)

val transport = HttpJSONRPCClientTransport(
    url = agentUrl,
)

val a2aClient = A2AClient(
    transport = transport,
    agentCardResolver = cardResolver
)

// Initialize client and fetch the card
a2aClient.connect()
Then you can use nodeA2ASendMessage or nodeA2ASendMessageStreaming in your strategy to call these clients and receive a message or task response.
val agentId = "agent_id"
val agent = AIAgent<String, String>(
    promptExecutor = MultiLLMPromptExecutor(
        LLMProvider.Google to GoogleLLMClient(System.getenv("GOOGLE_API_KEY")),
    ),
    strategy = strategy<String, String>("a2a") {
        val nodePrepareRequest by node<String, A2AClientRequest<MessageSendParams>> { input ->
            A2AClientRequest(
                agentId = agentId,
                callContext = ClientCallContext.Default,
                params = MessageSendParams(
                    message = A2AMessage(
                        messageId = Uuid.random().toString(),
                        role = Role.User,
                        parts = listOf(
                            TextPart(input)
                        )
                    )
                )
            )
        }
        val nodeA2A by nodeA2AClientSendMessage(agentId)

        val nodeProcessResponse by node<CommunicationEvent, String> {
            // Process event
            when (it) {
                is A2AMessage -> it.parts
                    .filterIsInstance<TextPart>()
                    .joinToString(separator = "\n") { it.text }

                is Task -> it.artifacts
                    .orEmpty()
                    .flatMap { it.parts }
                    .filterIsInstance<TextPart>()
                    .joinToString(separator = "\n") { it.text }
            }
        }

        nodeStart then nodePrepareRequest then nodeA2A then nodeProcessResponse then nodeFinish

    },
    agentConfig = agentConfig
) {
   install(A2AAgentClient) {
        this.a2aClients = mapOf(agentId to client)
    }
}

agent.run("Write blog post about A2A and Koog integration")
Next steps
To dive deeper into Koog and A2A, check out these useful materials:
Subscribe to JetBrains AI Blog updates