Announcing Grunt support in PhpStorm 8 EAP

 We are pleased to announce Grunt support in PhpStorm 8 EAP! If you’re new to Grunt, it is a JavaScript Task Runner, much like Phing is for PHP, which can automate a lot of tasks in our development workflow. Grunt has a large number of plugins available that can automate anything from minification and compilation to unit testing, linting and so on. Let’s see how we can get Grunt to work in our favorite IDE!
We’ll need some tools…
If you did not know this, PhpStorm contains all features that are available in WebStorm as well. This means we have excellent support for our beloved PHP, as well as HTML, CSS, JavaScript and all those other client-side development tools, including Grunt. Not all these features are enabled by default in PhpStorm, so let’s first make sure we have all prerequisites in place. We will need:
- NodeJS installed
- The NodeJS plugin enabled
- The grunt-cli npm module installed
- A version of the Grunt runner has to be installed into our project
Installing NodeJS can be done by following the instructions on their website. Once done, we can enable the NodeJS plugin for PhpStorm through IDE Settings | Plugins, clicking the Install JetBrains Plugin… button and adding NodeJS to our IDE. A quick restart should activate and load the plugin. (Check out our tutorial about NodeJS in PhpStorm if you want to learn more about it.)
The grunt-cli module can be installed using npm. From the Terminal tool window (Tools | Open Terminal…), execute the npm install -g grunt-cli command. Running npm install grunt --save-dev will install the Grunt runner into our project. Alternatively, go to Project Settings | Node.js and npm, and click Add. In the popup window, search for both of these packages, enter -g (to install the package globally) under options and then click Install.
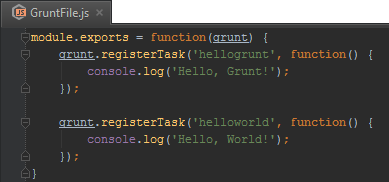
Editing GruntFile.js
The GruntFile.js is the place where it all happens: it contains all tasks and helpers that will be executed by Grunt later on. We can simply create a new JavaScript file or edit an existing one. Here’s an example with two simple tasks that do nothing more than echo “Hello Grunt!” to the console:
Autocompletion not working? That may well be the case! JavaScript has such a wide variety of flavors and libraries that we have to tell PhpStorm which ones we are using. No worries: we have to do this just once. Grunt files are NodeJS modules, so let’s start by adding autocompletion for NodeJS by using the Use JavaScript library | Node.js Globals context menu in the editor.
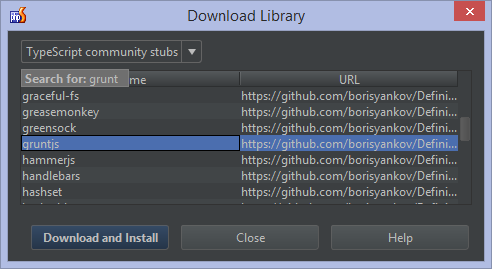
To add support for Grunt-specific syntax, we have to go through Project Settings | JavaScript | Libraries, click the Download… button and from the TypeScript Community stubs, download gruntjs.
If you want to learn more about Grunt itself, read the getting started tutorial and visit the plugins gallery to find out which tasks can be easily automated using Grunt.
Running Grunt tasks
Once we have a GruntFile.js in place, we can run it from within the IDE! In our editor, the Open Grunt Console context menu will bring up the Grunt Console tool window in which we can run individual tasks and so on. Phing users will definitely recognize this.
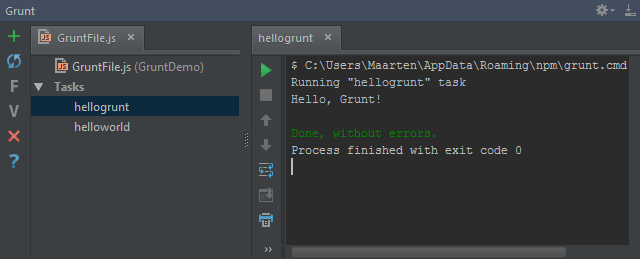
From the Grunt Console, we can run individual tasks (double-click or select one and Enter) and see the output on the right. We can also select multiple tasks and run them at once. The toolbar on the left can be used to enable the --force switch when running Grunt, or to enable/disable verbose mode.
This is a first pass on getting Grunt support into our IDE. Download the latest PhpStorm 8 EAP and give it a go! We would love to hear your thoughts, feature requests, issues and so on through the issue tracker, by posting in the comments below or in our forums!
Develop with pleasure!
– JetBrains PhpStorm Team