

.NET Tools
Essential productivity kit for .NET and game developers
Introducing ReSharper Build

ReSharper has always wanted to speed up your code editing, refactoring and navigation. ReSharper 10 now wants to speed up your build.
ReSharper Build is a new feature in ReSharper 10 that will reduce the time it takes to build your solution. It replaces Visual Studio’s build management with a system that applies heuristics to only build projects that need updating. Note that it doesn’t replace MSBuild — your projects are still built normally. They’re just not built as often.
In this post, we’re going to take a deep look at how ReSharper Build works, and how you can make use of it in your own solution.
The benefits of a faster build are obvious — we all want to speed up the development feedback cycle. No one wants to be interrupted when they’re in the flow, and a slow compile can be a real productivity killer. The quicker we can get a solution rebuilt, the sooner we can get feedback from our tests, and the sooner we can move on to new code, or fix up tests. And if this happens quickly enough, we stay in the zone, and remain productive.
Furthermore, ReSharper Build is also an important part of another new feature — Continuous Testing. This is a feature of dotCover and ReSharper Ultimate which intelligently runs only the subset of tests that cover the code that you’ve just changed. In order to be able to do this, we need to be able to build the changed code as quickly and efficiently as possible. We’ll take a closer look at Continuous Testing in a future blog post.
Some of you power users might recognize ReSharper Build’s heritage — it’s the latest evolution of a (somewhat) hidden/internal feature that we’ve been using on the development team for several years. When the uber-solution to everything that makes up ReSharper Ultimate is 600 projects, and the everyday solution for feature development can be as large as 300 projects, you need something to speed the build up!
How does ReSharper Build work?
Put simply, ReSharper Build manages the build process, and decides if each individual project needs to be built, or not. When building a solution, if a project doesn’t need to be rebuilt, it is intelligently skipped — what’s faster than doing nothing?
There are three main optimisations:
- All build management happens out of process. Visual Studio has been moving more of the build pipeline out of process in recent versions, but even in Visual Studio 2015, the core build management is still hosted in-process. ReSharper Build is hosted out of process, meaning that Visual Studio remains snappy and responsive while a build is running.
- Efficient timestamp monitoring. MSBuild supports building incrementally, by comparing the timestamps of inputs and outputs of a target — it they are up to date, the target isn’t run. But an MSBuild process must still be run so that it can check the inputs of outputs of each target and check all of the timestamps — this gives us an overhead to do nothing!
ReSharper Build maintains a dependency graph of inputs and outputs to tasks, targets and projects, and efficiently monitors the file system for changes. If a build is requested, ReSharper Build already knows if the timestamps are up to date, without having to invoke MSBuild. If it’s up to date, don’t build it.
This optimisation alone can greatly improve the time your solution takes to build — but we can go one better. - Public API surface monitoring. Traditionally, if a project is edited and rebuilt, Visual Studio and MSBuild will also rebuild all other projects that reference it. If we’re changing the public API of an assembly, then this is a good thing — referencing projects need to know if we change the name of a method, add parameters or remove an interface. But if we’re only changing the internal business logic of a class, we’re rebuilding the referencing projects unnecessarily — the generated code in the referenced assemblies won’t change.
When a project is built, ReSharper will scan the just compiled output assembly. If its public API hasn’t changed, then ReSharper Build knows that it doesn’t need to build any of the referencing projects, and they are intelligently skipped. This has a huge impact on larger solutions. If a change is made to the business logic of a root assembly, then traditionally, that would require the rest of the solution to be rebuilt. ReSharper Build will only rebuild the root assembly, and skip the rest.
How do you use it?
It’s very easy. Once enabled, ReSharper Build replaces and overrides the standard Visual Studio build process, and is invoked whenever a build is required — building, rebuilding or cleaning the solution, running or debugging the project, or running unit tests. ReSharper Build is disabled by default, meaning you have to opt-in to the new build management (there are some edge cases that can cause issues, particularly custom build steps, so we’ve decided that you need to make an explicit step to opt-in. See below for more details).
You can enable ReSharper Build by first displaying the ReSharper Build & Run tool window, from ReSharper → Windows → Build & Run.
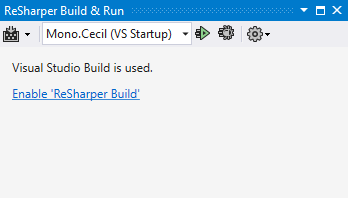
If ReSharper Build is not enabled, the tool window will show you that Visual Studio’s build process is being used, and provide a link to “Enable ReSharper Build”. You can also enable ReSharper Build and change the settings through ReSharper → Options → Build, and if you use the Save To button, you can enable/disable on a per-solution basis.
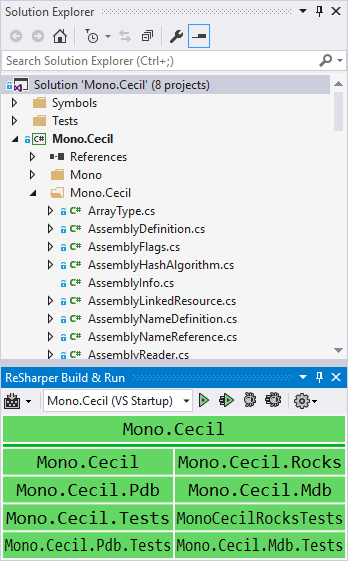
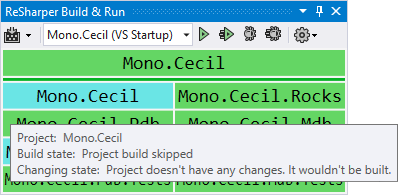
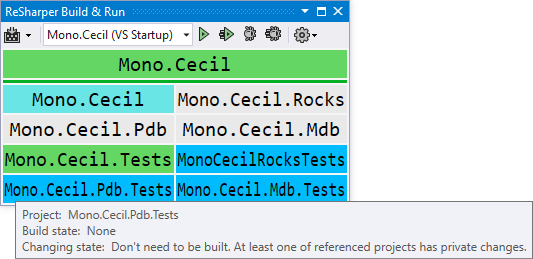
Once enabled, the ReSharper Build & Run tool window will show all of the projects in the solution, as coloured boxes. The colour of each box represents the state of the project, such as not requiring build, excluded from this build, skipped, built with errors, or successfully built. There are several more states available, and hovering the mouse over a project will display a tooltip explaining the state.
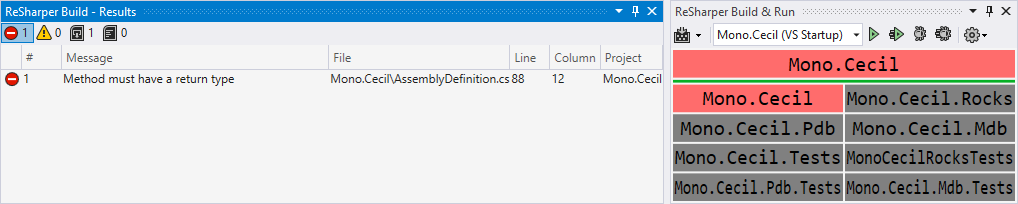
Once a build completes, any output from the build (errors, warnings, info and messages) are displayed in the ReSharper Build Results tool window, from which you can double click to navigate to the warnings and errors. We are still working on the UI during the EAP, so expect this window to change, as we will be adding support for keyboard shortcuts, and also grouping results.
Update for RTM: The Build Results tool window was removed from the final RTM release of ReSharper 10.0. We didn’t get the design and feature set finalised and working well enough to be included in this release. Instead, we have rolled back to the prototype implementation, which will automatically display build results as a tab in the Find Results window. While this location might seem a little surprising, ReSharper displays the window automatically, and whenever you double click one of the projects in the Build & Run tool window. Furthermore, the Find Results implementation offers more features, including grouping, filtering and keyboard shortcuts. The standard Visual Studio F8 and Shift+F8 shortcuts will navigate the errors, as will ReSharper’s standard previous/next shortcuts Ctrl+Alt+PageUp/PageDown (Ctrl+Alt+Up/Down for IntelliJ shortcut users). We will be re-evaluating how we display build results for a future release.
ReSharper Build overrides the standard Visual Studio build commands, meaning it gets invoked from the normal build keyboard shortcut, which will build the whole solution. Similarly, rebuild and clean keyboard shortcuts will build the whole solution.
When running tests, launching an application for debugging, or right clicking and selecting Build on the project’s context menu, ReSharper Build is invoked on a subset of the solution, and only processes those projects. Any other projects that need rebuilding are ignored, and marked in blue, showing they will be rebuilt in the future.
Similarly, ReSharper Build is available under the ReSharper → Build menu option, which allows for building, cleaning and rebuilding the solution. It also offers menu items to just build, rebuild and clean the current selection. You can also cancel the current build, if it’s taking too long (although we don’t expect this to get used much).
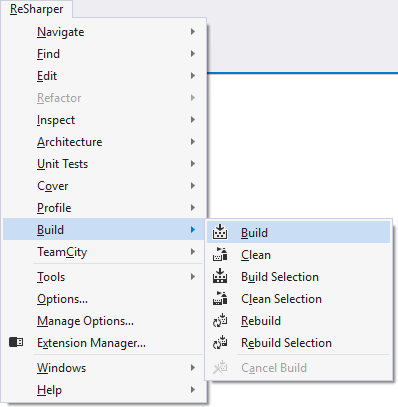
Update for RTM: The ReSharper → Build menu item has been removed – all options are already available on Visual Studio’s Build menu, with the exception of building a selection. This can be achieved from a project’s context menu, or automatically by ReSharper when building before running tests.
Configuring
ReSharper Build can be configured from ReSharper Options (ReSharper → Options → Build, or by clicking the “spanner” options icon in the ReSharper Build & Run tool window). You can set which version of MSBuild to use (Visual Studio’s, by default) and how many MSBuild processes to run for parallel build.
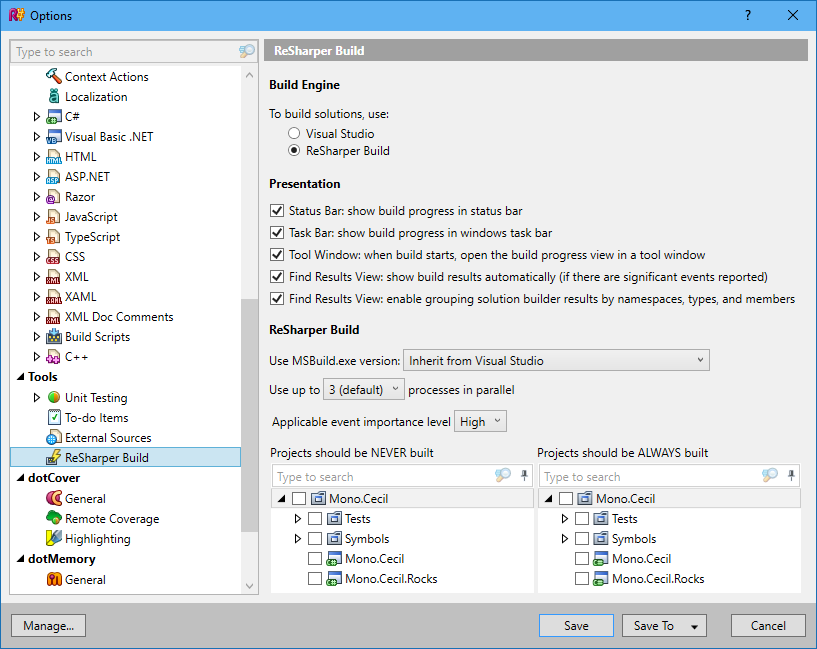
You can also configure which projects should never be built, and which projects should always be built. These two options can be very useful.
Excluding a project means it won’t get rebuilt, ever, even if source files are out of date or a referenced project has public API changes. This is quite drastic, and can lead to uncaught compilation errors, but can be useful to temporarily exclude a project that is slow to compile, and not used in your current development task. It’s similar to unloading a project in Visual Studio so that it doesn’t compile, but the source files are still available to ReSharper to allow for navigation and refactoring. We recommend reenabling and rebuilding before committing to source control, or using Solution Wide Analysis to show compile errors as you type!
Marking a project as “always build” tells ReSharper Build to never apply heuristics to this project, but to always pass it to MSBuild. This does not mean that the project will always be rebuilt and recompiled, but it means MSBuild is always called — MSBuild will still check timestamps and might perform an incremental build. This is useful for projects that have custom build steps that ReSharper Build can’t track (although it would be better to rewrite the custom build steps as proper MSBuild targets that support incremental build. See below).
Technical limitations
There are a couple of technical limitations that are due to ReSharper Build being based on MSBuild:
- Non-MSBuild projects. ReSharper Build can’t work with project types that are not MSBuild based. This includes Web Sites (folder based projects, not MVC web applications), WinJS applications and DNX applications. These projects will fall back to the standard Visual Studio build process, although the rest of the projects in the solution can continue to use ReSharper Build.
- Custom build steps. Typically, custom build steps (including pre- and post-build steps in C++ projects) are the equivalent of calling a batch file, with several command lines being executed to e.g. copy files to the output directory. These are a black box as far as ReSharper Build is concerned — it doesn’t know what’s happening in the custom build step, so can’t track the input and output. Furthermore, if the project is skipped, the build step doesn’t run, which could cause issues with the build (this is the main reason ReSharper Build is disabled by default).
However, custom MSBuild targets and tasks WILL work with ReSharper Build, as long as the custom target and task supports incremental building, with a list of inputs and outputs that can be monitored for timestamp changes. Converting a naive custom build step to custom targets is highly recommended in order to get good results with ReSharper Build.
If a custom build step cannot be replaced, the project can be added to the list of projects that should be “always built”, without having heuristics applied, meaning they are always passed to MSBuild, and MSBuild’s standard incremental build process will run. This can be configured in the ReSharper → Options → ReSharper Build page.
Known issues
As well as continuing to work on the UI, there are still a couple of known issues. If you encounter any other issues, PLEASE let us know!
- NuGet package restore is not currently supported. Right now, ReSharper Build does not trigger NuGet’s package restore functionality. To restore packages, go to the NuGet package UI, or temporarily switch to the Visual Studio build process using the “cog” icon in the ReSharper Build & Run tool window.
FAQ
- Does this work with Copy Local? Yes.
ReSharper Build also tracks copy tasks, and will replay them if timestamps have changed. So a project that is skipped will still get the latest version of any modified referenced assemblies in its output folder.
For even faster build times, we recommend building to a single bin folder (and NOT disabling Copy Local). This results in far fewer files being duplicated and copied around, and as an added bonus, reduces the number of files being monitored by ReSharper Build for timestamp changes. - Does this work for changes in resource files? Yes.
ReSharper Build monitors the timestamps of all inputs to targets, rather than changes to just source files. Any resource files (images, xml files, etc.) that are modified are flagged as timestamp changes, so the project is rebuilt. - Does this work with C++, F#, etc? Yes.
ReSharper Build monitors the inputs and outputs of targets and tasks, and can apply the timestamp heuristic to these projects. It can apply the surface API heuristic to any CLR based project — ReSharper Build calculates the public API surface from the output assembly, rather than the source of the project, so can monitor any CLR based assembly for API changes. However, please remember that custom build steps are a black box that ReSharper Build cannot track. If your project has a custom build step, including C++ pre- and post-build steps, ReSharper Build cannot know when they should be run. You can either rewrite the custom build steps to use proper MSBuild targets and tasks, or exclude the project from heuristics in the options.
Of course, if you encounter a project that doesn’t play nicely with ReSharper Build, please let us know. - Does this work with strong naming? Yes.
When referencing an assembly, the version is embedded as part of the reference. When an assembly is strong named, the version numbers must match exactly, or assembly loading will fail. This means referencing assemblies need to be recompiled, even if the public API hasn’t changed.
ReSharper Build considers the assembly version to be part of the public API. If the version changes, referencing assemblies are recompiled.
The AssemblyVersionAttribute specifies the version of the assembly. If it’s set to a static value such as “1.0.0.0”, the version doesn’t change with each compile, and ReSharper Build’s optimisations can be applied. However, if the assembly version is in the form “1.0.*”, the version is updated on each compile, and ReSharper Build considers the public API to have changed, and the surface API heuristic no longer applies.
The default C# project template sets the assembly version attribute value to be “1.0.0.0”, which fits nicely with ReSharper Build’s optimisations. However, the managed C++ template sets the attribute value to “1.0.*”, which will make ReSharper Build consider the public API as having changed. It is recommended to change the assembly version attribute to be a static value in order to get the most from ReSharper Build. - Does this require Solution Wide Analysis to be enabled? No.
The public API build heuristic works on the compiled assembly, and doesn’t need to analyse source code at all. If you have excluded a project from building in the options page, Solution Wide Analysis can be very useful to capture compile errors that you wouldn’t otherwise see. - How does this work with Run Configurations? ReSharper 9.2 introduced Run Configurations, which are ways of defining targets to run and debug. These can be running an executable with different command line parameters, launching a project, or even debugging a static method.

Naturally, ReSharper Build integrates nicely with Run Configurations, providing a drop-down of different configurations in the ReSharper Build & Run tool window. From here, you can select the default configuration that will happen when you run or debug, or define new ones.
And finally, a small tip to finish up — ReSharper Build monitors the public API surface of your assemblies. To reduce unnecessary builds, consider using “internal” instead of “public”. If a class, interface, method, etc. isn’t actually required to be public, making it internal reduces the API surface being monitored, and will reduce the number of unnecessary rebuilds.
Conclusion
We are very excited to launch a new feature such as this. We’re hoping it will have as much of a positive impact on your build times, as ReSharper has had on your development experience.
Please download the latest EAP and try it out with your projects, and PLEASE let us know if you encounter problems. This is why we run the Early Access Program — to get feedback on products before they’re finalised, to find issues before we release. Let us know if it’s working for you, and especially let us know if it doesn’t!


