TeamCity
Powerful CI/CD for DevOps-centric teams
How to Build a CI/CD Pipeline for Android Projects

This is a guest article by Kumar Harsh, draft.dev.
If you ship Android app releases frequently, you probably already understand the value of well-defined build, test, and deployment workflows. Without resilient, automated DevOps workflows in place, it can be difficult to maintain a high release velocity. Automating these through continuous integration and continuous deployment (CI/CD) can make your life a lot easier and allow you to detect bugs earlier and release faster.
JetBrains TeamCity is a CI/CD platform for building robust pipelines. It offers seamless integration with popular Android development tools and features a user-friendly interface for configuring build and test stages.
This article will show you how to set up a CI/CD pipeline for your Android project using JetBrains TeamCity. You’ll explore the key components of Android CI/CD pipelines and dive into configuring a few sample pipelines with TeamCity.
Understanding the Android CI/CD pipeline
An effective CI/CD pipeline for Android development contains all of the steps included in a standard DevOps pipeline and augments it with additional processes like artifact signing and auto-deployment to internal tracks on the Google Play Store. Here is a quick overview of all the steps involved in a typical Android CI/CD pipeline:
1. Code checkout and version control integration: The pipeline begins by fetching the latest code changes from your version control system (VCS), such as Git. If you’re using TeamCity, you’ll benefit from its integration with popular version control tools and automatic triggering of pipelines upon code commits or merges.
2. Build automation with Gradle: Gradle, the standard build tool for Android projects, takes center stage in this step. TeamCity executes Gradle commands to compile your code, assemble resources, and generate build artifacts. TeamCity’s build runners provide compatibility with different Gradle versions and customizable environments for build configurations.
3. Unit and integration testing for multiple Android versions/platforms: The next step involves running unit tests that verify individual code modules and integration tests (including UI tests) that check how different components interact. TeamCity allows you to configure multiple test runners and frameworks (e.g. JUnit, Espresso) and execute tests targeting various Android versions and platforms using emulators or device labs.
4. Static code analysis (featuring JetBrains Qodana) and code coverage reporting: Static code analysis helps identify potential bugs, security vulnerabilities, and coding style inconsistencies early on. TeamCity integrates with JetBrains Qodana, a static code analysis tool that offers features like code smell detection, complex code analysis, and integration with various programming languages, ensuring comprehensive code quality checks. Additionally, TeamCity can generate code coverage reports that indicate which parts of your code are exercised by unit tests. This helps developers focus on areas with weak coverage.
5. Artifact generation and signing (APKs and AABs): After successful builds and tests, the next step involves creating deployable artifacts. For Android apps, this typically involves generating signed Android Package Kits (APKs) or Android App Bundles (AABs). TeamCity allows you to automate the signing process within the pipeline using build steps.
6. Deployment to internal testing and production environments (Google Play, beta channels): CI/CD pipelines can automate app deployment to various environments. TeamCity allows configuration for deploying to internal testing platforms or directly to production channels on Google Play.
7. Continuous monitoring and feedback loops: A robust CI/CD pipeline doesn’t end with deployment. TeamCity integrates with monitoring tools, enabling you to track app performance, identify crashes, and gather user feedback. This feedback loop allows developers to react quickly to issues and continuously improve their app’s quality.
Building the pipeline with TeamCity
Now that you’ve explored the general CI/CD pipeline structure, let’s dive into building one using TeamCity. The following sections guide you through setting up TeamCity, creating build configurations tailored to your Android project, integrating automated testing, and finally, configuring packaging and deployment of your app.
To keep things simple, this tutorial uses the cloud-hosted version of TeamCity, which comes with a fourteen-day free trial. You can sign up for it using your GitHub, GitLab, Bitbucket, or Google Account, or by using the old-school combination of your email address and password. Make sure to activate your trial or subscription before moving to the next step.
However, you can also use TeamCity Cloud with self-hosted build agents or even TeamCity On-Premises for the purposes of this tutorial. Keep in mind that using self-hosted build agents or TeamCity On-Premises would require you to install Android SDK on your agents separately.
Setting up TeamCity
Once you have access to a TeamCity Cloud instance, here’s what your initial view will look like:

To get started with an Android project, click Create project… in the middle of the page. Then, you’ll be asked to provide a link to the source code of your project. If you signed up using a Git hosting provider (such as GitHub or Bitbucket Cloud), feel free to check out its corresponding section and use its dedicated project creation process.
However, if you have the repository URL, you can directly use it in the From a repository URL tab. TeamCity will automatically detect the Git hosting provider and pull in your project from there.

If you don’t have an Android project at hand, you can use the following repository to follow the tutorial:
bash
https://github.com/krharsh17/android-app-teamcity
If the repository you’re trying to access is private or secured using a username and password combination, you can provide it here so that TeamCity can access it. Once you’ve entered the repository URL (and any additional details as needed), click Proceed.
On the next page, TeamCity Cloud will verify the connection to the VCS repository. Once it’s successful, TeamCity will pull in some metadata related to the project, such as its name, its default branch, etc. You can modify these values before they are stored in the TeamCity project.

Once you’re happy with the information on this page, click the Proceed button. TeamCity will then begin to automatically detect any build steps applicable to the repository based on the available configuration files in the repository. Since this repository has Gradle-based configuration files, it will automatically suggest a set of Gradle tasks you can use to build the app from the repository (in this case, clean and build).
Check the box next to the Gradle build step, and click Use selected:

Once done, you’ll receive a small banner saying you can now run the first build in the project. Click Run at the top right to start the first build:

Once you click the button, a build will be queued, which will then wait for a build agent to become available. You can click Projects in the top navigation pane and choose the running build to view its properties and status:

The build will be completed in about 5–6 minutes. Congratulations! You’ve set up your first Android CI/CD pipeline with TeamCity. Also, since you used a VCS repository URL to set up this pipeline, it’s been configured to automatically poll the repository URL at fixed intervals to see if any new changes have been pushed to the repo. If new changes are found, the pipeline will automatically pull the latest commit and run the build again.
You can further enhance this by setting up platform-specific webhooks. For instance, the repository you just set up is hosted on GitHub. TeamCity allows you to conveniently install a GitHub webhook so that GitHub automatically sends out a notification to TeamCity every time there is some activity on the repo:

You can go ahead and do that if you’d like to. However, it’s not necessary for the purposes of this tutorial.
Configuring build artifacts
The repository you have set up includes two flavors (Free and Paid). For both of these flavors, there are two build variants (debug and release). This means that the result of a build task will include four binary files, one for each of the possible combinations of flavors and variants. Let’s configure the pipeline to extract and make these artifacts available for access after the pipeline has finished running.
To do that, click Projects in the top navigation pane and click Build under Android App Teamcity to open the details page for the build configuration titled Build:

Here, click the Edit configuration button in the top right-hand corner of the screen:

This is where you can configure the general settings for your build configuration. You’ll notice there’s a field titled Artifact paths towards the bottom of the list. This is where you need to define the paths of the artifacts that you wish to extract and retain after the build finishes running:

When you run the Gradle build task, the artifacts generated by Gradle are stored in app/build/outputs/apk. Therefore, you need to enter the following under Artifact paths:
app/build/outputs/apk/*/*/* => output
You add /*/*/* after app/build/outputs/apk because the complete path of an APK binary generated after a build looks like this: app/build/outputs/apk/<flavor>/<variant>/app-<flavor>-<variant>-unsigned.apk.
To accommodate all possible values of <variant>, <flavor>, and binary file names, we’ve used the wildcard *.
=> is a feature of Ant-style paths and is used to separate output and input directories. output is the name of the folder in which the final binaries will be stored.
Once you’ve added this, click the Save button at the bottom of the page. You’ll see a yellow banner saying your changes have been saved:

You can now try running the pipeline again using the Run button at the top right of the page to view the generated artifacts after the build is completed:

You’ve now set up a pipeline that’s triggered every time a commit is pushed to the main branch of your repo. This pipeline generates unsigned build artifacts for all flavor-variant combinations in your project, runs unit tests, and makes the build artifacts available for viewing.
Next, you’ll learn how to customize tests.
Customizing tests
As mentioned before, the Gradle task build also takes care of running unit tests on all generated build artifacts. However, there can be situations where you only want to run tests on a few variants of your app. In that case, you need to replace the clean build tasks with the appropriate tasks for your use case.
For instance, if you want to create an unsigned APK for the release variant of the free flavor of the app and run unit tests on it, you would replace clean build with assembleFreeRelease testFreeReleaseUnitTest. To do that, click on Projects in the top navigation pane and then click Build under Android App Teamcity. On the next page, click the Edit configuration button at the top right, just like you did in the previous step.
You should be on the General Settings page for the build configuration, which you accessed earlier to configure the artifacts path. On the left navigation pane, click Build Step: Gradle.

This will open the Build Steps page, where you can modify the build steps for this build configuration. Click Edit on the right side of the first build step (titled Gradle):

You can now update the Gradle tasks field to change the tasks that will be executed as part of this build. Replace clean build with assembleFreeRelease testFreeReleaseUnitTest:

Now, click Save at the bottom. Once the changes are saved, click the Run button at the top right. This will trigger another run of this build configuration.
Once the build finishes running, you can take a look at the reports generated by TeamCity in the Tests tab on the build run details page:

For each of the unit tests, you can view how long it took to run and if there was any stack trace left after the test was completed. You can also click the three dots on the far right of the test and select Show test history to compare the performance of the current run of the test with its past runs:

You can assign the investigation of a test to a team member and track its investigation history through TeamCity itself. If you’d like, you can also download the test results by clicking the Download link on the test overview page.
The number of tests in this repo is quite small, so the build run was completed in a few minutes. However, in a real-world project, there are usually hundreds, if not thousands, of unit tests. In such a situation, running all of these tests on the same runner agent one after another would take a significant amount of time. To solve this, you can use TeamCity’s parallel tests build feature.
TeamCity is capable of parallelizing your test runs by splitting them over multiple build agents, helping you to minimize the overall time it takes to run all the tests. To set this up, click the Edit configuration button on the build run details page and click Build Features on the left navigation pane:

On the Build Features page, click the + Add build feature button. In the dialog box that opens, choose Parallel tests in the dropdown menu:

You need to enter the maximum number of batches for executing tests in parallel. Enter a value between 4 and 8 to get the maximum benefit from parallelization.

Once done, click the Save button. You can now try running tests for a repository that has a larger number of test cases to see the difference in performance for yourself!
Managing multiple builds
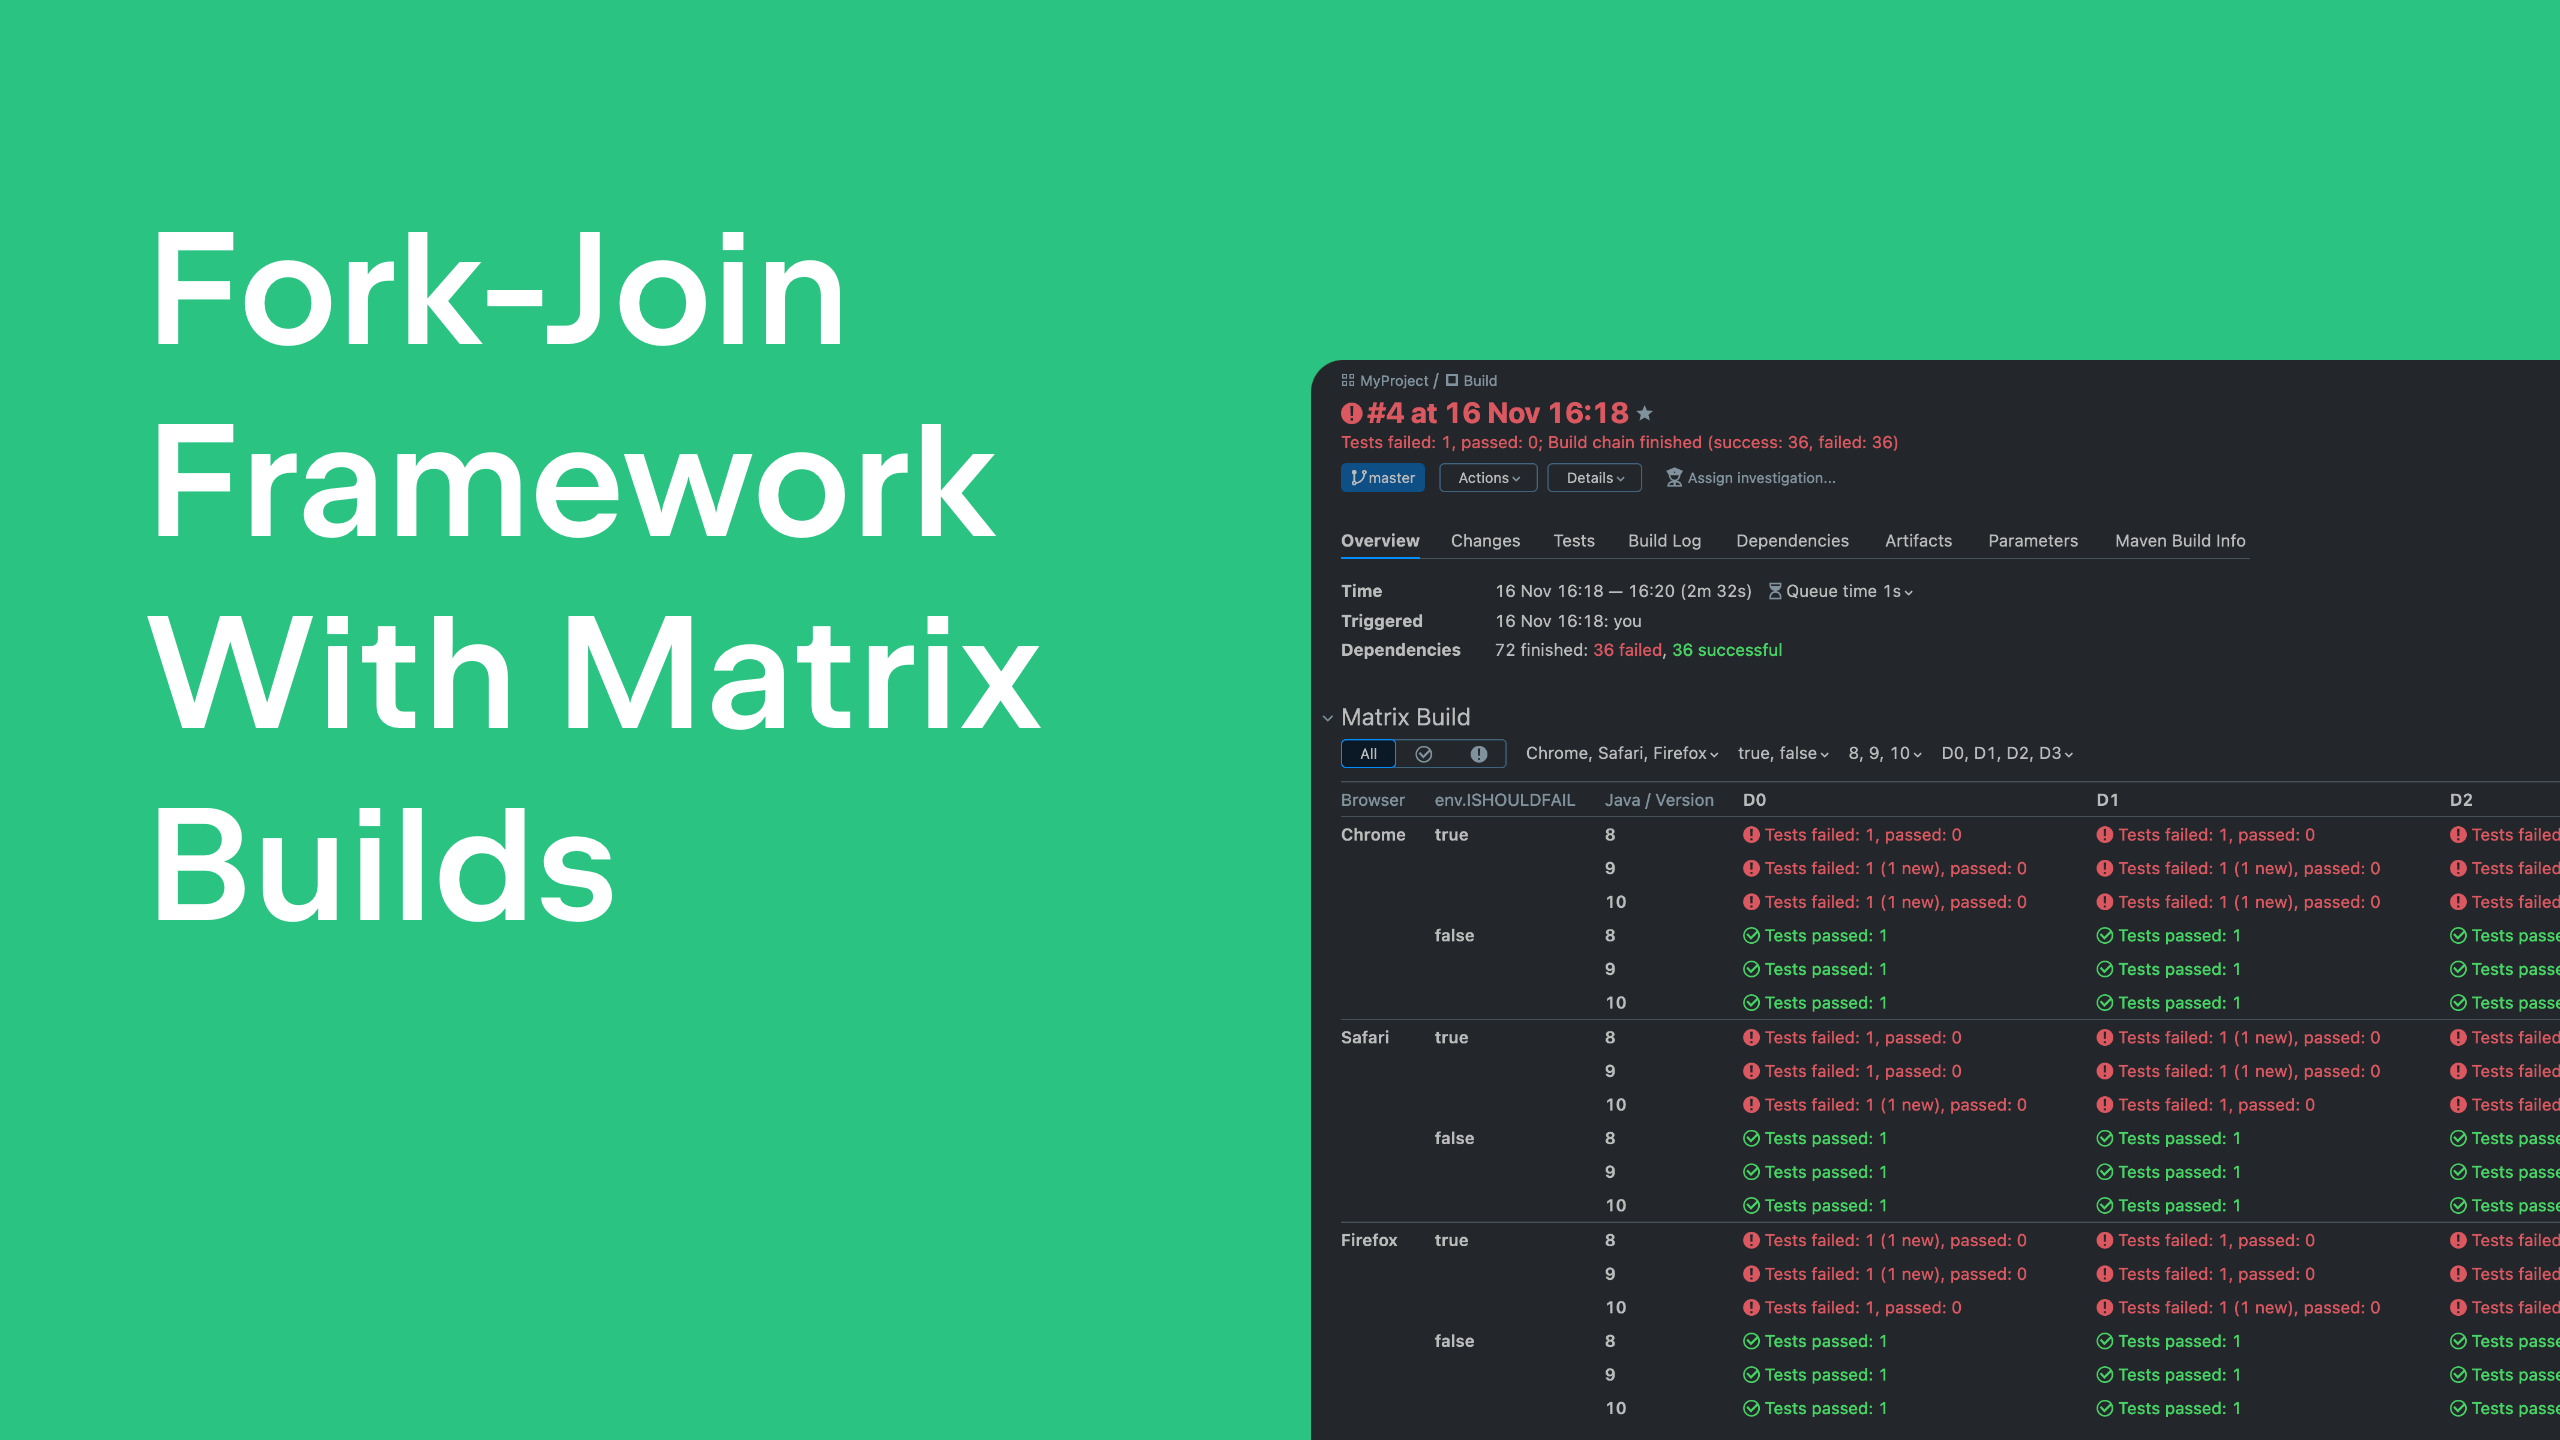
Since this app has multiple flavors and variants, it would make sense to make use of the matrix builds offered by TeamCity to speed up build pipelines by splitting each variant-flavor combination into its own run instance. Additionally, this also allows you to build specific combinations of the application without having to necessarily build all or just one variant-flavor combination.
To do this, you need to create a new build configuration. Click Projects in the top navigation pane and click Android App Teamcity. On the project details page, click the Edit project… button in the top right-hand corner:

On the General Settings page, click the + Create build configuration button under the Build Configurations section:

This will take you to the Create Build Configuration wizard. Enter the same repository URL as before (https://github.com/krharsh17/android-app-teamcity) in the Repository URL field and click Proceed:

Set the Build configuration name on the next page to Matrix Builds, and leave the default values in all other fields. Then, click the Proceed button:

TeamCity will notify you that a similar VCS root has been found. Click the Use this button in this dialog box:

This will ensure that TeamCity polls the VCS URL only once for both of these build configurations to avoid additional performance overhead.
Once the build configuration is complete, you should get a notification confirming it has been created:

This time, you don’t need to set up the clean build Gradle tasks, so don’t check any boxes on this page. Instead, click the link above the table that says configure build steps manually.
You’ll be taken to the New Build Step page, where you can choose your preferred runner for the build step:

Choose Gradle from this list. On the next page that opens, enter clean test%env.FLAVOR%%env.VARIANT% in the Gradle tasks field:

This will ensure that the runner first cleans the build folders and then runs the test task for the flavor and variant provided by the environment variables. For example, for the release variant of the free app, the task would be called clean testFreeRelease.
Scroll down and click the Save button. You’ll then be taken back to the Build Steps page:

Click the + Add build step button and add another Gradle build step with the task assemble%env.FLAVOR%%env.VARIANT%. This step will generate build artifacts for the given flavor and variant of the app.
Once done, your Build Steps page should list the two Gradle-based build steps you created with a quick summary of the Gradle tasks that will be run as part of them:

Now, you need to do two more things: define the values for the two environment variables you used and configure artifact paths.
You already know how to set the artifact paths for a build configuration. For this build configuration, set the value of the Artifact paths field to app/build/outputs/apk/*/*/* => output, the same as for the previous one.
To set the matrix values for the flavor and variant fields, click Build Features on the left navigation pane. On the Build Features page, click the + Add build feature button and search for Matrix Build in the dropdown menu in the dialog box:

Once you select the Matrix Build option from the dropdown list, you’ll be asked to provide parameters for the matrix build along with their values. Provide a parameter’s name as env.FLAVOR and its value as Free. Add another parameter, env.VARIANT, with two values: Release and Debug.

Now, click the Save button. This completes the setup of matrix builds on this pipeline. You can try testing it by clicking the Run button in the top right-hand corner of the page.
You’ll now be able to view the results of each run separately, along with separate build artifacts and test results.

You can click the Dependencies tab to view the build run details for each of the individual runs:

As you’ve seen before, you can explore each of these entries as a standalone, complete build run.
Packaging and deployment
One key part of an Android CI/CD pipeline is pushing out the release binaries to Google Play so they can be published to users. You can use TeamCity and Gradle Play Publisher (GPP) to automate this as well.
There are a few prerequisites before you start this process:
1. Make sure you have manually uploaded the first APK/AAB for your Android project to Google Play Console.
2. You must have a valid signing configuration.
3. You need to create a service account on Google Cloud Platform to be able to use the Google Play Developer APIs and retrieve its JSON credentials file. To do this, follow these steps before progressing to the next step.
Once you’ve completed the steps detailed in the link above, you need to install and configure GPP in your Android project. To do that, add the following line of code to the plugins block in the app-level build.gradle.kts file:
kt
id("com.github.triplet.play") version "3.9.1"
Then, at the root level of this file, add a new play {} block with the following content:
kt
play {
    serviceAccountCredentials.set(file("play_config.json"))
    track.set("internal")
    releaseStatus.set(ReleaseStatus.DRAFT)
    defaultToAppBundles.set(true)
}
This configures GPP to use the service account credentials from a file named play_config.json, set the track to internal and release status to DRAFT when pushing binaries to Play Console, and use app bundles in place of APKs by default.
This concludes the necessary configuration steps for your Android project. Commit and push these changes to the GitHub repository before proceeding.
You’ll now create a new build configuration for pushing binaries to Google Play in TeamCity. Follow the same steps as before to create a new build configuration. Set the first build step to use Gradle as the runner and bundleFreeRelease as the Gradle task to run:

Add another step to this build configuration, but choose Command Line as the build runner this time:

The new build step page for the command line runner will open. You need to provide the custom script that signs and publishes the app bundle to Google Play. Enter the following code in the Custom script field:
# Create the keystore file from the environment variables
echo %env.ANDROID_KEYSTORE_FILE% > keystore.jks.b64
base64 -d -i keystore.jks.b64 > app/keystore.jks

# Sign the AAB using the keystore and credentials retrieved from the environment variables
jarsigner \
-keystore app/keystore.jks \
-storepass %env.KEYSTORE_STORE_PASSWORD% \
-keypass %env.KEYSTORE_KEY_PASSWORD% \
-signedjar release.aab \
app/build/outputs/bundle/freeRelease/app-free-release.aab \
%env.KEYSTORE_KEY_ALIAS%

# Create the GCP service account credentials file from the environment variables
echo %env.PLAY_CONFIG_JSON% > play_config.json.b64
base64 -d -i play_config.json.b64 > app/play_config.json

# Use GPP to publish the app bundle
./gradlew publishFreeBundle --artifact-dir release.aab
The code has inline comments to explain what each line does. Once done, click the Save button at the bottom of the page:

You also need to define the following environment variables to provide the script with the right credentials to sign and publish the app:
bash
ANDROID_KEYSTORE_FILE
KEYSTORE_KEY_ALIAS
KEYSTORE_KEY_PASSWORD
KEYSTORE_STORE_PASSWORD
PLAY_CONFIG_JSON
Click Parameters in the left navigation pane to go to a page where you can define these environment variables. You’ll see that TeamCity has already populated the list of required variables on this page for you:

For KEYSTORE_KEY_ALIAS, KEYSTORE_KEY_PASSWORD, and KEYSTORE_STORE_PASSWORD, feel free to click Edit and provide their values in the resultant dialog boxes:

For ANDROID_KEYSTORE_FILE and PLAY_CONFIG_JSON, you first need to convert the files into Base64 using a tool like openssl, and then paste the Base64-encoded contents into the value fields of these variables.
This sets up the pipeline to build and publish a signed release of the free version of your application. You can try clicking the Run button at the top right of the page to trigger a run and see it in action.
Once the run succeeds, you’ll see a BUILD SUCCESSFUL message in the logs:

And here is the latest release of your app, available on the internal track in Google Play Console and ready for you to edit and promote:

You’ll notice that the new release has the same developer-facing name (“2.0”) as the previous one. This is because no name was specified in GPP’s configurations. You can take a look at the GPP documentation to learn how to do that yourself.
Best practices and tips
Now that you can set up your own pipeline for Android using TeamCity, here are a few key best practices you can consider implementing to ensure your pipelines are efficient and fast:
1. Version control and versioning practices: An effective CI/CD pipeline strongly depends on a robust version control system (VCS) like Git. Ensure your team adheres to clear versioning practices and implements a consistent branching strategy (e.g. feature branches). Develop customized pipelines for different branches to ensure you aren’t running unnecessary steps on WIP code, for instance.
2. Clear pass/fail criteria and thresholds: Clearly define what constitutes a successful build and test run. This can involve setting thresholds for unit test coverage, getting a green light on other code checks, and so on. You should configure TeamCity with pass/fail criteria for each stage of the pipeline to ensure robust builds and encourage developers to write better code.
3. Leveraging TeamCity notifications and alerts: TeamCity offers a detailed notification system to help notify users about pipeline events across web browsers, email, Slack, and IDEs. Make sure to set up alerts for build failures and critical test failures to keep your development team informed and allow for prompt issue resolution.
4. Collaboration and feedback loop: An effective CI/CD pipeline fosters collaboration within your development team. You should use build pipeline visualization within TeamCity to provide developers with a clear picture of the entire build and test process. You can also use test and build investigations to assign and collaborate on investigations into why a build or a test failed, right within TeamCity. Also, encourage team members to review build failures and code coverage reports to identify areas for improvement. This can help develop a culture of code quality and continuous improvement.
5. Security measures (code signing and access control): Make sure to configure your TeamCity instance with proper access controls, restricting access to sensitive information like signing keys to only those users who need access to the information. You should consider using a tool like HashiCorp Vault to manage and rotate all sensitive credentials that you might be using in your builds. You can check out a few other key security recommendations from TeamCity here.
Conclusion
In this article, you learned how to build and manage a detailed CI/CD pipeline for your Android development projects using JetBrains TeamCity. You explored the key stages of an Android CI/CD pipeline, from code checkout and version control integration to signing, deployment, and monitoring. You learned how TeamCity facilitates each stage and streamlines your development workflow. Toward the end, you also learned some key best practices to ensure your pipeline operates efficiently.
By using TeamCity to set up your Android pipelines, you can make your workflows significantly more efficient. This directly results in faster release cycles, fewer bugs, and ultimately, high-quality Android apps, delivered efficiently. So, take the first step towards a more streamlined development process, and start building your CI/CD pipeline today!
Subscribe to TeamCity Blog updates