

JetBrains AI
Supercharge your tools with AI-powered features inside many JetBrains products
ACP와 Deep Agents로 현대 소프트웨어 엔지니어링 명확히 이해하기

이 게스트 글의 기고자인 Jacob Lee는 LangChain의 창립 소프트웨어 엔지니어로, 실제로 자신이 선호하는 작업 방식에 더 잘 맞는 코딩 에이전트를 구축하고 있습니다. 이 글에서는 Deep Agents와 에이전트 클라이언트 프로토콜(ACP)을 사용해 구축한 결과물과 그 과정에서 얻은 인사이트를 설명합니다.
저는 제 소프트웨어 엔지니어 업무에서 점점 더 많은 부분을 LLM에 위임하게 될 것이라는 데 동의합니다. 자존심 때문인지는 몰라도 여전히 특정 상황에서는 제가 Anthropic의 모델보다 더 나은 코드를 작성할 수 있다고 생각하지만, Claude Code를 초창기부터 적극 활용해 왔고 현재는 직접 코드를 작성하기보다 거의 수정과 제안을 지시하는 편입니다.
이러한 변화는 제 생산성을 크게 향상했지만, 핵심 개발 업무를 불투명한 외부 모델에 의존한다는 것에 대한 불안감도 커졌습니다. 자체 모델을 구축하는 것은 여러 현실적인 선택지가 아니었지만(모델 해석 가능성 또한 여전히 해결되지 않은 과제입니다), 에이전트 하네스와 그 위에 구축된 UX는 결국 소프트웨어일 뿐이고, 소프트웨어라면 내가 이해할 수 있는 영역이었습니다. 그래서 육아 휴직 동안 시간이 조금 생겼을 때, 제 요구 사항에 맞는 몇 가지 도구를 직접 만들어 보기로 했습니다.
저는 LangChain이라는 스타트업에서 일하고 있으며, 자체 오픈 소스 에이전트 구성 요소를 개발해 왔습니다. 그래서 Deep Agents 프레임워크와 에이전트 클라이언트 프로토콜(ACP) 사이를 연결하는 어댑터를 구축하기로 결정했습니다. 목표는 단지 제 워크플로에 맞는 맞춤형 코딩 에이전트를 만드는 것이었지만, 결과는 기대 이상이었습니다. 몇 달 만에 이 에이전트는 제 주요 개발 환경에서 Claude Code를 완전히 대체했고, LangSmith를 실행하면 에이전트의 모든 동작을 투명하게 관찰할 수 있는 부가적 이점까지 얻을 수 있었습니다. 이 글에서는 이 에이전트의 작동 방식과 여러분이 직접 설정하는 방법을 자세히 소개합니다.
터미널과 TUI 대신 IDE와 ACP를 선택한 이유
ACP는 클라이언트(주로 WebStorm이나 Zed 같은 IDE와 함께 사용)가 AI 에이전트와 상호 작용하는 방식을 정의하는 오픈 프로토콜입니다. 이를 통해 IDE에서 보고 있는 코드 컨텍스트를 에이전트에 즉시 전달하는 등의 편리한 작업을 수행할 수 있습니다.
저는 지난 10년간 소프트웨어를 전문적으로 개발하면서 IDE로 높은 생산성을 유지해 왔고, 지금도 여전히 다음과 같은 몇 가지 이유로 IDE의 가치를 높게 평가합니다.
- 저는 여전히 직접 코드를 편집하곤 합니다. 대부분은 에이전트에게 설명하는 것보다 더 빠르게 처리할 수 있는 소규모 수정이거나, 실행 중인 에이전트와 병렬로 디버그 구문을 추가하는 등의 작업을 할 때이고, 이러한 방식은 아직까지 어느 정도 이점을 제공합니다.
- IDE는 코드 컨텍스트를 확인하기에 매우 훌륭한 인터페이스입니다. 저는 보통 프롬프트를 작성하기 전에 문제의 전체 범위를 파악하거나, 현재 브랜치를 직접 검토할 때 활용합니다. 또한 에이전트에게 전체를
grep하도록 요청하는 것보다 특정 파일을 직접 지정하는 것이 더 빠른 경우도 많습니다.
이전에는 IDE의 별도 터미널 창에서 Claude Code를 사용했는데, 작동은 했지만 항상 서로 분리된 2개의 도구처럼 느껴졌습니다. 반면 JetBrains IDE에서는 에이전트가 기본 도구 창에 통합되어 자연스럽게 동작합니다. 현재 보고 있는 파일이나 코드 블록을 @mention으로 지정할 수 있어서, 제 대화 스레드에는 “이거 한번 봐 줘. 이상해 보여? @thisFile“과 같은 메시지가 많습니다.
작동 방식
에이전트
에이전트를 구성하는 여러 요소를 처음부터 직접 만들 수도 있지만, Deep Agents를 사용하면 적절한 기본 방향이 설정되어 시작점으로 삼기 좋으며 다음을 이용할 수 있습니다.
- 파일 시스템과 상호 작용하기 위한 도구(
read/write/edit_file,ls,grep등)
- 린트, 테스트 등의 검증을 에이전트가 실행할 수 있도록 지원하는 Shell access
- 이와 함께 human-in-the-loop 지원을 이용해 위험한 작업을 제한할 수 있습니다.
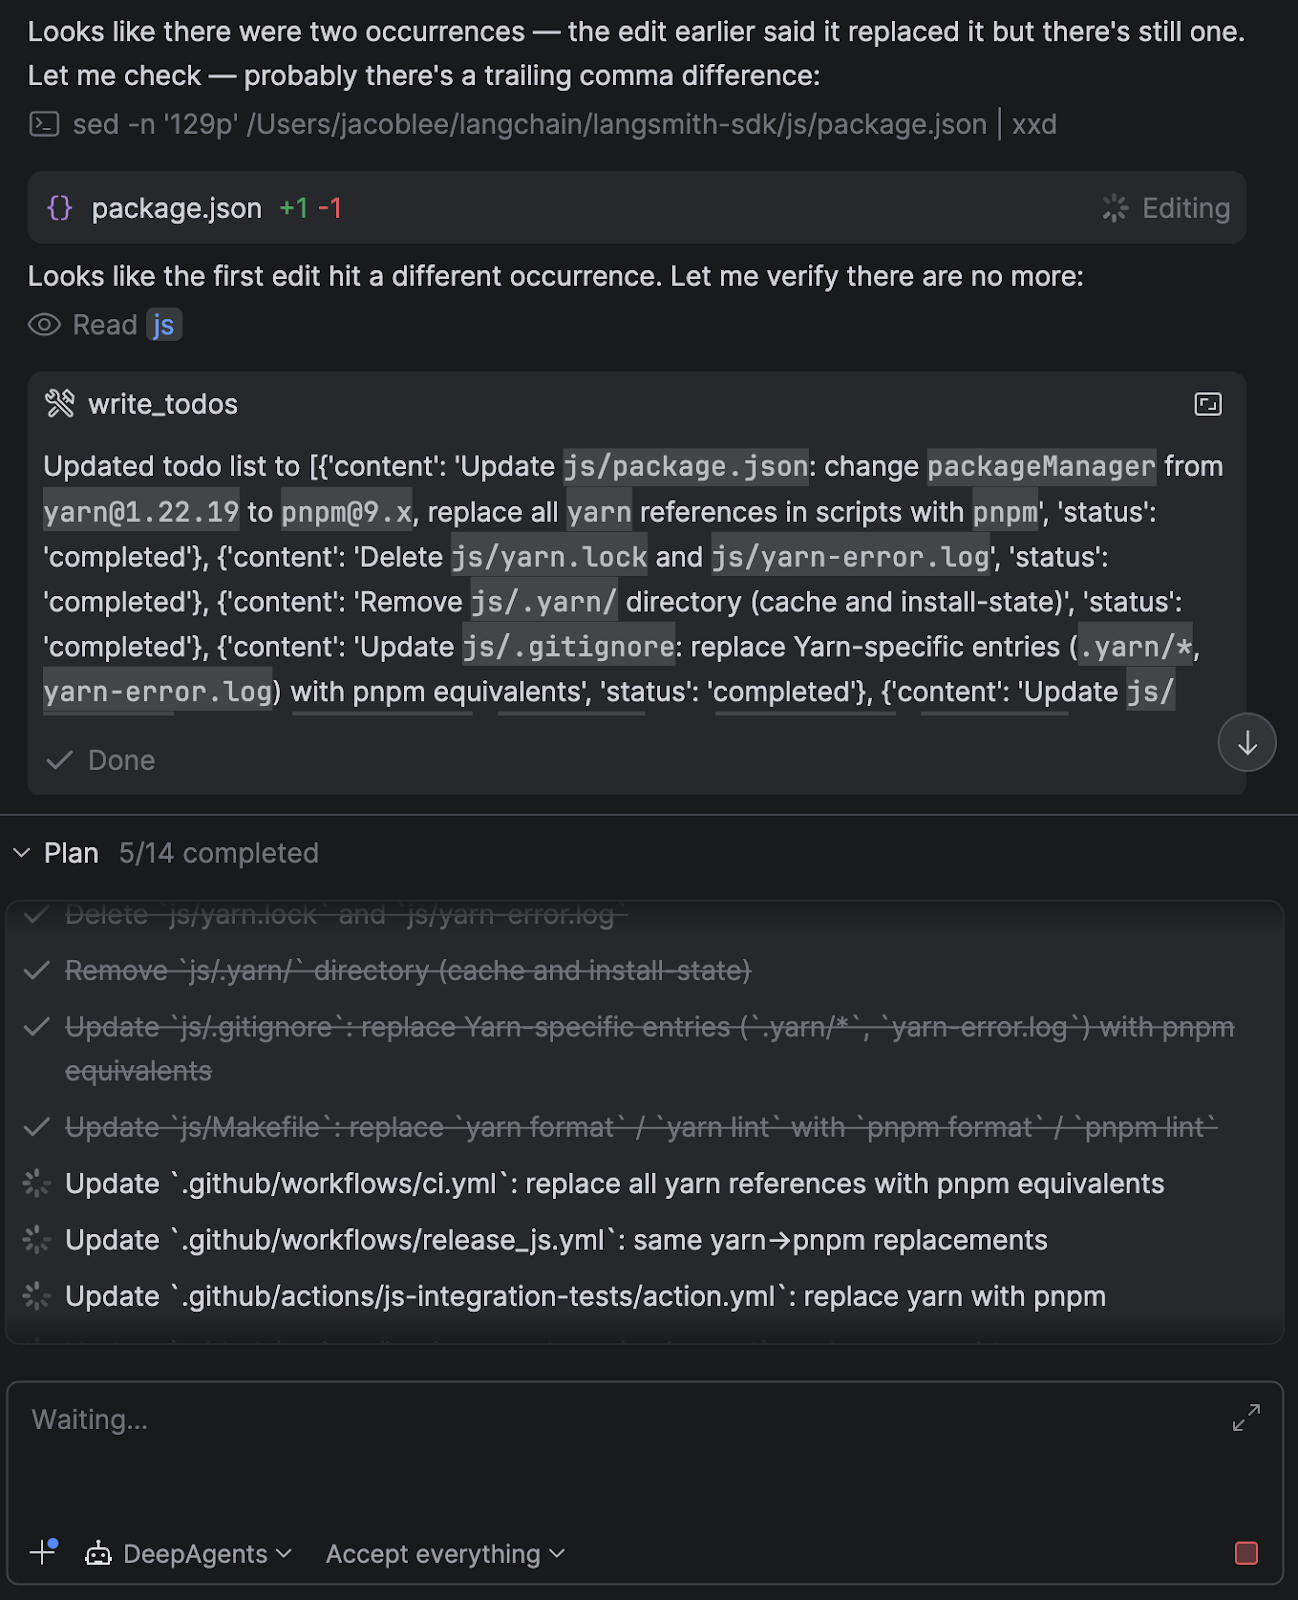
- 에이전트가 작업을 단계로 나누고 진행 상황을 추적하는 계획을 세우도록 하는
write_todos도구- 실제로 이는 긴 리팩터링 작업에서 에이전트의 집중도를 유지하는 데 큰 차이를 만듭니다.
- 병렬 처리 또는 작업 분리를 위해 독립적인 서브 에이전트를 생성하는 기능
- 각 서브 에이전트는 자체 컨텍스트를 가지며 독립적으로 실행되고 결과를 보고하여 모델의 컨텍스트 창을 효율적으로 관리할 수 있습니다.
- 스트리밍, 실행 취소, 프롬프트 캐시 처리, 컨텍스트 요약 등 기타 중요한 UX 기능
저는 현재 프로젝트 설정(IDE에서 열린 현재 디렉터리, git 저장소의 존재 여부, 패키지 관리자 탐지 등)에 대한 정보를 시스템 프롬프트에 추가하는 사용자 지정 미들웨어도 구현했습니다.
또한 새로운 CLI 구성 옵션을 만들지 않고도 Python으로 바로 스킬을 추가하거나 시스템 프롬프트를 조정하거나 사용자 지정 도구 또는 MCP 서버를 추가하는 등, 다양하게 구성할 수 있습니다.
ACP 어댑터
기본적인 에이전트 구성을 결정한 후에는 해당 에이전트를 ACP를 통해 클라이언트에 연결해야 했습니다. 저는 ACP 인터페이스를 구현하고 세션 수명 주기, 메시지 라우팅, 모델 전환, 스트리밍을 처리하는 어댑터를 만들었습니다.
인상적이었던 점은 에이전트의 기능이 ACP 개념에 매우 깔끔하게 매핑된다는 것이었습니다.
예를 들어 다음과 같은 문제가 있을 수 있습니다.
- 에이전트의 계획 단계(
write_todos)는 ACP의 agent plans에 자연스럽게 매핑됩니다.
- 에이전트의 요청(예: “이 명령어를 실행하고 싶습니다”)은 permission requests에 매핑됩니다.
- 스레드 및 세션 지속성은 Deep Agents의 체크포인터와 거의 1:1로 대응되었습니다.
프로토콜에 이미 제가 원하는 대부분을 처리할 수 있는 적절한 기본 구성 요소가 갖춰져 있었기 때문에, 별도의 글루 로직을 새로 설계할 필요가 별로 없었습니다. 전체 에이전트 러너는 대략 다음과 같으며, 도구 호출과 메시지 서식 지정은 제외되었습니다.
current_state = None
user_decisions = []
while current_state is None or current_state.interrupts:
    # Check for cancellation
    if self._cancelled:
        self._cancelled = False  # Reset for next prompt
        return PromptResponse(stop_reason="cancelled")

    async for stream_chunk in agent.astream(
        Command(resume={"decisions": user_decisions})
        if user_decisions
        else {"messages": [{"role": "user", "content": content_blocks}]},
        config=config,
        stream_mode=["messages", "updates"],
        subgraphs=True,
    ):
        if stream_chunk.__interrupt__:
            # If Deep Agents interrupts, request next actions from
            # the client via ACP's session/request_permission method
            user_decisions = await self._handle_interrupts(
                current_state=current_state,
                session_id=session_id,
            )
            # Break out of the current Deep Agent stream. The while
            # loop above resumes it with the user decisions
            # returned from the session/request_permission method
            break

        # ...translate LangGraph output into ACP
        # Tools that do not require interrupts are called
        # internally results are just streamed back here as well

        # current_state will be none when the agent has finished
        current_state = await agent.aget_state(config)

return PromptResponse(stop_reason="end_turn")
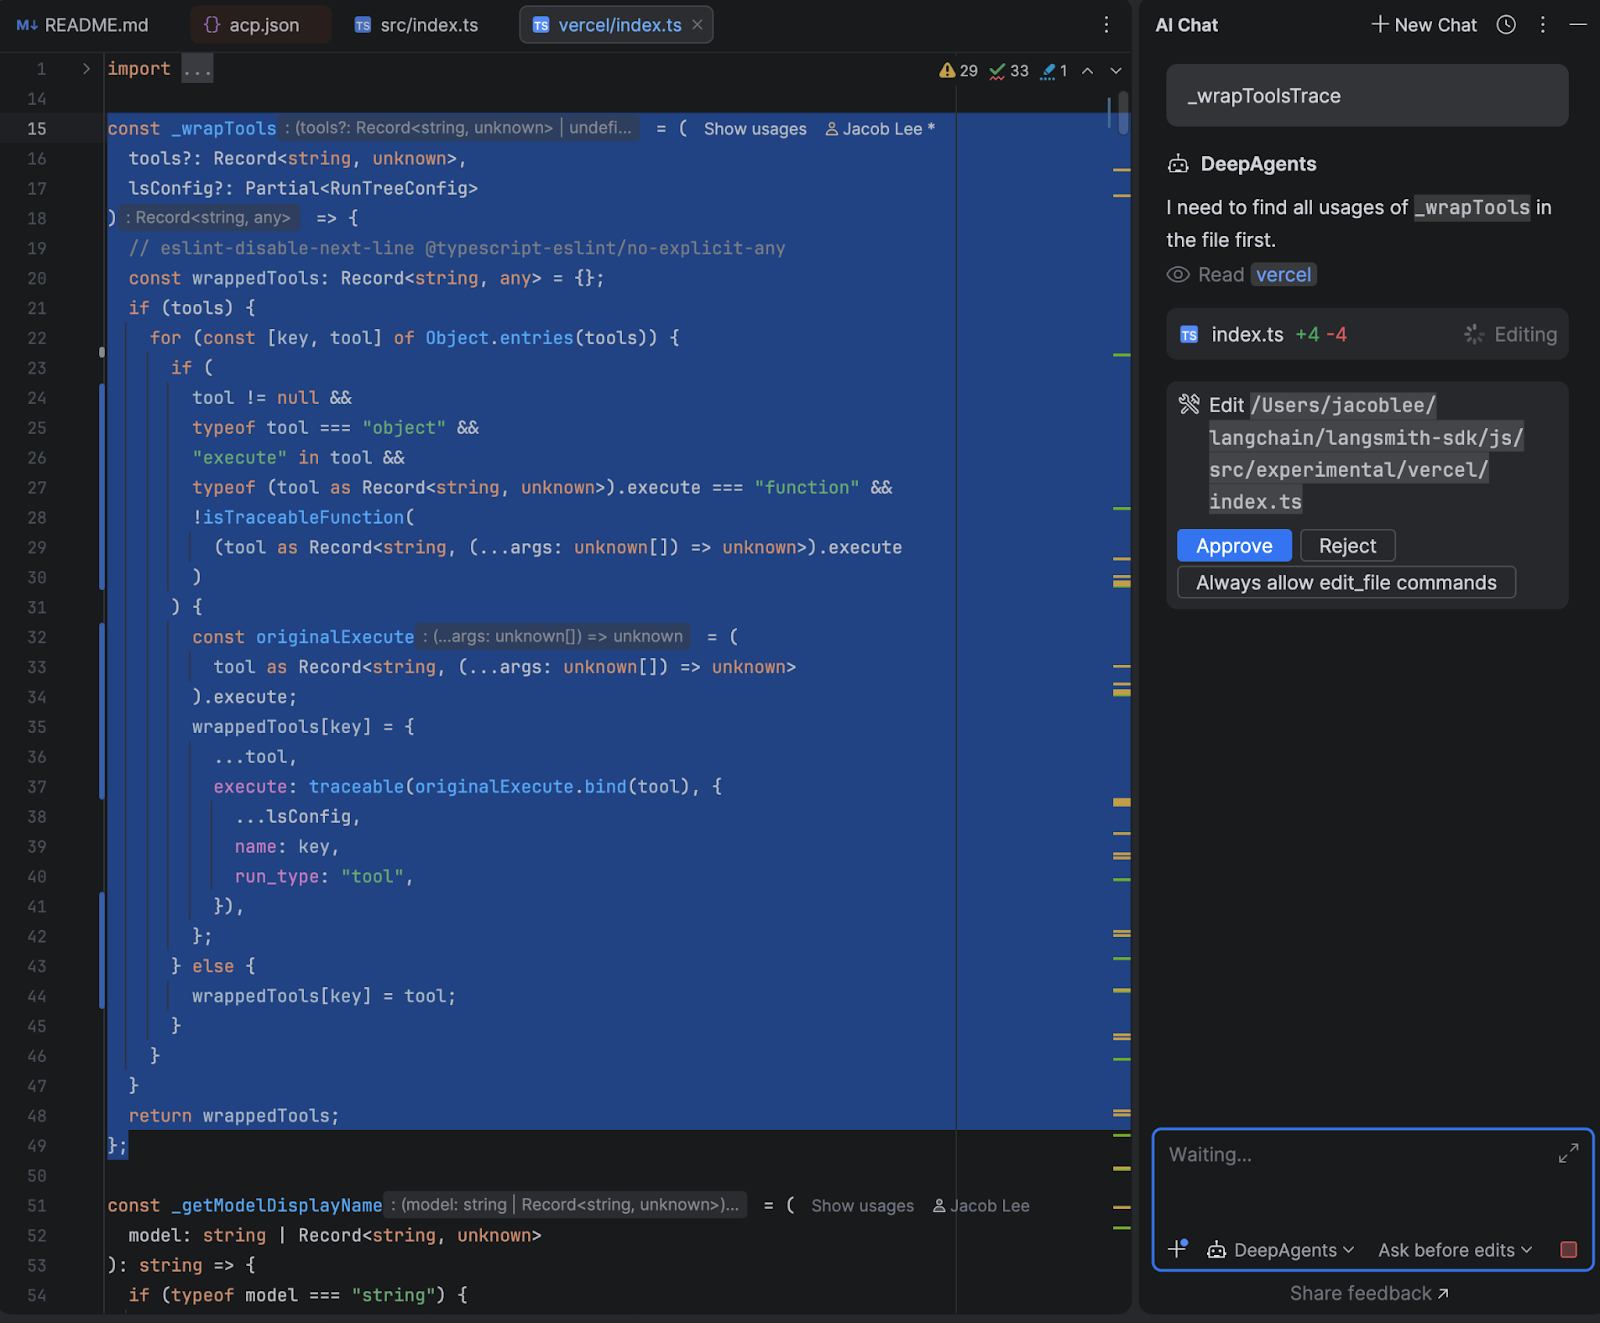
human-in-the-loop 흐름에 가장 많은 시간을 투자했습니다. 에이전트가 셸 명령어를 실행하거나 승인이 필요한 파일 편집을 수행하려고 할 때, 어댑터는 Deep Agents의 요청에 개입하여, 사용자가 선택한 권한 모드와 이전 승인 이력에 따라 즉시 실행을 재개하거나 IDE로 권한 요청을 전송합니다. 이때 해당 명령어 유형을 approve(승인), reject(거부) 또는 always-allow(항상 허용)하는 옵션을 선택할 수 있습니다.
always-allow는 세션 범위에 적용됩니다. 한 번 uv sync를 승인하고 ‘always allow’를 선택하면 이후의 uv sync 호출은 자동으로 프롬프트를 건너뜁니다. 다만 uv run script.py와 같은 유사한 명령어가 권한 검사를 건너뛰지 못하도록 조치를 취했습니다.
다음은 WebStorm에 표시되는 최종 결과입니다.
작업 결과
정식 평가를 수행하지는 않았지만, 몇 번의 반복만으로도 에이전트가 기대 이상으로 잘 작동하는 것을 보고 기분 좋은 놀라움을 느꼈습니다. Claude Code를 대체할 것이라고는 예상하지 못했지만, 이번 작업은 훌륭한 도그푸딩 사례가 되었고, OSS 팀이 제 피드백을 Deep Agents에 직접 반영할 수 있었습니다.
특히 설정 수준이 아닌 코드 수준에서 워크플로 제어권을 확보하려던 초기 목표도 효과적으로 달성되었습니다. 몇 주 전 Anthropic 장애가 발생했을 때, 저는 지연 없이 OpenAI의 gpt-5.4로 전환할 수 있었고, 그 과정에서 흥미로운 특성도 발견할 수 있었습니다. 또한 까다로운 작업에서는 세션 중간에 모델을 전환하며 다양한 측면을 살펴볼 수 있으며, GLM-5와 같은 오픈 소스 모델도 비용과 성능 측면에서 충분히 경쟁력이 있다는 점을 확인했습니다.
또 다른 장점은 LangSmith 추적을 통한 가시성 확보로, 문제가 발생했을 때 에이전트를 디버그하고 개선할 수 있습니다. 모델에 어떤 컨텍스트가 전달되었는지, 에이전트 어떤 도구를 호출했는지, 어디서 문제가 발생했는지 정확히 확인할 수 있어 이전에는 하네스 내부에 가려져 있던 동작을 이해하는 데 도움이 되었습니다. 다음은 이러한 추적이 작동하는 방식을 보여주는 예시입니다.
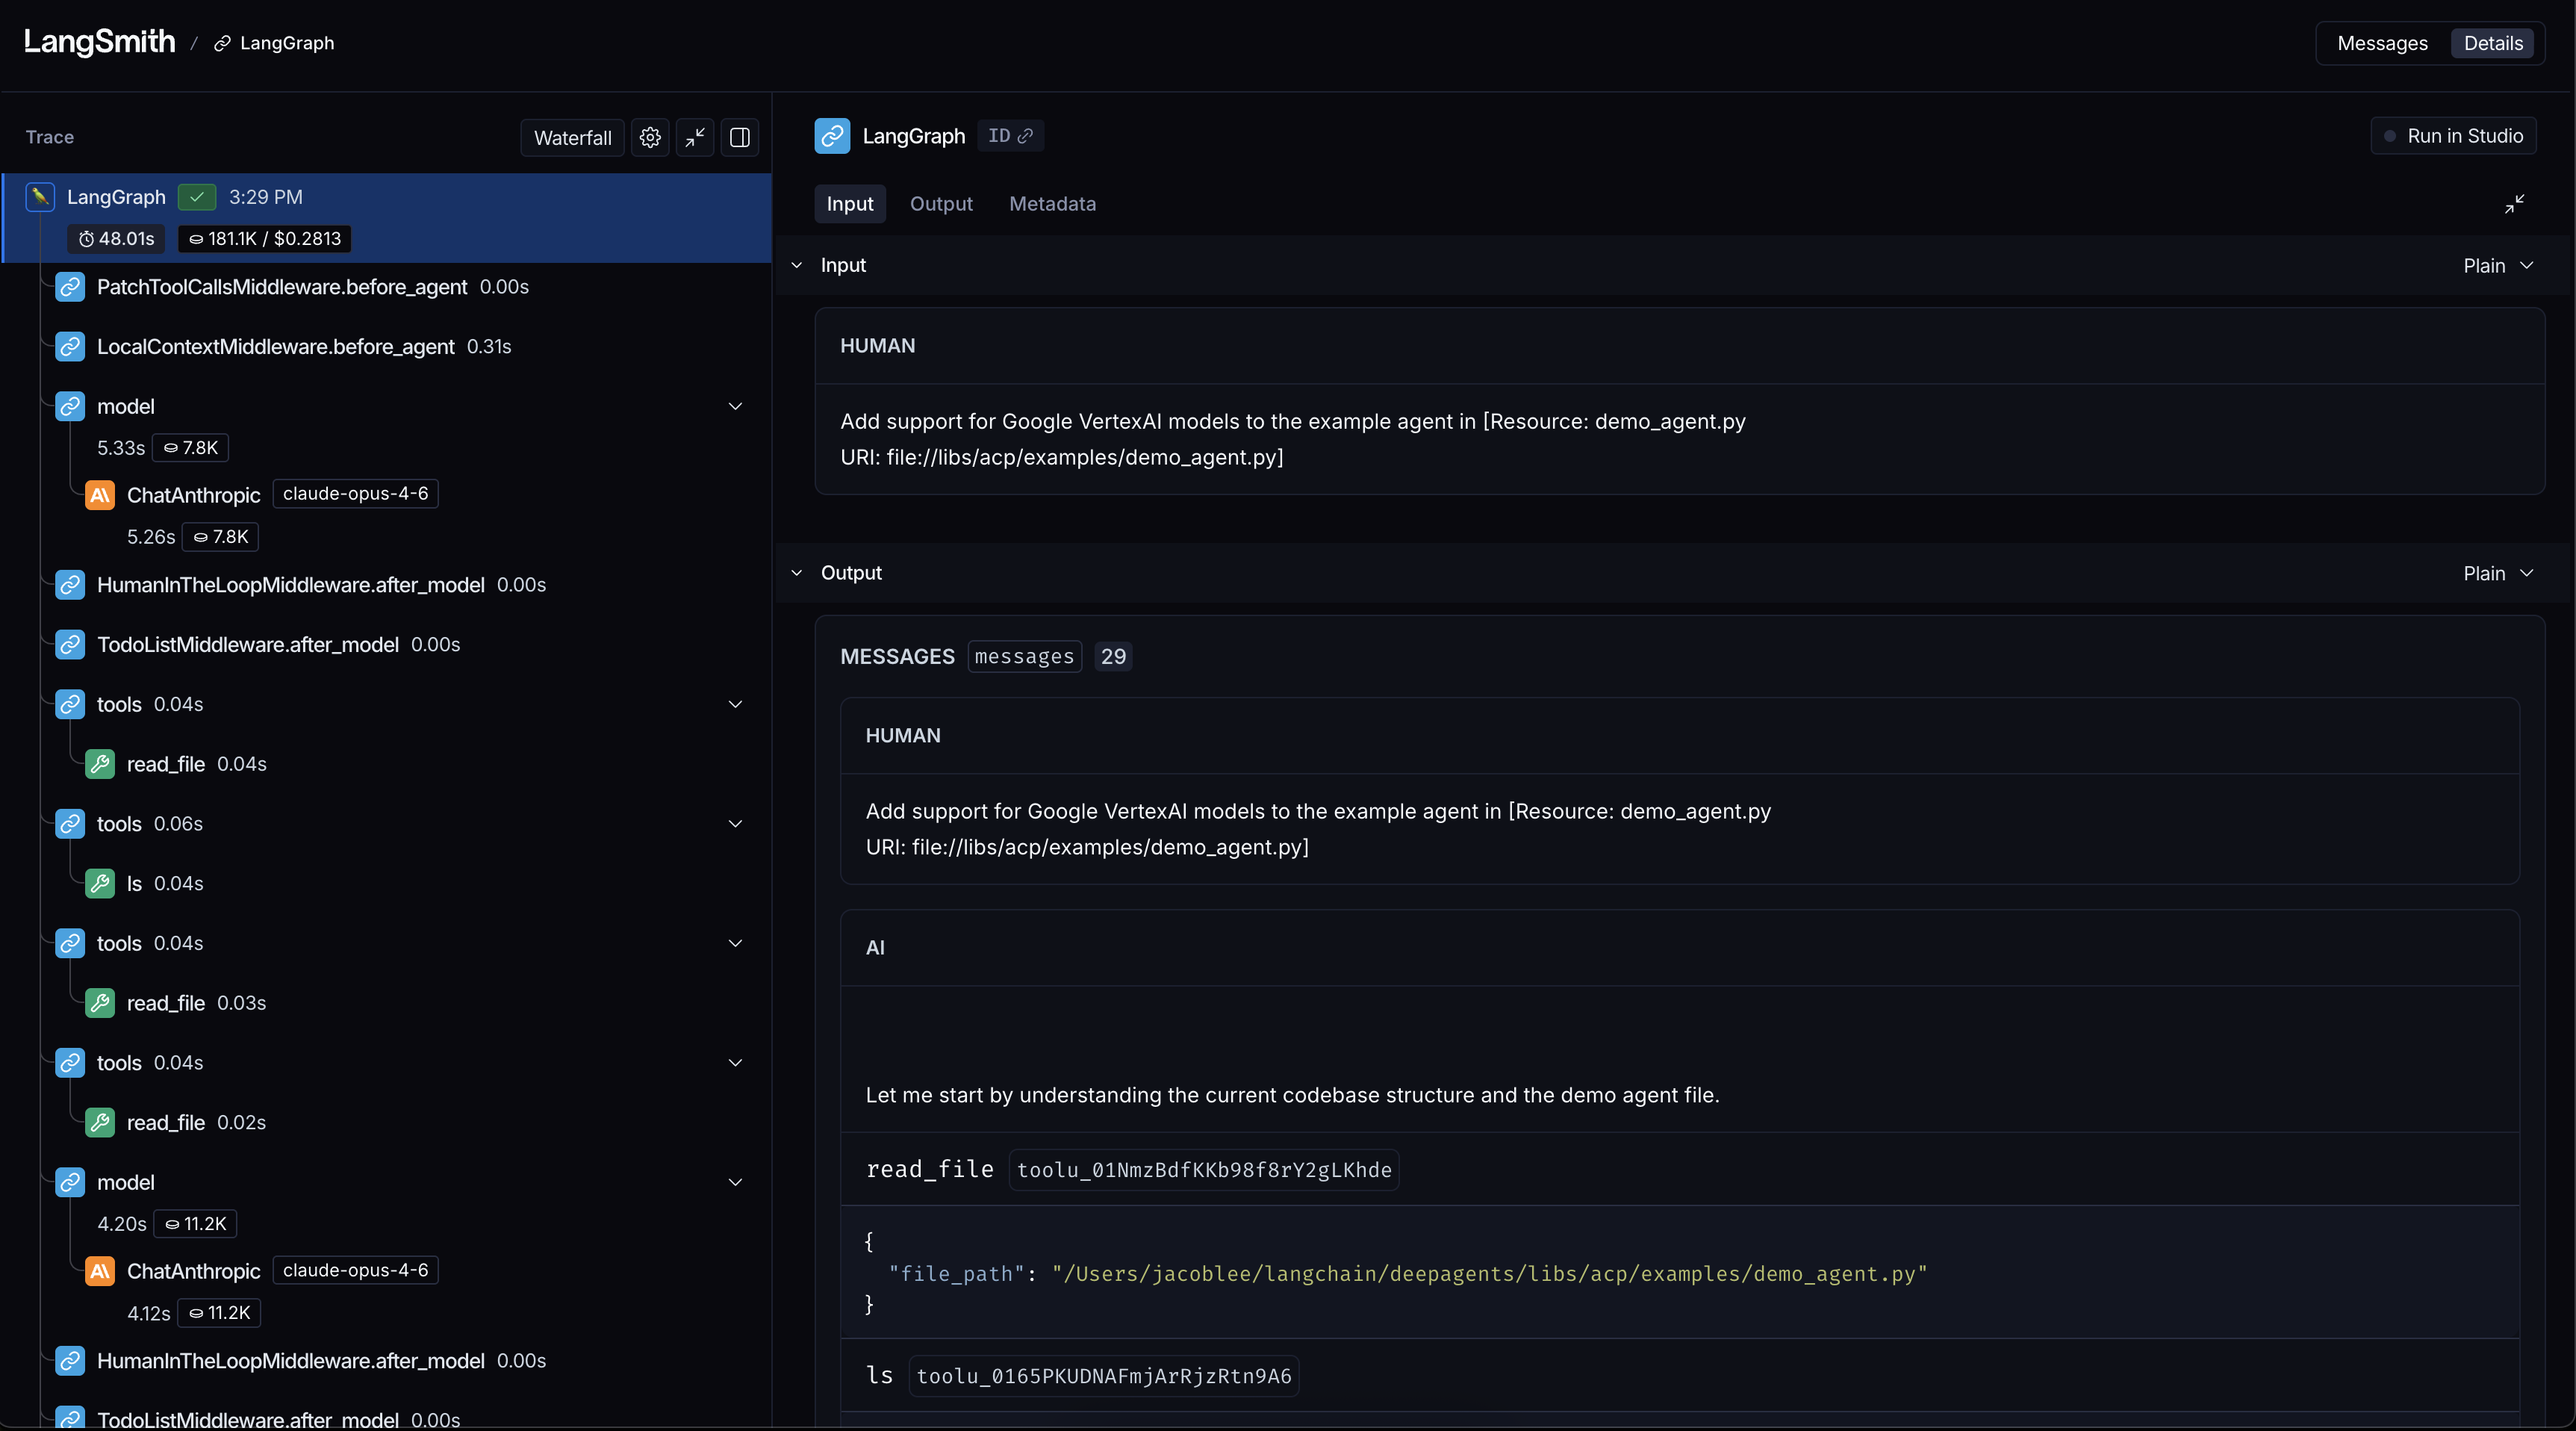
예를 들어, 저는 에이전트가 파일 시스템 전반을 광범위하게 천천히 탐색하기 시작하는 것 같았을 때, 추적을 사용하여 에이전트가 프로젝트 위치를 현재 작업 디렉터리가 아닌 파일 시스템 루트로 잘못 인식하도록 하는 버그가 시스템 프롬프트에 있음을 발견했습니다.
개발 워크플로의 중심을 재미와 수익 창출로 되돌리기
신생아 딸을 돌보며 밤늦게 진행하던 작은 프로젝트로 시작된 일이, 에이전트 동작에 대한 이해를 높이고 일상적인 워크플로를 개선하는 큰 성과로 이어졌습니다.
이 경험은 Claude Code가 마법이 아니라 정교한 여러 기술이 유기적으로 결합된 결과임을 깨닫게 해주었습니다. 하네스 계층은 단지 소프트웨어이며 소프트웨어는 개발자가 원하는 방식에 맞게 조정할 수 있습니다.
관심이 있다면 이러한 실험을 직접 시도해 보시기를 강력히 권합니다. 작은 프로토타입이라도 이러한 시스템이 어떻게 사고하고 어디에서 실패하는지에 대해 많은 것을 배울 수 있습니다. 저장소를 복제하고 여기에서 설정 가이드를 따라 소스 코드부터 시작해 보세요. 여러분의 생각을 공유해 주시면 감사하겠습니다. X에서 @Hacubu로 편하게 의견을 남겨주세요.
어댑터의 프로덕션 적용과 끊임없는 질문과 피드백으로 도움을 주신 @veryboldbagel 님과 @masondxry 님께 깊이 감사드립니다.
Subscribe to JetBrains AI Blog updates
Discover more


Using ACP + Deep Agents to Demystify Modern Software Engineering

This guest post comes from Jacob Lee, Founding Software Engineer at LangChain, who set out to build a coding agent more aligned with how he actually likes to work. Here, he walks through what he built using Deep Agents and the Agent Client Protocol (ACP), and what he learned along the way.
I’ve come to accept that I will delegate an ever-increasing amount of my work as a software engineer to LLMs. I was an early Claude Code superfan, and though my ego still tells me I can write better code situationally than Anthropic’s proto-geniuses in a data center, these days I’m mostly making point edits and suggestions rather than writing modules by hand.
This shift has made me far more productive, but I’ve become increasingly uncomfortable with blindly turning over such a big part of my job to an opaque third party. While training my own model was out of the question for many obvious reasons (and model interpretability is an unsolved problem anyway), the agent harness and UX on top of it is just software, and software IS something I understand. So when I had some free time during my paternity leave, I took a stab at building some tooling to my own specifications.
I work at a startup called LangChain, where we’ve been developing our own set of open-source agentic building blocks, and I settled on building an adapter between our Deep Agents framework and Agent Client Protocol (ACP). My goal was just to build a bespoke coding agent that fit my workflows, but the results were better than I expected. Over the past few months, it’s completely replaced Claude Code as my daily driver, with the added benefit of full observability into my agent’s actions by running LangSmith on top. In this post, I’ll cover how it works and how to set it up for yourself!
Why an IDE + ACP instead of a terminal + TUI?
If you’re not familiar with ACP, it’s an open protocol that defines how a client (most often used with IDEs like WebStorm or Zed) interacts with AI agents. It allows you to do cool things like quickly pass a coding agent the exact context you’re looking at in an IDE.
I’ve gotten quite used to being productive in IDEs over my decade writing software professionally, and I still find them valuable for a few reasons:
- I do still edit code by hand occasionally. Most often, these are small edits I can make faster than explaining the problem to an agent, or because I can do something in parallel alongside a running agent, like adding debug statements, but this still provides some alpha.
- IDEs are fantastic interfaces for viewing code in context. I most often use this to understand the general scope of a problem before prompting, or to self-review my current branch, but it’s also often just faster for me to point the agent at a file rather than asking it to
greparound.
I previously used Claude Code in a separate terminal pane in an IDE, which worked but always felt like two disconnected tools. In JetBrains IDEs, the agent lives in a native tool window with tight integration. I can @mention the file or block of code I’m currently looking at, and many of my threads are littered with messages like “Take a look at this. Does it look funny? @thisFile“.
How it works
The agent
Though I could have created the various pieces for my agent from scratch, Deep Agents provided a good, opinionated starting point, providing the following:
- Tools around interacting with the filesystem (
read/write/edit_file,ls,grep, etc.).
- Shell access, which allows the agent to run verifications like lint, tests, and more.
- Alongside this, human-in-the-loop support to allow restricting dangerous actions
- A
write_todostool, which encourages the agent to take a planning step that breaks work into steps and tracks progress.- In practice, this makes a big difference for longer refactors to keep the agent focused.
- Capabilities around spawning isolated sub-agents for parallel or compartmentalized work.
- Each one gets its own context, runs independently, and reports back, keeping the model’s context window manageable.
- Other important UX features like streaming, cancellation, prompt caching, and context summarization.
I also added some custom middleware that appends information about the current project setup in the system prompt, such as the current directory open in the IDE, whether a git repo was present, package manager detection, and more.
It’s also possible to add skills, tweak the system prompt, add custom tools or MCP servers, and more, directly in Python, rather than having to create a new CLI config option.
The ACP adapter
After deciding on a basic agent setup, I needed to hook that agent into the client via ACP. I created an adapter that implements the ACP interface and handles the session lifecycle, message routing, model switching, and streaming.
One nice surprise was how cleanly the agent’s capabilities mapped onto ACP concepts.
For example:
- The agent’s planning step (
write_todos) maps naturally to agent plans in ACP.
- Interrupts from the agent (e.g. “I want to run this command”) map to permission requests.
- Threads and session persistence were nearly 1:1 with Deep Agents checkpointers.
This meant I didn’t need to invent much glue logic – the protocol already had good primitives for most of what I wanted. The overall agent runner looks roughly like this, minus the tool call and message formatting:
current_state = None
user_decisions = []
while current_state is None or current_state.interrupts:
    # Check for cancellation
    if self._cancelled:
        self._cancelled = False  # Reset for next prompt
        return PromptResponse(stop_reason="cancelled")

    async for stream_chunk in agent.astream(
        Command(resume={"decisions": user_decisions})
        if user_decisions
        else {"messages": [{"role": "user", "content": content_blocks}]},
        config=config,
        stream_mode=["messages", "updates"],
        subgraphs=True,
    ):
        if stream_chunk.__interrupt__:
            # If Deep Agents interrupts, request next actions from
            # the client via ACP's session/request_permission method
            user_decisions = await self._handle_interrupts(
                current_state=current_state,
                session_id=session_id,
            )
            # Break out of the current Deep Agent stream. The while
            # loop above resumes it with the user decisions
            # returned from the session/request_permission method
            break

        # ...translate LangGraph output into ACP
        # Tools that do not require interrupts are called
        # internally results are just streamed back here as well

        # current_state will be none when the agent has finished
        current_state = await agent.aget_state(config)

return PromptResponse(stop_reason="end_turn")
The human-in-the-loop flow was where I spent the most time. When the agent wants to run a shell command or make a file edit that requires approval, the adapter intercepts the interrupt from Deep Agents, and depending on what permissions mode the user has selected and what they have previously approved, either resumes immediately or sends a permission request to the IDE with options to approve, reject, or always-allow that command type.
The always-allow is session-scoped – if you approve uv sync once and choose “always allow”, subsequent uv sync calls skip the prompt automatically, but I made efforts to prevent similar commands such as uv run script.py from bypassing the permission check.
Here’s how the end result looks in WebStorm:
How it went
While I haven’t run formal evals, I was pleasantly surprised by how well my agent performed after only a few iterations. I didn’t actually expect to switch away from Claude Code, and it was a great dogfooding exercise as well, since our OSS team was able to upstream some of my feedback back into Deep Agents itself.
My original goal of regaining code-level, rather than config-level, control over my daily workflows has also been great. When Anthropic had an outage a few weeks ago, I was able to switch over to OpenAI’s gpt-5.4 without skipping a beat, and I even found that it had some interesting quirks. I switch back and forth between models mid-session to gain different perspectives from each model when working on tricky tasks, and have also found open-source models like GLM-5 are quite capable while offering significant cost savings.
Another boon is observability via LangSmith tracing, which allows me to debug and improve my agent when I run into issues. Being able to see exactly what context was passed to the model, which tools it called, and where it went sideways helped me understand behaviors that were previously hidden inside the harness. Here’s an example of what such a trace looks like:
For example, when I noticed that my agent was starting to take wide, slow sweeps of my filesystem, I used a trace to find a bug in my system prompt that told the agent the project was at the filesystem root rather than the current working directory.
Taking back your dev workflows for fun and profit
What started as a small late-night project I worked on around taking care of a newborn daughter turned into a huge success, both for my own understanding of agent behavior and for improving my daily workflow.
It proved to me that Claude Code isn’t magic but a bundle of very clever tricks rolled up into a neat package. The harness layer is just software, and software is something any developer can shape to fit how they want to work.
If you’re curious, I’d highly recommend trying an experiment like this yourself. Even a small prototype can teach you a lot about how these systems think and where they break. Clone the repo and follow the setup guide here to get started from source code. I’d love to know what you think. You can reach out to me on X @Hacubu to let me know!
Special thanks to @veryboldbagel and @masondxry for helping productionize the adapter and dealing with my unending questions and feedback!