Working With STM32 Arm TrustZone-Based Projects in CLion

The Arm®v8-M architecture introduced a security extension called TrustZone®*, which splits the firmware running on the MCU into two worlds: secure and non-secure. In this blog post, I want to discuss how to work effectively on STM32 projects using this technology. We’ll get you all set up to use the latest and greatest code analysis tools with conventional debugging in CLion.
We’ll use the following setup:
- CLion 2026.1 EAP (Early Access Program) on Windows.
- STM32 NUCLEO-L552ZE-Q board.
We also need to install:
- STM32CubeProgrammer to configure the hardware.
- STM32CubeCLT 1.20.0 with the bundled
ST-Link _gdbserverand cross-compiler to build and debug the STM32 firmware.
You can find the project we’ll be using as a showcase on GitHub. The initial stub was generated by STM32CubeMX 6.16.0. If you want to follow along, you can use a slightly older version of CLion; the minimal required version is 2025.3.2.
Understanding the STM32 TrustZone-based project structure
The secure TrustZone mode is a privileged one and can serve requests from the unprivileged non-secure mode. Why would we want to use this? The reasoning is similar to why we have a user space in good old desktop computers – we don’t trust some code enough, and we don’t want it interfering with critical tasks. Mission-critical parts go into secure mode, while the processing of some user, wireless, remote, or internet data runs in non-secure mode. Thus, we isolate the important stuff from the exposed interface, such as Wi-Fi or Bluetooth.
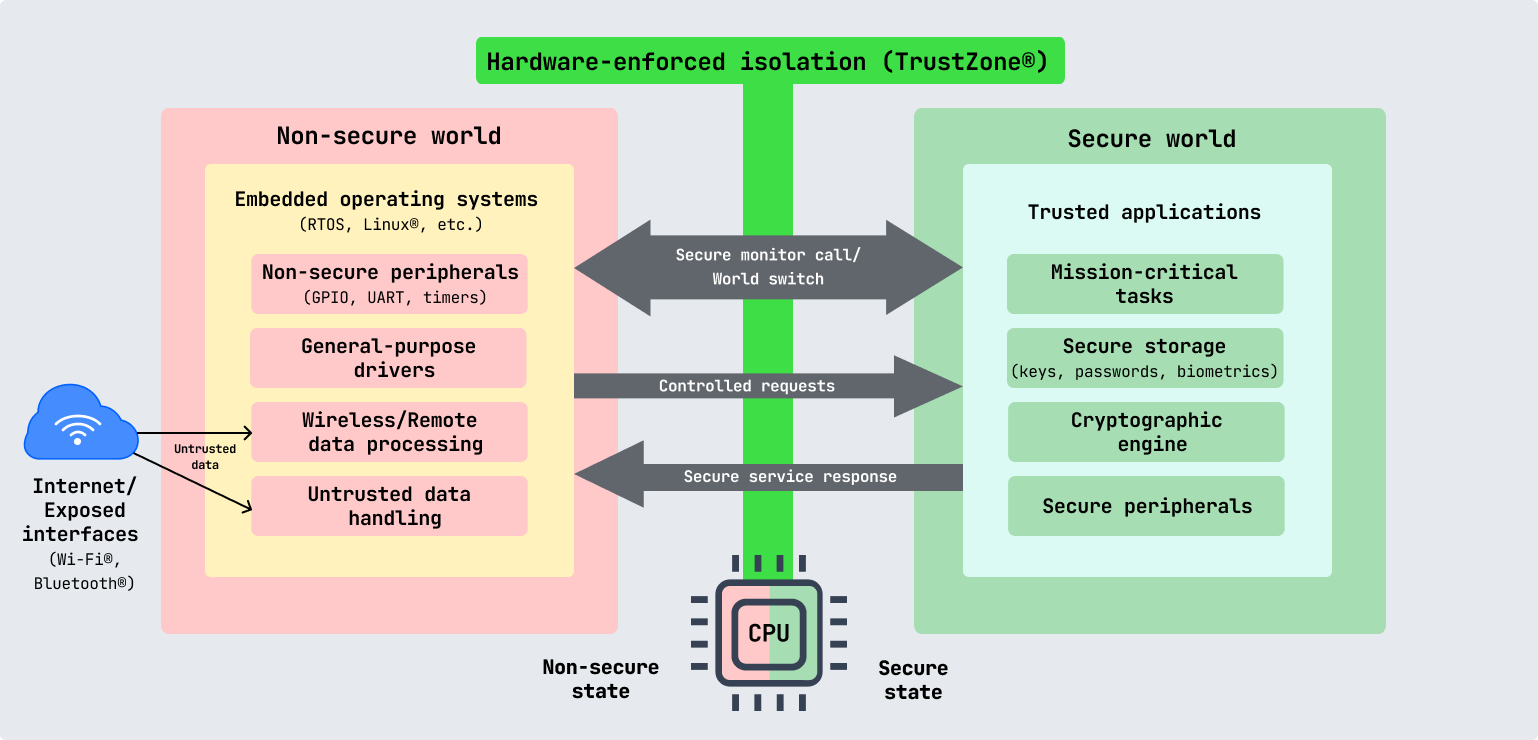
Even if there is a vulnerability in the internet-connected code, the important core remains unaffected. For example, even if the device’s non-secure application code is compromised, the secure bootloader allows a new, fixed application to be reflashed remotely and the device to be recovered without physical access.
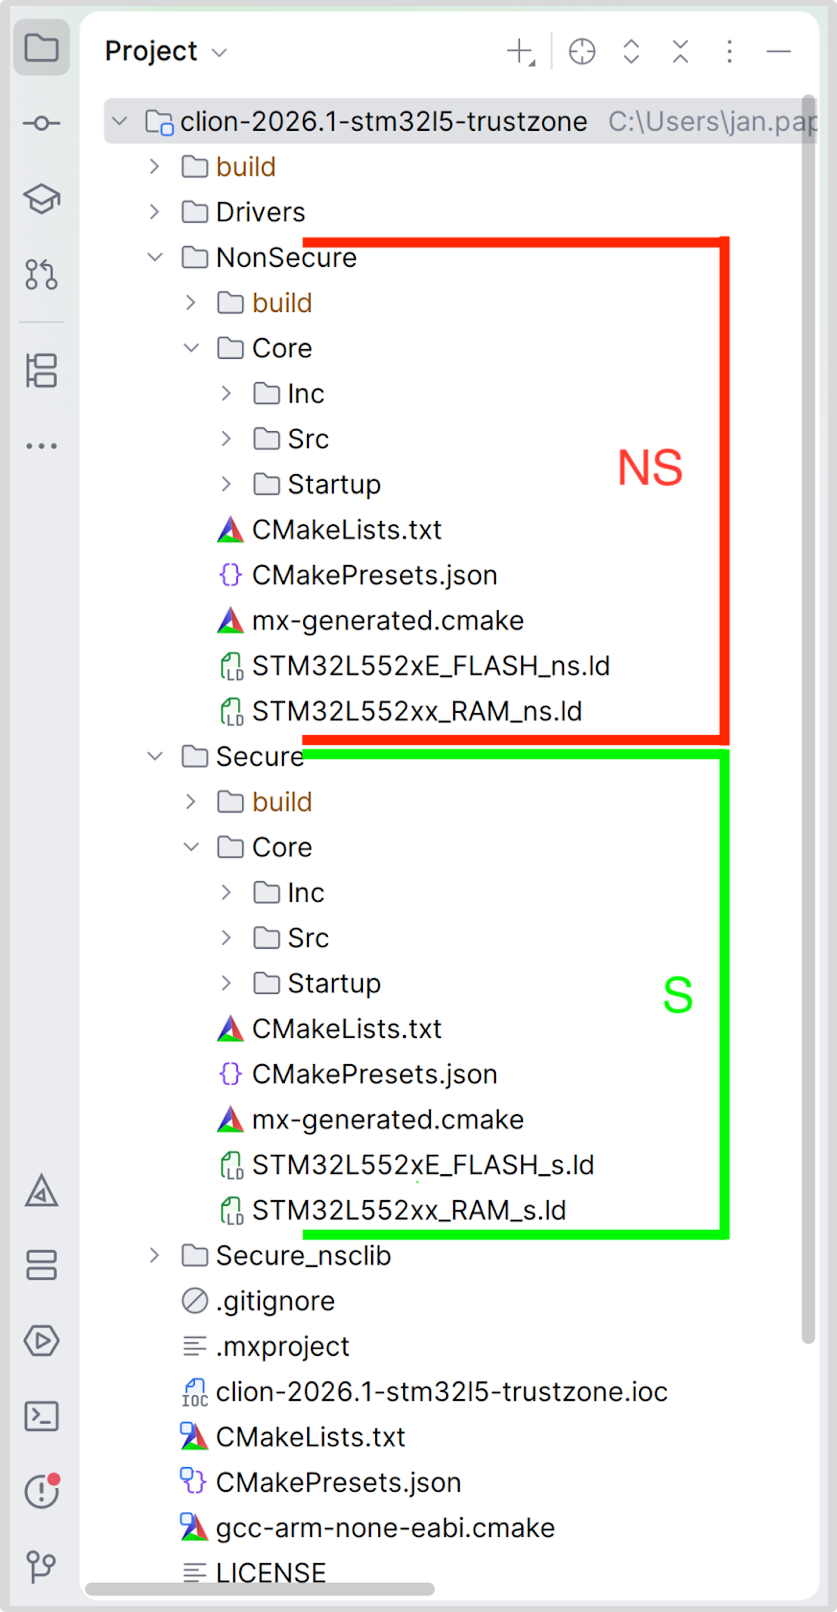
So, what changes in the project structure compared to the default STM32 CMake project?
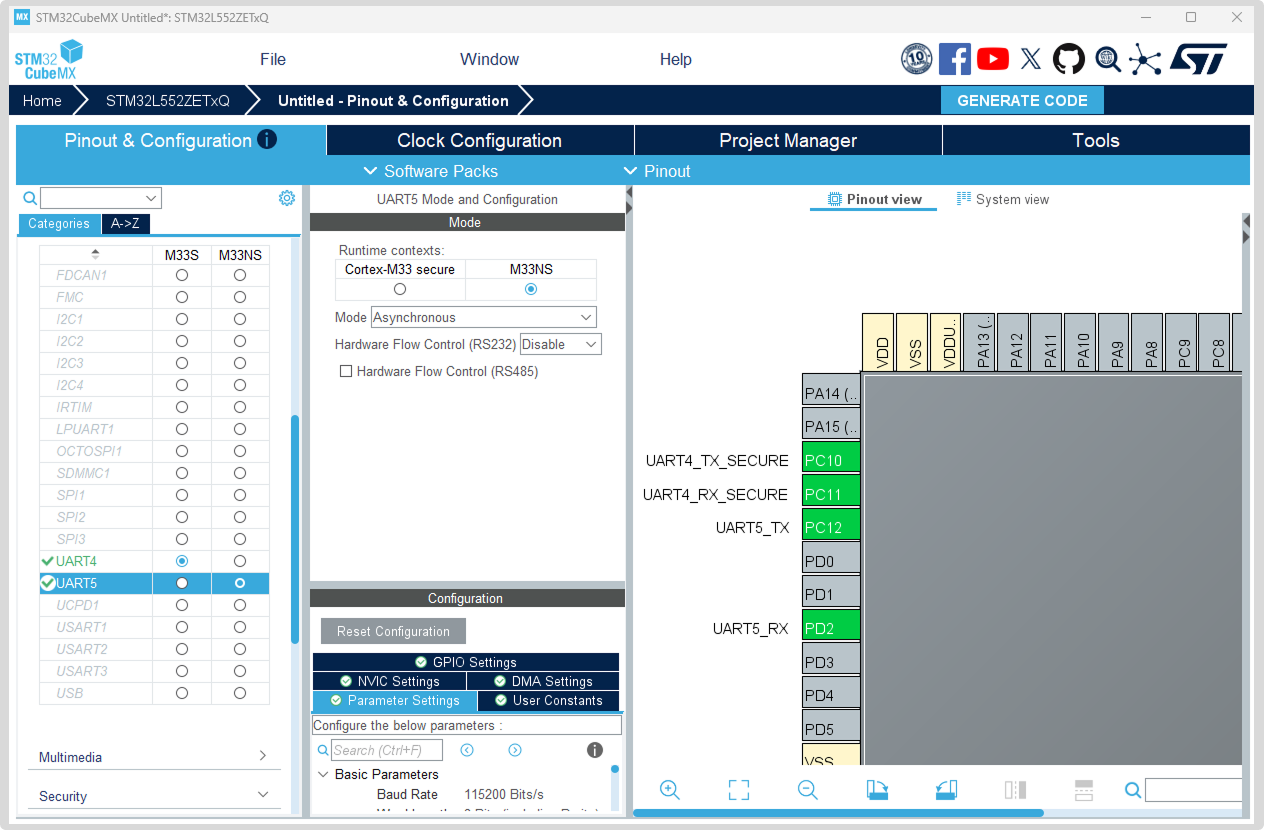
Tip: In STM32CubeMX, peripherals can be assigned to secure and non-secure zones, as shown in the image above.
The code generated by STM32CubeMX is actually two independent subprojects wrapped in a superproject that can build both. The root CMake project provides only the plumbing needed to build the two subprojects. It also contains the shared code referenced by both subprojects, such as the hardware drivers and the HAL on top of them. In CMake terms, this is done by the ExternalProject_Add directive. Here is how this superproject structure looks in CLion:
There is one important caveat, though: The subprojects are not configured until the project is actually built. This means that for CMake to report any information CLion uses for code insight, the superproject must be built first. CLion will then automatically gather the necessary information.
Configuring the project in CLion
To start, clone our example repository from GitHub and open the .ioc file as a project. The default editor that opens should greet you with the name of the project’s MCU and an option to open it with STM32CubeMX for reconfiguration.
If you don’t have access to the hardware we’re using, you can alternatively generate your own project with STM32CubeMX. Select the option to generate the project with TrustZone enabled, configure the peripherals you need, and generate for CMake (it does not matter which compiler you choose; we support both GCC and ST-ARM-CLANG).
As I’ve noted above, all we need to do now is build the project, and we’ll get code insight in the subprojects.
If you’re new to CLion, refer to our more thorough documentation to learn how to open an STM32 project or create a new one, configure it, and build it.
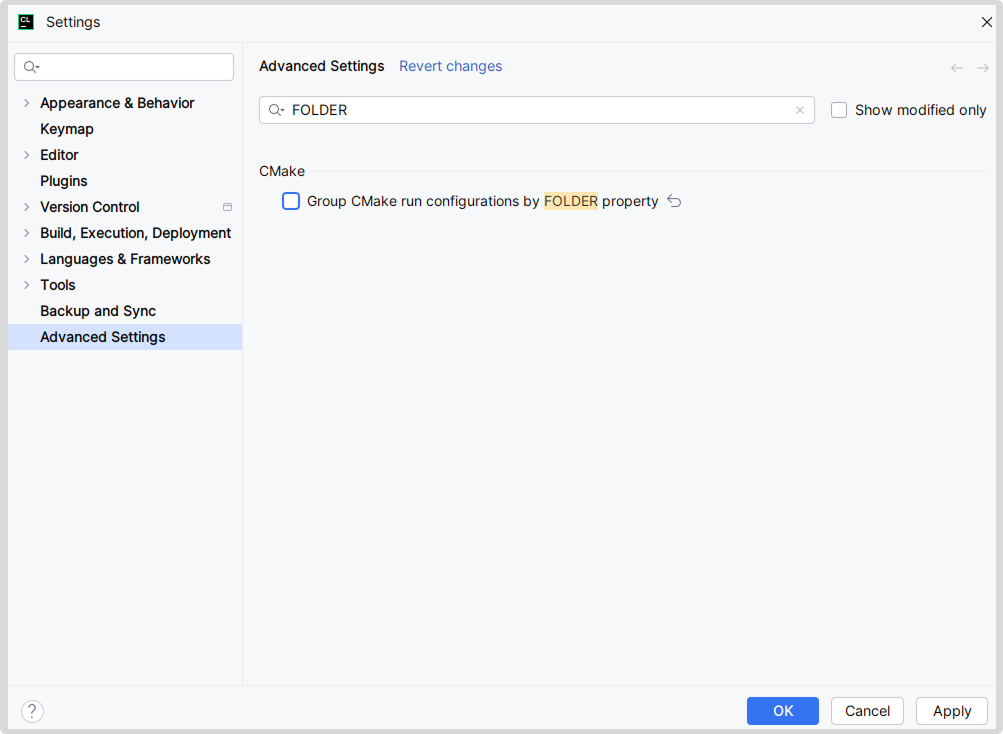
Tip: CLion respects the FOLDER property of CMake targets, but this creates unnecessary structure in the project run configurations. You can go to the advanced settings and turn this feature off by disabling Group CMake run configurations by FOLDER property.
Setting up debugging
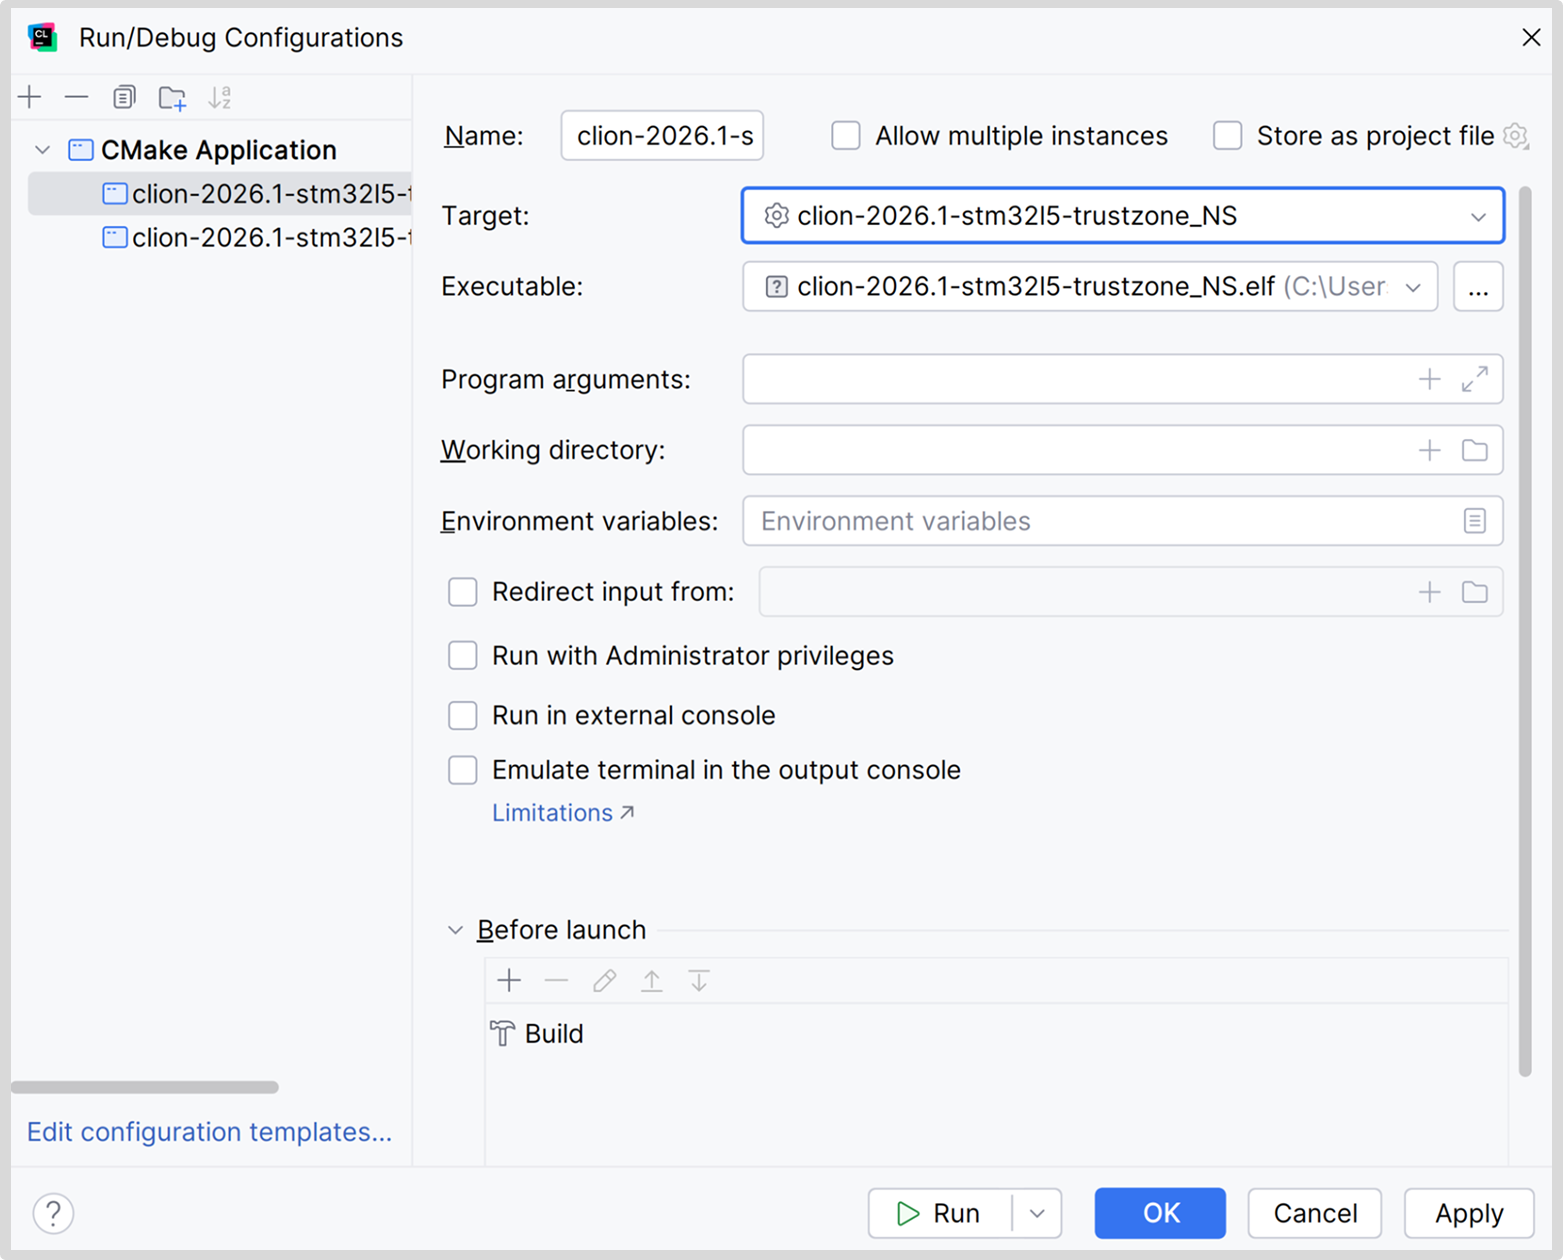
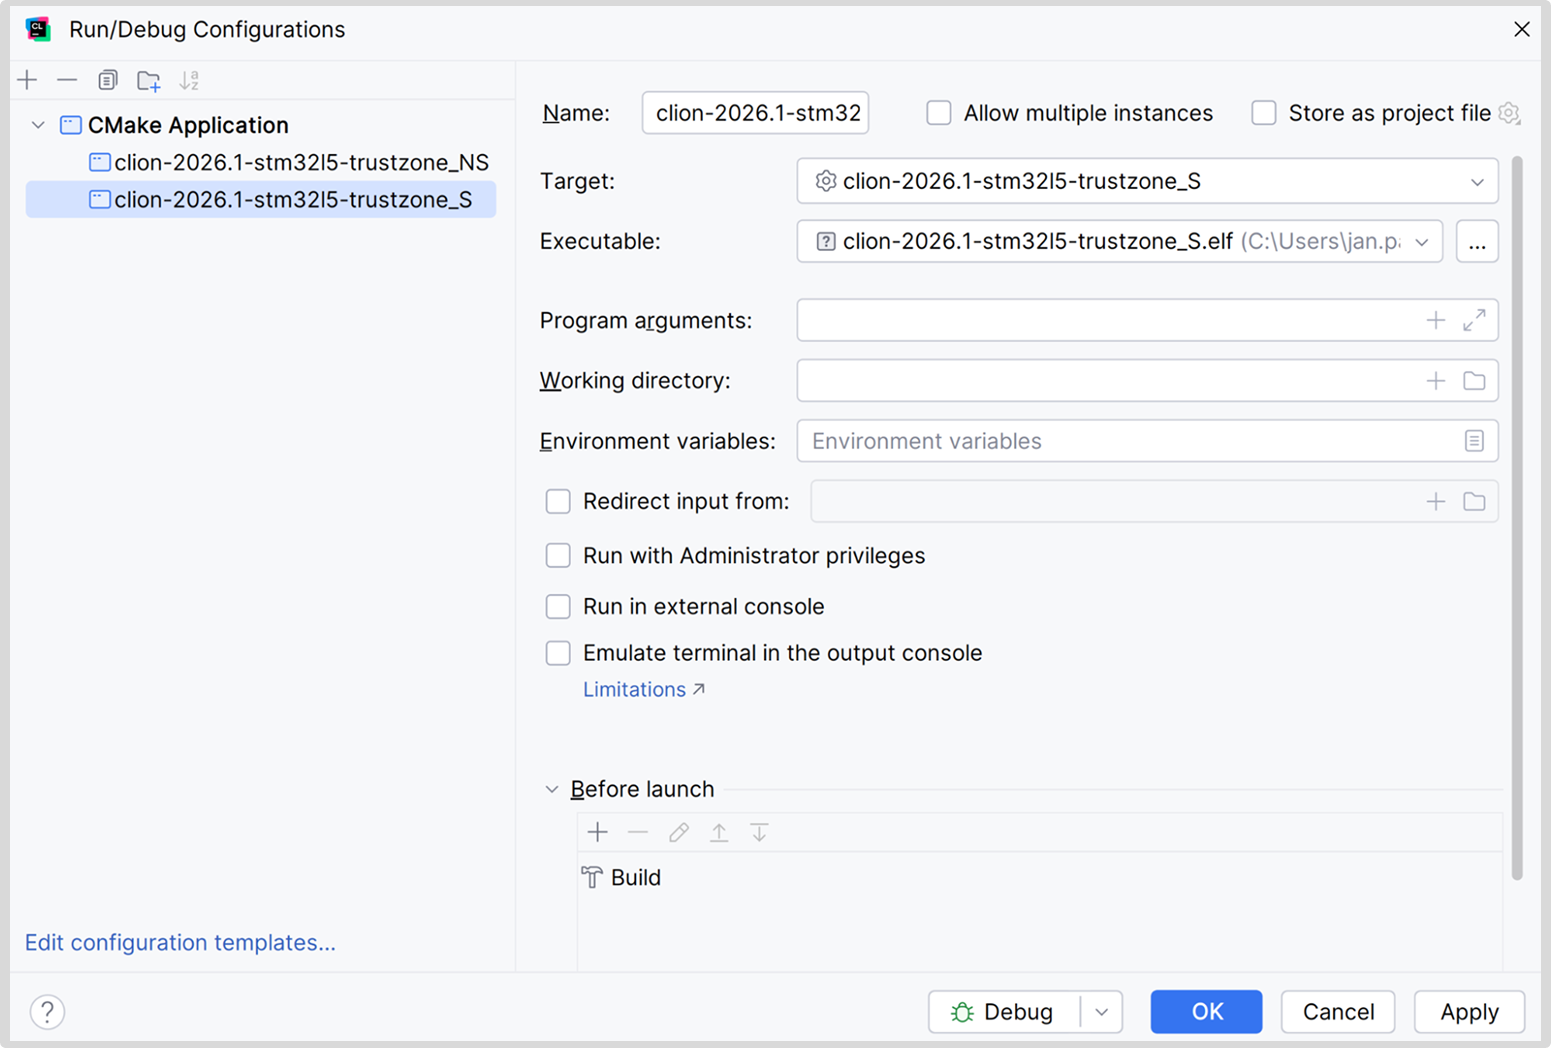
Unfortunately, the CMake targets corresponding to the secure and non-secure subprojects added to the superproject don’t include information about the compiled files. You will need to enter this manually in the run configuration. Edit both run configurations and select the corresponding binaries as the executables:
We are looking into ways to work around this limitation of CMake’s external projects (CPP-48380).
Tip: The non-secure target depends on the secure one, so when you build the non-secure one, the secure one is built as well.
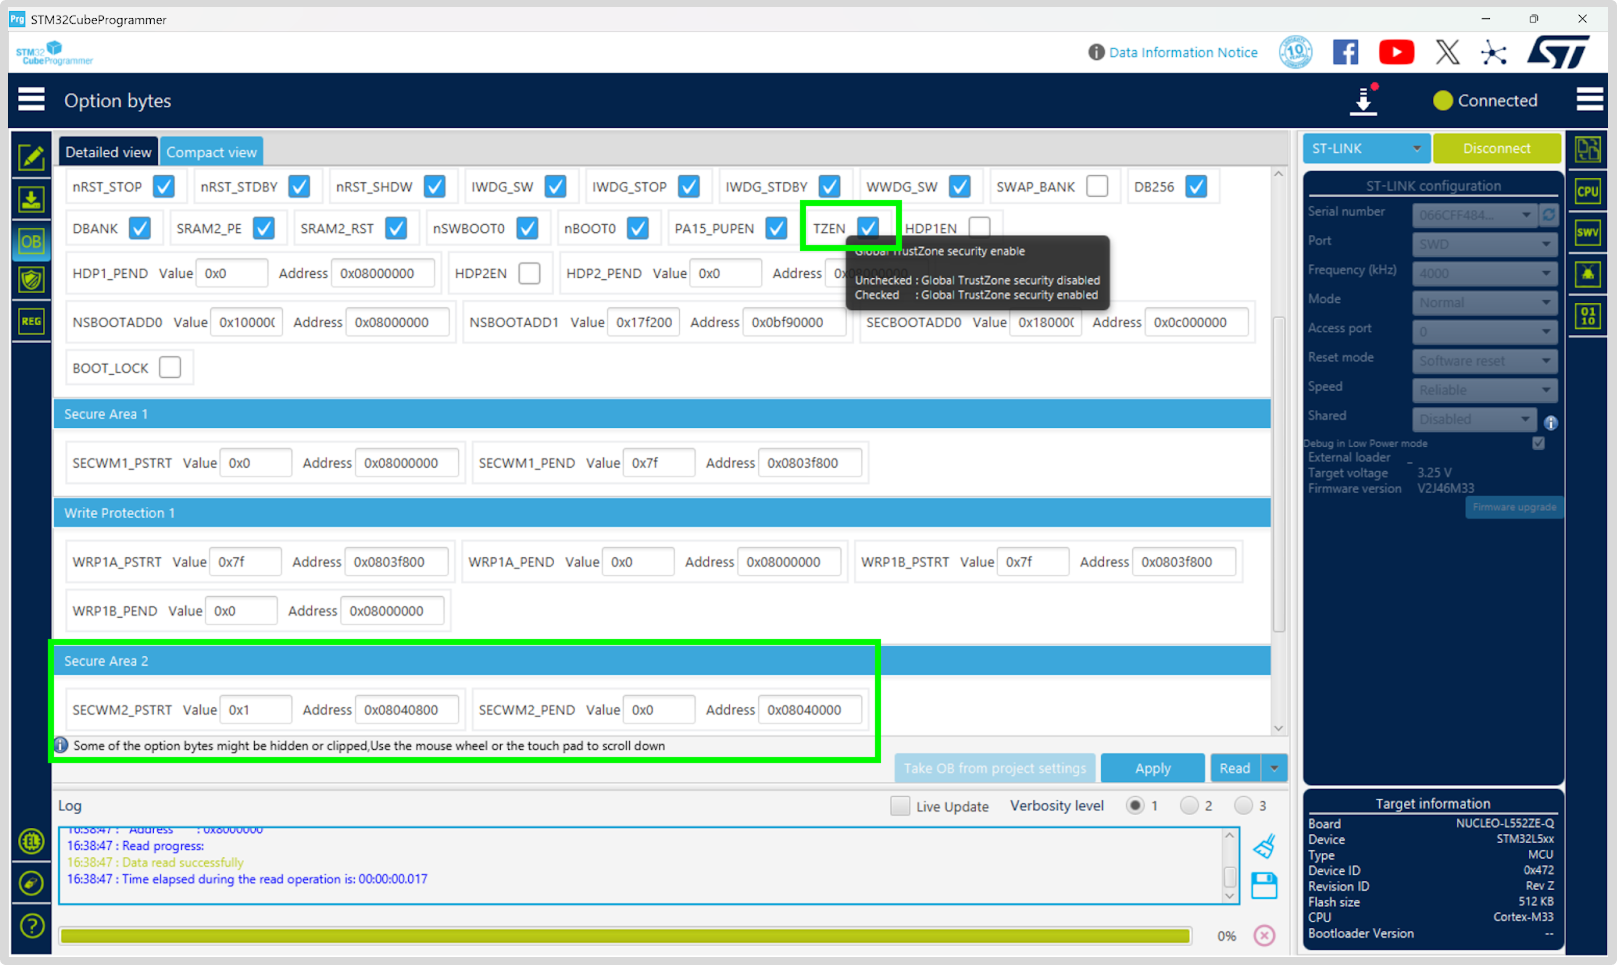
Consult the manual for the MCU you are using to learn how to enable and disable TrustZone on your particular hardware. Following the STM introductory tutorial, we used STM32CubeProgrammer to configure the following option bytes on our board: TZEN=1, SECWM2_PSTRT=0x1, and SECWM2_PEND=0x0.
If you’re using our example project or followed our instructions and opened the .ioc file as a project, you already have a debug server set up. If you started from scratch, an ST-LINK debug server should already be pre-selected and pre-configured in Settings | Debugger. It’s designed for a streamlined setup and intended to work in the majority of common cases.
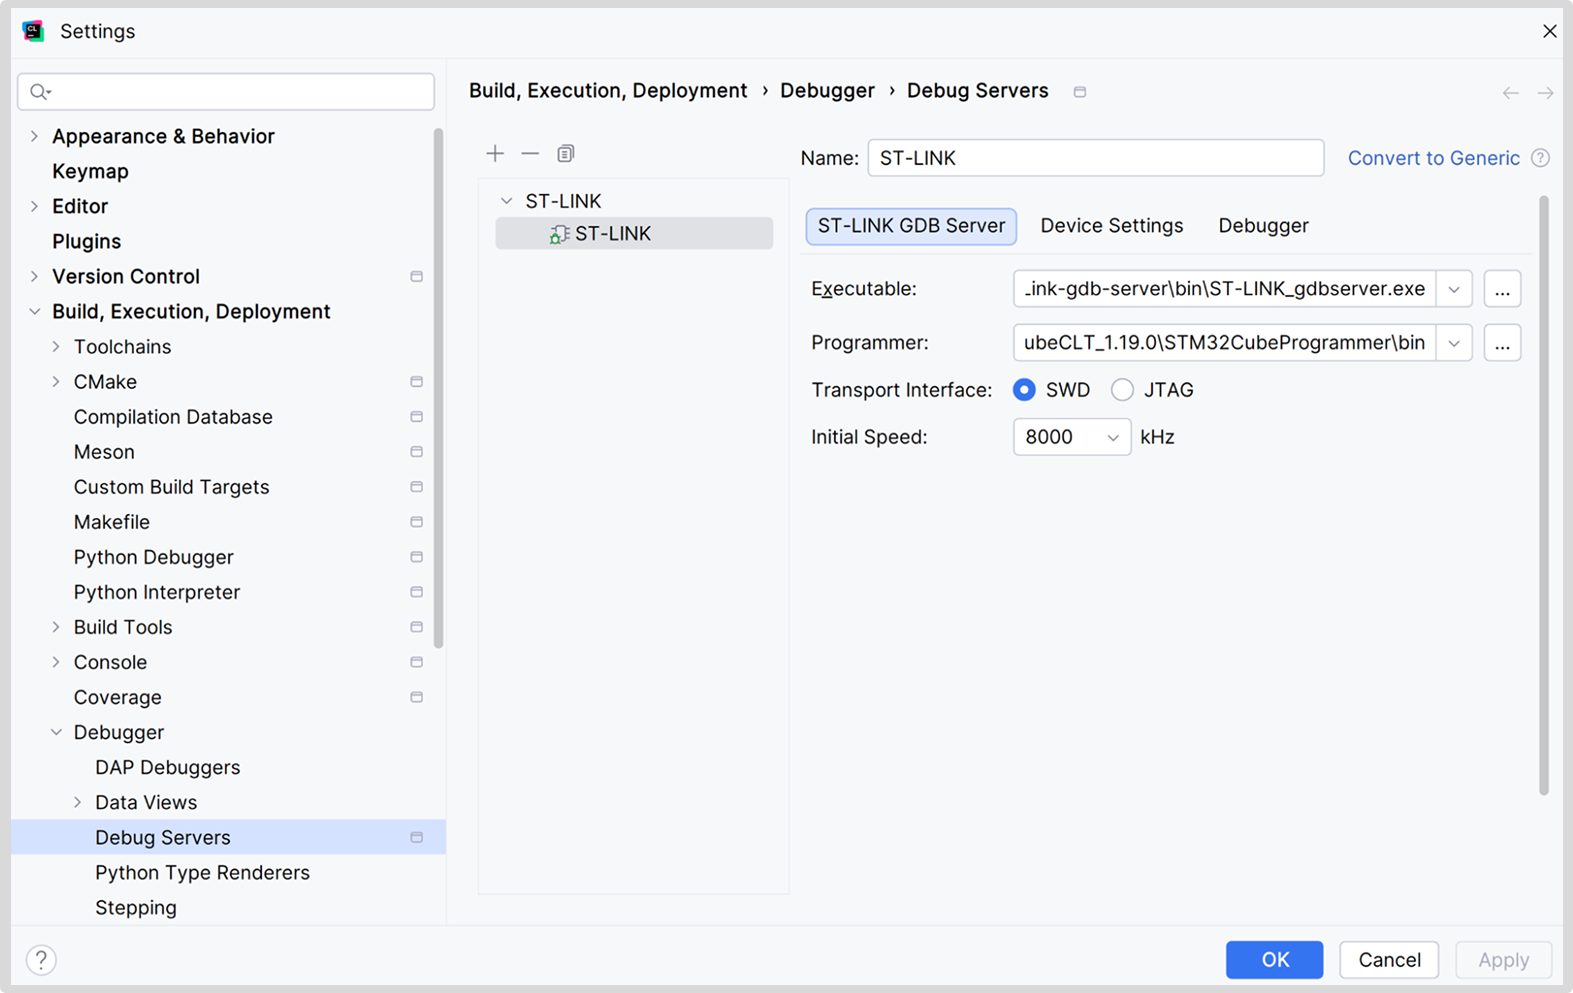
However, today we are discussing a somewhat more complex case, so we need something more powerful, more… generic. If you’re following our example, you will find the Generic debug server already set up in the project – we’ll use that one. Note that you might need to enable Debug Servers in Settings | Advanced Settings | Debugger to see it.
If you started from scratch, convert the ST-LINK debug server to Generic (using the button next to the Name field). This is a much more powerful option that allows full customization. We’ll need to adjust a few things to be able to flash two images, instead of just one, as the default. We are looking into automating this process (CPP-48379).
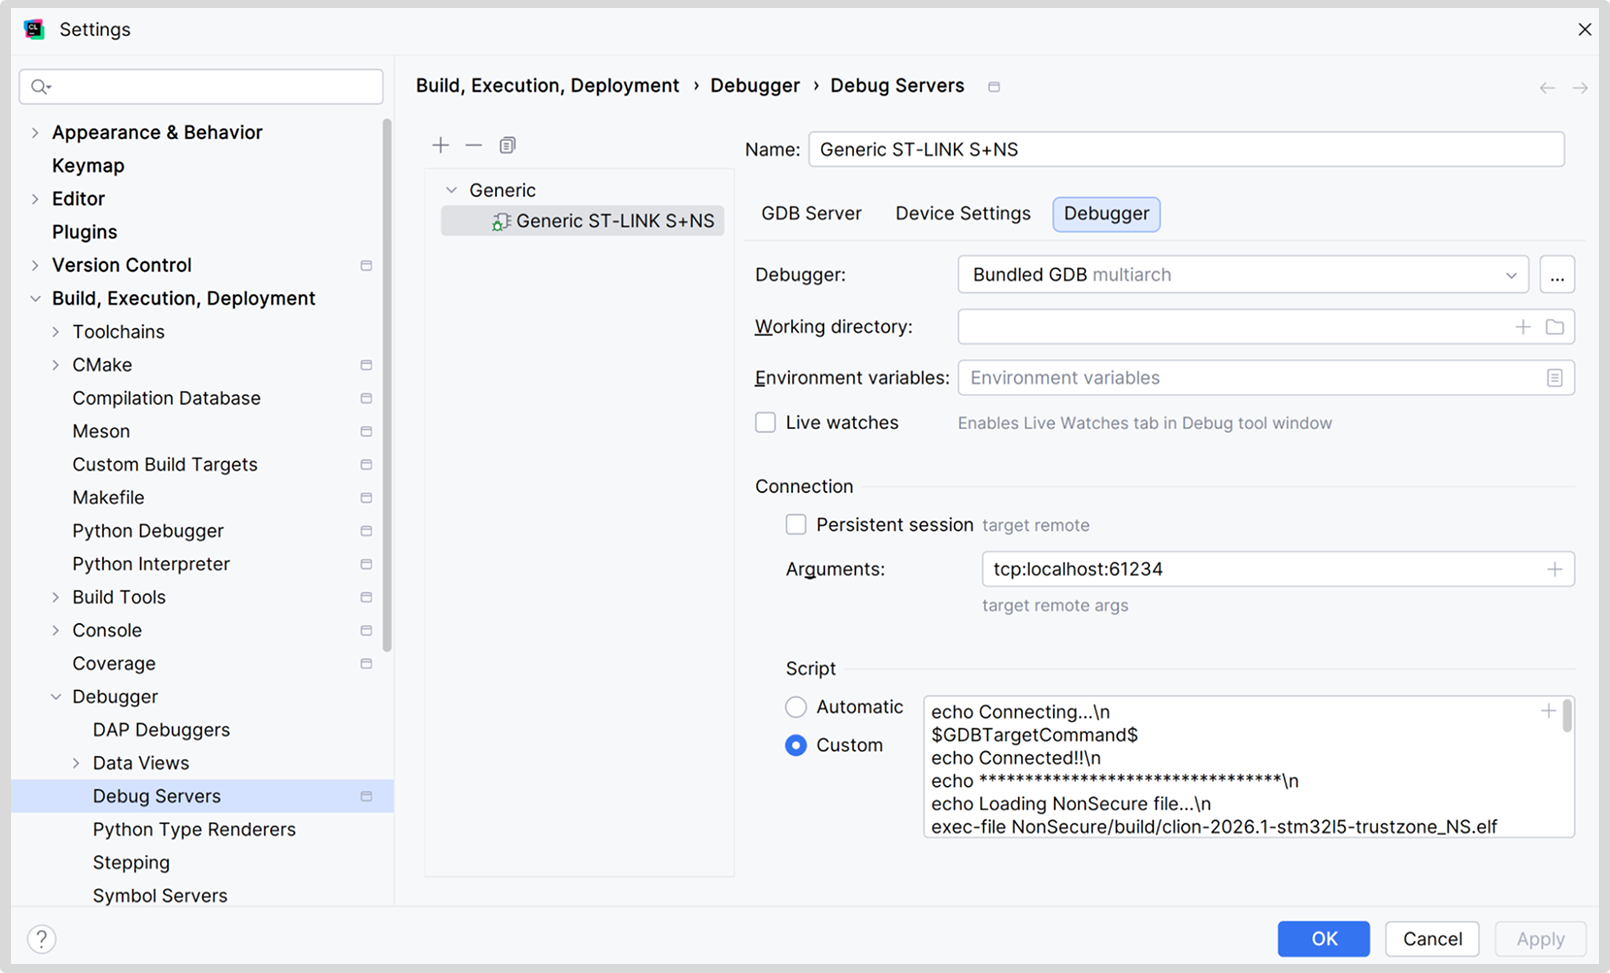
In the Debugger tab of the generic debug server, go to the Connection section, select the Script | Custom option, and add the following:
# Connect to GDB Server
$GDBTargetCommand$

# Flash NonSecure binary
exec-file NonSecure/build/stm32l5-trustzone_NS.elf
load

# Flash Secure binary and load its symbols
file Secure/build/stm32l5-trustzone_S.elf
load

# Load symbols from NonSecure binary
add-symbol-file NonSecure/build/stm32l5-trustzone_NS.elf

# Reset the MCU
monitor reset
You can find an extended version of this script with logging echoes in our example.
The script connects to your device, uploads both non-secure and secure firmware, loads the necessary debug information, and resets the device.
Tip: The $GDBTargetCommand$ expression is an IDE macro that expands to the connection script as though it were generated in automatic mode. A preview is shown when you have automatic mode selected – for example, target remote tcp:localhost:12345.
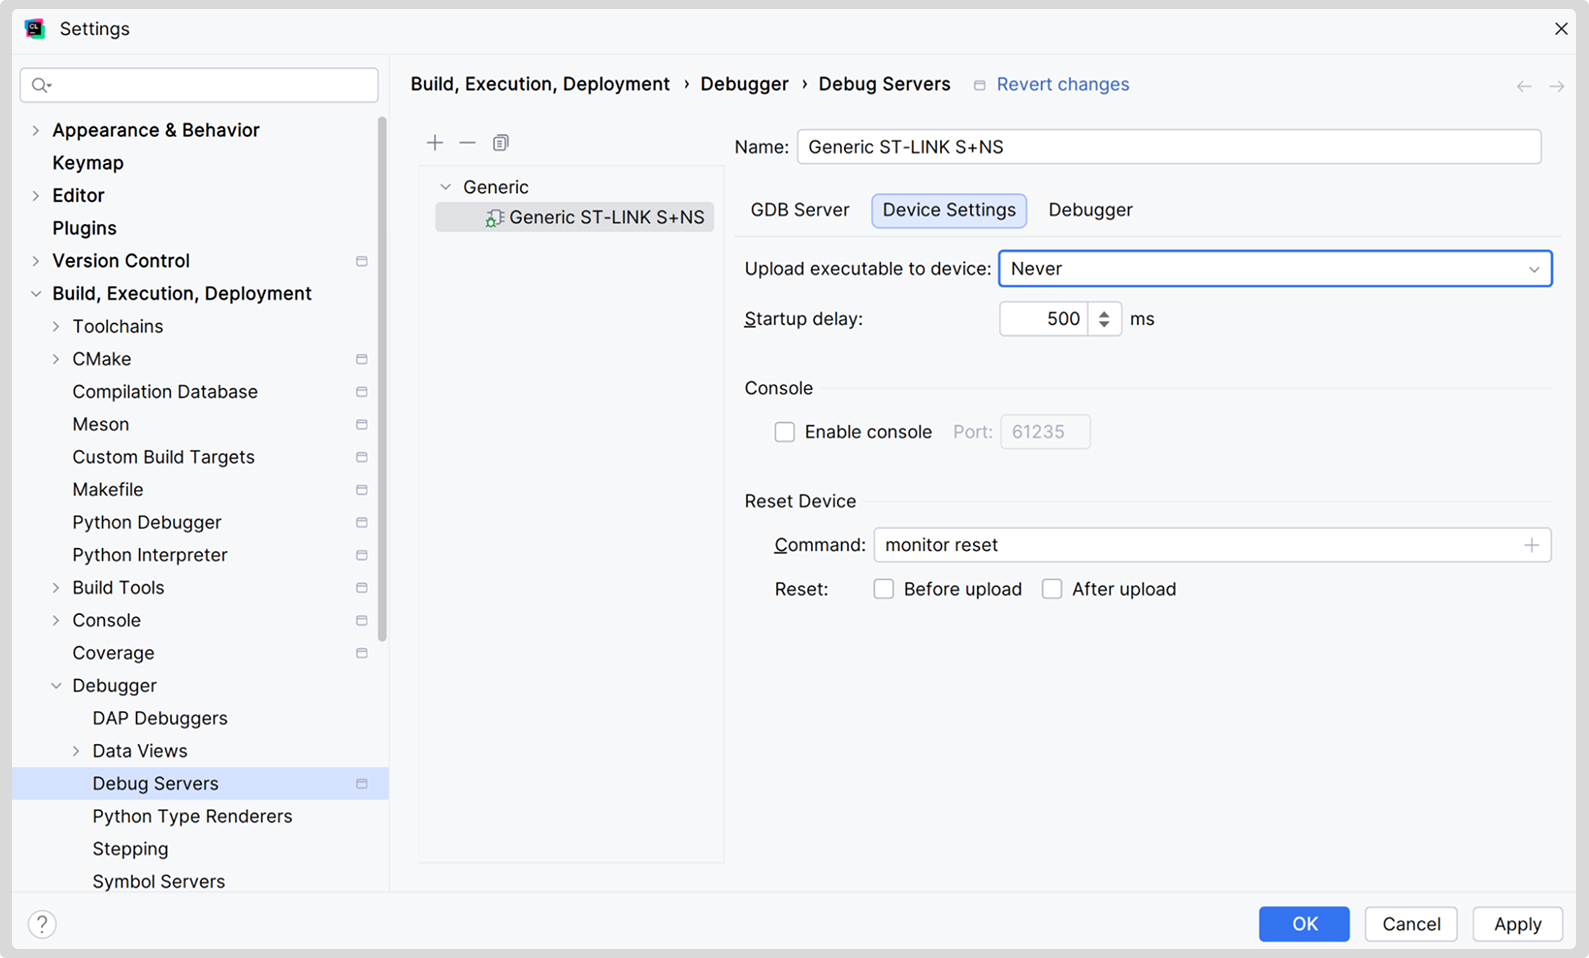
Since we’re now performing all these steps manually, let’s disable the automatically added ones so we don’t do the same work twice. In the Device Settings tab, set Upload executable to device to Never and deselect both options for Reset.
Now, if you’ve followed our hardware setup, you should be able to set up a couple of breakpoints and start debugging!
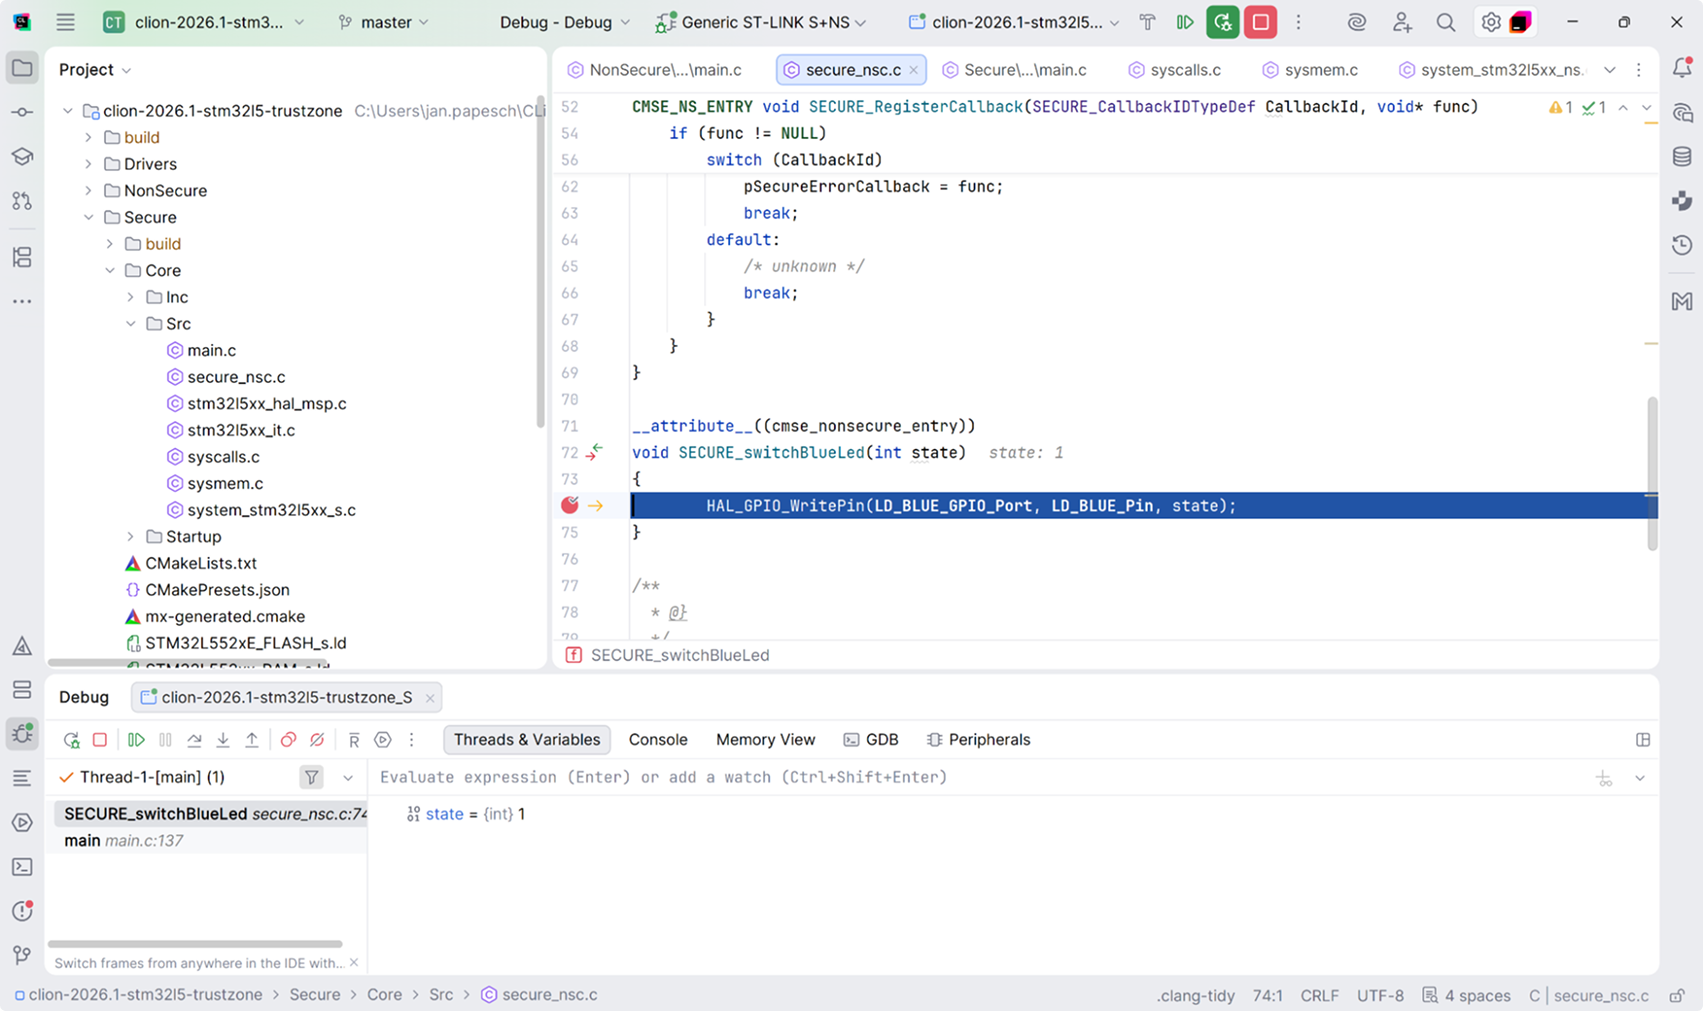
Be careful, though, and don’t get too far ahead of yourself. The number of hardware breakpoints is limited by design (6 on our STM32L5). This means you can run out of breakpoints faster than you might expect, especially when working with shared code. Setting breakpoints in shared code consumes twice as much – the code gets compiled into both images, is flashed twice, and requires a hardware breakpoint for each code copy.
Disabling TrustZone
After following this article, you may need to disable TrustZone mode on your MCU. Here, we briefly summarize instructions from the manual mentioned above. Refer to your device’s manual for instructions on how to proceed in your case.
To disable TrustZone:
- Raise the readout protection level to 1 (by setting RDP to DC, 0.5, or 2), which disables the debugging of secure code. Note that setting the protection level to 2 would also disable debugging for non-secure code, which is why we didn’t do this earlier.
- Raise the BOOT0 pin to VDD voltage.
- Cycle the IPP jumper (disconnect and reconnect it). At this stage, two LEDs should illuminate. After that, you should be able to connect with the STM32CubeProgrammer in Hot-plug mode.
- Simultaneously set the readout level to 0 (RDP to AA) and disable TZEN.
If necessary, you can now revert the memory security level for the second flash bank.
What’s next
Have any questions, or did something not work as described? Please leave us a comment, or visit us at Embedded World 2026, Hall 4, booth 146. We look forward to your feedback!
We plan on writing a similar walkthrough for working with dual-core MCUs and MCUs with bootflash or bootrom memory. The project structure in those cases is similar to external CMake projects, but the debugging experience differs.
As mentioned earlier, we’re actively working to improve support for STM32 projects. Any ideas on what would fit your workflow are very welcome, so please file an issue in YouTrack.
* Arm and TrustZone are registered trademarks of Arm Limited (or its subsidiaries or affiliates) in the US and/or elsewhere.