

JetBrains AI
Supercharge your tools with AI-powered features inside many JetBrains products
Koog 登陆 Java:JetBrains 推出企业级 AI 智能体框架

向企业后端添加 AI 智能体不应以破坏架构为代价。如果您的核心系统是使用 Java 构建的,编排 LLM 并不需要您引入单独的 Python 微服务或重写技术栈。
今天,我们正式发布 Koog for Java。Koog 最初是为了满足 JetBrains 自身活动扩展需求而构建的,它使用结构化、可观测且具备容错能力的工作流取代了不可预测、临时的提示更改方法。
如今,JVM 最强大的智能体框架之一拥有了完全符合 Java 惯用风格的 API。您的 Java 团队可以直接在现有后端中构建可靠的 AI 智能体,借助流畅的构建器风格 API、线程池执行器和原生 Java 抽象,完全不需要担心任何与 Kotlin 不兼容的问题。
Koog for Java 的功能
Java API 可以访问 Koog 的所有功能:
- 多种工作流策略(函数式、基于图和基于规划):精准控制智能体执行任务的方式。
- Spring Boot 集成:直接将 Koog 集成到现有的 Spring 应用程序中。
- 支持所有主流 LLM 提供商:使用 OpenAI、Anthropic、Google、DeepSeek、Ollama 等的首选模型。
- 通过持久性功能实现容错:故障后恢复之前的进度,无需重复开销大的 LLM 调用。
- 通过 OpenTelemetry 实现可观测性:全面了解智能体执行、token 使用情况和成本,并直接支持 Langfuse 和 W&B Weave
- 历史记录压缩:减少 token 使用量,并在大规模使用时优化成本
- 还有更多!
继续阅读,了解通过 Koog 使用 Java 构建智能体的方法。
设置简单
将大语言模型 (LLM) 与您应用程序中的函数(统称为“工具”)相关联,AI 智能体便会运转起来。LLM 会根据您为其指定的任务确定要调用的工具和调用条件。使用 Java 构建智能体时,首先要定义这些工具。使用 @Tool 为现有的 Java 方法添加注解和描述,以便 LLM 理解每个函数的功能:
public class BankingTools implements ToolSet {
    @Tool
    @LLMDescription("Sends money to a recipient")
    public Boolean sendMoney(
        @LLMDescription("Unique identifier of the recipient")
        String recipientId,
        Integer amount
    ) {
        return true; // Your implementation here
    }

    @Tool
    @LLMDescription("Account balance in $")
    public Integer getAccountBalance(String userId) {
        return 1000000; // Your implementation here
    }
}
接下来,使用构建器 API 创建智能体。您需要配置要使用的 LLM 提供商(OpenAI、Anthropic 等)、设置定义智能体角色的系统提示,并注册您的工具:
// Connect to one or more LLM providers
var promptExecutor = new MultiLLMPromptExecutor(
    new OpenAILLMClient("OPENAI_API_KEY"),
    new AnthropicLLMClient("ANTHROPIC_API_KEY")
);

// Build the agent
var bankingAgent = AIAgent.builder()
    .promptExecutor(promptExecutor)
    .llmModel(OpenAIModels.Chat.GPT5_2)  // Choose which model to use
    .systemPrompt("You're a banking assistant")  // Define the agent's role
    .toolRegistry(
        ToolRegistry.builder()
            .tools(new BankingTools())  // Register your tools
            .build()
    )
    .build();

// Run the agent with a user task
bankingAgent.run("Send 100$ to my friend Mike (mike_1234) if I have enough money");
当您运行此智能体时,它将:
- 使用
getAccountBalance()检查帐户余额 - 如果资金充足,则使用正确的形参调用
sendMoney() - 向用户返回响应
这样一来,您的 Java 应用程序的功能便会与一个完全自主的 AI 智能体关联起来,该智能体可以自主判断执行的操作。
通过自定义策略实现可预测的工作流
在上面的简单示例中,所有决策由 LLM 自主完成,包括调用的工具和工具的调用顺序。但对于生产系统来说,通常需要更精细的控制。如果您要确保某些操作在其他操作之前执行,该怎么办? 要限制每个步骤可用的工具呢? 要实现验证循环呢?
Koog 提供了不同的方式来定义智能体工作流:函数式(基于代码)、基于图和基于规划。
函数式策略允许您在代码中编排个别智能体步骤。可以将此策略当作编写常规 Java 方法,但每个步骤都可能涉及 LLM 调用和工具执行。您将大型任务拆分为较小的子任务,每个子任务都有自己的提示、限定的工具集和类型安全的输入/输出:
var functionalAgent = AIAgent.builder()
    .promptExecutor(promptExecutor)
    .functionalStrategy("my-strategy", (ctx, userInput) -> {
        // Step 1: First, identify the problem
        // Only give the agent communication and read-only database access here
        ProblemDescription problem = ctx
            .subtask("Identify the problem: $userInput")
            .withOutput(ProblemDescription.class)  // Type-safe output
            .withTools(communicationTools, databaseReadTools)  // Limited tools
            .run();

        // Step 2: Now solve the problem
        // Give the agent database write access only after problem identification
        ProblemSolution solution = ctx
            .subtask("Solve the problem: $problem") // Use output from step 1
            .withOutput(ProblemSolution.class)
            .withTools(databaseReadTools, databaseWriteTools)
            .run();

        // Verify the solution and try to fix it until the solution is satisfying
        while (true) {
            var verificationResult = ctx
                .subtask("Now verify that the problem is actually solved: $solution")
                .withVerification()
                .withTools(communicationTools, databaseReadTools)
                .run();

            if (verificationResult.isSuccessful()) {
                return problemSolution;
            } else {
                problemSolution = ctx
                    .subtask("Fix the solution based on the provided feedback: ${verificationResult.getFeedback()}")
                    .withOutput(ProblemSolution.class)
                    .withTools(databaseReadTools, databaseWriteTools)
                    .run();
            }
        }

    })
    .build();
利用此方式,您可以灵活编写代码,同时仍能够为个别步骤使用 AI 智能体。请注意您控制操作顺序的方式以及每个步骤可用的工具。您可以在此处查看完整的可运行示例。
图策略将工作流定义为具有类型安全节点和边缘的有限状态机。与函数式策略不同的是,图策略将逻辑(节点和边缘)与其执行分离。这样便可实现诸如细粒度持久性等强大功能 – 如果您的智能体崩溃,它可以从停止的确切节点恢复,而无需从头开始执行:
var graphAgent = AIAgent.builder()
    .graphStrategy(builder -> {
        // Define the overall graph structure
        var graph = builder
            .withInput(String.class)
            .withOutput(ProblemSolution.class);

        // Define workflow elements: individual nodes (steps) and subgraphs
        var identifyProblem = AIAgentSubgraph.builder()
            .withInput(String.class)
            .withOutput(ProblemDescription.class)
            .limitedTools(communicationTools, databaseReadTools)
            .withTask(input -> "Identify the problem")
            .build();

        var solveProblem = … // subgraph for solving a problem

        var verifySolution = … // subgraph for verifying a solution

        var fix = ...// subgraph for fixing a problem

        // Connect the nodes with edges to define execution flow
        graph.edge(graph.nodeStart, identifyProblem);
        graph.edge(identifyProblem, solveProblem);
        graph.edge(solveProblem, verifySolution);

        // Conditional edges: if verification succeeds, finish; otherwise, attempt a fix
        graph.edge(AIAgentEdge.builder()
        	.from(verifySolution)
        	.to(graph.nodeFinish)
        	.onCondition(CriticResult::isSuccessful)
        	.transformed(CriticResult::getInput)
        	.build());

        graph.edge(AIAgentEdge.builder()
        	.from(verifySolution)
        	.to(fix)
        	.onCondition(verification -> !verification.isSuccessful())
        	.transformed(CriticResult::getFeedback)
        	.build());

        graph.edge(fix, verifySolution);

        return graph.build();
    })
    .build();
如果您需要持久、复杂的分支逻辑,或希望直观呈现智能体的工作流,图策略是理想的选择。您可以与 ML 同事共享可视化内容并进行讨论:
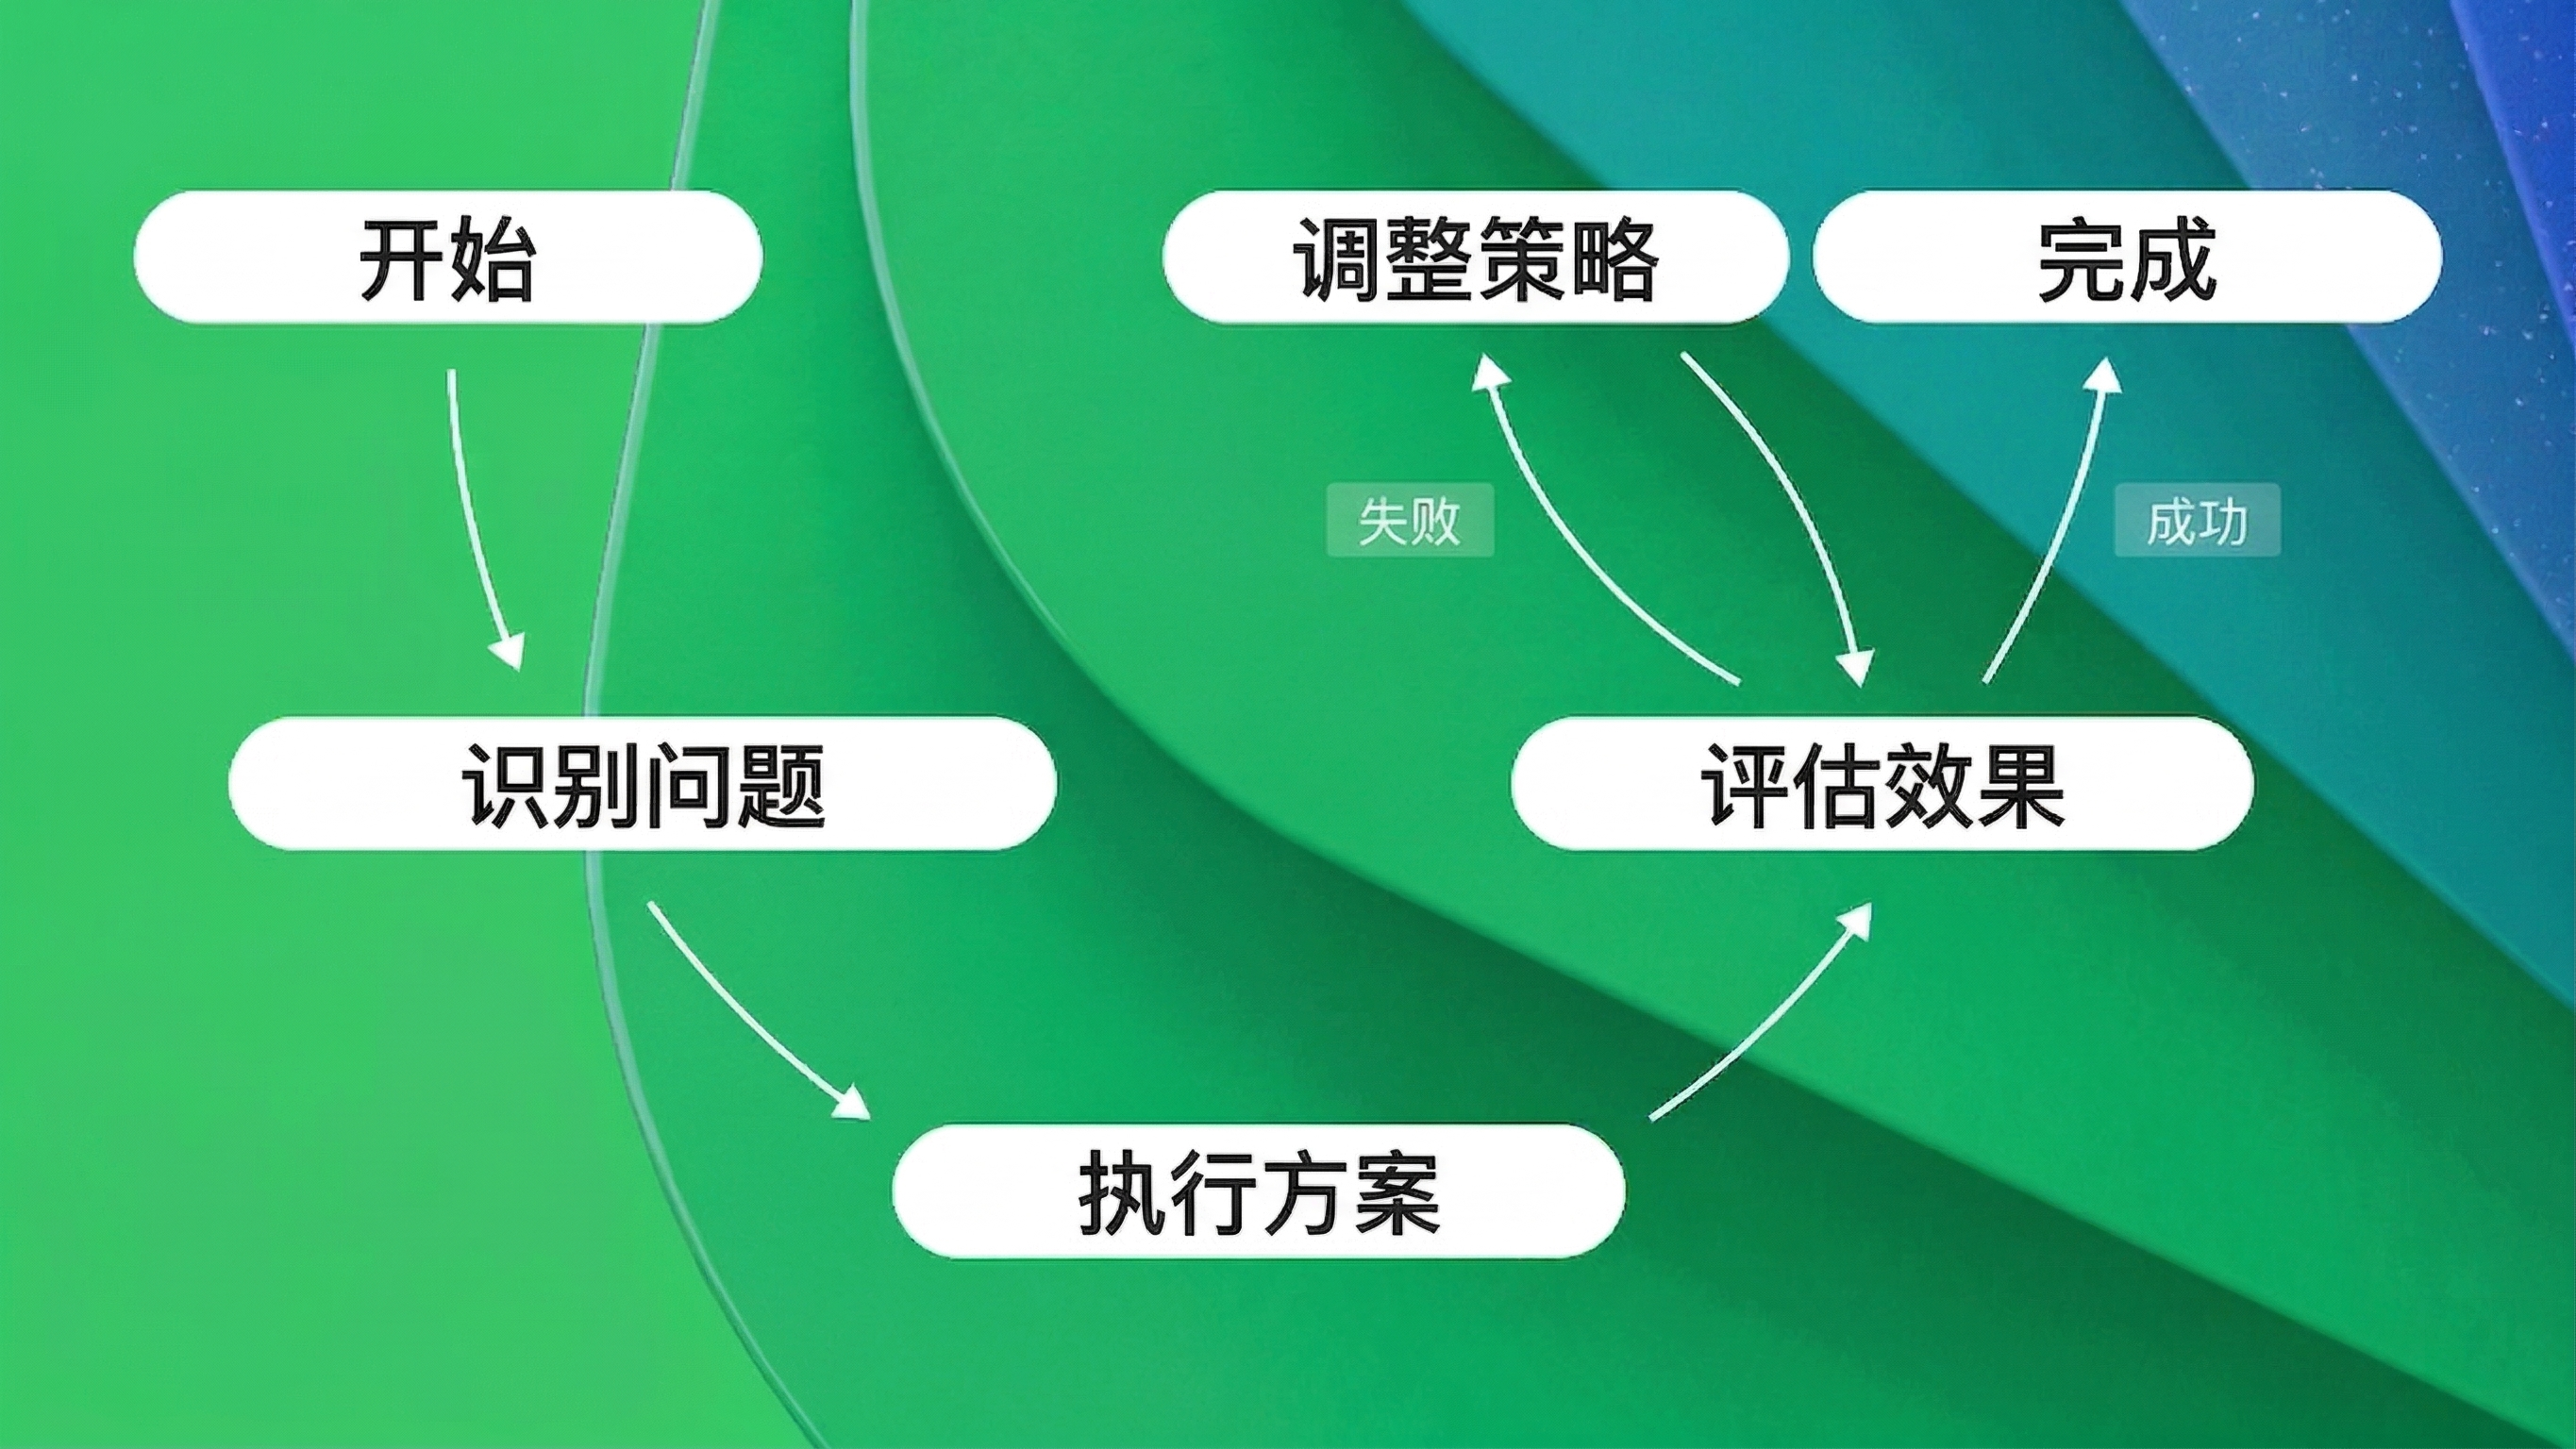
每个节点都是类型安全的,从而确保一个节点的输出与下一个节点的预期输入相匹配。您可以在此处查看完整示例。
规划策略使用以目标为导向的行动规划 (GOAP) 或基于 LLM 的规划。您无需定义具体的执行顺序,而是定义:
- 可用操作及其前提条件(操作的运行条件)
- 效果(它们对智能体状态的更改)
- 目标条件(智能体应实现的目标)
规划器会自动找出为达到目标而采用的最佳操作执行顺序。对于存在多种可行路径的复杂场景,或者要求动态变化的情况,此策略可以发挥强大作用。在此处查看详细示例。
通过持久性功能实现容错
AI 智能体通常会处理复杂的多步骤任务,这些任务可能需要数秒甚至数分钟才能完成。在此期间,服务器可能会崩溃,网络连接可能中断,或者可能进行部署。如果不具有持久性,您的智能体将不得不从头开始执行,将时间和金钱浪费在重复的 LLM 调用上。
Koog 的持久性功能可在每个步骤执行完毕后将智能体状态保存到磁盘、S3 或数据库。如果发生故障,基于图的智能体可以从停止的确切节点恢复,而无需从头开始执行。智能体将恢复到最后一个单独节点,并保留故障前完成的所有进度:
// First, configure where to store checkpoints
// Can be Postgres, S3, local disk, or your own implementation
var storage = new PostgresJdbcPersistenceStorageProvider(
    dataSource = dataSource,
    tableName = “banking_agent_checkpoints”
)

// Install the Persistence feature on your agent
var recoverableAgent = AIAgent.builder()
    // ... other agent configuration
    .install(Persistence.Feature, config -> {
        config.setStorage(storage);
        config.setEnableAutomaticPersistence(true);  // Auto-save after each step
    })
    .build();

// First run - starts fresh
recoverableAgent.run("Help me with my account", "user-session-0123");

// If a crash happens mid-execution...

// Second run with same session ID - automatically recovers and continues
recoverableAgent.run("Help me with my account", "user-session-0123");
会话 ID 会将检查点数据与特定用户会话(如用户 ID 或请求 ID)绑定。这样一来,您可以同时运行多个智能体实例,而不会发生冲突。
通过 OpenTelemetry 实现可观测性
在生产环境中运行智能体时,您需要了解智能体的行为。它们调用了哪些工具? 每个 LLM 请求使用了多少 token? 哪里出现了瓶颈? 成本来自哪里?
将 Koog 与 OpenTelemetry 集成可以了解这些信息。连接到 Langfuse 或 W&B Weave 这类后端可以查看智能体执行的具体跟踪信息,包括嵌套事件(节点、工具调用和 LLM 请求)、 token 数量、成本和用时信息:
var observableAgent = AIAgent.builder()
    // ... other agent configuration
    .install(OpenTelemetry.Feature, config -> {
        // Export telemetry data to your observability backend
        config.addSpanExporter(OtlpGrpcSpanExporter.builder()
            .setEndpoint("http://localhost:4317")  // Your OpenTelemetry collector
            .build());
    })
    .build();
配置完成后,每次智能体运行时都会自动生成详细的跟踪信息,供您在可观测性工具中查看。
历史记录压缩
当智能体处理复杂任务时,随着每次的 LLM 调用和工具调用,它的对话历史记录都会不断增加。此历史记录会随每个后续请求一起发送,以提供上下文。但上下文越长,意味着:
- LLM 响应速度越慢
- 成本越高(为每个 token 支付的费用)
- 最终会达到上下文窗口的限制
Koog 的历史记录压缩功能会以智能方式总结关键信息,或从历史记录中提取关键信息,从而解决上述问题,同时减少 token 使用量,并保留重要信息:
var agentWithCompression = AIAgent.builder()
    .functionalStrategy("compressed", (ctx, userInput) -> {
        var response = ctx.requestLLM(userInput);
        // Your agent logic...

        // When history gets long, compress it
        ctx.compressHistory();
    })
    .build();
您可以自定义压缩的实现方式:
HistoryCompressionStrategy.WholeHistory– 将整个历史记录压缩成一个摘要。HistoryCompressionStrategy.FromLastNMessages(100)– 只压缩最后 N 条消息。HistoryCompressionStrategy.Chunked(20)– 以 N 条消息为一组进行压缩。RetrieveFactsFromHistory– 从历史记录中提取特定事实(例如“客户叫什么名字?”,或“执行了哪些操作?”)。
您还可以实现自己的历史记录压缩策略。
管理 Java 线程
在典型的 Java 应用程序中,您需要对线程池进行细粒度控制。您可能会为受 CPU 约束的工作指定专属的线程池,并为 I/O 操作指定另一个线程池。Koog 允许您为智能体执行的每个部分指定单独的 ExecutorService:
var threadControlledAgent = AIAgent.builder()
    .promptExecutor(promptExecutor)
    .agentConfig(AIAgentConfig.builder(OpenAIModels.Chat.GPT5_2)
        .strategyExecutorService(mainExecutorService)      // For agent logic
        .llmRequestExecutorService(ioExecutorService)      // For LLM API calls
        .build())
    .build();
通过这种分离操作,您可以优化资源使用情况 — 例如,为受 I/O 约束的 LLM 请求使用较大的线程池,同时为策略执行逻辑保持较小的线程池。
试用 Koog for Java
Koog for Java 通过自然且符合 Java 惯用风格的 API,为您的 Java 应用程序带来了企业级智能体工程。无论是构建简单的工具调用智能体,还是构建具有持久性和可观测性的复杂多步骤工作流,Koog 都能提供您需要的提取能力。
点击此处立即开始:https://docs.koog.ai/
本博文英文原作者:
Subscribe to JetBrains AI Blog updates
Discover more


Koog Comes to Java: The Enterprise AI Agent Framework From JetBrains

Adding AI agents to your enterprise backend shouldn’t mean compromising your architecture. If your core systems are built in Java, orchestrating LLMs shouldn’t require you to introduce separate Python microservices or rewrite your stack.
Today, we are launching Koog for Java. Originally built to keep pace as JetBrains scaled up its own activities, Koog replaces unpredictable, ad hoc prompt changing with structured, observable, and fault-tolerant agent workflows.
Now, one of the JVM’s most powerful agent frameworks comes with a fully idiomatic Java API. Your Java teams can build reliable AI agents directly inside your existing backends, with fluent builder-style APIs, thread pool executors, and native Java abstractions – completely free of Kotlin-specific friction.
What you get with Koog for Java
The Java API provides access to all of Koog’s features:
- Multiple workflow strategies (functional, graph-based, and planning): Control exactly how your agent executes tasks.
- Spring Boot integration: Drop Koog into your existing Spring applications.
- Support for all major LLM providers: Use your preferred models from OpenAI, Anthropic, Google, DeepSeek, Ollama, and more.
- Fault tolerance with Persistence: Recover from failures without losing progress or repeating expensive LLM calls.
- Observability with OpenTelemetry: Get full visibility into agent execution, token usage, and costs, with Langfuse and W&B Weave support out of the box
- History compression: Reduce token usage and optimize costs at scale
- And much more!
Read on to see what building agents in Java with Koog looks like.
Simple setup
AI agents work by connecting large language models (LLMs) with functions from your application, which are generally referred to as “tools”. The LLM decides which tools to call and when, based on the task you give it. Building an agent in Java starts with defining these tools. Annotate your existing Java methods with @Tool and add descriptions so the LLM understands what each function does:
public class BankingTools implements ToolSet {
    @Tool
    @LLMDescription("Sends money to a recipient")
    public Boolean sendMoney(
        @LLMDescription("Unique identifier of the recipient")
        String recipientId,
        Integer amount
    ) {
        return true; // Your implementation here
    }

    @Tool
    @LLMDescription("Account balance in $")
    public Integer getAccountBalance(String userId) {
        return 1000000; // Your implementation here
    }
}
Next, create an agent using the builder API. You’ll need to configure which LLM providers to use (OpenAI, Anthropic, etc.), set a system prompt that defines the agent’s role, and register your tools:
// Connect to one or more LLM providers
var promptExecutor = new MultiLLMPromptExecutor(
    new OpenAILLMClient("OPENAI_API_KEY"),
    new AnthropicLLMClient("ANTHROPIC_API_KEY")
);

// Build the agent
var bankingAgent = AIAgent.builder()
    .promptExecutor(promptExecutor)
    .llmModel(OpenAIModels.Chat.GPT5_2)  // Choose which model to use
    .systemPrompt("You're a banking assistant")  // Define the agent's role
    .toolRegistry(
        ToolRegistry.builder()
            .tools(new BankingTools())  // Register your tools
            .build()
    )
    .build();

// Run the agent with a user task
bankingAgent.run("Send 100$ to my friend Mike (mike_1234) if I have enough money");
When you run this agent, it will:
- Check the account balance using
getAccountBalance() - If there’s enough money, call
sendMoney()with the right parameters - Return a response to the user
This connects your Java application’s functionality with a fully autonomous AI agent that can reason about which actions to take.
Predictable workflows with custom strategies
The simple example above lets the LLM decide everything – which tools to call and in what order. But for production systems, you often need more control. What if you want to ensure certain operations happen before others? Or limit which tools are available at each step? Or implement verification loops?
Koog provides different approaches to defining agent workflows: functional (code-based), graph-based, and planning-based.
Functional strategies let you orchestrate individual agentic steps in code. Think of it like writing a regular Java method, but each step can involve LLM calls and tool executions. You split large tasks into smaller subtasks, each with its own prompt, limited set of tools, and type-safe inputs/outputs:
var functionalAgent = AIAgent.builder()
    .promptExecutor(promptExecutor)
    .functionalStrategy("my-strategy", (ctx, userInput) -> {
        // Step 1: First, identify the problem
        // Only give the agent communication and read-only database access here
        ProblemDescription problem = ctx
            .subtask("Identify the problem: $userInput")
            .withOutput(ProblemDescription.class)  // Type-safe output
            .withTools(communicationTools, databaseReadTools)  // Limited tools
            .run();

        // Step 2: Now solve the problem
        // Give the agent database write access only after problem identification
        ProblemSolution solution = ctx
            .subtask("Solve the problem: $problem") // Use output from step 1
            .withOutput(ProblemSolution.class)
            .withTools(databaseReadTools, databaseWriteTools)
            .run();

        // Verify the solution and try to fix it until the solution is satisfying
        while (true) {
            var verificationResult = ctx
                .subtask("Now verify that the problem is actually solved: $solution")
                .withVerification()
                .withTools(communicationTools, databaseReadTools)
                .run();

            if (verificationResult.isSuccessful()) {
                return problemSolution;
            } else {
                problemSolution = ctx
                    .subtask("Fix the solution based on the provided feedback: ${verificationResult.getFeedback()}")
                    .withOutput(ProblemSolution.class)
                    .withTools(databaseReadTools, databaseWriteTools)
                    .run();
            }
        }

    })
    .build();
This approach gives you the flexibility of code while still using AI agents for individual steps. Notice how you control the order of operations and which tools are available at each step. You can check the full runnable example here.
Graph strategies define workflows as finite state machines with type-safe nodes and edges. Unlike functional strategies, graph strategies separate the logic (nodes and edges) from its execution. This enables powerful features like fine-grained persistence – if your agent crashes, it can resume from the exact node where it stopped, not from the beginning:
var graphAgent = AIAgent.builder()
    .graphStrategy(builder -> {
        // Define the overall graph structure
        var graph = builder
            .withInput(String.class)
            .withOutput(ProblemSolution.class);

        // Define workflow elements: individual nodes (steps) and subgraphs
        var identifyProblem = AIAgentSubgraph.builder()
            .withInput(String.class)
            .withOutput(ProblemDescription.class)
            .limitedTools(communicationTools, databaseReadTools)
            .withTask(input -> "Identify the problem")
            .build();

        var solveProblem = … // subgraph for solving a problem

        var verifySolution = … // subgraph for verifying a solution

        var fix = ...// subgraph for fixing a problem

        // Connect the nodes with edges to define execution flow
        graph.edge(graph.nodeStart, identifyProblem);
        graph.edge(identifyProblem, solveProblem);
        graph.edge(solveProblem, verifySolution);

        // Conditional edges: if verification succeeds, finish; otherwise, attempt a fix
        graph.edge(AIAgentEdge.builder()
        	.from(verifySolution)
        	.to(graph.nodeFinish)
        	.onCondition(CriticResult::isSuccessful)
        	.transformed(CriticResult::getInput)
        	.build());

        graph.edge(AIAgentEdge.builder()
        	.from(verifySolution)
        	.to(fix)
        	.onCondition(verification -> !verification.isSuccessful())
        	.transformed(CriticResult::getFeedback)
        	.build());

        graph.edge(fix, verifySolution);

        return graph.build();
    })
    .build();
Graph strategies are ideal when you need persistence, complex branching logic, or want to visualize your agent’s workflow. You can share the visualization and discuss it with your ML colleagues:
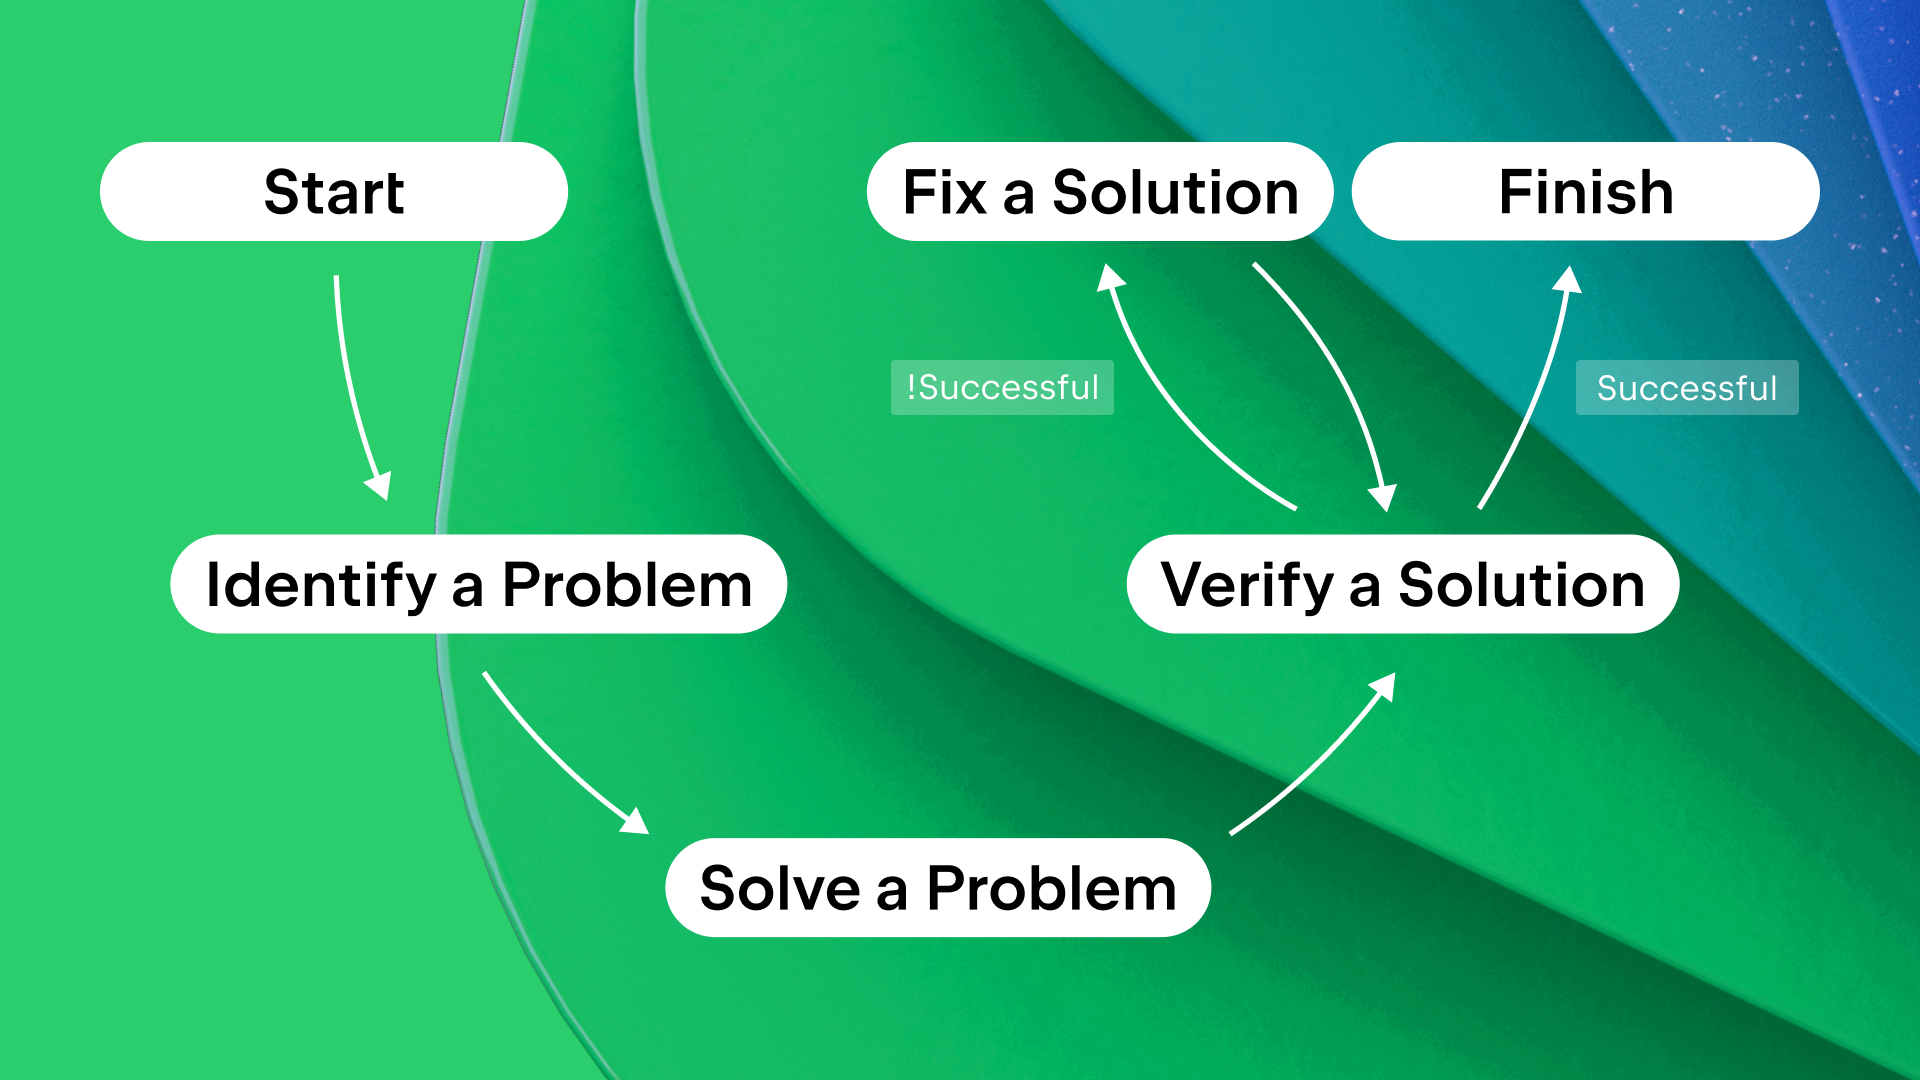
Each node is type-safe, ensuring that the outputs from one node match the expected inputs of the next. You can find the full example here.
Planning strategies use goal-oriented action planning (GOAP) or LLM-based planning. Instead of defining the exact execution order, you define:
- Available actions with their preconditions (when they can run)
- Effects (what they change in the agent’s state)
- A goal condition (what the agent should achieve)
The planner automatically figures out the optimal order for executing actions to reach the goal. This is powerful for complex scenarios where multiple paths might work, or when requirements change dynamically. See a detailed example here.
Persistence for fault tolerance
AI agents often handle complex, multi-step tasks that can take seconds or even minutes. During this time, servers can crash, network connections can fail, or deployments can happen. Without persistence, your agent would have to start all over again, wasting time and money on repeated LLM calls.
Koog’s persistence feature saves agent state to disk, S3, or a database after each step. If something fails, the graph-based agent can resume from exactly where it stopped, not from the beginning. It will restore at the last individual node and preserve all progress made before the failure:
// First, configure where to store checkpoints
// Can be Postgres, S3, local disk, or your own implementation
var storage = new PostgresJdbcPersistenceStorageProvider(
    dataSource = dataSource,
    tableName = “banking_agent_checkpoints”
)

// Install the Persistence feature on your agent
var recoverableAgent = AIAgent.builder()
    // ... other agent configuration
    .install(Persistence.Feature, config -> {
        config.setStorage(storage);
        config.setEnableAutomaticPersistence(true);  // Auto-save after each step
    })
    .build();

// First run - starts fresh
recoverableAgent.run("Help me with my account", "user-session-0123");

// If a crash happens mid-execution...

// Second run with same session ID - automatically recovers and continues
recoverableAgent.run("Help me with my account", "user-session-0123");
The session ID ties checkpoint data to a specific user session (like a user ID or request ID). This lets you run multiple agent instances simultaneously without conflicts.
Observability with OpenTelemetry
When running agents in production, you need visibility into what they’re doing. Which tools did they call? How many tokens did each LLM request use? Where are the bottlenecks? Where did costs come from?
Koog integrates with OpenTelemetry to provide this visibility. Connect to backends like Langfuse or W&B Weave to see detailed traces of agent execution, including nested events (nodes, tool calls, and LLM requests), token counts, costs, and timing information:
var observableAgent = AIAgent.builder()
    // ... other agent configuration
    .install(OpenTelemetry.Feature, config -> {
        // Export telemetry data to your observability backend
        config.addSpanExporter(OtlpGrpcSpanExporter.builder()
            .setEndpoint("http://localhost:4317")  // Your OpenTelemetry collector
            .build());
    })
    .build();
Once configured, every agent run automatically generates detailed traces that you can explore in your observability tool.
History compression
As agents work on complex tasks, their conversation history grows with every LLM call and tool invocation. This history is sent with each subsequent request to provide context. But longer context means:
- Slower LLM responses
- Higher costs (you pay per token)
- Eventually hitting context window limits
Koog’s history compression solves this by intelligently summarizing or extracting key information from the history, reducing token usage while preserving what’s important:
var agentWithCompression = AIAgent.builder()
    .functionalStrategy("compressed", (ctx, userInput) -> {
        var response = ctx.requestLLM(userInput);
        // Your agent logic...

        // When history gets long, compress it
        ctx.compressHistory();
    })
    .build();
You can customize how compression works:
HistoryCompressionStrategy.WholeHistory– compress entire history into a summary.HistoryCompressionStrategy.FromLastNMessages(100)– only compress the last N messages.HistoryCompressionStrategy.Chunked(20)– compress in chunks of N messages.RetrieveFactsFromHistory– extract specific facts from history (e.g. “What’s the user’s name?” or “Which operations were performed?”).
You can also implement your own history compression strategy.
Managing Java threads
In a typical Java application, you want fine-grained control over thread pools. Maybe you have a dedicated pool for CPU-bound work and another for I/O operations. Koog lets you specify a separate ExecutorService for each part of an agent’s execution:
var threadControlledAgent = AIAgent.builder()
    .promptExecutor(promptExecutor)
    .agentConfig(AIAgentConfig.builder(OpenAIModels.Chat.GPT5_2)
        .strategyExecutorService(mainExecutorService)      // For agent logic
        .llmRequestExecutorService(ioExecutorService)      // For LLM API calls
        .build())
    .build();
This separation lets you optimize resource usage – for example, using a larger pool for I/O-bound LLM requests while keeping a smaller pool for strategy execution logic.
Try Koog for Java
Koog for Java brings enterprise-grade agent engineering to your Java applications with an API that feels natural and idiomatic. Whether you’re building simple tool-calling agents or complex multi-step workflows with persistence and observability, Koog provides the abstractions you need.
Get started here: https://docs.koog.ai/