Kotlin
A concise multiplatform language developed by JetBrains
Kotlin Notebook のご紹介

IntelliJ IDEA 用 Kotlin Notebook プラグインの初の実験的バージョンが公開されました! この記事ではこのプラグインの機能とユースケースをご紹介しますが、その前にプラグインの動作をご覧ください。
Kotlin Notebook プラグインとは?
ノートブックはコード、視覚表示、およびテキストを 1 つのドキュメントにまとめられる対話型ツールです。 ノートブックではコードスニペット(セル)を記述して実行したり、その結果を表示したり、開発者の思考プロセスを 1 か所でドキュメント化したりできます。
ノートブックはすでに広く採用されており、迅速なプロトタイピング、解析、およびデータサイエンスにおいて信頼を得ています。 Kotlin Notebook プラグインは IntelliJ IDEA に対話型開発機能を追加し、多用途性に優れたブラウザーの視覚表示機能と合わせて IDE の Kotlin 言語サポートの全機能を補完します。
このプラグインで実現できることと、その機能を技術的な側面から説明します。
インストール
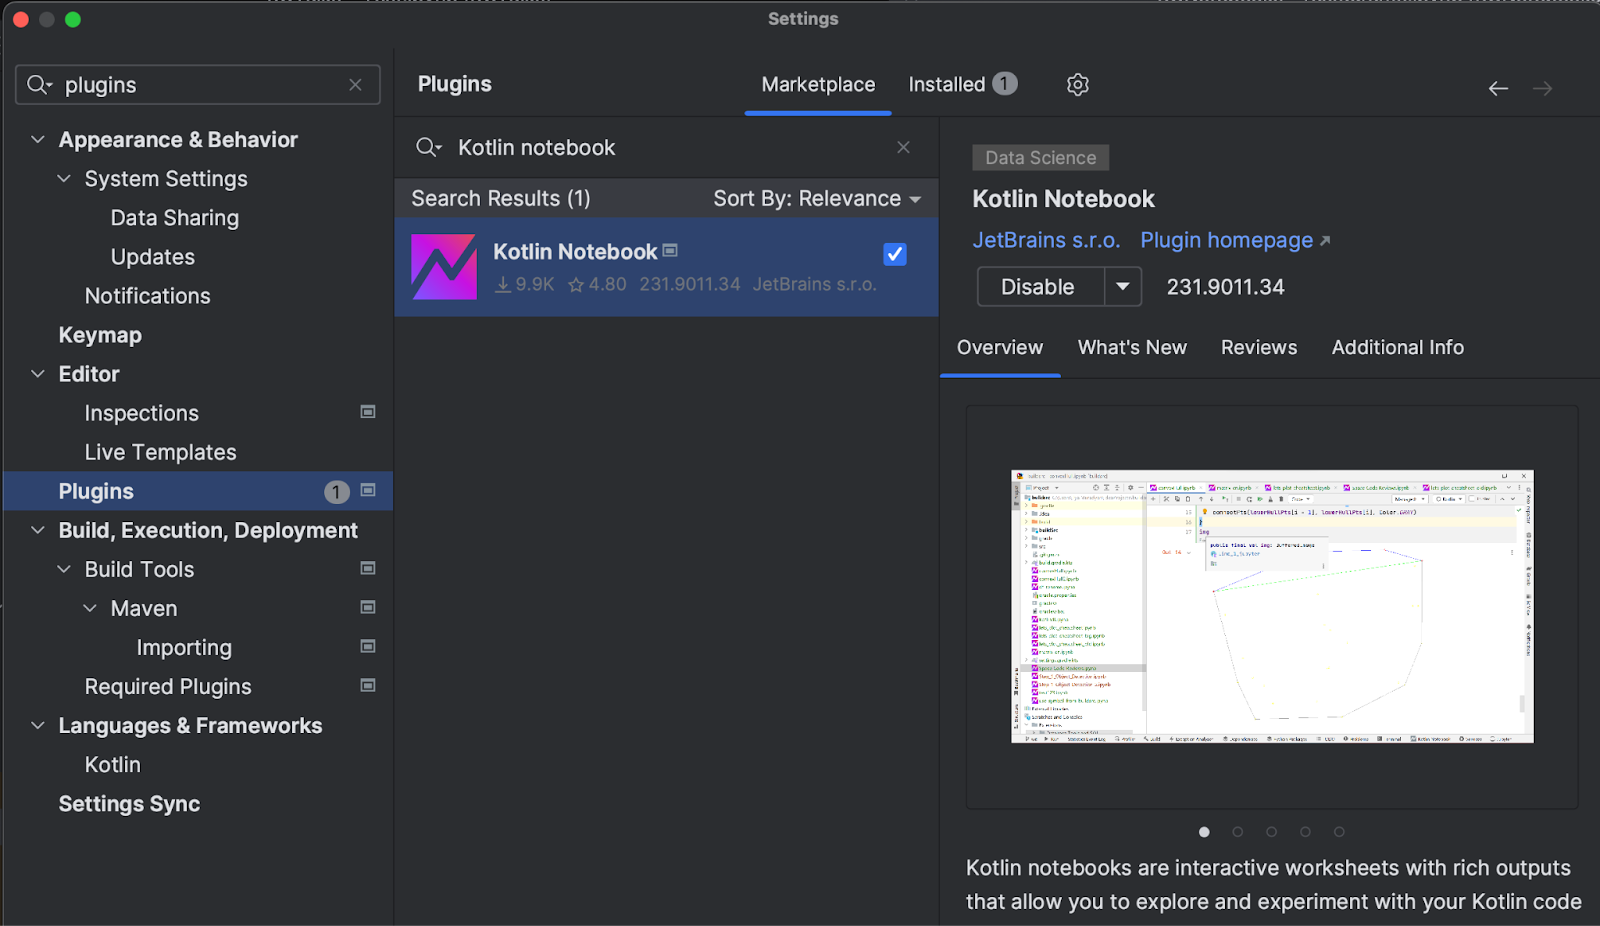
プラグインを取得するには、IntelliJ IDEA Ultimate の Settings(設定)| Plugins(プラグイン) タブにある Marketplace からインストールする必要があります。 IntelliJ IDEA はバージョン 2023.1.2 以上を使用してください。 以前のバージョンでもプラグインをインストールすることは可能かもしれませんが、動作は不安定になります。
インストールプロセスでは Python プラグインをインストールするように提案されます。この提案を受け入れてください。 お使いのワークステーションに Python がインストールされるわけではないので、ご心配いりません。 Kotlin Notebook には Python プラグインに含まれる UI コンポーネントにいくつかの依存関係があるだけです。 この依存関係は近いうちに削除する予定です。

Kotlin Notebook プラグインは現在、IntelliJ IDEA Ultimate でのみ動作することにご注意ください。
Kotlin Notebook の操作
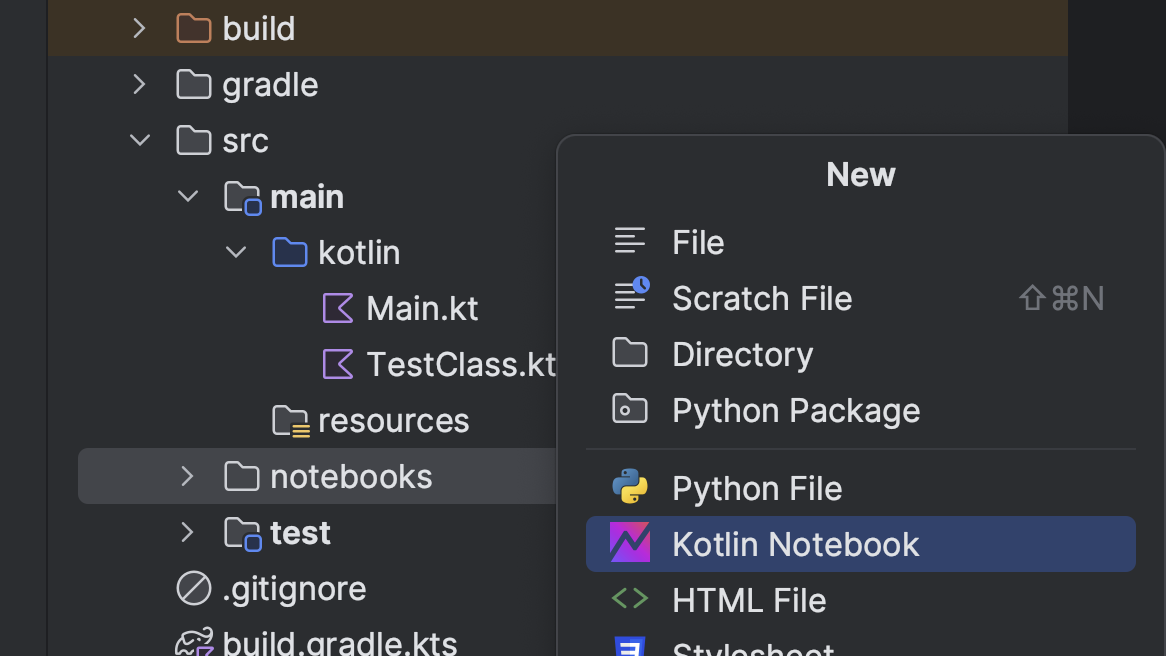
プラグインをインストールしたら、最初のノートブックを作成できるようになります。 基本的にノートブックはディスク上のファイルでしかないため、New(新規)| Kotlin Notebook(Kotlin ノートブック) アクションを使って Project(プロジェクト)ビューの任意の場所に作成できます。

.ipynb 拡張子のファイルが作成されます。 この拡張子は Jupyter ノートブックをすでにご存知の方にはおなじみでしょう。 Kotlin ノートブック内部の構造、フォーマット、およびプロトコルには同じものが使用されているため、このファイルは GitHub や Jupyter ノートブックまたは Kotlin カーネルがインストールされた JupyterLab で表示可能です。
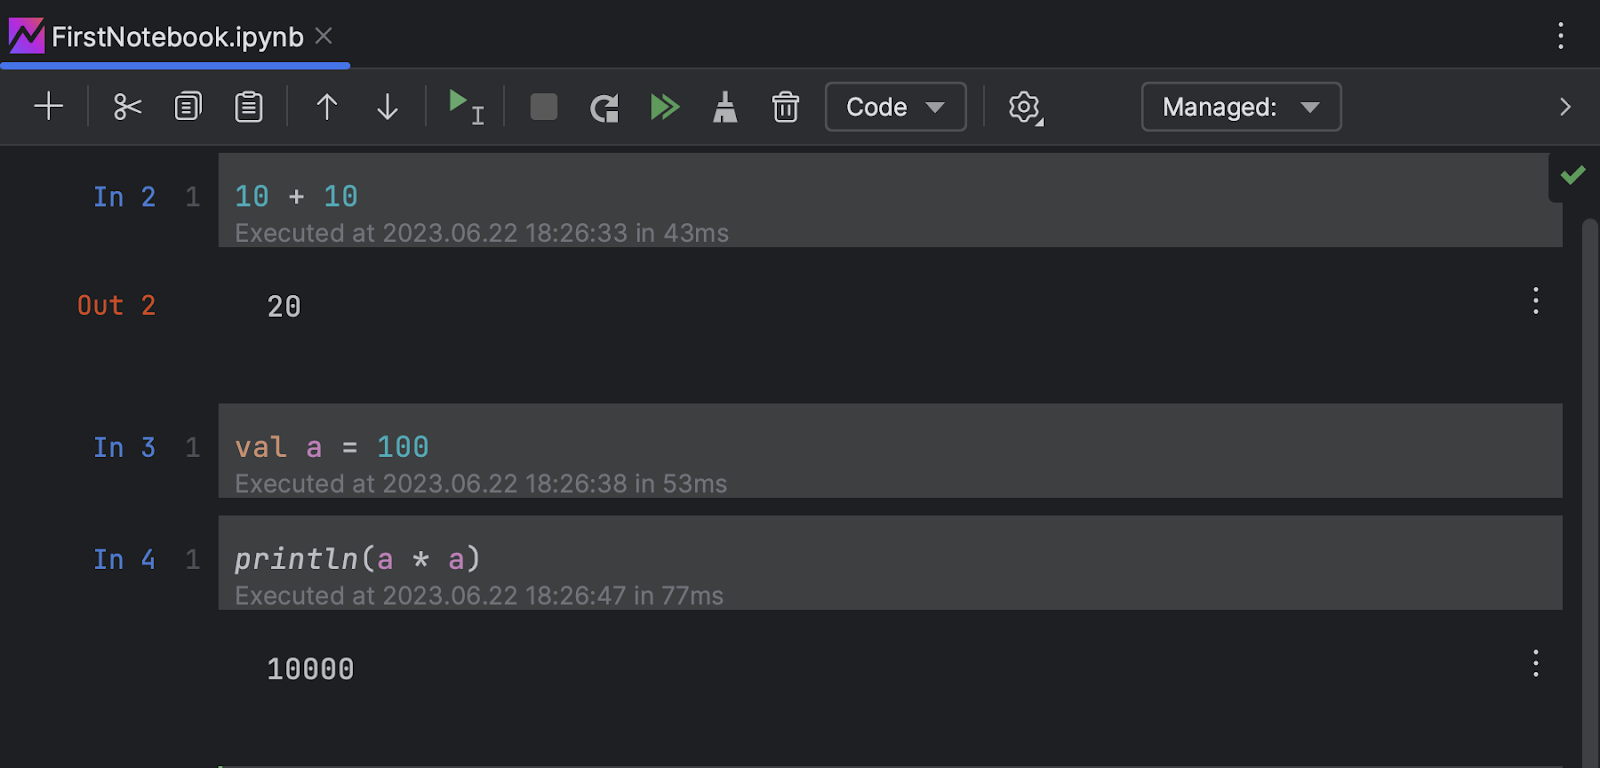
作成されたノートブックには最初の空のセルのみが含まれています。 セルはノートブックのメインのビルディングブロックであり、コードまたはテキストのいずれかを含めることができます。 コードセルを実行するには、それを選択して Run(実行)ボタンをクリックするか、Shift + Enter ショートカットを使用できます。 コードが実行され、そのセルの下に出力またはエラーが表示されます。
Markdown セルにテキストを記述することも可能です。ヘッダー、リスト、リンク、LaTeX、画像などの豊富な書式設定オプションがサポートされています。 Markdown セルをレンダリングして書式設定されたテキストを見るには、コードセルの実行と同じ方法でセルを実行します。
ノートブックには対話型の反復処理ワークフローが備わっています。 セルは任意の順序で実行可能で、コードまたはテキストを変更したり、変数を宣言して宣言し直したり、セルを再実行したりして更新された結果を確認できます。 このため、作業の実験、プロトタイピング、およびドキュメント化が楽になります。

コードの説明とドキュメント用にノートブックを使用するメリットを直接体験するため、こちらのノートブックをダウンロードして試すことをお勧めします。 このブログ記事で説明した Kotlin ノートブックのすべての側面を実際に体験できるため、理論と実践を融合できます。
出力
ノートブックの際だった特徴は、サポートされている出力形式が豊富である点です。
- テキスト: 最も単純な出力形式で、コードから出力されたステートメント、変数の値、またはテキストベースの出力が含まれます。 セルの結果が他の形式に当てはまらない場合、
toString()メソッドによってテキストとして出力されます。 - HTML: Jupyter ノートブックは HTML を直接レンダリングできるため、リッチテキスト書式設定、テーブルの使用、またはウェブサイトの埋め込みも可能です。
- 画像: 静的画像を PNG、JPEG、および SVG などの形式で表示できます。
BufferedImage型の結果もサポートされています。 これらの画像はすべて、ファイル、生成されたグラフ、またはその他のビジュアルメディアからの画像となります。 - リッチテキスト: Markdown セルはリスト、フォントスタイル、コードブロックなどをサポートしているため、リッチテキスト HTML 出力を生成します。
- LaTeX: 学術機関で広く使用されている LaTeX という組版システムを使用して数式や方程式を見栄え良くレンダリングできます。
- エラーとトレースバック: コードにエラーが含まれる場合、ノートブックはエラーメッセージとトレースバックを表示するため、デバッグに必要な詳細情報を得られます。
ノートブックの依存関係
ノートブックにどんな依存関係が生じるかを考慮することも重要です。 標準のライブラリが初期状態で使用できるのは明らかですが、それでは不十分な場合もよくあります。 以下のようにさまざまなオプションが提供されています。
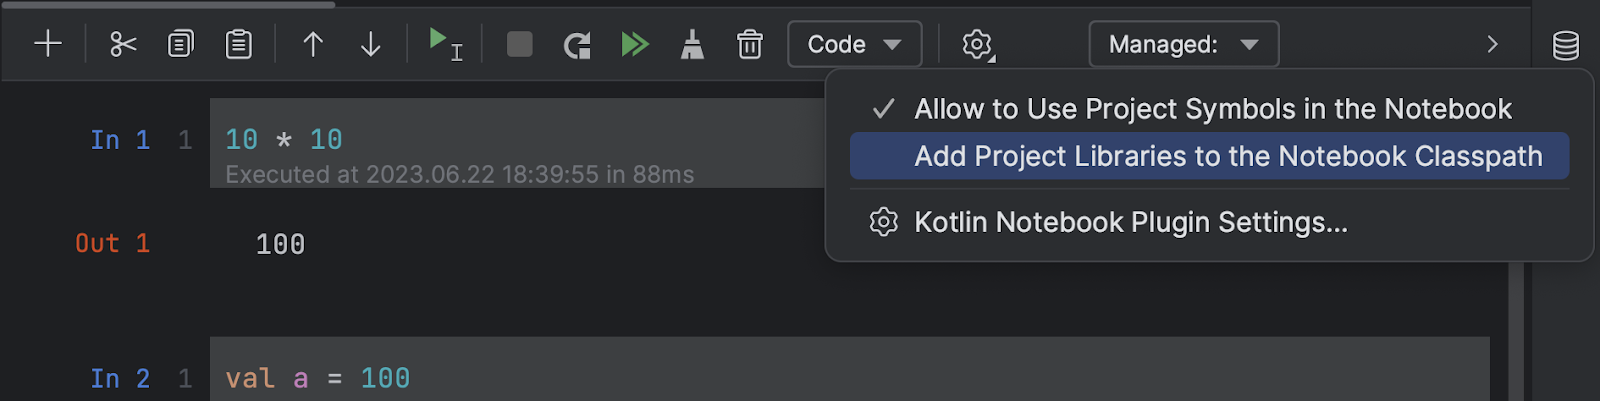
- プロジェクトの依存関係を利用してノートブックが確実に同じクラスにアクセスできるようにします。
- ノートブック内でプロジェクト自体のクラスとその他のエンティティを使用することができます。 ただし、このような場合には各セルの実行前に必要に応じてプロジェクトの変更がチェックされ、再コンパイルされます。

- Gradle スタイルの構文を使って任意のセルにライブラリのパスを指定すると、Maven リポジトリからそのライブラリを読み込むことができます。
USE {
  repositories {
  maven {
    url = "https://my.secret.repo/maven/"
    credentials {
      username = USER
      password = TOKEN
    }
  }
  dependencies {
    val ktorVersion = "2.0.3"
    implementation("my.secret:artifact:1.0-beta")
    implementation("io.ktor:ktor-client-core-jvm:$ktorVersion")
    implementation("io.ktor:ktor-client-apache-jvm:$ktorVersion")
  }
}
- または、
DependsOnアノテーションによる短縮形式を使用できます。
@file:DependsOn(“io.ktor:ktor-client-core-jvm:$ktorVersion“)
- Maven のパスを記憶して場所を指定するのは面倒です。 この作業を単純化するため、よりスマートで便利な方法で一般的なライブラリを読み込めるようにしました。
%useマジックコマンドの後に 1 つ以上のライブラリ名を続けるだけで読み込めます。

%use ステートメントが実行されると、ライブラリ依存関係がダウンロードされるだけでなく、デフォルトのインポートもノートブックに追加されます。 また、ライブラリの型のレンダラーが登録され、次のセクションで説明するさまざまな機能が含まれます。
ライブラリの統合
Kotlin ノートブックには豊富なライブラリ統合オプションが用意されています。
ユーザーは以下の 1 行のコードを追加するだけで、それらのオプションを使用できます。
%use libraryName
ライブラリ作成者は同じコマンドを足がかりにして以下を行うことができます。
- Maven リポジトリからライブラリのバイナリをダウンロードする。
- 最初のインポートを含める。
- 初期化中にコードを除外する。
- 各セルの実行前後にコードを実行する。
- 各セルのコードを前処理する。
- 特定の型の変数を作成する際にコールバックを呼び出す。
- ライブラリで定義されているさまざまな型のカスタムレンダラーを作成する。
- その他多くの操作。
これらをまとめれば、対話型ユーザーエクスペリエンスをほぼ無制限に作り出すことができます。 Kotlin の static 型や AOT 型を考えた場合、オンザフライ式の自動コード生成機能によってさらなる柔軟性と拡張性を得ることができます。
全体を網羅するドキュメントはこちらからご覧ください。 私たちはすべてのライブラリ作成者にその統合を共通のレジストリで共有し、すべての Kotlin ノートブックユーザーが使用できるようにすることを推奨しています。 特に、一部のライブラリ(WebTau、Roboquant、 Kaliningraph など)ですでにこのアプローチが活用されていることは素晴らしいことです。
共有
チーム内外に限らず、ノートブックを他のユーザーと共有したいことはよくあります。 Kotlin ノートブックは汎用の Jupyter 形式に準拠しているため、任意のノートブックウェブビューアーを使って簡単に配布できます。 特に、GitHub にはこれらをネイティブにレンダリングする機能が備わっています。
また、JetBrains には Kotlin ノートブックをシームレスにサポートする Datalore プラットフォームがあります。 Datalore は機能を共有するだけではありません。ノートブックの実行と編集を可能にし、対話型レポートなどの高度な機能やノートブックの実行をスケジュール設定するオプションが含まれているため、利便性と柔軟性を向上させます。
要点
Kotlin Notebook プラグインの最初の実験的バージョンは IntelliJ IDEA Ultimate のプロジェクトでお試しいただけます!
Kotlin ノートブックの基本をハンズオン形式で学習できるサンプルノートブックをこちらでダウンロードできます。
ライブラリ作成者の方は Kotlin ノートブックとの統合の追加をご検討ください。
問題やバグに遭遇した場合は、プロジェクトの課題トラッカーでチケットを提出してお知らせください。 また、Kotlin Slack の #notebook チャンネルにぜひフィードバックをお寄せください。
Kotlin Notebook をお楽しみください!
オリジナル(英語)ブログ投稿記事の作者:

Subscribe to Kotlin Blog updates
Discover more


Kotlin Notebook 소개

IntelliJ IDEA용 Kotlin Notebook 플러그인의 첫 실험적 버전이 출시되었습니다! 이 글에서는 플러그인의 기능 및 사용 사례에 대한 인사이트를 제공하며, 그 설명 전에 플러그인에 대해 먼저 알려드리겠습니다.
Kotlin Notebook 플러그인이란 무엇인가요?
Notebook은 코드, 시각화 및 텍스트를 단일 문서에 결합할 수 있게 해주는 대화형 도구입니다. Notebook에서는 코드 스니펫(셀)을 작성 및 실행하고, 결과를 확인하고, 생각의 전개를 문서화하는 작업을 모두 한 곳에서 수행할 수 있습니다.
Notebook은 이미 널리 채택되어 신속한 프로토타이핑, 분석 및 데이터 과학에 도움을 주는 것으로 신뢰를 받고 있습니다. Kotlin Notebook 플러그인은 IntelliJ IDEA에 대화형 개발의 장점을 제공하여 브라우저의 풍부한 시각화 기능을 결합해 Kotlin의 IDE 언어 지원의 전체 성능을 보완합니다.
이 플러그인이 무엇을 할 수 있고 어떻게 작동하는지 기술적 세부 사항을 살펴보겠습니다.
설치
IntelliJ IDEA Ultimate의 Settings(설정) | Plugins(플러그인) 탭에서 Marketplace를 통해 플러그인을 간편하게 설치할 수 있습니다. 단, IntelliJ IDEA 버전 2023.1.2 이상을 사용 중이어야 합니다. 이전 버전에 플러그인을 설치할 수도 있지만 불안정합니다.
설치가 진행되는 동안 Python 플러그인 설치를 제안하면, 이를 수락해야 합니다. 워크스테이션에 Python이 설치되지는 않으니 걱정하지 마세요. Kotlin Notebook은 Python 플러그인에 있는 UI 구성 요소를 일부 이용합니다. 이러한 종속성은 곧 없앨 계획입니다.
Kotlin Notebook 플러그인은 현재 IntelliJ IDEA Ultimate에서만 작동한다는 점을 참고해 주세요.
Kotlin Notebook에 익숙해지기
플러그인을 설치하면 첫 Notebook을 만들 준비가 됩니다. 기본적으로 Notebook은 디스크에 있는 파일일 뿐이므로 New(새로 만들기) | Kotlin Notebook 액션을 이용해 Project(프로젝트) 뷰 내 어디에서든 만들 수 있습니다.

확장자가 .ipynb인 파일이 생성됩니다. 이미 Jupyter Notebook에 대해 잘 알고 있다면 이 확장자가 매우 익숙할 것입니다. 내부적으로 Kotlin Notebook은 동일한 구조, 형식 및 프로토콜을 따릅니다. 즉, 이러한 파일은 GitHub, Jupyter Notebook 또는 Kotlin 커널이 설치된 JupyterLab에서 볼 수 있습니다.
처음 Notebook을 생성하면 첫 번째 빈 셀만 들어 있습니다. 셀은 Notebook의 주요 빌딩 블록이며 코드 또는 텍스트를 포함할 수 있습니다. 코드 셀을 실행하려면 해당 셀을 선택한 다음 Run(실행) 버튼을 클릭하거나 Shift + Enter 단축키를 사용하면 됩니다. 코드가 실행되고 출력 또는 오류가 셀 아래에 표시됩니다.
헤더, 목록, 링크, LaTeX 및 이미지와 같은 풍부한 서식 지정 옵션을 지원하는 Markdown 셀에 텍스트를 작성할 수도 있습니다. Markdown 셀을 렌더링하고 서식이 지정된 텍스트를 보려면 코드 셀을 실행하는 것과 같은 방식으로 실행하면 됩니다.
Notebook은 대화형 및 반복 워크플로를 제공합니다. 셀을 어떤 순서로든 실행하고, 코드 또는 텍스트를 수정하고, 변수를 선언 및 재선언하고, 셀을 다시 실행하여 업데이트된 결과를 볼 수 있습니다. 따라서 작업을 시험해 보고 프로토타입을 만들고 문서화하기가 쉽습니다.

코드 설명 및 문서화에 Notebook을 사용할 때 어떤 이점이 있는지 직접 체험하려면 이 Notebook을 다운로드하여 한 번 살펴보세요. 이 블로그 게시물에 논의된 모든 Kotlin Notebook 관련 내용을 보여주므로 이론과 실습을 겸할 수 있습니다.
출력
Notebook을 돋보이게 만드는 주요 기능 중 하나는 Notebook이 지원하는 다양한 종류의 출력입니다.
- 텍스트: 가장 간단한 유형의 출력이며 인쇄된 구문, 변숫값 또는 코드의 모든 텍스트 기반 출력을 포함합니다. 셀의 결과가 아래 카테고리 중 하나에 속하지 않는 경우
toString()메서드를 통해 텍스트로 출력됩니다. - HTML: Jupyter Notebook은 HTML을 직접 렌더링하여 서식 있는 텍스트의 서식 지정, 표 사용, 심지어 웹사이트 삽입까지 가능하게 해줍니다.
- 이미지: 정적 이미지는 PNG, JPEG 및 SVG와 같은 형식으로 표시될 수 있습니다.
BufferedImage유형의 결과도 지원됩니다. 이러한 모든 이미지는 파일, 생성된 그래프 또는 기타 시각적 미디어에서 만들어진 이미지일 수 있습니다. - 서식 있는 텍스트: Markdown 셀은 목록, 글꼴 스타일, 코드 블록 등을 지원하는 서식 있는 텍스트 HTML 출력을 생성합니다.
- LaTeX: 학계에서 널리 사용되는 조판 시스템인 LaTeX를 사용하여 수학 공식과 방정식을 아름답게 렌더링할 수 있습니다.
- 오류 및 역추적: 코드에 오류가 포함된 경우, Notebook에 오류 메시지와 역추적이 표시되어 디버그에 유용한 정보를 제공합니다.
Notebook 종속성
Notebook에 어떤 종속성이 있는지 고려하는 것도 중요합니다. 표준 라이브러리를 기본적으로 사용할 수 있지만 이것으로 충분하지 않은 경우가 종종 생깁니다. 다음과 같은 다양한 옵션을 사용할 수 있습니다.
- Notebook이 동일한 클래스에 액세스할 수 있도록 프로젝트의 종속성을 이용할 수 있습니다.
- Notebook 내에서 프로젝트 자체의 클래스와 기타 엔티티를 사용할 수 있습니다. 그러나 이러한 경우 각 셀을 실행하기 전에 프로젝트에 변경 사항이 있는지 확인하고 필요한 경우 다시 컴파일링합니다.

- 어떤 셀에서든 Gradle 스타일 구문을 사용하여 좌표를 지정하는 식으로 Maven 저장소에서 라이브러리를 로드할 수 있습니다.
USE {
  repositories {
  maven {
    url = "https://my.secret.repo/maven/"
    credentials {
      username = USER
      password = TOKEN
    }
  }
  dependencies {
    val ktorVersion = "2.0.3"
    implementation("my.secret:artifact:1.0-beta")
    implementation("io.ktor:ktor-client-core-jvm:$ktorVersion")
    implementation("io.ktor:ktor-client-apache-jvm:$ktorVersion")
  }
}
- 또는
DependsOn어노테이션을 통해 더 짧은 버전을 사용할 수 있습니다.
@file:DependsOn(“io.ktor:ktor-client-core-jvm:$ktorVersion“)
- Maven 좌표를 기억하고 찾으려면 번거로울 수 있습니다. 이 프로세스를 단순화하기 위해 더 스마트하고 편리하게 주요 라이브러리를 로드하는 방법을 도입했습니다.
%use매직 명령어 다음에 하나 이상의 라이브러리 이름을 입력하기만 하면 됩니다.

%use 구문을 실행하면 라이브러리 종속성이 다운로드될 뿐만 아니라 Notebook에 기본 가져오기가 추가됩니다. 또한 라이브러리 유형에 대한 렌더러가 등록되고 다음 섹션에서 설명하는 다양한 기타 기능이 포함됩니다.
라이브러리 통합
Kotlin Notebook은 광범위한 라이브러리 통합 옵션을 제공합니다.
사용자의 경우, 한 줄의 코드를 추가하는 것처럼 간단하게 이를 활용할 수 있습니다.
%use libraryName
라이브러리 작성자의 경우, 동일한 명령어가 다음과 같은 작업을 수행하는 발판 역할을 할 수 있습니다.
- 모든 Maven 저장소에서 라이브러리 바이너리를 다운로드합니다.
- 초기 가져오기를 포함합니다.
- 초기화 중에 코드를 실행합니다.
- 각 셀 실행 전후에 코드를 실행합니다.
- 각 셀의 코드를 전처리합니다.
- 특정 유형의 변수를 생성할 때 콜백을 호출합니다.
- 라이브러리에 정의된 다양한 유형에 대해 사용자 지정 렌더러를 만듭니다.
- 기타 다양한 기능
이러한 다양한 부분들이 결합되어 대화형 사용자 경험을 만들 수 있는 거의 무한한 가능성이 제공됩니다. Kotlin의 정적 및 AOT 유형을 고려할 때 즉석에서 자동으로 이루어지는 코드 생성 기능은 유연성과 확장성을 더욱 높여줍니다.
여기에서 전체 내용이 담긴 문서를 볼 수 있습니다. 라이브러리 작성자 여러분, 공통 레지스트리에서 해당 통합을 공유하여 모든 Kotlin Notebook 사용자가 이용할 수 있도록 해주세요. 기쁘게도, 일부 라이브러리(예: WebTau, Roboquant, Kaliningraph 등)가 이미 이러한 방식의 이점을 누리고 있다는 사실이 확인되고 있습니다.
공유
팀 내외부의 사람들 모두와 Notebook을 공유하려는 상황은 매우 흔합니다. Kotlin Notebook은 범용 Jupyter 형식을 준수하므로 모든 Notebook 웹 뷰어를 사용하여 쉽게 배포할 수 있습니다. 특히 GitHub에는 Notebook을 기본적으로 렌더링할 수 있는 기능이 있습니다.
또한 JetBrains에는 Kotlin Notebook을 원활하게 지원하는 Datalore 플랫폼이 있습니다. Datalore는 단순한 공유 그 이상을 제공합니다. Notebook을 실행 및 편집할 수 있고 대화형 보고서와 같은 고급 기능은 물론 Notebook 실행을 예약하는 옵션을 제공하여 편리성과 유연성을 높여줍니다.
요약
Kotlin Notebook 플러그인의 첫 시험 버전을 IntelliJ IDEA Ultimate의 프로젝트에서 사용해 볼 수 있습니다!
다음 샘플 Notebook을 다운로드하여 Kotlin Notebook의 기본 사항을 익혀보세요.
라이브러리 작성자라면 Kotlin Notebook과의 통합을 추가해 보세요.
문제점이나 버그가 발견되면 프로젝트의 이슈 트래커에 티켓을 제출하여 알려주세요. Kotlin Slack의 #notebook 채널에서도 의견을 공유해주실 수 있습니다.
Kotlin Notebook과 즐거운 시간 보내세요!
게시물 원문 작성자
Subscribe to Kotlin Blog updates
Discover more
Introducing Kotlin Notebook

The first experimental version of the Kotlin Notebook plugin for IntelliJ IDEA is now available! This post will offer insight into the plugin’s functionality and use cases, but before launching into that, we’d like to let the plugin speak for itself:
What is the Kotlin Notebook plugin?
A notebook is an interactive tool that allows you to combine code, visualizations, and text in a single document. In notebooks, you can write and run code snippets (cells), view the results, and document your thought process all in one place.
Notebooks are already widely adopted and trusted for rapid prototyping, analytics, and data science. The Kotlin Notebook plugin brings the power of interactive development to IntelliJ IDEA, supplementing the full power of the IDE’s language support for Kotlin combined with the versatile visualization capabilities of browsers.
Let’s dive into technical details to see what this plugin can do and how it works.
Installation
To get the plugin, you simply need to install it from Marketplace in IntelliJ IDEA Ultimate’s Settings | Plugins tab. You should be using at least version 2023.1.2 of IntelliJ IDEA. You may also be able to install the plugin on previous versions, but it will be unstable.
During the installation process, you will see a suggestion to install the Python plugin, which you should accept. Don’t worry, this will not install Python on your workstation. Kotlin Notebook simply has some dependencies on UI components that are located in the Python plugin. We plan to remove these dependencies soon.

Note that the Kotlin Notebook plugin currently works only in IntelliJ IDEA Ultimate.
Getting familiar with Kotlin Notebook
After installing the plugin, you’ll be ready to create your first notebook. Essentially, a notebook is just a file on a disk, so it can be created anywhere in the Project view by using the New | Kotlin Notebook action.
A file with an .ipynb extension will be created. If you are already acquainted with Jupyter notebooks, this extension should be quite familiar to you. Internally, Kotlin notebooks follow the same structure, format, and protocol, meaning these files can be viewed on GitHub or in Jupyter notebooks or JupyterLab with the Kotlin kernel installed.
Once created, the notebook contains only the first empty cell. Cells are the main building blocks of notebooks, and they can contain either code or text. To run a code cell, you can simply select it and then click the Run button or use the Shift + Enter shortcut. The code will be executed, and any output or errors will be displayed below the cell.
You can also write text in Markdown cells, which support rich formatting options such as headers, lists, links, LaTeX and images. To render a Markdown cell and see the formatted text, you just have to run it in the same way you run a code cell.
Notebooks provide an interactive and iterative workflow. You can execute cells in any order, modify the code or text, declare and re-declare variables, and re-run the cells to see the updated results. This makes it easy to experiment, prototype, and document your work.
To experience firsthand the advantages of using notebooks for code explanation and documentation, we encourage you to download and explor this notebook. It demonstrates all the aspects of Kotlin notebooks discussed in this blog post, allowing you to pair theory with practice.
Outputs
One key feature that makes notebooks stand out is the variety of output types they support:
- Text: This is the simplest type of output, and it includes printed statements, variable values, or any text-based output from your code. If a cell’s result doesn’t fall under one of the categories below, it will be printed as text via the
toString()method. - HTML: Jupyter notebooks can render HTML directly, enabling rich text formatting, the use of tables, or even the embedding of websites.
- Image: Static images can be displayed in formats such as PNG, JPEG, and SVG. Results of the
BufferedImagetype are also supported. All these images can be images from files, generated graphs, or any other visual media. - Rich text: Markdown cells produce rich text HTML output, offering support for lists, font styles, code blocks, and more.
- LaTeX: Mathematical formulas and equations can be beautifully rendered using LaTeX, a typesetting system widely used in academia.
- Error and traceback: When code contains errors, notebooks display an error message and a traceback, providing insights for debugging.
Notebook dependencies
It is also important to consider what dependencies your notebook will have. Obviously the standard library can be used out of the box, but it is often insufficient. Various options are available to you:
- You can utilize the dependencies of your project, ensuring that the notebook has access to the same classes.
- It is possible to use classes and other entities from the project itself within the notebook. In such cases, however, the project will be checked for changes and recompiled if necessary before the execution of each cell.
- You can load any library from the Maven repository by specifying its coordinates using a piece of Gradle-style syntax in any cell.
USE {
  repositories {
    maven {
      url = "https://my.secret.repo/maven/"
      credentials {
        username = USER
        password = TOKEN
      }
    }
  }
  dependencies {
    val ktorVersion = "2.0.3"
    implementation("my.secret:artifact:1.0-beta")
    implementation("io.ktor:ktor-client-core-jvm:$ktorVersion")
    implementation("io.ktor:ktor-client-apache-jvm:$ktorVersion")
  }
}
- Or you can use the shorter version via the
DependsOnannotation:
@file:DependsOn(“io.ktor:ktor-client-core-jvm:$ktorVersion“)
- Remembering and locating Maven coordinates can be a cumbersome task. To simplify this process, we’ve introduced a smarter and more convenient method for loading popular libraries. Simply use the
%usemagic command followed by the name of one or several libraries.
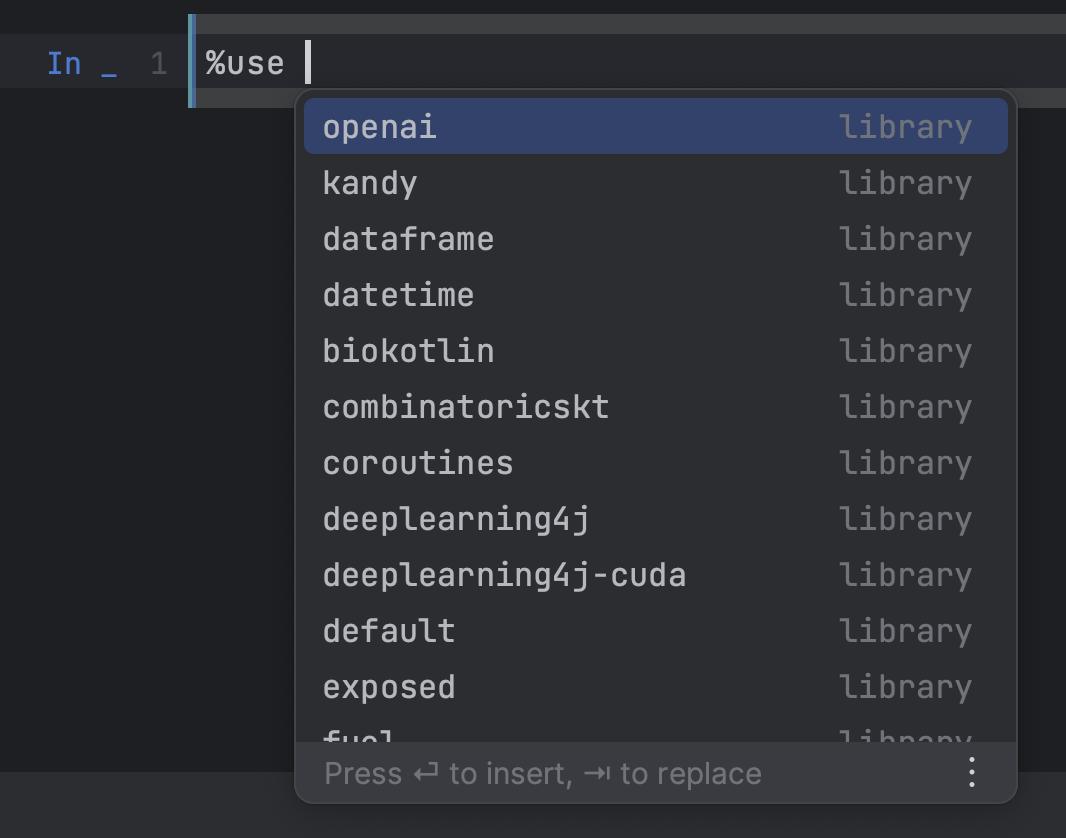
When the %use statement is executed, it not only downloads the library dependencies but also adds default imports to the notebook. Additionally, it registers renderers for the library’s types and includes various other functionalities discussed in the next section.
Library integrations
Kotlin notebooks offer a vast spectrum of library integration options.
For users, taking advantage of them as simple as adding a single line of code:
%use libraryName
For library authors, this same command serves as a springboard, enabling them to:
- Download library binaries from any Maven repository.
- Include initial imports.
- Execute code during initialization.
- Run code before and after each cell execution.
- Preprocess each cell’s code.
- Invoke a callback when creating variables of certain types.
- Craft custom renderers for a variety of types defined in the library.
- And much more.
Collectively, this provides almost infinite possibilities for creating an interactive user experience. Considering Kotlin’s static and AOT types, the capability for automatic, on-the-fly code generation offers an added level of flexibility and expandability.
Comprehensive documentation can be accessed here. We encourage all library authors to share their integrations in the common registry so they’re available to all Kotlin Notebook users. We’re especially thrilled to see that some libraries (like WebTau, Roboquant, Kaliningraph, and others) are already benefiting from this approach.
Sharing
It’s common to want to share your notebooks with others, both inside and outside your team. Because Kotlin notebooks adhere to the universal Jupyter format, they can be easily distributed using any notebook web viewer. Notably, GitHub has the ability to natively render them.
Additionally, JetBrains has the Datalore platform, which seamlessly supports Kotlin notebooks. Datalore offers more than just sharing capabilities; it also enables you to execute and edit notebooks and includes advanced features such as interactive reports, as well as the option to schedule notebook runs for added convenience and flexibility.
In essence
The first experimental version of the Kotlin Notebook plugin is ready for you to try in your project in IntelliJ IDEA Ultimate!
Here’s a sample notebook that you can download and learn the basics of Kotlin notebooks hands on:
If you are a library author, please consider adding an integration with Kotlin notebooks.
If you encounter any problems or bugs, please let us know by filing a ticket in the project’s issue tracker. We will also be happy to hear your feedback in the #notebook channel on Kotlin Slack.
Have a nice Kotlin Notebook!