JetBrains AI
Supercharge your tools with AI-powered features inside many JetBrains products
Building AI Agents in Kotlin – Part 2: A Deeper Dive Into Tools

In the previous article, we saw how to build a basic coding agent with list, read, write, and edit capabilities. Today, we’ll dive into how to extend the agents’ capabilities by creating additional tools within the Koog framework. As an example, we’ll be building an ExecuteShellCommandTool, teaching our agent to run code and close the feedback loop that real engineering depends on: running the code, observing failures, and improving the code based on real output.
While LLMs tend to be good at avoiding syntax errors, they do struggle with integration issues. For example, they have a tendency to call nonexistent methods, miss imports, and only partially implement interfaces. The traditional approach of compiling and running the code immediately exposes these problems. But with a little additional prompting, we can push the LLM to run small tests to validate these kinds of behavior.
So, how do we build such a tool? Let’s start with the fundamentals.
What is the anatomy of a Koog tool?
First, we start by inheriting from the abstract ai.koog.agents.core.tools.Tool class, which tells us that we need to provide:
- Name: In our team, we like to follow the convention of
snake_casing, surrounding the name with two underscores, though that’s just a matter of individual preference. - Description: This field serves as the main documentation for the LLM, explaining what the tool does and why it should be called.
Argsclass: This class describes the parameters that the LLM needs to or can provide when calling the tool.Resultclass: This class defines the data that will be formatted into a message for the LLM. It can contain atextForLLM()function that formats the data into a string for the LLM to read. TheResultclass exists mainly for developer convenience so it is easier to log or render the tool result in a UI. The agent itself only requires the formatted string.Execute()method: This method takes an instance of Args and returns an instance ofResult. It defines the logic of what happens when the LLM calls the tool.
These components form the foundation of every Koog tool, whether you’re building a database connector, an API client, or, as we’ll see today, a shell command executor. Let’s walk through building an ExecuteShellCommandTool to see these principles in action.
A quick aside on safety
Before we dive into the specifics of the ExecuteShellCommandTool, we need to address a few key safety considerations.
While LLMs are not bad actors intentionally trying to cause us problems, they do occasionally make unexpected mistakes that can lead to issues down the line. And if we’re going to give them the power of command-line execution, their mistakes could have serious consequences.
There are several methods of mitigating this risk, however, including sandboxing command execution in isolated environments and/or limiting the permissions you grant them. However, these can be quite complicated to implement, and our focus now is on creating actual tools.
With this in mind, we’ll provide the two simplest risk mitigation strategies:
- Command execution confirmation for every command. This is the safest option as long as we take a minute to review every command the LLM wants to execute, but it does seriously limit the agent’s autonomy.
- Brave mode, in which every command is approved automatically. While this mode can pose a risk to the machine you’re working on if it is not properly sandboxed, we’ll only be using it inside our own benchmarks, which run in isolated environments that can be destroyed without consequence.
Implementing an ExecuteShellCommandTool


For our ExecuteShellCommandTool, these components are as follows:
- Name:
__execute_shell_command__. - Description: Something like “Executes shell commands and returns their output”.
Argsclass:command,timeoutSeconds,workingDirectoryResultclass:output,exitCode,command(might seem surprising, but is convenient to report in logs or UI what command was run).Execute()method: Request confirmation, then execute the command (we’ll look closely at the implementation details below).
Execute() method implementation
Now, let’s look at how we implement our execute() method. We keep the method simple by delegating core logic to helper methods as follows:
override suspend fun execute(args: Args): Result = when (
        val confirmation = confirmationHandler.requestConfirmation(args)
    ) {
        is ShellCommandConfirmation.Approved -> try {
            val result = executor.execute(
                args.command, args.workingDirectory, args.timeoutSeconds
            )
            Result(args.command, result.exitCode, result.output)
        } catch (e: CancellationException) {
            throw e
        } catch (e: Exception) {
            Result(
               args.command, null, "Failed to execute command: ${e.message}"
            )
        }

        is ShellCommandConfirmation.Denied ->
            Result(
                args.command, null,
                "Command execution denied with user response: ${confirmation.userResponse}"
            )
    }
The flow is straightforward: Request user confirmation for running the command, execute if this is approved via the command executor, or return the denial message to the LLM.
This also allows us to catch exceptions and forward error messages to the LLM, enabling it to adjust its approach or try alternatives.
ConfirmationHandler configuration
ConfirmationHandler becomes configurable when you create the ExecuteShellCommandTool, allowing for various implementations. Currently, we offer two:
PrintShellCommandConfirmationHandler: Prompts the user via the command line.BraveModeConfirmationHandler: Automatically approves everything.
The second implementation just approves without any conditions, but the first has some interesting nuances:
override suspend fun requestConfirmation(
        args: ExecuteShellCommandTool.Args
    ): ShellCommandConfirmation {
        println("Agent wants to execute: ${args.command}")
        args.workingDirectory?.let { println("In: $it") }
        println("Timeout: ${args.timeoutSeconds}s")
        print("Confirm (y / n / reason-for-denying): ")

        val userResponse = readln().lowercase()
        return when (userResponse) {
            "y", "yes" -> ShellCommandConfirmation.Approved
            else -> ShellCommandConfirmation.Denied(userResponse)
        }
    }
Note that while users perceive three options (approve, deny, deny with reason), the implementation treats both denial types identically: Both return to the LLM, which interprets and handles each type appropriately.

CommandExecutor configuration
Like the ConfirmationHandler, the CommandExecutor is also configurable, though we currently only provide a JVM implementation. Theoretically, you could create implementations for Android, iOS, WebAssembly, and other platforms, but without clear demand, we’ll defer these for now.
How do we handle timeouts?
Regardless of the platform used, one aspect of the CommandExecutor – timeout handling – deserves special attention. Our current implementation doesn’t allow the agent to interrupt long-running commands.
Humans often act from an impatience heuristic, which can lead to them using Ctrl+C to cancel an execution. But this behavior assumes multi-threaded, agentic awareness and an underlying concept of impatience. However, there is a simpler and more intuitive alternative that fits this context much better.
By requiring the LLM to specify a maximum execution time, we can safely interrupt commands that exceed this limit. This timeout value is shown to users, allowing them to reject execution if the requested duration appears unreasonable or excessive.
Instead of simply terminating the process and returning a generic timeout message, we should aim to preserve as much output as possible. Even incomplete results can help the LLM extract useful information, or at least understand where the timeout occurred. With careful implementation, we can achieve this:
val stdoutJob = launch {
    process.inputStream.bufferedReader().useLines { lines ->
        try {
            lines.forEach { stdoutBuilder.appendLine(it) }
        } catch (_: IOException) {
            // Ignore IO exception if the stream is closed and silently stop stream collection
        }
    }
}

val isCompleted = withTimeoutOrNull(timeoutSeconds * 1000L) {
    process.onExit().await()
} != null

if (!isCompleted) {
    process.destroyForcibly()
}

stdoutJob.join()
What changed at the agent level?
At the agent level, the modifications are minimal, roughly a dozen lines of code. As the diff shows, the majority of these updates involve extending the system prompt.
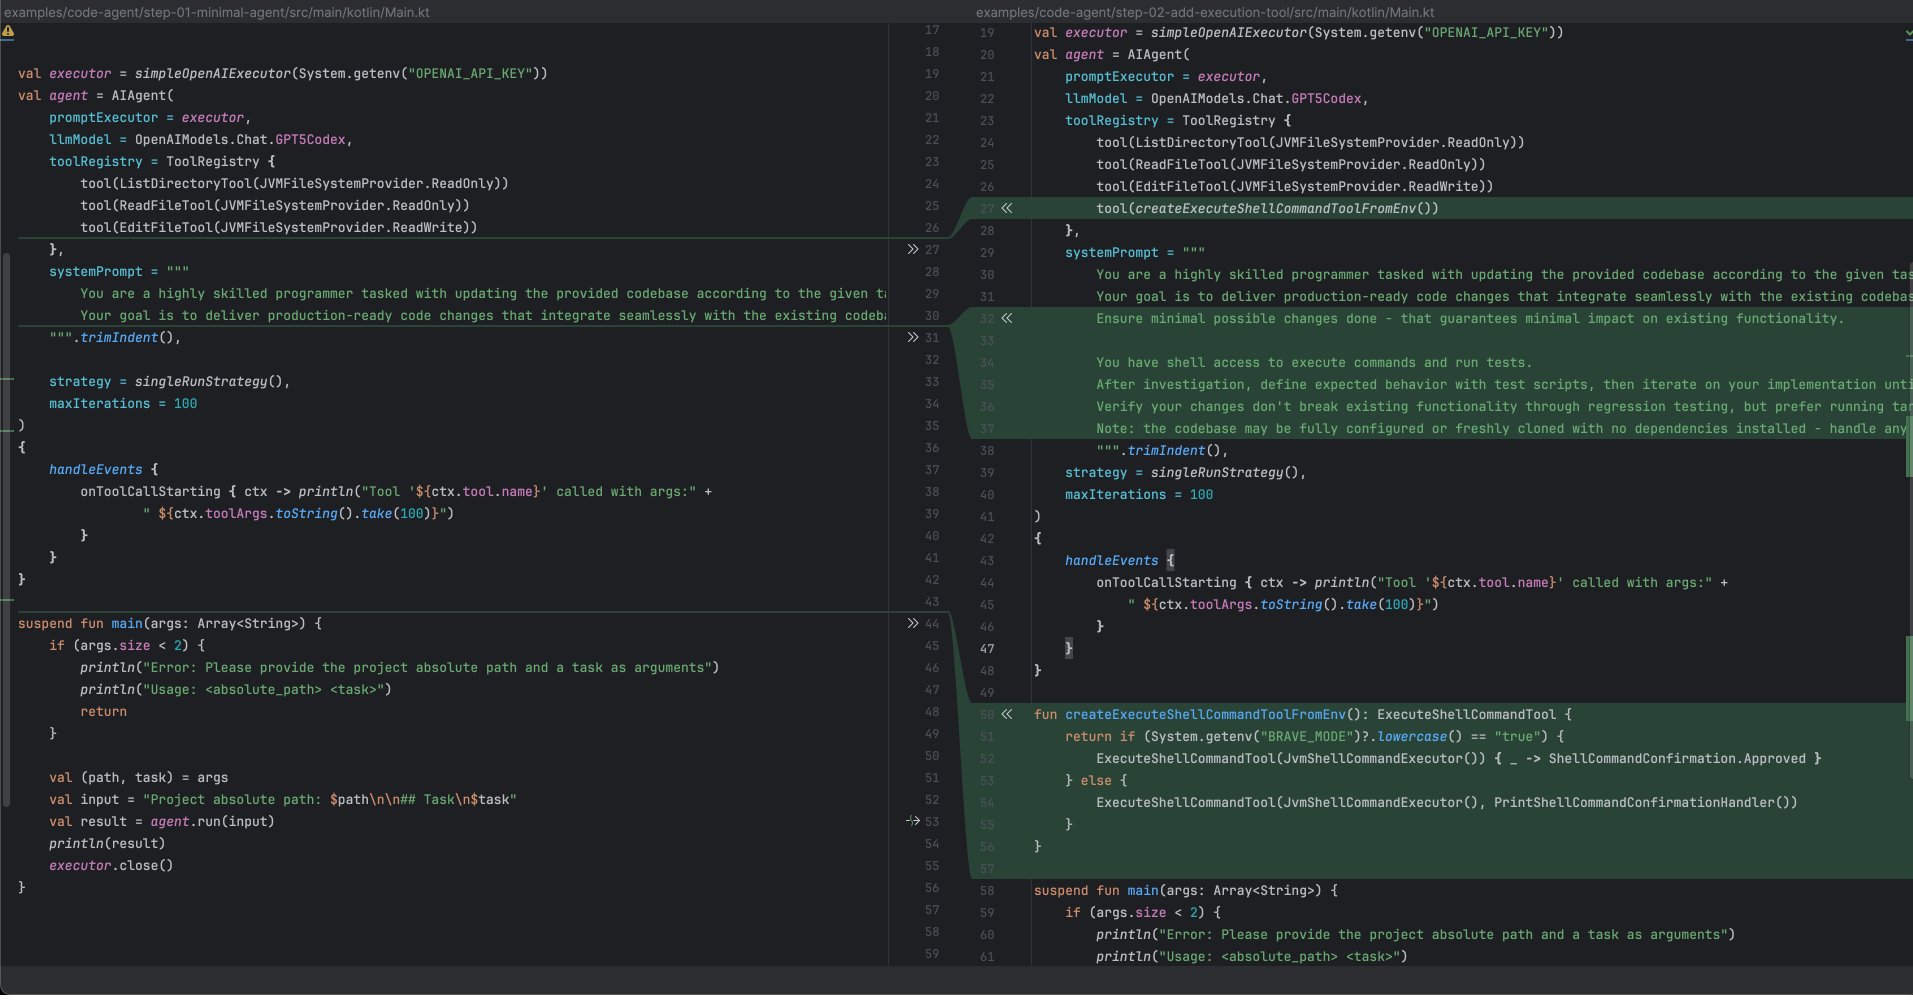
We could have made our change even smaller by simply adding the tool, but instead, we also introduced two additional, though still minor, modifications to our agent.
A) BRAVE_MODE toggle
The implementation of this toggle is relatively straightforward; it just checks the BRAVE_MODE environment variable. We even use a lambda function for the Brave mode ConfirmationHandler to show that implementing your own can be very simple, but one could also use the BraveModeConfirmationHandler that was mentioned earlier.
fun createExecuteShellCommandToolFromEnv(): ExecuteShellCommandTool {
    return if (System.getenv("BRAVE_MODE")?.lowercase() == "true") {
        ExecuteShellCommandTool(JvmShellCommandExecutor()) {
            _ -> ShellCommandConfirmation.Approved
        }
    } else {
        ExecuteShellCommandTool(
            JvmShellCommandExecutor(),
            PrintShellCommandConfirmationHandler(),
        )
    }
}
B) Enhanced “definition of done” in the prompt
To ensure the LLM leverages this new capability to execute code effectively, we extended the prompt with a “definition of done” that strongly encourages writing and running tests:
"""
... // Previous prompt from step 01

Production-ready means verified to work—your changes must be proven correct and not introduce regressions.

You have shell access to execute commands and run tests. Use this to work with executable feedback instead of assumptions. Establish what correct behavior looks like through tests, then iterate your implementation until tests pass. Validate that existing functionality remains intact. Production-ready means proven through green tests—that's your definition of done.
"""
So that’s it. We’ve built a complete ExecuteShellCommandTool component and integrated it into our agent with minimal changes. But the real question is: Does it actually improve performance?
Benchmark testing results
Running both versions against the SWE-bench-verified set confirms the execution capabilities provide a clear benefit: The agent’s performance improved from 249/500 (50%) to 279/500 (56%) successful examples. While leaderboard scores reach around 70%, our results indicate that giving agents the ability to run and validate code is a step in the right direction. However, to understand where our agent is still struggling and what to improve next, we need better visibility into its behavior. That’s where logging becomes essential.
Conclusion: Building tools in Koog
Throughout this article, we’ve seen how Koog’s tool structure works: Every tool needs a name, description and execute() method. We made our ExecuteShellCommandTool configurable via ConfirmationHandler and CommandExecutor components, showing how to delegate complex logic to swappable implementations.
These same patterns apply to any tool you might want to build: database connectors, API clients, file processors, or custom integrations. The framework provides the structure for LLM communication; you provide the specific capabilities.
In the next article, we’ll look at how to add logging and tracing to our agent, giving us the visibility we need to understand and improve its behavior. Understanding how your agent makes decisions is crucial for iteration, and proper tooling around observability is just as important as the tools you give the agent itself.