JetBrains AI
Supercharge your tools with AI-powered features inside many JetBrains products
Koog x ACP: Connect an Agent to Your IDE and More

We hope you’re staying up to date with our latest posts and have checked out our tutorials on how to create coding agents in Koog and connect ACP-compliant agents to your JetBrains IDE. As useful as these guides are, one important piece was hitherto missing from the puzzle: How do you make your Koog agent ACP-compliant in the first place?
This is where Koog’s native integration with the ACP comes into play, providing a streamlined path from agent implementation to IDE integration. Let’s review some basics first.
What is the ACP?
The Agent Client Protocol (ACP) is an open protocol that defines how agents and clients communicate. Its main uses include notifying the client about things like an LLM’s response or a tool call, or requesting permissions to edit a file.
ACP provides extensive documentation and SDKs for Python, TypeScript, Kotlin, and Rust, all of which fully implement the agent-client communication layer. As a result, developers don’t need to reimplement protocol logic; they can simply use the already-implemented notifications and request handlers.
This significantly reduces the effort required to integrate agents with clients and makes interoperability the default: Any ACP-compatible agent can be used with any ACP-compatible editor or client. Several existing coding agents already follow the ACP and can be easily connected with a wide range of clients, including AI Chat in JetBrains IDEs.
So if you want to build your own coding or code-related agent and connect it to an IDE, the first step is choosing an agent framework. And a perfect choice here is Koog.
What is Koog?
Koog is a Kotlin-based framework for building AI agents that targets JVM, Android, iOS, WebAssembly, and in-browser applications. It’s suitable for any kind of agent and provides various ready-made components, including:
- Multiple agent strategies and execution patterns.
- Support for various LLM providers.
- Agent tracing and state persistence.
- MCP (Model Context Protocol) and A2A (Agent2Agent protocol) integration.
- A feature mechanism to make the agent extensible.
What’s more, our recent Koog blog post series walks through the entire process of building coding agents from prompt design to tool implementation, making it an excellent starting point for getting familiar with the framework. With that foundation in place, we can now take the next step: applying Koog’s agent-building capabilities to create an ACP-compliant agent.
How Koog and ACP work together?
Koog x ACP integration is built on top of the ACP Kotlin SDK and implemented using Koog’s feature mechanism.
The Kotlin ACP SDK provides an API for defining an ACP-compatible agent and for declaring the logic of agent instantiation and execution.
First is AgentSupport, which manages client-agent sessions:
class KoogAgentSupport: AgentSupport {

    override suspend fun initialize(clientInfo: ClientInfo): AgentInfo {
    	// Client establishes connection with the agent
    }

    override suspend fun createSession(sessionParameters: SessionCreationParameters): AgentSession {
    	// Client creates a new interactive session with the agent
    }

    override suspend fun loadSession(
        sessionId: SessionId,
        sessionParameters: SessionCreationParameters,
    ): AgentSession {
    	// Client loads a previous interactive session with the agent
    }
}
The createSession method must return an AgentSession, which represents a single client-agent interaction. The session begins when the client sends a prompt request, triggering agent execution:
class KoogAgentSession(
    override val sessionId: SessionId,
) : AgentSession {

    override suspend fun prompt(
        content: List<ContentBlock>,
        _meta: JsonElement?
    ): Flow<Event> = channelFlow {
        // Client sends prompt, agent starts execution and emits notification into the events flow, which are sent back to client
    }

    override suspend fun cancel() {
        // Agent stops execution
    }
Now, let’s build a simple Koog coding agent that can read and edit files directly in your project from the IDE. The place to define and run the agent is the prompt method in AgentSession:
    private var agentJob: Deferred<Unit>? = null

    override suspend fun prompt(
        content: List<ContentBlock>,
        _meta: JsonElement?
    ): Flow<Event> = channelFlow {
        // Define config with agent prompt and model of your choice
        val agentConfig = AIAgentConfig(
            prompt = prompt("acp") {
                system("You are coding agent.")
            // NB: append client prompt
            }.appendPrompt(content),
            model = OpenAIModels.Chat.GPT4o,
            maxAgentIterations = 1000
        )

        // Register file system tools
        val toolRegistry = ToolRegistry {
            tool(::listDirectory.asTool())
            tool(::readFile.asTool())
            tool(::editFile.asTool())
        }

       // Implement your custom agent strategy
       val strategy = strategy<Unit, Unit>("acp-agent") {
            val executePlan by subgraphWithTask<Unit, Unit> {
                "Execute the task."
            }
            nodeStart then executePlan then nodeFinish
        }

       // Combine everything and run
       val agent = AIAgent<Unit, Unit>(
            promptExecutor = promptExecutor,
            agentConfig = agentConfig,
            strategy = strategy,
            toolRegistry = toolRegistry,
        ) {
            // NB: add ACP feature
            install(AcpAgent) {
                this.sessionId = this@KoogAgentSession.sessionId.value
                this.protocol = this@KoogAgentSession.protocol
                this.eventsProducer = this@channelFlow
                // To allow default notifications about basic llm and tool events
                this.setDefaultNotifications = true
            }
        }

        // To make sure the agent is cancellable, wrap it in a job
        agentJob = async { agent.run(Unit) }
        agentJob?.await()
    }

    override suspend fun cancel() {
        agentJob?.cancelAndJoin()
    }
Having AgentSupport and AgentSession implemented, it becomes possible to execute a Koog agent in ACP mode. Try it using the terminal client – you can find an example implementation here.
But now let’s move on and try to connect this Koog coding agent to some ACP-capable client, for example, your IntelliJ-based IDE.
How to connect the Koog ACP agent to your IDE?
All IntelliJ-based IDEs support the ACP. This means you can connect any ACP-compatible agent and use it directly via the AI Chat.
When a new AI Assistant chat is opened, the IDE instantiates the configured ACP agent and connects to it via the built-in ACP client using standard I/O transport. The client processes all notifications and requests emitted by the running agent, displaying them in the chat and reflecting permission requests directly in the IDE UI.
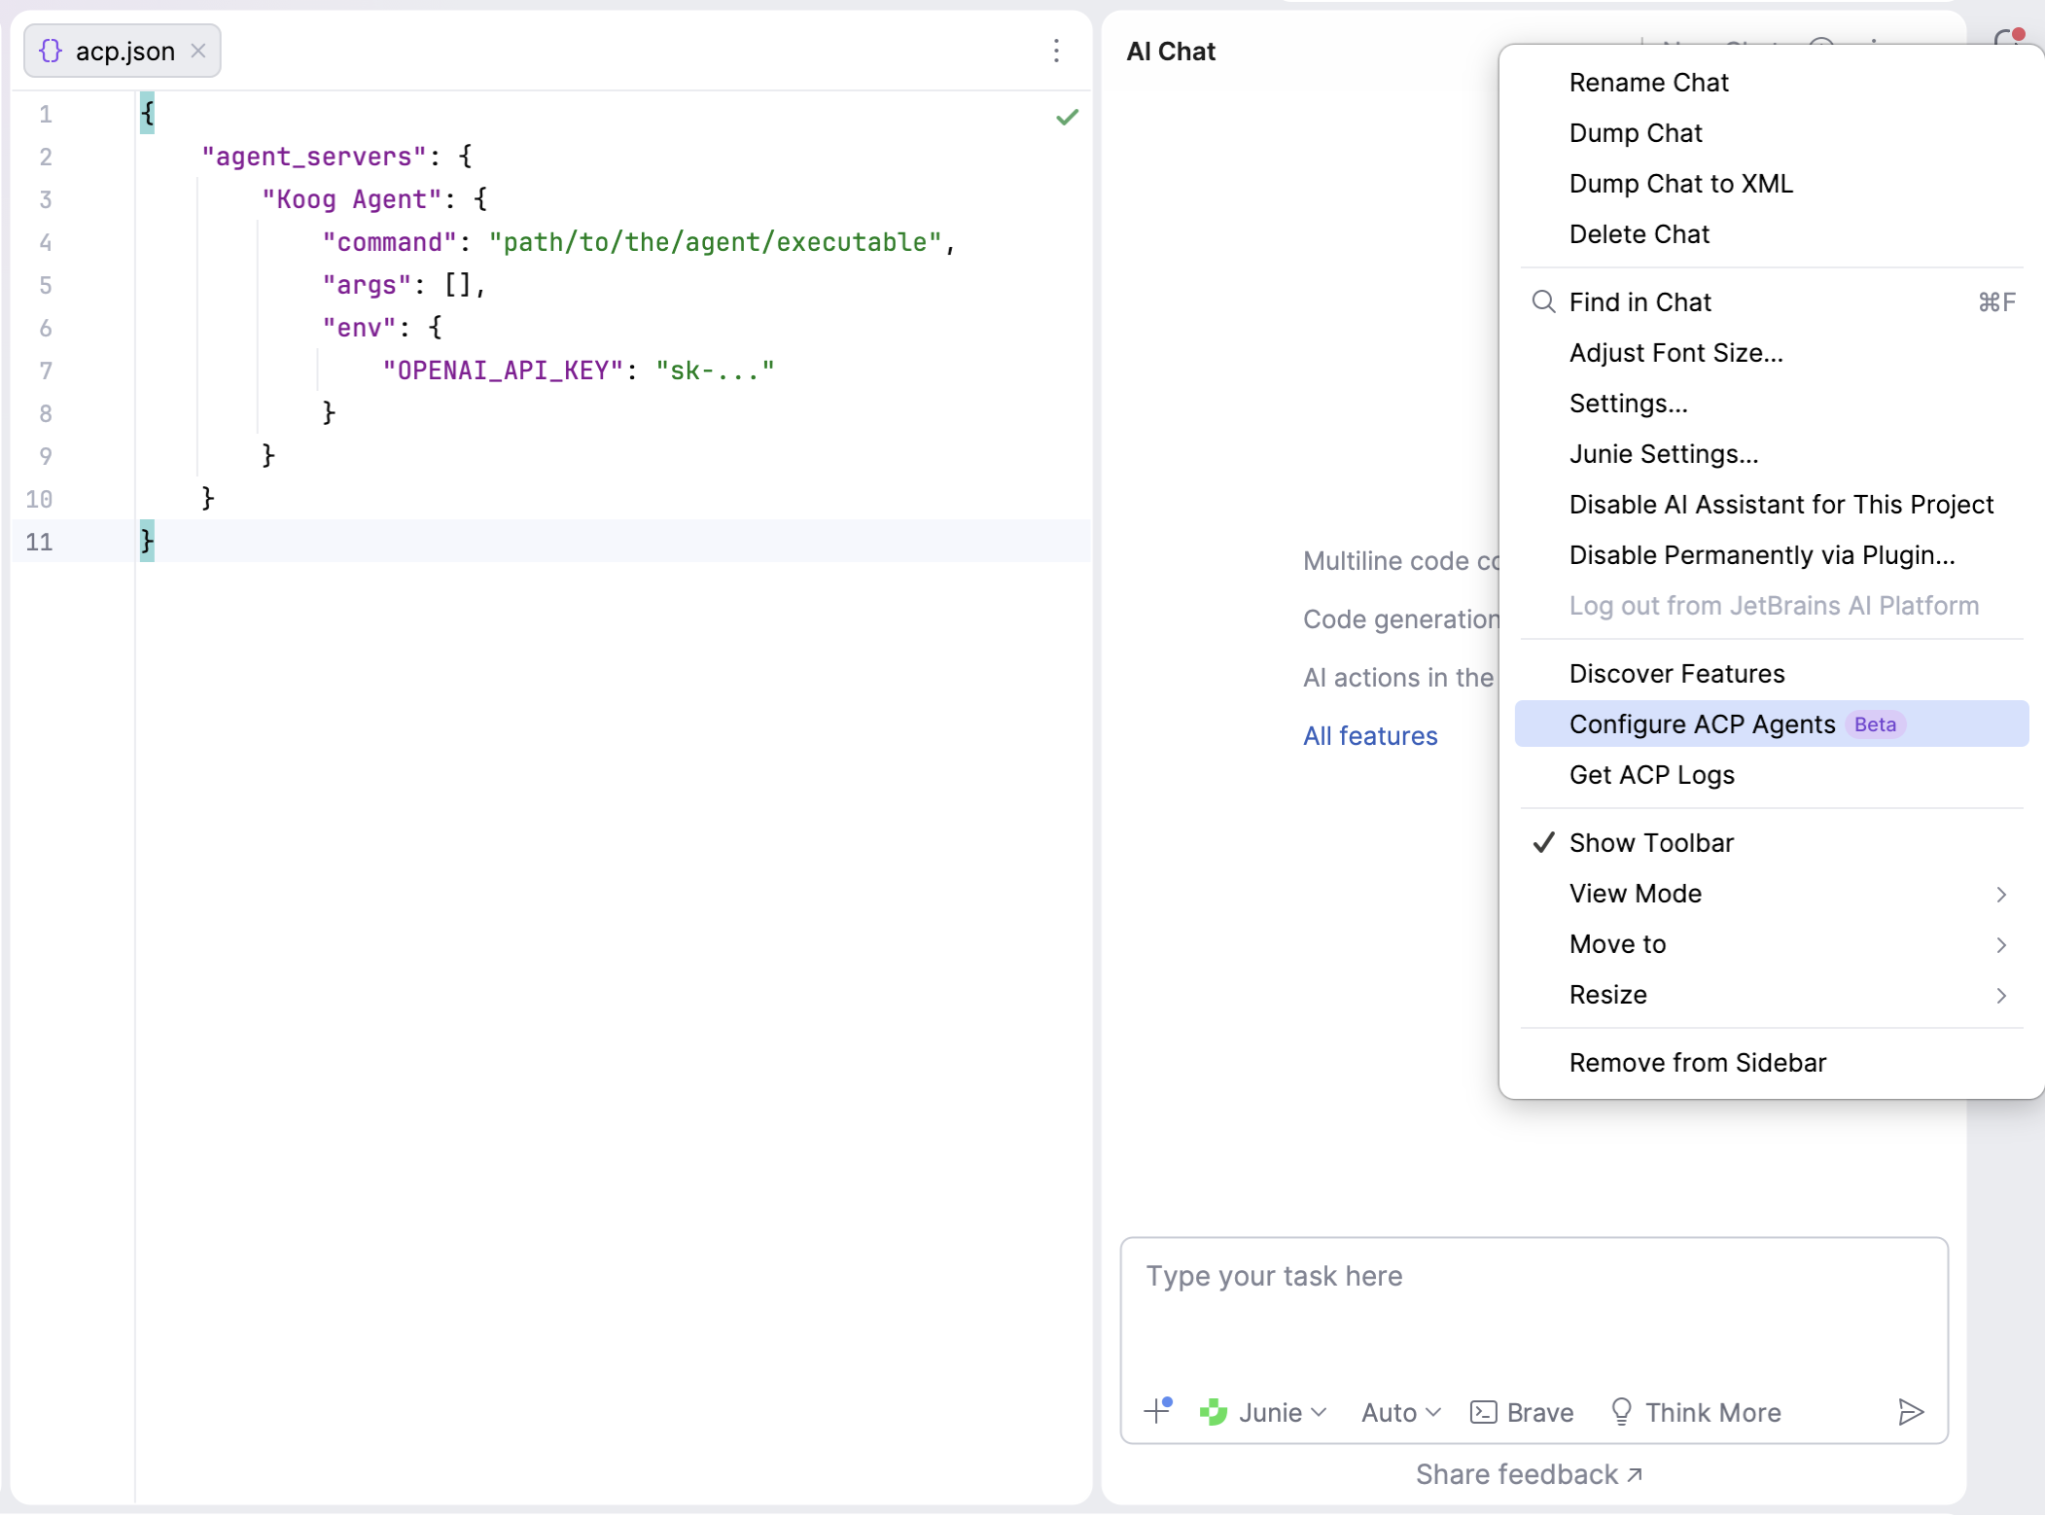
An ACP agent can be connected to the 25.3 version of IntelliJ-based IDEs via the ~/.jetbrains/acp.json config file, where the agent run command, arguments, and environment variables should be defined in JSON format:
The easiest way to create an agent executable is to package it as an application. To do this, we place the agent entry point in a separate AcpAgentKt file, where STDIO transport is initialized. This transport captures the process’s standard input and output streams and launches the agent connected to the transport, using the previously defined KoogAgentSupport.
suspend fun main() = coroutineScope {
    val token = System.getenv("OPENAI_API_KEY") ?: error("OPENAI_API_KEY env variable is not set")

    val agentTransport = StdioTransport(
        this, Dispatchers.IO,
        input = BufferedInputStream(System.`in`).asSource().buffered(),
        output = BufferedOutputStream(System.out).asSink().buffered(),
        name = "koog-agent"
    )

    val promptExecutor = simpleOpenAIExecutor(token)

    try {
        val agentJob = launch {
            val agentProtocol = Protocol(this, agentTransport)

            Agent(
                agentProtocol,
                KoogAgentSupport(
                    protocol = agentProtocol,
                    promptExecutor = promptExecutor,
                    clock = Clock.System,
                )
            )

            agentProtocol.start()
        }
        agentJob.join()

    } finally {
        agentTransport.close()
        promptExecutor.close()
    }
}
Using Gradle, configure the application entry point, then run the installDist task to generate the executable distribution in projectRoot/build/install/coding-agent/bin/coding-agent.
application {
    mainClass = "ai.coding.agent.AcpAgentKt"
}
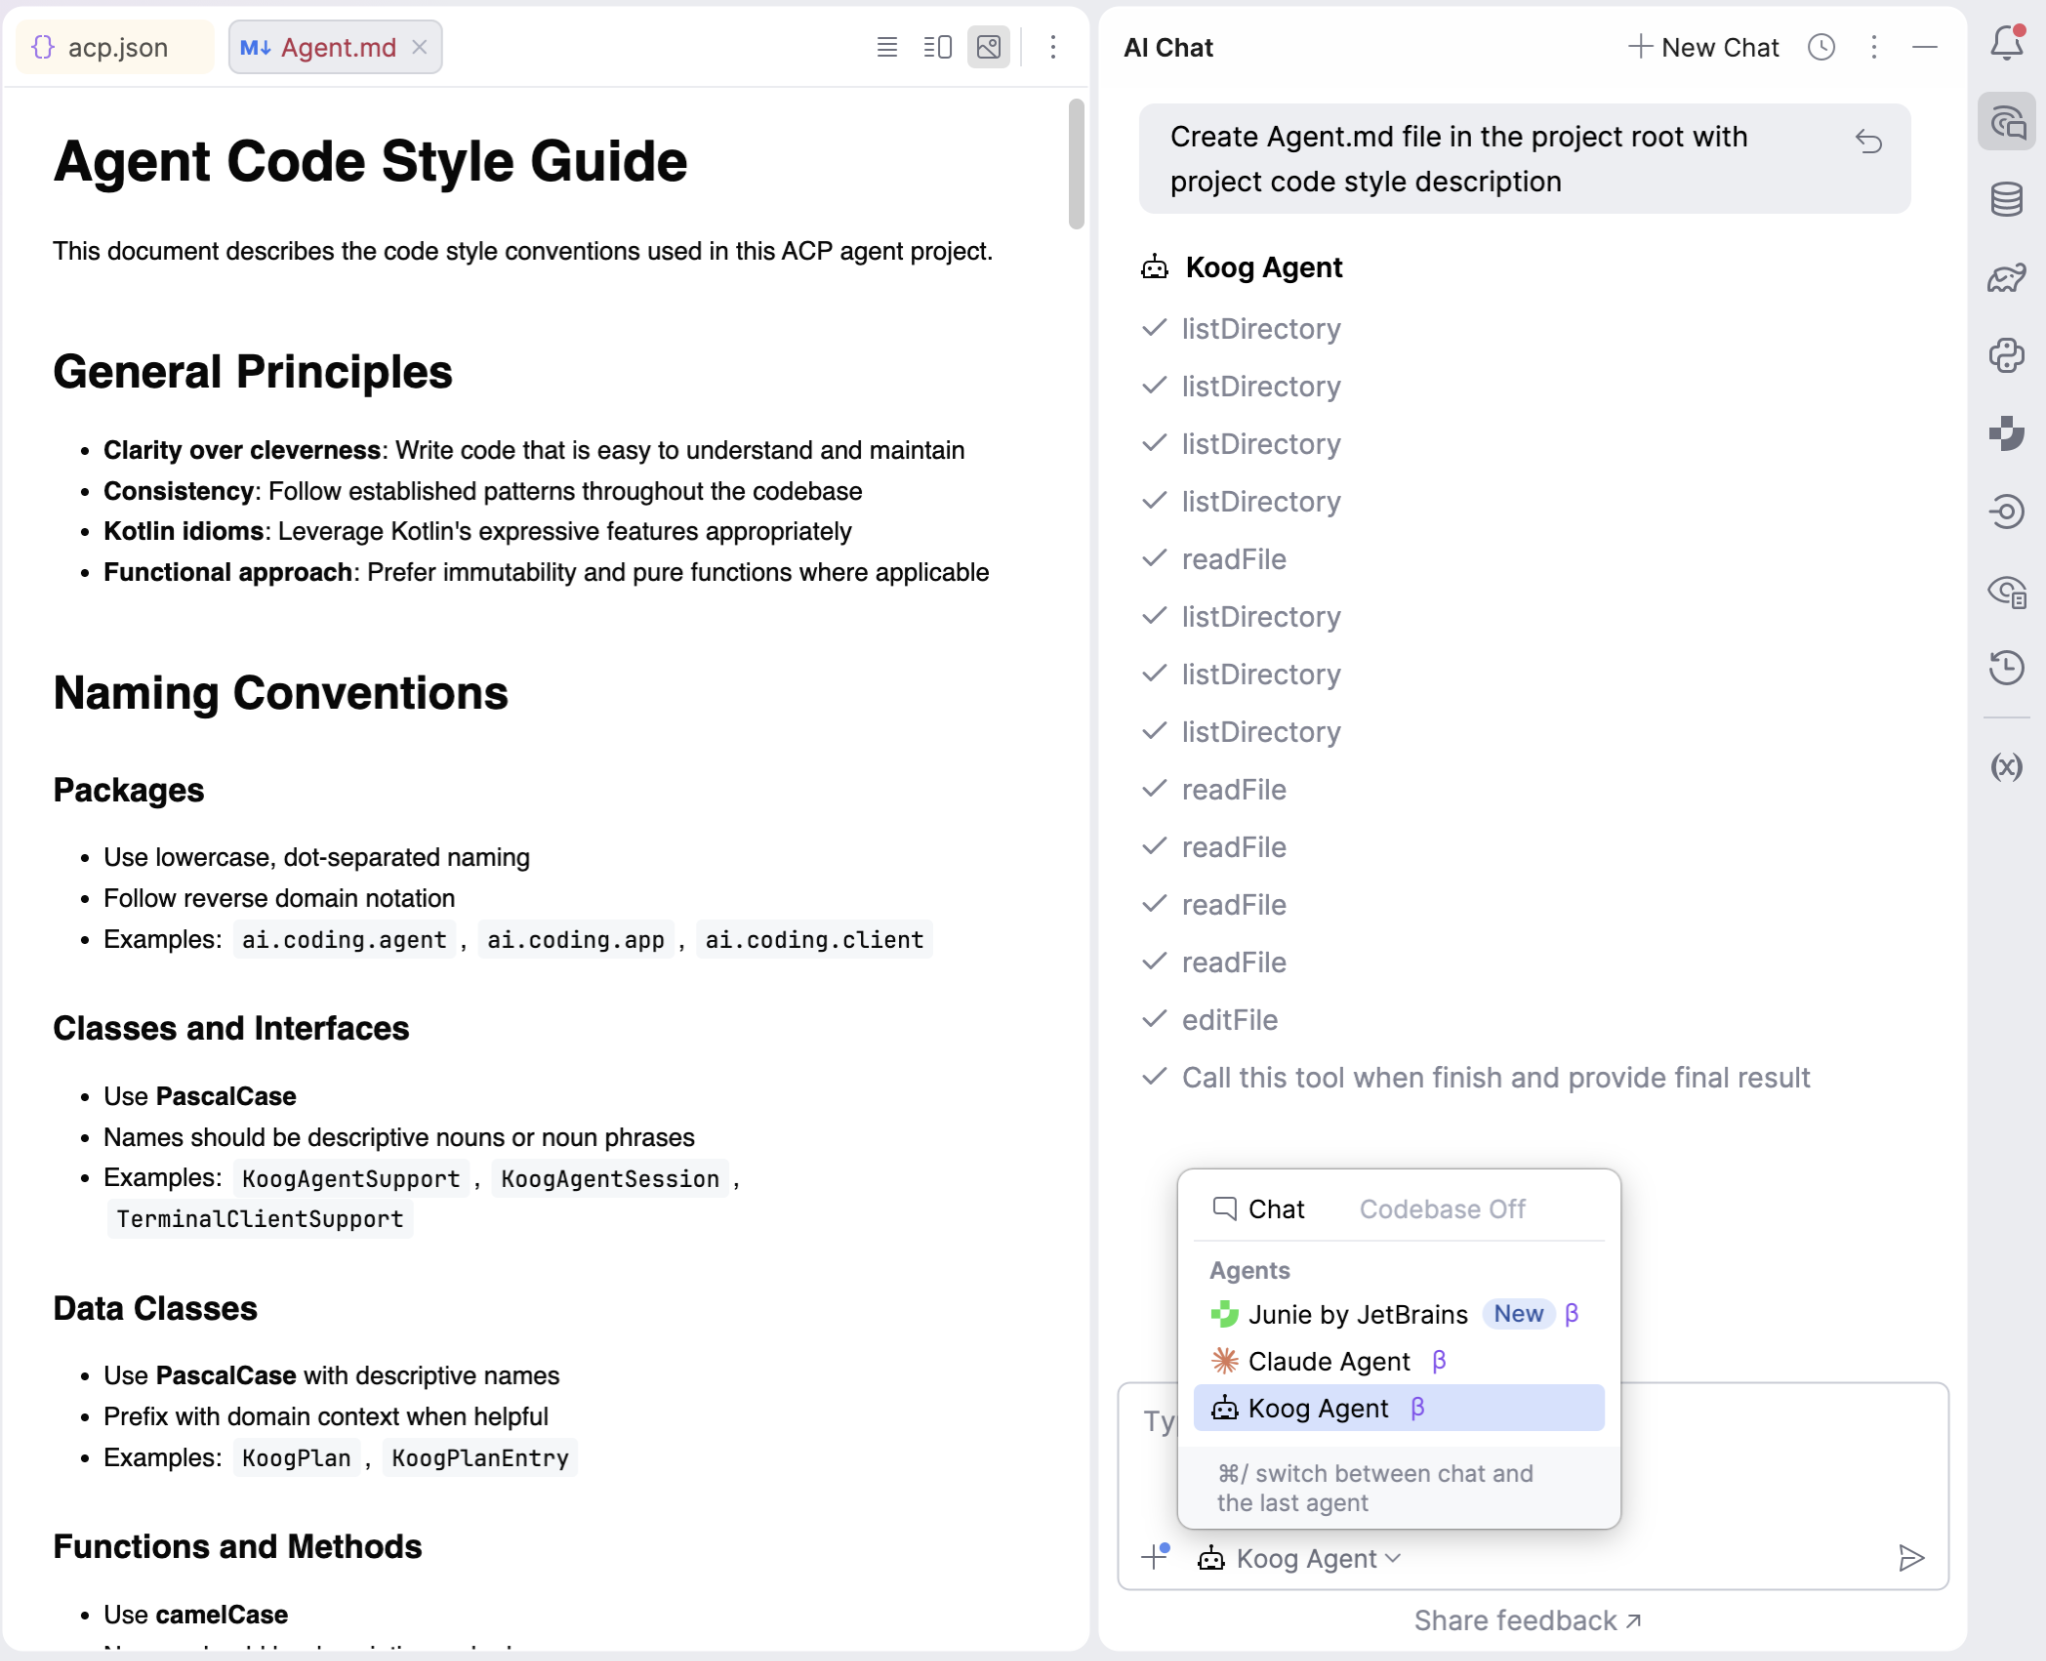
Provide this path in the IDE ACP configuration JSON – and voilà! You can now connect your Koog agent to the AI chat and send prompts directly from the UI…and let the agent code for you!
Looking ahead
You can find a complete example of the ACP × Koog coding agent here and use it as a template for building your own in-IDE and external assistants. You can implement an agent for any existing ACP-compatible client or build your own client using the ACP SDKs.
With the ACP, Koog, and just a few lines of code, you can connect your agent to your web page or desktop application, receive notifications about the agent lifecycle, and surface them directly in the UI. Keep experimenting!