
IntelliJ IDEA
IntelliJ IDEA – the Leading IDE for Professional Development in Java and Kotlin
How to Use AI Agents in IntelliJ IDEA With ACP

The Agent Client Protocol (ACP) defines a common contract between a client – like IntelliJ IDEA – and an agent. IntelliJ IDEA already includes several ACP-compatible agents: Codex, Claude Agent, and Junie. Beyond these bundled options, the ACP Registry provides more choices, and teams can register internal or unlisted agents through acp.json.
The key idea is the boundary. IntelliJ IDEA remains the environment where you navigate the project, inspect code, and review changes. Across the ACP connection, each agent maintains its own models, behavior, authentication, and agent-side tools.
This makes the replaceable unit larger than an LLM. An ACP-compatible agent includes the full harness around the model: its planning logic, tools, model-routing behavior, and observability. Because ACP standardizes the boundary between the IDE and the agent, you can swap one agent for another smoothly, without changing how IntelliJ IDEA integrates with it.
ACP in a nutshell
ACP is often described as the LSP (Language Server Protocol) for coding agents. The analogy works because the integration problem is similar.
Before the LSP, supporting each language meant writing a separate editor integration. The LSP replaced that matrix with a single contract.
ACP applies the same idea to the connection between an editor or IDE and a coding agent. Any ACP-compatible agent can connect without requiring a bespoke plugin or private API for each pairing.
ACP originated from a collaboration between JetBrains and Zed, with both JetBrains IDEs and Zed targeted as clients from the start.
For local agents, IntelliJ IDEA starts a subprocess and communicates with it via JSON-RPC over standard input and output. During initialization, the IDE and the agent negotiate protocol versions and capabilities. Once connected, prompts flow to the agent, while progress updates, file operations, and permission requests return to the IDE.
Agents can still behave differently under that shared contract. During initialization, each one declares the optional capabilities it supports. Plans, modes, slash commands, session loading, terminal operations, and other features can differ between agents.
ACP carries the interaction between IntelliJ IDEA and the agent. Additional tools and context can reach the agent through MCP (Model Context Protocol), including user-configured servers and the integrated IntelliJ MCP server.
Start with an available agent
IntelliJ IDEA ships with several agents that require no manual ACP configuration, including Codex, Claude Agent, and Junie. Choose one and describe the task you want it to handle.
Each agent has its own workflow style, which may include a planning mode, slash commands, or a particular authentication flow. ACP lets IntelliJ IDEA host that interaction through a shared contract while preserving those differences.
Ask the agent to make a small change. After it edits a file, AI Chat shows the changed file in the conversation. Click it to open the diff in the editor beside the chat and inspect exactly what changed.
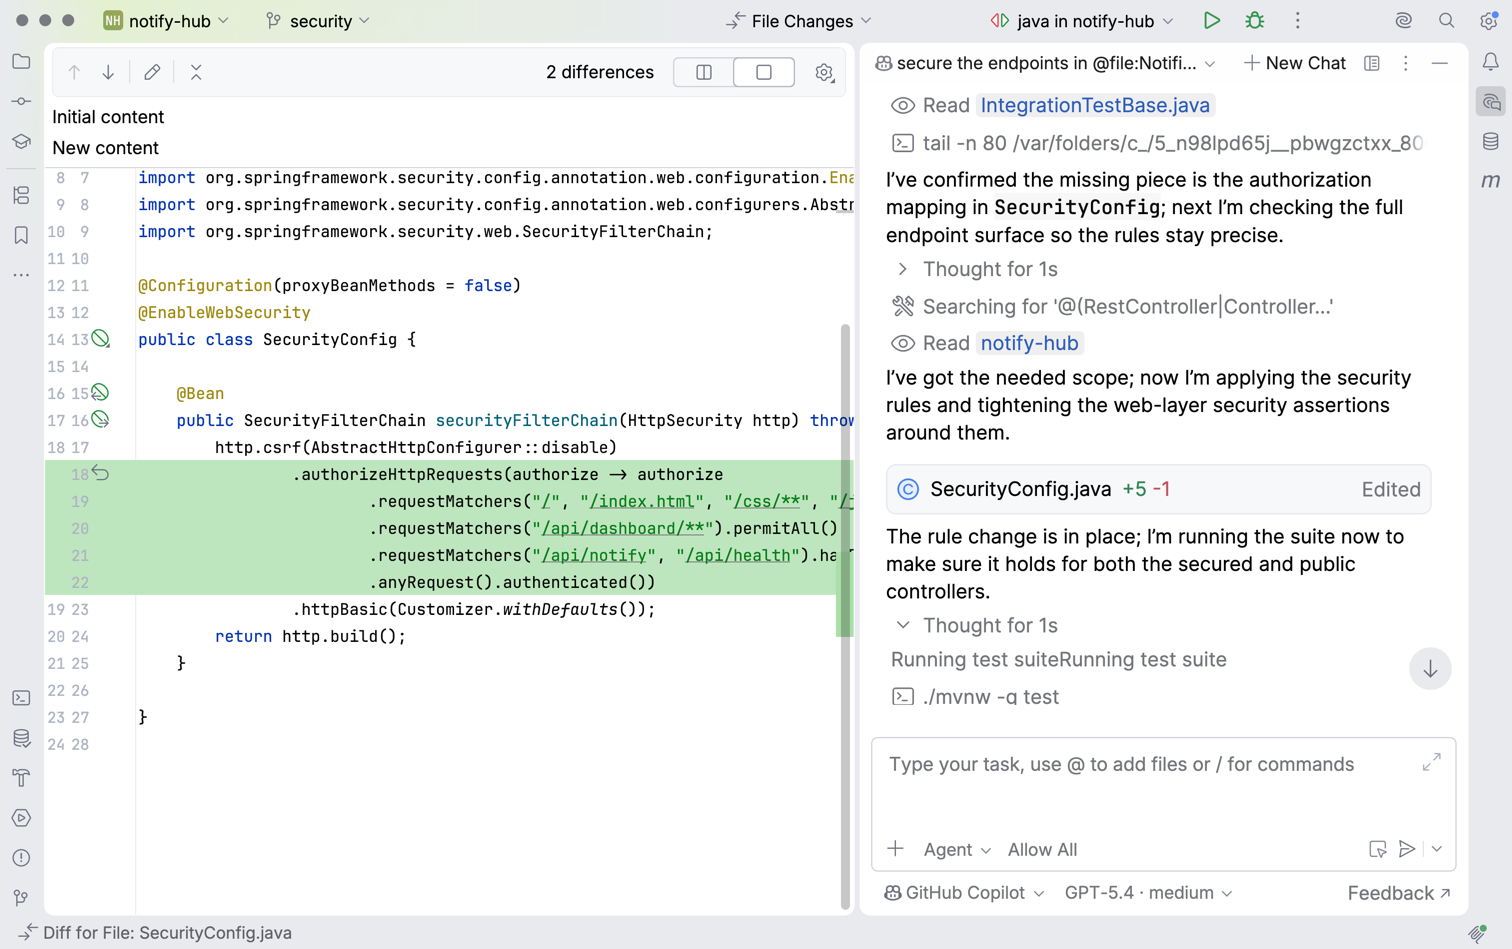
That edit-and-review loop is the part worth keeping. If you switch agents later, having the loop inside the IDE prevents you from having to move the project or review changes in a separate tool.
Install an agent from the ACP Registry
The ACP Registry contains additional ACP-compatible agents, together with the metadata IntelliJ IDEA needs to install them.
In IntelliJ IDEA, open Settings | Tools | AI Assistant | Agents and then choose an agent from the registry. The current ACP documentation describes the complete installation flow.
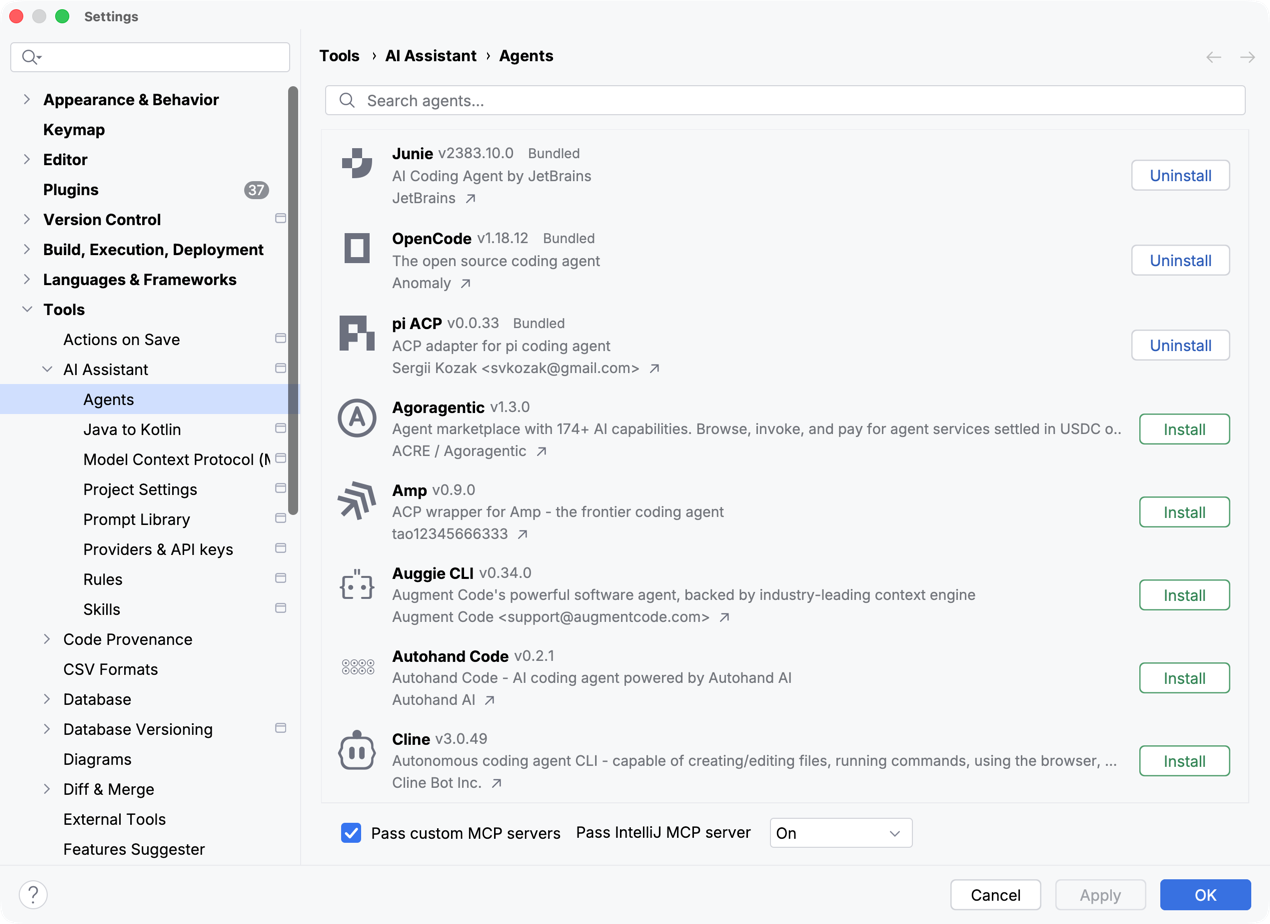
The agent’s configuration view also lets you expose the MCP servers configured in AI Assistant, the integrated IntelliJ MCP server, or both.
IntelliJ IDEA downloads the agent files when you apply the settings. The first session may ask you to authenticate using a method supported by that agent.
The registry also supplies the metadata used for updates and uninstallation. These operations remain in the Agents settings, so adding an agent does not require maintaining another IDE plugin.
Each registry agent retains its own license, service, credentials, and privacy terms. Check these details before granting repository access.
Connect a custom agent with acp.json
Registry agents are intended for broad distribution. An internal agent, however, often has a narrower role and should stay inside the company.
If an internal agent implements ACP, register it in ~/.jetbrains/acp.json. IntelliJ IDEA provides an Add Custom Agent action that creates and opens this file, but you can also edit the file directly.
The configuration below registers a hypothetical company migration agent:
{
  "agent_servers": {
    "Company Migration Agent": {
      "command": "/opt/company/bin/migration-agent",
      "args": ["acp"]
    }
  }
}
Each key under agent_servers becomes the agent’s display name. The command value must contain the full path to the executable that IntelliJ IDEA will start. Place the arguments required to activate that agent’s ACP mode in args; the exact values come from the agent’s documentation.
Use env when the process needs environment variables. Many agents expect you to authenticate through their CLI first and reuse credentials stored in the agent’s user configuration. If an agent accepts an API key through env, follow its documentation and avoid committing the file or its secrets to a repository.
Save acp.json and then select the configured agent in IntelliJ IDEA.
If any ACP-compatible agents are already installed on the machine, the IDE will detect them and offer to add them to the configuration.
Why use more than one agent?
Teams may want different agents for different kinds of work. ACP gives those agents a common way to connect to IntelliJ IDEA:
- Connecting an ACP-compatible agent through `
acp.json` avoids developing and maintaining a separate IntelliJ IDEA plugin. - Navigation, editing, and diff review remain in IntelliJ IDEA while developers choose the agent for the work.
- If an agent’s service or model provider is unavailable, developers can switch to another configured agent and continue working in the same IntelliJ IDEA project.
Keep the IDE, choose the agent
Use an agent already available in IntelliJ IDEA, install one from the ACP Registry, or register an internal agent in acp.json.
ACP turns the coding agent from an IDE commitment into a replaceable choice you can revisit at any time.