Fleet
More Than a Code Editor
Fleet Plugins Launched – Themes First

Fleet is engineered for ultimate extensibility, offering a dynamic and customizable experience. Virtually every feature of Fleet is already powered by plugins pre-packaged with the Fleet distribution. Now, we are happy to announce the rollout of the Fleet Plugins SDK to the broader developer community. As an exciting first step, we are enabling the creation and sharing of custom color themes for Fleet. Let’s start crafting a unique Fleet experience!
How to publish a custom color theme in three steps
It is now possible to publish your own custom color themes. Themes for Fleet are distributed via JetBrains Marketplace as Fleet plugins, so a theme must be packaged accordingly. The process of creating and distributing color themes consists of the following three steps:
- Designing a custom color theme (as a JSON file).
- Packaging the theme as a Fleet plugin.
- Publishing the plugin on JetBrains Marketplace.
Let’s look at these steps a bit more closely.
Step 1: designing a custom color theme
The easiest way to start designing a custom color theme is by using the Edit Color Theme… action (it can be invoked from the Actions popup launched via Cmd/Ctrl-Shift-K). This action creates a JSON file with a copy of the current theme and makes this copy the current one. Any changes to this file are applied in the UI automatically on save.
To demonstrate, let’s have some fun with tab header backgrounds. My favorite Fleet Light theme has the following color definitions:
"tab.background.default": "Gray 110",
"tab.background.hovered": "Gray 100",
"tab.background.selected": "White",
It may not be the most exciting tab background, though. The following seems a bit more visually appealing to me:
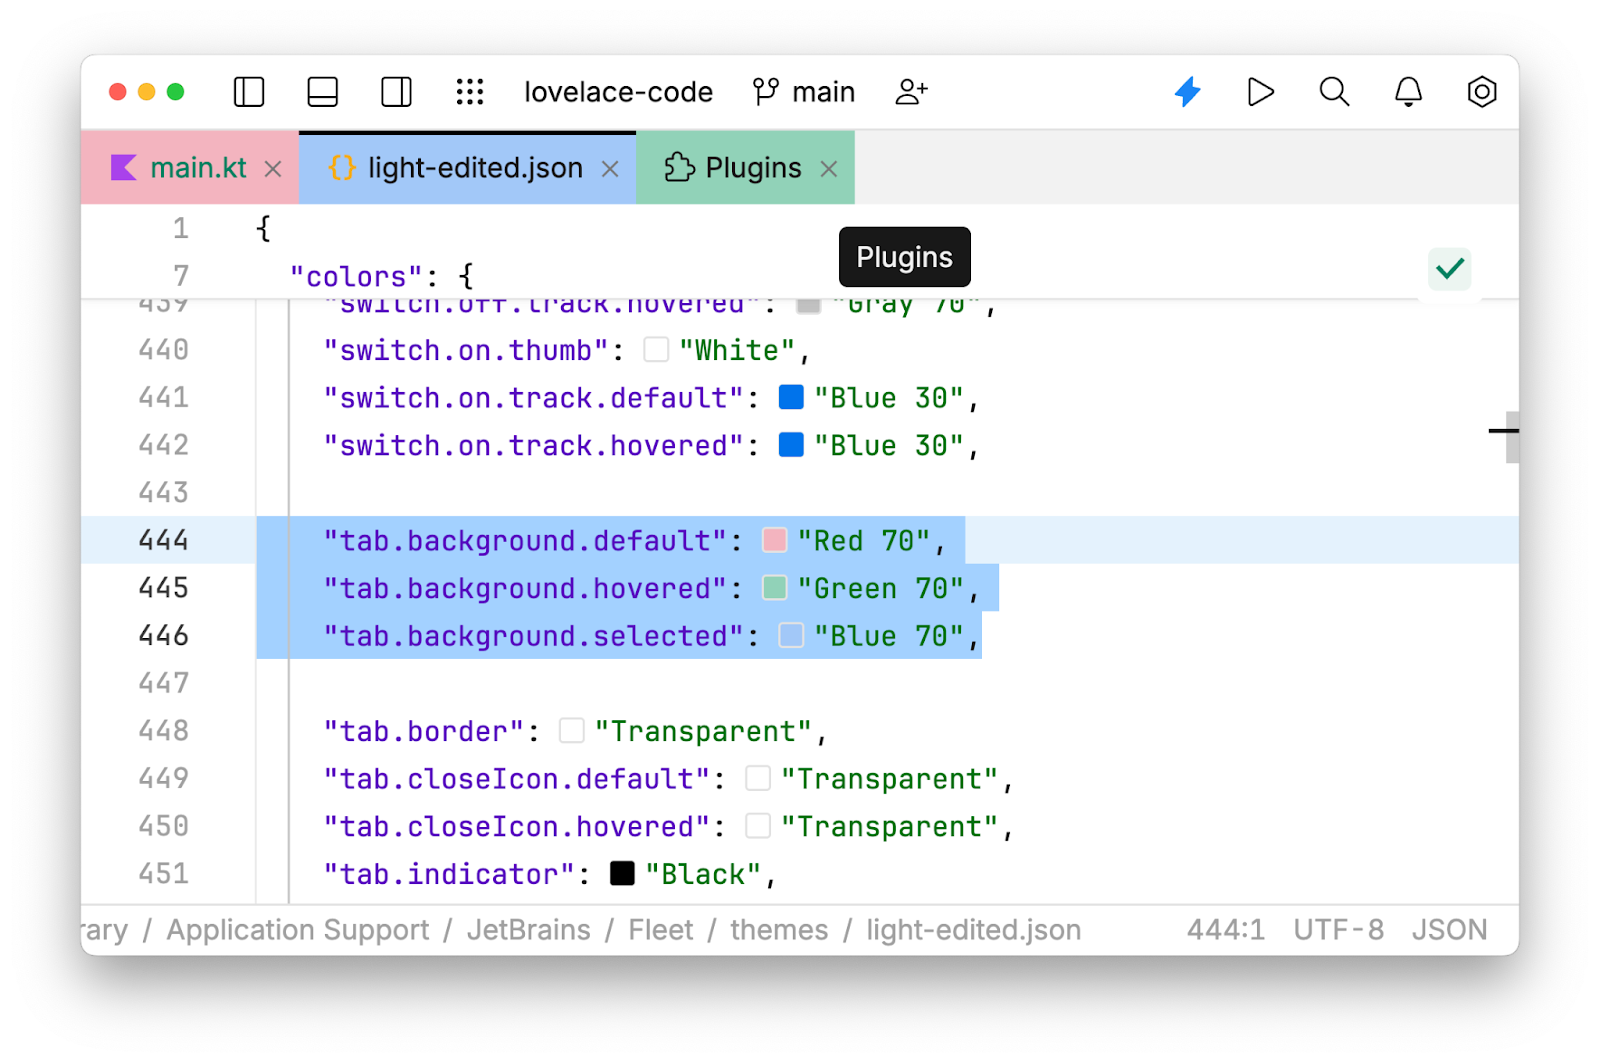
The colors used here are defined in the “palette” section of the theme’s JSON file (closer to the end of this long file):
	"Red 70": "#f3b4bf",
	"Green 70": "#91d2b8",
	"Blue 70": "#a2c8f7",
Let’s also give this theme a new name by editing the theme.name key in the beginning of the file and renaming the file itself to light-improved.json:
{
  "meta": {
	"theme.name": "Fleet Light - Improved",
You can find more details regarding editing theme JSON files in the documentation.
Now we’re almost ready to share the theme with the rest of the world and start racking up download numbers. But before that, we need to package the theme as a plugin.
Step 2: packaging your theme as a Fleet plugin
Developing Fleet plugins requires a working installation of JDK 17, which can be obtained here (JDKs from other vendors are also supported). Then, we should create a new project from the dedicated theme plugin template on GitHub. There are several things which must be adjusted in the project before the theme plugin is ready.
First, we need to replace the sample theme JSON file in my-theme-plugin/frontendImpl/src/jvmMain/resources/ with the file we prepared in the previous step.
Second, we need to register the theme in Fleet. This is where we have to start writing some real code, as opposed to just editing JSONs. Our code will be executed when the plugin is loaded in the running Fleet instance. To do this, we edit the my-theme-plugin/frontendImpl/src/jvmMain/kotlin/fleet/sample/frontendImpl/MyThemePlugin.kt file:
package fleet.sample.frontendImpl

import fleet.dock.api.ThemeId
import fleet.frontend.theme.registerTheme
import fleet.kernel.plugins.ContributionScope
import fleet.kernel.plugins.Plugin
import fleet.kernel.plugins.PluginScope

class MyThemePlugin : Plugin<Unit> {
	companion object : Plugin.Key<Unit>

	override val key: Plugin.Key<Unit> = MyThemePlugin

	override fun ContributionScope.load(pluginScope: PluginScope) {
		registerTheme(ThemeId(id = "light-improved"))
	}
}
The only line that needs to be edited is the call to the registerTheme function. The theme id must be the same as the name of the theme JSON file (without an extension). Note that theme registration doesn’t enable the theme automatically, but adds the theme to the list of available themes.
Third, we need to do some bookkeeping for the plugin configuration. The plugin should have a unique id, a readable name, and a description. The name and the description are visible both on Marketplace and in Fleet’s Plugins tab (use the Plugins… action to open it). These parameters are set in the my-theme-plugin/build.gradle.kts file, for example:
fleetPlugin {
	// STEP 1: chose an ID for your plugin, it must be unique
	id = "pro.bravit.great.theme"

	// STEP 2: set up the sensible metadata for your plugin
 	metadata {
		readableName = "Fleet Light - Improved"
		description = "Great light theme for Fleet"
	}

	fleetRuntime {
		version = libs.versions.fleet.runtime
	}
}
Plugins are compiled against a fixed Fleet version. We can set the Fleet version in the gradle/libs.versions.toml file as follows:
fleet-runtime = "1.38.89"
This line also means that the plugin is supposed to work with Fleet versions from 1.38.89 onward (until it breaks – remember, that Fleet is still in Preview and we don’t provide any API stability guarantees).
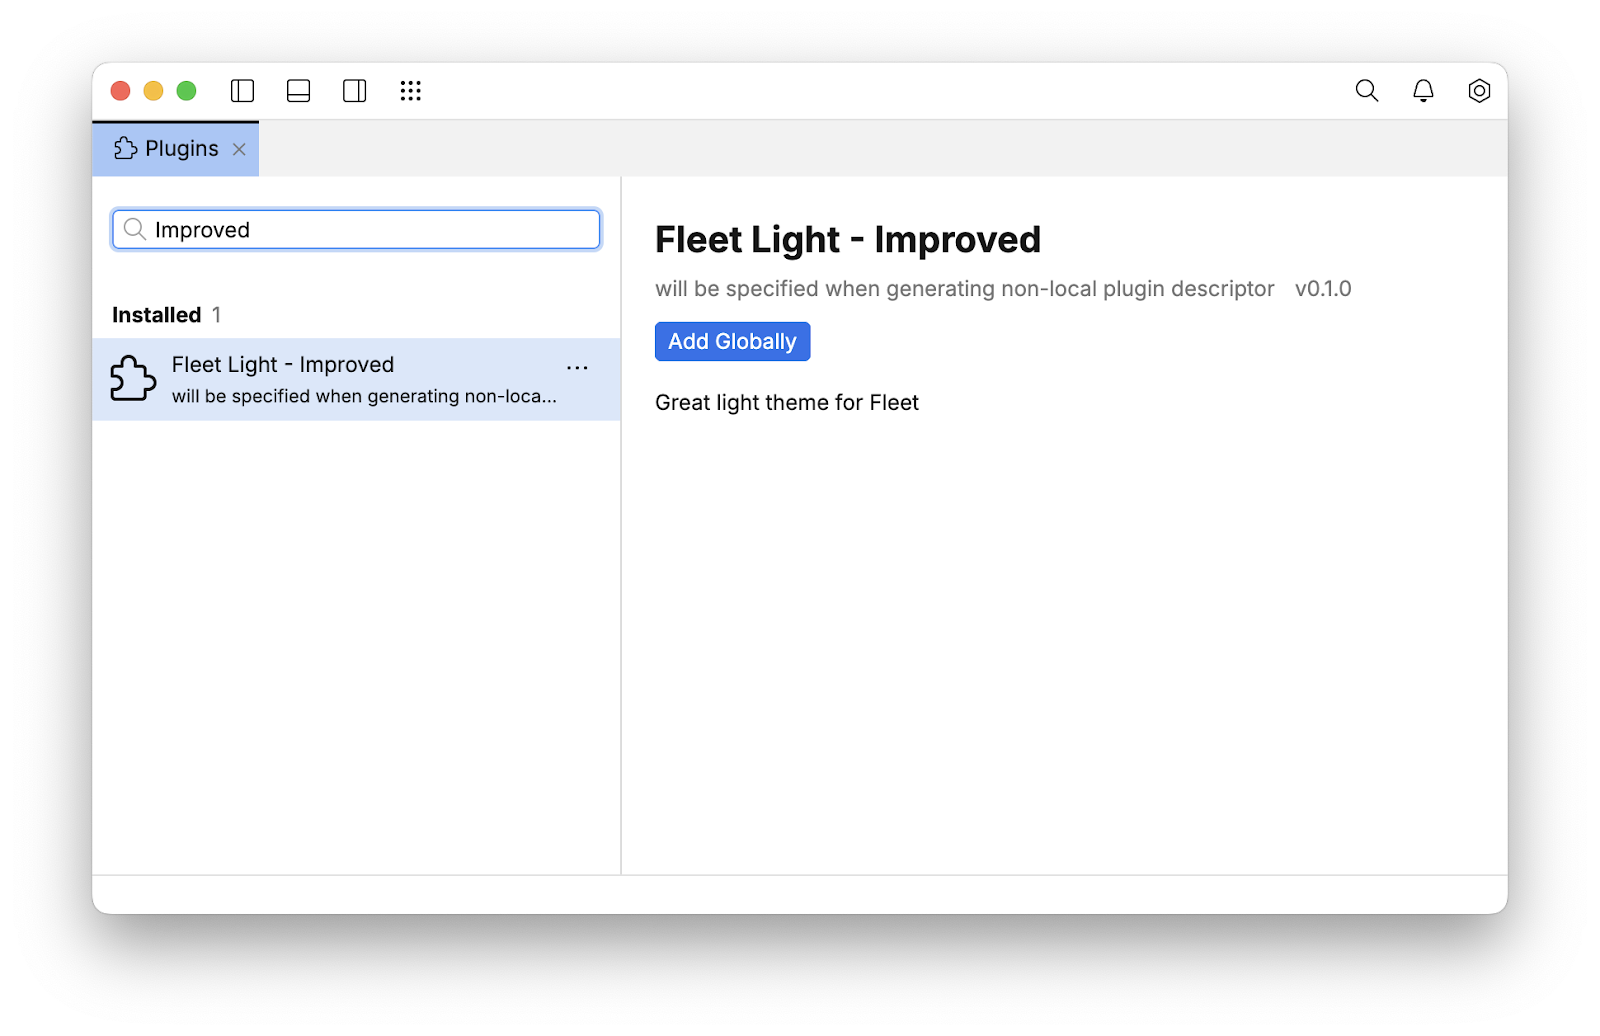
Once we are done with editing the files, we can launch Fleet with the plugin in development by opening the Run dialog and choosing the Run Fleet with local plugin run configuration. The Fleet instance will be launched after a bit of compilation and will have our theme available in the Color Theme… dialog, so we can select it and make sure that it works as expected. We can also check out the Plugins tab to make sure that the plugin has been loaded:
There’s still one last problem we need to address – our plugin is not yet available for other users to install. Let’s fix that!
Step 3: publishing your plugin on Marketplace
Fleet uses JetBrains Marketplace for distributing its plugins. To be able to upload plugins, plugin developers need to meet the following requirements:
- They should have a JetBrains account (can be created at JetBrains Account Center).
- They should register as vendors on JetBrains Marketplace (can be done at this page).
- They should get a personal token (can be generated here).
The personal token from Marketplace should be a value of the org.jetbrains.fleet-plugin.marketplaceUploadToken Gradle property. This property can be set in multiple ways. The easiest way is to add it to the gradle.properties file in the Gradle User Home Directory (defaulted to $HOME/.gradle/ on macOS and Linux, or C:\Users\<USERNAME>\.gradle\ on Windows):
org.jetbrains.fleet-plugin.marketplaceUploadToken=perm:...
When publishing a plugin for the first time, we need to prepare a zip-file distribution by running the following command in the terminal:
./gradlew distZip
This command creates the my-theme-plugin/build/pluginDistribution/my-theme-plugin-0.1.0.zip file. Then we go to the Upload plugin page, select Plugin For Fleet, fill all the other required fields, and press the Upload Plugin button.
The freshly uploaded plugin requires approval from the Marketplace team. Once the plugin is approved, anyone can install it from the Plugins tab in Fleet. Hooray!

For the subsequent uploads of the newer versions of a plugin, we can use the uploadPlugin Gradle task:
./gradlew uploadPlugin
Now that we’ve published our first plugin, let’s get a bird’s-eye view of the Fleet Plugins SDK and Fleet plugins in general.
What is the Fleet Plugins SDK
As pieces of software, Fleet plugins require specialized tooling to be developed. We use Gradle as the foundation for that tooling. From a technical perspective, the main component of the Fleet Plugins SDK is the Fleet plugin for Gradle. This plugin manages the entire process, including preparing the plugin source code for building, downloading the necessary dependencies, building the plugin project, assembling the plugin artifact, and uploading it to JetBrains Marketplace.
The Fleet Plugins SDK also includes a collection of APIs and their implementations, which provide access to the underlying Fleet functionalities. We aim to design their APIs to be robust and versatile, enabling developers to seamlessly integrate and extend various aspects of Fleet.
What is a Fleet plugin
Fleet plugins are developed as Kotln Multiplatform Gradle-based projects. Only one Kotlin Multiplatform target is supported at this time: Kotlin/JVM.
Plugin projects consist of layers that reflect Fleet’s architecture and replicate Gradle source sets. The simplest plugin might have only one layer that provides an implementation of a contributed frontend-only functionality. More sophisticated plugins might also implement some functionality for Fleet workspaces, provide common code for both frontends and workspaces, and also define additional APIs other plugins can depend on.
For example, here’s the structure of a sample theme plugin project, as described in settings.gradle.kts:
rootProject.name = "my-theme-plugin-project"
include(":my-theme-plugin")
include(":my-theme-plugin:frontendImpl")
There are also several build.gradle.kts files in the project, describing the whole project, a contributed plugin, and each layer respectively:
- build.gradle.kts
- my-theme-plugin/build.gradle.kts
- my-theme-plugin/frontendImpl/build.gradle.kts
As yet another level of modularization, Fleet leverages the Java Platform Modules system. Java modules are used to describe module dependencies and exported packages and to represent a plugin as a service provider (loadable via the Java ServiceLoader API). The my-theme-plugin/frontendImpl/src/jvmMain/java/module-info.java file describes the theme plugin’s module:
module fleet.sample.frontendImpl {
	requires fleet.frontend;
	requires fleet.kernel;
	requires fleet.util.logging.api;
	requires fleet.rhizomedb;
	requires fleet.frontend.ui;

	exports fleet.sample.frontendImpl;
	provides fleet.kernel.plugins.Plugin
		with fleet.sample.frontendImpl.MyThemePlugin;
}
In Kotlin terms, a Fleet plugin is a class that implements the fleet.kernel.plugins.Plugin<API> interface. The ContributionScope.load extension method defined as part of this class serves as an entry point for all the functionality provided by a plugin. In the sample theme plugin, we’ve registered a theme in this method. To do something else, we need to know how to approach other pieces of Fleet functionality from a plugin.
Fleet Plugins roadmap
In the coming months, we aim to gradually publish various parts of the Fleet Plugins API to enable the extension and customization of the following Fleet functionalities:
- Keymaps: This will allow users to customize keyboard shortcuts, creating a more personalized and efficient workflow. Users can map commands to specific key combinations to suit their individual preferences and streamline their development process.
- Syntax highlighting: By enabling customization of syntax highlighting, developers can tailor the way code is displayed based on their personal preferences or project-specific requirements. This can enhance readability and help in quickly identifying different parts of the code, such as keywords, variables, and function names.
- Supporting language servers via LSPs (language server protocols): This feature will support the integration of existing language servers, enabling advanced code editing features like auto-completion, error checking, and refactoring across various programming languages. It will facilitate a more robust and versatile development environment within Fleet.
- Running external tools: Users will have the ability to integrate and execute external tools directly from within the Fleet environment. This can include anything from build tools and linters to custom scripts and automation processes, enhancing the flexibility and power of the development workflow.
- Extending the UI: This functionality will provide options for users to modify and extend the user interface of Fleet. Whether it’s adding new panels, customizing existing ones, or creating entirely new UI components, users will be able to tailor the interface to better fit their needs and preferences.
- And many more: In addition to the aforementioned functionalities, a wide range of other extension and customization options will be made available. This may include features like version control integration, debugging tools, project management enhancements, and more, all designed to make Fleet a more powerful and adaptable development environment.
Stay tuned!