A Practical Guide to Profiling in Go

As is often the case with Go, the standard library comes with a great tool for profiling your programs – pprof. It samples your call stack, allowing you to later generate reports that help you analyze and visualize your software’s performance without installing any plugins. Everything you need is in the Go development kit.
The problem? It’s a bit of a hassle. In our discussions with Go developers, we’ve heard that some actually avoid it if they can. There could be a few reasons for this. For many developers, typical Go services perform well enough without optimizations, so when they do need to use profiling, it becomes a complex “rescue mission” tool they aren’t really experienced with. For some, the issue isn’t profiling in itself, but rather what to do with the results. Since pprof just shows developers a lot of low-level profiling data, it’s on them to make sense of it and find the root of the issue. On the other end of the spectrum, there are those who practice continuous profiling and use dedicated tools for it.
This article serves as a practical guide for those developers who would rather avoid dealing with Go’s confusing profiling tools. Profiling is incredibly useful – it helps you identify CPU bottlenecks, memory issues, and concurrency problems, all of which affect both your and your users’ experience with your product. So to help you make the best use of it, we will explain some of the main profiling types in Go (CPU, heap, allocs, mutex, block, and goroutine), as well as how to run and interpret them. And because you’re on the JetBrains blog, we’ll also show you how GoLand makes profiling as easy as pressing a single button. But first…
How does profiling work in Go?
Go profilers track program performance by sampling the call stack and additional data at either regular time intervals or upon specific runtime events, depending on the profile. They generate profile files that can then be analyzed using tools like the pprof CLI or its web interface, so you can see where your program spends time and memory. This helps you find functions that use unnecessary resources and slow down the program, without having to guess. For example, Go’s diagnostic documentation recommends profiling to identify expensive or frequently called code paths.
Types of profiles in Go
As mentioned in the intro, Go comes pre-equipped with a profiling tool called pprof, so you don’t need any external libraries. There are different things you can analyze with it, depending on your needs. The most popular profiles that we’ll be discussing in this article are:
- CPU: Samples the call stack and tracks where CPU time was spent.
- Memory (allocs / heap): Tracks allocations (total / currently in use) to show you where memory is being used.
- Block: Tracks blocking events, showing you where goroutines were blocked.
- Mutex: Captures which goroutines blocked other goroutines, revealing lock contention.
- Goroutine: Takes snapshots of stack traces of goroutines to show you how many there are at the moment, and what they’re doing.
It’s perhaps worth mentioning here that Go also has the runtime/trace package – an execution tracer that records specific runtime events, capturing the timeline rather than snapshots. runtime/trace will not be covered in this article.
CPU
CPU profiling is often the first step when diagnosing performance issues in Go programs. It records where your program spends CPU time by periodically sampling the stack of the goroutines that are being executed.
It’s good for things like finding hot paths in CPU-bound code (e.g. expensive parsing, serialization, hashing, or tight loops), understanding why a benchmark is slower than expected under realistic load, investigating the root cause of a Grafana alert, or generating input for profile-guided optimization.
What this profile does not tell you is where your program spends time waiting on locks or the network. Since CPU profiling samples active execution, blocking and contention need other profiles, like the block and mutex ones described below. This means the actual running time of a goroutine will not match its execution time on the CPU.
Memory profiles – heap and allocs
The memory profiles – heap and allocs – are perhaps the most confusing, even for seasoned Go developers. To clarify: heap and allocs are both types of memory profiling that give you insights into memory consumption, allocation patterns, and garbage collection (GC). Under the hood, both store the same data. The only difference is which sample type they present as the default.
The sampling types available in both profiles are:
inuse_space: The amount of memory (in bytes) that’s currently allocated and has not yet been garbage collected.inuse_objects: The total number of individual objects currently on the heap.alloc_space: The cumulative amount of memory (in bytes) allocated since the program started (including memory that has already been freed).alloc_objects: The cumulative count of objects allocated since the program started (including those that have already been collected).
The heap profile shows inuse_space as the default view, and the allocs profile shows alloc_space. You can, however, switch between all four sampling types freely.
An important point about memory profiles is that they are sampled, not exact. Go’s A Guide to the Go Garbage Collector explains that, by default, these profiles only sample a subset of heap objects that’s good enough to find hotspots.
Another thing to remember is that memory profiles don’t actually cover all memory, as Go can allocate some values to the stack and outside the heap that’s managed by GC, depending on the outcome of escape analysis.
Block profile
The block profile shows you where goroutines are blocked waiting for synchronization primitives such as sync.Mutex, sync.RWMutex, sync.WaitGroup, sync.Cond, and channel send/receive/select. A block profile tracks blocking events, measures how long they last, and then aggregates them by stack trace once they are completed. It tells you where your program spent time waiting instead of doing useful work and helps you optimize inefficient synchronization patterns.
The block profile tracks two sample types:
- Contentions: This shows the number of times a block event occurred (i.e. multiple goroutines attempted to access a shared resource simultaneously and only one could proceed).
- Delay (latency): This shows the total time spent being blocked (i.e. the actual amount of time a goroutine spent in a blocked state before it could resume execution).
This is an important distinction because you can have low contention with high delay (and vice versa); for example, when only one goroutine waits for a lock, but it takes 10 seconds because the holder is performing a slow network call.
Block profiling is disabled by default in the Go runtime, as it introduces overhead. In production, you should enable block profiling only for very short periods and at a very long sampling interval to investigate known issues.
Mutex profile
In contrast to the block profile, the mutex profile captures goroutines that block other goroutines and focuses specifically on sync.Mutex and sync.RwMutex contention. You could say that, while the block profile tells you what is waiting, the mutex profile tells you what is causing the wait. Another significant difference is that mutex profiling uses event-based sampling rather than time-based sampling.
On the other hand, the mutex profile behaves similarly to the block profile in that it only records completed events and is also disabled by default. It also tracks two sample types – contentions and delay.
You should reach for a mutex profile when you think your application throughput or latency is being limited by lock contention. The Go diagnostic docs explicitly recommend using it when the CPU is not fully utilized because of mutex contention.
Goroutine profile
As the name would suggest, goroutine profiling helps you inspect how many goroutines exist in your program and what they’re doing at the moment by taking a snapshot of their stack traces. The goroutine profile helps you debug concurrency issues by identifying goroutine leaks or deadlocks as they are happening
In the context of block and mutex profiles, it’s critical to remember that the goroutine profile deals with current goroutines. Every entry in the profile shows the current function call stack, whether the goroutine is running, waiting, or blocked, and where it’s stuck (channel, mutex, I/O, etc.). The profile is exposed in net/http/pprof by default, which makes it the go-to choice for troubleshooting your program when it’s hanging or experiencing a pile-up.
That said, when you’re investigating problems with your program, it’s best to look at all three profiles – goroutine, block, and mutex – to get the full picture. For example, if you see a pile-up in the goroutine profile that shows multiple goroutines parked in sync.Mutex.Lock, the block profile will tell you which callers spent time blocked there, and the mutex profile will tell you which section made the wait expensive.
How to collect Go profiles
Now that we know what the main profiles in Go are, let’s see how you can collect and interpret them to actually improve your software.
There are different ways to collect the profiles – with runtime/pprof, net/http/pprof, and… GoLand. They all produce pprof-compatible profiles that you can then visualize with either go tool pprof or GoLand.
While the “traditional” ways are somewhat tedious, if you know how to run one profile, you know how to run the others – for the most part. We’ll go through the general steps and point out differences and exceptions where necessary.
And for those of you who have GoLand version 2026.1.2 or higher, we’ll show you how to run and inspect the profiles without having to remember any commands or a single line of code.
runtime/pprof
For explicit, code-controlled profiling, runtime/pprof is the way to go. For most applications, this is the most direct API:
import (
	"os"
	"runtime"
	"runtime/pprof"
)

func captureCPU() error {
	f, err := os.Create("cpu.pb.gz")
	if err != nil {
		return err
	}
	defer f.Close()

	if err := pprof.StartCPUProfile(f); err != nil {
		return err
	}
	defer pprof.StopCPUProfile()

	runLoad()
	return nil
}

func captureHeap() error {
	runtime.GC() // run GC first to capture only the most current objects
	f, err := os.Create("heap.pb.gz")
	if err != nil {
		return err
	}
	defer f.Close()
	return pprof.Lookup("heap").WriteTo(f, 0)
}

func captureAllocs() error {
	f, err := os.Create("allocs.pb.gz")
	if err != nil {
		return err
	}
	defer f.Close()
	return pprof.Lookup("allocs").WriteTo(f, 0)
}

func dumpGoroutines() error {
	return pprof.Lookup("goroutine").WriteTo(os.Stdout, 2)
}
- As you can see, the CPU profile uses
StartCPUProfile/StopCPUProfile. It has its own start/stop API because it streams during a time window – you turn it on, run the workload, and then stop it when it’s finished. - The heap profile captures data since the last GC, so you should call
runtime.GC()before writing a profile. Forcing the GC will give you the most up-to-date stats, but there are some scenarios where you might want to avoid that. - For goroutine profile, text output is usually better than
pprofgraphs when you’re debugging a leak or a deadlock, hencepprof.Lookup("goroutine").WriteTo(os.Stdout, 2).
net/http/pprof
The standard choice for long-running services is net/http/pprof. You start by importing the package:
import (
	"log"
	"net/http"
	_ "net/http/pprof"
)

func main() {
	go func() {
		log.Println(http.ListenAndServe("localhost:6060", nil))
	}()

	runServer()
}
Here are the typical live commands:
# CPU: 30-second profile
go tool pprof http://localhost:6060/debug/pprof/profile?seconds=30

# Live heap, forcing a GC first
go tool pprof http://localhost:6060/debug/pprof/heap?gc=1

# Total allocations since process start
go tool pprof http://localhost:6060/debug/pprof/allocs

# Block profile (only useful if SetBlockProfileRate was configured)
go tool pprof http://localhost:6060/debug/pprof/block

# Mutex profile (only useful if SetMutexProfileFraction was configured)
go tool pprof http://localhost:6060/debug/pprof/mutex

# Human-readable goroutine dump
curl http://localhost:6060/debug/pprof/goroutine?debug=2
- For CPU,
seconds=Nmeans “record the CPU profile for N seconds”. The HTTP handler for CPU defaults to 30 seconds if you omit the parameter. - For heap,
heap?gc=1will run the GC, while heap andheap?gc=0will not. debug=1switches the profile to text (with the exception of the CPU profile).
If you want a quick and easy way to take a look at the profiles, head straight to http://localhost:6060/debug/pprof – you’ll find an HTML index listing all the available profiles there.
Capturing profiles with GoLand
If you don’t work with profiles regularly, collecting them the traditional way usually requires you to look up the documentation or tutorials to first remember what, where, and when. That’s why, in GoLand 2026.1.2, we implemented a new profiler tool that makes it easier for you to both collect and inspect profiles – all from the comfort of your IDE.
The tool currently allows you to capture CPU, heap, allocs, goroutine, block, and mutex profiles, as well as view their imports.
Opening the profiler
There are multiple ways to start the profiler tool.
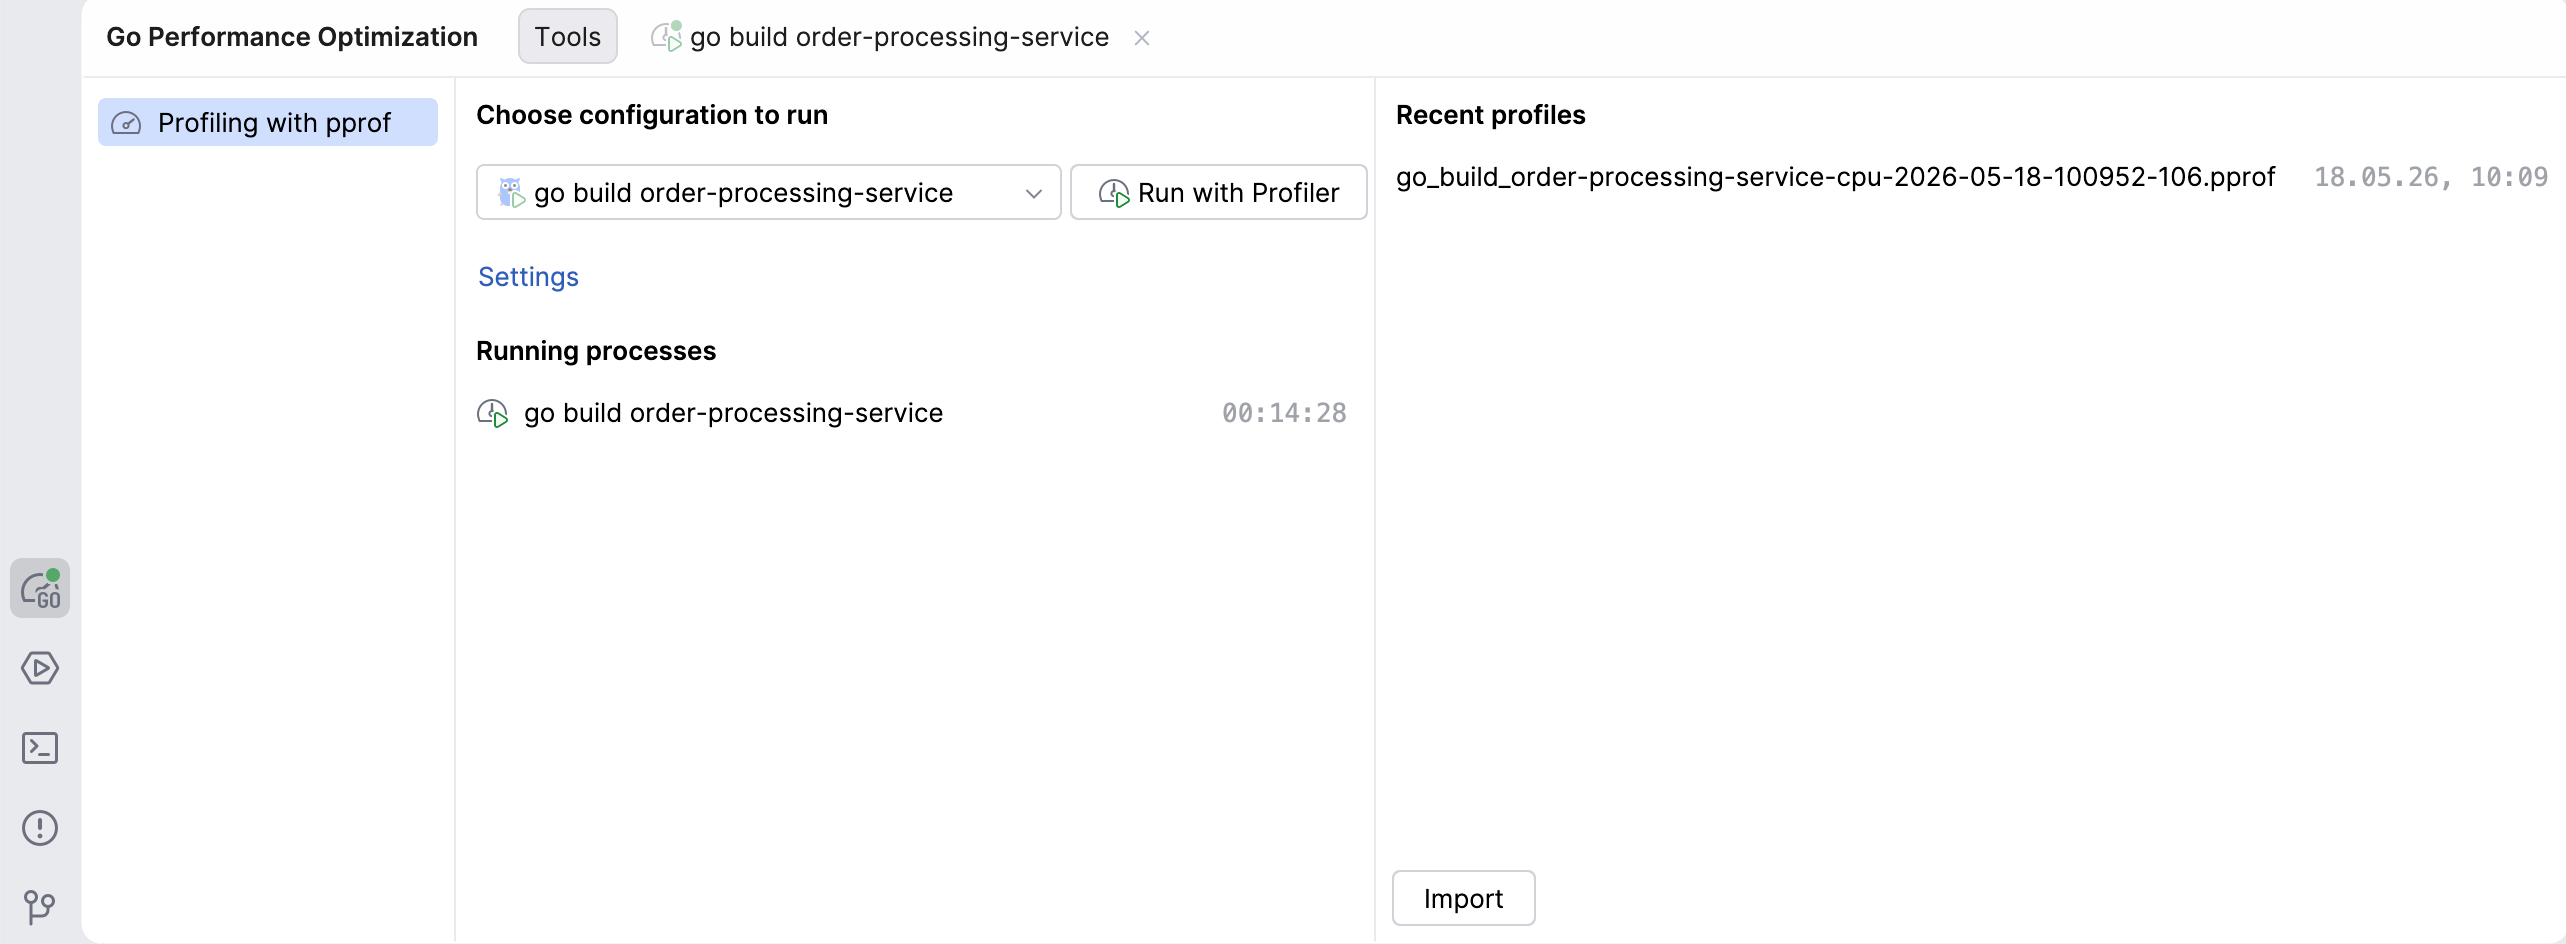
- Go Performance Optimization tool window: In the tool window bar, you will see a new icon for the Go Performance Optimization tool, which is where profiling actions can be performed. From there, you can choose which configuration to run, view profiles you already captured, or import profiles captured by someone else.
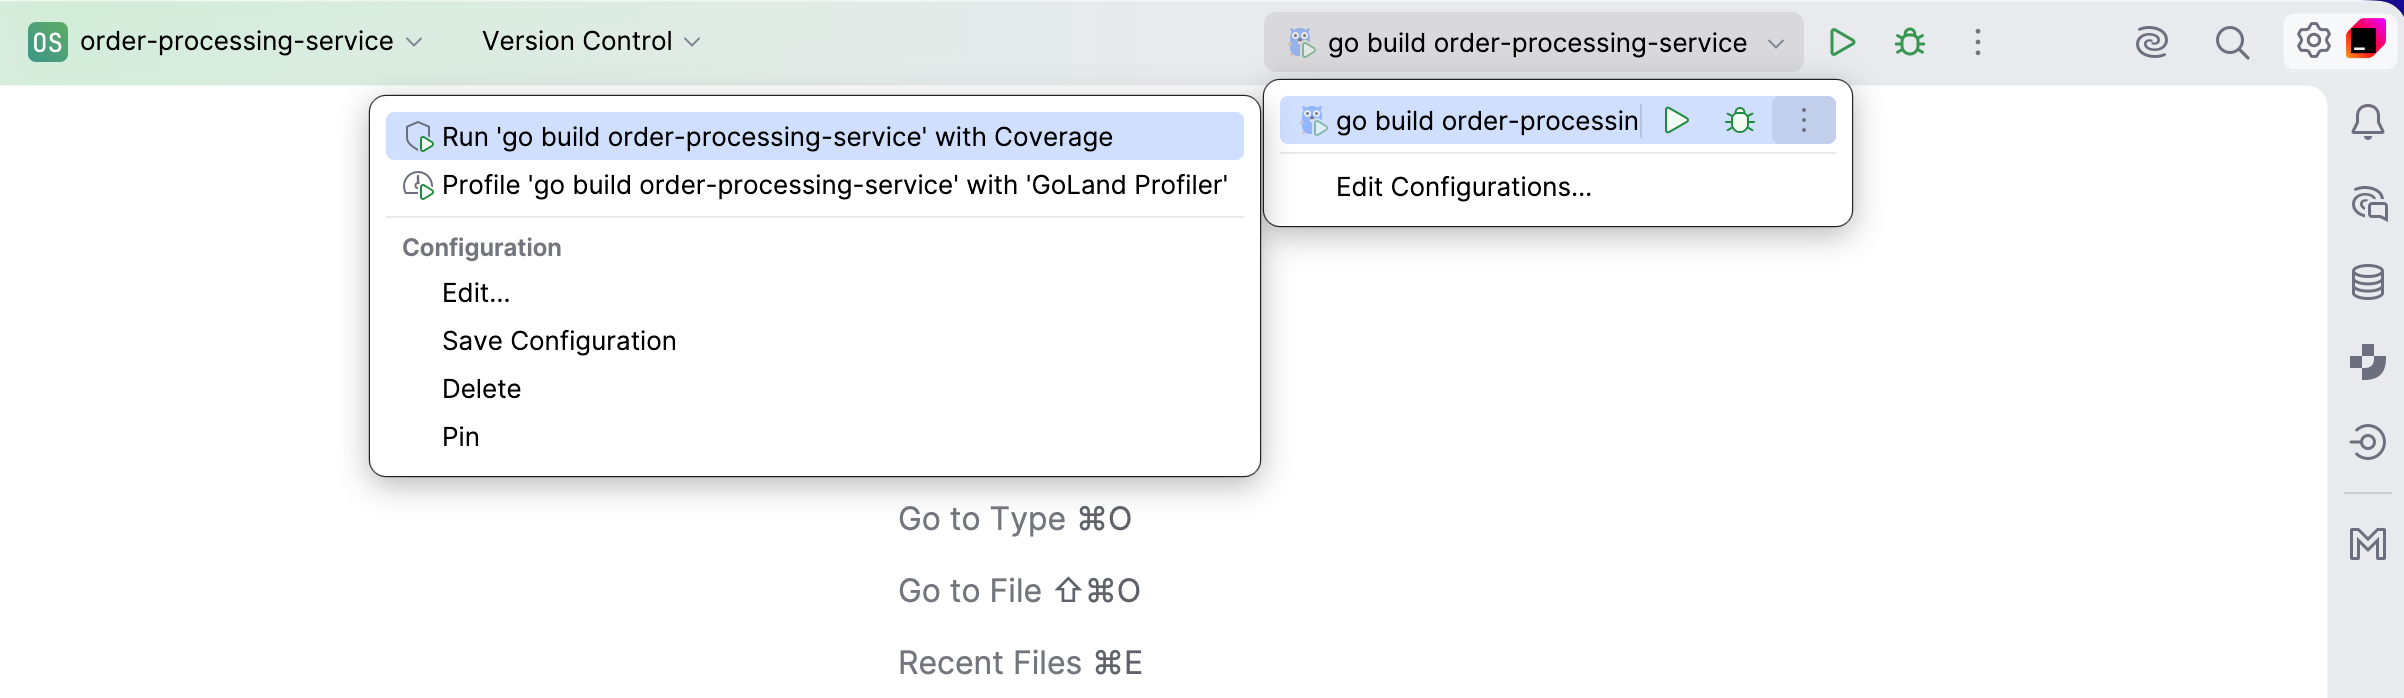
- Run widget: Now, in addition to running and debugging, this widget also includes an option to profile your program, available under the More Actions icon. Clicking on the Profile with… option will set up the process and open the Go Performance Optimization tool window.
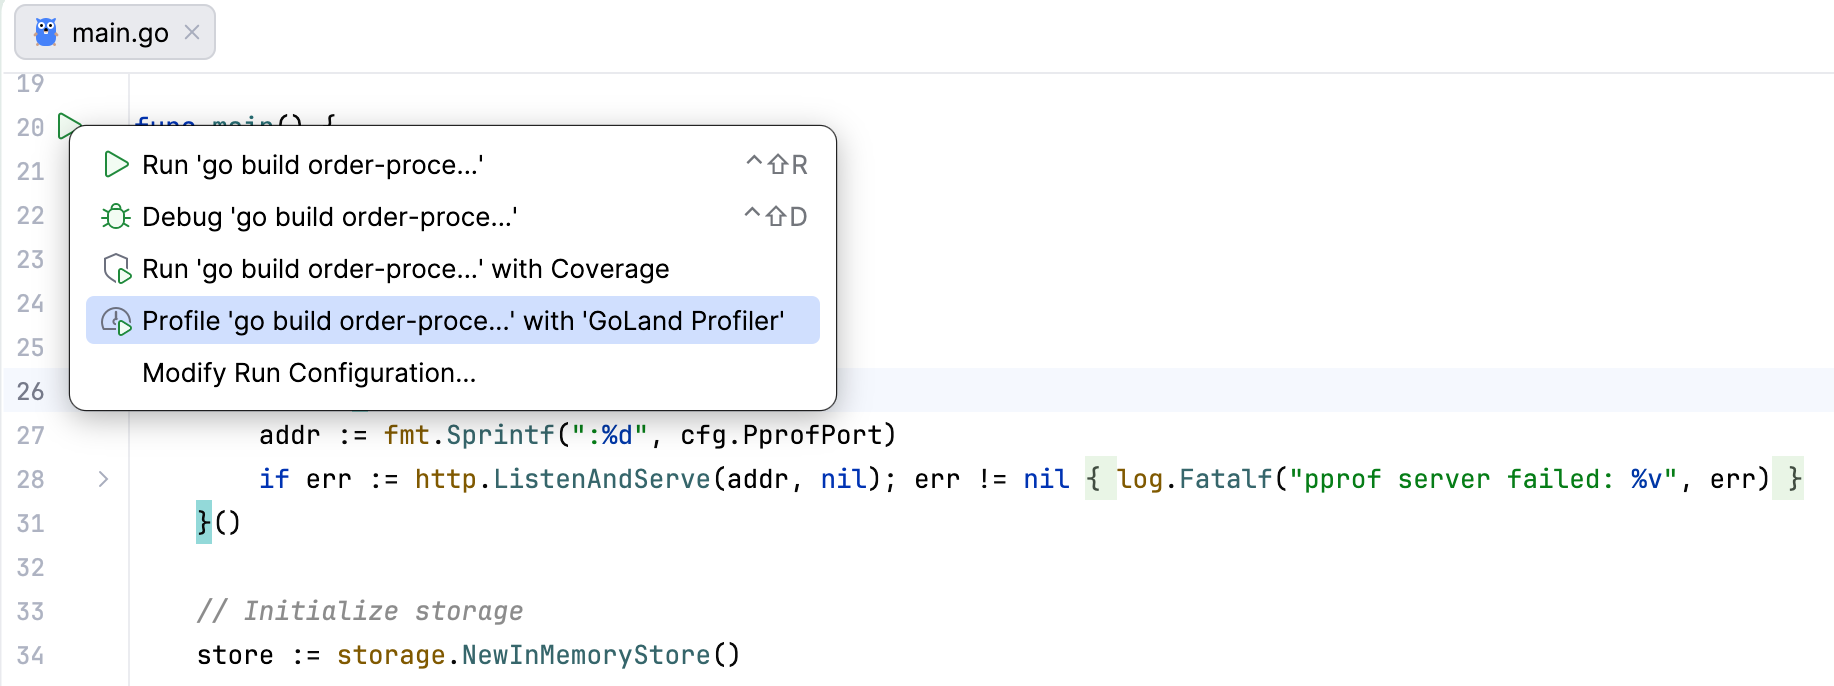
- Gutter icon: Wherever you see the run icon in the gutter, you can launch the profiler tool from the dropdown that appears when you click on it.
Capturing profiles
Capturing profiles is pretty straightforward. To launch your program in profiling mode, click the Run with Profiler button – GoLand will set up the entire process for you. To capture the profile you’re interested in, simply click on the corresponding button.
An important caveat is that when profiling is initiated, GoLand modifies the executable during compilation to expose the required profiling API. Your code and your program will not be affected, but for that reason, the profiler can’t be attached to a program that’s currently running.
Capturing a CPU profile
Since a CPU profile is not collected continuously or by default, it works a little differently from the other profiles. In order to run it, you have to click Start CPU recording, let the profiler run for the desired amount of time, and then stop the recording to inspect the results.
Capturing a heap profile
GoLand allows you to capture a heap profile with or without forcing garbage collection first. Normally, the advice is to run the GC before collecting a heap profile since it reports memory stats as of the most recently completed GC cycle and skips more recent allocations to avoid skewing the profile toward short-lived garbage. Therefore, if you want to see the heap objects that are currently live, you should force GC first.
There are, however, scenarios where you don’t want that, and then it makes sense for you to collect the heap profile without GC:
- You want to see the process in its natural state. Forcing GC changes the heap, GC pacing, and short-term memory behavior. If you want to see what the service looks like under normal load, avoid it.
- You’re looking into allocation pressure or memory spikes. When you want to investigate how much work the GC has to actually do, forcing a cleanup will hide the “mess” that you’re trying to investigate.
- You’re comparing the states before and after forced GC. If memory disappears after garbage collection, it was probably garbage that was waiting for collection or GC pacing. If it remains, you have retained objects.
Note that if you capture the heap profile with GC first, GoLand will actually force garbage collection, so capturing a heap profile without GC right after will likely not provide meaningful insights.
Importing and exporting profiles
The Profiler tool also allows you to open and view profiles captured by others (not necessarily using GoLand), as long as they’re in a pprof-compatible format. Simply drag and drop the file, or click the Import button in the Go Performance Optimization tool window and select the file from there.
Profiles captured with GoLand are pprof-compatible and stored in a designated directory. If you want to share a profile you captured in GoLand, go to Recent profiles and right-click on the one you want to share to reveal its location.
How to inspect profiles
Once you have a Go profile, inspection is mostly the same, no matter how it was collected, since go tool pprof can read either a saved file or a live HTTP URL.
In the terminal
If you have a saved profile file collected with runtime/pprof, you can access it in the terminal:
go tool pprof ./your-binary cpu.pb.gz
This will start pprof’s interactive shell in the terminal. The main text reports are top, list, tree, peek, and traces.
If you want a one-shot terminal report instead of an interactive shell, add a format flag:
go tool pprof -text ./your-binary cpu.pb.gz
go tool pprof -tree ./your-binary mutex.pb.gz
go tool pprof -peek='mypkg.(*Cache).Get' ./your-binary cpu.pb.gz
go tool pprof -list='mypkg.(*Cache).Get' ./your-binary cpu.pb.gz
This will print the report and exit the profile.
From the web interface
This is the easiest way if you want to see graphs and flame graphs, and move between top, peek, and source views.
# saved local profile
go tool pprof -http=localhost:8081 ./server cpu.pb.gz

# live profile from a running service, with the local binary for symbols/source
go tool pprof -http=localhost:8081 ./server \
  'http://localhost:6060/debug/pprof/profile?seconds=30'
With -http=host:port, pprof starts a local web server and opens a browser. The web UI provides multiple views of the same profile:
- Graph: Visualizes the call graph.
- Flame Graph: Provides an interactive flame graph (the larger the node and the thicker the edge, the higher the resource consumption is).
- Top: Lists the functions consuming the most resources in a table format.
- Source: Displays source code annotated with resource consumption.
- Peek: Provides a statistical peek at function samples.
Inspecting profiles with GoLand
Navigating between your code and different endpoints, as is the case with go tool pprof, can be quite distracting. The profiling tool in GoLand lets you see and manage everything related to profiling in one place – your IDE.
Once you collect or import your profiles, you will have access to views that you probably recognize from the web interface – (call) graph, flame graph, and top – as well as a tree view. You can access these views for all the profiles (CPU, heap, allocs, goroutine, block, and mutex) and select different sample types:
- The CPU profile can show you either CPU time or samples.
- The heap profile, by default, shows you in-use space, but it can also show in-use objects, allocated space, or allocated objects.
- The allocs profile, by default, shows allocated space, but it can also show you everything that the heap profile does. That’s because these two are both representations of the same memory profile, which we discussed earlier.
- Mutex and block both can show either contentions or delay.
- The goroutine profile only has one sample type – number of goroutines – so there is no selector for that profile.
You can easily navigate directly to the relevant line of code from any of the views, simply by clicking on the relevant function. The tool will also highlight any hotspots in your code with a fire icon in the editor’s gutter.
Now that you know what profiles you can visualize, let’s discuss in more detail what the different views show and how to use them.
Top
The Top view shows you an ordered table of the top functions in the profile. The values in this view represent different units, depending on the profile (e.g. CPU time, memory bytes, or goroutine counts).
- Flat and Flat%: The amount of the resource consumed directly by that function, excluding callees. Flat values tell you if the function itself is expensive.
- Sum%: Running sum of Flat%.
- Cumulative and Cumulative%: The total amount of the resource consumed by this function and everything it calls. This tells you if the function creates a lot of work overall.
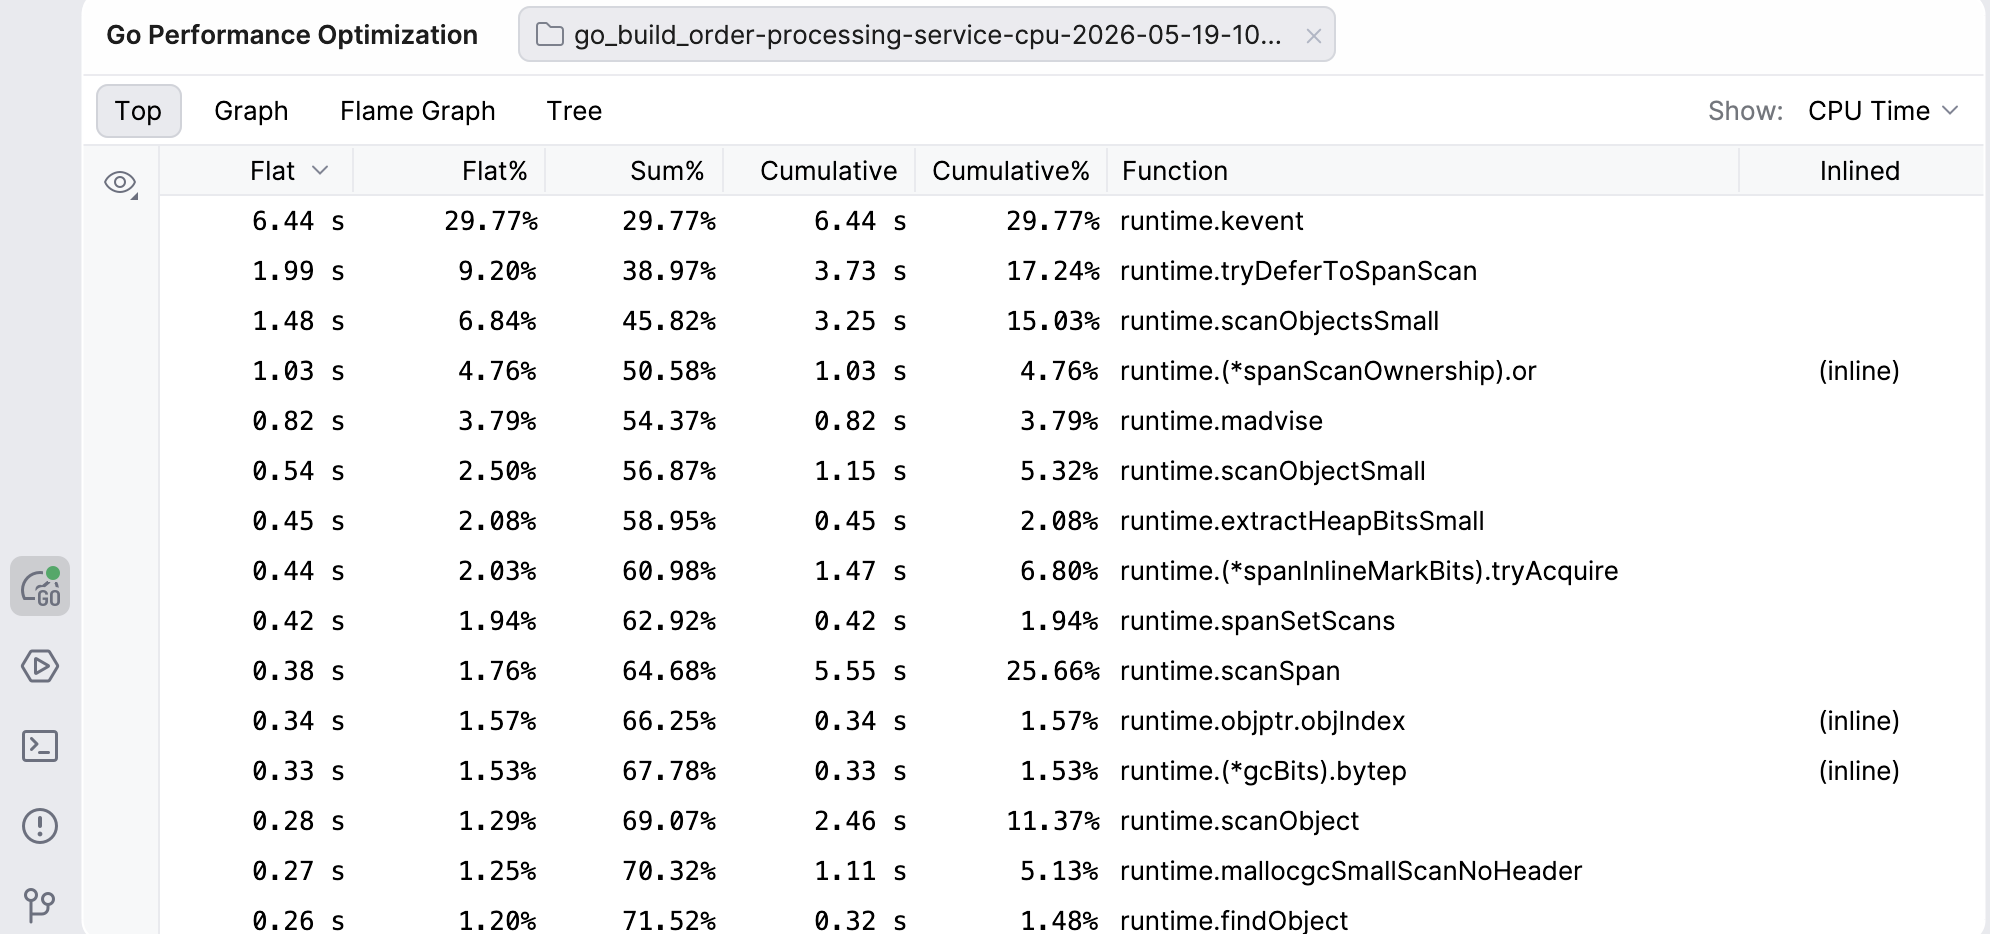
By default, the functions in this view are ordered from the highest to lowest Flat. However, you can reorder the view however you like – clicking on any other header will make it the default for ordering, and clicking on the same header again will reverse the order.
Clicking on a function’s row will also take you to the relevant line of code in the editor.
Graph
In the web interface, a call graph is the default way of visualizing the data as a network. We’ve taken efforts to make the Graph view more visually inviting and interactive.
The nodes of the graph are functions – the redder the box, the more resource-intensive the function. The edges are function calls labeled with how much data (e.g. CPU time or memory) flows in that call – the bolder and redder the arrow, the more resources the call consumes. The dashed lines represent paths through nodes that have been removed from view because of the graph settings (such as node count). You can move both the edges and the nodes to improve visibility if the graph looks too dense.
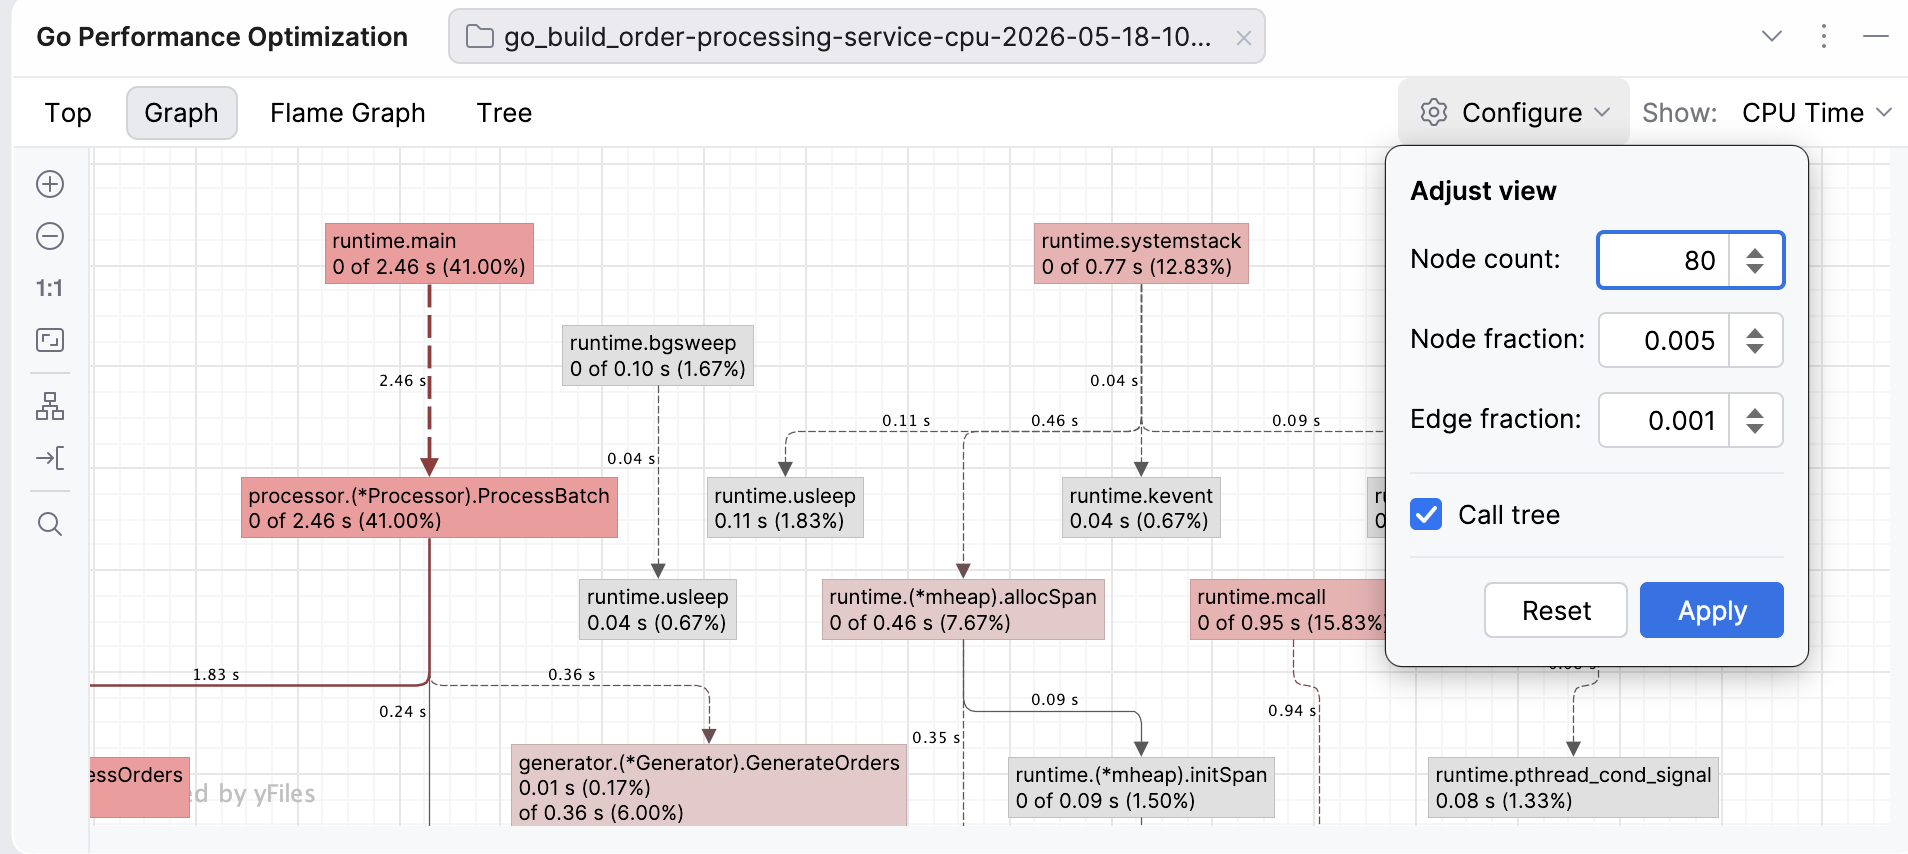
The Graph view in GoLand allows you to adjust the view to your needs by modifying the node and edge fractions:
- Node count: Limits the number of nodes shown on the graph to the top N nodes. For example, if you set your node count to N=80, the graph will only show 80 nodes (regardless of the remaining settings). Visible nodes are determined by a special entropy-based algorithm from the
pproftool (for example, the algorithm favors nodes with high cumulative or flat values and diverse call patterns, while deprioritizing simple passthrough nodes). - Node fraction: Controls which nodes will be shown, based on how much of the total sample value a node accounts for. For example, if you set the node fraction to 0.01, the graph will only show functions responsible for 1% or more of the total samples. The smaller the value, the more detail you will see, but this may also lead to more clutter that will make it harder for you to notice hotspots.
- Edge fraction: This setting works similarly to the node fraction, but controls which edges (the call paths between functions) are shown. For example, if you set it to 0.005, the graph will only show call edges that contribute 0.5% of the total samples.
- Call tree: This toggle changes how the data is presented by showing the actual paths, which means the same function can appear multiple times in different contexts. By default, instead of a call tree, the graph shows a call graph, where functions are merged so there’s only one node per function.
If you look at the default graph and find it overwhelming, try increasing the fractions to see fewer nodes or edges, or reduce the node count. If you feel like important paths are missing, decrease the node or edge fractions.
Flame graph
The Flame graph is the default view when you open a profile, as our research has established that this is the view developers access the most often.
A flame graph is a visualization of the call stack where cost is presented as width, i.e. the longer the bar, the more resources the function and its children are using. The height only signifies the depth of the call chain, so a tall but skinny tower will not be your culprit when it comes to resource consumption.
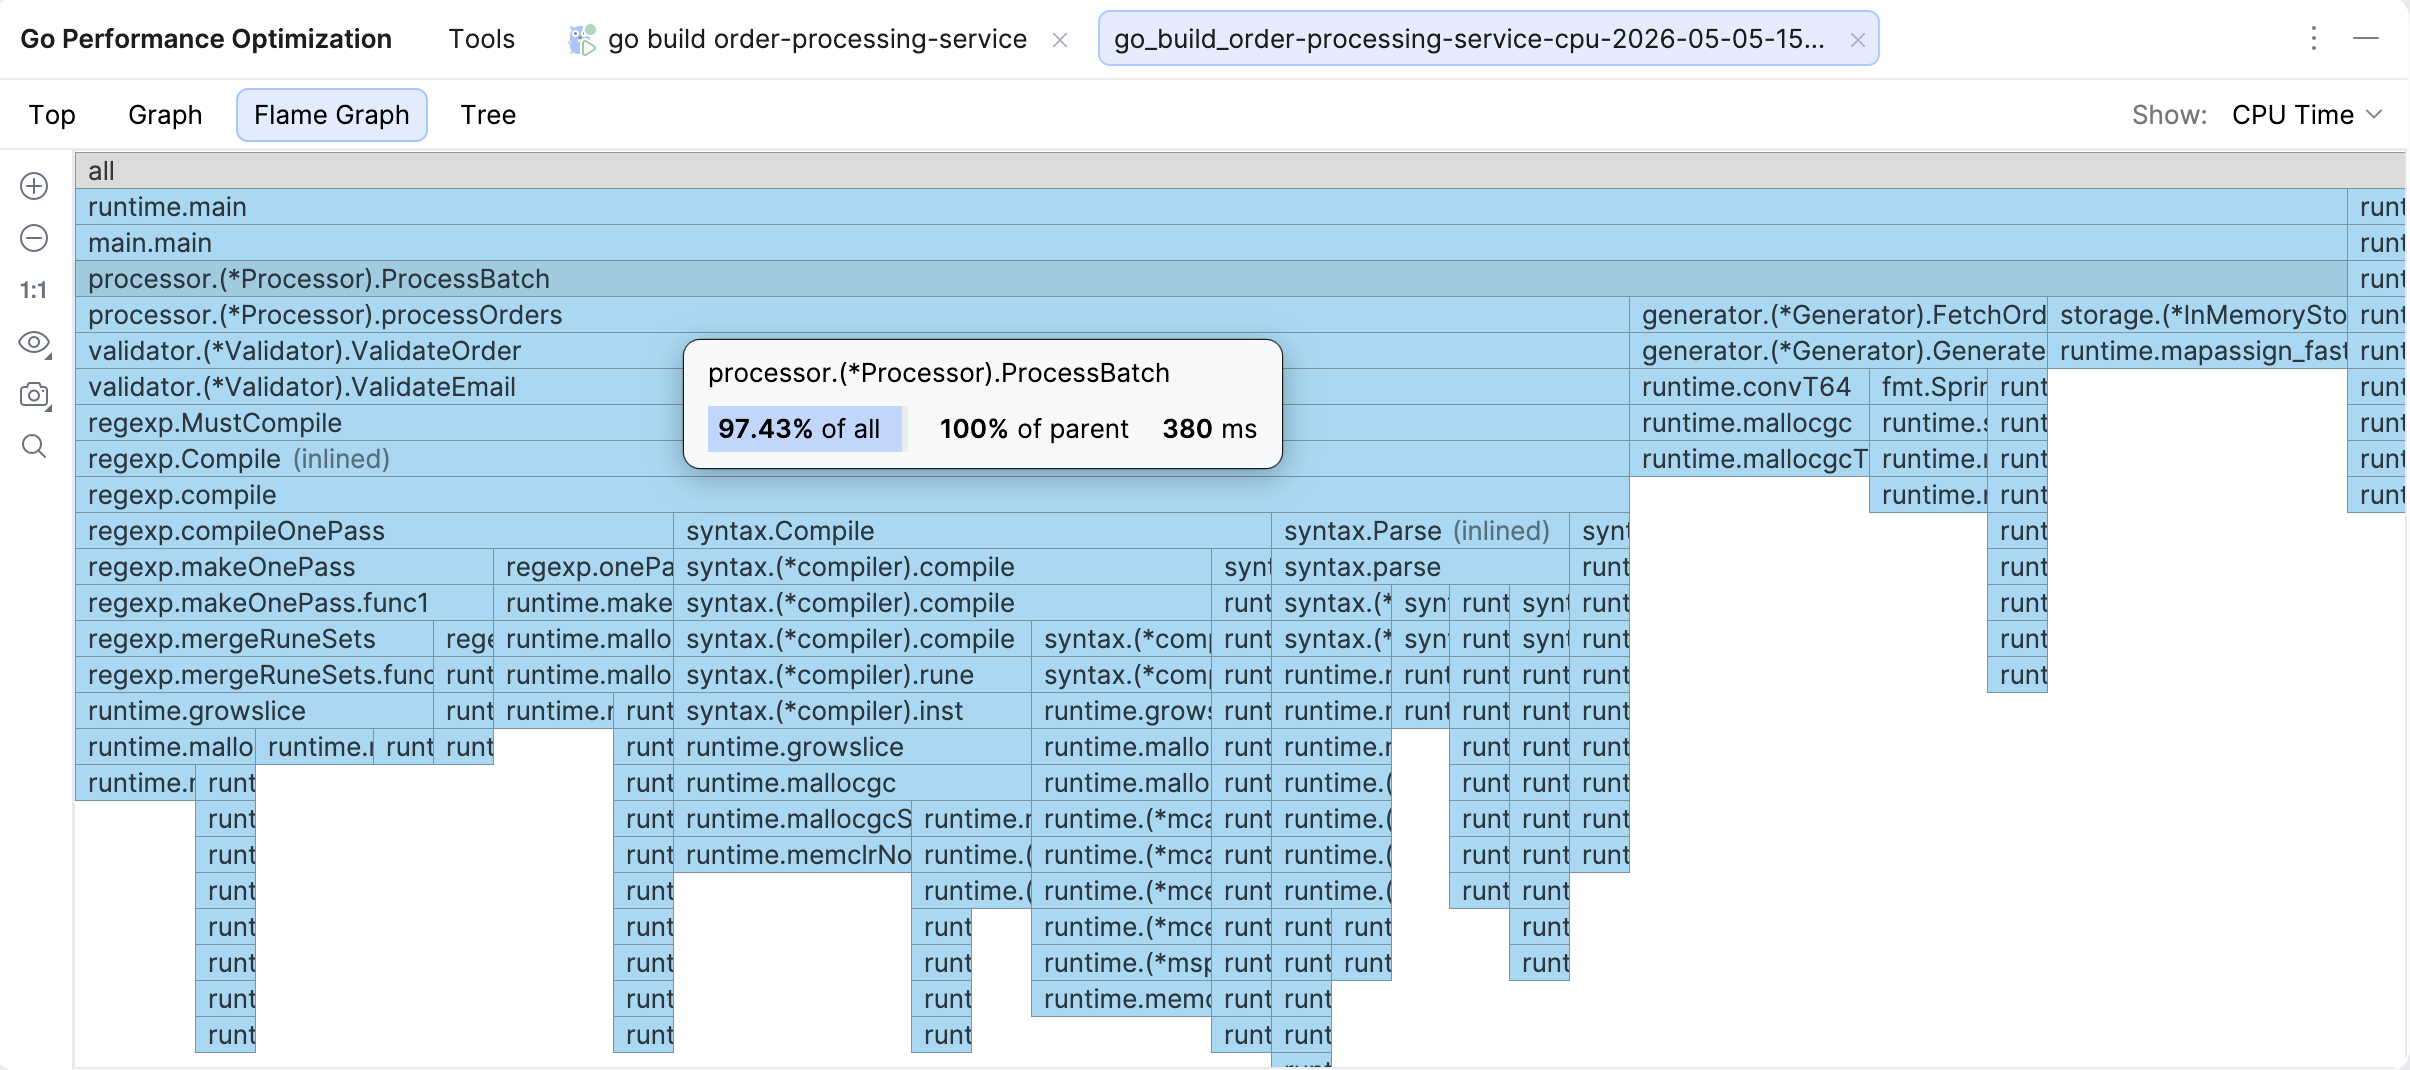
If you hover over a function, you will see the cumulative percentage (% of all), the share relative to the parent (% of parent), and cumulative value – the same data you can also see in Top and Tree views. Clicking on a function’s bar will take you to the relevant line of code, and if that function is hot, there will be a flame icon in the gutter.
Some other interesting functions in this view are:
- Icicle graph: The flame graph by default is presented in an icicle view, i.e.
mainis at the top. You can uncheck that option to turn the view upside down. - Capture image: You can take a snapshot of the graph and save it or copy it to the clipboard.
- Search: You can search for the function you’re interested in.
You can also try out the New Flame Graph view option for a more modern look and feel.
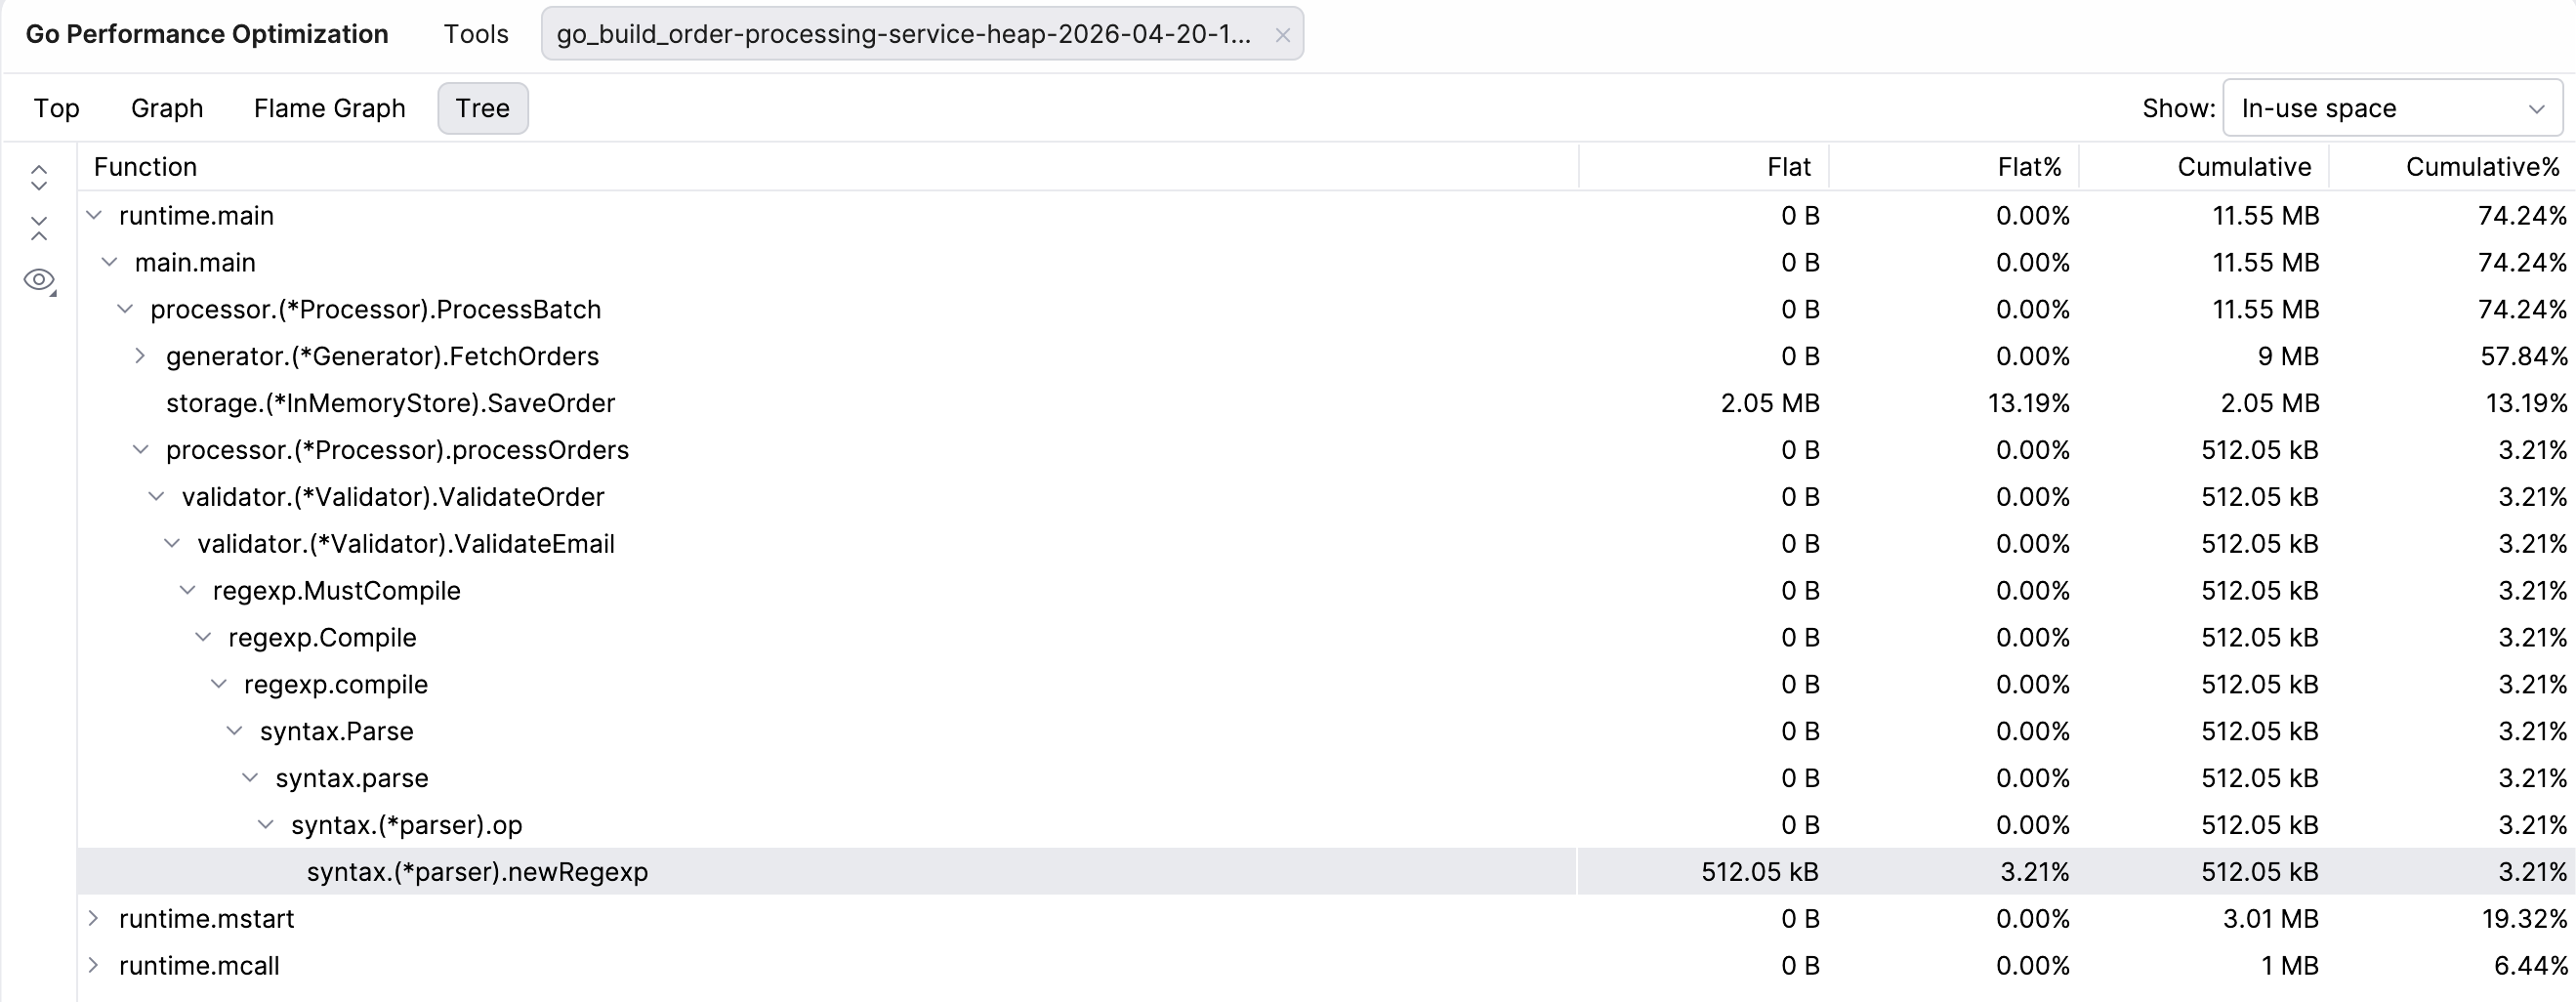
Tree
You can also see the Tree view. This view presents the same data as the Top view, but organizes all functions under their parent function, regardless of how resource-intensive they are.
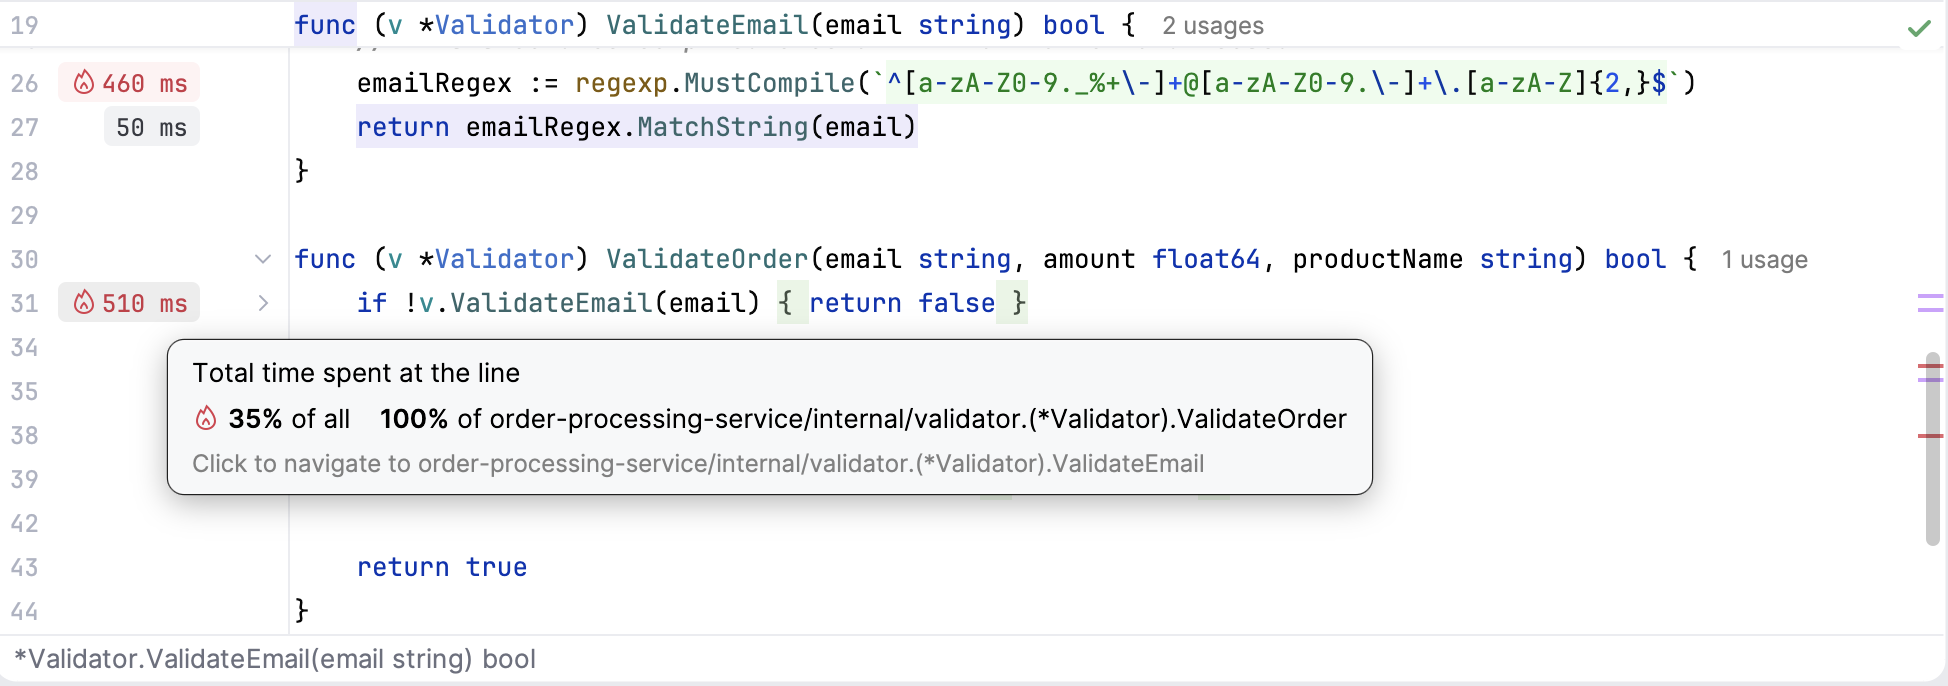
Line profiler
The line profiler is an alternative to the -list command in pprof.
Once you run your program with the profiler tool, GoLand will add runtime hints near the corresponding lines of code right in the editor. Lines that took a significant amount of time to execute will have grey labels, while the most resource-intensive ones will be marked with red labels with a fire icon.
The connection works the other way round as well. You can navigate directly to a specific line of code in the editor from any of the profiling views, simply by clicking on the relevant function.
Why try GoLand’s profiler?
The profiler tool in GoLand makes profiling your software as easy as clicking a button. You no longer need to remember commands or additional steps. The entire process stays in your IDE, so you don’t have to jump between the editor and the browser, and you can easily check the problematic lines of code. We hope that both the new tool and this guide will take the guesswork out of profiling and help more developers make this code optimization technique a part of your daily work.
Happy coding!
The GoLand Team