JetBrains Platform
Plugin and extension development for JetBrains products.
Kotlin Notebook Meets IntelliJ Platform: Advancing IDE Plugin Development

The value of extensibility
The ability to extend and customize software, from game mods to browser extensions, gives users a sense of freedom and the chance to bring their ideas to life. JetBrains IDEs already provide this sense of freedom through their support for plugins.
For some time now, creating plugins for JetBrains IDEs has been possible, but getting started with these sorts of projects can be intimidating. Navigating documentation, project templates, IntelliJ Platform dependencies, and Gradle configurations can be overwhelming for those wanting to experiment and test their ideas in real-world scenarios. Luckily, there’s now a more efficient option!
Introducing Kotlin Notebook
Kotlin Notebook is an interactive platform for data analysis, visualization, and prototyping with Kotlin. Like Jupyter Notebook, it provides a robust environment for data scientists, engineers, and researchers to explore and showcase their work within a dynamic, executable document. It combines Kotlin’s capabilities with the interactiveness of notebooks, allowing you to write and run code while seeing the results and visualizations in the same environment. This encourages an iterative workflow, boosting productivity and collaboration on data projects.
Building on the Kotlin Notebook plugin, we have started exploring how to connect it with the IntelliJ Platform. This enables the direct execution of IntelliJ Platform code from a notebook file within the active IDE runtime. The iterative workflow of Kotlin notebooks allows you to brainstorm, build, and test plugin features faster. The integration with the IntelliJ Platform makes moving the finished code into your plugin easy.
This initial idea has developed into a strong integration, and as of the 2025.2 release, the functionality is now available for use.
Getting started: A practical guide
To get started, create a new Kotlin notebook either as a new file in your project or as a scratch file, using ⌘⇧N on macOS or Ctrl+Shift+N on Windows/Linux.
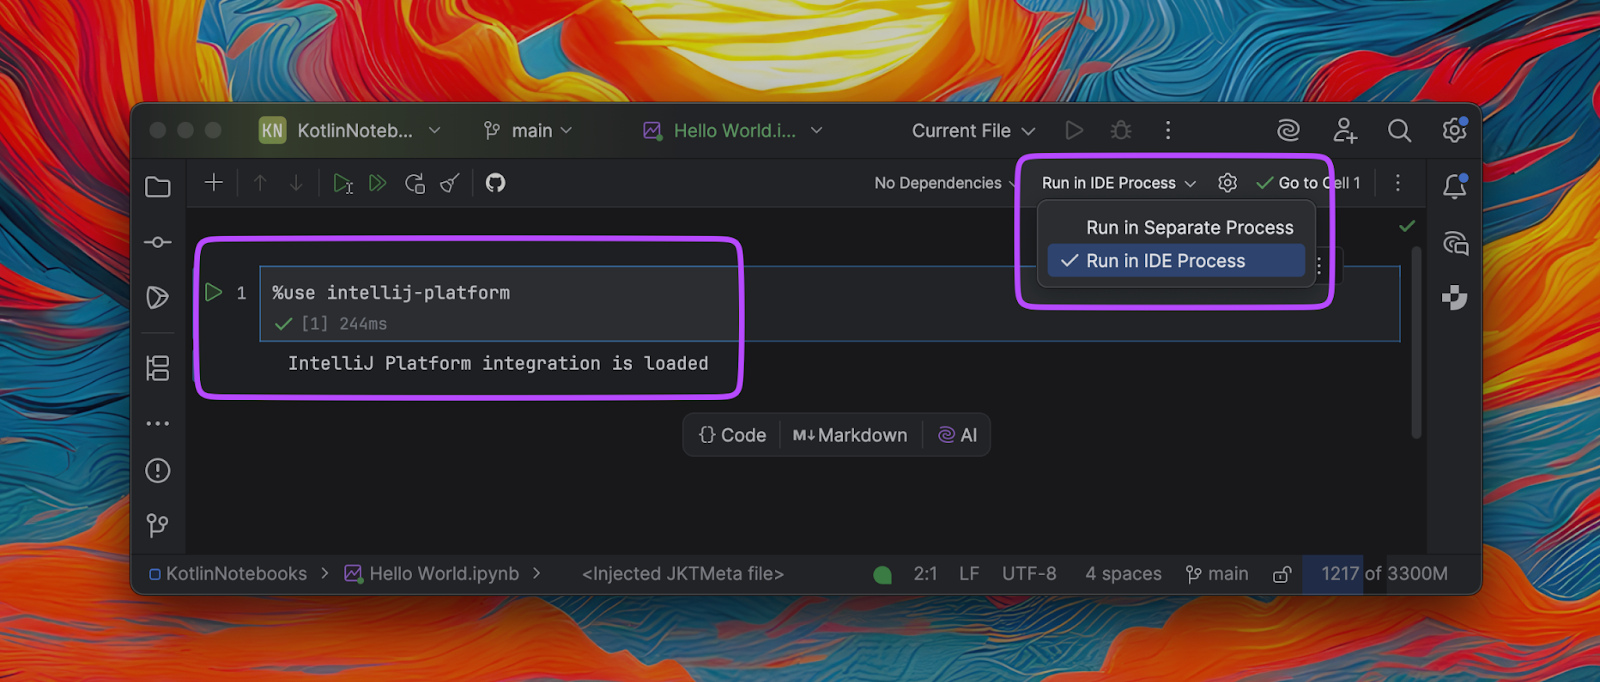
Notebooks are based on the concept of cells. To start using this integration, switch to Run in IDE Process mode, create a new code cell, and declare:
%use intellij-platform
Due to the technical issues on Windows, it’s recommended to explicitly request the latest available version until the IntelliJ IDEA 2025.2.1 is released using:
%useLatestDescriptors
%use intellij-platform
Once you do this, the necessary IntelliJ Platform libraries will be loaded into the notebook’s classpaths, making them available for import in the subsequent cells.
Core features
UI rendering made simple
The ability to run code within the same IDE environment removes the need to build a full plugin project to test UI components. The runInEdt {} The helper ensures that the code runs on the Event Dispatch Thread (EDT), catching any exceptions and showing them below your cell.
Returning UI elements as a response when working with the Kotlin UI DSL or standard Swing components renders them immediately. All rendered components stay fully interactive.
Resource management with the Disposer
The integration uses the Disposer mechanism available in the IntelliJ Platform. A dedicated global notebookDisposable variable allows for registering and later disposing of specific notebook elements, such as extensions, listeners, actions, or UI components. This ensures the IDE manages the lifetime of your objects when you close the project or restart the notebook.
// Register something that needs cleanup
Disposer.register(notebookDisposable, myDisposable)

Disposer.register(notebookDisposable) {
  // Cleanup components directly
}
Loading plugins
When you integrate your notebook with the IntelliJ Platform, only the core platform is initially loaded into the classpath, similarly to when you’re working on a standalone plugin. However, you may need to depend on and use other plugins, whether bundled or installed from JetBrains Marketplace. To load plugins installed in your IDE, you must explicitly call the loadPlugins(vararg pluginIds: String) helper.
// Load specific plugins
loadPlugins("Git4Idea", "com.intellij.java")
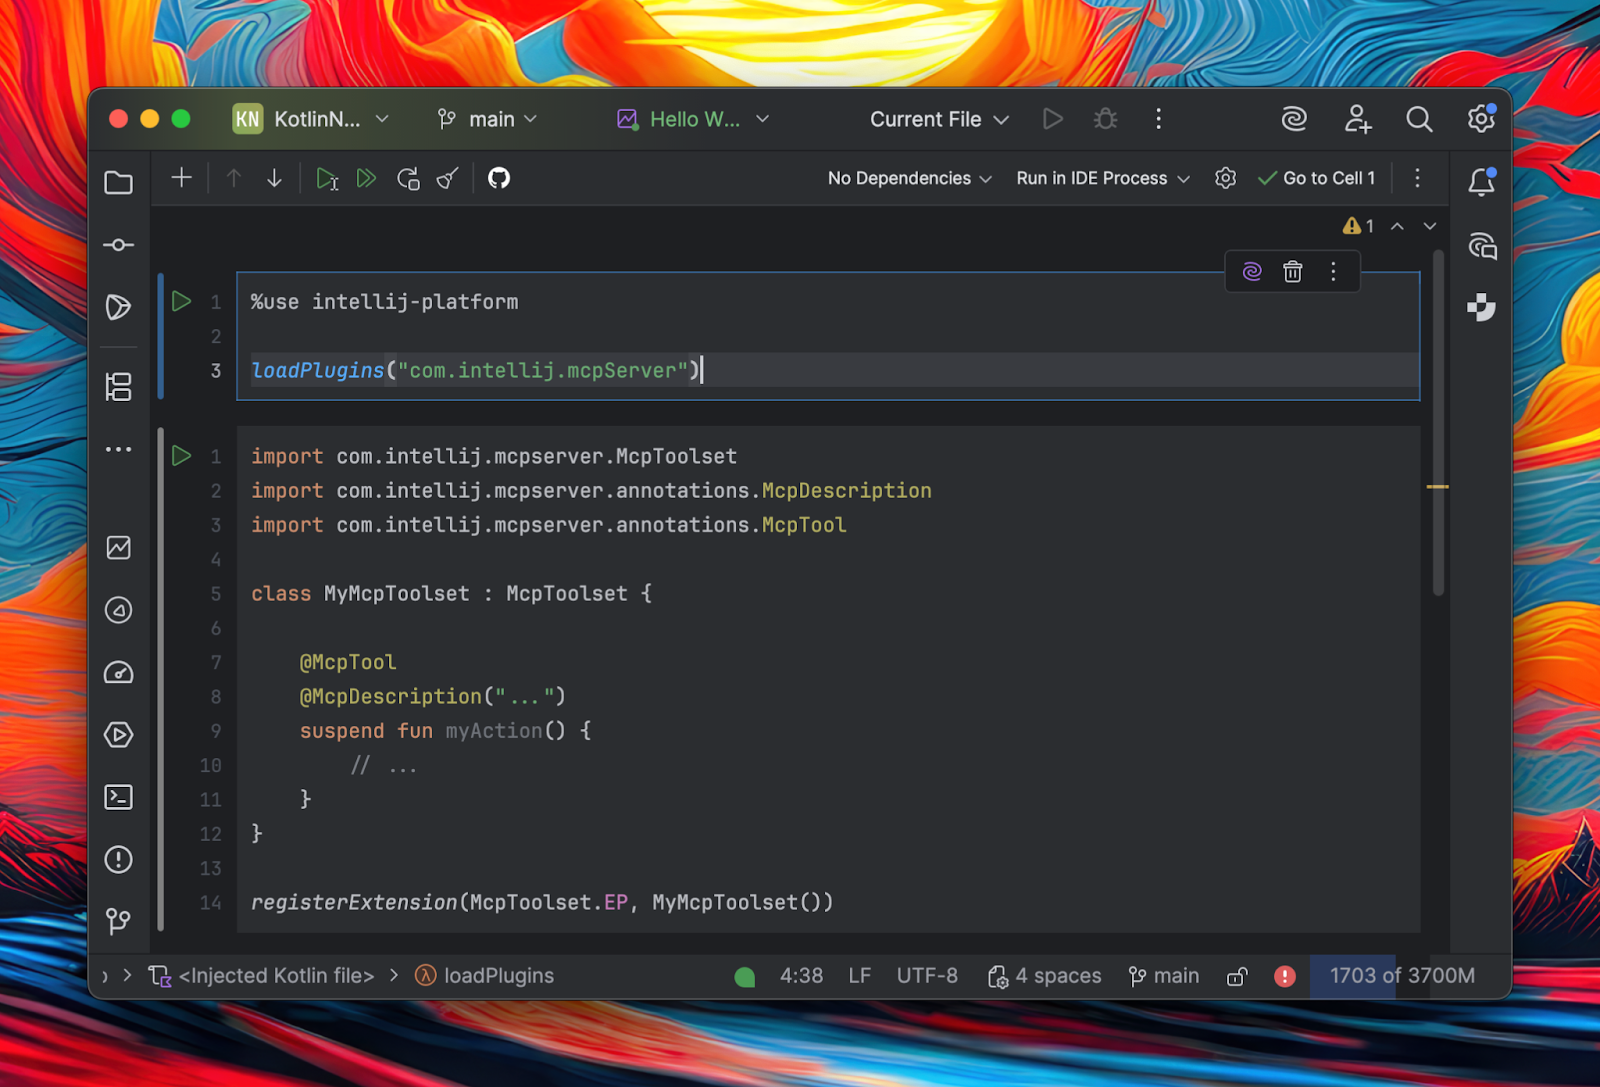
Extension registration
In traditional plugin development, extensions are defined in the plugin.xml file. With Kotlin notebooks, you can dynamically register extensions using registerExtension(), avoiding the need for a structured plugin project.
For example, to register a custom ChatMessageHandler and ChatAgent for the AI Assistant plugin, you can simply run the following:
loadPlugins("com.intellij.ml.llm")
class MyChatMessageHandler : ChatMessageHandler {

    override fun isApplicable(project: Project, kind: ChatKind, userMessage: UserMessage) = true

    override fun createAnswerMessage(
        project: Project,
        chat: ChatSession,
        userMessage: UserMessage,
        kind: ChatKind,
    ) = SimpleCompletableMessage(chat)

    override suspend fun serveAnswerMessage(
        project: Project,
        chat: ChatSession,
        answerMessage: ChatMessage,
        smartChatEndpoints: List<SmartChatEndpoint>,
    ) {
        ChatAgent.EP_NAME.extensionList
            .find { it.id == "groot" }
            ?.serveAnswerMessage(project, chat, answerMessage)
    }
}

registerExtension(ChatMessageHandler.EP, MyChatMessageHandler())
class MyChatAgent : ChatAgent {

    override val id = "groot"
    override val name = "I am Groot"

    override fun createAnswerMessage(
        project: Project,
        chat: ChatSession,
        userMessage: UserMessage,
        kind: ChatKind,
    ) = SimpleCompletableMessage(chat)

    override suspend fun serveAnswerMessage(
        project: Project,
        chat: ChatSession,
        answerMessage: ChatMessage,
    ) {
        answerMessage as SimpleCompletableMessage
        answerMessage.appendText("*I am Groot*".privacyConst)
    }
}

registerExtension(ChatAgent.EP_NAME, MyChatAgent())
Similarly, you can register a custom UI theme as follows:
import com.intellij.ide.ui.UIThemeProvider

val theme = UIThemeProvider().apply {
    id = "My Theme"
    path = "Theme.json"
}
registerExtension(UIThemeProvider.EP_NAME, theme)
This approach allows you to experiment and test extensions instantly within the IDE runtime, streamlining development and saving time.
Exploring your IDE environment
The integration provides several ways to access the internal details of the currently running IDE, such as its build details and location in the file system. Exposed mechanisms such as the Plugin Manager and Plugin Repository allow for interacting with plugins available in JetBrains Marketplace, or even ones installed locally. All available variables and helper methods are documented in the relevant section in the IntelliJ Platform SDK documentation.
// Access IDE information
productInfo.name        // "IntelliJ IDEA"
productInfo.version     // "2025.3"
productInfo.buildNumber // "253.xxxx"

idePath // “/Users/hsz/Applications/IntelliJ IDEA Ultimate 2025.3 Nightly.app/Contents”

ide // com.jetbrains.plugin.structure.ide.Ide instance

// Work with the plugin manager
pluginManager.findEnabledPlugin(PluginId.getId("com.intellij.java"))

// Request JetBrains Marketplace
pluginRepository.pluginManager.searchCompatibleUpdates(
    build = "${productInfo.productCode}-${productInfo.buildNumber}",
    xmlIds = listOf(“org.jetbrains.junie”),
    channel = “default”,
)
Opportunities and improvements
Integrating Kotlin Notebook with the IntelliJ Platform represents a significant step forward for custom plugin development. With traditional barriers associated with project setup, compilation, and deployment removed, developers can now concentrate more effectively on implementing their ideas.
We already have great ideas for ways to improve this experience further:
- Rapid prototyping of IDE features and plugins: This functionality allows for the development of features, with the potential for AI assistance in the refinement process. Once you’ve completed a scratch implementation of your plugin in your notebook file and it is ready to be adapted for use in a Plugin Template-based project, you can use Junie to convert it and give it a formal plugin structure.
- Expeditious testing of platform APIs and behaviors: The JetBrains QA teams are already using Kotlin notebooks to debug the IntelliJ Platform more quickly, achieving particular success when using them with a UI testing framework. Improving scripting and adding reusable helpers can make notebooks more adaptable and suited to this use case.
- Interactive documentation and tutorials for IntelliJ Platform development: The storytelling style of notebooks, combining runnable code snippets with explanatory comments, can create a more engaging learning experience.
- Compose/Jewel support: As development advances in this area, the ability to render Compose/Jewel components is a natural next step, mirroring the current functionality supplied by Java Swing or the Kotlin UI DSL. This can be especially useful for prototyping IDE-specific UI/UX elements, whether you’re developing plugins or working on an entire IDE based on the IntelliJ Platform.
Take it for a spin and let us know what you think!
Follow these simple steps to get started:
- Create a new Kotlin Notebook.
- Switch to Run in IDE Process mode.
- Unleash your creativity with
%use intellij-platform.
If you’d like to share feedback, please visit the JetBrains Platform forum, where we can discuss any challenges and ideas for improving this integration. You can also join the #notebooks public Slack channel for discussions and questions.
The IntelliJ Platform integration and the examples featured in this article are now publicly accessible on GitHub, along with a dedicated section in the IntelliJ Platform SDK documentation. We welcome pull requests with ideas to improve the user experience.
Happy hacking!
Jakub