

Rust Unit and Integration Testing in RustRover

As software developers, we aim to deliver high-quality solutions to users that spark joy and solve more problems than they introduce. Testing, and more specifically unit and integration testing, are techniques that can help you achieve this goal. For Rust developers, these are first-class features of the ecosystem and are available for use throughout your codebase.
This post will examine how to set up your Rust projects for maximum testing efficiency for both unit and integration tests. We’ll also investigate how to run and debug tests within RustRover, which will help you be more productive while increasing the quality of your software. By the end of this post, you’ll be a testing powerhouse.
Be sure to download the latest version of RustRover to try out unit testing in Rust.
Project Structure
Rust has a flexible project structure that ranges from very straightforward to incredibly intricate. It’s what makes Rust an excellent option for building all kinds of solutions, and picking the proper structure can set you up for success.
We recommend you take advantage of crates as much as possible, as they can help isolate unit tests while allowing you to write integration tests more easily. But before discussing project structure, let’s first address the difference between a unit test and an integration test.
Unit Test vs. Integration Test
In general, the purpose of a unit test is to exercise code within your application. The Rust Book says:
“The purpose of unit tests is to test each unit of code in isolation from the rest of the code to quickly pinpoint where code is and isn’t working as expected.”
– The Rust Book
But what about integration tests? What do they do, and how are they different from unit tests?
“Integration tests are entirely external to your library and use your code in the same way any other external code would, using only the public interface and potentially exercising multiple modules per test.”
– The Rust Book
Integration tests allow you to test how multiple crates interact with each other in a way a unit test should not. They emphasize black box testing, focusing on the public API exposed to users and the results returned from calling functions. You may also do some initial test harness setup, like clearing a directory, setting up a database, or creating shared resources.
Let’s get back to the project and look at the directory structure.
Crates are great!
This section will provide a general guideline for setting up crates for binaries, libraries, and integration tests. Let’s first examine the final structure and break down the individual parts.
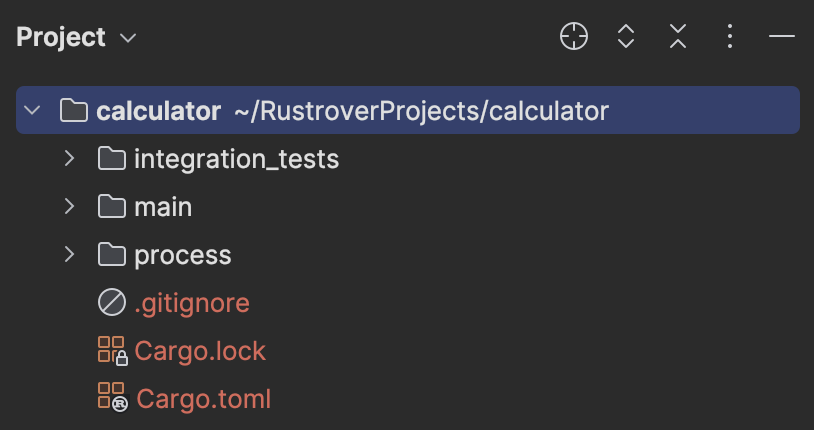
The first step is to create a root directory to place a Cargo.toml file. The content of this file will manage the project’s workspace. In the case of this post, the workspace consists of two libraries and one binary crate.
[workspace]
members = []
resolver = "2"
Using RustRover, you can now add a binary crate for main, and two crate libraries for process and integration_tests.
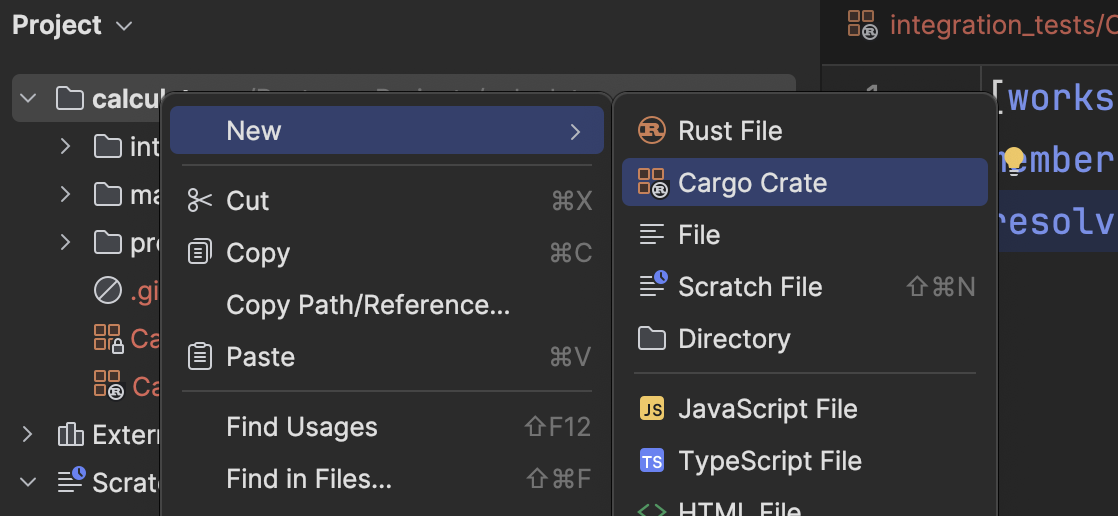
The final contents of the file should be as follows.
[workspace]
members = [ "main","process", "integration_tests"]
resolver = "2"
One more step is to create a tests directory under the integration_tests crate. Rust recognizes this as a reserved folder name for integration tests.
Another step is to link our process library to our integration tests and binary with the following dependency block.
[dependencies]
process = { path = "../process" }
We’re ready to get to work. Note that you can have as many or as few integration test crates as your project requires. Sometimes, you may not even need them, but having at least one for when you need it is lovely.
Unit Tests in modules
I’ve implemented a few calculator operations in the process crate, such as add, subtract, multiply, and divide. I’ve placed them in a methods module file under the src directory of the crate.
use std::str::FromStr;

pub fn add(a: i32, b: i32) -> i32 {
    a + b
}

pub fn subtract(a: i32, b: i32) -> i32 {
    a - b
}
pub fn multiply(a: i32, b: i32) -> i32 {
    a * b
}

pub fn divide(a: i32, b: i32) -> i32 {
    if b == 0 {
        panic!("Division by zero is not allowed")
    } else {
        a / b
    }
}

pub enum OperationKind {
    Add,
    Subtract,
    Multiply,
    Divide,
}

impl FromStr for OperationKind {
    type Err = String;

    fn from_str(value: &str) -> Result<Self, Self::Err> {
        match value {
            "add" => Ok(OperationKind::Add),
            "sub" => Ok(OperationKind::Subtract),
            "mul" => Ok(OperationKind::Multiply),
            "div" => Ok(OperationKind::Divide),
            v => Err(v.to_string()),
        }
    }
}
Rust’s general philosophy around unit testing is to put any unit tests as close to the implementation as possible, and you can generally add unit tests anywhere code exists.
At the bottom of the file, you can use RustRover’s tmod live template to create a tests module.

Which generates the following boilerplate code.
#[cfg(test)]
mod tests {
    use super::*;


}
Here, we can write tests. We can decorate all tests with the test attribute, and function bodies use the assert variations included in Rust, such as assert_eq!, assert!, and assert_neq!. The line use super::* allows our tests module to reference all functions from the parent module, including our calculator operations. We can also test failure scenarios with the should_panic attribute. Finally, all println! usages will display the standard output.
To create individual tests, you can also use the live template of tfn, which creates the boilerplate for individual tests.

Let’s update the file to include all of our new tests.
#[cfg(test)]
mod tests {
    use super::*;

    #[test]
    fn test_can_add_1_to_1_equals_2() {
        assert_eq!(add(1, 1), 2)
    }

    #[test]
    fn test_can_subtract_1_from_1_to_0() {
        assert_eq!(subtract(1, 1), 0)
    }

    #[test]
    fn test_can_subtract_1_from_2_to_negative_1() {
        println!("why so negative?");
        assert_eq!(subtract(1, 2), -1)
    }

    #[test]
    fn test_can_multiply_2_and_3_equals_6() {
        assert_eq!(multiply(2, 3), 6)
    }

    #[test]
    fn test_can_divide_4_by_2_equals_2() {
        let result = divide(4, 2);
        assert_eq!(result, 2)
    }

    #[test]
    #[should_panic]
    fn text_cannot_divide_by_zero() {
      let _result = divide(4, 0);
    }
}
Now that we have a few unit tests, let’s move to some integration tests.
Integration Tests in a separate crate
As mentioned previously, integration tests exist outside of a crate and are written primarily to exercise the public API and the interaction between crates. I’ve created an execute function for this project that processes command-line arguments passed to our application.
// process/src/lib.rs
use crate::methods::*;

pub mod methods;

pub fn execute(args: Vec<String>) -> i32 {

    if args.len() < 4 {
        panic!("incorrect amount of arguments: {:?}", args)
    }

    let _app_path = args[0].to_string();
    let method = args[1].parse().unwrap();
    let a = args[2].parse().unwrap_or_default();
    let b = args[3].parse().unwrap_or_default();

    let result = match method {
        OperationKind::Add => add(a, b),
        OperationKind::Subtract => subtract(a, b),
        OperationKind::Multiply => multiply(a, b),
        OperationKind::Divide => divide(a, b),
    };

    println!("{} + {} = {}", a, b, result);
    result
}
This function abstracts the logic used in the main binary crate.
// main/src/main.rs
extern crate process;
use std::env;
use process::execute;
fn main() {
let args: Vec<String> = env::args().collect();
execute(args);
}
While I could have placed a unit test in the main crate, I included one in my integration_tests crate due to its interaction with the command line arguments. Where you place tests is up to you and your judgment.
In my integration_tests crate, I created two modules, common/mod.rs and main_tests.rs.
The common module is a place for reusable functions between integration tests. In my case, it is a straightforward println!.
pub fn setup() {
    println!("calling common setup");
}
In main_tests you can expect to see the integration test for execute. Note that we can only access the public API found in our process crate.
extern crate process;

mod common;

#[cfg(test)]
mod tests {
    use process::execute;
    use crate::*;

    #[test]
    fn test_main_add() {

        common::setup();

        // setup environment args
        let app_name: String = "".to_string();
        let args: Vec<String> = vec![
            app_name,
            "add".into(),
            "1".into(),
            "1".into()
        ];
        // call main
        let result = execute(args);

        assert_eq!(result, 2)
    }
}
Integration tests use the exact same mechanisms as unit tests, so it’s no surprise they look similar.
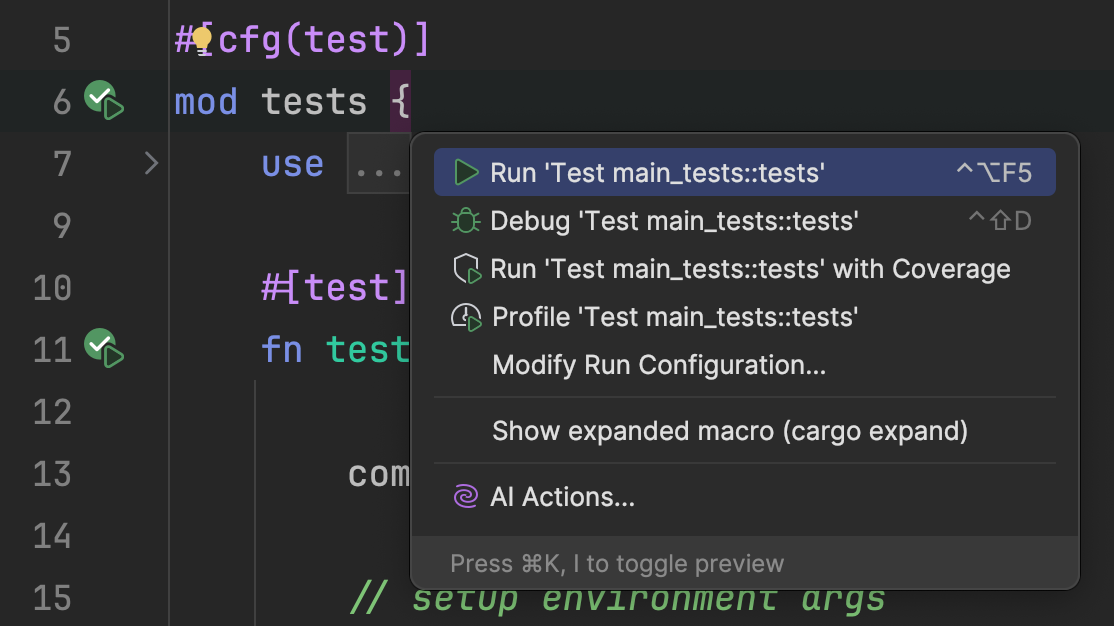
Running Tests
So we’ve written all these tests, but how do we run them? In RustRover, you get gutter icons that allow you to execute and run a single test, a test module, or the entire test suite found in a crate or a project. There’s also a Run All Tests that can be found by right-clicking on a crate and choosing it from the context menu.
RustRover categorizes results into passing and failing groups in the Test tool window. Additionally, you’ll see any println! calls made during the test run’s lifetime.
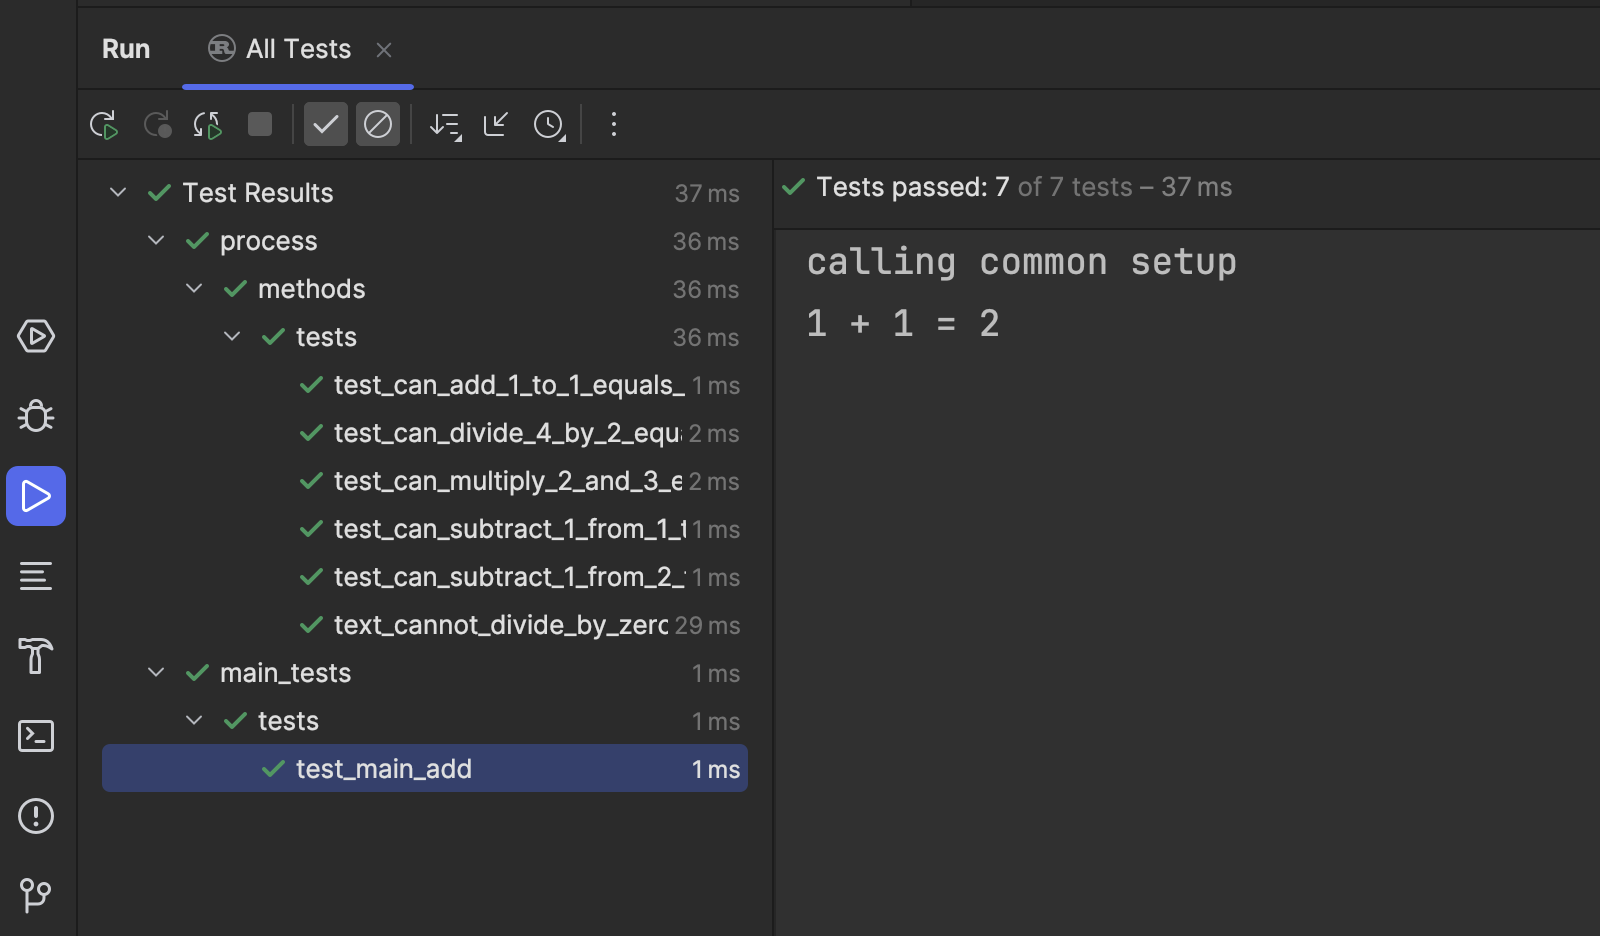
You can also choose the Rerun Automatically feature to run all tests on code changes or Rerun Failed Tests only to target the failed tests during programming sessions.

Debugging Tests
While the tests we’ve seen are relatively straightforward, sometimes a test may fail, and understanding “why?” can be tricky.
With RustRover, you can debug any tests by setting breakpoints and stepping through the test execution.
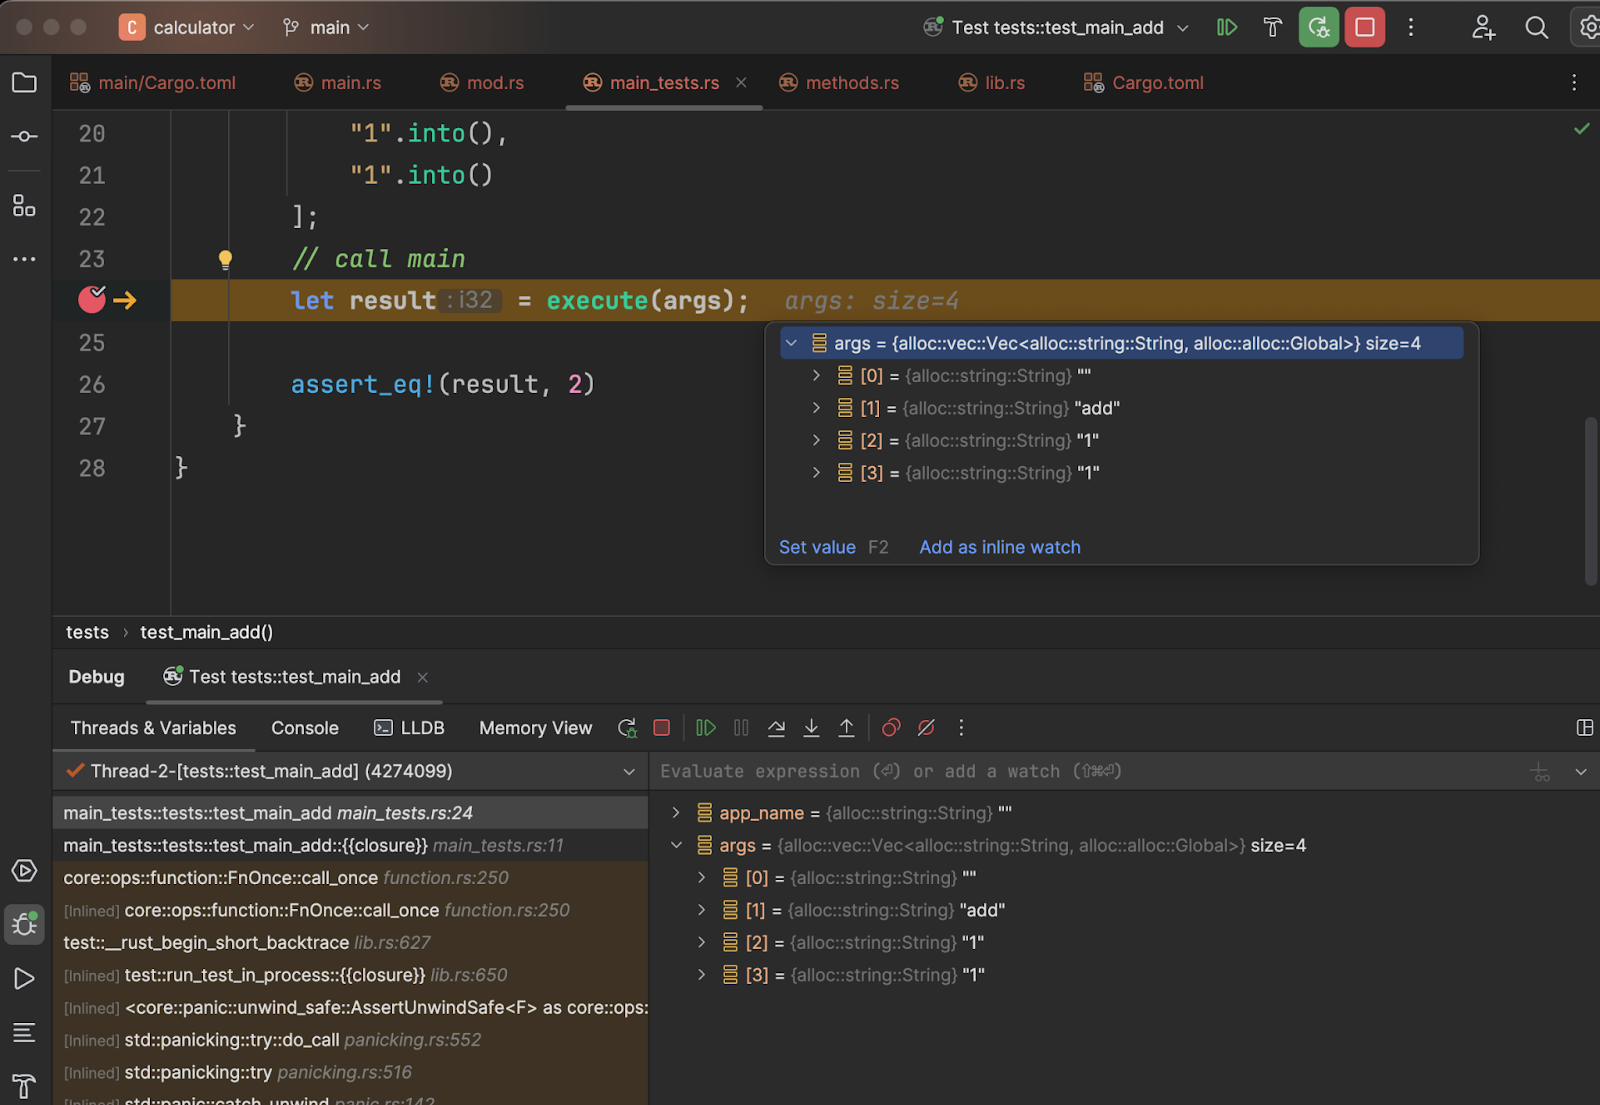
With RustRover’s debugger, you can see what variables are in scope and their values. You can also evaluate expressions, add watches to simplify information visibility and navigate the call stack. The debugger is a powerful tool to help you squash annoying bugs and return to productivity.
Update: Our readers have asked for the code used in the sample, so I’ve uploaded it here to a GitHub Repository for your convenience.
Conclusion
As you’ve read in this post, setting up your project directory in a certain way can set you up for testing success. Thinking about your solution in terms of crates can help you choose where modules should go and how you will craft your private and public APIs. Whether you lean on unit tests, integration tests, or a combination, RustRover can help you write and run them. If you’re struggling with a particular test, remember that all tests can be run under the debugger, giving you more insight than println! calls.
As always, please leave your comments and questions below. Also, be sure to download and try RustRover. We know you’ll love it.


