JavaScript Unit Testing Support

If you’re a JavaScript developer, you probably know that the quality and correctness of your application are crucial. Well, consistency and regression testing just got a little less painful. Meet JsTestDriver plugin – an open-source project that was originally started at Google and is now contributed to by the JetBrains team.
WebStorm 3.0 bundles it.
Users of other JetBrains IDE – PhpStorm, IntelliJ IDEA, PyCharm, RubyMine, and AppCode – can install it from the plugin repository following these instructions.
It allows you to enjoy all the benefits of JsTestDriver right from the comfort of your IDE. This includes the following features:
- starting and stopping the server;
- running and rerunning tests;
- filtering and viewing test results, navigation from results to source code;
- jumping from JavaScript exception stacktrace to source code;
- support for JsTestDriver configuration file: syntax and error highlighting, basic completion, navigation to referenced files;
- capturing messages sent to console.log();
- support for Jasmine, QUnit and JsTestDriver built-in assertion frameworks:
- quick-fixes for enabling global symbol reference resolving for each assertion framework (if you have QUnit or Jasmine tests in a project, you will be prompted to install the corresponding adapter);
- contextual code generation actions (Alt+Insert) for creating new tests, setup and teardown methods for each assertion framework;
- declarative HTML injection support for JsTestDriver built-in assertion framework.
The best way to understand how this works is to see it in action.
Getting started
If you aren’t aware of JsTestDriver concepts, consider visiting http://code.google.com/p/js-test-driver/wiki/GettingStarted. There is also an excellent tutorial introduction to JavaScript unit testing by Christian Johansen.
Setup project
We have created a sample project for you. Please download greeter-sample.zip, extract it and open the project in your IDE.
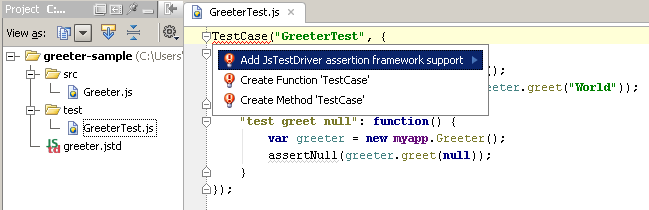
If you open GreeterTest.js for the first time, you will see error highlighting on the TestCase method call expression. Position the caret on the error-highlighted code, press Alt+Enter/Option+Enter and choose “Add JsTestDriver assertion framework support” from the list of available intention actions.
A global JavaScript library named “JsTestDriver Assertion Framework” will be created and associated with a project. To view it, open the Settings dialog (File | Settings or IntelliJ IDEA | Preferences) and select JavaScript Libraries.
Before you can run any of your tests you need to start the test server and capture at least one slave browser. The server does not have to reside on the machine where the test runner is, and the browsers themselves can be on different machines as well.
Starting JsTestDriver server locally
To launch the JsTestDriver server, look for the tool window at the bottom of the screen.
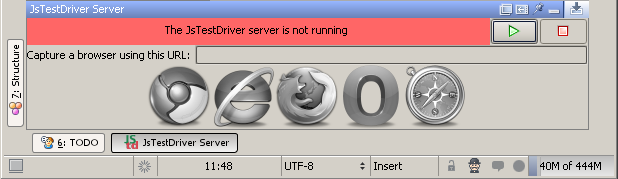
Click the green arrow to the right of the address bar to start the server. The status bar turns yellow to let you know the server is running, but has no slave browsers.
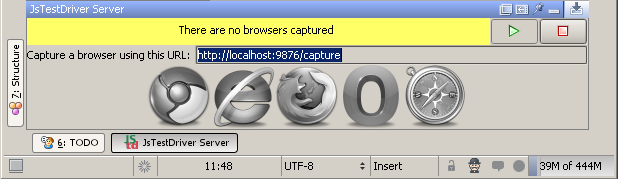
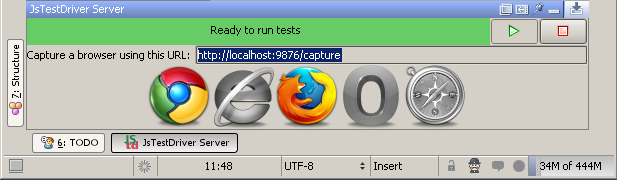
Then, copy the capture URL and paste it in a browser. The status bar turns green, and the corresponding browser icon lights up. Now you’re ready to run tests.
Running tests
To run tests, right-click greeter.jstd and choose Run “greeter.jstd”. Tests will be run against the local JsTestDriver server.
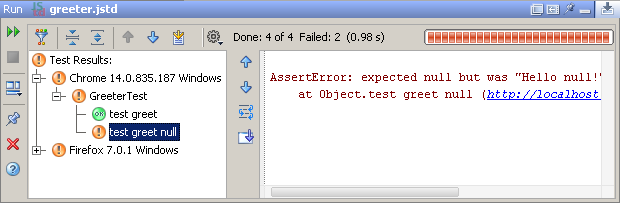
In our case we have one failed test ‘GreeterTest.test greet null’. You can easily navigate from the stack trace to the source code that causes problems. You can also navigate from the test results tree to the test case/test function declaration using the F4 key.
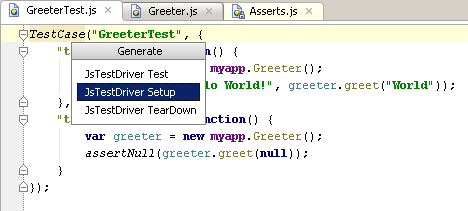
Generate code
In order to remove duplicated code that sets the greeter local variable, you can refactor the Greeter object creation to a special method called setUp, which is called before each test function is executed. Just invoke the Generate action by pressing Alt+Insert inside of a TestCase method call expression, and then choose “JsTestDriver Setup”.
Use the Shift+F10 keyboard shortcut to re-run the tests after changing code.
Test with pleasure!
Download WebStorm for your platform from project EAP page.
Note: Users of PhpStorm, as well as other JetBrains IDE – IntelliJ IDEA, PyCharm, RubyMine, and AppCode – should install it from the plugin repository following these instructions.