Run Nodeunit Tests With WebStorm 3.0
Hello everybody,
As you know Node.js support has been already presented in WebStorm 3.0. Now we would like to introduce integration with nodeunit — unit testing framework for Node.js.
To start you should have nodeunit module installed. Make sure NODE_PATH environment variable points to the parent directory of nodeunit module.
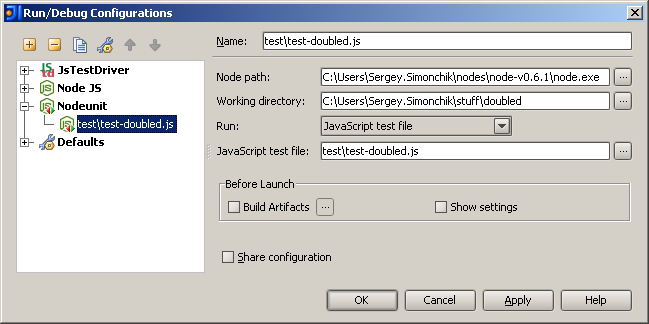
To run tests first you need to create Nodeunit Run Configuration:
- Open Run/Debug Configurations dialog (Main menu | Run | Edit Configurations)
- Press
 icon and select
  Nodeunit
Next fill Node path and Working Directory as you usually do in NodeJS Run Configuration. Next select what kind of test you intend to run from Run list. Finally you have to specify a path to a single test file or a directory (this path should be relative to the working directory you have already specified).

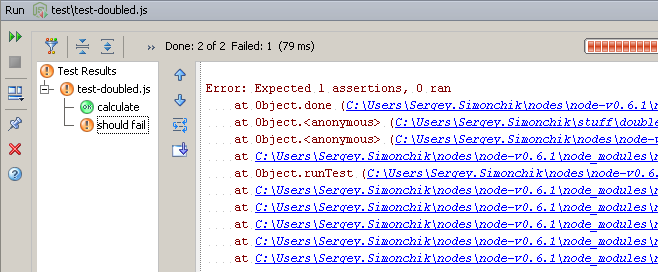
Save Nodeunit Run Configuration and run it (Main menu | Run | Run…).
You will see something like this.

You can navigate from the stack trace to the source code.
If you prefer to run your tests often, it’s helpful to use Shift+F10 shortcut to rerun the last Run Configuration.
Test Node.js app with pleasure!
Download WebStorm for your platform from project EAP page.
Note: Users of PhpStorm, as well as other JetBrains IDE – IntelliJ IDEA, PyCharm, RubyMine, and AppCode – should install “NodeJS” plugin from the plugin repository.
Subscribe to WebStorm Blog updates


