

IntelliJ IDEA
IntelliJ IDEA – the Leading IDE for Professional Development in Java and Kotlin
Top 10 UI Updates in IntelliJ IDEA for 2023

Hey there, fellow developers! Today, we want to share the most significant UI updates from 2023 that have transformed how IntelliJ IDEA looks and functions.
New UI
Of course, the highlight of our recent updates was the launch of our new, clean, and modern UI. This was first announced at the end of 2022, but the UI truly began to flourish in 2023. The new UI was designed to help you focus more on your code and access essential tools faster.
This year, the IntelliJ IDEA UI gained several exciting enhancements, including a compact mode, a revamped Run widget, a fresh Dark theme, the ability to personalize the main toolbar via a context menu, and much more.
Check out this blog post for more details.
Color-coded editor tabs
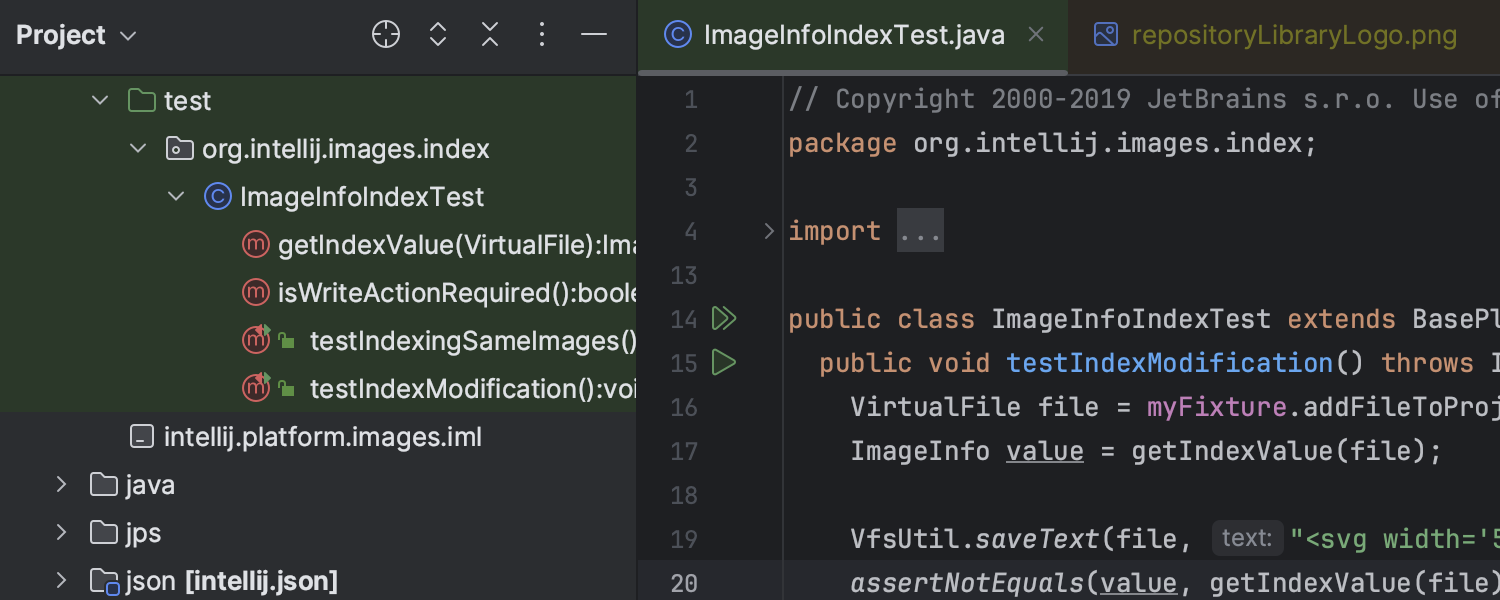
We made navigating different file types in the editor a whole lot easier! Now, editor tabs come with default color-coded highlighting. This matches their look in the Project tool window, making switching between various files much easier when working with a busy screen. This comes with the added bonus of giving you a more vibrant and organized editing experience!

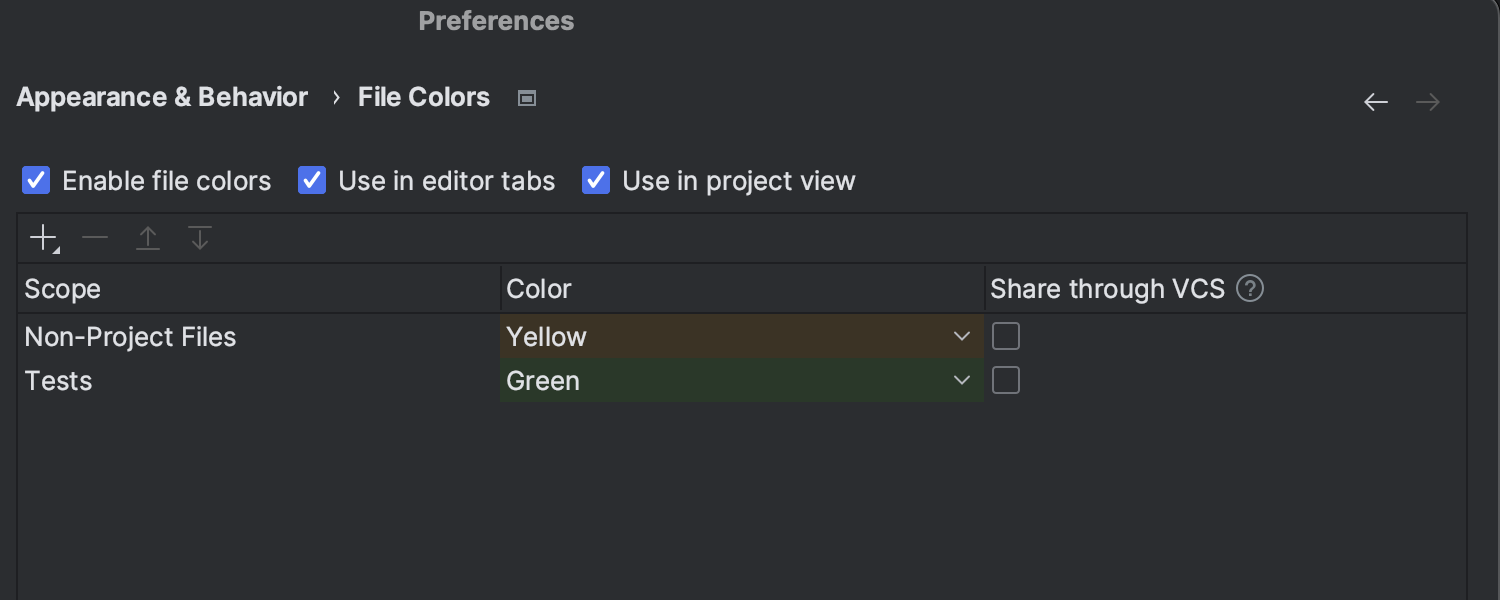
You can customize this setting in Settings/Preferences | Appearance & Behavior | File Colors.

Colored project headers
We’ve introduced colored headers to make it visually easier to switch between your open projects. Each project can have its own unique color and icon, so you’ll always know which project you’re working on.
And there’s more – these headers come with fun, predefined colors, but you can change them to whichever ones you like! Just right-click on a header, select Change Toolbar Color in the context menu, and pick your favorite shade. Not into colors? No problem. You can turn this feature off at any time by deselecting Use Project Colors in Toolbar from the same menu.

Run to Cursor inlay option in the debugger
When you’re knee-deep in debugging and stepping doesn’t bring you to the desired line of code, the Run to Cursor inlay option lets you land exactly where you want. Once your program is suspended, just hover over your target line, click on the Run to Cursor popup, and you’re there. You can also activate this feature by pressing ⌥F9 on macOS or Alt+F9 on Windows once you’ve positioned the cursor on the line you’re interested in.

In-editor performance hints
This year, the IntelliJ Profiler’s UI received a fantastic makeover! We rolled out in-editor hints – something that we see as a game-changer when it comes to understanding your code’s performance, line by line, helping you fix performance problems quicker than ever.
With this feature, the IntelliJ Profiler’s data now appears directly in your editor. You’ll see the execution time and memory allocation data right next to the relevant lines of code, in the gutter. And to make things even easier, these annotations come in different colors. This helps you instantly spot which methods need your attention – those eating up most of the parent method’s resources are marked in red, and if they’re drastically impacting total execution time, you’ll also see a fire icon.

These inline performance hints are enabled by default. If you prefer to work without them, no problem! Just right-click on any of the annotations and select Close Line Annotations to disable them.
Floating toolbar
An exciting new feature, the floating toolbar, pops up right next to the code you’re working on. It’s packed with quick-edit actions like Extract, Surround, Reformat, and Comment.
If you want to fine-tune this toolbar to your liking, just click on the kebab menu (those three little vertical dots) to personalize it. And if you ever feel like it’s in the way, no worries – you can easily hide it, either by selecting Don’t Show Toolbar from the same menu or by heading to Settings/Preferences| Advanced Settings | Editor and selecting the Hide floating toolbar for code editing box.

Improved main toolbar customization
Customizing the new UI’s main toolbar has become much easier and more fun in 2023. You can now simply use the dropdown menu to quickly pick and add the tools you need. Just right-click on any widget, select Add to Main Toolbar, and explore all the available options.

Window layouts
Back in March 2023, we rolled out a feature allowing you to save various tool window layouts and switch between them, making your workspace customized to your needs. Then, later in the year, we added the Default layout option that lets you quickly reset your workspace to its original look. This layout is fixed and can’t be customized, but it’s easily accessible under Window | Layouts.

File sorting by modification time in the Project view
We added a much-requested feature to arrange files in the Project view by their modification time. This cool new function keeps your files organized automatically, updating their order every time you save changes in your project. To enable this feature, just head to the kebab menu in the Project view, and choose Tree Appearance | Sort by Modification Time.

Full IDE zoom
Say goodbye to eye pain! With IntelliJ IDEA, you can now zoom in and out of the entire interface, resizing all UI elements in one go. Just navigate to the main menu, and click on View | Appearance, where you can easily adjust the IDE’s scaling to your comfort.

Spoiler alert: in the next release, version 2024.1, we’re introducing the ability to zoom out your UI to below 100%!
We hope you’ve enjoyed these changes as much as we loved creating them. We’re excited to bring even more cool UI updates your way throughout 2024. Your feedback is invaluable to us, so please, let us know your thoughts in the comments below this blog post.

Subscribe to IntelliJ IDEA Blog updates
Discover more


2023년 IntelliJ IDEA의 상위 10가지 UI 업데이트

안녕하세요, 동료 개발자 여러분! 오늘은 IntelliJ IDEA의 디자인과 기능을 변화시킨 2023년 가장 중요한 UI 업데이트를 함께 알아보고자 합니다.
새로운 UI
물론, 최근 업데이트의 흥미로운 내용은 깔끔하고 현대적으로 새롭게 바뀐 UI의 출시였습니다. 이 UI는 2022년 말에 처음 발표되었지만 본격적으로 사용되기 시작한 것은 2023년부터입니다. 새로운 UI는 코드에 더 집중하고 필수 도구에 더 빠르게 액세스할 수 있도록 설계되었습니다.
올해 IntelliJ IDEA UI에는 컴팩트 모드, 개선된 Run 위젯, 새로운 어두운 테마, 컨텍스트 메뉴를 이용한 메인 툴바 맞춤 설정 등 다양하고 흥미로운 개선 사항이 도입되었습니다.
자세한 내용은 이 블로그 게시물을 확인하세요.
색상으로 구분된 에디터 탭
에디터에서 다양한 파일 형식을 탐색하기가 훨씬 쉬워졌습니다! 이제 에디터의 탭이 기본적으로 색상으로 구분되어 표시됩니다. 이는 Project(프로젝트) 도구 창의 모양과 일치하므로 번잡한 화면에서 작업할 때 다양한 파일 사이를 훨씬 쉽게 전환할 수 있습니다. 게다가 더 생동감 있고 잘 정리된 환경에서 편집 작업을 수행할 수 있다는 부가적인 이점도 있습니다!
Settings(설정)/Preferences(환경 설정) | Appearance & Behavior(모양 및 동작) | File Colors(파일 색상)에서 이 설정을 사용자 지정할 수 있습니다.
색상이 지정된 프로젝트 헤더
열려 있는 프로젝트 사이를 시각적으로 더 쉽게 전환할 수 있도록 색상이 지정된 헤더를 도입했습니다. 각 프로젝트에 고유한 색상과 아이콘이 부여되므로 항상 어떤 프로젝트에서 작업 중인지 쉽게 알 수 있습니다.
미리 정의된 재미 있는 색상 외에도 이러한 헤더를 원하는 색상으로 변경할 수 있습니다! 헤더를 마우스 오른쪽 버튼으로 클릭하고 컨텍스트 메뉴에서 >Change Toolbar Color(툴바 색상 변경)를 선택한 다음 원하는 색상을 고르면 됩니다. 색상에는 흥미가 없나요? 문제 없습니다. 같은 메뉴에서 Use Project Colors in Toolbar(툴바에서 프로젝트 색상 사용)를 선택 취소하여 언제든지 이 기능을 해제할 수 있습니다.
디버거의 Run to Cursor(커서 위치까지 실행) 인레이 옵션
디버그 작업에 집중하고 있을 때 단계별로 실행해도 원하는 코드 줄로 이동할 수 없는 경우 Run to Cursor(커서 위치까지 실행) 인레이 옵션을 사용하면 정확히 원하는 위치로 이동할 수 있습니다. 프로그램이 중단되면 대상 줄 위로 마우스를 가져가서 Run to Cursor(커서 위치까지 실행) 팝업을 클릭하면 됩니다. 해당 줄에 커서를 놓은 후, macOS에서는 ⌥F9, Windows에서는 Alt+F9를 눌러 이 기능을 활성화할 수도 있습니다.
에디터 내의 성능 힌트
올해에는 IntelliJ Profiler의 UI가 환상적으로 바뀌었습니다! 새롭게 출시된 에디터 내 힌트는 코드의 성능을 한 줄씩 파악하여 그 어느 때보다 빠르게 성능 문제를 해결하는 데 도움을 주는 획기적인 기능입니다.
이 기능을 사용하면 이제 IntelliJ Profiler의 데이터가 에디터에 바로 표시됩니다. 여백의 관련 코드 줄 바로 옆에 실행 시간과 메모리 할당 데이터가 표시됩니다. 그리고 작업을 더욱 쉽게 하기 위해 이러한 어노테이션은 다양한 색상으로 제공됩니다. 이를 통해 주의가 필요한 메서드를 즉시 식별할 수 있습니다. 상위 메서드의 리소스를 가장 많이 소모시키는 메서드는 빨간색으로 표시되고, 총 실행 시간에 큰 영향을 미치는 경우 불타는 아이콘도 표시됩니다.
이러한 인라인 성능 힌트는 기본적으로 활성화되어 있습니다. 이 기능을 사용하기 싫다면, 문제 없습니다! 어노테이션을 마우스 오른쪽 버튼으로 클릭하고 Close Line Annotations(줄 어노테이션 닫기)을 선택하여 비활성화하세요.
플로팅 툴바
흥미로운 새 기능인 플로팅 툴바가 작업 중인 코드 바로 옆에 나타납니다. 여기에는 Extract(추출) Surround(둘러싸기), Reformat(서식 다시 지정), Comment(주석)와 같은 다양한 빠른 편집 액션이 포함되어 있습니다.
이 툴바를 원하는 대로 세부 조정하려면 케밥 메뉴(세 개의 작은 세로 점)를 클릭하고 필요에 맞게 설정하세요. 이 툴바가 방해가 된다고 생각된다면 걱정하지 마세요! 동일한 메뉴에서 Don’t Show Toolbar(툴바 표시 안 함)를 선택하거나 Settings(설정)/Preferences(환경 설정)| Advanced Settings(고급 설정) | Editor(에디터)로 이동하여 Hide floating toolbar for code(코드 플로팅 툴바 숨기기) 편집 상자를 선택하여 쉽게 숨길 수 있습니다.
메인 툴바 사용자 지정 개선
2023년에는 새로운 UI의 메인 툴바를 훨씬 더 쉽고 재미있게 맞춤 설정할 수 있게 되었습니다. 이제 간단히 드롭다운 메뉴를 사용하여 필요한 도구를 빠르게 선택하고 추가할 수 있습니다. 위젯을 마우스 오른쪽 버튼으로 클릭하고 Add to Main Toolbar(메인 툴바에 추가)를 선택한 다음, 사용 가능한 모든 옵션을 둘러보세요.
창 레이아웃
2023년 3월에 다양한 도구 창 레이아웃을 저장하고 이러한 레이아웃 사이를 전환하여 필요에 맞게 작업 공간을 맞춤화할 수 있는 기능이 출시된 바 있습니다. 이후 같은 해에 작업 공간을 원래 모양으로 빠르게 재설정할 수 있는 Default(디폴트) 레이아웃 옵션이 추가되었습니다. 이 레이아웃은 고정되어 있어 사용자 지정할 수 없지만 Window(창) | Layouts(레이아웃)에서 쉽게 액세스할 수 있습니다.
Project(프로젝트) 뷰에서 수정 시간별로 파일 정렬
그 동안 있었던 많은 요청을 반영하여, Project(프로젝트) 뷰에서 수정 시간을 기준으로 파일을 정렬하기 위한 기능을 추가했습니다. 이 멋진 새 기능은 파일을 자동으로 정리하여 프로젝트에 변경 사항을 저장할 때마다 순서를 업데이트합니다. 이 기능을 활성화하려면 Project(프로젝트) 뷰의 케밥 메뉴로 이동하여 Tree Appearance(나무 모양) | Sort by Modification Time(수정 시간을 기준으로 정렬)을 선택하면 됩니다.
전체 IDE 확대/축소
이제 눈이 편안해집니다! IntelliJ IDEA에서 이제 전체 인터페이스를 확대 및 축소하여 모든 UI 요소의 크기를 한 번에 조정할 수 있습니다. 메인 메뉴로 이동하여 View(보기) | Appearance(모양)를 클릭하고, 여기서 IDE 크기를 편안한 수준으로 쉽게 조절할 수 있습니다.
한 가지 미리 알려 드리면, 다음 출시할 버전인 2024.1에서는 UI를 100% 미만으로 축소하는 기능을 도입할 예정입니다!
만드는 과정에서 저희가 그랬던 만큼, 이러한 변화가 여러분에게도 즐거움을 드리기를 바랍니다. 2024년 계속해서 더욱 멋진 UI 업데이트를 제공해 드리겠습니다. 여러분의 의견은 매우 소중합니다. 이 블로그 게시물 아래 댓글란에 여러분들의 생각을 알려주세요.
게시물 원문 작성자