TeamCity
Powerful CI/CD for DevOps-centric teams
Modern CI/CD for a Post-VMware World: Embrace KubeVirt With TeamCity

In November 2023, Broadcom acquired VMware for a whopping USD 69 billion. The strategic goal behind the acquisition was to enable customers to create and modernize their cloud environments, both private and hybrid.
Following the acquisition, VMware perpetual license holders started receiving cease-and-desist letters from Broadcom. Users can continue using the software, but can no longer renew support services unless they have an existing contract that allows ongoing renewals.
While the business goal to generate more revenue by pushing users to buy subscriptions to VMware product bundles is clear, it has, however, been deemed controversial by the community.
“Nothing says ‘good customer relations’ like sending your customers cease and desist letters”, says one of the commenters.
In the whirlwind of these events, many teams are looking for alternatives. What options exist for those who wish to switch to a more reliable solution?
The rise of KubeVirt
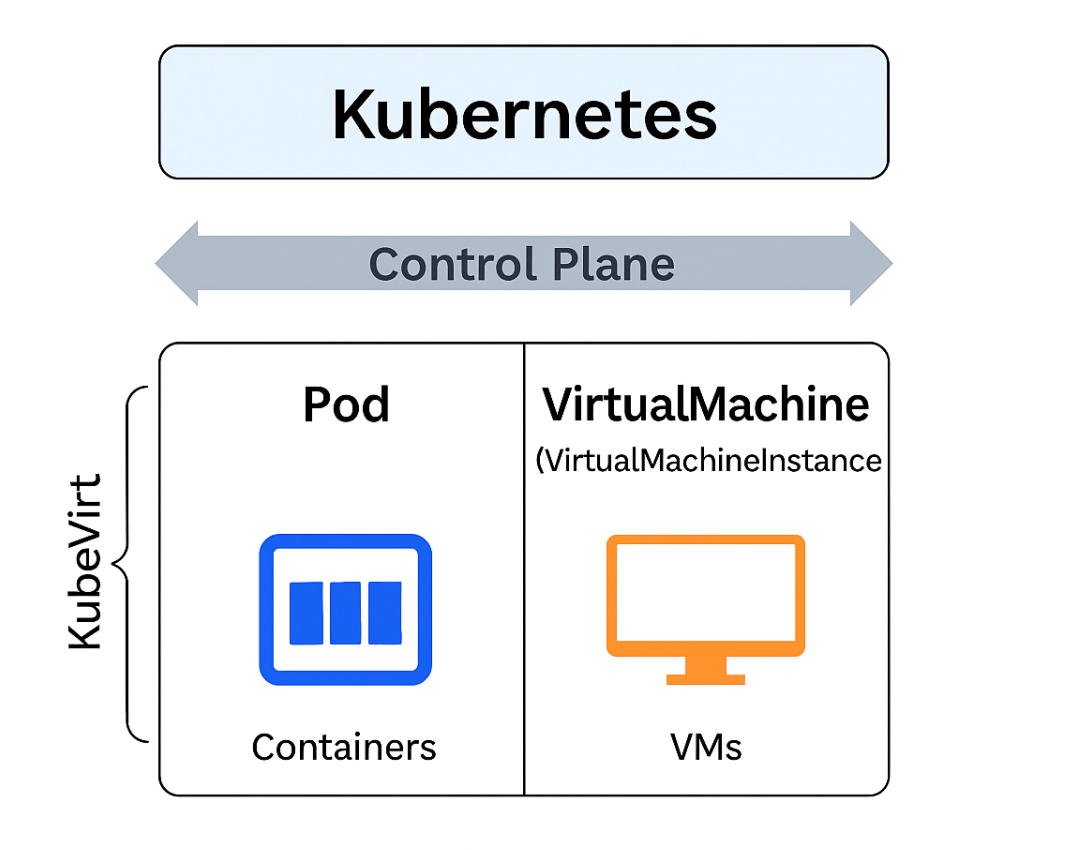
One option is KubeVirt, an open-source project that enables you to run virtual machines within Kubernetes. It brings virtualization capabilities into Kubernetes, allowing you to manage both containers and VMs side by side using the same control plane.
In KubeVirt, virtual machines are defined using Kubernetes-native custom resources called VirtualMachine or VirtualMachineInstance (VMI). This process is similar to defining a pod, but instead of deploying containers, you’re launching full virtual machines.
How TeamCity can help
If you’re thinking about moving away from VMware and want something that works well with Kubernetes, KubeVirt is a solid choice. TeamCity supports this by letting you define a KubeVirt resource instead of a regular pod template in a Kubernetes cloud profile.
In the cloud image settings, you can provide a custom resource template. That can be a VirtualMachineInstance, which TeamCity will use to start build agents.
You can set up a KubeVirt cloud profile in TeamCity to spin up VMs on demand, just like you would with AWS or GCP. These VMs run as part of your Kubernetes cluster using KubeVirt, and TeamCity can use them as build agents. Just keep in mind that your cluster needs to be set up to support virtual machines.
It’s a great way to get the flexibility of virtual machines while still staying in the Kubernetes ecosystem.
Here’s how the flow works:
- Configure a Kubernetes cloud profile in the TeamCity web UI.
- In the cloud image settings, define a custom template using a KubeVirt
VirtualMachineInstance(VMI) instead of a standard Pod.
- When a build starts, TeamCity requests a new VM from the KubeVirt backend. When a build is triggered, TeamCity sends a request to the Kubernetes API to create that VMI.
- KubeVirt handles the VMI and starts a virtual machine on your cluster.
- A TeamCity agent is bootstrapped inside the VM and begins processing the build.
This mirrors how TeamCity works with cloud providers like AWS or GCP – except here, your VMs run in your own Kubernetes infrastructure.
Setting up a cloud profile for KubeVirt
Here’s a high-level outline of how you might set this up:
1. Define a VirtualMachine YAML template in KubeVirt.
Before you can run build agents as VMs, you need a reusable VM template in your Kubernetes cluster. This is typically a paused virtual machine that TeamCity can use to start new build agents when needed.
Check out the official KubeVirt documentation for more guidance.
2. Add a Kubernetes cloud profile in TeamCity
In the TeamCity admin UI:
- Go to Project Settings | Cloud Profiles.
- Add a new Kubernetes cloud profile.
- In the cloud image section, define a custom resource template using the
VirtualMachineInstancespec (instead of a regular pod).
You’ll need to provide:
- The Kubernetes API endpoint and credentials.
- The namespace where your VM templates live.
- The base VM image or reference template name (e.g.
teamcity-agent-template). - Any necessary init containers, environment variables, or startup scripts.
3. Start a build
Once configured, when a build is queued:
- TeamCity provisions a VM based on your template.
- It waits for the TeamCity agent to register.
- The build runs in the newly spun-up VM.
After completion, the VM is automatically shut down or deleted (depending on your cleanup strategy).
Potential use cases
Here are some practical scenarios where this integration might be especially useful:
- Running builds in clean VM environments for strong isolation.
- Building Android or desktop apps where a full OS and nested virtualization might be needed.
- Supporting legacy toolchains or build tools that require a VM rather than a container.
- Enabling hybrid infrastructure, where some builds run in containers and others in KubeVirt-managed VMs – all orchestrated by TeamCity.
Conclusion
If you’re moving away from VMware, KubeVirt gives you a solid way to keep using VMs – in a more modern, Kubernetes-native setup. You can run VMs and containers side by side, all managed through the same platform.
TeamCity already works with KubeVirt, so you don’t have to change how you build or run your pipelines. Whether you use containers, VMs, or both, everything keeps working the way you expect.
If you’d like to try adopting TeamCity for your team, consider starting a free trial or reaching out to us for a demo. We’ll be happy to help.