Using Docker Compose on Windows in PyCharm
By popular demand, PyCharm 2017.2 Professional Edition expands its Docker Compose support to those of you who run Windows. Let’s take a look and see how this works!
In our last Docker Compose post, we created a guest book in Flask. This time we’ll take a simple todo app in Django, and dockerize it. The starting point today will be a Django todo app which works locally, see the code on GitHub.
Setting Up Docker on Windows
If you don’t have Docker installed yet, you’ll need to make a decision about which version to install:
- Are you using anything other than Windows 10 Pro or Enterprise, or do you have Virtualbox, VMware, or anything other than Hyper-V installed: get Docker Toolbox and Virtualbox.
- If you’re on Windows 10 Pro or Enterprise, and you have either Hyper-V or no virtualization software installed: get Docker for Windows.
The reason for this is that Docker for Windows is based on Microsoft’s Hyper-V virtualization technology. Hyper-V is a seriously cool bit of tech that wraps your Windows in a hypervisor, rather than installing a hypervisor within Windows. What this means is that effectively you’ll be using a VM when you’re using your computer. Hypervisors are unable to run on a VM, so when you enable Hyper-V on Windows, you can’t run any other VM software anymore.
Setting Up Docker Toolbox
If you installed Docker for Windows, you can skip this section.
Docker Toolbox works by redirecting all your Docker commands to a Docker instance running either on a local VM, or on a cloud service. Today, let’s set up a Virtualbox VM on our local computer. Run with a cmd window:
docker-machine create --driver virtualbox default
Let’s verify that it works by connecting our command-line Docker. To do so, we need to run this cryptic looking command in cmd:
@FOR /f "tokens=*" %i IN ('docker-machine env default --shell=cmd') DO @%i
To see what it does, run docker-machine env default --shell=cmd, it will output several commands to set environment variables that configure Docker and Docker Compose. The long command above simply runs these all.
At this point, if you run docker run hello-world you should see a cheerful message that confirms that everything works:
Running Django in Docker
For our Django app we’ll need to create two containers: a database container, and a container which holds our actual application. We’ll use Docker Compose to link the containers together.
Let’s get started with writing our Dockerfile:
FROM python:3.6

WORKDIR /app

# By copying over requirements first, we make sure that Docker will cache
# our installed requirements rather than reinstall them on every build
COPY requirements.txt /app/requirements.txt
RUN pip install -r requirements.txt

# Now copy in our code, and run it
COPY . /app
EXPOSE 8000
CMD ["python", "manage.py", "runserver", "0.0.0.0:8000"]
This is enough configuration to start Django, however, before we can proceed we should also make sure that we configure our database. For this we should write a compose file where we add both our Django service, and our postgres service:
version: '2'
services:
 web:
   build: .
   ports:
    - "8000:8000"
   volumes:
    - .:/app
   links:
    - db

 db:
   image: "postgres:9.6"
   ports:
     - "5432:5432"
   environment:
     POSTGRES_PASSWORD: hunter2
The postgres image is easily configured with environment variables, for details read the image’s page on Docker hub. In this case we’re only setting the password, leaving the defaults for username and database. If you want to persist data when the container is destroyed, you’d need to create a named volume for the /var/lib/postgresql/data folder.
After adding these files, let’s just head over to our Django settings.py to configure our new database credentials:
DATABASES = {
   'default': {
       'ENGINE': 'django.db.backends.postgresql',
       'NAME': 'postgres',
       'USER': 'postgres',
       'PASSWORD': 'hunter2',
       'HOST': 'db'
   }
}
In a Docker Compose project, you can connect to linked containers by their service name unless you’ve specified an alias in the link section of the compose file. In this case we wrote:
links:
 - db
Therefore we should tell Django to look for the db host. Although I’m hardcoding it here for simplicity, ideally you’d get this configuration from environment variables.
This is all the configuration we need to do, and we can get started with building our images now.
Let’s first let PyCharm know where to find Docker. Go to Settings | Build, Execution, Deployment | Docker, and make sure that your Docker is configured. If you’re using Docker for Windows, and there’s no Docker listed, just click the green ‘+’ icon, and the defaults should be correct. If you’re using Docker machine, select the ‘Docker Machine’ radio button, and select the correct machine in the dropdown:
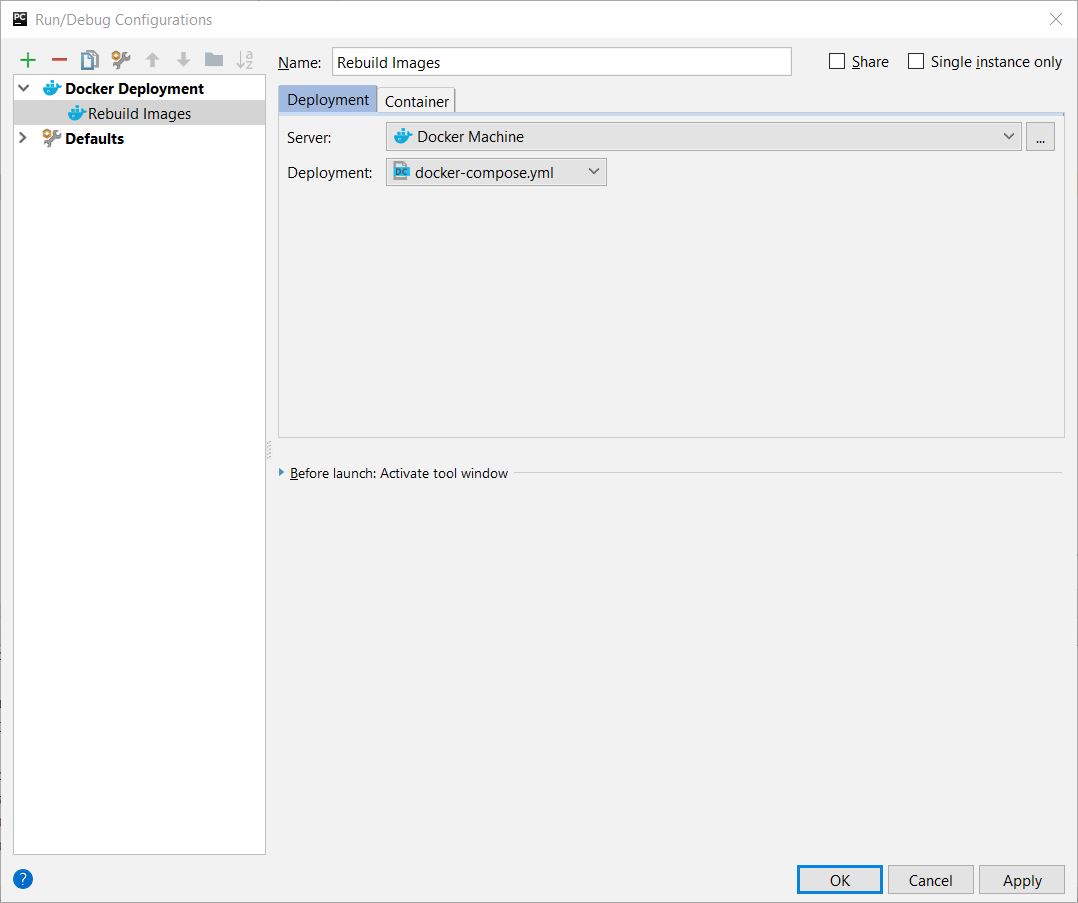
After that’s set up, we can go and add our Docker run configuration, go to the ‘Edit Run Configurations’ screen, and add a Docker Deployment run configuration.
Let’s name it Rebuild Images, and in the Deployment field, select the compose file:
Now when we run this configuration, we should see that all the layers are pulled from Docker hub, and both the database and Django are started.
Setting up the Python Remote Docker Interpreter
Now to make sure that we can debug our Django project, let’s configure PyCharm to use the Python interpreter within our Docker container. To do so go to Settings | Project Interpreter, and use the gear icon to select Add Remote:
Choose the Docker Compose interpreter type, and make sure the docker-compose.yml file is selected. The service you choose under ‘service’ is the service you want to debug with this run configuration, when you start it, all services will still be started either way. As the only Python service is ‘web’, let’s select that here:
Afterwards you should see that PyCharm detected the packages we configured in requirements.txt, and the path mappings:
Now we can add a normal Django server run configuration, just make sure to set host to ‘0.0.0.0’ to make sure that we listen to requests coming from outside the Docker container.
Now first run the migrations, by going to Tools | Run manage.py task, and then writing migrate. After this command has completed, we can use the regular run and debug icons in PyCharm to run and debug our Django project. So let’s run it!
To see our Django application in the browser, go to http://localhost:8000 if you’re using Docker for Windows. If you’re using Docker Machine, we’ll first need to check on which IP our Docker Machine is running, run docker-machine ip default on the command line. In my case this is 192.168.99.100, so I’ll go to http://192.168.99.100:8000 in the browser.
Now if you see a message “DisallowedHost at /”, go to Django’s settings.py, and find ALLOWED_HOSTS. During development we can change this to: ALLOWED_HOSTS = [‘*’] to disable this check. Please make sure you appropriately configure it when running in production however.
When everything works, we can add a breakpoint, and debug as usual:
Subscribe to PyCharm Blog updates


