IntelliJ IDEA
IntelliJ IDEA – the Leading IDE for Professional Development in Java and Kotlin
Type Renderers
While developing any application, you most probably debug it, and I bet my bottom dollar, making this process a little bit easier and faster would not be out of place.
In this post, I’d like to tell you about one of the IntelliJ IDEA features — type renderers. They provide you the ability to customize how objects are displayed in the debugger, offering a “logic-oriented” presentation of data vs. structure-oriented as it is by default, and thus improving the readability of the Debug tool window. Let’s see how it works.
To define your own type renderers, open Settings (Ctrl+Alt+S) dialog, click Debugger and select Type Renderers tab. This tab lists all the renderers you’ve defined and allows you to turn them on and off at any time using the check box next to their name. The order of the list is important. It determines which renderer is used, if more than one renderer is applicable to an object instance.
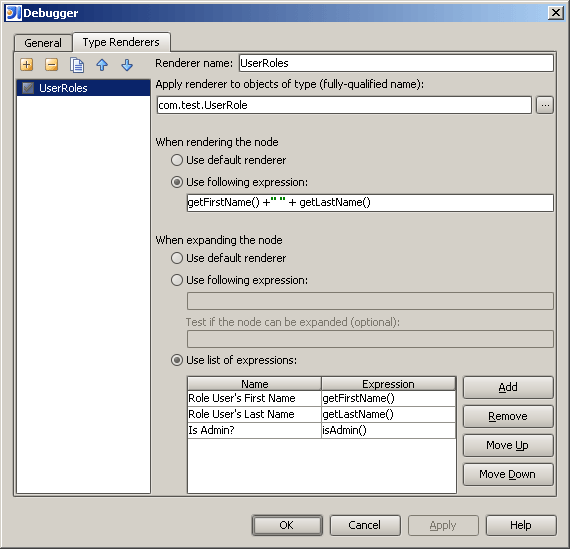
Now let’s add a new renderer. To do so click the plus button, then specify renderer name, the object class to which it applies, and which expressions to use while rendering.

In our example, we’ve created an expression that displays the user’s full name by accessing the first and last name properties of the object.
Also we’ve defined the appearance of the expanded node. Normally, expanding a node in the debugger lists the object’s member variables. Nevertheless, you can override that behavior. Here we’ve selected to reflect only three of the object’s properties and have used descriptive names rather than the member variable’s name.
Note: There is also a possibility to use a single expression to calculate information to be presented for the node. When expanding the node, the specified expression is evaluated and applicable renderer is picked for the resulting value. The chosen renderer is then applied to get the nodes that will be attached as children to the node that was originally rendered. We can also specify a Boolean expression to test if the node can be expanded. If it is true the renderer displays the expandable nodes for the defined objects. Otherwise, no nodes are displayed.
These expressions are helpful when you want to limit the amount of information displayed or to be more precise in how the information is presented, for example.

When defining expressions, feel free to use IntelliJ IDEA‘s code-completion features to help you. All method calls and member variable access is relative to the object you’re rendering. Use this to refer to the instance, to which the renderer is applied.
Note: Using “heavy” expressions in renderers may slow down data rendering in views. Much as method calls should be used with caution because of possible side-effects.
One more trick: you can easily switch between applicable renderers for particular object in already built data tree with the View As option in the context menu of the Variables or Watches tab of the Debugger, even if your custom type renderer is disabled.
P.S. Type renderers are available since IntelliJ IDEA version 5.0.
Subscribe to IntelliJ IDEA Blog updates


