

IntelliJ IDEA
IntelliJ IDEA – the Leading IDE for Professional Development in Java and Kotlin
UI Secrets: Customize the Appearance of IntelliJ IDEA

IntelliJ IDEA includes a number of features to improve the readability of the source code, such as various code style settings and color schemes for proper highlighting. But writing source code is not the only activity when creating software. It involves using various tools that need to be at hand whenever you need them.
This blog post covers some of the more important ways to customize the interface of IntelliJ IDEA for the best combination of functional and visual convenience that works for you. These are known features but there are tips and tricks related to those features that can make you much more productive when customizing the way your IDE layout works.

User interface themes
The interface theme defines the appearance of windows, dialogs, buttons, and all visual elements of the user interface. By default, IntelliJ IDEA uses the Darcula theme, unless you changed it during the first run.
This is no secret. To change it, open the Settings / Preferences dialog and select Appearance & Behavior | Appearance. There, you can use the Theme selector to choose a UI theme.
The built-in themes include Darcula, IntelliJ Light, Windows or macOS Light, and the special High Contrast theme for visually impaired users. But that’s not all! Themes are customizable. Even better, users can create plugins with themes in their favorite colors and upload them to the JetBrains Plugin Repository.
Check them out: open the Plugins page in the Settings / Preferences dialog and search the Marketplace for “theme”.
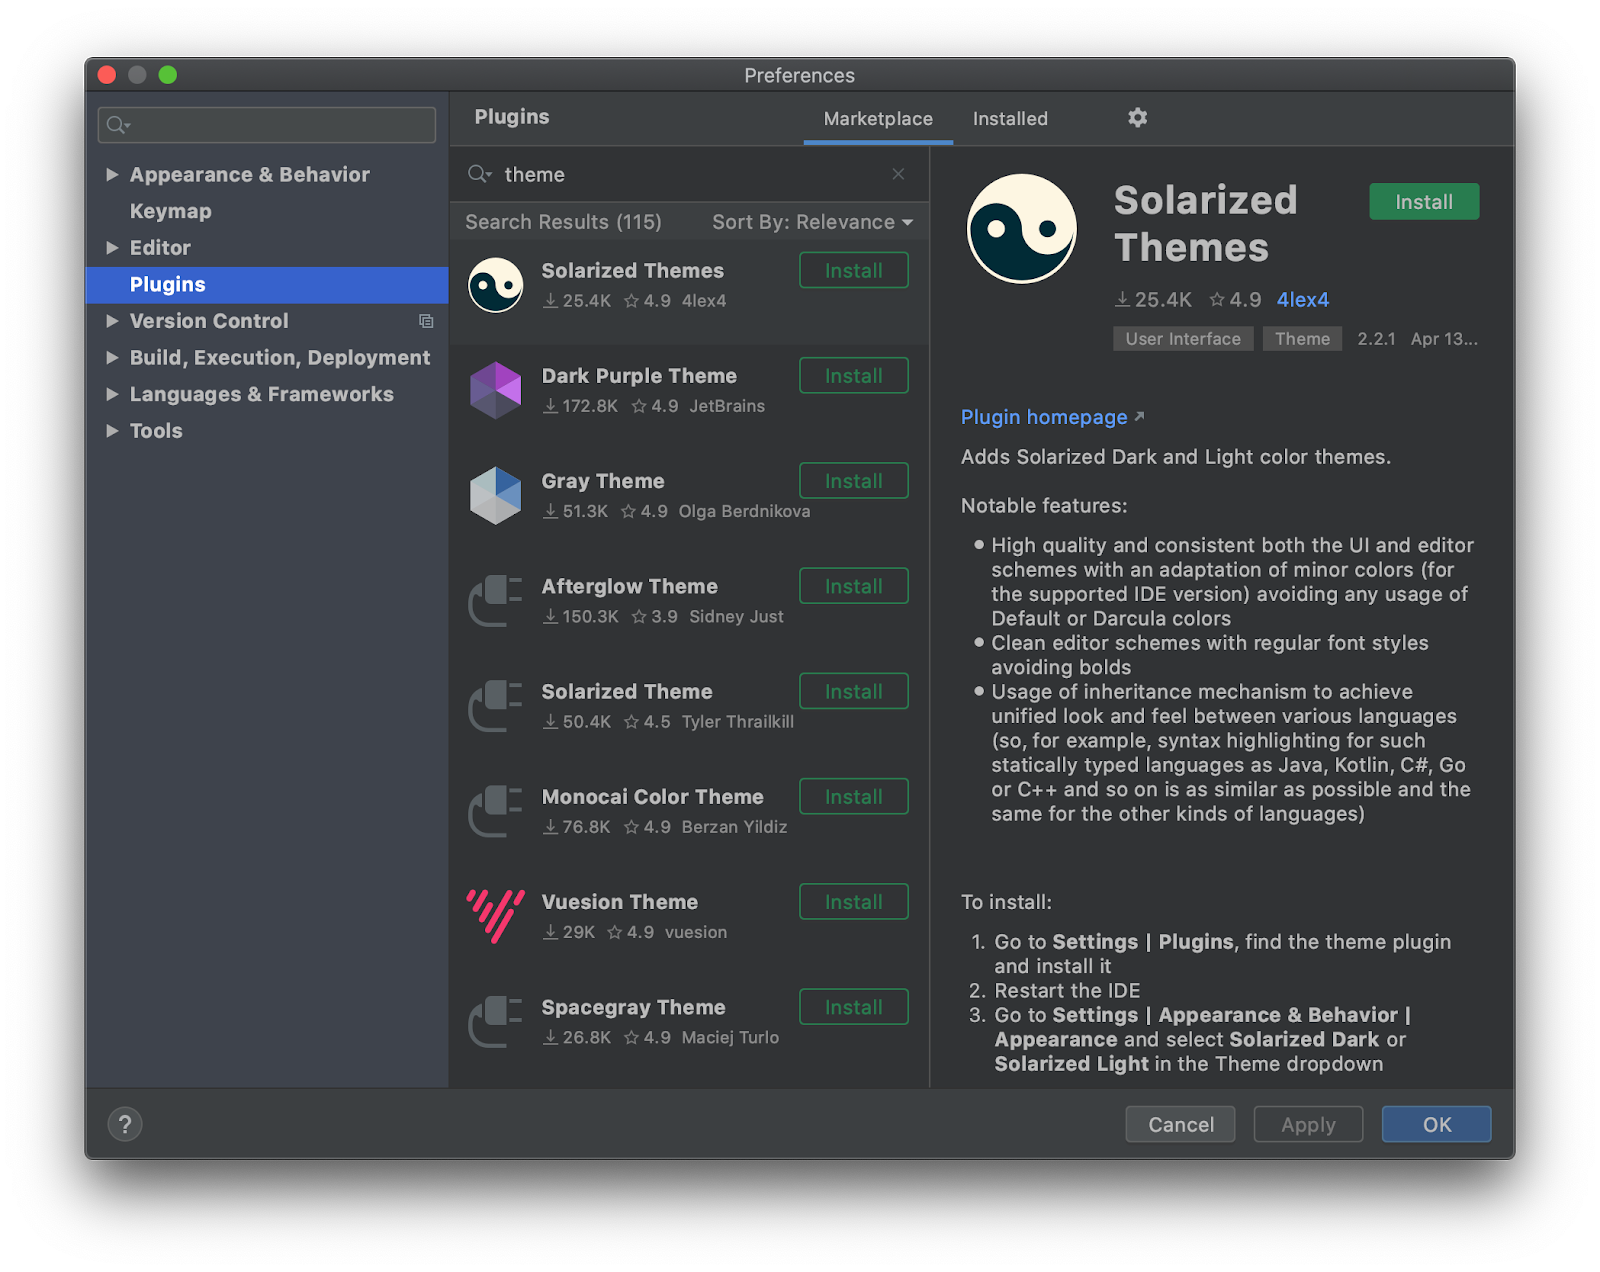
Install any of the theme plugins to add them to the Theme selector.
For more information about customizing and creating your own themes, see the IntelliJ Platform SDK Documentation.
By the way, you can change your interface theme much quicker by pressing Ctrl + Backtick or Cmd + Backtick, which brings up the Switch popup.
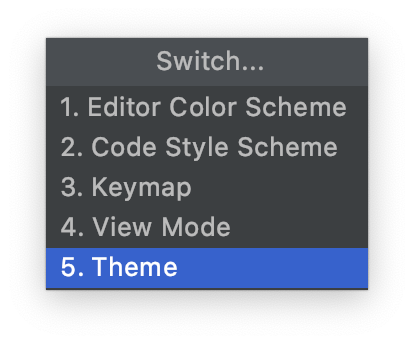
Note that you can quickly switch more than just the UI theme. So let’s take a look at something else that you can switch using this handy popup.
IDE viewing modes
IntelliJ IDEA provides special viewing modes for specific usage patterns. For example, if you need to focus on the code or present your code to an audience.
You already know how to toggle the View Mode with the Switch popup. Alternatively, you can use actions under View | Appearance in the main menu.
If you need to toggle some viewing mode often, you can assign a shortcut for it. Here’s how you can do it quickly: press Shift twice to bring up the Search Everywhere popup and search for the name of the mode, for example, type “presentation”. Now highlight the Enter Presentation Mode action and press Alt + Enter. Then press some key combination to use as a shortcut, such as Ctrl + F12.
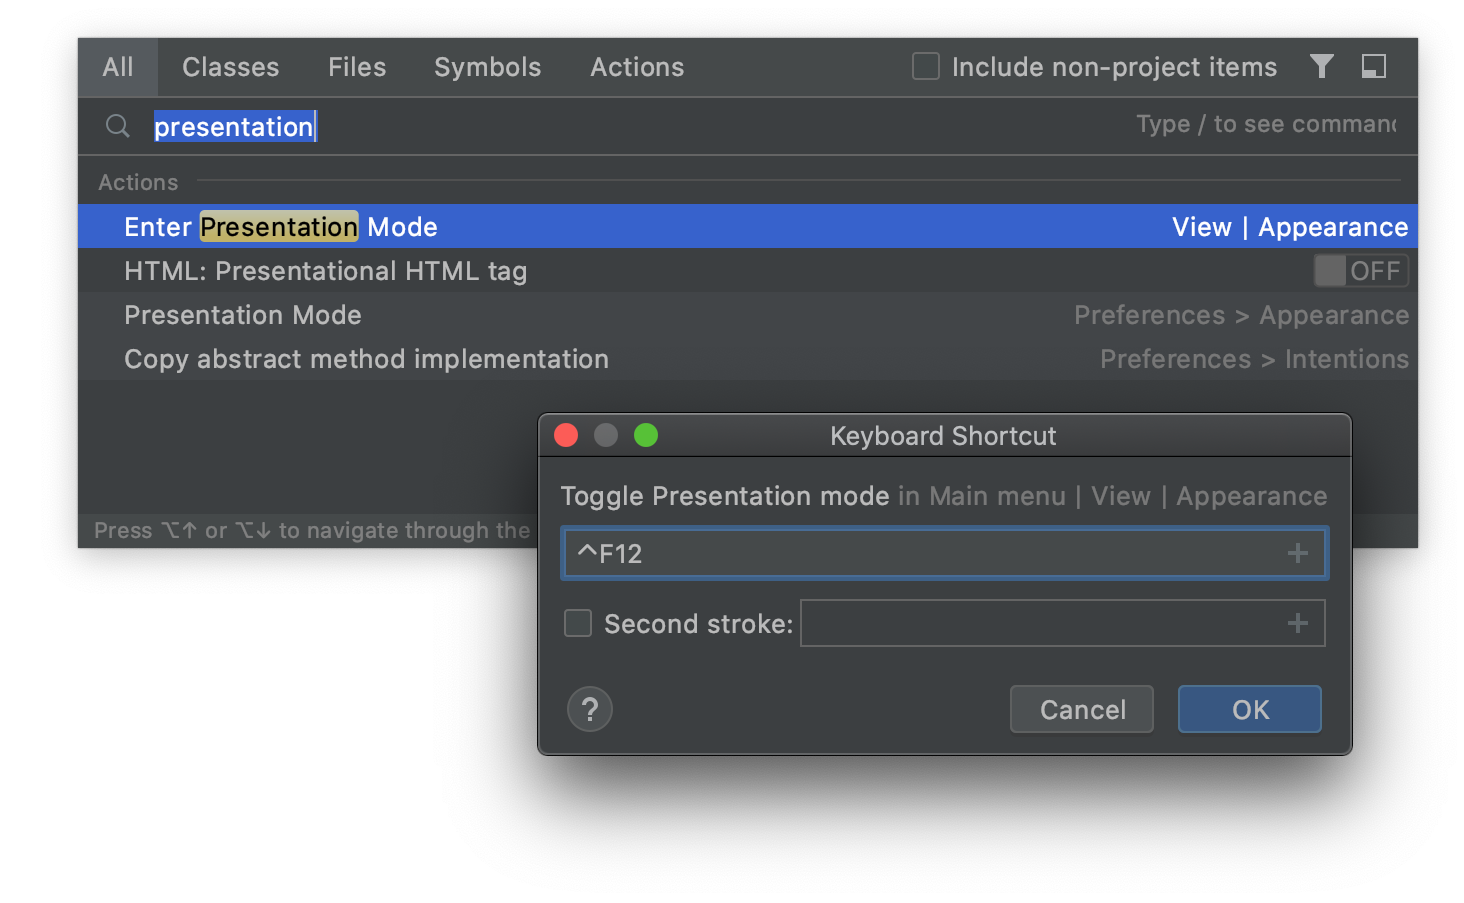
Make sure IntelliJ IDEA doesn’t show any conflicts with existing shortcuts and click OK. Now when you are at a conference and need to present your code to an audience, just press the assigned shortcut. Then press it again to exit Presentation Mode.
Menus and toolbars
It’s always faster to use keyboard shortcuts for all actions, or at least for those that you use more often. However, you probably sometimes execute actions with buttons on the toolbars and items in various menus (such as the main menu and right-click context menus). If you prefer these for some of your workflows, you may want to customize the relevant menu or toolbar to reorder items, remove those you do not need, and add those not available by default.
Open the Settings / Preferences dialog and select Appearance & Behavior | Menus and Toolbars. For example, you can customize the New node in the context menu of the Project tool window. That is, when you right-click on a directory in your Java project and want to add a new file, IntelliJ IDEA lists all file types available in this context. The same menu shows up when you select a node in the Project tool window and press Ctrl + N or Cmd + N. The following screenshot shows how this menu looks for a Java source package directory and the corresponding default settings.
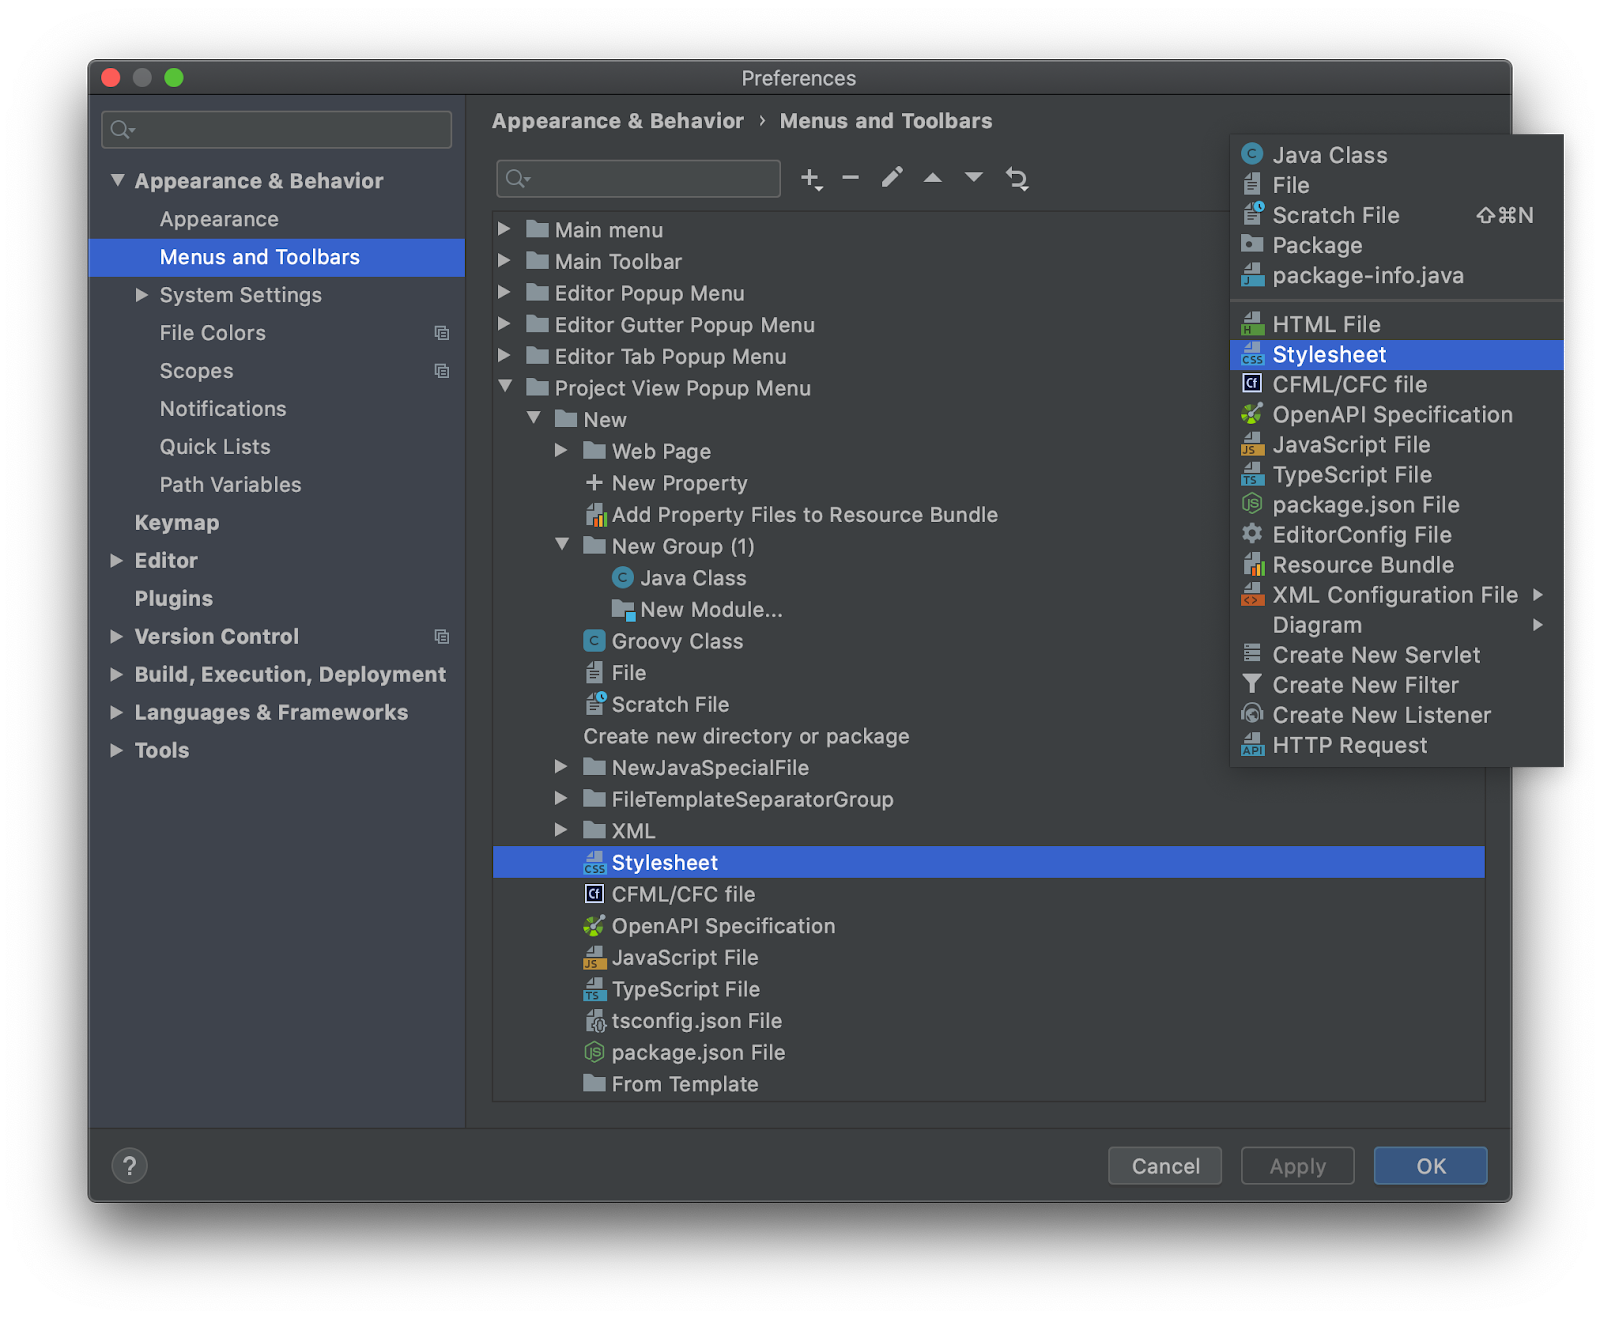
If you are developing an enterprise web application, you may want to move the file templates for creating beans, servlets, and HTTP request files higher up in this list because by default they are at the bottom.
Quick lists
Quick lists are alternatives to built-in menus and toolbars that you can call with a dedicated shortcut. For example, here is one built-in quick list with remote app deployment actions:

Open the Settings / Preferences dialog and select Appearance & Behavior | Quick Lists. Add a list, give it a name and a description, and add a bunch of related actions to it.
How do you call your quick list? Bring up Search Everywhere with a double-press on the Shift key and enter the name of your quick list. But don’t just activate it from there. Highlight it and assign a shortcut to it. You already know how to do that: Alt + Enter.
Note how actions in quick lists are assigned dedicated numbers from 1 through 0. This makes using them almost as fast as having dedicated shortcuts for each action on the list. Just press the shortcut for your quick list and then press the number of the action you need. And it executes just like that.
Tool windows
Almost all space around the editor in IntelliJ IDEA is occupied by tool windows. They help you manage your sources, analyze their structure, monitor the running or debugging process, integrate with version control systems, and much more. Anything that is not related to actually writing source code is probably in tool windows.
Some tool windows are always available by default, some show up only when relevant (like Run when running your app), some depend on enabled plugins (like Maven or Spring). In any case, you want to arrange them in a way to use your screen estate to full capacity.
First of all, you should know how to quickly show and hide the tool windows. They are listed in the main menu under View | Tool Windows and on tool window bars around the edges of the window. But don’t bother clicking menu items and buttons with your mouse. Use keyboard shortcuts! The most frequently used tool windows have numbers from 1 through 9 assigned to them. Hold down Alt or Cmd and press the corresponding number. For example, Alt + 7 or Cmd + 7 opens and focuses the Structure tool window. Press it again to hide the tool window when you don’t need it.
You can move a tool window to any edge of the UI by dragging it to the corresponding tool window bar. And then resize it by dragging the edges of the tool window. But what if you need to temporarily increase the size with a shortcut to see more of the content, like messages in the Run console? Focus the tool window, then hold Ctrl + Shift or Cmd + Shift and press the arrow key depending on the direction where to expand the tool window. When you are done, you can make it smaller again with the same key combination and the opposite arrow key. You can also maximize the tool window width or height with Ctrl + Shift + ‘ or Cmd + Shift + ‘ and then return it to the initial size.
When you are focused on coding and need to hide all tool windows leaving just the editor, there is an action for that: Window | Active Tool Window | Hide All Windows. The default shortcut is Ctrl + Shift + F12 or Cmd + Shift + F12. Press it again to restore the tool windows.
Finally, you can change the view mode of tool windows depending on how “obstructive” you want them. Right-click the tool window button or title bar, or click the tool window options menu button, then select View Mode.
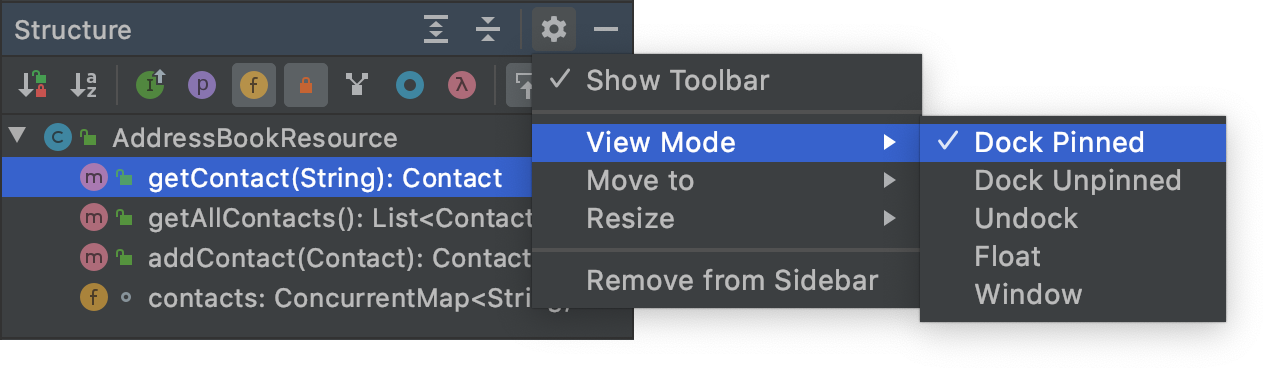
Decide which tool windows you want to stay pinned (always visible), which you want to attach only to the edge of the UI and slide over the editor or other tool windows when activated, which you want to detach and place over the main menu anywhere, and which you want to act as separate independent application windows that you can move to a different monitor or desktop.
By the way, you can restore the default arrangement of tool windows if you don’t like your customizations: Window | Restore Default Layout. Or you can save your current arrangement as the new default: Window | Store Current Layout as Default.
Bonus: small monitors and wide-screen monitors
If you have a small monitor, you can maximize the screen estate by removing the tool window bars around the edges, the main toolbar and the navigation bar at the top, the status bar at the bottom, and the main menu (on Windows and Linux). Take a look at the options under View | Appearance.
There are also several options for wide-screen monitors. Open the Settings / Preferences dialog and select Appearance & Behavior | Appearance. Scroll down to the Window Options group and try enabling the following:
- Widescreen tool window layout maximizes the height of vertical tool windows by limiting the width of horizontal tool windows.
- Side-by-side layout on the left and Side-by-side layout on the right displays vertical tool windows in two columns instead of stacked on top of each other.
That’s it for this post. Stay tuned for future how2pro posts to be even more productive with IntelliJ IDEA. Is there some topic that you would like to read about? Now that we’ve covered the appearance of the UI, what if we wrote about customizing the appearance of the actual source code: formatting, colors, and fonts? Or leave your ideas in the comments.
Happy developing!


