

IntelliJ IDEA
IntelliJ IDEA – the Leading IDE for Professional Development in Java and Kotlin
Some README.md Love: Markdown Support Improvements

Developers and other users of JetBrains IDEs have been using the integrated Markdown support for a long time. It is great for editing your project’s README.md file, as well as any documentation that comes with the source code, or even your static web site sourced in Markdown. You can also use Markdown scratch files to draft up blog posts, store your meeting notes, or a to-do list.

For several years now, we have been improving the overall experience with natural languages in our IDEs. As a result, we have also increased our focus on Markdown support. This post outlines some of the recent improvements for working with Markdown files in IntelliJ-based IDEs. For detailed instructions about these and other related features, see the Markdown topic in the IntelliJ IDEA Help.
The Markdown plugin is bundled and enabled by default in IntelliJ IDEA and most other IntelliJ-based IDEs. If not, you can install it manually.
HTML Preview
The preview is probably the most useful feature for writing in Markdown. There have been a lot of complaints in the past about the speed and accuracy of the preview. For several releases now the preview is much more responsive and user-friendly. It is conveniently located next to the editor and provides fast and smooth incremental updates as you type. The scroll bar in the preview is synchronized with the editor so you always see the relevant content.
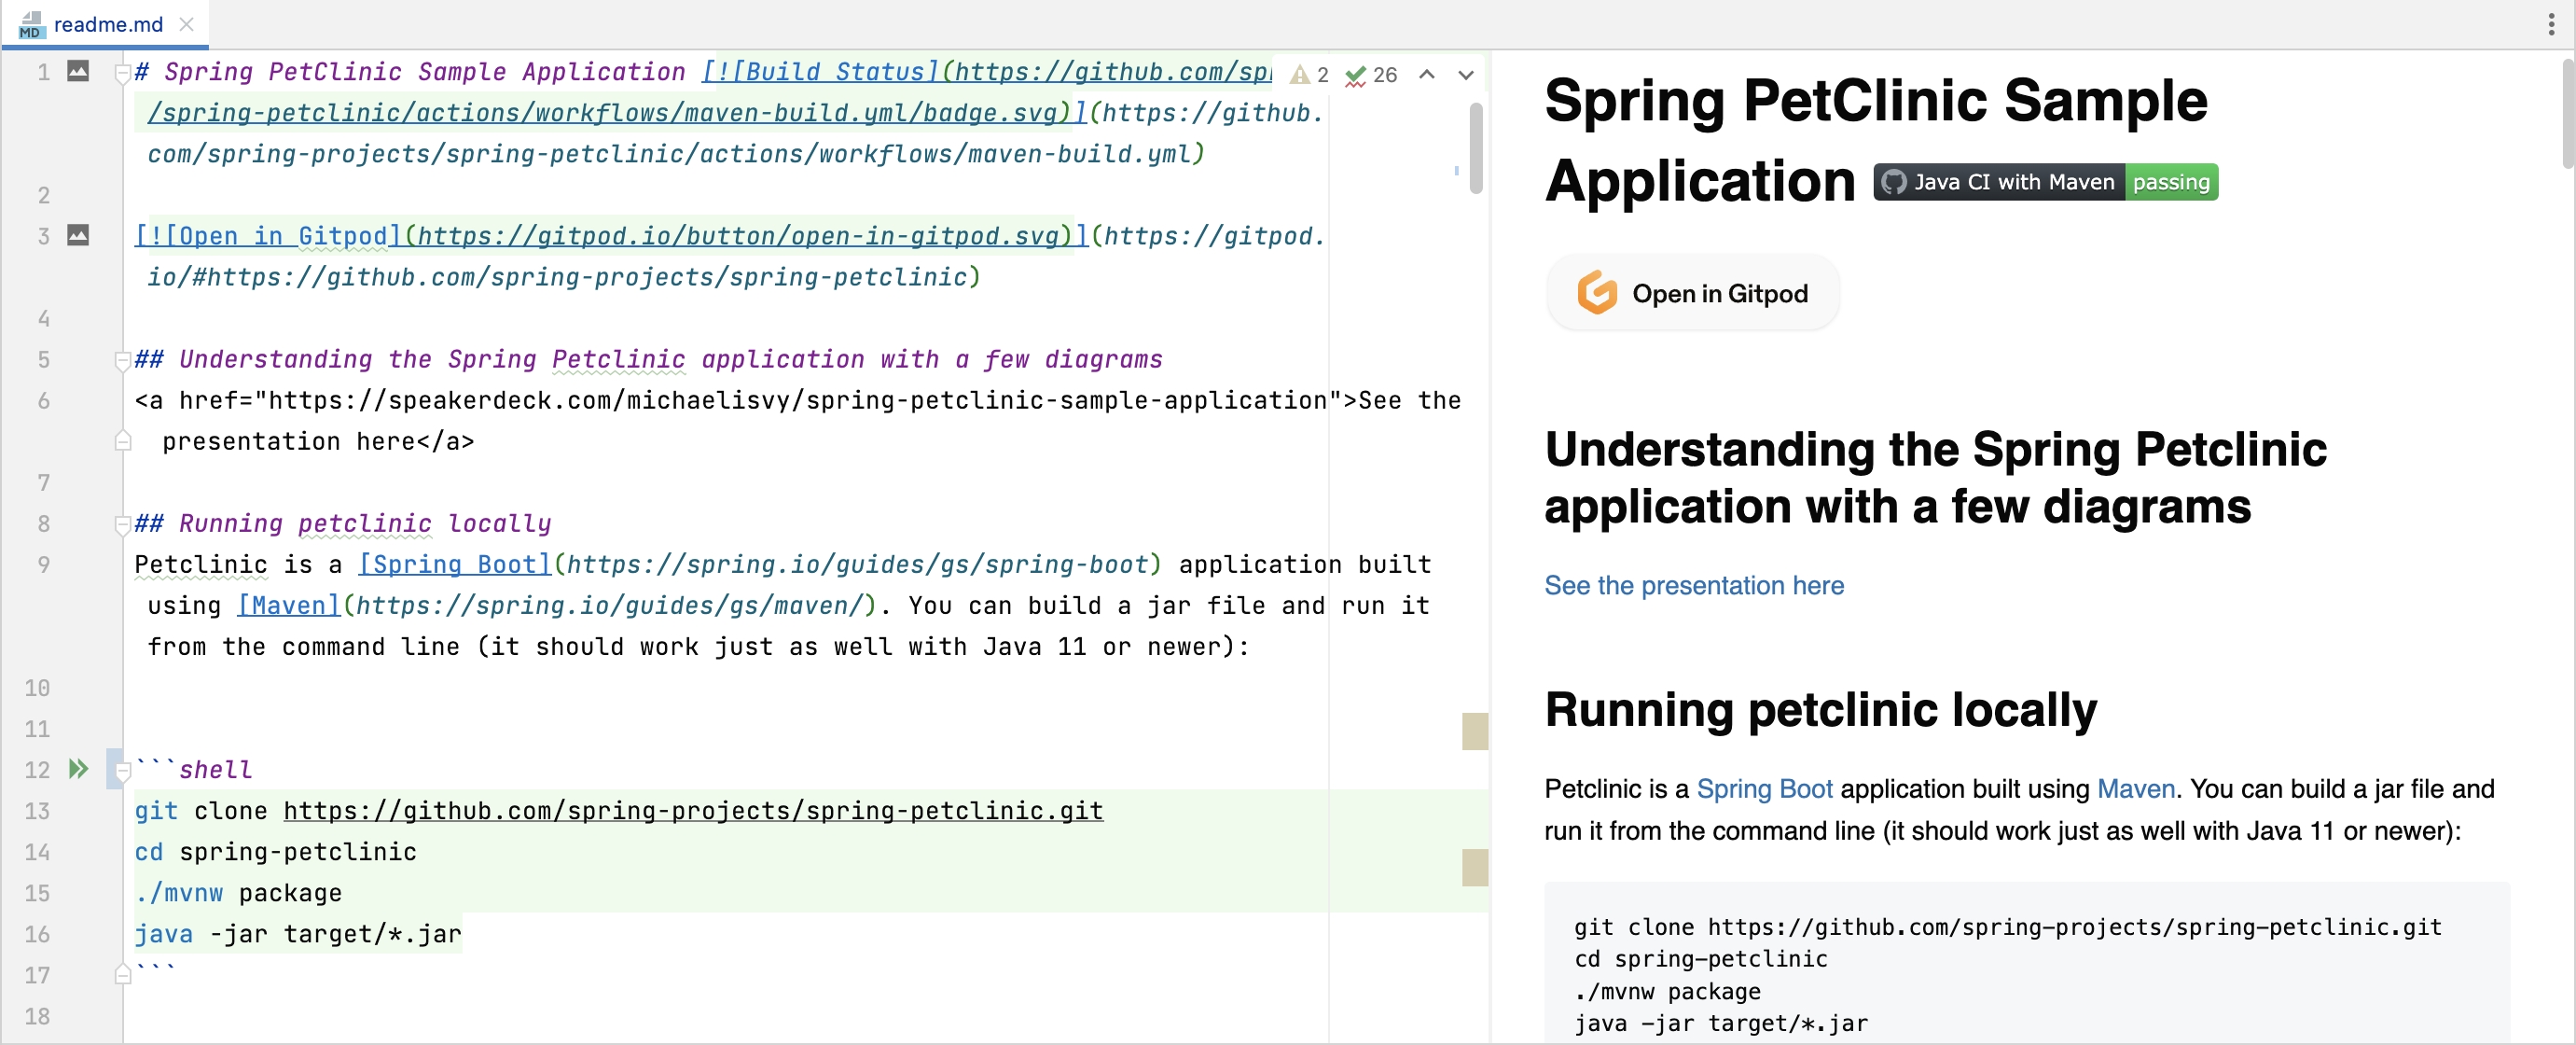
The built-in style sheets used for the preview are aligned with the overall look and feel of the selected UI themes. It is still possible to customize the styles in the preview with custom CSS.
NOTE: The preview does not work in Android Studio. This is a known issue and there is a workaround: use JetBrains Runtime instead of the default Android Studio runtime. For more information, see Fix Markdown Plugin in Android Studio.
Floating Toolbar
When you select some text, the Markdown editor shows a floating toolbar with some basic formatting actions.
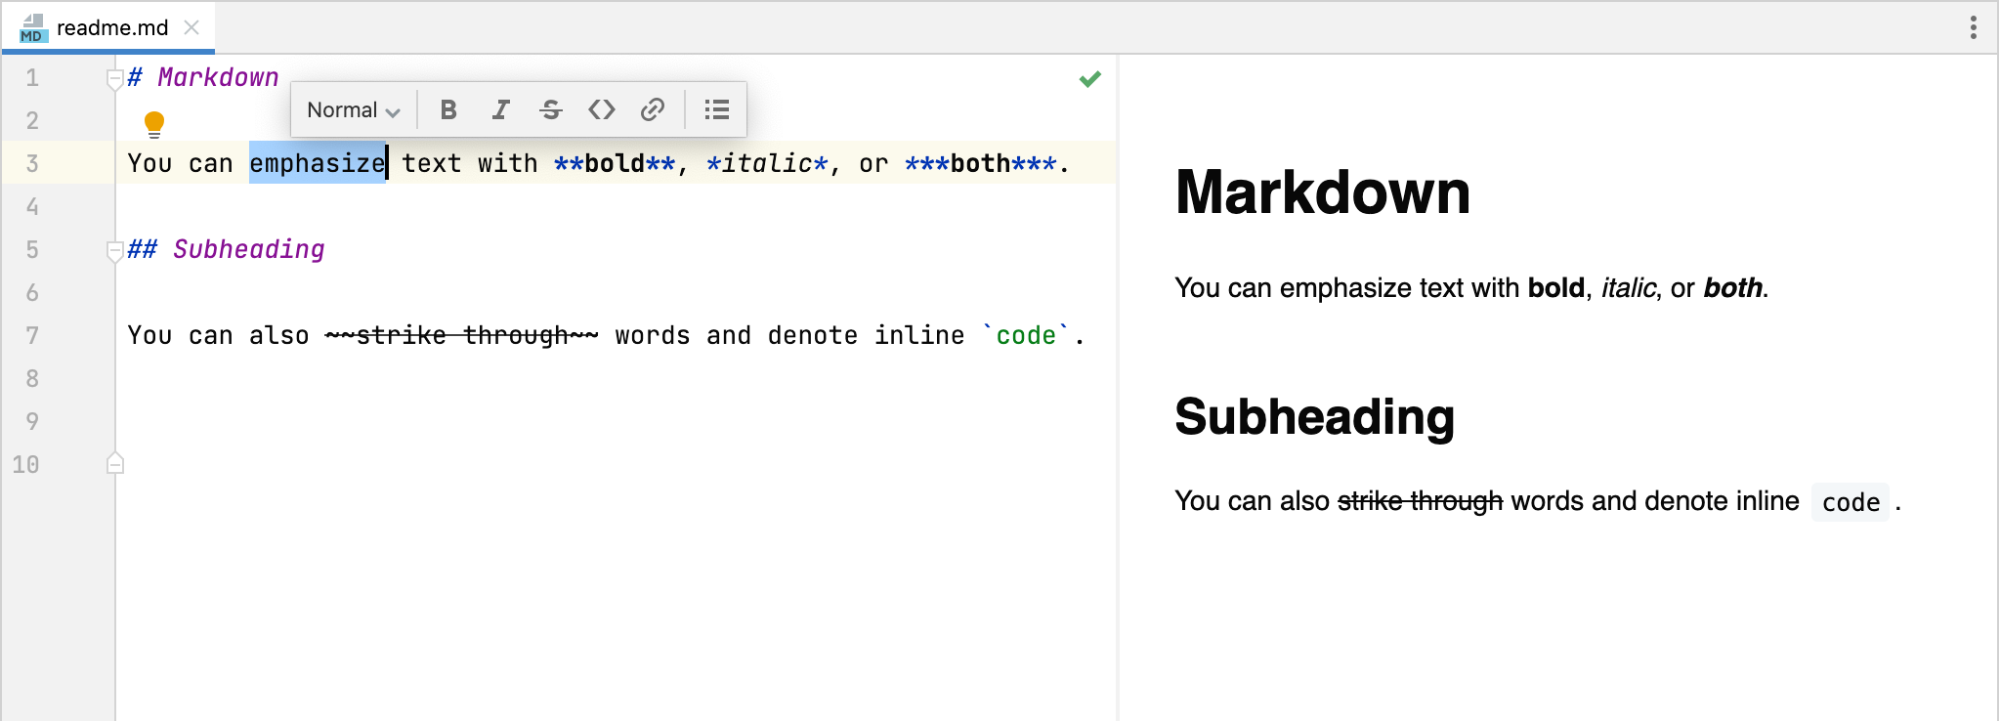
You can toggle between normal text, various heading levels, and different types of lists. You can also apply inline formatting:
| Windows and Linux | macOS | |
| Bold | Ctrl + B | Cmd + B |
| Italic | Ctrl + I | Cmd + I |
| Ctrl + Shift + S | Cmd + Shift + S | |
Code | Ctrl + Shift + C | Cmd + Shift + C |
| Link | Ctrl + Shift + U | Cmd + Shift + U |
You can modify the floating toolbar by removing or adding actions in the IDE’s appearance settings under Menus and Toolbars.
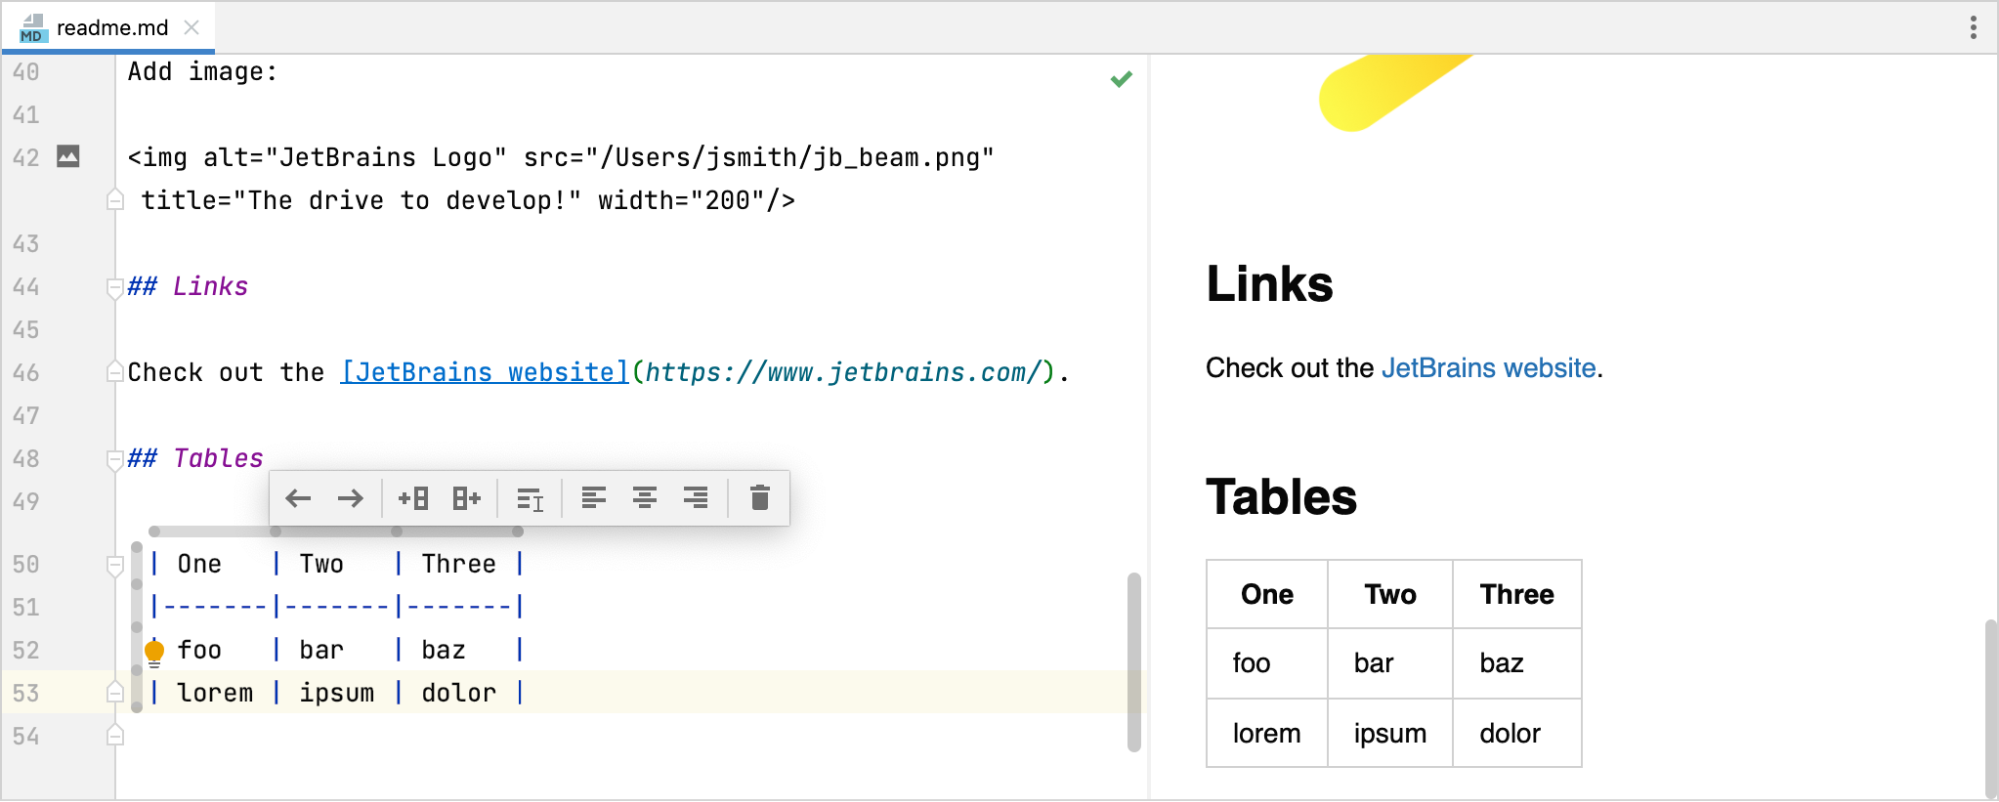
Images
The easiest way to add an image is to drag and drop it directly into the Markdown editor.
Alternatively, press Ctrl + U or Cmd + U to open the Insert Image dialog and select the image to insert. In this dialog, you can choose to add the image using raw HTML, which lets you specify the size of the image.
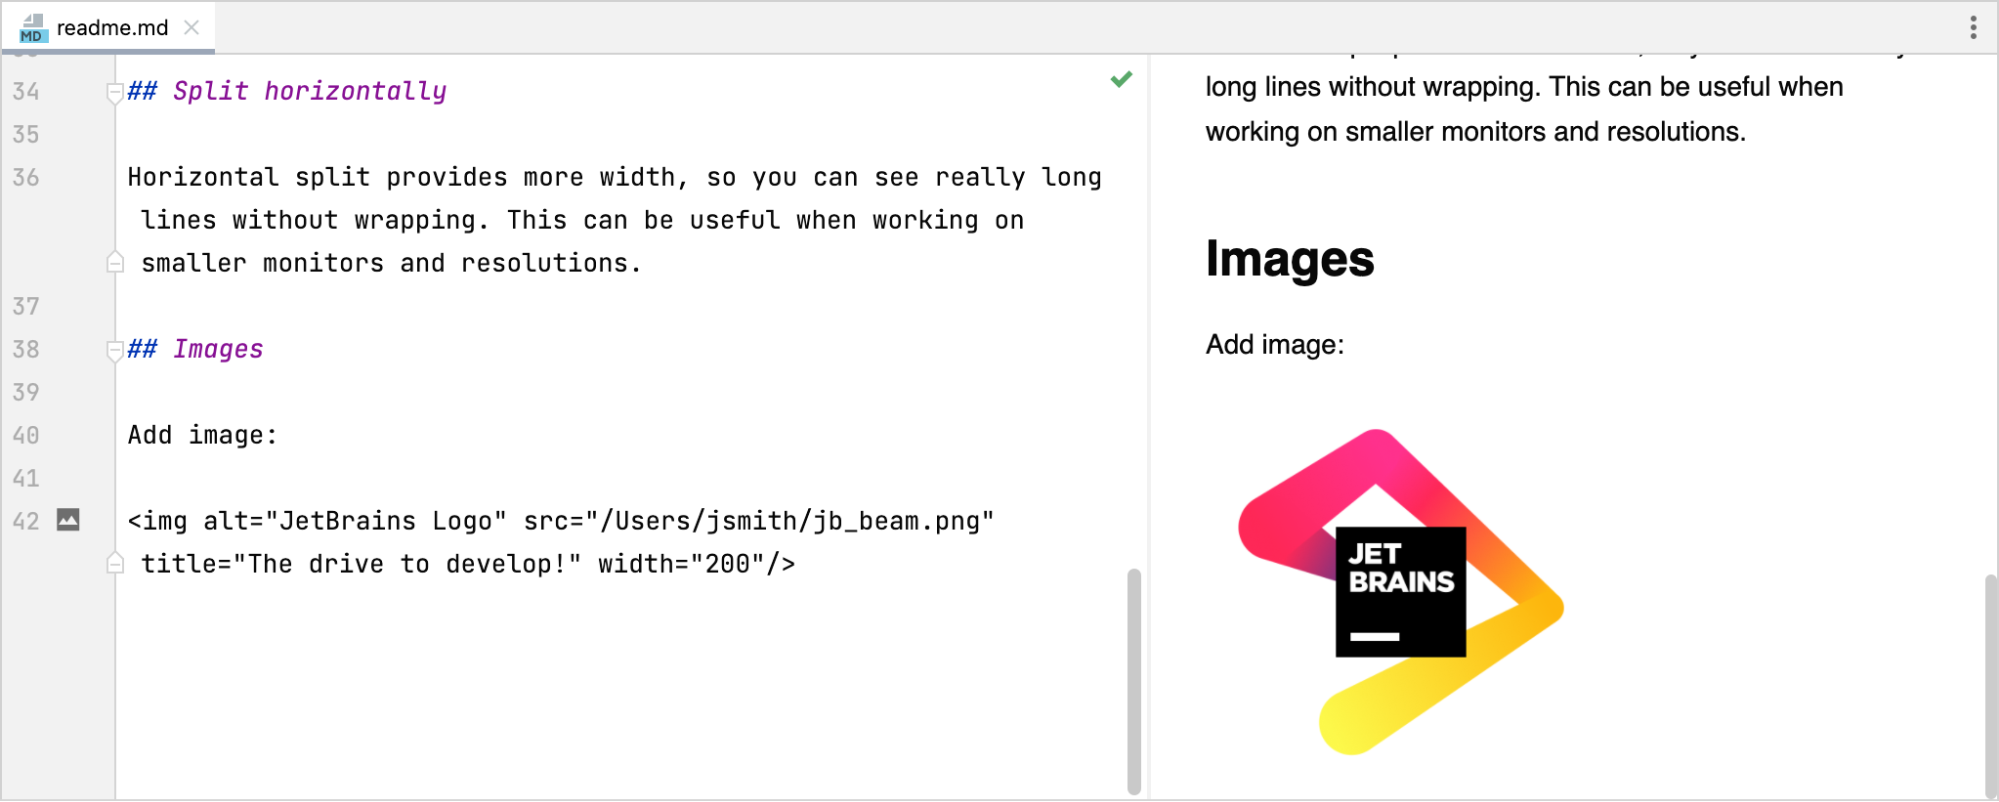
Either way, the IDE shows an icon in the gutter at the line with the image. Click this gutter icon to configure the image settings: location, size, title, and description.
Tables
To generate a table, press Ctrl + N or Cmd + N, select Table, and then select the number of rows and columns for it.
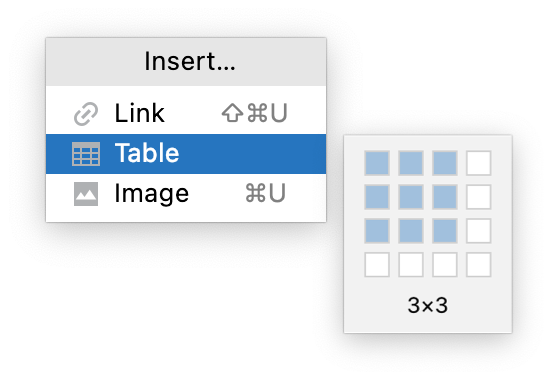
Use the Tab key to move the cursor between cells. The Markdown editor automatically adjusts the sizes of cells in the table as you add text to them. Click the special markers to select, move, insert, remove, and align the columns and rows.
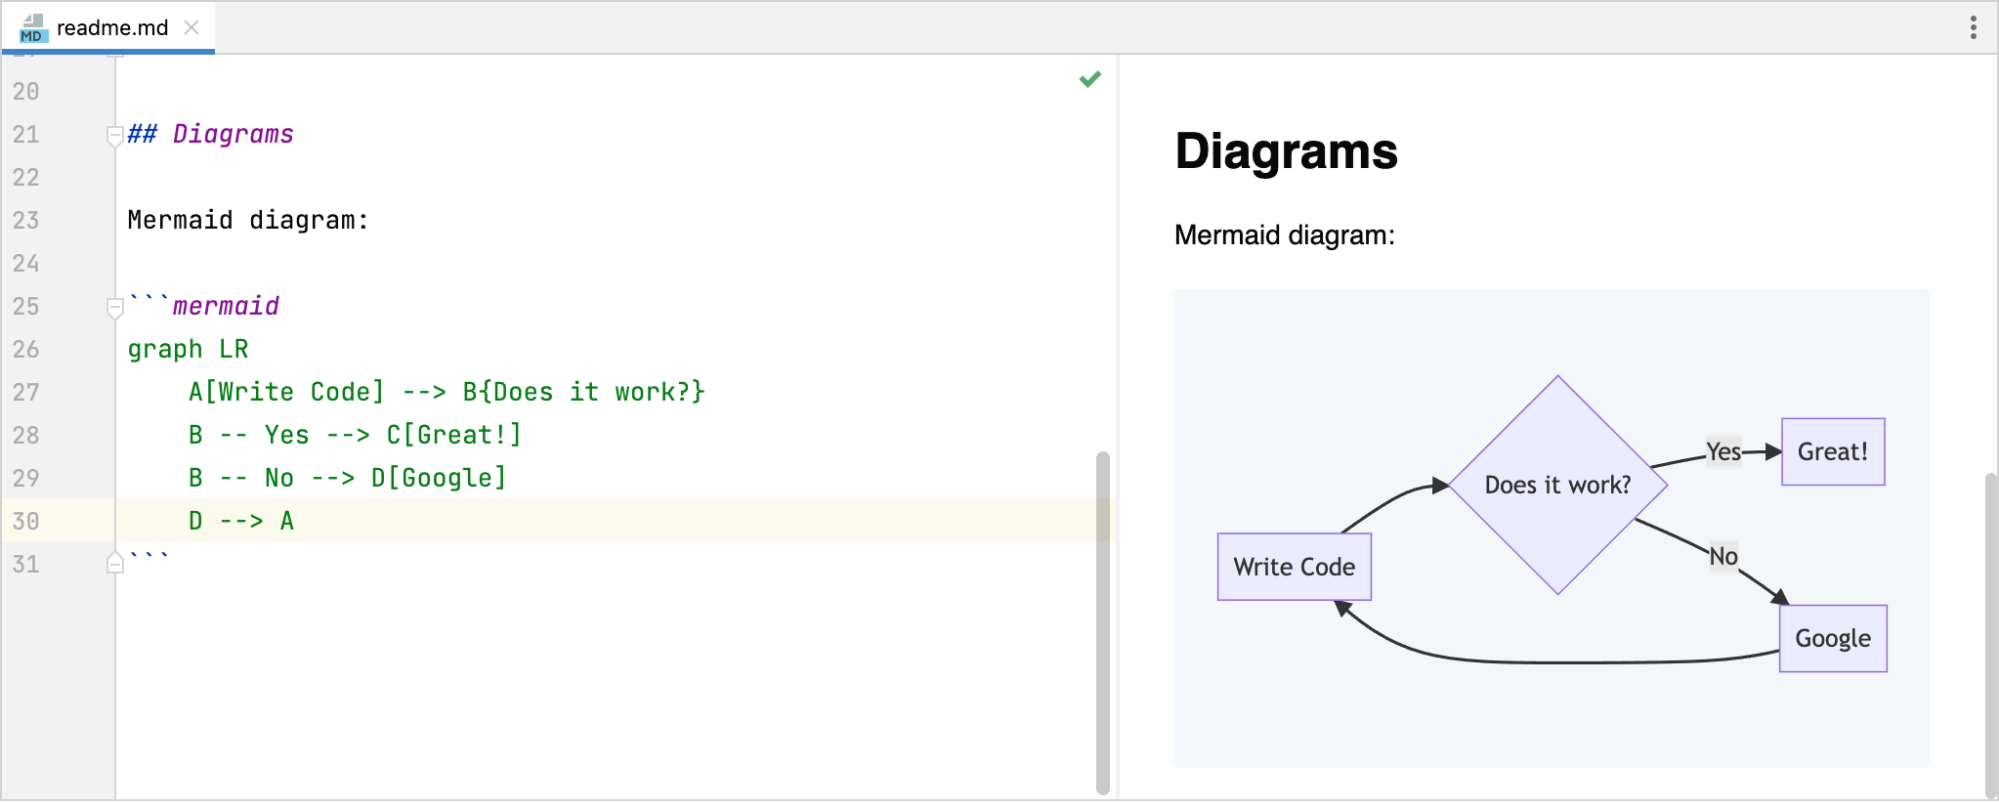
Diagrams
The Markdown editor can render diagrams defined with Mermaid and PlantUML. Both are disabled by default and require the corresponding Markdown extensions. You can install both extensions in the IDE settings for Markdown or using a gutter icon that appears next to a Mermaid or PlantUML diagram block if the corresponding extension is not installed.
Code Blocks
When you add a code block and specify its language, the Markdown editor injects the specified language so you get highlighting, completion, and any other assistance available for this language.
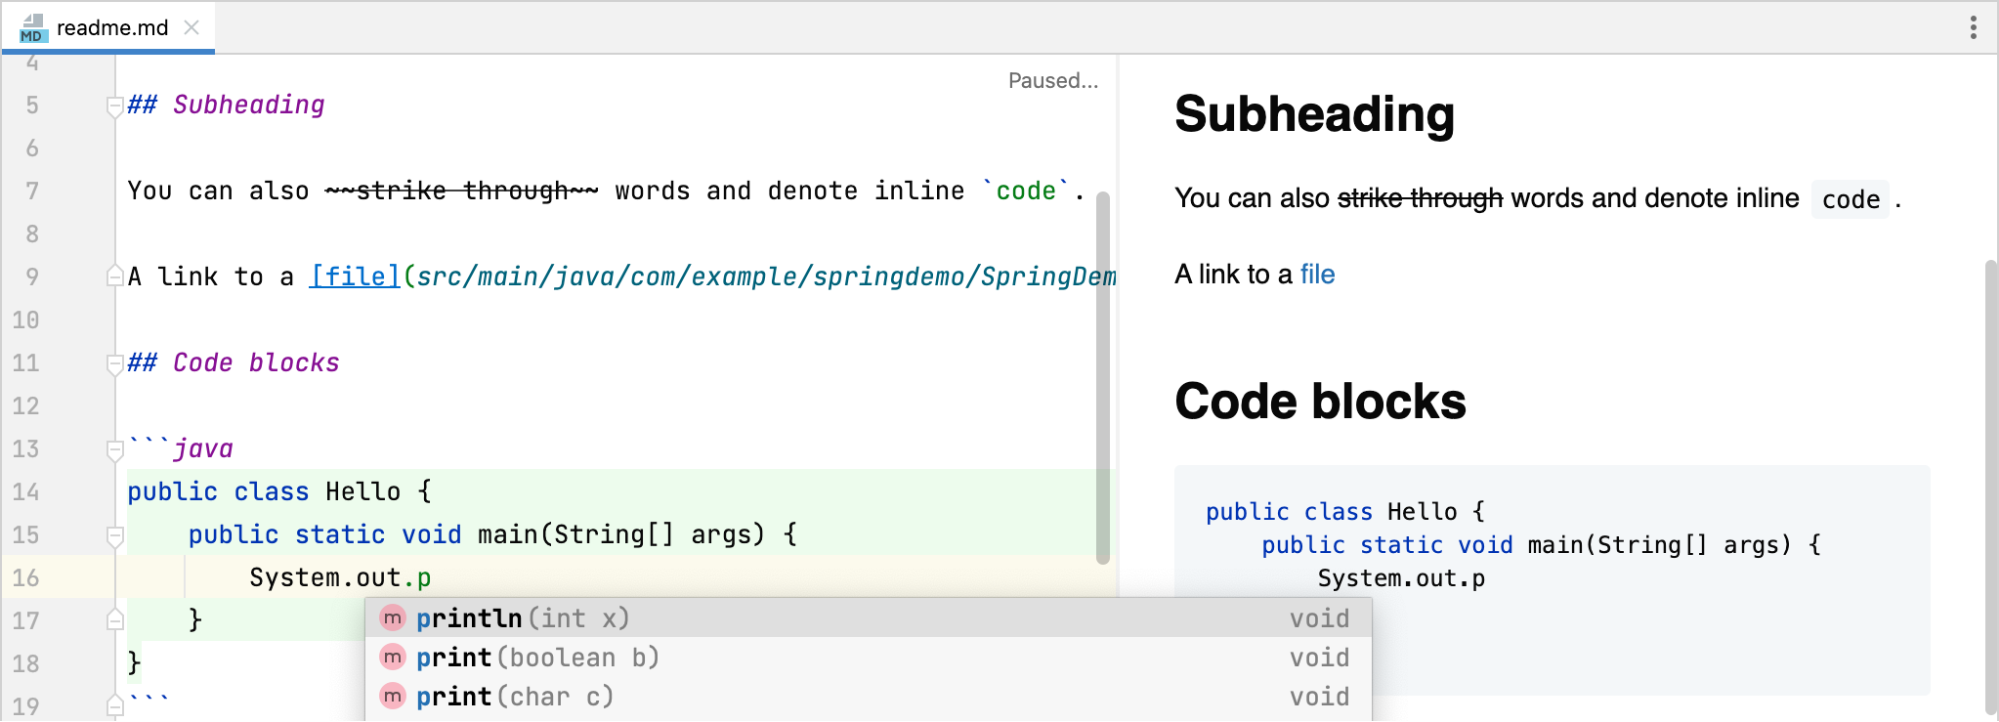
It also properly highlights the code block in the rendered output according to the conventions for the specified language.
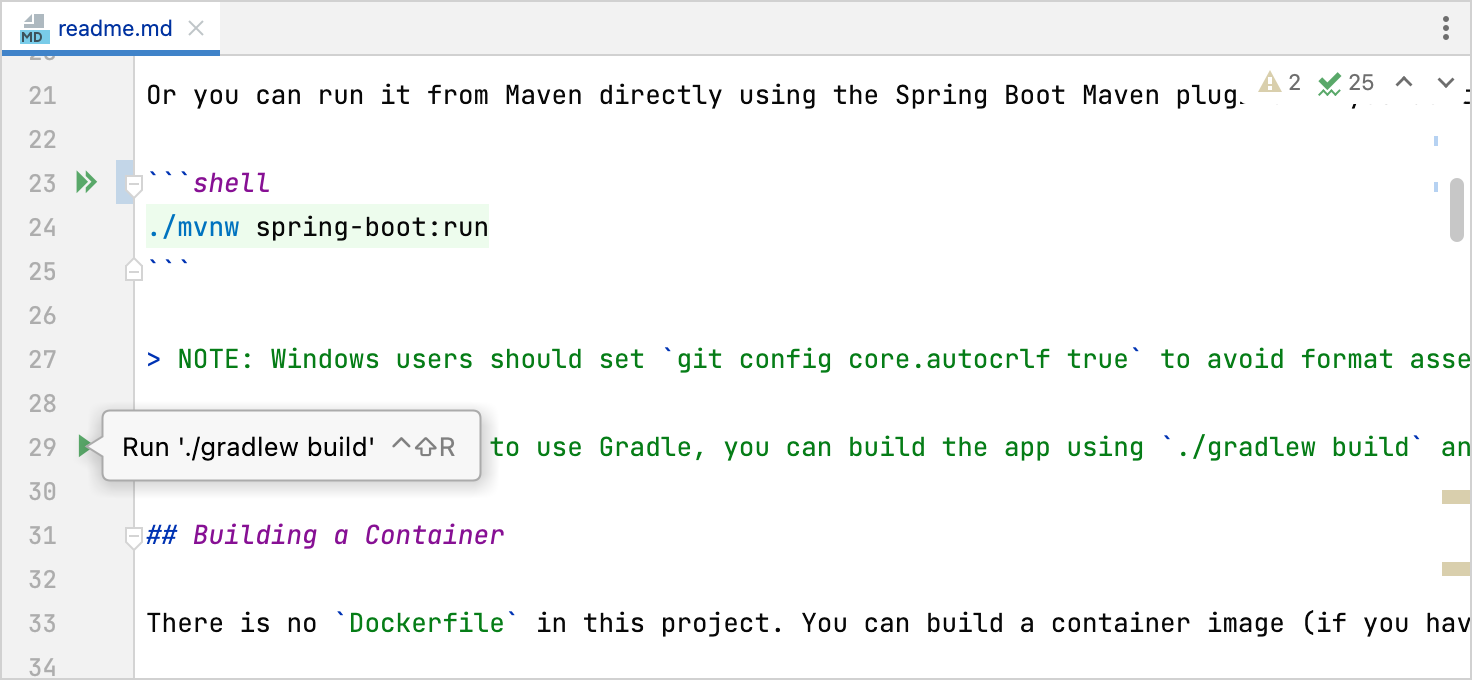
If you have code blocks with shell script commands, you can run them directly from the Markdown editor. This is especially convenient for cloned projects that have a README.md with commands for configuring the environment, building, and running the application. Just click the corresponding gutter icon next to the code block.
Lists
When editing lists, the Markdown editor properly inserts and adjusts the markers, numeric characters, and indentation. Press Tab and Shift + Tab to add or remove indentation levels. Switch the type of list with a single action in the floating toolbar.
Table of contents
You can generate a properly indented list of headers available in the current file: press Ctrl + N or Cmd + N and select Table of Contents. If you already have a table of contents in this file, select Update Table of Contents to update it after you add, remove, or rename some headers.
You can navigate directly to the referenced file or chapter by holding Ctrl or Cmd when you click the reference.
Reformat Markdown files
The IDE can properly format Markdown according to the defined rules for line wrappings, blank lines, and indentation. You can find the action in the menu bar under Code | Reformat Code (Ctrl + Alt + L or Cmd + Alt + L).
Configure the formatting rules in the Markdown code style settings: go to Editor | Code Style | Markdown in the IDE settings.
Convert from Markdown to Other Formats
The Markdown plugin can export your Markdown files to HTML and PDF. If you configure Pandoc, it will also be able to export to and import from Microsoft Word files (DOCX).
The converter actions are in the menu bar under Tools | Markdown Converter.
Upcoming features
There are also some features planned for version 2022.3 coming later this year:
- Drag and drop any file from the project directly into the Markdown editor to generate a link to it.
- Find Usages and Rename refactoring for headings: find all links that reference a heading and safely rename it with all its usages.
- Experimental Front Matter support: the Markdown editor recognizes Front Matter headers, injects YAML with proper highlighting for your convenience, and does not render them in the preview.


