Kotlin
A concise multiplatform language developed by JetBrains
Object Detection with KotlinDL and Ktor

I presented the webinar “Object Detection and Image Recognition with Kotlin,” where I explored a deep learning library written in Kotlin, described how to detect objects of different types in images, and explained how to create a Kotlin Web Application using Ktor and KotlinDL that recognizes cars and persons on photos. I have decided there is more that I would like to share with you on the subject, and so here is an extended article.
If you are new to Deep Learning, don’t worry about it. You don’t need any high-level calculus knowledge to start using the Object Detection Light API in the KotlinDL library.
However, when writing this article, I did assume you would be familiar with basic Kotlin web-development fundamentals, e.g., HTML, web-server, HTTP, and client-server communications.
This article will take you through how to detect objects in different images and create a Kotlin Web Application using Ktor and KotlinDL.
What is Object Detection?
It’s a pretty simple term from the Deep Learning world and just means the task of detecting instances of objects of a certain class within an image.
You are probably already familiar with Image Recognition, where the idea is to recognize the class or type of only one object within an image without having any coordinates for the recognized object.
Unlike the Image Recognition, during Object Detection, we are trying to detect a few objects (sometimes it could be a significant number, 100 or even 1,000, for example) and their locations, which are usually presented as four coordinates of a rectangle (x_min, x_max, y_min, y_max) containing the detected object.
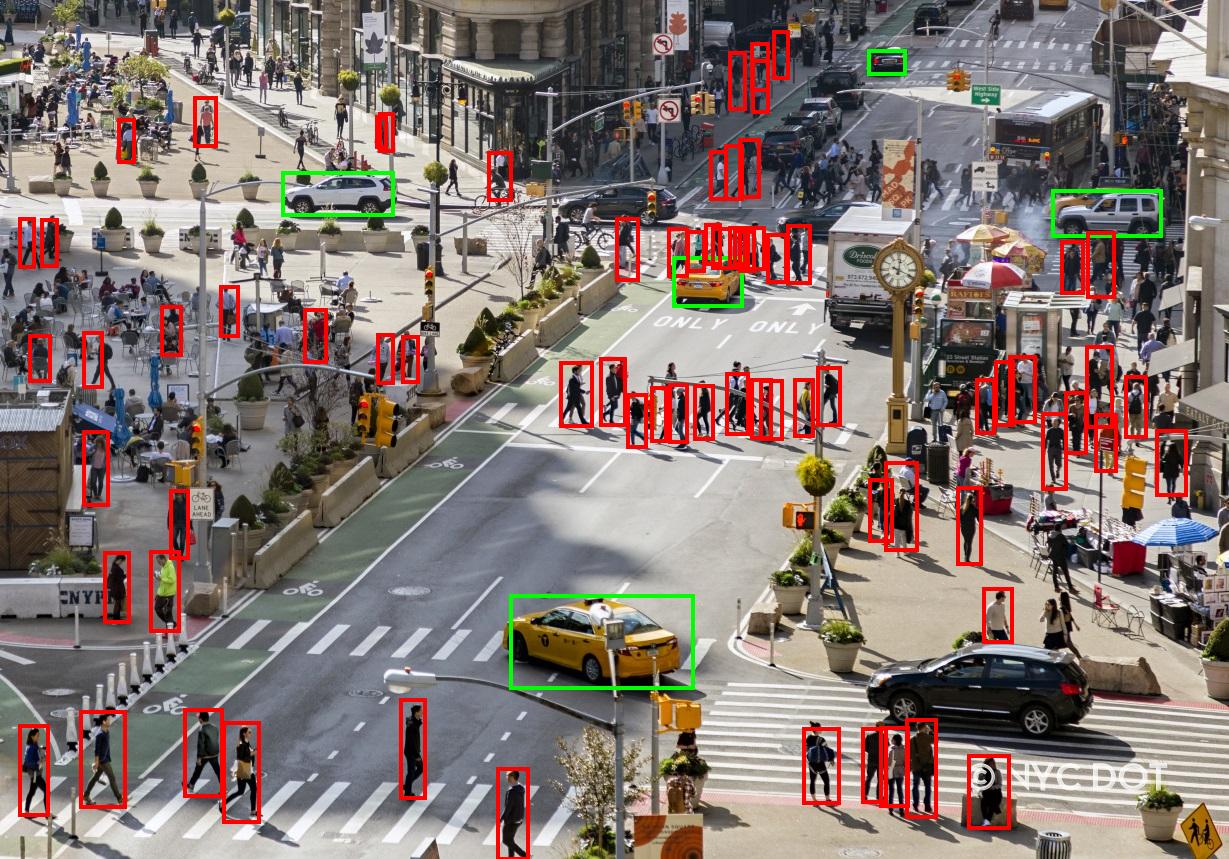
For example, this screenshot of the example application shows how a few objects have been recognized, and their positions annotated:

OK – now for the fun stuff! It’s time to write some Kotlin code to detect objects within an image.
Object Detection Example
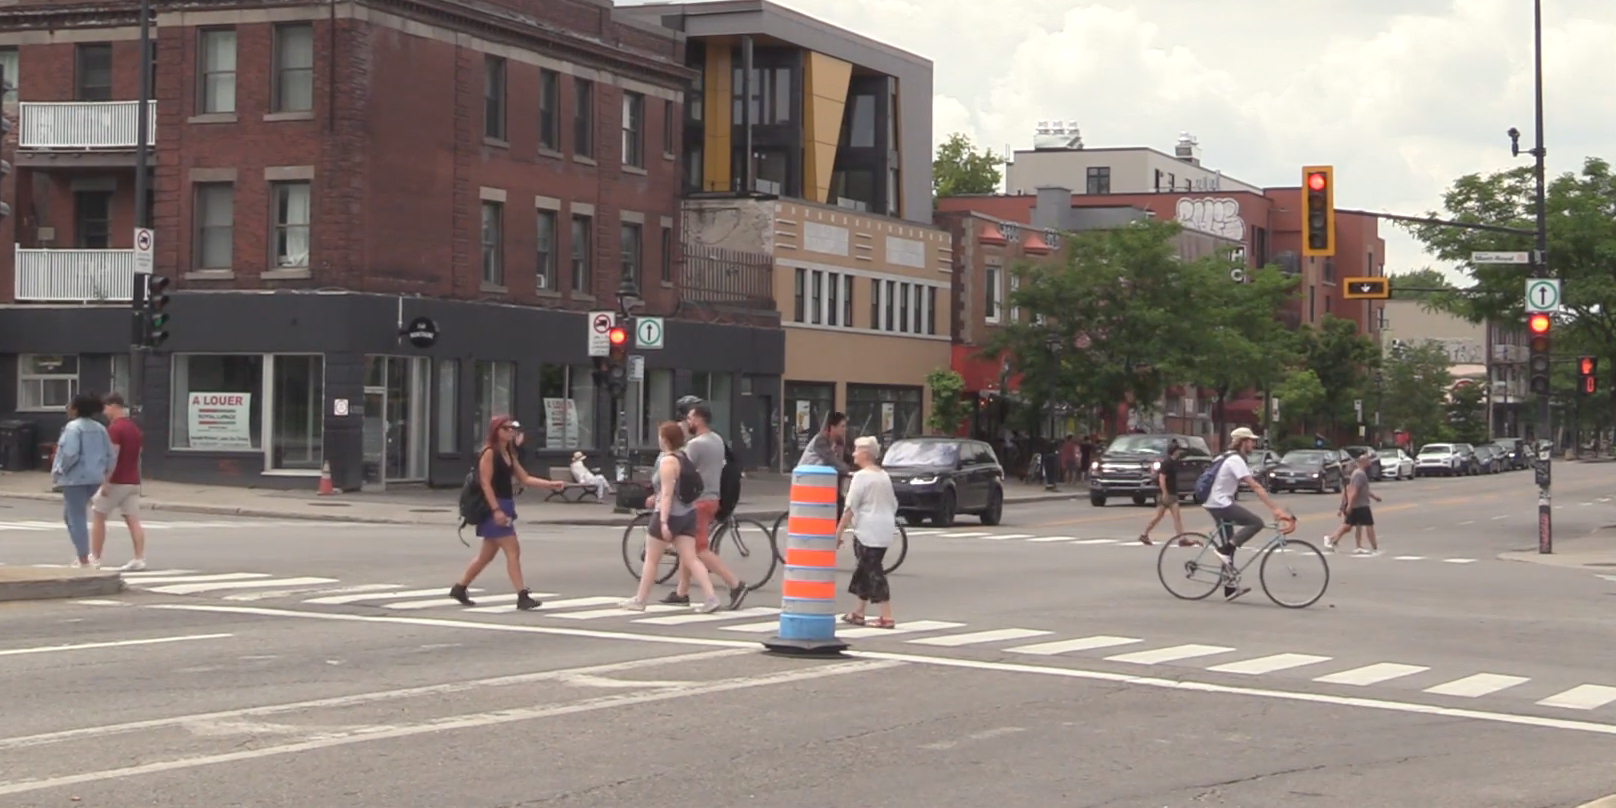
Let’s say we have the following image. We see a typical street: several cars, pedestrians crossing, traffic lights, and even someone using the pedestrian crossing on a bicycle.
With a few rows of code, we can obtain a list of the detected objects, sorted by score or probability (the degree of confidence of the model that a certain rectangle contains an object of a certain type).
This code prints the following:
OK, it looks like the model can detect objects, just like our eyes can do, but how do we go about marking the objects?
We can use the Swing framework to draw rectangles over the image. This also requires simple image preprocessing before visualization.
First, we need to add a simple visualization using JPanel, BufferedImage, and Graphics2D objects in the visualise function.
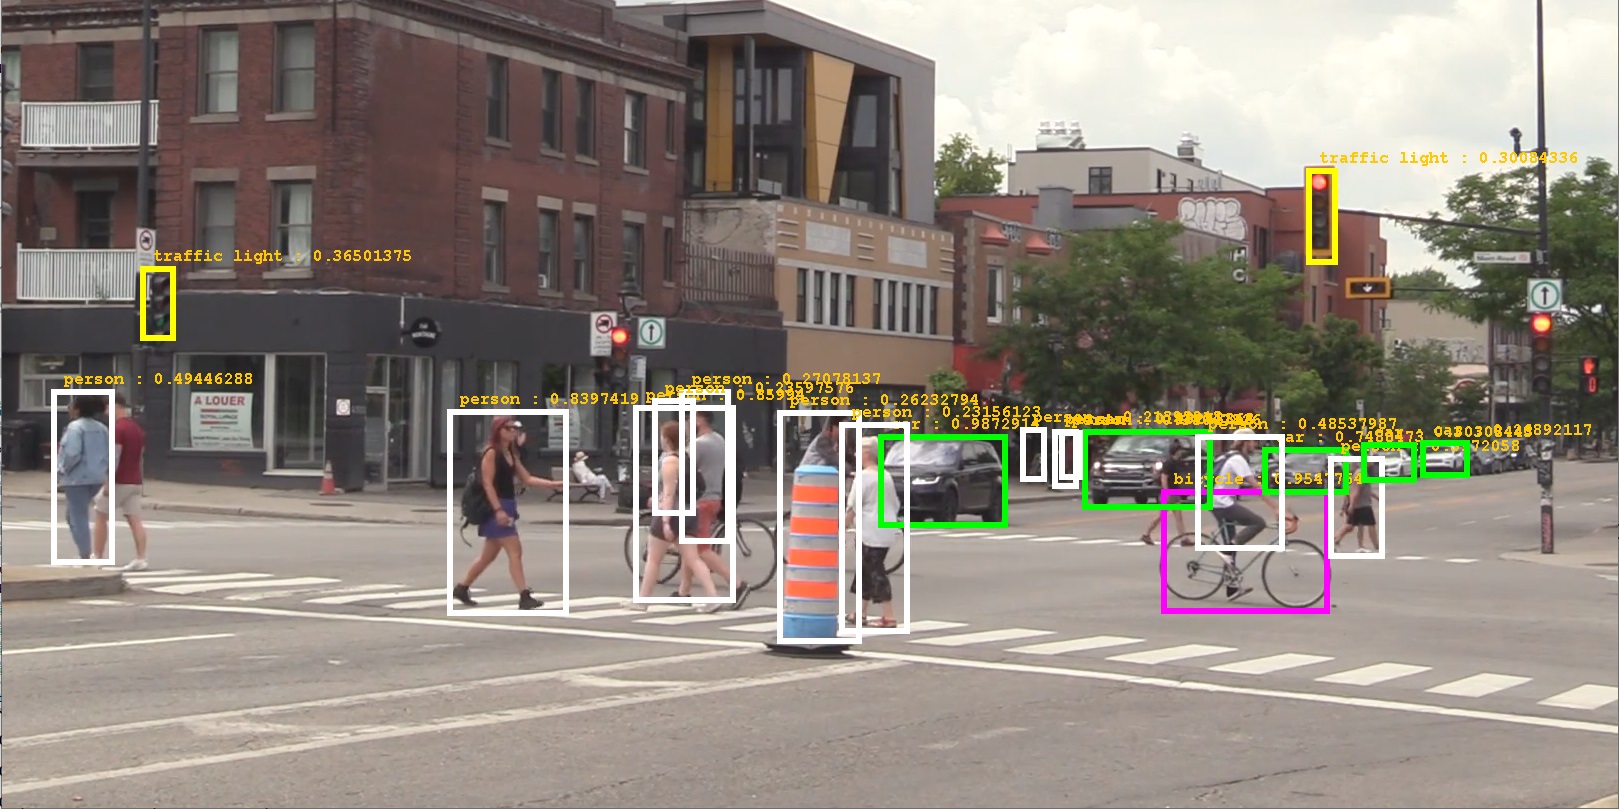
Drawing rectangles on an image with the Graphics2D API may not be the best approach, but we can use it as a good starting point for our research.
The result is the following image:
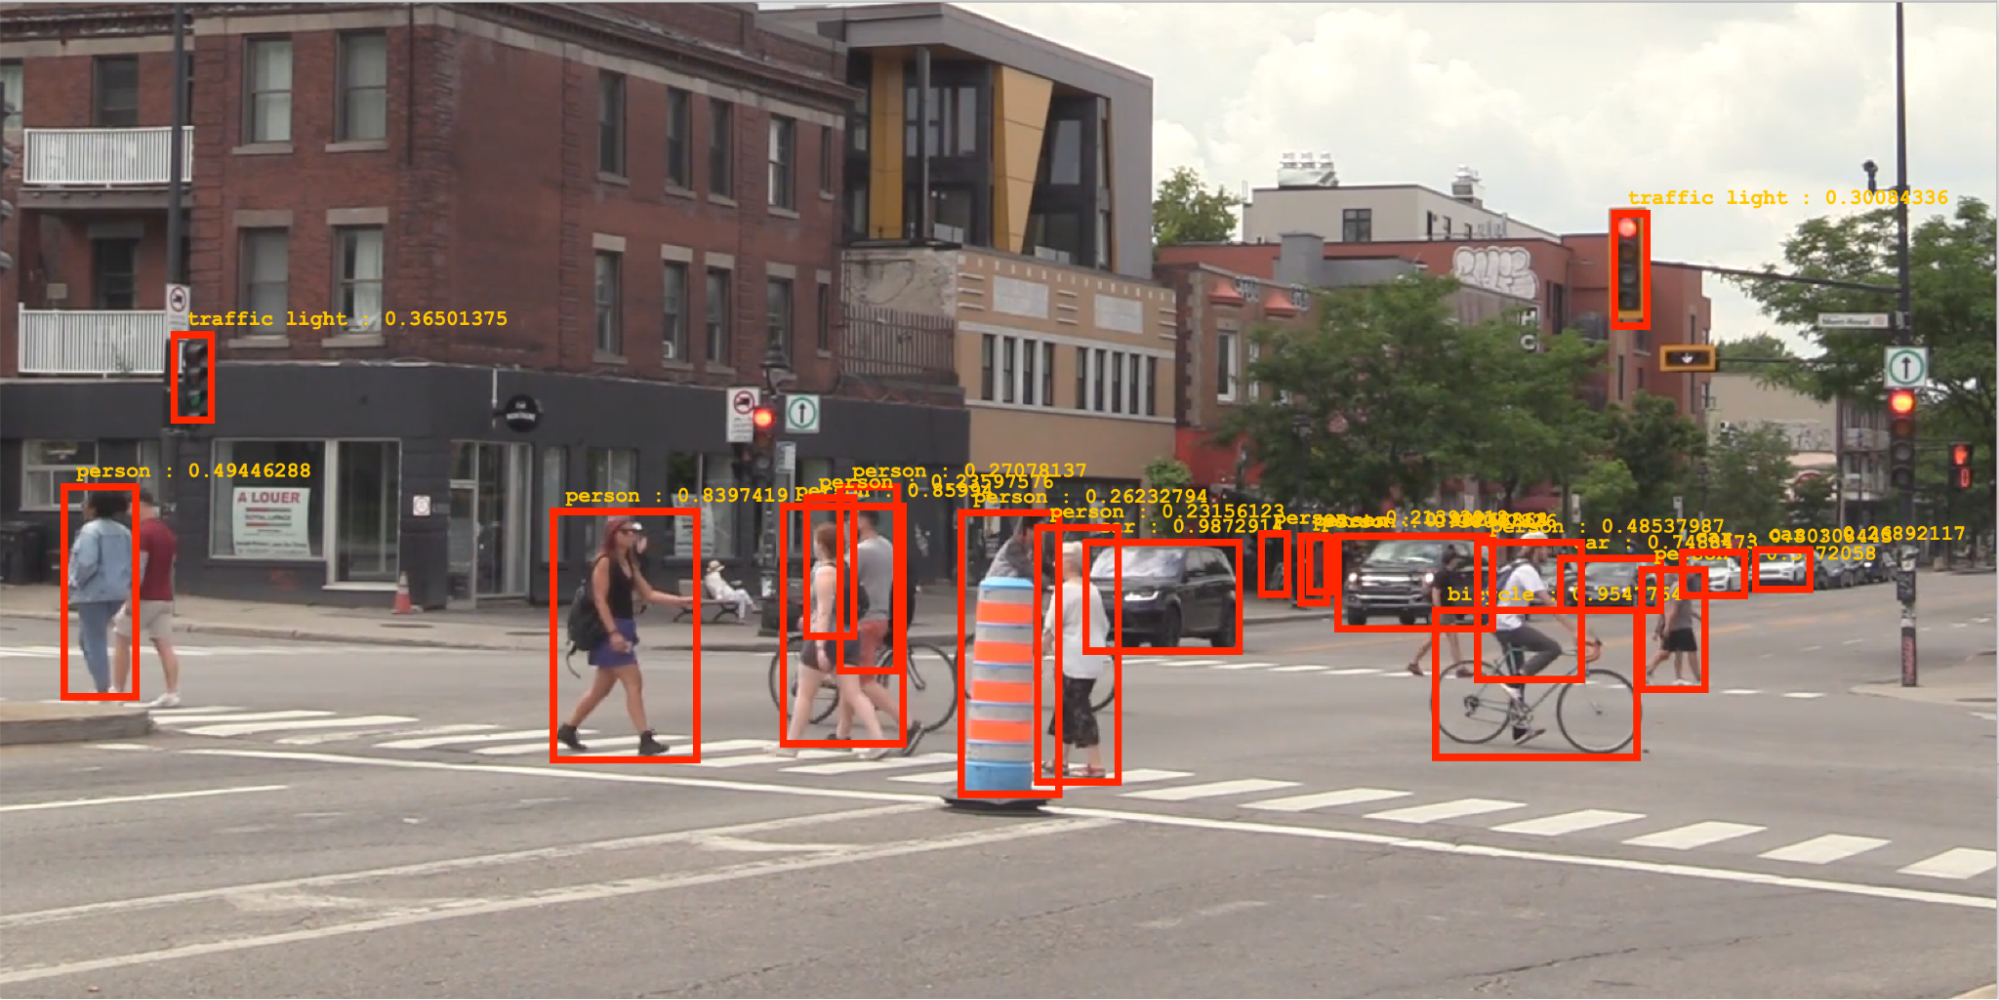
As you can see, the Object Detection Light API returns not only the class label and score but the relative image coordinates, which can be used for drawing rectangles or boxes around the detected objects.
Also, we could play a little bit with the paint palette and use different colors to differentiate people, bicycles, cars, and traffic lights.
That looks significantly better!
You can continue experimenting with the visualization, but we need to move on!
Client-Server Application with Ktor
In this section, I will use Ktor to write two simple programs: client and server. The client application will send the image to the server application. If you have never used Ktor before, it’s an excellent time to see how easy it is to deal with classic web stuff like HTTP requests, headers, MIME types, and so on.
When the code below is run, the client application sends a POST request via the submitFormWithBinaryData method. You can read more about how this works in Ktor documentation. The result with the added boxes for the detected objects can be found in the clientFiles folder.
Unfortunately, Ktor has no special API for receiving files from the server-side. But we’re programmers, right? Let’s just write the bytes obtained over the network to the File object.
The server part is a little more difficult. I’ll need to explain some parts of the code below.
Because model creation is a time-consuming step (due to loading and initializing), we need to create the model before we can run the server.
The intermediate result will be saved to the serverFiles folder. After that, the server application will send this file back to the client.
To send form data in a test POST/PUT request, you must set the Content-Type header and specify the request body. To do this, you can use the addHeader and setBody functions, respectively.
At the end, we need to close our model to release all the resources.
Run the server, and after that, try to make multiple runs of the client with the different images. Check clientFiles and serverFiles folders to find all the images that were sent with detected objects.
The complete example, including drawing and saving files to the serverFiles folder, can be found here in the GitHub repository.
Web Application
It’s time to write the whole Web Application with an HTML page rendered on the server, a few inputs, and a button. I’d like to upload an image, fill some input fields with the parameters, and press a button to download the image with the detected objects on my laptop.
The application will contain only the server part, but it has a few interesting aspects we will need to consider. It should handle two HTTP requests: the POST request, which handles multipart data with FileItem and FormItem handlers, and the GET request, which returns a simple HTML page.
From multipartData we can not only extract binary data like in the previous example but the values of the form parameters, too. These parameters, topK, and classLabelNames, will be explained later.
To describe the HTML page with this nice DSL, Ktor uses kotlinx.html as written in the documentation. This integration allows you to respond to a client with HTML blocks. With HTML DSL, you can write pure HTML in Kotlin, interpolate variables into views, and build complex HTML layouts using templates.
Run the server and open the page http://localhost:8002. Here you’ll find a form. Simply upload the image, fill inputs with the request parameters (or leave them empty), and press the button “Detect objects.” The new image will start downloading in a few seconds.
You also could play with the parameters topK, and classLabelNames to obtain different results. The topK parameter is used to determine how many detected objects (sorted by a score from highest to lowest) will be drawn on the image. The classLabelNames parameter takes as an input a list of labels (from the following list) separated by commas to filter categories of detected objects in the picture that will be enclosed in a rectangle.
The complete example can be found here in the GitHub repository.
This represents only a small fraction of what you can do with the full power of Ktor. For example, you can also build a REST API for Object Detection, Image Recognition, or build a helpful microservice. It is your choice!
In conclusion
Release 0.3 was shipped with only one effective object detection model: SSD. The new release, 0.4, brings seven new object detection models with different characteristics of velocity and accuracy as well as the ability to detect complex objects.
We strongly recommend using Compose for Desktop, instead of Swing, for your visualization needs. The community is working on moving these examples to the new framework.
This is not the only improvement you can expect in the Object Detection Light API. In future releases, we will add some helpful methods for filtering and unioning different boxes in the YOLO style to avoid having places in the image where a single object has multiple rectangles drawn on it.
If you have any thoughts or user experience related to this use case, just make an issue on GitHub or ask in the Kotlin Slack (kotlindl channel).