By popular demand, PyCharm 2017.2 Professional Edition expands its Docker Compose support to those of you who run Windows. Let’s take a look and see how this works!
In our last Docker Compose post, we created a guest book in Flask. This time we’ll take a simple todo app in Django, and dockerize it. The starting point today will be a Django todo app which works locally, see the code on GitHub.
Setting Up Docker on Windows
If you don’t have Docker installed yet, you’ll need to make a decision about which version to install:
- Are you using anything other than Windows 10 Pro or Enterprise, or do you have Virtualbox, VMware, or anything other than Hyper-V installed: get Docker Toolbox and Virtualbox.
- If you’re on Windows 10 Pro or Enterprise, and you have either Hyper-V or no virtualization software installed: get Docker for Windows.
The reason for this is that Docker for Windows is based on Microsoft’s Hyper-V virtualization technology. Hyper-V is a seriously cool bit of tech that wraps your Windows in a hypervisor, rather than installing a hypervisor within Windows. What this means is that effectively you’ll be using a VM when you’re using your computer. Hypervisors are unable to run on a VM, so when you enable Hyper-V on Windows, you can’t run any other VM software anymore.
Setting Up Docker Toolbox
If you installed Docker for Windows, you can skip this section.
Docker Toolbox works by redirecting all your Docker commands to a Docker instance running either on a local VM, or on a cloud service. Today, let’s set up a Virtualbox VM on our local computer. Run with a cmd
window:
1 |
docker-machine create --driver virtualbox default |
Let’s verify that it works by connecting our command-line Docker. To do so, we need to run this cryptic looking command in cmd
:
1 |
@FOR /f "tokens=*" %i IN ('docker-machine env default --shell=cmd') DO @%i |
To see what it does, run docker-machine env default --shell=cmd
, it will output several commands to set environment variables that configure Docker and Docker Compose. The long command above simply runs these all.
At this point, if you run docker run hello-world
you should see a cheerful message that confirms that everything works:
Running Django in Docker
For our Django app we’ll need to create two containers: a database container, and a container which holds our actual application. We’ll use Docker Compose to link the containers together.
Let’s get started with writing our Dockerfile:
1 2 3 4 5 6 7 8 9 10 11 12 13 |
FROM python:3.6 WORKDIR /app # By copying over requirements first, we make sure that Docker will cache # our installed requirements rather than reinstall them on every build COPY requirements.txt /app/requirements.txt RUN pip install -r requirements.txt # Now copy in our code, and run it COPY . /app EXPOSE 8000 CMD ["python", "manage.py", "runserver", "0.0.0.0:8000"] |
This is enough configuration to start Django, however, before we can proceed we should also make sure that we configure our database. For this we should write a compose file where we add both our Django service, and our postgres service:
1 2 3 4 5 6 7 8 9 10 11 12 13 14 15 16 17 |
version: '2' services: web: build: . ports: - "8000:8000" volumes: - .:/app links: - db db: image: "postgres:9.6" ports: - "5432:5432" environment: POSTGRES_PASSWORD: hunter2 |
The postgres image is easily configured with environment variables, for details read the image’s page on Docker hub. In this case we’re only setting the password, leaving the defaults for username and database. If you want to persist data when the container is destroyed, you’d need to create a named volume for the /var/lib/postgresql/data folder.
After adding these files, let’s just head over to our Django settings.py to configure our new database credentials:
1 2 3 4 5 6 7 8 9 |
DATABASES = { 'default': { 'ENGINE': 'django.db.backends.postgresql', 'NAME': 'postgres', 'USER': 'postgres', 'PASSWORD': 'hunter2', 'HOST': 'db' } } |
In a Docker Compose project, you can connect to linked containers by their service name unless you’ve specified an alias in the link
section of the compose file. In this case we wrote:
1 2 |
links: - db |
Therefore we should tell Django to look for the db
host. Although I’m hardcoding it here for simplicity, ideally you’d get this configuration from environment variables.
This is all the configuration we need to do, and we can get started with building our images now.
Let’s first let PyCharm know where to find Docker. Go to Settings | Build, Execution, Deployment | Docker, and make sure that your Docker is configured. If you’re using Docker for Windows, and there’s no Docker listed, just click the green ‘+’ icon, and the defaults should be correct. If you’re using Docker machine, select the ‘Docker Machine’ radio button, and select the correct machine in the dropdown:
After that’s set up, we can go and add our Docker run configuration, go to the ‘Edit Run Configurations’ screen, and add a Docker Deployment
run configuration.
Let’s name it Rebuild Images
, and in the Deployment
field, select the compose file:
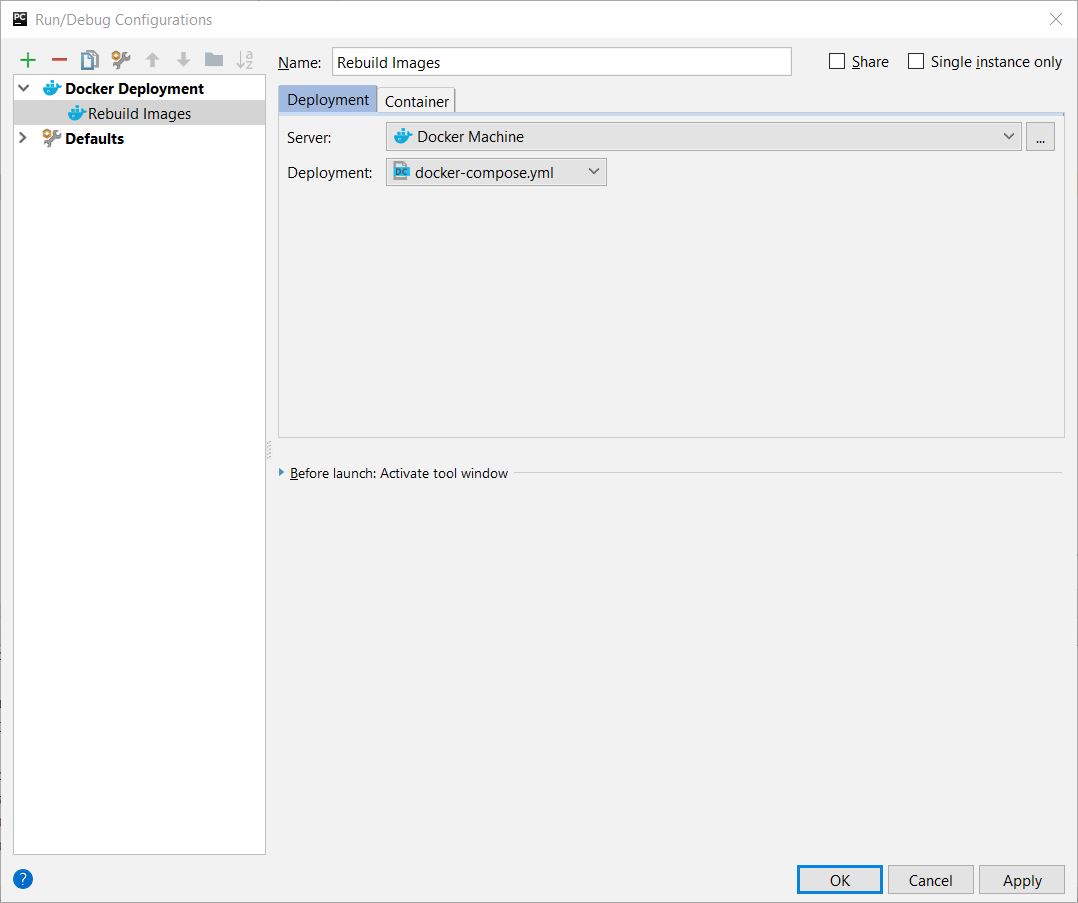
Now when we run this configuration, we should see that all the layers are pulled from Docker hub, and both the database and Django are started.
Setting up the Python Remote Docker Interpreter
Now to make sure that we can debug our Django project, let’s configure PyCharm to use the Python interpreter within our Docker container. To do so go to Settings | Project Interpreter, and use the gear icon to select Add Remote
:
Choose the Docker Compose interpreter type, and make sure the docker-compose.yml file is selected. The service you choose under ‘service’ is the service you want to debug with this run configuration, when you start it, all services will still be started either way. As the only Python service is ‘web’, let’s select that here:
Afterwards you should see that PyCharm detected the packages we configured in requirements.txt, and the path mappings:
Now we can add a normal Django server run configuration, just make sure to set host to ‘0.0.0.0’ to make sure that we listen to requests coming from outside the Docker container.
Now first run the migrations, by going to Tools | Run manage.py task, and then writing migrate
. After this command has completed, we can use the regular run and debug icons in PyCharm to run and debug our Django project. So let’s run it!
To see our Django application in the browser, go to http://localhost:8000 if you’re using Docker for Windows. If you’re using Docker Machine, we’ll first need to check on which IP our Docker Machine is running, run docker-machine ip default
on the command line. In my case this is 192.168.99.100, so I’ll go to http://192.168.99.100:8000 in the browser.
Now if you see a message “DisallowedHost at /”, go to Django’s settings.py, and find ALLOWED_HOSTS
. During development we can change this to: ALLOWED_HOSTS = [‘*’]
to disable this check. Please make sure you appropriately configure it when running in production however.
When everything works, we can add a breakpoint, and debug as usual:
I can’t get it installed! Looks like it is an issue with my PC, but I will be back.
I guess it is worth noting that default docker shell on Windows with Kitematic is PowerShell not cmd.exe.
Thank you! This makes my like easier. Ahhh…
When stepping from a breakpoint in toggle_todo(), I did get a debugging error about not finding base.py. I asked PyCharm to list candidate paths, chose the first one (it has a strange path with lots of digits in it), and everything worked. Woohoo!
This tutorial puts the project in c:\Users\dude. I read that PyCharm Docker for Windows debugging won’t work if the project is outside the user’s home dir. Do you know if this is true?
Thanks again.
You’re completely right about the home directory issue: this is a Docker Machine restriction, not a PyCharm restriction
I’ve been modifying your files to allow me to get to a shell prompt after running the container. Then I can inspect the file system (e.g., check on uploaded files), run Apache, etc.
It’s been somewhat successful. The adjusted setup lets me right-click on the web service in the Docker window and attach, and get a shell prompt. I can start Apache, start the Django server, access them both from the host on two different ports, etc.
The changed docker-compose has:
ports:
– “8000:8000”
– “80:80”
stdin_open: true
tty: true
Dockerfile has:
RUN apt-get install -y apache2 && \
apt-get install -y libapache2-mod-wsgi-py3 && \
echo “ServerName localhost\n$(cat /etc/apache2/apache2.conf)” > /etc/apache2/apache2.conf
…
EXPOSE 8000 80
CMD /bin/bash
Debugging is the only thing that doesn’t work. Run|Debug clobbers the attached console. I’m not complaining; the debugger has Pixie Magic.
I’ve tried obvious things, like running debug and attaching, or using Exec, then entering /bin/bash. That gives a shell prompt, but breaks the debugger.
Any way to have the debugger working, and get a shell on the Docker container?
Why do you need a shell prompt? To run Apache?
I don’t think you can connect debuggers to Django running in any WSGI server. If you’d like to host your application with Apache in production, your best bet is to run the Django application in Gunicorn or uWSGI in one container, and then run Apache with a reverse proxy (mod_proxy) in another. That way you can for debugging purposes run the debug server rather than Gunicorn/uWSGI, and still debug behind Apache. Have a look here: https://github.com/ErnstHaagsman/djangodocker/tree/apache, if you’d like to try that out, make sure to set up the remote interpreter for the now renamed ‘app’ container rather than web.
I can’t figure it out. I’m getting this when I try to run the configuration:
eval “$(docker-machine env default)”Deploying 'Compose: docker-compose.yml'...
Removing old containers...
TLS configuration is invalid - make sure your DOCKER_TLS_VERIFY and DOCKER_CERT_PATH are set correctly.
You might need to run
eval “$(docker-machine env default)”(Re)building services...
TLS configuration is invalid - make sure your DOCKER_TLS_VERIFY and DOCKER_CERT_PATH are set correctly.
You might need to run
eval “$(docker-machine env default)”Starting...
TLS configuration is invalid - make sure your DOCKER_TLS_VERIFY and DOCKER_CERT_PATH are set correctly.
You might need to run
No containers created for service: db
No containers created for service: web
Failed to deploy 'Compose: docker-compose.yml': Some services/containers not started
Windows 10 Pro
PyCharm 2017.2.3
Docker version 17.06.2
Docker-compose version 1.14.0
Everything works if I run
docker-compose up
in cmdIs it just my setup or is it a bug?
Please remove the path to the certificates folder in Settings | Build, Execution, Deployment | Docker, and try again.
Playing with this, it is extremely slow. Any action just takes forever (starting, restarting, listing the remote packages). Is this a known issue or am I doing something wrong?
This is a compose project, so for anything that we want to use a container for, we need to spin up not just the application container, but also the database container. This takes some time, unfortunately. When you run
docker-compose run web pip3 freeze
you can see this happen on the command line.No there’s something seriously wrong with either my settings or pycharm. Running
docker-compose run web pip3 freeze
from the command line takes about 2 seconds. Opening the Project Interpreter in Pycharm and waiting for the package listing to be filled takes close to 3 *minutes*! Can you help me troubleshoot this?Tried again, this time it took 40 seconds. The first time it took that long because it might have been trying to update skeletons at the same time? But still that’s no excuse for neither the 40 seconds or the 3 minutes
On Windows, using Docker For Windows, the default install has Daemon exposed only via TLS and i needed to turn on exposing without TLS to get PyCharm to see it, otherwise was getting java ConnectionException: Connection refused
Excellent tutorial, but I’m having a problem (I’m using PyCharm 2017.3, so I have to take some creative license in the instructions).
Everything appears to be fine. I build the docker image, run the migrations. but when I come to running my Django server, I get:
Couldn’t upload helpers for remote interpreter: Error connecting to remote host localhost: Connection refused: connect
and:
Can’t run remote python interpreter: Error connecting to remote host localhost
This is a strange one, as the migrations appear to run fine. I guess I am doing something wrong, but I don’t know what.
My run server config is the same as default, apart from host is: ‘0.0.0.0’.
Any help would be appreciated. Thanks.
This is what I am getting from db log. Some steps are missing from the instructions.
LOG: MultiXact member wraparound protections are now enabled
LOG: database system is ready to accept connections
LOG: autovacuum launcher started
FATAL: password authentication failed for user “djangotodo”
DETAIL: Role “djangotodo” does not exist.
Connection matched pg_hba.conf line 95: “host all all all md5”
LOG: received smart shutdown request
LOG: autovacuum launcher shutting down
LOG: shutting down
LOG: database system is shut down
LOG: database system was shut down at 2018-02-02 06:20:55 UTC
LOG: MultiXact member wraparound protections are now enabled
LOG: database system is ready to accept connections
LOG: autovacuum launcher started
FATAL: password authentication failed for user “djangotodo”
DETAIL: Role “djangotodo” does not exist.
Connection matched pg_hba.conf line 95: “host all all all md5”
FATAL: password authentication failed for user “pgadmin”
DETAIL: Role “pgadmin” does not exist.
Connection matched pg_hba.conf line 95: “host all all all md5”
FATAL: password authentication failed for user “djangotodo”
DETAIL: Role “djangotodo” does not exist.
Connection matched pg_hba.conf line 95: “host all all all md5”
Looks like you’re specifying “djangotodo” as the database username. In the compose file no username is specified, so the database uses the default username: “postgres”. The database should be named “postgres” as well. Let me know if this helps!
How can you pass environment variables to the docker-compose config? I’ve added a variable while adding my docker-compose config but it isn’t passed into the compose file.
I’ve seen a few examples of setting up docker-compose remote interpreters, but none show the use of environment variables.
For example, I’ve got optional ports for HTTP & database, e.g. “${DB_PORT:-3306}:3306” but the container always stars with the default mysql port of 3306. The environment variable defined with the compose config doesn’t get fed in.
Thank you for the interesting article.
Why do you use the old version of docker-compose, rather than 3.6?