Guest Post: Four Ways To Quickly Display OpenCV Images During Debugging

This is a guest blog post by Adrian Boguszewski, author of OpenCV Image Viewer Plugin.
The average programmer makes 70 errors per 1,000 lines of code and spends 75% of their time on debugging (source). In computer vision (CV), this process may involve not only fixing the code but also checking that the visual effect produced by the algorithm has been applied to images correctly. To facilitate the inspection of this visual effect, the relevant image must be displayed using the fastest and easiest method possible. In this article, we’ll show you four quick ways to display an OpenCV image while debugging.
Computer vision is a field of artificial intelligence (AI) that empowers computers to interpret and understand visual information from the world, enabling them to perceive, analyze, and make decisions based on images or videos in much the same way that the human eye does. It encompasses tasks like object recognition, image analysis, and scene understanding, and has applications in areas such as autonomous vehicles, healthcare, and augmented reality.
OpenCV, which is short for Open Source Computer Vision Library, is an open-source software library that provides a comprehensive set of tools and functions for computer vision and image processing tasks. It enjoys widespread use in applications like image and video analysis, object detection, facial recognition, and robotics, enabling developers to work with visual data efficiently and effectively.
After any transformation of the image, such as resizing or changing its brightness or color space, it’s a good idea to check whether the algorithm has been correctly implemented. After all, any errors in processing images can significantly impact computer vision models. If images are incorrectly preprocessed or contain artifacts, such as noise or distortion, this can mean features are extracted or represented incorrectly and may hamper the model’s ability to recognize patterns and objects effectively. What’s more, inconsistent or biased preprocessing techniques across datasets can introduce biases and make the model less able to deal with real-world variations by hindering generalization. Basically, image processing errors can compromise the model’s performance, reliability, and its ability to make accurate predictions in practical applications.
Displaying and visually inspecting images is the quickest and easiest way of checking that transformations have been applied without any errors. This means it’s highly useful to learn simple ways to display the OpenCV image during debugging. Below, we’ll be looking at four different methods that can help you in your daily computer vision work with OpenCV images.
Save the image to the hard drive
The first visual debugging method involves saving the image to your hard drive.
To do this, you must enter the following code at the point where the variable you want to check changes:
cv2.imwrite("path/to/file.png", img)
Once you’ve done that, run your application until you reach the line shown above. Now, switch windows and check the saved image in the IDE or in the directory you specified as the first argument.
Pros
The image is saved permanently on the disk. You can check it at any time.
Cons
- This method uses hard disk space, which is a problem when there are many large image files.
- Whenever you want to view an image, you have to type the above snippet of code.
- If you’re using a debugger, you’ll need to stop it temporarily and then restart it to save the image.
- The additional code will no longer be required at the production stage and so must be removed once debugging is completed.
Add a code snippet to display the image
This method is rather similar to the one above. But this time the image isn’t saved to the hard disk – it appears on screen in a popup window instead.
To use this method for displaying the OpenCV image, simply type the following code fragment at the line where you wish to see what the image will look like after the relevant changes have been made.
cv2.imshow("img", img)
cv2.waitKey(0)
Pros
- No disk space is used.
- There’s no need to switch between applications. The image automatically appears on the screen.
Cons
This method has the same cons as the previous one, namely having to add code snippets to view the images which will need to be removed from the code base, and interrupting the debugger.
Run the code needed to display the image in the debugger
This option involves using PyCharm’s native debugger. This method is cleaner than the above two methods, as it doesn’t require you to add any code fragments that won’t be needed at the production stage.
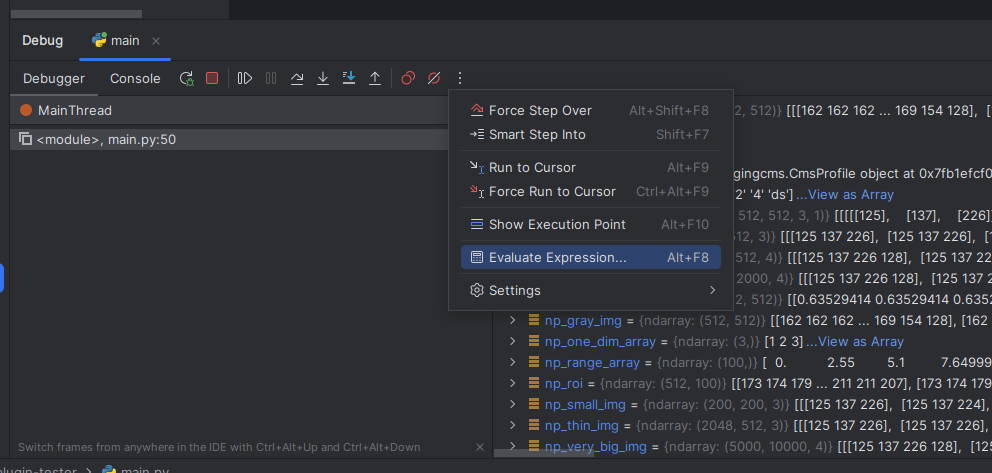
All code is entered in the Evaluate Expression window, which is called by the keyboard shortcut Alt+F8 (Windows and Linux) or ⌥ F8 (macOS). This means there’s no need to write any code in the program that is running the debugging. When the evaluator is closed, the code disappears.
To show the image, simply enter the following code (same as above) into the evaluator:
cv2.imshow("img", img)
cv2.waitKey(0)
Pros
- No temporary code has to be removed during the deployment of the production version.
- There’s no need to stop the debugging process and then restart it to display the image.
Cons
- The code disappears every time you run the code and close the evaluator. To see the next image, you’ll have to enter the code again.
- A large number of steps must be completed in order to open the image. These are as follows:
- Open the evaluator;
- Write the code;
- Display the image (by clicking Evaluate);
- Close the evaluator;
- Close the image by clicking any key when there is focus on the image.
You’ll also have to repeat all these steps each time you wish to display an image.
Use the OpenCV Image Viewer plugin
This plugin combines the advantages of each of the above solutions while simultaneously eliminating their disadvantages. The OpenCV Image Viewer plugin is designed to work with PyCharm. To start using the plugin, first install it from the JetBrains Marketplace. Then, the next time you start the debugger, it will be ready to use. After installation, a View as Image option will be added to the context menu, which can be clicked to preview the image without interrupting the debugging process. Alternatively, you can click the mouse wheel or use the Alt+I shortcut (Windows and Linux).

Pros
- There’s no need to stop debugging.
- The number of steps needed to view images is reduced.
- There’s no need to call the
imshowfunction – a single click is all it takes. - There are two image display options (dialog and popup window).
- It is compatible with different programming languages (C++, Python, Java, Kotlin, and Android).
Cons
- TensorFlow, PyTorch, and PIL images are not yet supported.
- Advanced features are still being implemented.
In computer vision, image display is the basis for debugging. For this reason, it’s worth using one of the above methods to quickly and effectively check that any transformations made meet your expectations. All four methods have their specific pros and cons, so try each and decide which is best for you!
The snippets of code given in points 1–3 are written in Python. However, after adjusting the syntax, they can also be used in C++, Java, and Kotlin.
About the author