How to Use FastAPI for Machine Learning


FastAPI provides a quick way to build a backend service with Python. With a few decorators, you can turn your Python function into an API application.
It is widely used by many companies including Microsoft, Uber, and Netflix. According to the Python Developers Survey, FastAPI usage has grown from 21% in 2021 to 29% in 2023. For data scientists, it’s the second most popular framework, with 31% using it.
In this blog post, we will cover the basics of FastAPI for data scientists who may want to build a quick prototype for their project.
What is FastAPI?
FastAPI is a popular web framework for building APIs with Python, based on standard Python type hints. It is intuitive and easy to use, and it can provide a production-ready application in a short period of time. It is fully compatible with OpenAPI and JSON Schema.
Why use FastAPI for machine learning?
Most teams working on machine learning projects consist of data scientists whose domains and professions lie on the statistics side of things. They may not have experience developing software or applications to ship their machine learning projects. FastAPI enables data scientists to easily create APIs for the following projects:
Deploying prediction models
The data science team may have trained a model for the prediction of the sales demand in a warehouse. To make it useful, they have to provide an API interface so other parts of the stock management system can use this new prediction functionality.
Suggestion engines
One of the very common uses of machine learning is as a system that provides suggestions based on the users’ choices. For example, if someone puts certain products in their shopping cart, more items can be suggested to that user. Such an e-commerce system requires an API call to the suggestion engine that takes input parameters.
Dynamic dashboards and reporting systems
Sometimes, reports for data science projects need to be presented as dashboards so users can inspect the results themselves. One possible approach is to have the data model provide an API. Frontend developers can use this API to create applications that allow users to interact with the data.
Advantages of using FastAPI
Compared to other Python web frameworks, FastAPI is simple yet fully functional. Mainly using decorators and type hints, it allows you to build a web application without the complexity of building a whole ORM (object-relational mapping) model and with the flexibility of using any database, including any SQL and NoSQL databases. FastAPI also provides automatic documentation generation, support for additional information and validation for query parameters, and good async support.
Fast development
Creating API calls in FastAPI is as easy as adding decorators in the Python code. Little to no backend experience is needed for anyone who wants to turn a Python function into an application that will respond to API calls.
Fast documentation
FastAPI provides automatic interactive API documentation using Swagger UI, which is an industry standard. No extra effort is required to build clear documentation with API call examples. This creates an advantage for busy data science teams who may not have the energy and expertise to write technical specifications and documentation.
Easy testing
Writing tests is one of the most important steps in software development, but it can also be one of the most tedious, especially when the time of the data science team is valuable. Testing FastAPI is made simple thanks to Starlette and HTTPX. Most of the time no monkey patching is needed and tests are easy to write and understand.
Fast deployment
FastAPI comes with a CLI tool that can bridge development and deployment smoothly. It allows you to switch between development mode and production mode easily. Once development is completed, the code can be easily deployed using a Docker container with images that have Python prebuilt.
How to use FastAPI for a machine learning project
In this example, we will turn a classification prediction model that uses the Nearest Neighbors algorithm to predict the species of various penguins based on their bill and flipper length into a backend application. We will provide an API that takes parameters from the query parameters of a URL and gives back the prediction. This shows how a prototype can be made quickly by any data scientist with no backend development experience.
We will use a simple `KNeighborsClassifier` on the penguin data set as an example. Details of how to build the model will be omitted, but feel free to check out the relevant notebook here. In the following tutorial, we will focus on the usage of FastAPI and explain some fundamental concepts. We will be building a prototype to do so.
1. Start a FastAPI project with PyCharm
In this blog post, we will be using PyCharm Professional 2024.1. The best way to start using FastAPI is to create a FastAPI project with PyCharm. When you click New Project in PyCharm, you will be presented with a large selection of projects to choose from. Select the FastAPI tab: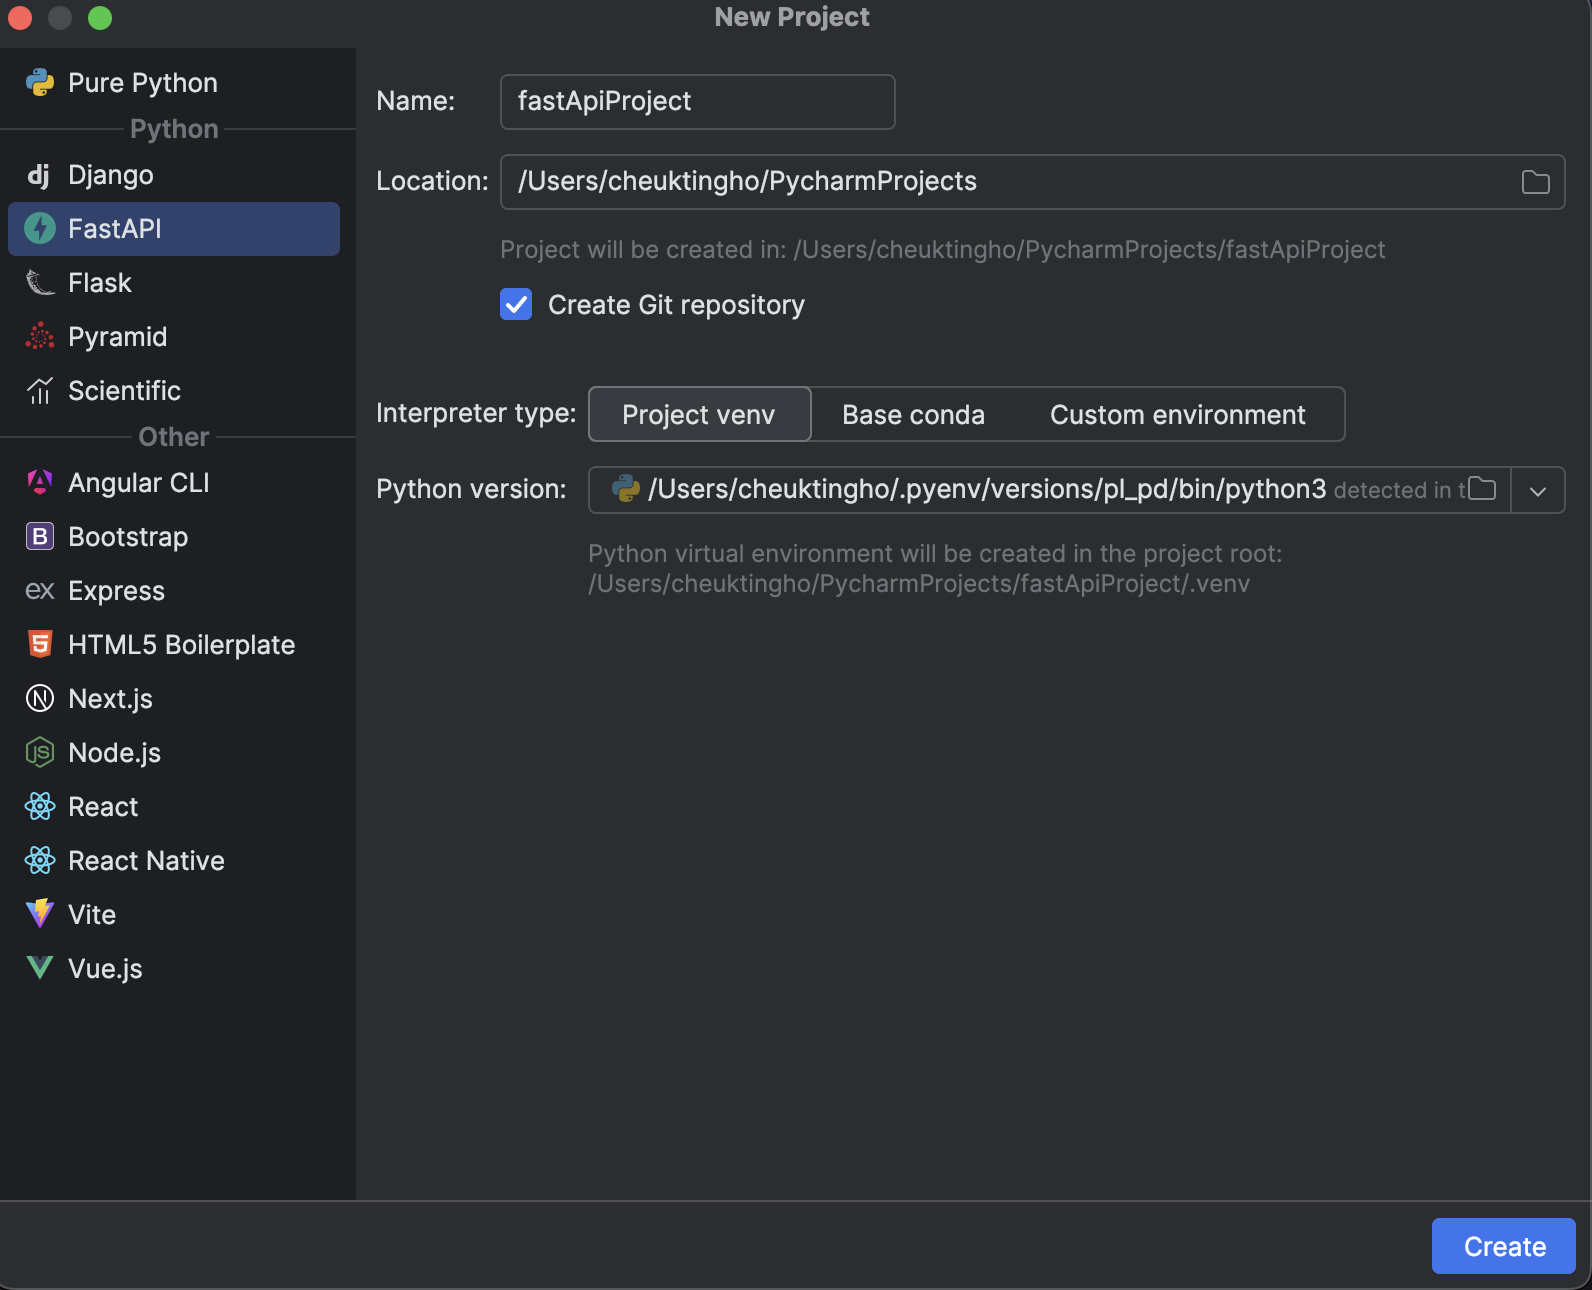
From here, you can put in the name of your project and take advantage of other options such as initializing Git and the virtual environment that you want to use.
After doing so, you will see the basic structure of a FastAPI project set up for you.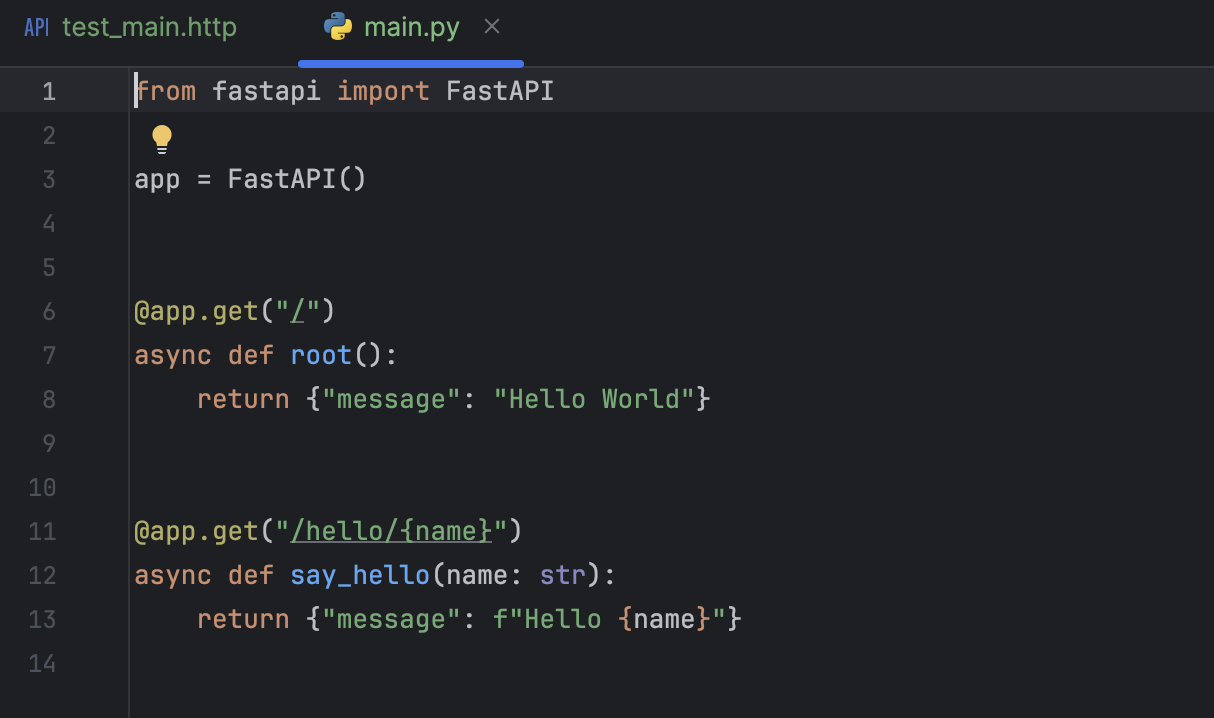
There is also a `test_main.http` file set up for you to quickly test all the endpoints.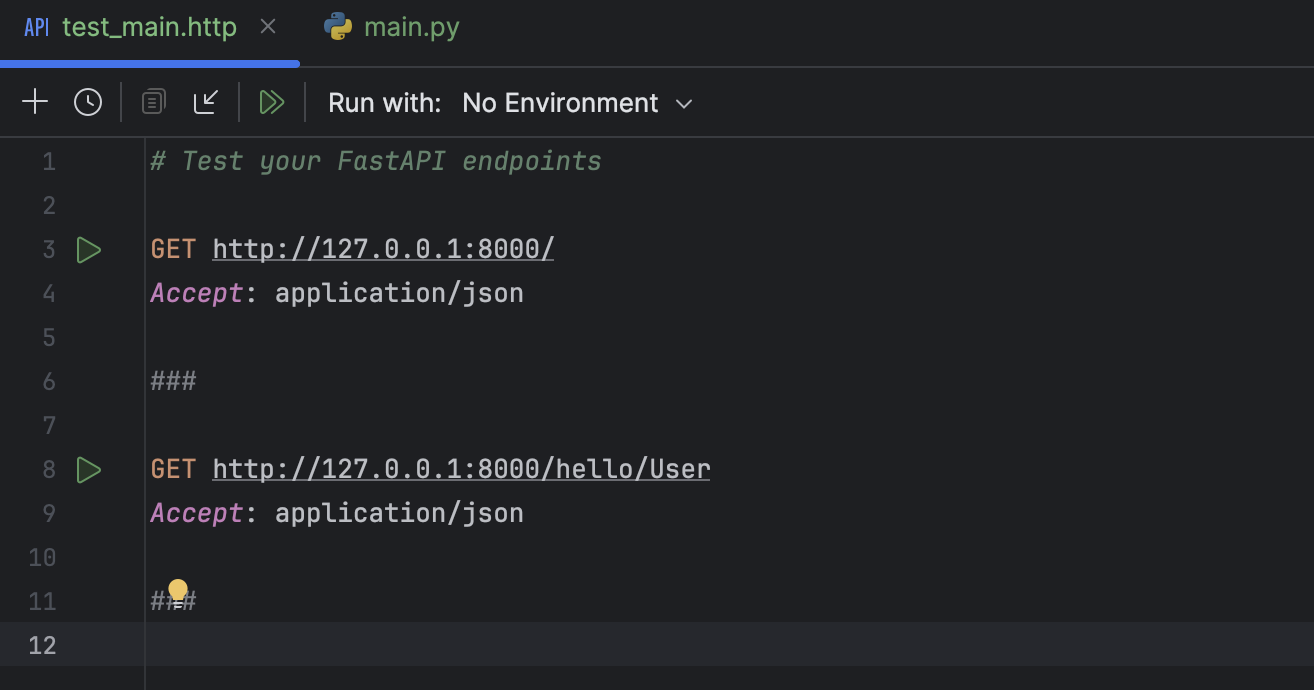
2. Set up environment dependencies
Next, set up our environment dependency with `requirements.txt` by selecting Sync Python Requirements under PyCarm’s Tool menu.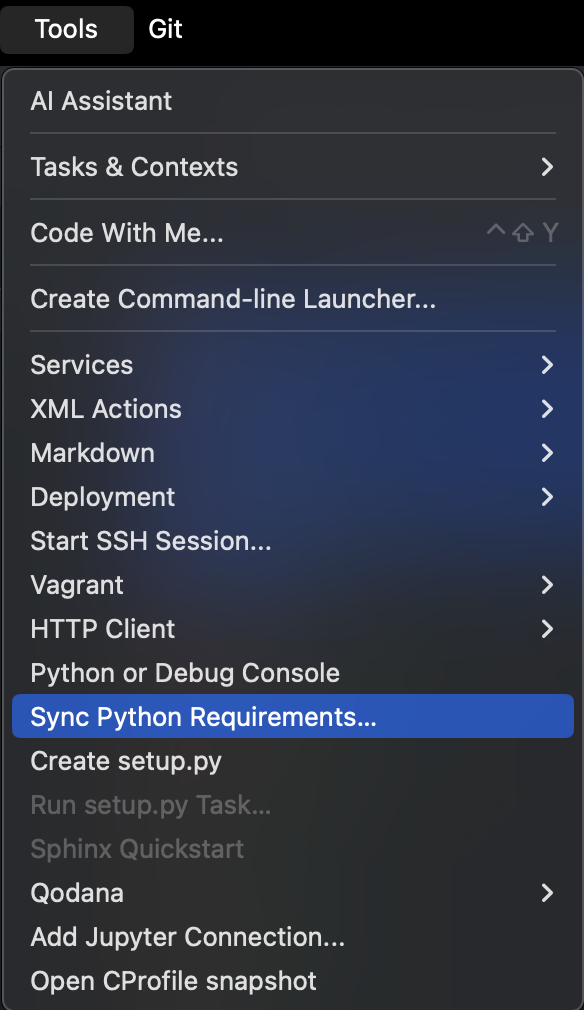
Then you can select the `requirements.txt` file to be used.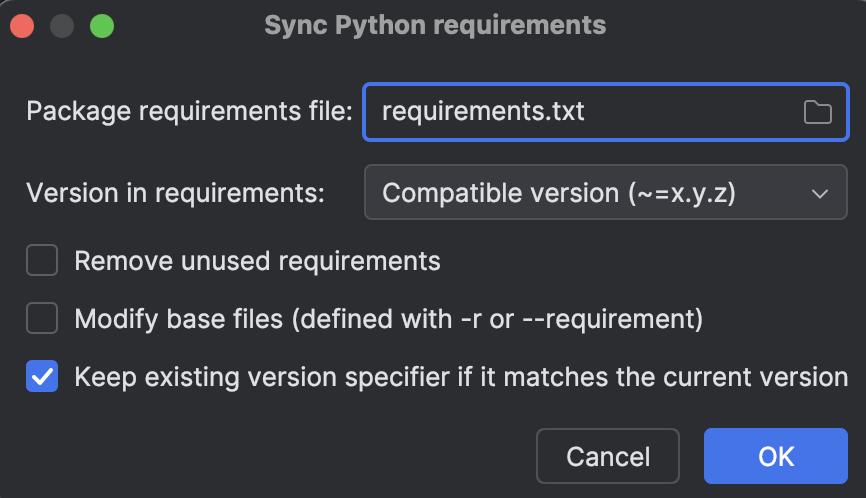
You can copy and use this `requirements.txt` file. We will be using pandas and scikit-learn for the machine learning part of the project. Also, add the `penguins.csv` file to your project directory.
3. Set up your machine learning model
Arrange your machine learning code in the `main.py` file. We will start with a script that trains our model:
import pandas as pd
from sklearn.model_selection import train_test_split
from sklearn import preprocessing
from sklearn.neighbors import KNeighborsClassifier
from sklearn.pipeline import Pipeline
from sklearn.preprocessing import StandardScaler

data = pd.read_csv('penguins.csv')
data = data.dropna()

le = preprocessing.LabelEncoder()
X = data[["bill_length_mm", "flipper_length_mm"]]
le.fit(data["species"])
y = le.transform(data["species"])
X_train, X_test, y_train, y_test = train_test_split(X, y, stratify=y, random_state=0)
clf = Pipeline(
    steps=[("scaler", StandardScaler()), ("knn", KNeighborsClassifier(n_neighbors=11))]
)
clf.set_params().fit(X_train, y_train)
We can place the above code after `app = FastAPI()`. All of it will be run when we start the application.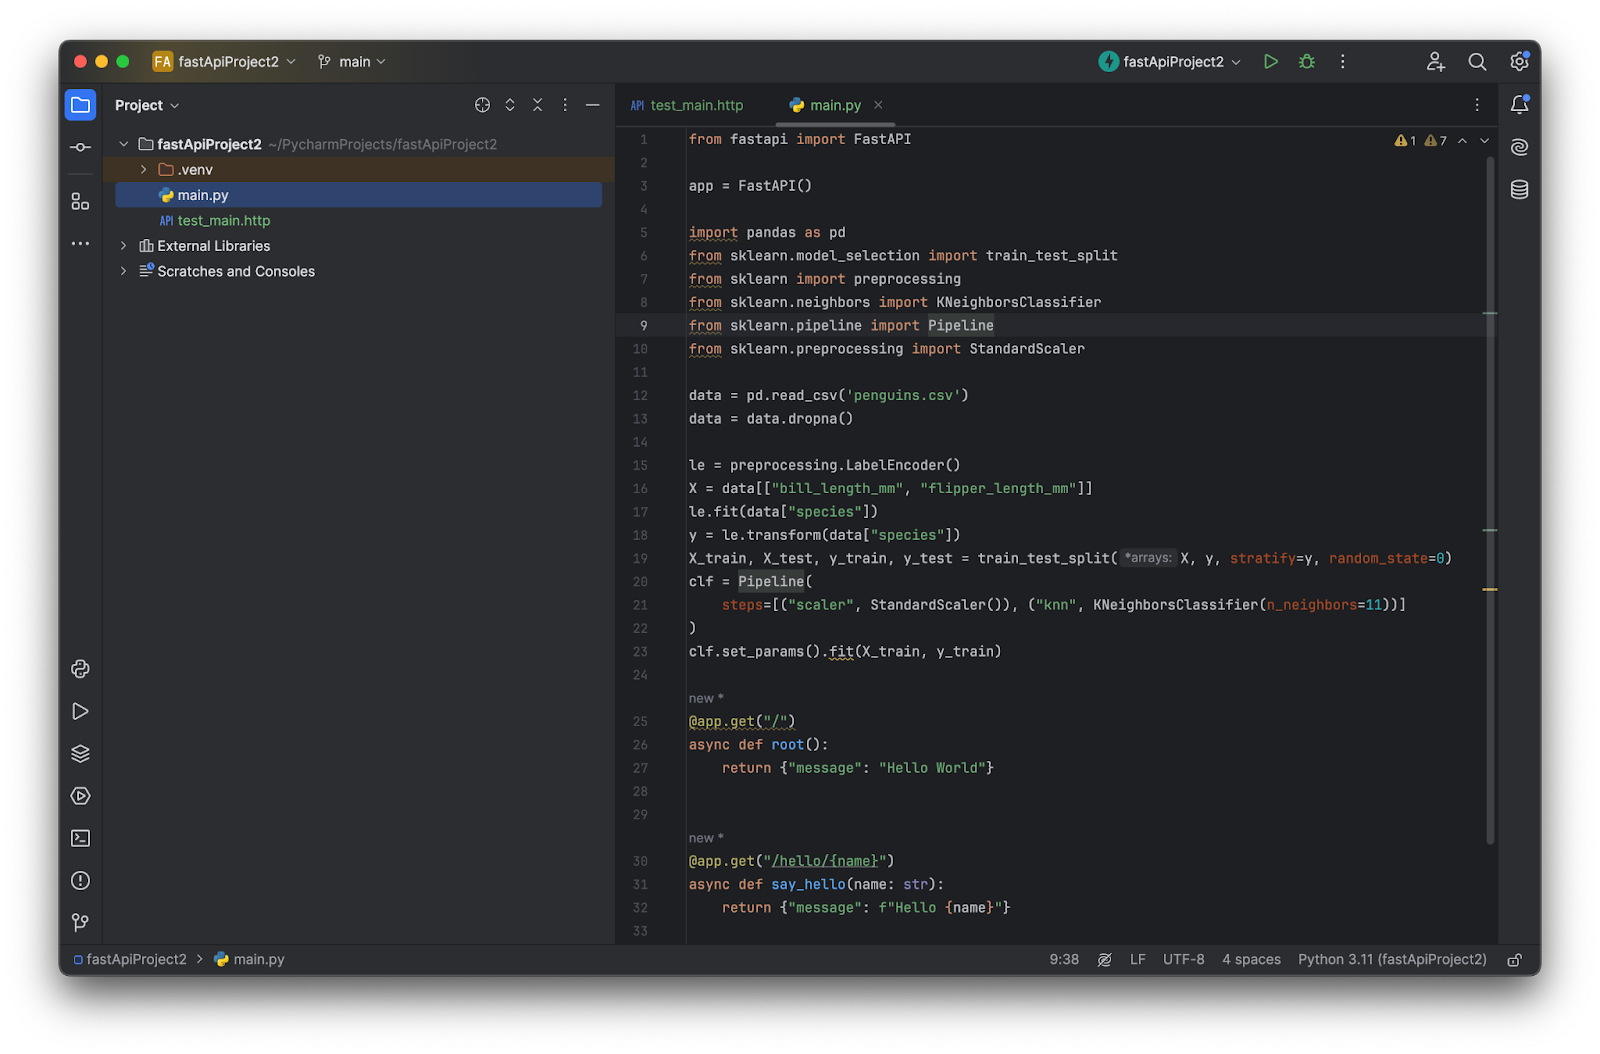
However, there is a better way to run the start-up code we used to set up our model. We will cover that in a later part of the blog post.
4. Request a response
Next we will look at how to add our model to FastAPI functionality. As a first step, we will add a response to the root of the URL and just simply return a message about our model in JSON format. Change the code in `async def root():` from “Hello world” to our message like this:
@app.get("/")
async def root():
    return {
        "Name": "Penguins Prediction",
        "description": "This is a penguins prediction model based on the bill length and flipper length of the bird.",
    }
Now, test our application. First, we will start our application, which is easy in PyCharm. Just press the arrow button (![]() ) next to your project name at the top.
) next to your project name at the top.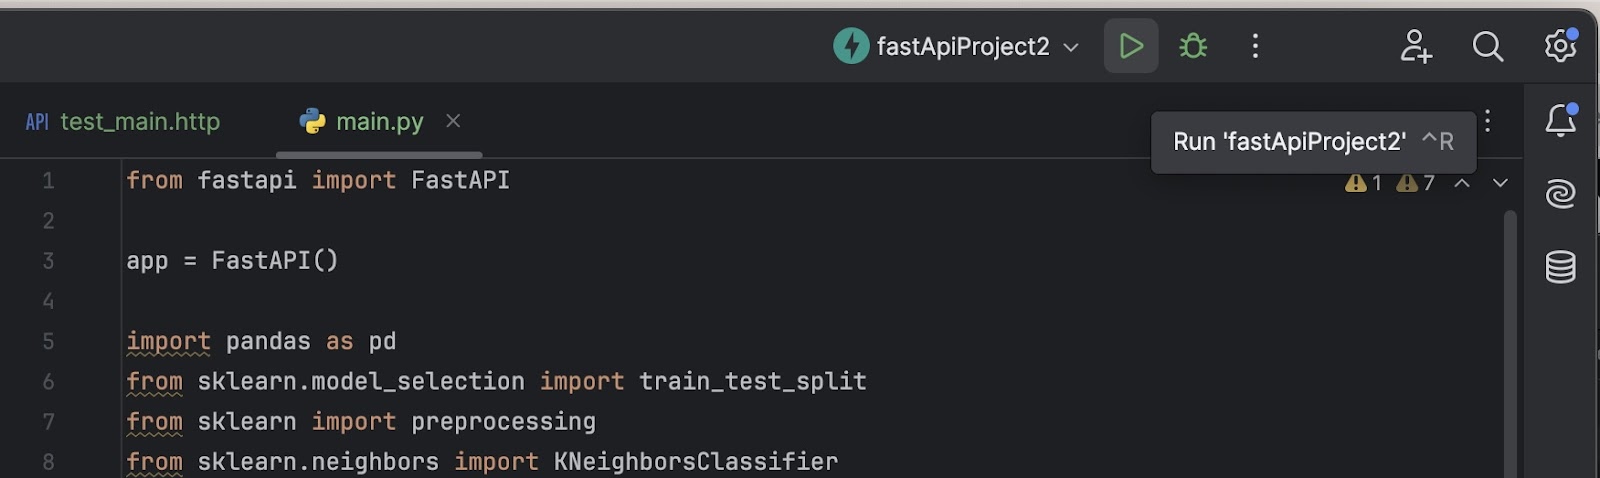
If you are using the default settings, your application will run on http://127.0.0.1:8000. You can double-check that by looking at the prompt from the Run window.
Once the process has started, let’s go to `test_main.http` and press the first arrow button (![]() ) next to `
) next to `GET`. From the HTTP Client in the Services window, you will see the response message that we put in.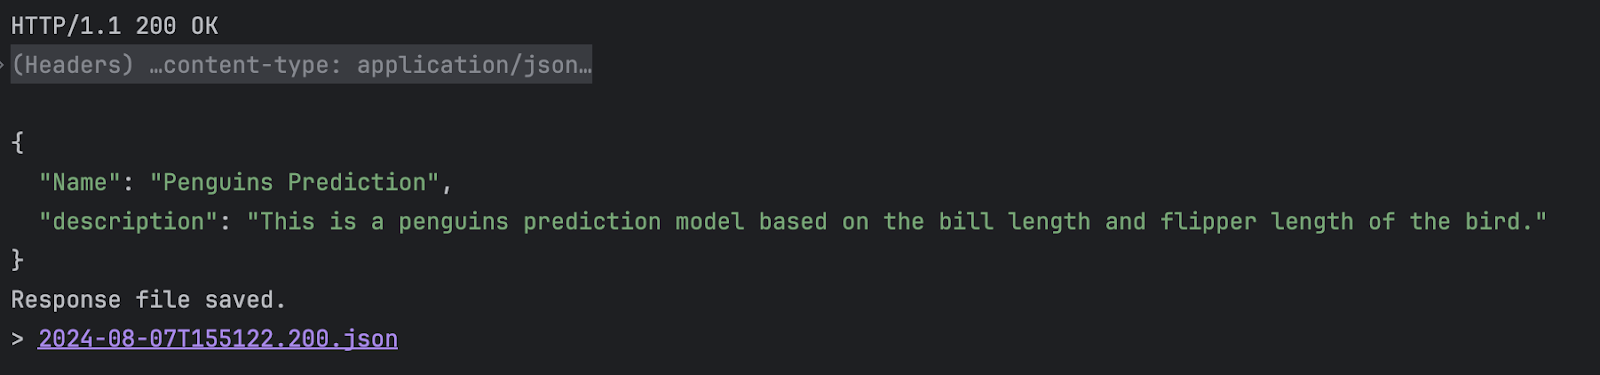
The response JSON file is also saved for future inspection.
5. Request with query parameters
Next, we would like to let users make predictions by providing query parameters in the URL. Let’s add the code below after the `root` function.
@app.get("/predict/")
async def predict(bill_length_mm: float = 0.0, flipper_length_mm: float = 0.0):
param = {
"bill_length_mm": bill_length_mm,
"flipper_length_mm": flipper_length_mm
}
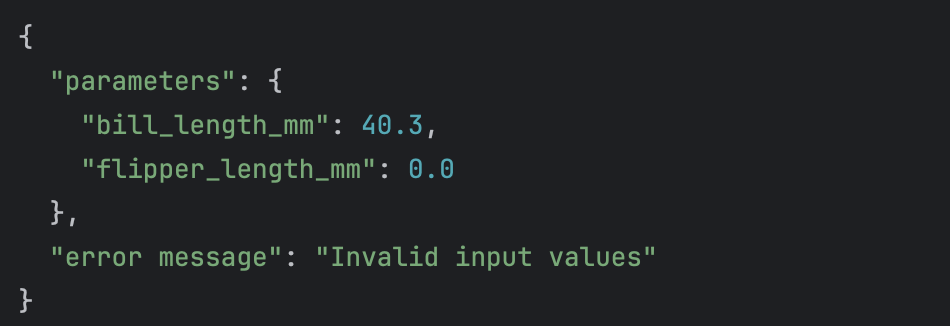
if bill_length_mm <=0.0 or flipper_length_mm <=0.0:
return {
"parameters": param,
"error message": "Invalid input values",
}
else:
result = clf.predict([[bill_length_mm, flipper_length_mm]])
return {
"parameters": param,
"result": le.inverse_transform(result)[0],
}
Here we set the default value of the `bill_length_mm` and `flipper_length_mm` to be 0 if the user didn’t input a value. We also add a check to see if either of the values is 0 and return an error message instead of trying to predict which penguin the input refers to.
If the inputs are not 0, we will use the model to make a prediction and use the encoder to do an inverse transformation to get the label of the predicted target, i.e. the name of the penguin species.
This is not the only way you can verify inputs. You can also consider using Pydantic for input verification.
If you are using the same version of FastAPI as stated in `requirements.txt`, FastAPI automatically refreshes the service and applies changes on save. Now put in a new URL in `test_main.http` to test (separated from the URL before with ###):
###

GET http://127.0.0.1:8000/predict/?bill_length_mm=40.3&flipper_length_mm=195
Accept: application/json
Press the arrow button (![]() ) next to our new URL and see the output.
) next to our new URL and see the output.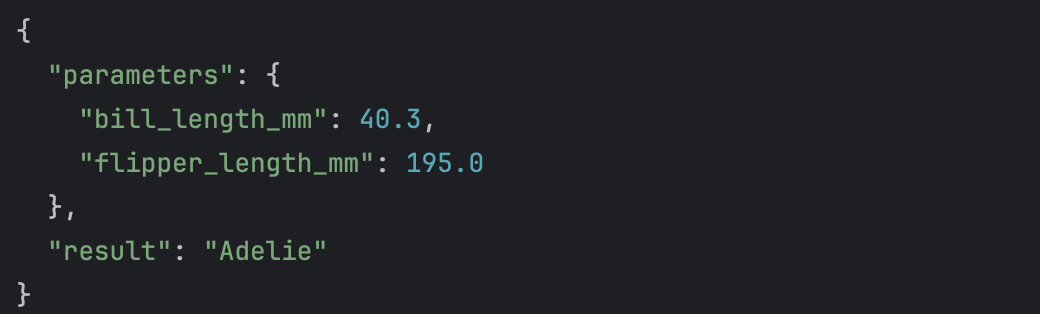
Next you can try a URL with one or both of the parameters removed to see the error message:
###

GET http://127.0.0.1:8000/predict/?bill_length_mm=40.3
Accept: application/json
6. Set up a machine learning model with lifespan events
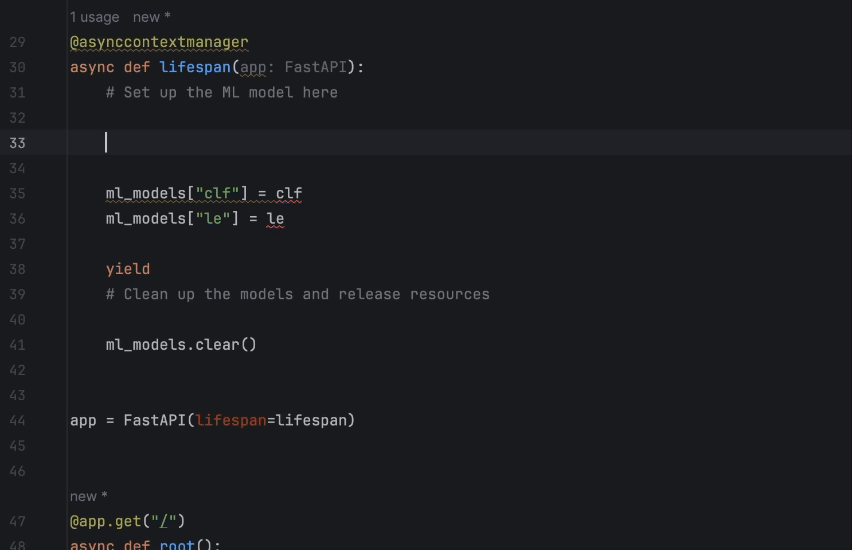
Last, let’s look at how we can set up our model with FastAPI lifespan events. The advantage of doing that is we can make sure no request will be accepted while the model is still being set up and the memory used will be cleaned up afterward. To do that, we will use an `asynccontextmanager`. Before `app = FastAPI()` we will add:
from contextlib import asynccontextmanager

ml_models = {}

@asynccontextmanager
async def lifespan(app: FastAPI):
    # Set up the ML model here

    yield
    # Clean up the models and release resources


    ml_models.clear()
Now we will move the import of pandas and scikit-learn to be alongside the other imports. We will also move our setup code inside the `lifespan` function, setting the machine learning model and LabelEncoder inside `ml_models` like this:
from fastapi import FastAPI
from contextlib import asynccontextmanager

import pandas as pd
from sklearn.model_selection import train_test_split
from sklearn import preprocessing
from sklearn.neighbors import KNeighborsClassifier
from sklearn.pipeline import Pipeline
from sklearn.preprocessing import StandardScaler

ml_models = {}

@asynccontextmanager
async def lifespan(app: FastAPI):
    # Set up the ML model here

    data = pd.read_csv('penguins.csv')
    data = data.dropna()

    le = preprocessing.LabelEncoder()
    X = data[["bill_length_mm", "flipper_length_mm"]]
    le.fit(data["species"])
    y = le.transform(data["species"])
    X_train, X_test, y_train, y_test = train_test_split(X, y, stratify=y, random_state=0)
    clf = Pipeline(
        steps=[("scaler", StandardScaler()), ("knn", KNeighborsClassifier(n_neighbors=11))]
    )
    clf.set_params().fit(X_train, y_train)

    ml_models["clf"] = clf
    ml_models["le"] = le

    yield
    # Clean up the models and release resources

    ml_models.clear()
After that we will add the `lifespan=lifespan` parameter in `app = FastAPI()`:
app = FastAPI(lifespan=lifespan)
Now save and test again. Everything should work and we should see the same result as before.
Afterthought: When to train the model?
From our example, you may wonder when the model is trained. Since `clf` is trained at the beginning, i.e. when the service is launched, you may wonder why we do not train the model every time someone makes a prediction.
We do not want the model to be trained every time someone makes a call, because it costs way more resources to re-train everything. Additionally, it may cause race conditions since our FastAPI application is working concurrently. This is especially the case if we use live data that changes all the time.
Technically, we can set up an API to collect data and re-train the model (which we will demonstrate in the next example). Other options would be to schedule a re-train at a certain time when a certain amount of new data has been collected or to let a super user upload new data and trigger the re-training.
So far, we are aiming to build a prototype that runs locally. Check out this article on deploying a FastAPI project on a cloud service for more information.
What is concurrency?
To put it simply, concurrency is like when you are cooking in the kitchen, and while waiting for the water to boil, you go ahead and chop the vegetables. Since, in the web service world, the server is talking to many terminals, and the communication between the server and the terminals is slower than most internal applications, so the server will not talk to and serve the terminals one by one. Instead, it will talk to and serve many of them at the same time while fulfilling their requests. You may want to check out this explanation in the FastAPI documentation.
In Python, this is achieved by using async code. In our FastAPI code, the use of `async def` instead of `def` is obvious evidence that FastAPI is working concurrently. There are other keywords used in Python async code, like `await` and `asyncio.get_event_loop`, but we won’t be able to cover them in this blog post.
How to use FastAPI for an image classification project
To discover more FastAPI functionality, we will add an image classification model based on the MNIST example in Keras to our application as well (we are using the TensorFlow backend). If you installed the `requirements.txt` provided, you should have Keras and Pillow installed for image processing and building a convolutional neural network (CNN).
1. Refactoring
Before we start, let’s refactor our code. To make the code more organized, we will put the model setup for the penguins prediction in a function:
def penguins_pipeline():
    data = pd.read_csv('penguins.csv')
    data = data.dropna()

    le = preprocessing.LabelEncoder()
    X = data[["bill_length_mm", "flipper_length_mm"]]
    le.fit(data["species"])
    y = le.transform(data["species"])
    X_train, X_test, y_train, y_test = train_test_split(X, y, stratify=y, random_state=0)
    clf = Pipeline(
        steps=[("scaler", StandardScaler()), ("knn", KNeighborsClassifier(n_neighbors=11))]
    )
    clf.set_params().fit(X_train, y_train)

    return clf, le
Then we rewrite the lifespan function. With full-line code completion in PyCharm, it is very easy:
2. Set up a CNN model for MNIST prediction
In similar fashion as the penguin prediction model, we create a function for MNIST prediction (and we will store the meta parameters globally):
# MNIST model meta parameters
num_classes = 10
input_shape = (28, 28, 1)
batch_size = 128
epochs = 15

def mnist_pipeline():
    # Load the data and split it between train and test sets
    (x_train, y_train), _ = keras.datasets.mnist.load_data()

    # Scale images to the [0, 1] range
    x_train = x_train.astype("float32") / 255

    # Make sure images have shape (28, 28, 1)
    x_train = np.expand_dims(x_train, -1)

    # convert class vectors to binary class matrices
    y_train = keras.utils.to_categorical(y_train, num_classes)

    model = keras.Sequential(
        [
            keras.Input(shape=input_shape),
            layers.Conv2D(32, kernel_size=(3, 3), activation="relu"),
            layers.MaxPooling2D(pool_size=(2, 2)),
            layers.Conv2D(64, kernel_size=(3, 3), activation="relu"),
            layers.MaxPooling2D(pool_size=(2, 2)),
            layers.Flatten(),
            layers.Dropout(0.5),
            layers.Dense(num_classes, activation="softmax"),
        ]
    )

    model.compile(loss="categorical_crossentropy", optimizer="adam", metrics=["accuracy"])

    model.fit(x_train, y_train, batch_size=batch_size, epochs=epochs, validation_split=0.1)

    return model
Then add the model setup in the lifespan function:
ml_models["cnn"] = mnist_pipeline()
Note that since this is added, every time you make changes to `main.py` and save, the model will be trained again. It can take a bit of time. So in development you may want to use a dummy model that requires no training time at all or a pre-trained model instead. After training, the CNN model will be ready to go.
3. Set up a POST endpoint for uploading an image file for prediction
To set up an endpoint that takes an upload file, we have to use UploadFile in FastAPI:
@app.post("/predict-image/")
async def predicct_upload_file(file: UploadFile):
    img = await file.read()

    # process image for prediction
    img = Image.open(BytesIO(img)).convert('L')
    img = np.array(img).astype("float32") / 255
    img = np.expand_dims(img, (0, -1))

    # predict the result
    result = ml_models["cnn"].predict(img).argmax(axis=-1)[0]
    return {"filename": file.filename,
            "result": str(result)}
Please note that this is a POST endpoint (so far we have only set up GET endpoints).
Don’t forget to import `UploadFile` from `fastapi`:
from fastapi import FastAPI, UploadFile
And `Image` from Pillow. We are also using `BytesIO` from the `io` module:
from PIL import Image
from io import BytesIO
To test this using the PyCharm HTTP Client with a test image file, we will make use of the `multipart/form-data` encoding. You can check out the HTTP request syntax here. This is what you will put in the `test_in.http` file:
###

POST http://127.0.0.1:8000/predict-image/ HTTP/1.1
Content-Type: multipart/form-data; boundary=boundary

--boundary
Content-Disposition: form-data; name="file"; filename="test_img0.png"

< ./test_img0.png

--boundary–
4. Add an API to collect data and trigger retraining
Now, here comes the retraining. We set up a POST endpoint like above to accept a zip file which contains training images and labels. The zip file will then be processed and the training data will be prepared. After that we will fit the CNN model again:
@app.post("/upload-images/")
async def retrain_upload_file(file: UploadFile):

    img_files = []
    labels_file = None
    train_img = None

    with ZipFile(BytesIO(await file.read()), 'r') as zfile:
        for fname in zfile.namelist():
            if fname[-4:] == '.txt' and fname[:2] != '__':
                labels_file = fname
            elif fname[-4:] == '.png':
                img_files.append(fname)

        if len(img_files) == 0:
            return {"error": "No training images (png files) found."}
        else:
            for fname in sorted(img_files):
                with zfile.open(fname) as img_file:
                    img = img_file.read()

                    # process image
                    img = Image.open(BytesIO(img)).convert('L')
                    img = np.array(img).astype("float32") / 255
                    img = np.expand_dims(img, (0, -1))

                    if train_img is None:
                        train_img = img
                    else:
                        train_img = np.vstack((train_img, img))

        if labels_file is None:
            return {"error": "No training labels file (txt file) found."}
        else:
            with zfile.open(labels_file) as labels:
                labels_data = labels.read()
                labels_data = labels_data.decode("utf-8").split()
                labels_data = np.array(labels_data).astype("int")
                labels_data = keras.utils.to_categorical(labels_data, num_classes)

    # retrain model
    ml_models["cnn"].fit(train_img, labels_data, batch_size=batch_size, epochs=epochs, validation_split=0.1)

    return {"message": "Model trained successfully."}
Remember to import `ZipFile`:
from zipfile import ZipFile
If we now try the endpoint with this zip file of 1000 retraining images and labels, you will see that it takes a moment for the response to come, as the training is taking a while:
POST http://127.0.0.1:8000/upload-images/ HTTP/1.1
Content-Type: multipart/form-data; boundary=boundary

--boundary
Content-Disposition: form-data; name="file"; filename="training_data.zip"

< ./retrain_img.zip

--boundary--
Imagine the zip files contain more training data or you’re retraining a more complicated model. The user would then have to wait for a long time and it would seem like things are not working for them.
5. Retrain the model with BackgroundTasks
A better way to handle retraining is, after receiving the training data, we process it and check if the data is in the right format, then give a response saying that the retraining has restarted and train the model in `BackgroundTasks`. Here is how to do it. First, we will add `BackgroundTasks` to our `upload-images` endpoint:
@app.post("/upload-image/")
async def retrain_upload_file(file: UploadFile, background_tasks: BackgroundTasks):
	...
Remember to import it from `fastapi`:
from fastapi import FastAPI, UploadFile, BackgroundTasks
Then, we will put the fitting of the model into the `background_tasks`:
# retrain model
    background_tasks.add_task(
        ml_models["cnn"].fit,
        train_img,
        labels_data,
        batch_size=batch_size,
        epochs=epochs,
        validation_split=0.1
    )
Also, we will update the message in the response:
return {"message": "Data received successfully, model training has started."}
Now test the endpoint again. You will see that the response has arrived much quicker, and if you look at the Run window, you’ll see that the training is running after the response has arrived.
At this point, more functionality can be added, for example, an option to notify the user later (e.g. via email) when the training is finished or track the training progress in a dashboard when a full application is built.
Conclusion and next steps
In this tutorial, we walked through how FastAPI can be used to turn machine learning models into usable APIs with minimal overhead. Starting from a simple classification model, we built GET and POST endpoints, handled input validation, managed model lifecycles with lifespan events, and explored more advanced workflows like image classification and background retraining tasks.
This approach shows why FastAPI is such a strong fit for data science teams. It allows you to move quickly from experimentation to a working prototype, without needing deep backend expertise, while still following production-ready patterns.
If you want to take this prototype further, here are some logical next steps:
- Dockerise the application to ensure consistent environments and simplify deployment across development, staging, and production.
- Deploy to the cloud using platforms like AWS, GCP, Azure, or a container-based service, so your models can be accessed reliably by other systems or users.
- Add authentication and authorisation to protect prediction and retraining endpoints, especially if models or data are sensitive.
- Introduce model versioning and monitoring to track performance, detect data drift, and safely roll out updates.
- Connect a frontend or dashboard to visualise predictions, training status, or model metrics for non-technical stakeholders.
With these additions, a simple FastAPI prototype can evolve into a robust machine learning service that’s ready for real-world use.
Develop ML FastAPI applications with PyCharm
FastAPI provides an easy way to convert your data science project into a working application in several easy steps. It is perfect for data science teams that want to provide an application prototype for their machine learning model which can be further developed into a professional web application if needed.
PyCharm Professional is the Python IDE that allows you to develop FastAPI applications more easily with a preconfigured project for FastAPI, coding assistance, tailored run/debug configurations, and the Endpoints tool window for managing API endpoints efficiently.
In this blog post, we showed the process of providing a simple API for a pre-trained prediction model. To learn more about FastAPI, I would suggest checking out the official FastAPI documentation. If you’re choosing between different frameworks, explore how FastAPI differs from Django.