How to use Stimulus in your Rails apps with RubyMine

Hello everyone!
The RubyMine team is constantly striving to provide support for new technologies for Ruby and Rails. One of the most exciting recent additions to Rails is undoubtedly Hotwire, so we’ve prepared an overview of this suite of frameworks and a tutorial on how to use the most important Turbo and Stimulus features in your Rails app with RubyMine. This post covers Stimulus; For Turbo, please see our previous blog post.
Hotwire and Stimulus
What is Hotwire?
Hotwire simplifies web development by sending HTML over the wire instead of JSON (hence the name, which stands for “HTML over the wire”). This reduces the amount of JavaScript developers need to write and the application needs to send to the browser, while also keeping template rendering on the server. Hotwire is made up of several frameworks: Turbo, Stimulus, and Strada. In this post, we’ll be looking at Stimulus.
What is Stimulus?
Stimulus is a JavaScript framework designed to work with static HTML and its existing DOM elements. It lets users add JavaScript functionality to the DOM by connecting elements to Stimulus controllers, which can be used to manipulate the DOM. Its goal isn’t to provide a full JavaScript frontend, but rather to enhance existing HTML elements.
The stimulus-rails gem is shipped by default with Rails 7, so you can start using it in your applications right away!
RubyMine provides support for Stimulus, such as code completion, navigation, and rename refactoring, which we encourage you to try as you make your way through the tutorial.
Tutorial: how to use Stimulus in Rails apps with RubyMine
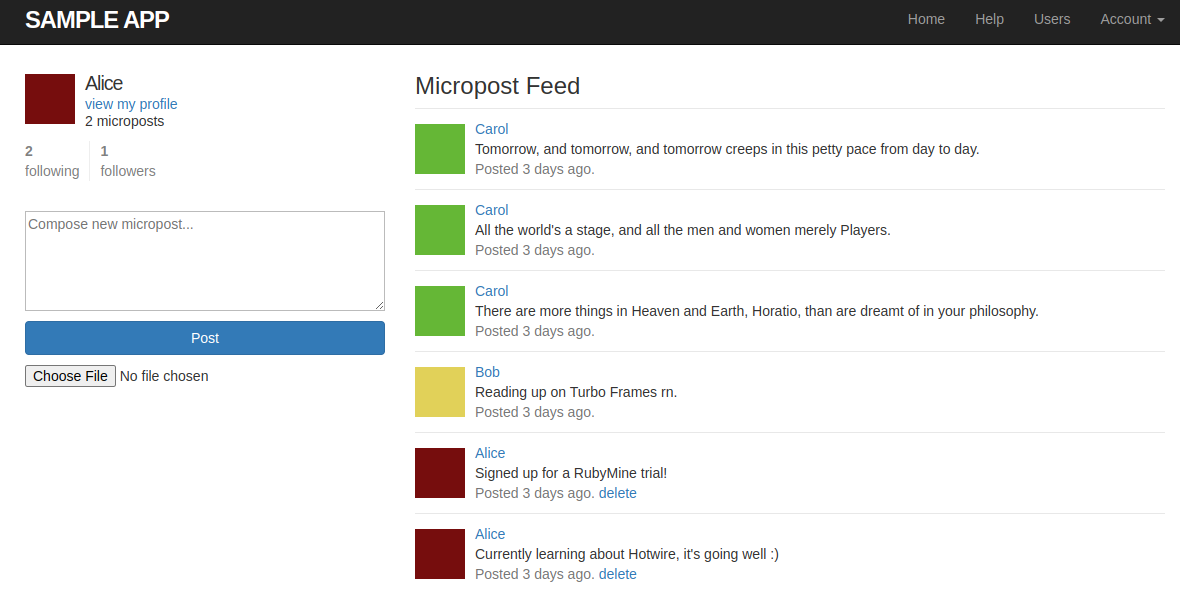
In this tutorial, we’ll show you how to use the basic building blocks of Stimulus to easily integrate JavaScript into your applications. We’ll use a sample Rails application that allows the users to make accounts, create microposts, follow each other, and read the microposts in a feed.
Clone the sample Rails app
Follow these steps to clone and run our sample app:
- Check out the sample application at https://github.com/JetBrains/sample_rails_app_7th_ed/tree/hotwire_setup (make sure to switch to the
hotwire_setupbranch once you’ve cloned the project). For further information on how to set up a Git repository, please see the documentation. - Specify the Ruby interpreter and install the gems.
Let’s explore Stimulus in action by building a simple Copy to clipboard button.
Copy to clipboard button
Let’s add a Copy to clipboard button next to our Delete link. The intended function of this new button is to copy the text of the micropost when we click on it.
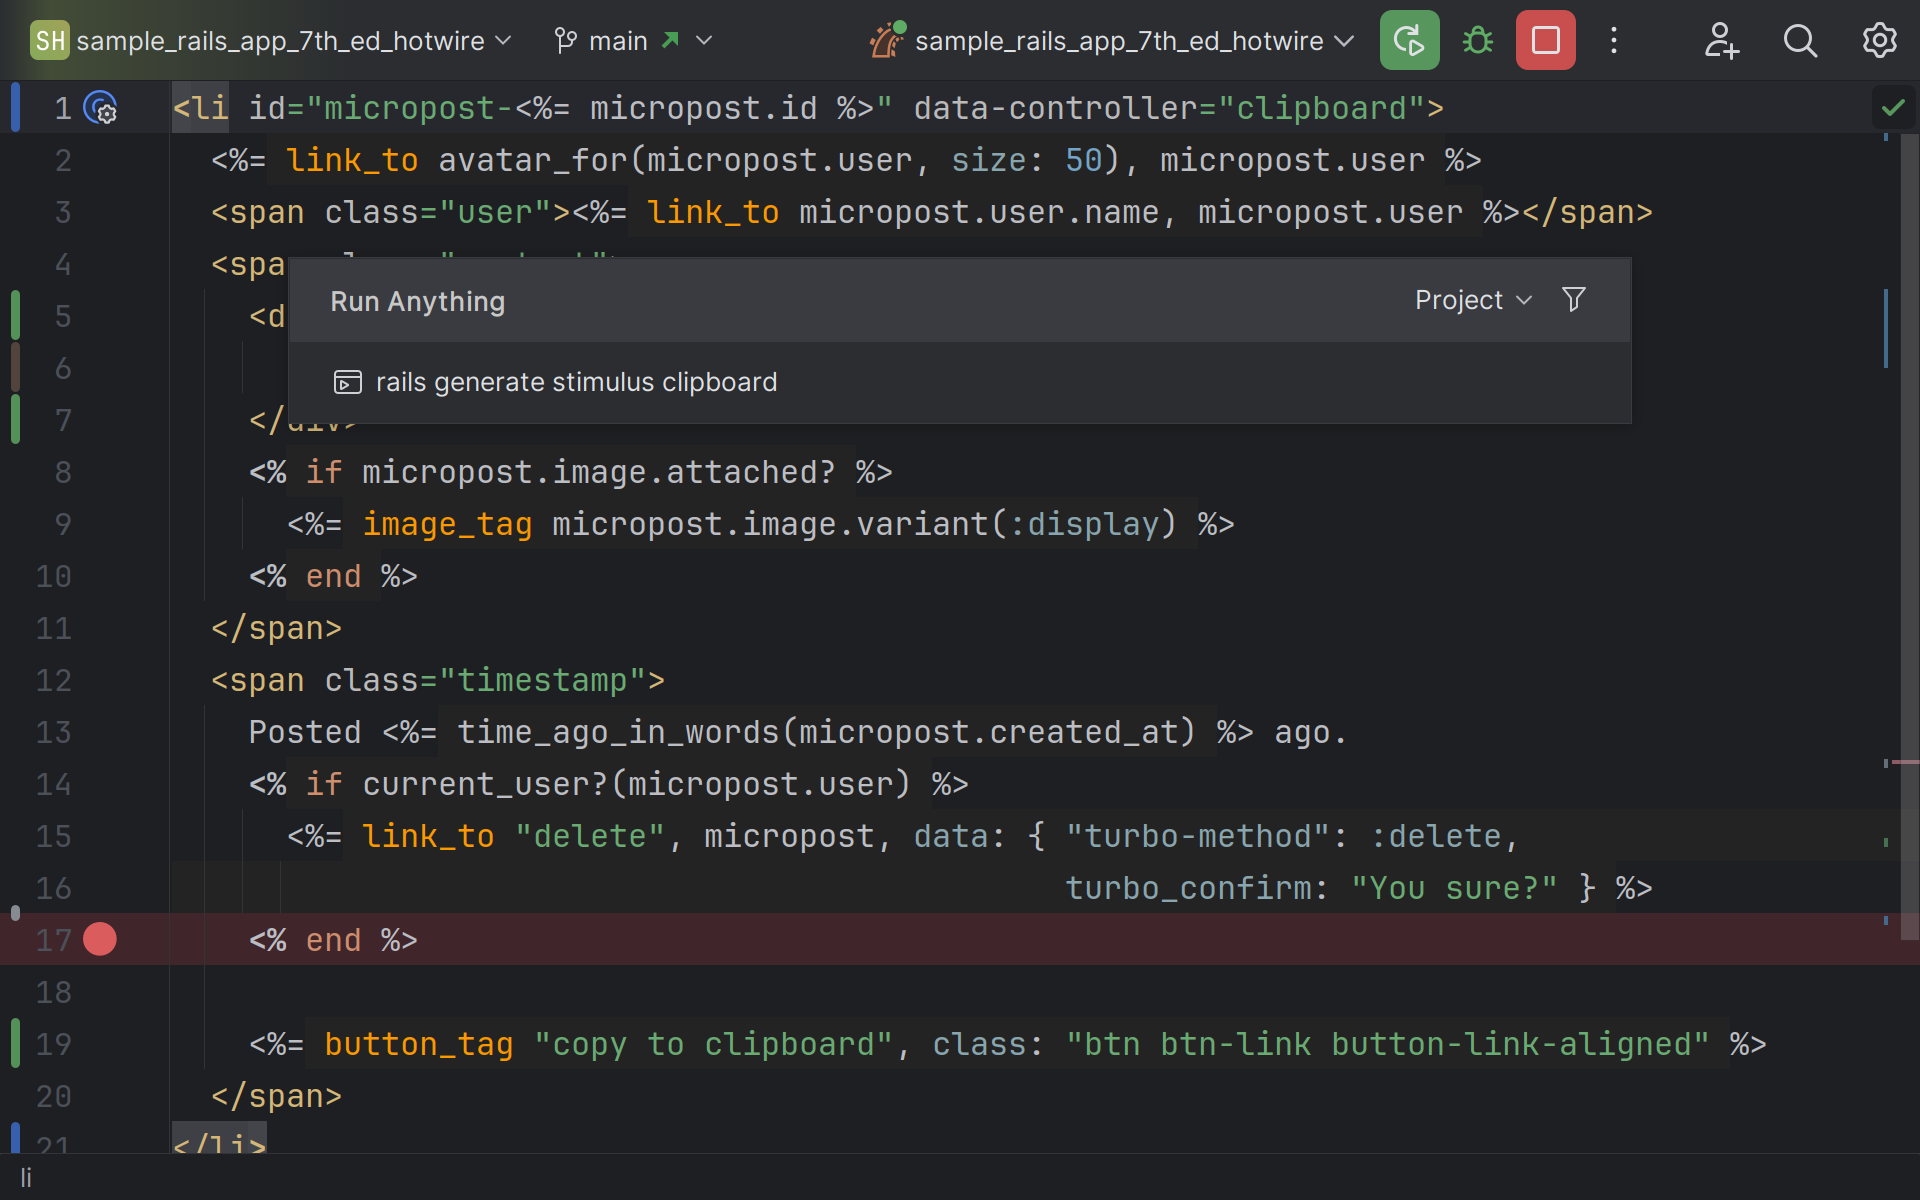
1. Open the _micropost.html.erb file and add the button to the view:
<% if current_user?(micropost.user) %>
  <%= link_to "delete", micropost, data: { "turbo-method": :delete,
                                           turbo_confirm: "You sure?" } %>
<% end %>

<%= button_tag "copy", class: "btn btn-link button-link-aligned" %>
To copy the text with a single mouse click, we’ll need to use JavaScript. To do that, let’s connect our button to a Stimulus controller.
2. Execute the following command using RubyMine’s Run Anything feature (Ctrl+Ctrl): rails generate stimulus clipboard
This command will generate a Stimulus controller, which is the component that allows us to create a connection between our DOM elements and JavaScript.
The name of our controller is clipboard. This command generates a file named clipboard_controller.js in the app/javascript/controllers directory. The controllers from this directory are loaded automatically (see the file index.js).
3. In the file _micropost.html.erb, add the data-controller attribute:
<li id="micropost-<%= micropost.id %>" data-controller="clipboard">
  ...
</li>
This will allow us to connect our micropost to the clipboard controller. You can check if we successfully connected to the controller by adding some debug logging into the connect method and then checking the browser console upon loading the page.
4. Update the copy button in _micropost.html.erb:
<%=button_tag "copy", class: "btn btn-link button-link-aligned", data: { action: "clipboard#copy"} %>
When we click on the button, we want to perform a specific action, namely, copying some text. That text should come from a certain target, the body of the micropost. Actions and targets are some of the core concepts of Stimulus.
Actions connect controller methods to DOM events. When you click on an element, input some text, or submit a form, you can invoke some JavaScript code by specifying a controller method using the data-action attribute. This is exactly what we did with our button in the code above.
5. Add the copy method to the clipboard controller:
export default class extends Controller {
  connect() {
  }

  copy() {
  }
}
To copy the text, we can use the navigator.clipboard.writeText method, except we need some way of obtaining the element from which the text is to be copied. This is where targets come in handy.
6. Add a target to your controller by pasting the following line into your controller class:
static targets = ["source"];
Targets let you reference DOM elements that you might want to manipulate in your controller.
You can specify which targets your controller is going to be using inside a static field in the controller class.
7. Wrap the content of your micropost in a div tag in _micropost.html.erb:
<div data-clipboard-target="source">
  <%= micropost.content %>
</div>
We can refer to controller targets inside our HTML by using the data-[controller-name]-target attribute, e.g. data-clipboard-target = "source".
8. Complete the body of the copy method:
// clipboard_controller.js

copy() {
  navigator.clipboard.writeText(this.sourceTarget.textContent);
}
We can use this.sourceTarget to refer to the target inside our JavaScript controller.
Please note that navigator.clipboard is only available in secure contexts. For local development, you can run your app on localhost.
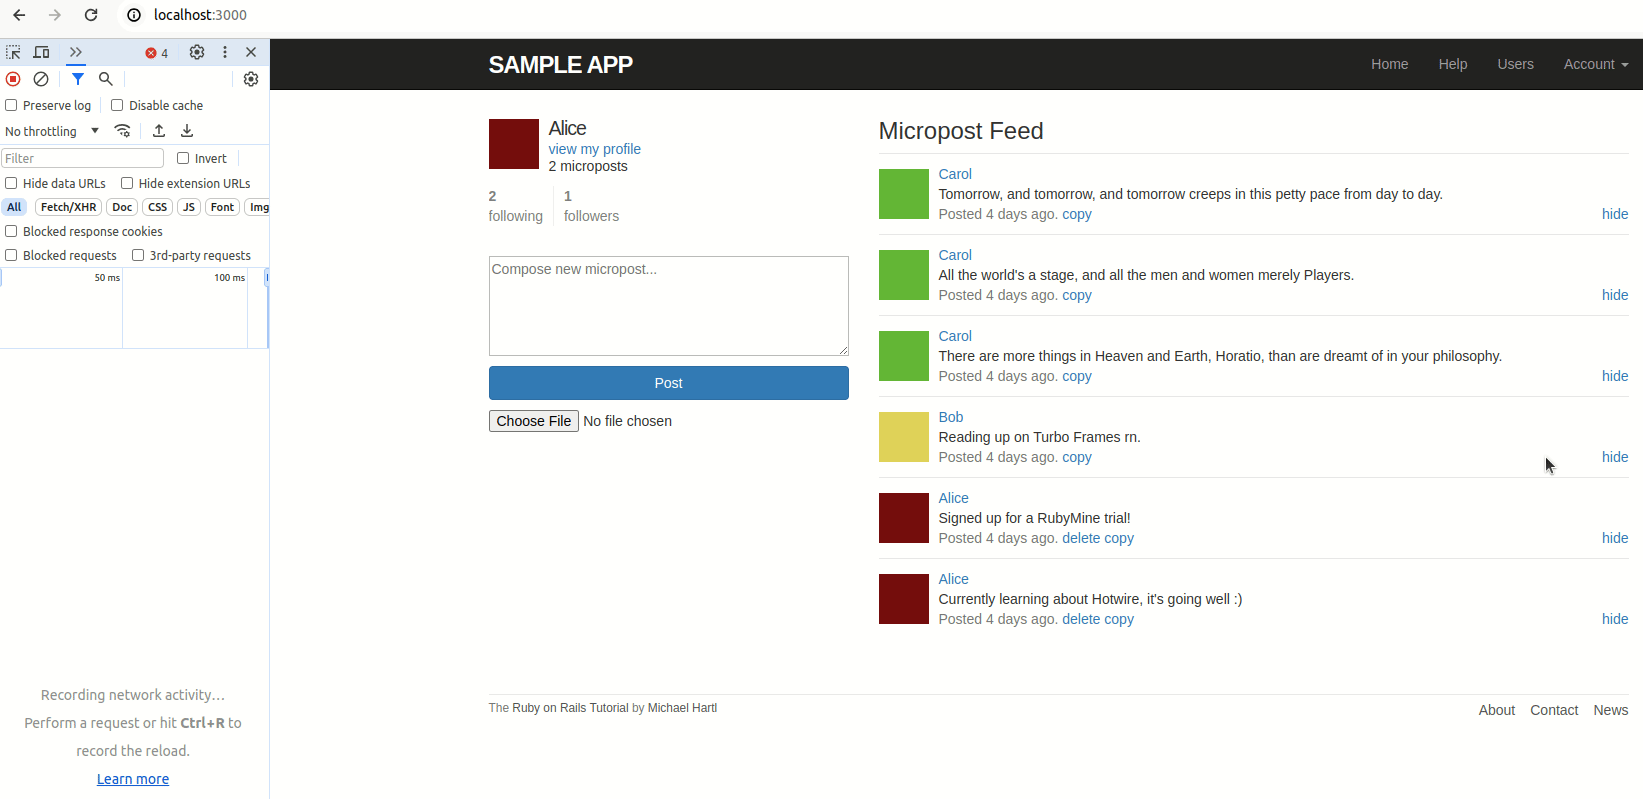
That’s it! Now we can copy the content of our microposts to the clipboard with a simple button click.
Hide a micropost from the feed
Other important Stimulus concepts include values, classes, and outlets.
You might want to pass some values as attributes of the controller element and use those values in your JavaScript code. This is exactly what Stimulus values are designed to do. Specify them next to the data-controller attribute as follows:
<li id="micropost-<%= micropost.id %>" data-controller="clipboard" data-clipboard-copyable-value="true">
Here, clipboard is the name of the controller, and copyable is the name of the property that we’d like to read (or write) in the controller. Then, you define the value names and types in the controller in a special static object, as shown below:
// clipboard_controller.js

static values = { copyable: Boolean };
For further information about available types, please consult the documentation.
You can reference the values in your JavaScript code as this.[valueName]Value:
// clipboard_controller.js

if (!this.copyableValue) {
  ...
}
Outlets let you reference other Stimulus controllers and elements from within your controller: This way, different controllers in your project can communicate between themselves.
Classes refer to CSS classes: You can manipulate them programmatically from your JavaScript code. Let’s take a closer look at how to work with them by implementing a controller that can hide microposts on our feed with a single click. The same effect can be achieved by directly manipulating the style of the element (target.style.display = "none"), but we’ll accomplish this by setting the CSS class of the element instead. We can reuse this technique for many other visual effects, too.
1. Open the custom.scss file and add the following class:
.invisible {
  display: none
}
2. Generate a controller to manipulate the visibility of posts: rails generate stimulus visibility.
3. Open the file visibility_controller.js and add a class and a target to the controller:
import { Controller } from "@hotwired/stimulus"

export default class extends Controller {
  static classes = ["hidden"];
  static targets = ["hide"];
}
4. Add a hide method to the controller:
export default class extends Controller {
  ...

  hide() {
    this.hideTarget.classList.add(this.hiddenClass);
  }
}
This method will then append the CSS class hidden to the target hide.
5. Add the new controller and the class to the micropost view template by adding the following HTML attributes:
<li id="micropost-<%= micropost.id %>" data-controller="clipboard visibility" data-visibility-hidden-class="invisible" data-visibility-target="hide">
First, we add another controller: data-controller="clipboard visibility". Second, we specify which actual CSS class the logical class from the controller corresponds to: data-visibility-hidden-class="invisible". Classes must be specified on the same elements as the controllers to which they belong. Third, we specify the target that we want to hide, which is the entire micropost.
6. Add a hide button to the right of each micropost in _micropost.html.erb:
<span class="timestamp">
  ...
  <%= button_tag "hide", class: "btn btn-link button-link-aligned", data: { action: "visibility#hide" }, style: "float: right;" %>
</span>
The button uses Stimulus actions to connect to the controller method hide.
If we click on this button, the corresponding micropost will disappear.
…until we refresh the page.
There are many ways to approach persisting the hidden state of a micropost here. For example, you could use Stimulus values and create a boolean value named hidden. Then, the hidden class will be automatically added to those elements for which the value is true. Alternatively, you could simply choose not to load such microposts from the database. To do that, though, we’ll need to communicate something back to our Rails app, which we can do by sending a simple request. Let’s revisit our hide method in the Stimulus controller.
7. Add the following code to the hide method in visibility_controller.js:
hide(e) {
  this.hideTarget.classList.add(this.hiddenClass);

  const id = e.target.dataset.id
  const csrfToken = document.querySelector("[name='csrf-token']").content
  fetch(`/microposts/${id}/hide`, {
    method: 'POST',
    headers: {
      'Content-Type': 'application/json',
      'X-CSRF-Token': csrfToken
    },
    body: JSON.stringify({ hidden: true })
  }).then(response => response.json())
}
We’re now sending a very basic POST request to microposts/:id/hide. You could send anything in the body of the request, but here, we’ll simply state that hidden is now true.
Notice that this code uses the micropost ID, which it must receive from the view.
8. Pass the ID in the data hash next to the action in _micropost.html.erb:
<%= button_tag "hide",
              class: "btn btn-link button-link-aligned",
              data: { action: "visibility#hide", id: micropost.id },
              style: "float: right;" %>
9. Add the following route to routes.rb:
post 'microposts/:id/hide', to: 'microposts#hide'
10. Add a hide method to microposts_controller.rb:
def hide
  @micropost = Micropost.find(params[:id])
  hidden_post = HiddenPost.new
  hidden_post.user = current_user
  hidden_post.micropost = @micropost
  hidden_post.save
end
11. Use Run Anything to generate a model that will store information about hidden posts for a specific user:
rails generate model HiddenPost user:references micropost:references
12. Update the User#feed method in the user.rb file:
# user.rb

def feed
  following_ids = "SELECT followed_id FROM relationships
                  WHERE  follower_id = :user_id"
  hidden_posts_for_user = "SELECT micropost_id FROM hidden_posts WHERE user_id = :user_id OR user_id IN (#{following_ids})"
  Micropost.where("user_id IN (#{following_ids})
                  OR user_id = :user_id", user_id: id)
          .where("id NOT IN (#{hidden_posts_for_user})", user_id: id)
          .includes(:user, image_attachment: :blob)
end
Now that we’ve saved the information about hidden posts in the database, those will no longer be visible in the user feed, even after a page refresh.
Conclusion
In this tutorial, we’ve explored the Stimulus framework and its core concepts: controllers, targets, and actions. We’ve learned to use Stimulus in our Rails applications to easily connect our DOM elements to JavaScript.
Take advantage of Hotwire support in your favorite JetBrains IDE for Ruby and Rails. Download the latest RubyMine version from our website or via the free Toolbox App.
To learn about the newest features as they come out, please follow RubyMine on X.
We invite you to share your thoughts in the comments below and to suggest and vote for new features in the issue tracker.