Space
The intelligent code collaboration platform
Space and SpaceCode will be discontinued on June 1, 2025. Learn more → →
Space Packages. Get Started with Maven Repository
In one of our previous blog posts, we’ve made an introduction to Space Packages. Now, it’s time to try them in action! Let’s start with Maven repositories: we’ll take a look at how to create a Maven repo, log into it, and then publish the artifacts of a Gradle or Maven project.
Create a repository
The steps needed to do this are pretty obvious, but let’s cover them just to be sure.
- Open the Packages page in Space.
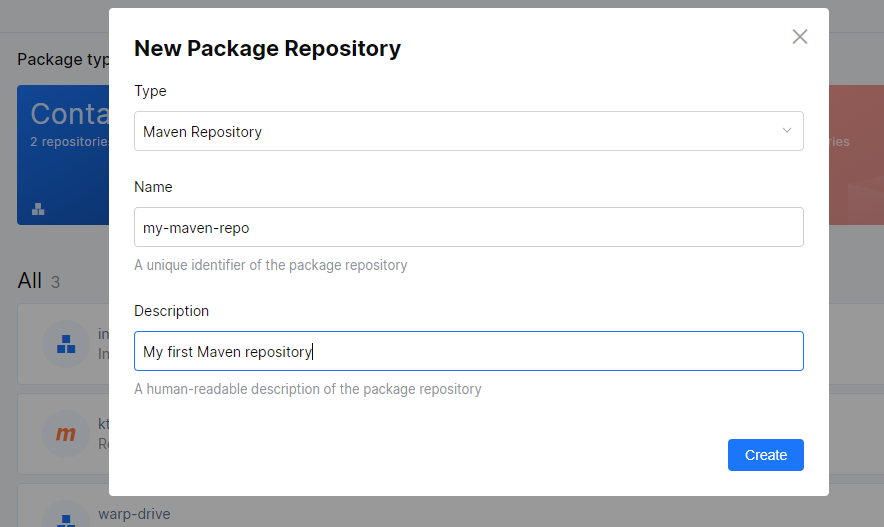
- To create a repo, click New repository and then specify its type (Maven Repository in our case), name, and description.

- After you create the repository, its URL will be shown on the title bar of the repo page:

Log in to the repository
Important: Currently, all authenticated accounts are allowed to access any repository in Packages. Soon, repository owners will be able to limit access on a per-team or per-account basis.
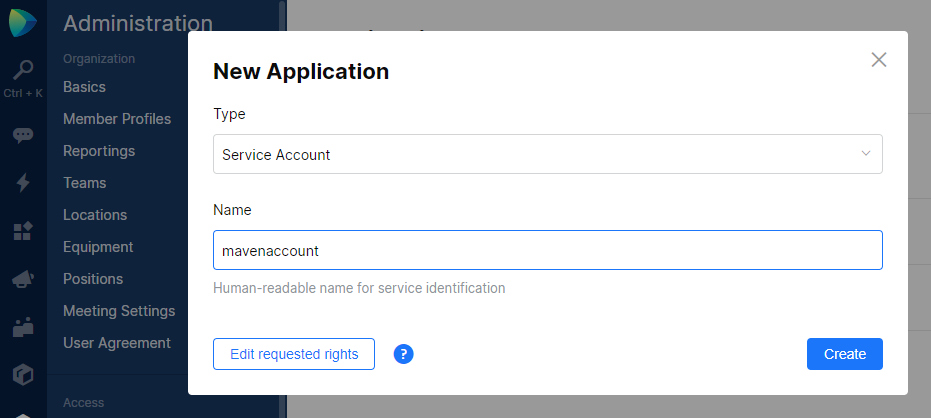
So, you have a Maven repository and now it’s time to log in to it. For authentication purposes, you should either use your Space login and password or create a special service account. To do this, use Administration | Applications | New application and choose Service Account in Type:
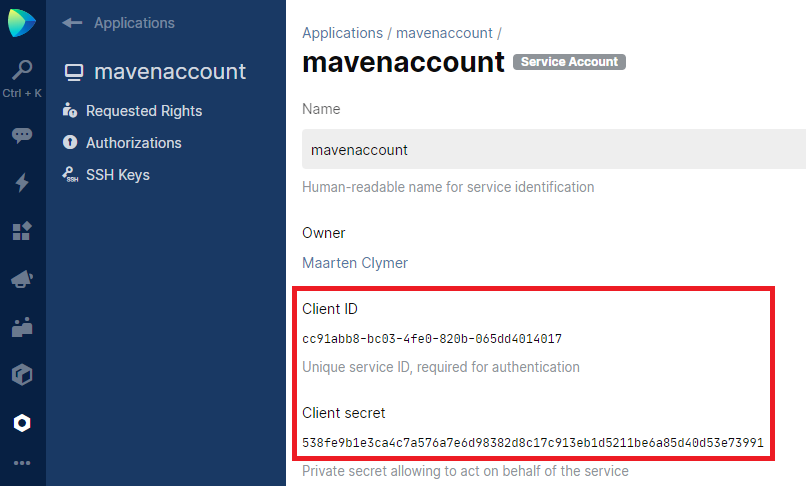
After you create an account, go to the account page.
You’re interested in only two fields:
Client ID: you will use it as a username
Client secret: you will use it as a password
Publishing artifacts from a Gradle project
Gradle is one of today’s most popular build systems, so we think that publishing a Maven artifact from a Gradle project is one of the most demanded scenarios.
In Gradle, almost all configuration is done via build.gradle. Let’s go through the most important steps which include specifying artifact properties, referencing a repository, and getting authenticated in it:
- In the project’s
build.gradlefile, reference the Maven plugin:
apply plugin: 'maven-publish' - In the publishing section, specify the package properties (the generated package name will be
groupId:artifactId). For the sake of length, we show a reduced example of the section:publishing { publications { maven(MavenPublication) { groupId = 'org.company' artifactId = 'sample' version = "0.9-SNAPSHOT" from components.java pom { name = 'My Library' description = 'A description of my library' url = ... ... } } } } - In the
repositoriessub-section, add the repository settings including the credentials and the URL. The key thing here is that you should not explicitly specify credentials inbuild.gradle. It’s kind of obvious, as you don’t want them to appear in the VCS. Instead, you should use variables, which in our example are$usrand$pwd. We’ll assign values to these variables in the next step.publishing { ... repositories { maven { credentials { username = "$usr" password = "$pwd" } url = "https://maven.jetbrains.space/mycompany/my-maven-repo" } } } - You can set variable values in the
gradle.propertiesfile, which is stored locally on your machine. The default location of this file is:
on Windows:%HOMEPATH%\.gradle\gradle.properties
on Linux / macOS:~/.gradle/gradle.properties
As described earlier in the ‘Log in to the repository’ section, here you must use credentials of either your own Space account or a separate service account:usr=admin pwd=1234
- That’s it! Now, you can publish project artifacts by using, for example, the project’s Gradle wrapper:
gradlew publish
You can also reference packages from this repository in the dependencies section ofbuild.gradle.
Publishing artifacts from a Maven project
For a project that uses Maven as a build tool, the workflow is the same as for Gradle. You need to specify artifact properties, reference a repository, and get authenticated in it. The main difference is that in Maven projects, all configuration happens in the project’s pom.xml file:
- In
pom.xml, indistributionManagement, specify repository ID (it must be a unique repository identifier) and URL.<distributionManagement> <repository> <id>my-repo</id> <url>https://maven.jetbrains.space/mycompany/my-maven-repo</url> </repository> </distributionManagement> - Specify the package properties (the generated package name will be
groupId:artifactId):<groupId>org.company</groupId> <artifactId>sample</artifactId> <packaging>pom</packaging> <version>0.9-SNAPSHOT</version>
- As it’s not secure to store credentials in the VCS, we must use the local user-specific Maven settings:
- on Windows:
%HOMEPATH%/.m2/settings.xml - on Linux / macOS:
~/.m2/settings.xml
Place the repository id (the one from Step 1) and the credentials in the servers section of
settings.xml:<servers> <server> <id>my-repo</id> <username>admin</username> <password>1234</password> </server> </servers>Note that it may be not secure to store the server password in plain text. The best practice is to encrypt it using the built-in Maven capabilities.
- on Windows:
- Done! Now, you can publish artifacts with:
mvn deploy
Exploring Maven artifacts in Space Packages
After you publish a Maven artifact to Packages, it will appear on the repository page:
After you click on the package, you’ll see more info about it including the number of downloads, its name and description, the package author, and so on. The coolest thing here is the snippets section. Select a build tool and get a working snippet that lets you reference this package in any project.

That’s all for now. If you have any comments or questions, please leave them in the comments below. And, of course, do try Packages!
Subscribe to Space Blog updates


