TeamCity
Powerful CI/CD for DevOps-centric teams
First-Class Docker Support: Building and Deploying Containers With TeamCity

This article was brought to you by Kumar Harsh, draft.dev.
Docker has changed the way we build and ship software. Instead of wrestling with “it works on my machine” issues, developers can now package applications and all their dependencies into a neat, portable container that runs anywhere. No wonder Docker has become the de facto standard for modern DevOps workflows.
However, building and deploying containers at scale isn’t as simple as running docker build. You need a reliable CI/CD system that can consistently build, test, and push images to your registries while keeping the process fast, repeatable, and secure.
In this article, we’ll explore how to set up a complete Docker-based build and deployment pipeline with TeamCity’s first-class Docker support. You’ll see how features like built-in runners, native registry integration, and Kotlin DSL support make container pipelines smoother and more maintainable compared to the plugin-heavy, script-driven approach in Jenkins.
By the end, you’ll know exactly how to create and run a Docker pipeline in TeamCity, from building images to pushing them to your registry and even deploying them to staging.
The Docker pipeline setup experience in Jenkins vs. TeamCity
If you’ve ever tried to set up a Docker pipeline in Jenkins, you know the drill: Find and install the right plugins, configure them to match your environment, and then hold your breath hoping they don’t break when Jenkins upgrades.
Even the official Docker plugin, while powerful, requires manual setup, custom scripting, and constant upkeep to stay compatible.
For many teams, this quickly turns into a maintenance burden, especially as pipelines grow more complex.
TeamCity takes a very different approach. Docker support isn’t added on via third-party plugins; it’s baked into the product. Right out of the box, you get dedicated Docker build runners, registry integration, and full support for defining Docker steps in both the UI and the Kotlin DSL. That means no hunting down plugins, no brittle scripts, and far fewer surprises during upgrades.
Another difference lies in configuration. Jenkins pipelines often rely on long Groovy scripts or scattered YAML files, which can be challenging to maintain over time. TeamCity, on the other hand, offers a clean UI-driven configuration for quick setup, with the option to switch over to the Kotlin DSL for version-controlled, production-grade pipelines. This dual approach makes it easy to start simple and then scale your configuration as your projects demand.
How TeamCity handles Docker better
Here’s what TeamCity’s native Docker support looks like in practice:
- Docker build runners: Instead of writing ad hoc scripts, you can add dedicated Docker build steps directly in your pipeline. Whether you’re building images, running containers, or cleaning up afterward, it’s all handled through first-class runners.
- Built-in registry support: Authenticating and pushing images to Docker Hub, GitHub Container Registry, or a private registry is straightforward. TeamCity provides registry connections out of the box, so you don’t have to wire up custom credentials every time.
- Kotlin DSL integration: If you prefer pipelines as code, you can declare Docker build and push steps in the Kotlin DSL with just a few lines. This makes it easy to track changes in version control and keep your pipelines reproducible.
- Bundled Docker plugin: Perhaps the best part about all this is that there’s no separate plugin to install. The Docker integration is bundled with TeamCity, maintained alongside the product itself. That means fewer moving parts and no surprises during upgrades.
Creating a Docker build and push pipeline in TeamCity
Let’s now see TeamCity’s Docker support in action by setting up a simple build-and-push pipeline. The goal here is to take a standard Dockerfile, build an image from it, and push that image to a container registry like Docker Hub or GitHub Container Registry.
Step 1: Set up your Dockerfile
Start with a project that has a valid Dockerfile at its root. (You can use this one if you don’t have your own. Make sure to fork it to your GitHub account.)
Here’s what the Dockerfile in this project looks like:
# Use official Node.js LTS image

FROM node:24-alpine

# Set working directory

WORKDIR /usr/src/app

# Copy package files and install dependencies

COPY package*.json ./

RUN npm install --production

# Copy app source

COPY index.js ./

# Expose the port the app runs on

EXPOSE 3000

# Start the app

CMD ["node", "index.js"]
It’s a pretty barebones Dockerfile for setting up the environment for a Node.js app, copying source code files, and running the app.
Step 2: Add a Docker build step
In TeamCity, set up a new project for your pipeline.
Note: If you’re creating a new TeamCity project with a Dockerfile, TeamCity will most likely autodetect the right build steps for you to get started quickly. You can select the right steps for your workflow and click Use selected to set up the pipeline right away!
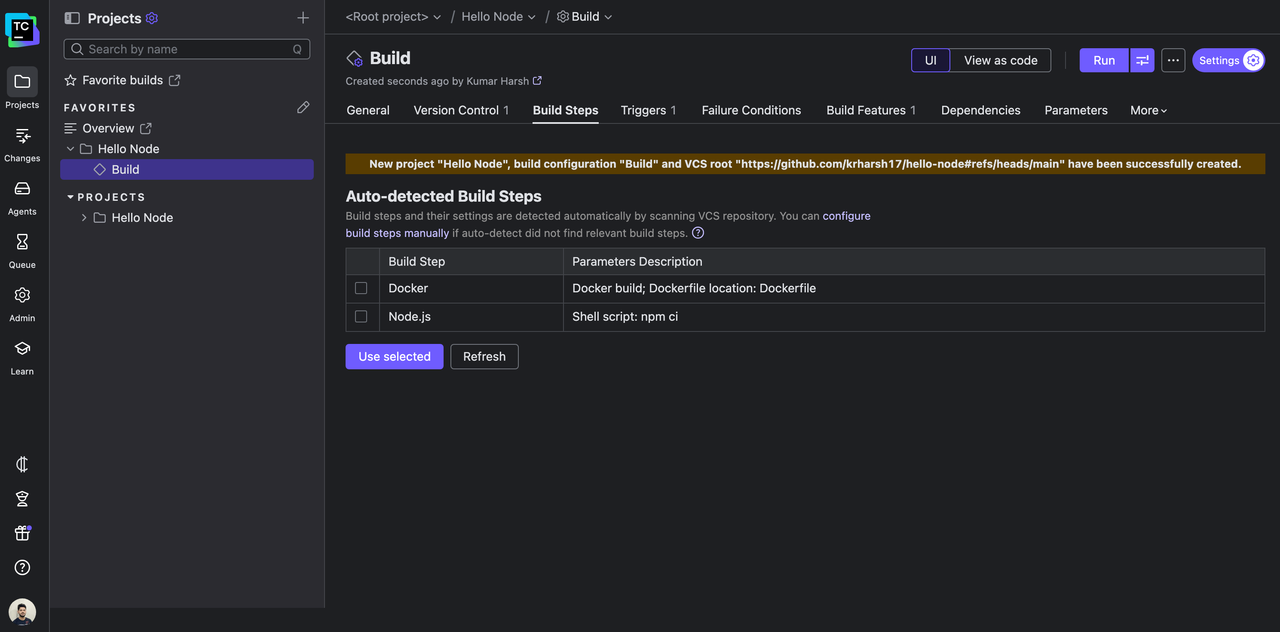
To learn how to add a Docker build step by yourself, read along.
In your TeamCity project, create a new build configuration if you don’t have one prepared already. In the build configuration settings page, go to Build Steps and add a new build step to build the Docker image.
Choose Docker as the runner for the build step:
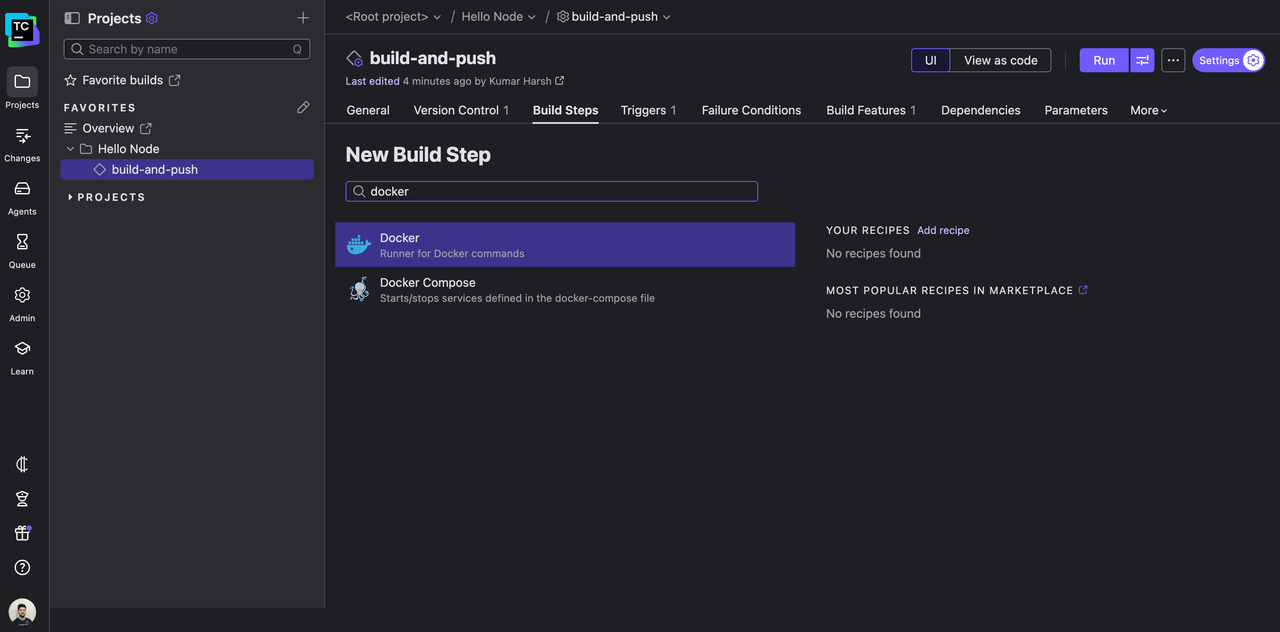
On the next page, you can configure what happens in this new build step. TeamCity’s Docker build runner makes this process straightforward. You don’t have to write ad hoc shell scripts for every operation – just pick the command you want (build, push, or other) and fill in the additional parameters as you need.
For example, in the build step, you need to configure the path to your Dockerfile, the platform your built images should target, and the name and tag for it. You can also supply additional arguments to add to the docker build command as follows, should you need to:
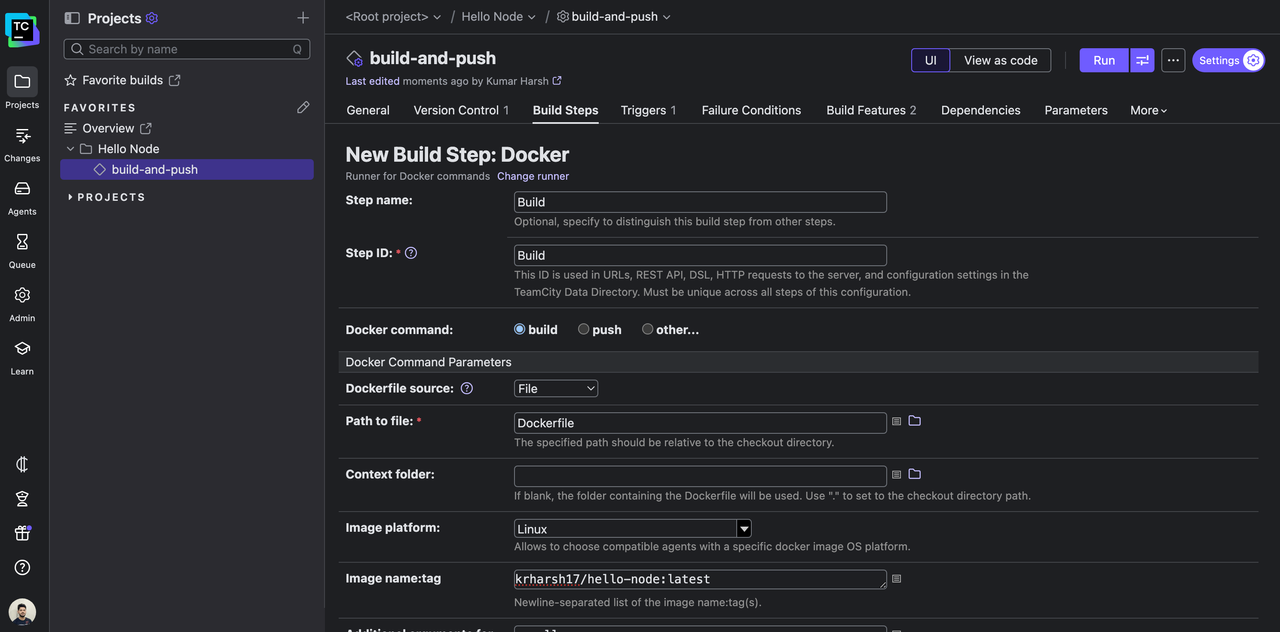
Thanks to TeamCity’s registry connections, you don’t need to embed credentials in scripts. TeamCity logs in before the build and automatically logs out afterward.
💡 Pro tip: You can set environment variables in TeamCity (like commit SHA or build number) and use them in your image tags for traceability.
Here’s the equivalent Kotlin DSL snippet:
steps {

    dockerCommand {

        name = "Build"

        id = "Build"

        commandType = build {

            source = file {

                path = "Dockerfile"

            }

            platform = DockerCommandStep.ImagePlatform.Linux

            namesAndTags = "krharsh17/hello-node:latest"

            commandArgs = "--pull"

        }

    }

}
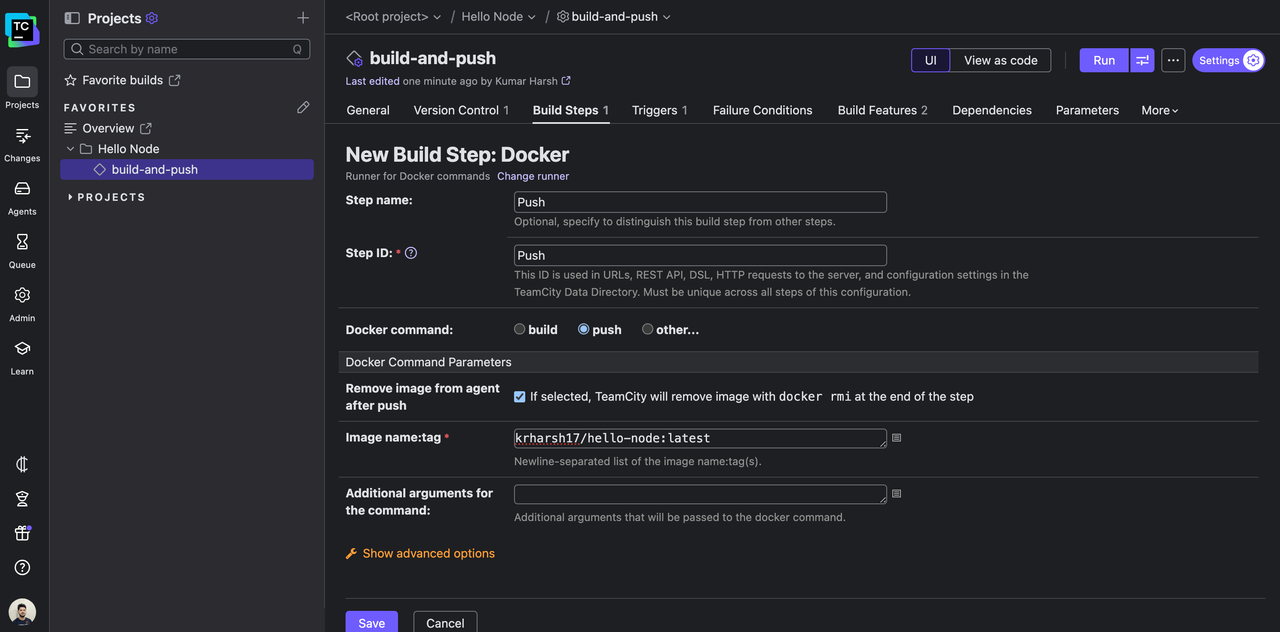
Step 3: Add a Docker push step
Next, add a Docker push build step. Select Docker once again as the build runner, and select push as the Docker command this time. Provide an image name and tag to use when pushing the image to your Docker registry:
Here’s what the build step looks like as a Kotlin DSL snippet:
steps {
    dockerCommand {
        name = "Push"
        id = "Push"
        commandType = push {
            namesAndTags = "krharsh17/hello-node:latest"
        }
    }
}
Save the build step.
Step 4: Configure Docker registry connection
All that’s left now is to provide the TeamCity project with instructions on how to access your container registry account. You’ll need to do two things:
- Create a new connection in your project.
- Configure your
build-and-pushbuild configuration to use the Docker Registry Connections build feature to access the connection you just created.
To create the new connection, head over to Admin | Your Project | Connections | New Connection.
Choose Docker Registry as the connection type, and provide your registry address and a username and password pair if needed:
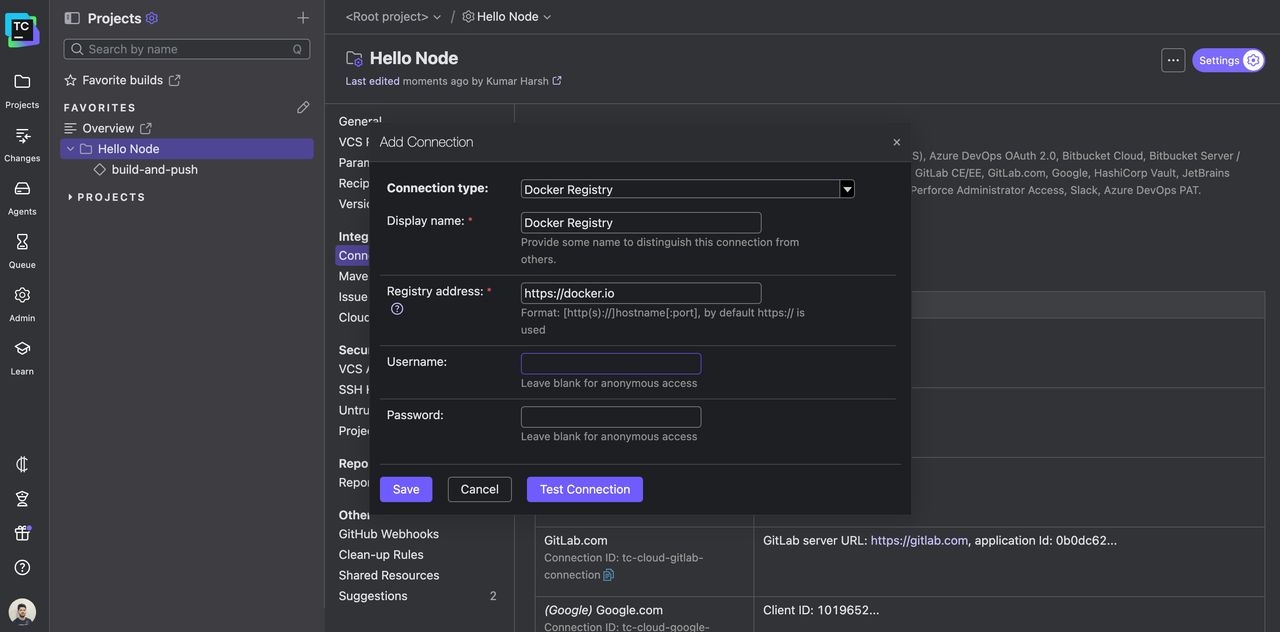
Test the connection and save it.
To use this connection through the Docker Registry Connections build feature, head over to your build configuration’s settings page and click the Build Features tab. Click the + Add Build Feature button here. In the dialog that opens, select Docker Registry Connections as the build feature to add.
Next, you need to choose which connection to link here. Click on the + Add registry connection button, and select the new connection you just created:
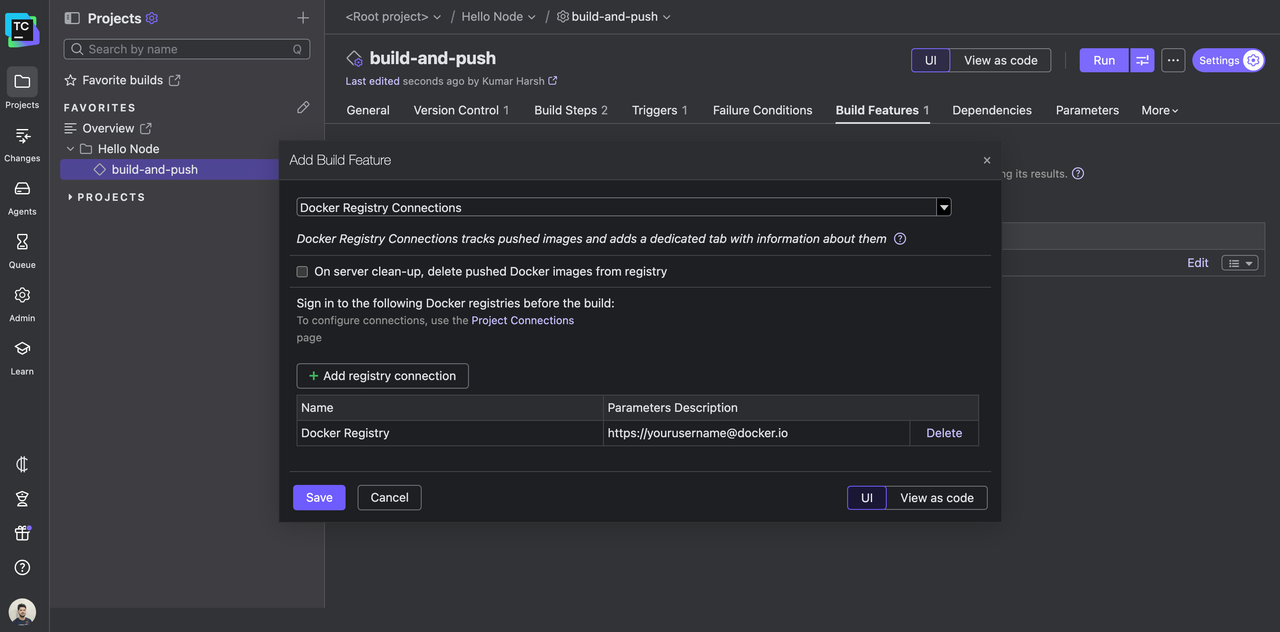
Click Save to add the feature.
If you prefer Kotlin DSL, here’s what the new build feature would look like:
features {
    dockerRegistryConnections {
        loginToRegistry = on {
            dockerRegistryId = "PROJECT_EXT_3"
        }
    }
}
PROJECT_EXT_3 is the connection ID. You can get this value from the Connections page on your TeamCity project.
Step 5: Testing the pipeline
You’re all set! It’s time to test the pipeline now.
Try triggering a build. You should see a new image tag get pushed to your Docker registry as soon as the build completes:
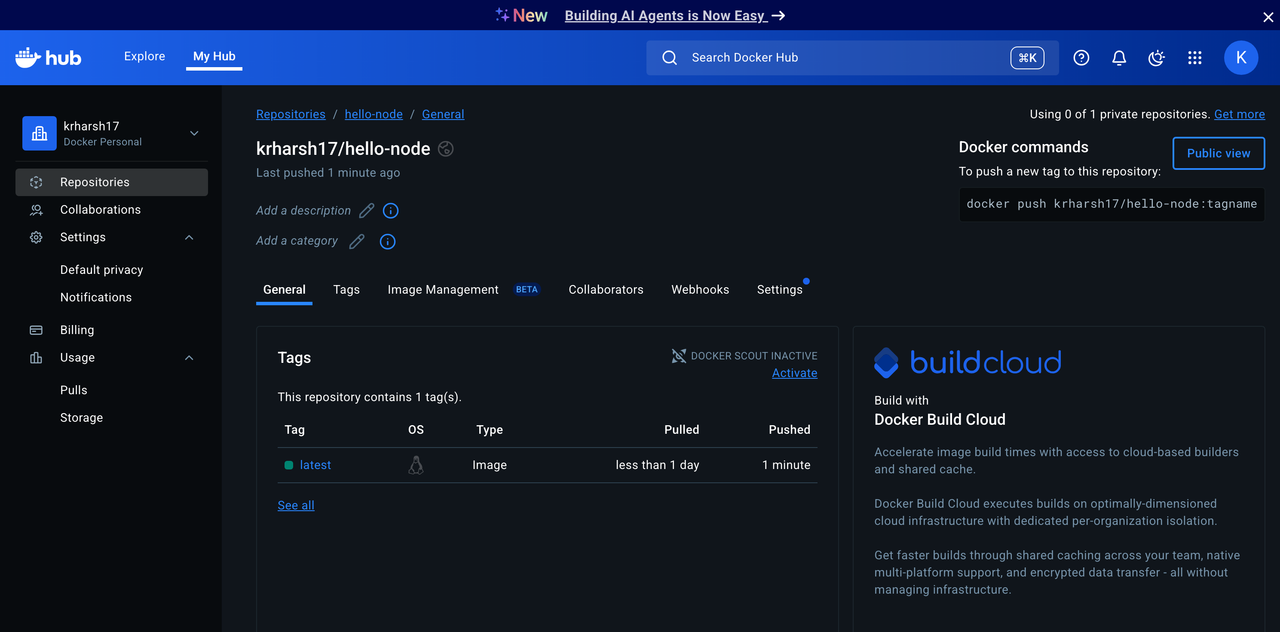
This means that your Docker-native pipeline is ready.
You can also go further by adding steps to run containerized tests or deploy to a staging environment. For instance, spin up the freshly built container with docker run as part of your CI/CD workflow, then run integration tests against it.
Integrated security and caching features
When building and pushing containers, you need to ensure functionality, security, and efficiency. TeamCity’s native Docker support includes features that help you protect sensitive data and speed up pipelines without extra work:
- Secure registry authentication: TeamCity’s Docker Registry Connections build feature automatically logs in to container registries (like Docker Hub or private registries) before each build and logs out afterward. You don’t need to embed credentials in scripts. TeamCity manages them securely for you.
- Image cleanup: When enabled, the Docker Registry Connections feature can automatically clean up pushed images after builds are cleaned up on the server. This keeps registry storage tidy and maintains good hygiene for build artifacts.
- Layer caching for speed: Rebuilding from scratch every time slows down development. With TeamCity’s Build Cache feature, key files and dependencies (like
node_modules/or.m2/) can be cached and reused across builds, significantly accelerating repeat runs. - Optimized for iterative workflows: With secure, credential-managed builds and reusable cache artifacts, teams can iterate quickly on Docker pipelines. Small updates don’t mean starting over from scratch, and the process stays secure by default.
Conclusion
If you’ve ever grappled with Docker pipelines in Jenkins, you know how fragile things can feel: chasing down plugin updates, maintaining brittle scripts, and dealing with configs that never quite stay consistent. It works, but it often feels like you’re spending more time nursing your CI/CD than actually delivering software.
TeamCity treats Docker as a first-class citizen. Native runners, registry integrations, caching, secrets management, and the Kotlin DSL replace Jenkins’s patchwork setup with a workflow you can actually rely on. Instead of simply trying to get builds to pass, you have a system you can trust to scale with you.
If you’re already running Docker pipelines in Jenkins, the migration path is straightforward and liberating. You’ll spend less time firefighting pipeline issues and more time shipping the features your users are waiting for.
If you’re ready to modernize your container pipelines, it’s worth seeing TeamCity in action. Head over to the TeamCity Docker documentation, or try TeamCity yourself and experience how first-class Docker support can simplify your CI/CD pipeline.