TeamCity
Powerful CI/CD for DevOps-centric teams
AWS Image Builder Plugin for TeamCity

Cloud build agents are one of those CI/CD features that feel almost magical when everything works well. Your TeamCity server can scale build capacity up when the queue gets busy, then wind it back down when the rush is over. You get extra power exactly when you need it, without keeping machines idle the rest of the time.
They also make builds cleaner and more predictable. Each cloud agent starts as a fresh VM from a cloud image, so every build gets an isolated environment rather than inheriting the state left behind by a previous build. Scalable, cost-efficient, and reliable, cloud build agents are a perfect fit for a truly robust and streamlined TeamCity setup.
Of course, cloud build agents are not without trade-offs. The most obvious one is maintenance. Agents are launched from a static machine image, and that image starts aging the moment your tooling changes or the TeamCity server is updated. Suddenly, every new agent has to spend valuable time catching up… or you have to repeat the familiar cycle: Start an instance, install updates, create a new snapshot, and update the TeamCity cloud profile.
Large repositories add another wrinkle. Since every cloud agent starts from a fresh VM, it also starts with an empty checkout directory. The bigger the repository, the more time each build can spend just pulling sources. One workaround is to bake repository mirrors into the image alongside your tools, so agents only need to fetch the latest commits. But that, too, is temporary: As changes accumulate, the mirrors become stale, and the image needs another update.
If you run AMI-based cloud build agents on Amazon Web Services, there’s a better way to handle this – the AWS Image Builder plugin. It turns image maintenance from a manual, repetitive chore into a regular TeamCity build configuration.
Prerequisites
To automate AMI updates, download and install the AWS Image Builder TeamCity plugin from JetBrains Marketplace. You can do this directly in TeamCity: navigate to Admin | Plugins, then click Browse plugins repository. Don’t forget to enable this plugin after installing it.
You will also need a suitable AWS connection configured in TeamCity. The connection’s IAM principal needs EC2 permissions to launch instances, create images, and read VPC metadata.
Create a build configuration
- Once the plugin is installed and enabled, create a new build configuration under the project that has access to the AWS connection mentioned in the previous section.
- Add the Image Builder AWS AMI build step.
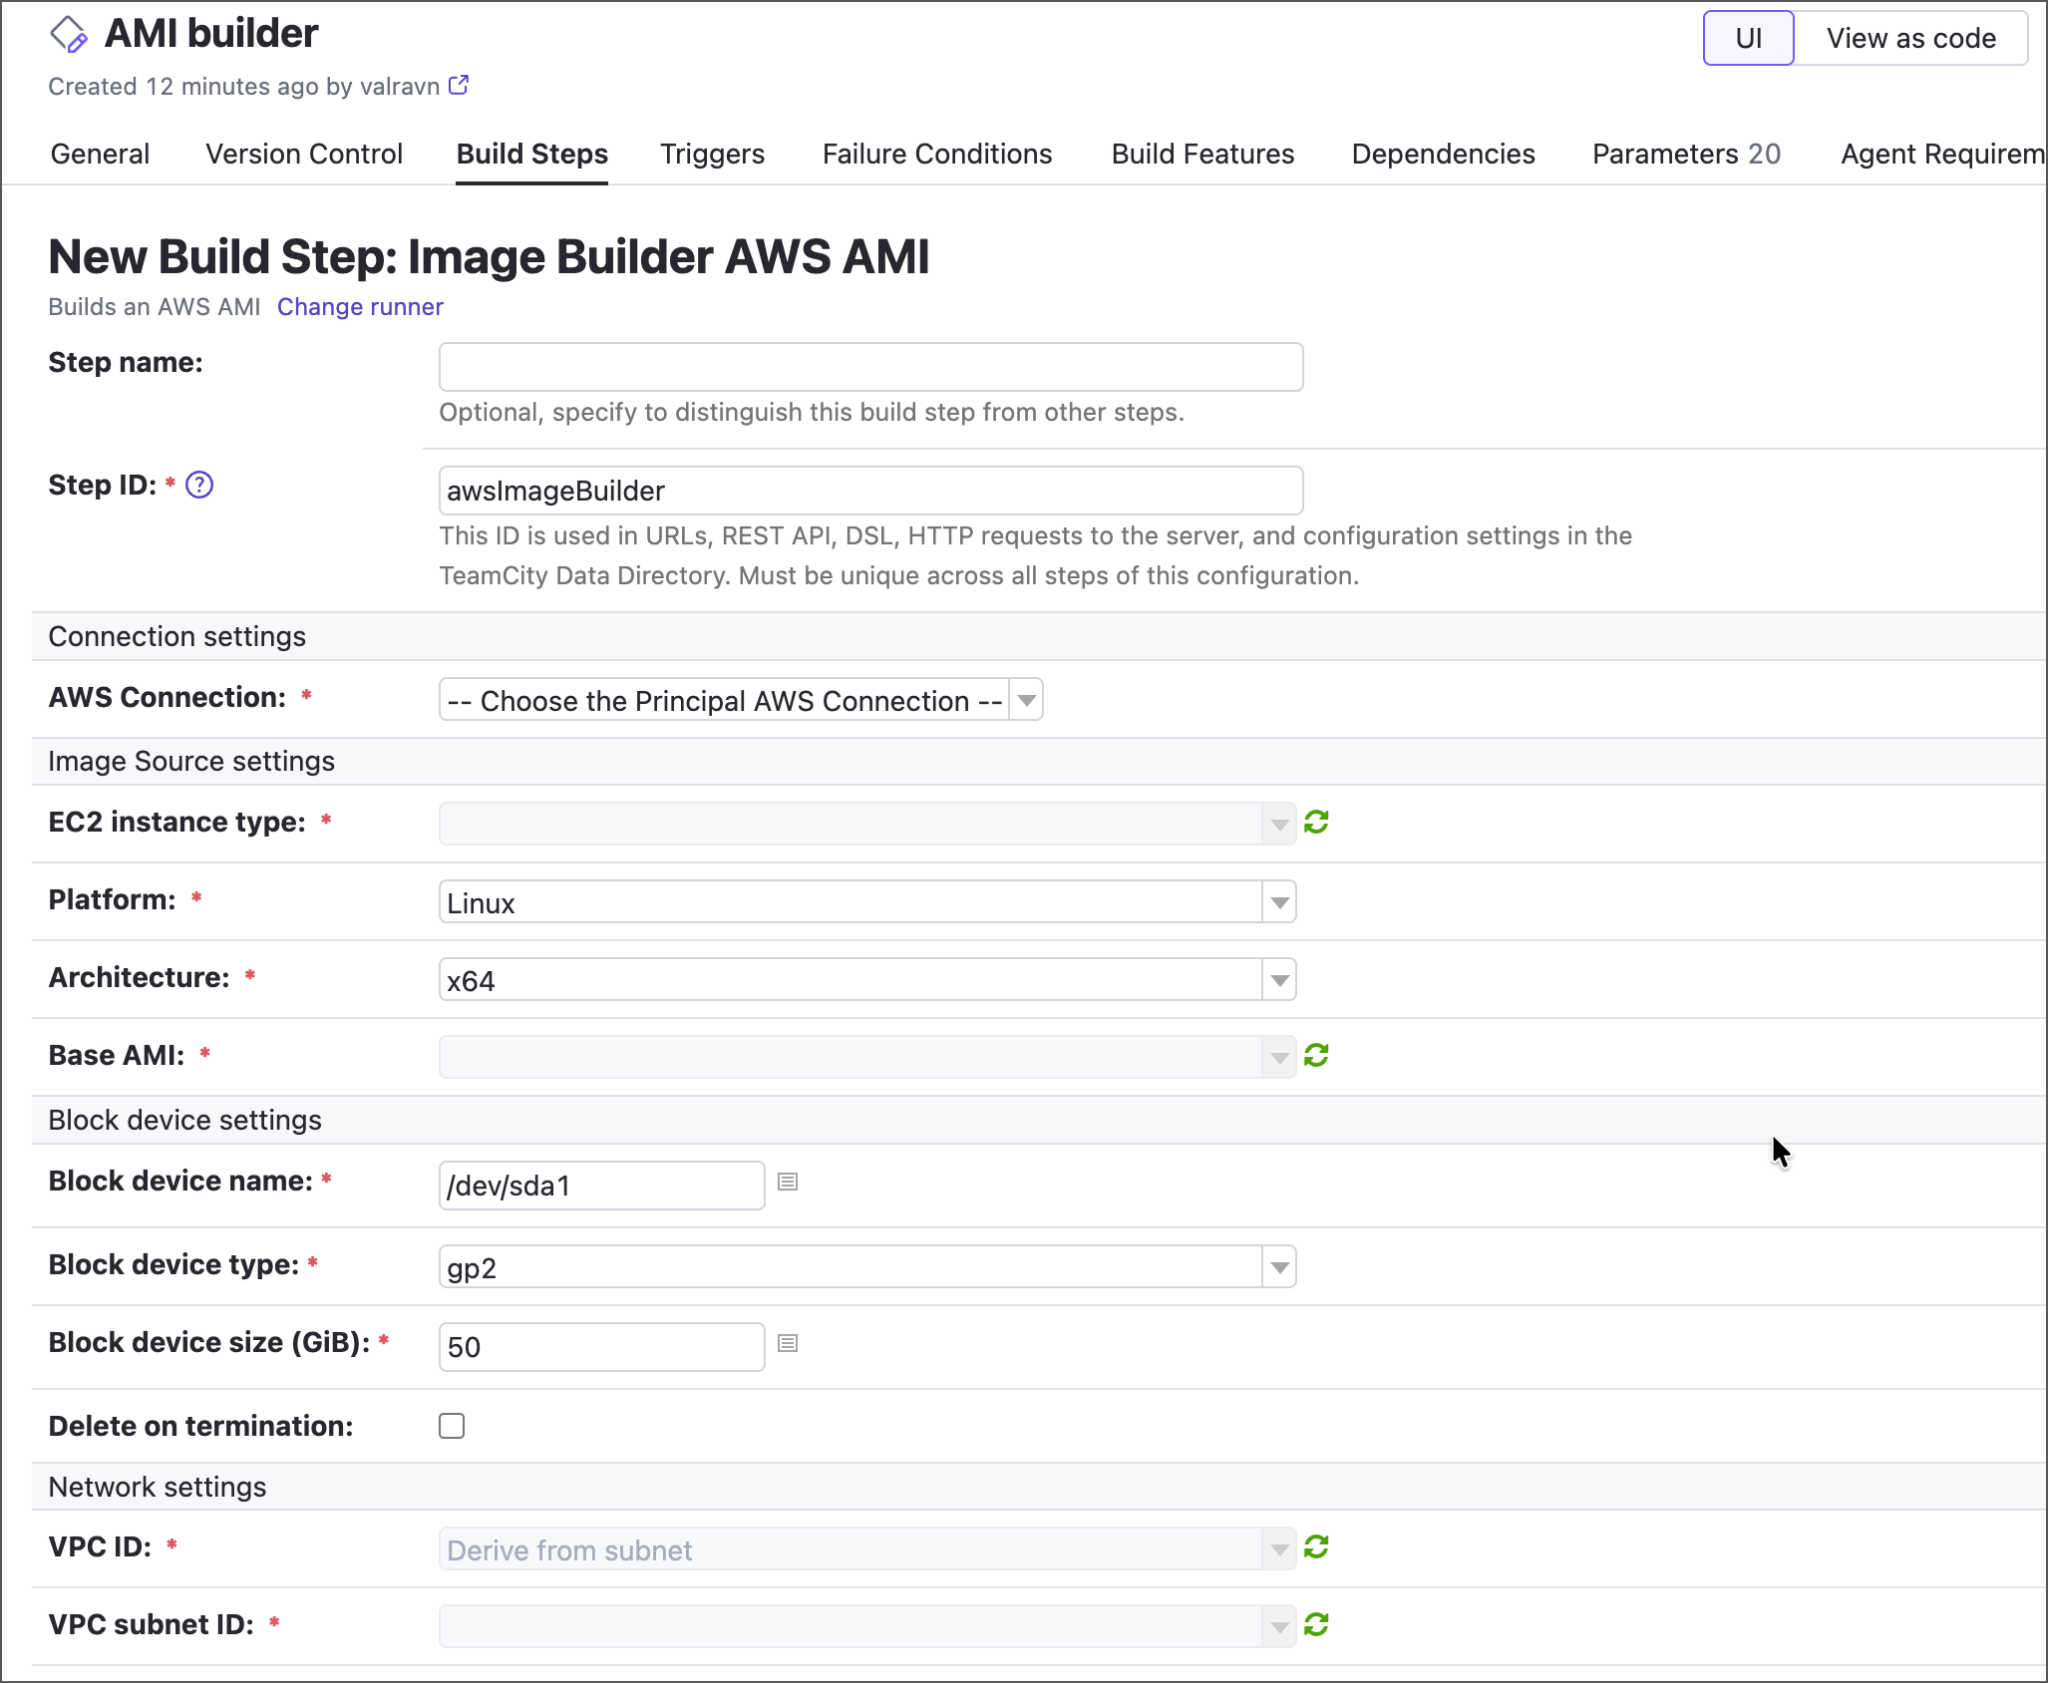
- Specify core step settings:
- AWS Connection – Choose the connection that TeamCity will use to communicate with AWS.
- Base AMI – Select the AMI this configuration will rebuild.
- Network settings – Required to access AWS resources.
- Tags – The list of
name=valuetags that will be assigned to a newly built AMI. This step is important if you want TeamCity to automatically update its cloud profiles (see below). - Image access – Enter account IDs, organization ARNs, or OU ARNs to specify who will be able to access your newly built image.
- Tick Install TeamCity agent to bake the build agent into the AMI. The full agent distribution will be taken directly from the TeamCity instance, so your agents will always match the server version. After major TeamCity updates, run this build configuration to supply your AMI with the corresponding agent version.
- Specify optional scripts to run during the build (TeamCity first-run script files; the inline script will be executed last). You can use these scripts to install runtimes, SDKs, agent plugins, or perform any environment setup that would otherwise run on every agent boot.
- Enable VCS mirrors to speed up the build checkout phase. The plugin will pre-populate the image with Git object mirrors based on the VCS roots attached to this configuration. The roots contain all the required information (connection details, credentials, submodule checkout policy, and so on), making them the perfect tool for the job.
To specify which mirrors should be baked in:
- Save the build step to go back to the build configuration settings.
- Navigate to the Version Control tab and click Attach VCS Root.
- If your AMI builder configuration is owned by the same project that has regular configurations that build, test, and deploy required repositories, you can attach an existing VCS root. Otherwise, create a new one.
- For a newly created Git VCS root, specify the fetch URL and authorization settings.
- Switch the root’s Checkout policy to Use mirrors.
Run the builder configuration
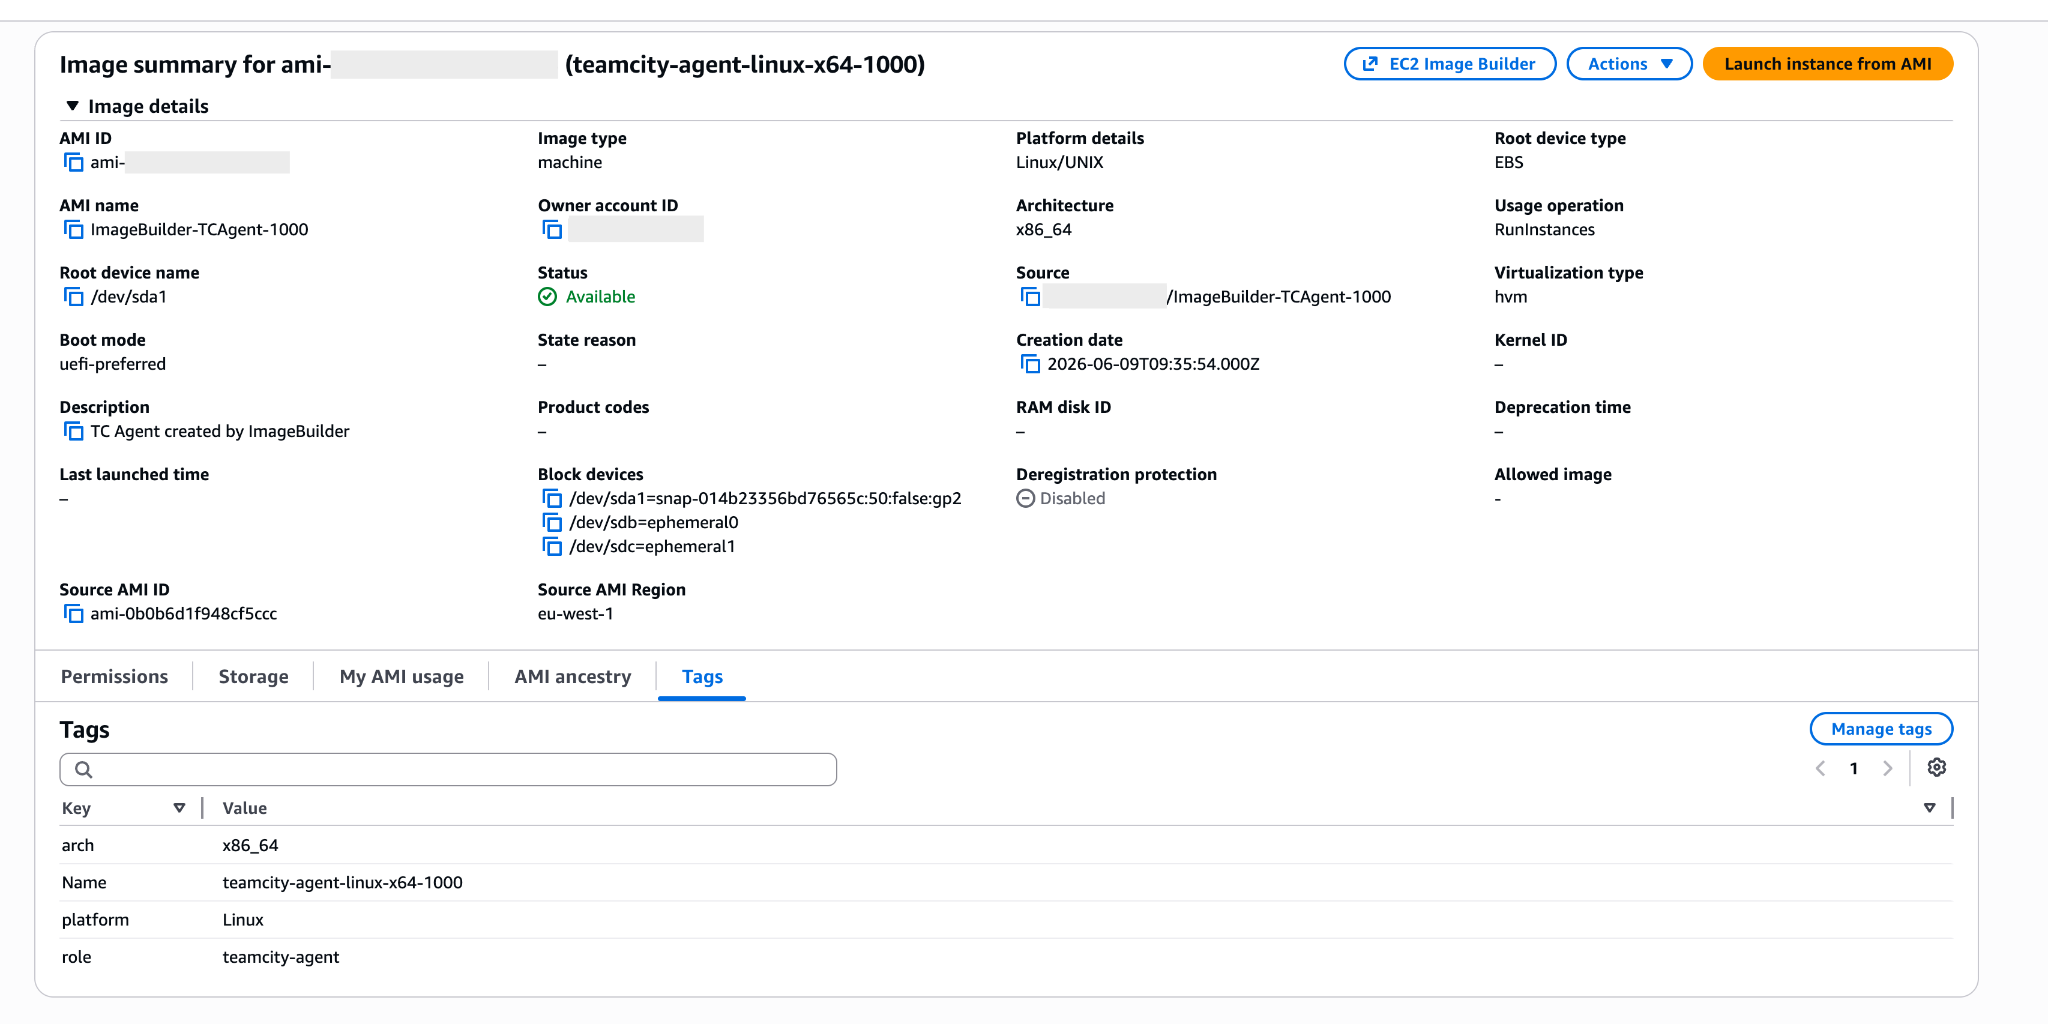
Once you’ve filled in all build-step and VCS root settings, run the configuration and verify the results.
- Check the value of the
teamcity.build.awsImageBuilder.amiIdbuild parameter that stores the AMI ID of your new image. - Navigate to the Artifacts tab and view the hidden
.teamcity/image_builder/artifact. This directory stores a generated HashiCorp Packer template that the AWS Image Builder plugin uses to upload the final AMI. - Log in to your AWS console to verify the new AMI is published and tagged.
Update TeamCity cloud profiles
Building an updated AMI is only half the automation story. The next step is making sure TeamCity starts using it automatically as soon as it’s ready.
To do this, go to Project settings | Cloud profiles, open the profile you want to update, and check each cloud image in it. Set the Instance toggle to AMI by tags so TeamCity selects images by tag instead of a fixed AMI ID. Use the same AMI tags that you configured in the image builder build step.
Over time, repeated image builder runs will produce multiple AMIs with the same tags, but that will not become an issue. When a cloud image uses the AMI by tags policy, TeamCity periodically checks AWS for matching AMIs and chooses the one with the most recent creation date. This means your cloud agents can keep launching from the latest AMI without any manual profile updates.
Kotlin DSL
If you prefer to configure your TeamCity workflows in Kotlin DSL rather than TeamCity UI, here’s how to configure the AMI builder step in code:
awsImageBuilderBuild {

    name = "Build Agent AMI"

    awsConnectionId = "AmazonWebServicesAws"

    baseAmi = "ami-0xxxxxxxxxxxxxxxxx"

    instanceType = "t3.medium"

    subnetId = "subnet-0xxxxxxxxxxxxxxxxx"

    tags = """

        role=teamcity-agent

        env=prod

    """.trimIndent()

    includeAgent = true

    inlineScript = "systemctl enable teamcity-agent"

}
Tell us what you think
We love building features that solve real, everyday DevOps challenges. The AWS Image Builder plugin is designed to do exactly that by making cloud build agent maintenance much easier, so you can spend less time tinkering with the images and more looking at your builds.
As always, your feedback matters. If you run into issues or feel that an important customization option is missing, please let us know in the comments on the JetBrains Marketplace plugin page or in the corresponding YouTrack ticket.