更快的 Python:解开 Python 全局解释器锁

什么是 Python 的全局解释器锁 (GIL)?
“全局解释器锁”(或 GIL)是 Python 社区中的常见术语。 这是一个众所周知的 Python 功能。 但 GIL 到底是什么?
如果您有使用其他编程语言(例如 Rust)的经验,您可能已经知道什么是互斥锁 (mutex)。 互斥锁可以确保数据每次只能由一个线程访问。 这可以防止数据被多个线程同时修改。 您可以把它视为一种“锁”,它会阻止所有线程访问数据,除了持有密钥的线程之外。
GIL 基本上是一个互斥锁。 它一次只允许一个线程访问 Python 解释器。 我有时把它想象成 Python 的方向盘。 您肯定不会想让多个人操控方向盘! 但话说回来,一群人旅行时经常会换司机。 这就有点像把解释器访问权限交给另一个线程。
由于 GIL,Python 不允许真正的多线程进程。 这项功能在过去十年中引发了争议,并且有很多尝试通过移除 GIL 和允许多线程进程来提高 Python 的速度。 最近在 Python 3.13 中,引入了一种无需 GIL 即可使用 Python 的选项,有时也称为无 GIL 或自由线程 Python。 由此,Python 编程的新时代开始了。
为什么 GIL 最开始会出现?
既然 GIL 这么不受欢迎,那当初为什么要实现它呢? 拥有 GIL 其实有很多好处。 在其他具有真正多线程处理的编程语言中,有时问题源自多个线程修改数据,最终结果取决于哪个线程或进程首先完成。 这被称为“竞争条件”。 像 Rust 这样的语言通常很难学习,因为程序员必须使用互斥锁防止竞争条件。
在 Python 中,所有对象都有一个引用计数器来跟踪有多少其他对象需要从它们获取信息。 如果引用计数器达到零,因为我们知道由于 GIL,Python 中不存在竞争条件,我们可以放心地声明该对象不再需要并且可以作为垃圾被回收。
当 Python 在 1991 年首次发布时,大多数个人计算机只有一个核心,并且没有多少程序员要求多线程处理支持。 拥有 GIL 可以解决程序实现中的很多问题,同时还使代码易于维护。 因此,Python 的创造者 Guido van Rossum 于 1992 年添加了 GIL。
快进到 2025 年:个人计算机拥有多核处理器,因此计算能力更强。 我们可以利用额外的算力实现真正的并发,而无需摆脱 GIL。
在本文的后面,我们将分解说明移除它的流程。 现在,我们先看看在 GIL 存在的情况下真正的并发是如何运作的。
Python 中的多进程处理
在深入探究移除 GIL 的流程之前,我们先看看 Python 开发者如何使用 multiprocessing 库实现真正的并发。 multiprocessing 标准库提供本地和远程并发,使用子进程而不是线程有效避开全局解释器锁。 这样一来,multiprocessing 模块允许程序员充分利用特定机器上的多个处理器。
不过,要执行多进程处理,我们必须以稍微不同的方式设计程序。 下面的示例展示了如何在 Python 中使用 multiprocessing 库。
还记得我们博客系列第 1 部分中的异步汉堡店吗?
import asyncio

import time

async def make_burger(order_num):

    print(f"Preparing burger #{order_num}...")

    await asyncio.sleep(5) # time for making the burger

    print(f"Burger made #{order_num}")

async def main():

    order_queue = []

    for i in range(3):

        order_queue.append(make_burger(i))

    await asyncio.gather(*(order_queue))

if __name__ == "__main__":

    s = time.perf_counter()

    asyncio.run(main())

    elapsed = time.perf_counter() - s

    print(f"Orders completed in {elapsed:0.2f} seconds.")
我们可以使用 multiprocessing 库来做同样的事,例如:
import multiprocessing


import time


def make_burger(order_num):


   print(f"Preparing burger #{order_num}...")


   time.sleep(5) # time for making the burger


   print(f"Burger made #{order_num}")


if __name__ == "__main__":


   print("Number of available CPU:", multiprocessing.cpu_count())


   s = time.perf_counter()


   all_processes = []


   for i in range(3):
       process = multiprocessing.Process(target=make_burger, args=(i,))
       process.start()
       all_processes.append(process)


   for process in all_processes:
       process.join()


   elapsed = time.perf_counter() - s


   print(f"Orders completed in {elapsed:0.2f} seconds.")
您可能还记得,multiprocessing 中的许多方法与 threading 非常相似。 为了了解 multiprocessing 的区别,我们来探索一个更复杂的用例:
import multiprocessing
import time
import queue


def make_burger(order_num, item_made):
   name = multiprocessing.current_process().name
   print(f"{name} is preparing burger #{order_num}...")
   time.sleep(5)  # time for making burger
   item_made.put(f"Burger #{order_num}")
   print(f"Burger #{order_num} made by {name}")


def make_fries(order_num, item_made):
   name = multiprocessing.current_process().name
   print(f"{name} is preparing fries #{order_num}...")
   time.sleep(2)  # time for making fries
   item_made.put(f"Fries #{order_num}")
   print(f"Fries #{order_num} made by {name}")


def working(task_queue, item_made, order_num, lock):
   break_count = 0
   name = multiprocessing.current_process().name
   while True:
       try:
           task = task_queue.get_nowait()
       except queue.Empty:
           print(f"{name} has nothing to do...")
           if break_count > 1:
               break  # stop if idle for too long
           else:
               break_count += 1
           time.sleep(1)
       else:
           lock.acquire()
           try:
               current_num = order_num.value
               order_num.value = current_num + 1
           finally:
               lock.release()
           task(current_num, item_made)
           break_count = 0


if __name__ == "__main__":


   print("Welcome to Pyburger! Please place your order.")


   burger_num = input("Number of burgers:")
   fries_num = input("Number of fries:")


   s = time.perf_counter()


   task_queue = multiprocessing.Queue()
   item_made = multiprocessing.Queue()
   order_num = multiprocessing.Value("i", 0)
   lock = multiprocessing.Lock()


   for i in range(int(burger_num)):
       task_queue.put(make_burger)
   for i in range(int(fries_num)):
       task_queue.put(make_fries)


   staff1 = multiprocessing.Process(
       target=working,
       name="John",
       args=(
           task_queue,
           item_made,
           order_num,
           lock,
       ),
   )
   staff2 = multiprocessing.Process(
       target=working,
       name="Jane",
       args=(
           task_queue,
           item_made,
           order_num,
           lock,
       ),
   )


   staff1.start()
   staff2.start()


   staff1.join()
   staff2.join()


   print("All tasks finished. Closing now.")
   print("Items created are:")


   while not item_made.empty():
       print(item_made.get())


   elapsed = time.perf_counter() - s


   print(f"Orders completed in {elapsed:0.2f} seconds.")
这是我们得到的输出:
Welcome to Pyburger! Please place your order.
Number of burgers:3
Number of fries:2
Jane has nothing to do...
John is preparing burger #0...
Jane is preparing burger #1...
Burger #0 made by John
John is preparing burger #2...
Burger #1 made by Jane
Jane is preparing fries #3...
Fries #3 made by Jane
Jane is preparing fries #4...
Burger #2 made by John
John has nothing to do...
Fries #4 made by Jane
Jane has nothing to do...
John has nothing to do...
Jane has nothing to do...
John has nothing to do...
Jane has nothing to do...
All tasks finished. Closing now.
Items created are:
Burger #0
Burger #1
Fries #3
Burger #2
Fries #4
Orders completed in 12.21 seconds.
请注意,multiprocessing 中存在一些限制,导致上述代码以这种方式设计。 接下来我们逐一分析。
首先,记住我们之前有 make_burger 和 make_fries 函数来生成具有正确 order_num 的函数:
def make_burger(order_num):
   def making_burger():
       logger.info(f"Preparing burger #{order_num}...")
       time.sleep(5)  # time for making burger
       logger.info(f"Burger made #{order_num}")


   return making_burger


def make_fries(order_num):
   def making_fries():
       logger.info(f"Preparing fries #{order_num}...")
       time.sleep(2)  # time for making fries
       logger.info(f"Fries made #{order_num}")


   return making_fries
使用 multiprocessing 时我们不能执行同样的操作。 如果尝试,会导致如下错误:
AttributeError: Can't get local object 'make_burger..making_burger'
原因是 multiprocessing 使用 pickle,它通常只能序列化顶层模块函数。 这是 multiprocessing 的局限之一。
其次,注意上面使用 multiprocessing 的示例代码段,我们没有对共享数据使用任何全局变量。 例如,我们不能对 item_made 和 order_num 使用全局变量。 要在不同的进程之间共享数据,multiprocessing 库中的特殊类对象(如 Queue 和 Value)会被使用并作为实参传递给进程。
一般来说,不建议在不同进程之间共享数据和状态,因为这会导致更多问题。 在上面的例子中,我们必须使用 Lock 确保 order_num 的值每次只能被一个进程访问和递增。 如果没有 Lock,商品的订单号可能会变成这样:
Items created are:

Burger #0
Burger #0
Fries #2
Burger #1
Fries #3
以下是使用锁来避免麻烦的方式:
           lock.acquire()
           try:
               current_num = order_num.value
               order_num.value = current_num + 1
           finally:
               lock.release()
           task(current_num, item_made)
要详细了解如何使用 multiprocessing 标准库,您可以在这里阅读文档。
移除 GIL
近十年来,移除 GIL 一直是一个话题。 2016 年,在 Python Language Summit 上,Larry Hastings 讲解了他对 CPython 解释器进行“GIL 切除”的想法以及他在这一想法上取得的进展[1]。 这是移除 Python GIL 的一次开创性尝试。 2021 年,Sam Gross 重新引发了关于移除 GIL 的讨论[2],并催生了 2023 年发布的 PEP 703 – Making the Global Interpreter Lock Optional in CPython。
可以看到,移除 GIL 绝不是一个仓促的决定,并且已经在社区内引起很多争论。 如上面的多进程处理示例(以及上面链接的 PEP 703)所示,当 GIL 提供的保证被移除时,情况很快就会变得复杂起来。
[1]: https://lwn.net/Articles/689548/
[2]: https://lwn.net/ml/python-dev/CAGr09bSrMNyVNLTvFq-h6t38kTxqTXfgxJYApmbEWnT71L74-g@mail.gmail.com/
引用计数
存在 GIL 时,引用计数和垃圾回收更加直观。 当一次只有一个线程可以访问 Python 对象时,我们可以依靠简单的非原子引用计数,并在引用计数达到零时移除对象。
移除 GIL 让情况有些棘手。 我们不能再使用非原子引用计数,因为这不能保证线程安全。 如果多个线程同时对 Python 对象执行引用的多次递增和递减,则可能出现问题。 理想情况下,原子引用计数将用于保证线程安全。 但这种方法开销较大,当线程较多时效率会受到影响。
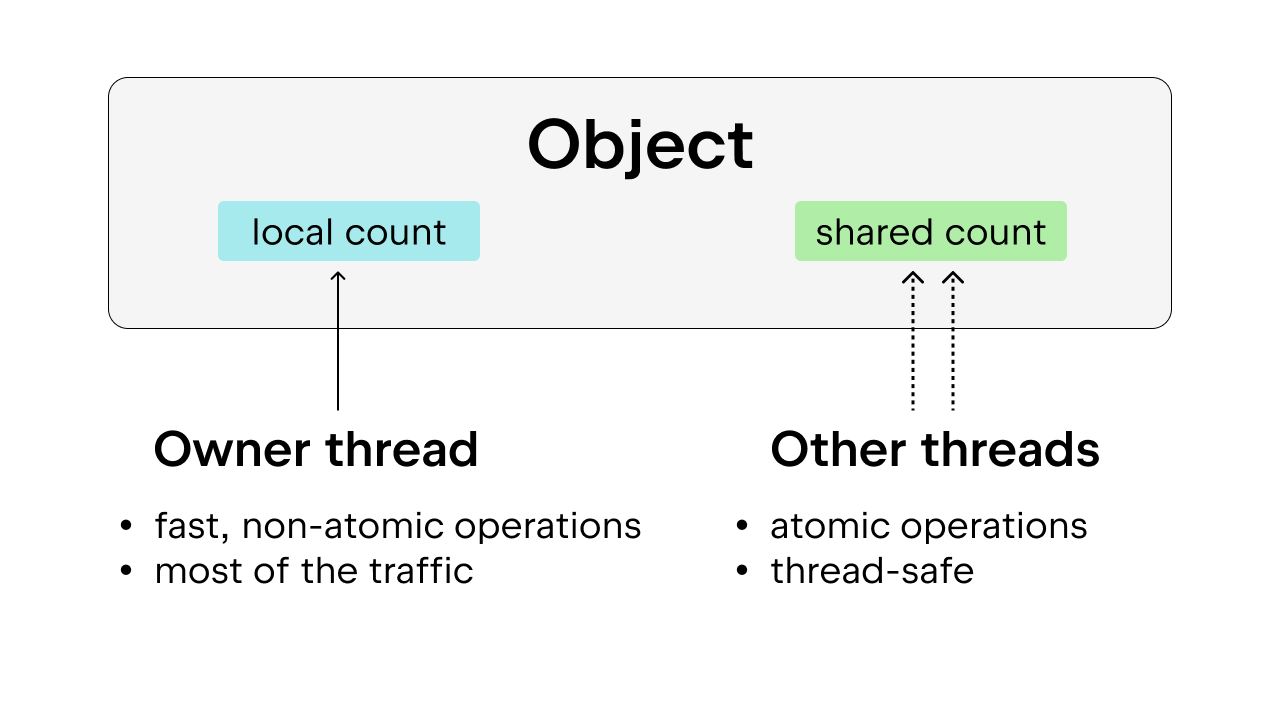
解决方案是使用偏向引用计数,这也保证了线程安全。 这里的想法是将每个对象偏向于所有者线程,即大多数时间访问该对象的线程。 所有者线程可以对其拥有的对象执行非原子引用计数,其他线程则需要对这些对象执行原子引用计数。 这个方法比单纯的原子引用计数更可取,因为大多数对象大多数时间仅由一个线程访问。 我们可以通过允许所有者线程执行非原子引用计数来减少执行开销。
此外,一些常用的 Python 对象,例如 True、False、小整数和一些暂存字符串,都是持久的。 这里的“持久”表示对象将在程序的整个生存期内保留,因此不需要引用计数。
垃圾回收
我们还必须修改垃圾回收完成的方式。 引用被释放时,不是立即减少引用计数,引用计数达到零时,也不是立即移除对象,而是使用一种名为“延迟引用计数”的技术。
需要减少引用计数时,对象被存储在一个表中,表后续将接受双重检查以确定引用计数的递减是否准确。 这避免了在其被引用时过早移除对象,这种情况在没有 GIL 的情况下可能会发生,因为引用计数并不像 GIL 那样直观。 这使垃圾回收过程更为复杂,因为垃圾回收可能需要遍历每个线程的堆栈以获取每个线程自己的引用计数。
另一件需要考虑的事:垃圾回收期间引用计数需要保持稳定。 如果一个对象即将被丢弃但突然被引用,这将导致严重的问题。 因此,在垃圾回收周期中,它必须“停止整个世界”来提供线程安全保证。
内存分配
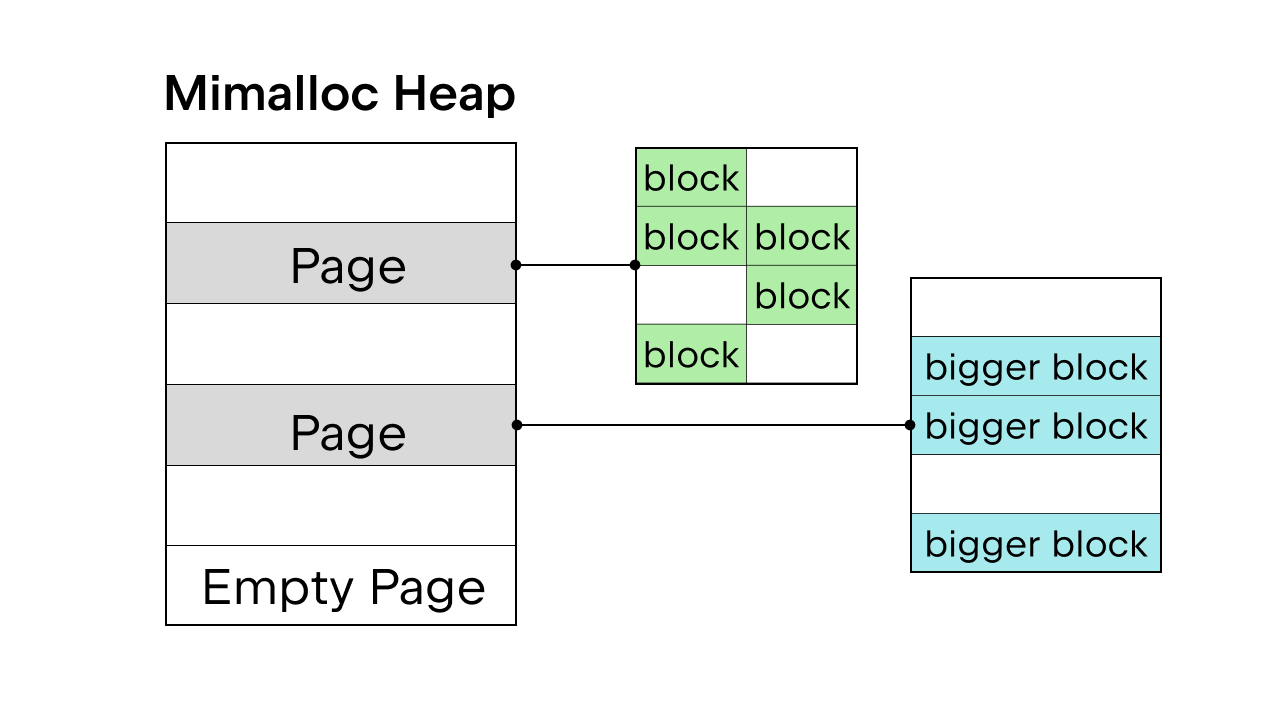
有 GIL 保证线程安全时,将使用 Python 内部内存分配器 pymalloc。 但是没有 GIL,我们将需要一个新的内存分配器。 Sam Gross 在 PEP 中提出了 mimalloc,这是由 Daan Leijen 创建并由 Microsoft 维护的通用分配器。 这是一个很好的选择,因为它线程安全,并且在小对象上性能良好。
Mimalloc 使用页面填充其堆,使用块填充页面。 每个页面都包含块,并且每个页面内的块大小均相同。 对列表和字典访问添加一些限制后,垃圾回收器不必维护关联列表即可查找所有对象,并且还可以在不获取锁的情况下对列表和字典进行读取访问。
关于移除 GIL 还有更多细节,但这里不可能全部涵盖。 您可以查看 PEP 703 – Making the Global Interpreter Lock Optional in CPython 获得完整分析。
有无 GIL 的性能差异
由于 Python 3.13 提供了自由线程选项,我们可以将 Python 3.13 标准版本的性能与自由线程版本进行比较。
安装自由线程 Python
我们将使用 pyenv 安装两个版本:标准版(例如 3.13.5)和自由线程版(例如 3.13.5t)。
或者,您也可以使用 Python.org 上的安装程序。 确保在安装过程中选择 Customize(自定义)选项,并选中可选框以安装自由线程 Python(参见这篇博文中的示例)。
安装两个版本后,我们可以将它们添加为 PyCharm 项目中的解释器。
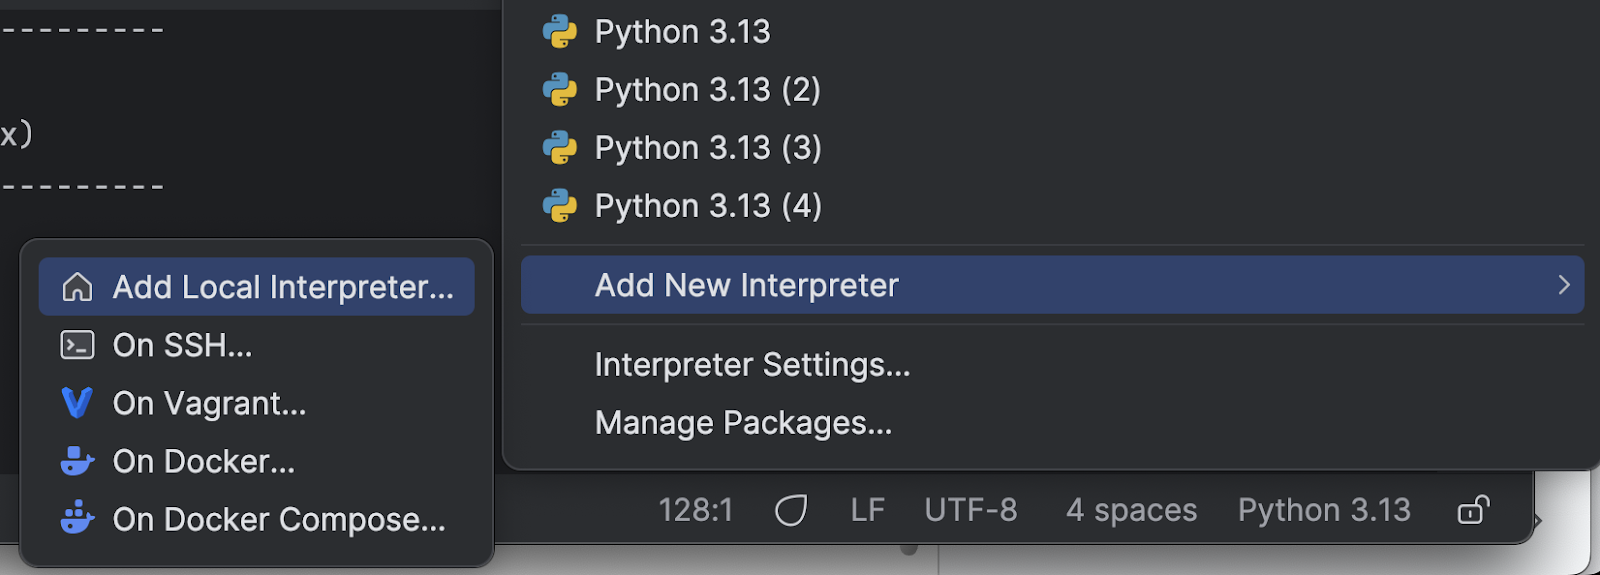
首先,点击右下角的 Python 解释器的名称。

在菜单中选择 Add New Interpreter(添加新解释器),然后选择 Add Local Interpreter(添加本地解释器)。
选择 Select existing(选择现有),等待解释器路径加载(如果您像我一样有很多解释器,这可能需要一段时间),然后从下拉菜单 Python path(Python 路径)中选择刚刚安装的新解释器。
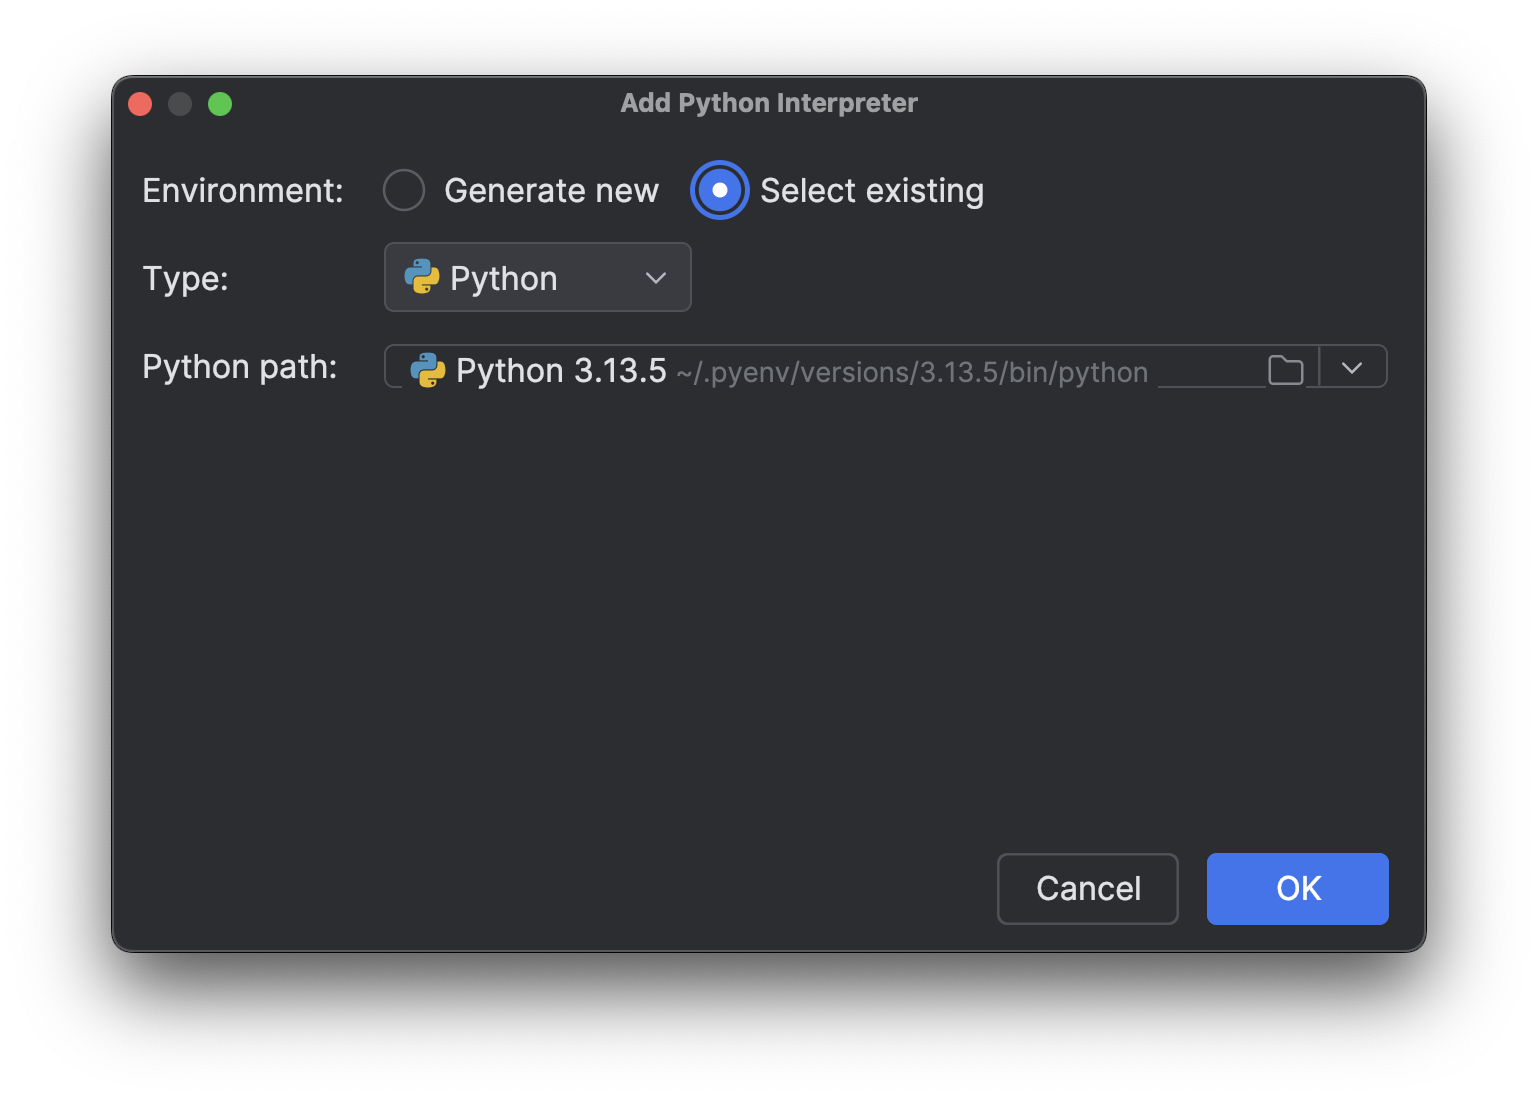
点击 OK(确定)来添加。 对另一个解释器重复相同的步骤。 现在,再次点击右下角的解释器名称时,您将看到多个 Python 3.13 解释器,就像上图一样。
使用受 CPU 限制的进程进行测试
接下来,我们需要一个脚本来测试不同的版本。 我们在本博文系列的第 1 部分中解释过,为了加快受 CPU 限制的进程的速度,我们需要真正的多线程处理。 为了查看移除 GIL 是否能够实现真正的多线程处理并使 Python 更快,我们可以在多个线程上使用受 CPU 限制的进程进行测试。 这是我让 Junie 生成的脚本(我做了一些最终调整):
import time
import multiprocessing  # Kept for CPU count
from concurrent.futures import ThreadPoolExecutor
import sys


def is_prime(n):
   """Check if a number is prime (CPU-intensive operation)."""
   if n <= 1:
       return False
   if n <= 3:
       return True
   if n % 2 == 0 or n % 3 == 0:
       return False
   i = 5
   while i * i <= n:
       if n % i == 0 or n % (i + 2) == 0:
           return False
       i += 6
   return True


def count_primes(start, end):
   """Count prime numbers in a range."""
   count = 0
   for num in range(start, end):
       if is_prime(num):
           count += 1
   return count


def run_single_thread(range_size, num_chunks):
   """Run the prime counting task in a single thread."""
   chunk_size = range_size // num_chunks
   total_count = 0


   start_time = time.time()


   for i in range(num_chunks):
       start = i * chunk_size + 1
       end = (i + 1) * chunk_size + 1 if i < num_chunks - 1 else range_size + 1
       total_count += count_primes(start, end)


   end_time = time.time()


   return total_count, end_time - start_time


def thread_task(start, end):
   """Task function for threads."""
   return count_primes(start, end)


def run_multi_thread(range_size, num_threads, num_chunks):
   """Run the prime counting task using multiple threads."""
   chunk_size = range_size // num_chunks
   total_count = 0


   start_time = time.time()


   with ThreadPoolExecutor(max_workers=num_threads) as executor:
       futures = []
       for i in range(num_chunks):
           start = i * chunk_size + 1
           end = (i + 1) * chunk_size + 1 if i < num_chunks - 1 else range_size + 1
           futures.append(executor.submit(thread_task, start, end))


       for future in futures:
           total_count += future.result()


   end_time = time.time()


   return total_count, end_time - start_time


def main():
   # Fixed parameters
   range_size = 1000000  # Range of numbers to check for primes
   num_chunks = 16       # Number of chunks to divide the work into
   num_threads = 4       # Fixed number of threads for multi-threading test


   print(f"Python version: {sys.version}")
   print(f"CPU count: {multiprocessing.cpu_count()}")
   print(f"Range size: {range_size}")
   print(f"Number of chunks: {num_chunks}")
   print("-" * 60)


   # Run single-threaded version as baseline
   print("Running single-threaded version (baseline)...")
   count, single_time = run_single_thread(range_size, num_chunks)
   print(f"Found {count} primes in {single_time:.4f} seconds")
   print("-" * 60)


   # Run multi-threaded version with fixed number of threads
   print(f"Running multi-threaded version with {num_threads} threads...")
   count, thread_time = run_multi_thread(range_size, num_threads, num_chunks)
   speedup = single_time / thread_time
   print(f"Found {count} primes in {thread_time:.4f} seconds (speedup: {speedup:.2f}x)")
   print("-" * 60)


   # Summary
   print("SUMMARY:")
   print(f"{'Threads':<10} {'Time (s)':<12} {'Speedup':<10}")
   print(f"{'1 (baseline)':<10} {single_time:<12.4f} {'1.00x':<10}")
   print(f"{num_threads:<10} {thread_time:<12.4f} {speedup:.2f}x")


if __name__ == "__main__":
   main()
为了更轻松地使用不同的 Python 解释器运行脚本,我们可以向 PyCharm 项目添加自定义运行脚本。
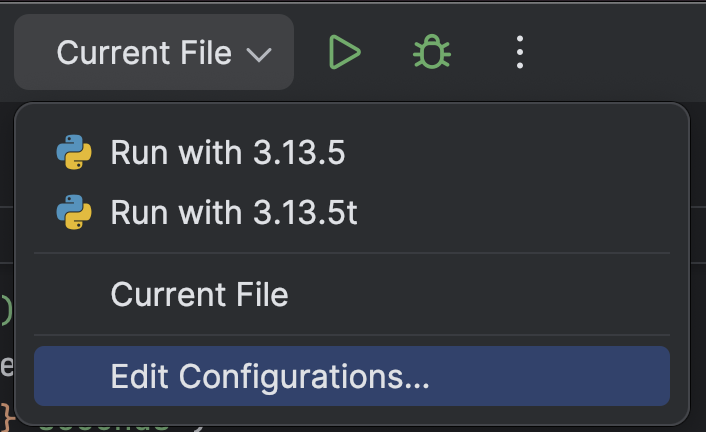
在顶部,从 Run(运行)按钮 (![]() ) 旁边的下拉菜单中选择 Edit Configurations…(编辑配置…)。
) 旁边的下拉菜单中选择 Edit Configurations…(编辑配置…)。
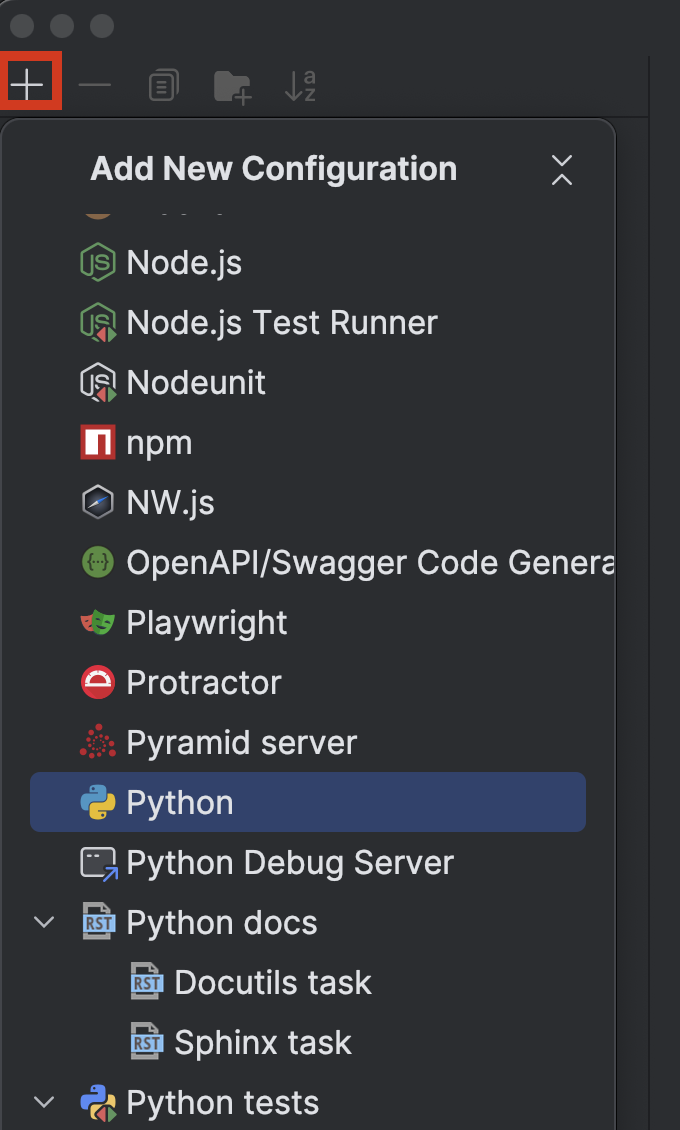
点击左上角的 + 按钮,然后从 Add New Configuration(添加新配置)下拉菜单中选择 Python。
选择一个名称,以便自己知道正在使用具体哪个解释器,例如 3.13.5 与 3.15.3t。 选择正确的解释器并添加测试脚本的名称,如下所示:
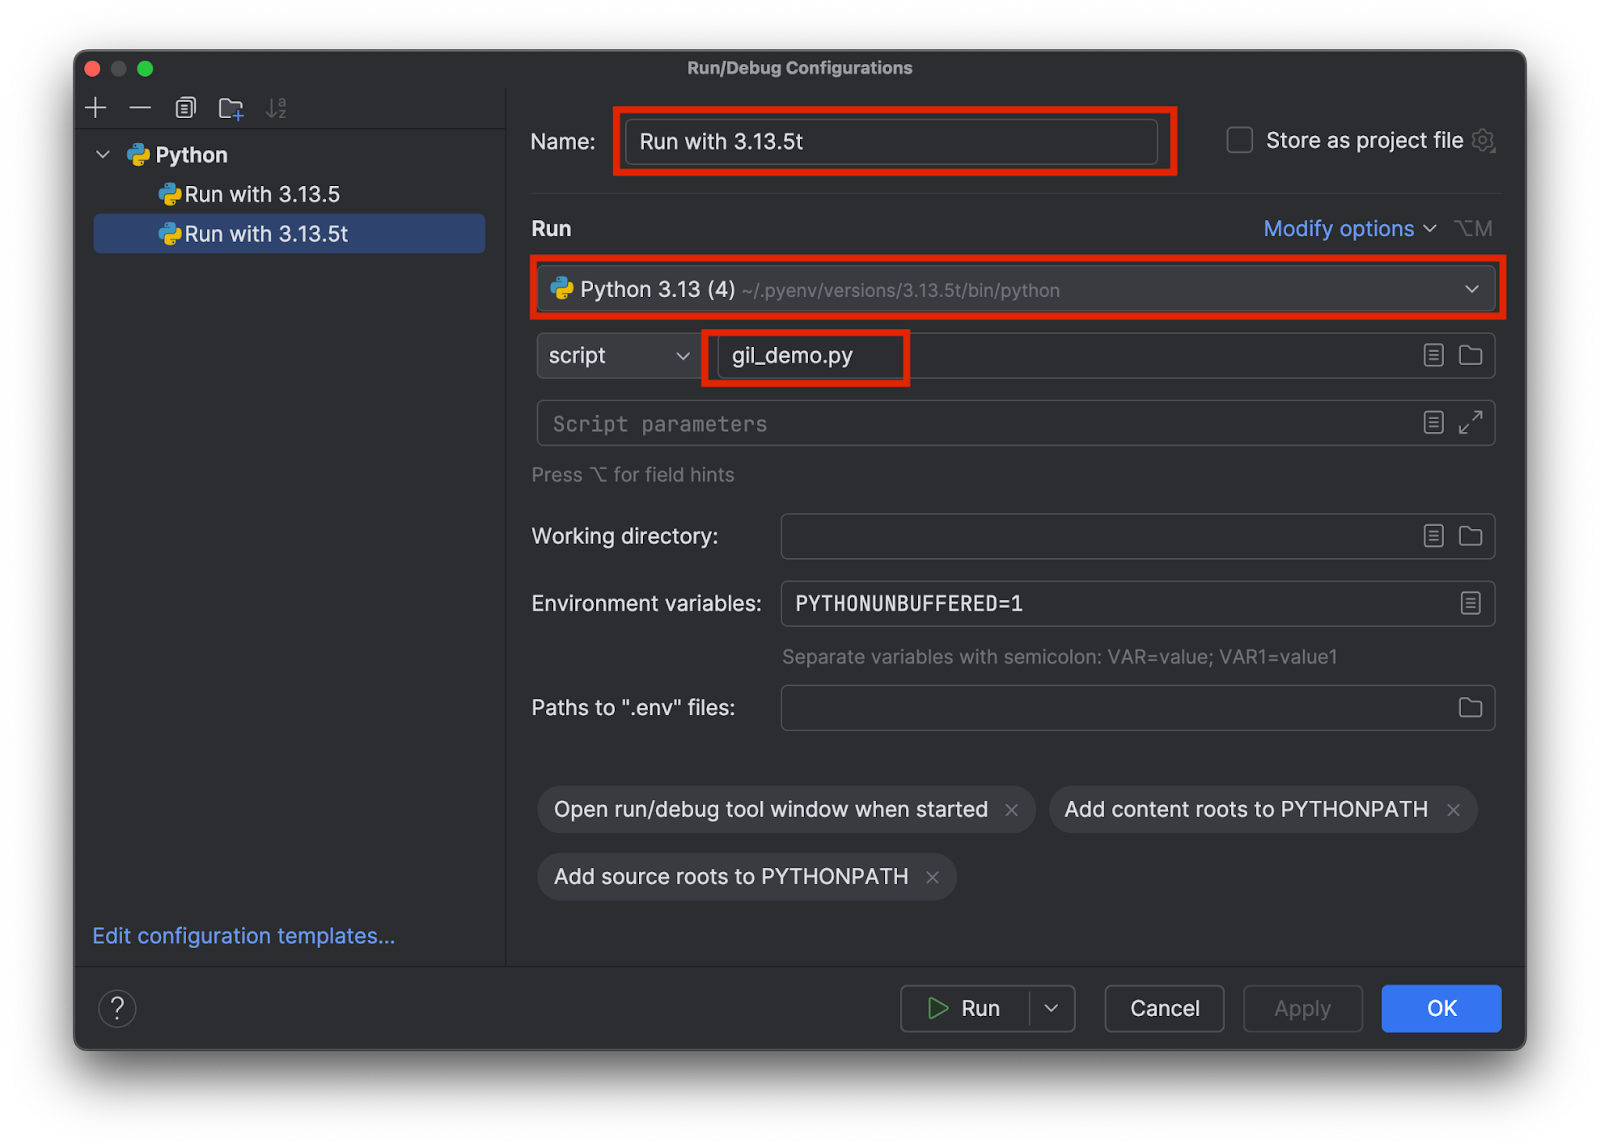
添加两个配置,每个解释器一个。 然后,点击 OK(确定)。
现在,我们可以选择配置并点击顶部的 Run(运行)按钮 (![]() ) 轻松选择并运行带有或不带有 GIL 的测试脚本。
) 轻松选择并运行带有或不带有 GIL 的测试脚本。
比较结果
这是我运行带有 GIL 的标准版本 3.13.5 时得到的结果:
Python version: 3.13.5 (main, Jul 10 2025, 20:33:15) [Clang 17.0.0 (clang-1700.0.13.5)]
CPU count: 8
Range size: 1000000
Number of chunks: 16
------------------------------------------------------------
Running single-threaded version (baseline)...
Found 78498 primes in 1.1930 seconds
------------------------------------------------------------
Running multi-threaded version with 4 threads...
Found 78498 primes in 1.2183 seconds (speedup: 0.98x)
------------------------------------------------------------
SUMMARY:
Threads    Time (s)     Speedup
1 (baseline) 1.1930       1.00x
4          1.2183       0.98x
可以看到,与单线程基线相比,运行 4 个线程的版本时速度没有显著变化。 我们看看运行自由线程版本 3.13.5t 时会得到什么:
Python version: 3.13.5 experimental free-threading build (main, Jul 10 2025, 20:36:28) [Clang 17.0.0 (clang-1700.0.13.5)]
CPU count: 8
Range size: 1000000
Number of chunks: 16
------------------------------------------------------------
Running single-threaded version (baseline)...
Found 78498 primes in 1.5869 seconds
------------------------------------------------------------
Running multi-threaded version with 4 threads...
Found 78498 primes in 0.4662 seconds (speedup: 3.40x)
------------------------------------------------------------
SUMMARY:
Threads    Time (s)     Speedup
1 (baseline) 1.5869       1.00x
4          0.4662       3.40x
这次的速度是之前的 3 倍多。 请注意,两种情况下都会有多线程处理的开销。 因此,即使是真正的多线程处理,运行 4 个线程时的速度也不会是 4 倍。
结论
在《更快的 Python》博文系列的第 2 部分中,我们讨论了过去使用 Python GIL 的原因、使用 multiprocessing 规避 GIL 的限制,以及移除 GIL 的流程和效果。
截至这篇博文发布,Python 的自由线程版本仍然不是默认版本。 不过,随着社区和第三方库的采用,社区预计 Python 的自由线程版本将在未来成为标准。 根据公布的消息,Python 3.14 将包含一个自由线程版本,该版本将度过实验阶段,但仍为可选。
PyCharm 提供了一流的 Python 支持,可以确保速度和准确性。 受益于最智能的代码补全、PEP 8 合规性检查、智能重构和各种检查,满足所有编码需求。 如本文所示,PyCharm 为 Python 解释器和运行配置提供了自定义设置,只需点击几下即可在解释器之间切换,这使其适用于各种 Python 项目。
本博文英文原作者: