Creating and Using Code Snippets
Note: This post was updated in February 2021.
Code snippets, or live templates as they are called in WebStorm, can help you save and reuse code. This can be any code fragment that you find yourself using often – it could be something little and simple, for instance, a line of code like a method definition, or something big and complex like a skeleton for a whole file.
From this blog post, you’ll learn how to use predefined live templates as well as how to create new ones and share them with your team.
Work with live templates
WebStorm comes with a number of ready-to-use live templates for JavaScript, TypeScript, style sheets, and other supported languages and frameworks, including Vue, Angular, and React. Here’s how you can create a new React stateless component from an rsc predefined template.

A template can have multiple variables and they can depend on each other. In this example, the variable for the selector name is a dashed-case version of the class name, according to the Angular Style Guide.

To see the list of predefined templates, go to Preferences / Settings | Editor | Live Templates.
For each template, WebStorm provides an abbreviation. To insert the template, just type its abbreviation and press ⇥ / Tab.

Have you forgotten what the abbreviation is? Press ⌘J / Ctrl+J, and WebStorm will show you all the templates that are applicable in the current context. Just select the one you want to use.

With ⇥ / Tab you can also jump between the variables within an expanded template. For example, when you expand a fori template into an iteration loop stub.

Create your own live templates
What if a template you need is not on the predefined list? You can create your own.
In Preferences / Settings | Editor | Live Templates, select the group where you want to add your template, click +, and select Live Template.

Alternatively, you can create a new group and add your templates there: click +, select Template Group, and create a new group.

You can also duplicate an existing template by clicking the Duplicate toolbar icon, modify it as needed, and save it with a different name. The following example shows how you can modify a predefined template that encloses a selected code fragment in a tag so the selection turns into a paragraph.

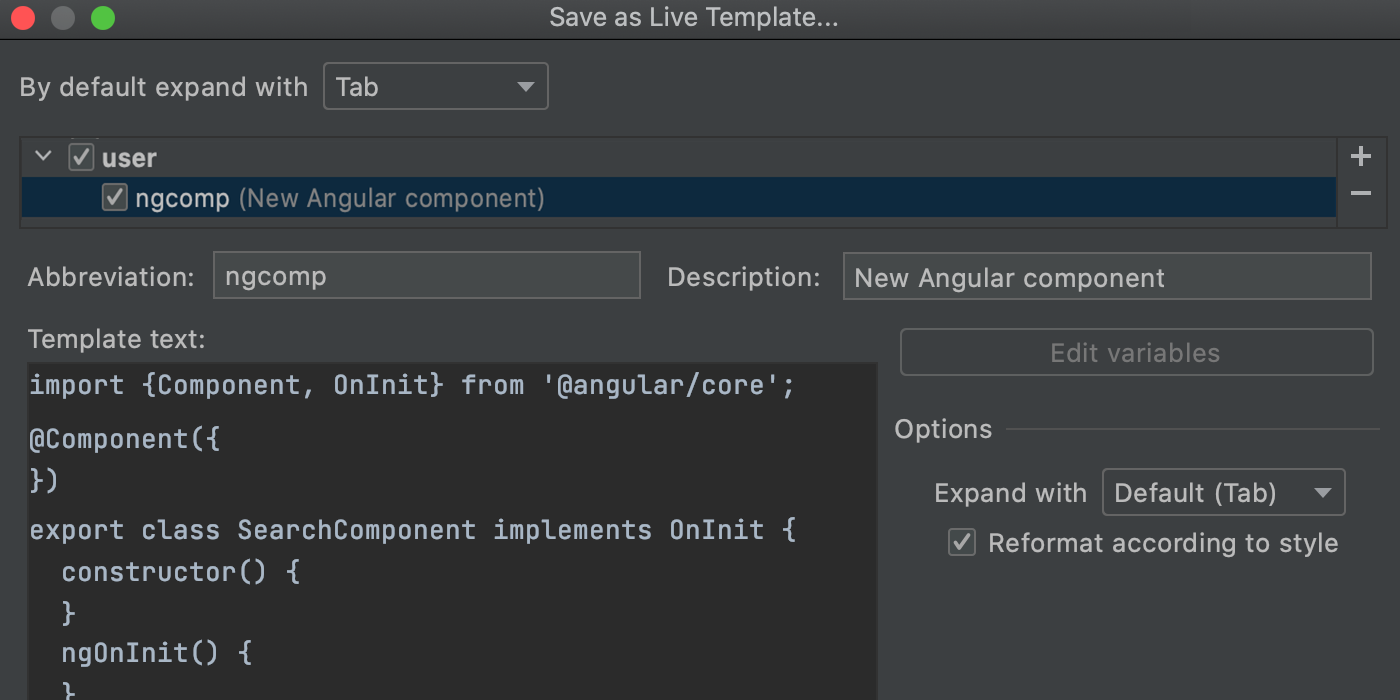
If you already have a suitable code fragment, you can convert it into a live template right in the editor. Let’s create a template for an Angular component, similar to the default a-component.
Unlike the example above, where we just replaced the tag, in this template, we will need two variables.
The first one, $ComponentName$, will become a placeholder for the name of the new component.
The second one is $END$, which indicates where the cursor should be at the end after the template is expanded and you fill in the $ComponentName$ placeholder.
Select the code you want to use in the template in the editor, press ⇧⌘A / Ctrl+Shift+A, and search for the action Save as Live Template…

Enter the abbreviation that you’ll be using to invoke the template. We’ll go with ngcomp.
Add a template description, for example, New Angular component.

Now it’s time to add the variables to our template. Replace SearchComponent with $ComponentName$ and add $END$ to ngOnInit(){}.

Let’s tell WebStorm that we want our ngcomp to be available in any part of a TypeScript file. Click the Change link below and select the TypeScript checkbox.

Click OK to save the template. That’s it!
Share your live templates
Once you’ve created some custom templates, you may want to share them with your teammates. To do this, select File | Manage IDE Settings | Export Settings from the main menu. In the dialog that opens, click Select None to clear everything, select Live templates, and specify the folder where you want to save the settings.zip.

To import the templates, go to File | Manage IDE Settings | Import Settings and select the saved settings.zip file. Then restart WebStorm to apply the imported settings.
Alternatively, you can use the IDE Settings Sync plugin or the settings repository to share the IDE settings, including live templates. You can learn more about this in the Share IDE settings help article.
The WebStorm team
Subscribe to WebStorm Blog updates


