CLion for Embedded Development Part II

Hi,
This is a second guest blog post by Ilya Motornyy about programming for microcontrollers in CLion.
- CLion for Embedded Development Part I
- CLion for Embedded Development Part III: OpenOCD debugger support and integration with STM32CubeMX is available out of the box in CLion
Upd. An alternative approach from Klaus Nagel in a small demo project on GitHub: Embedded Development on STM32 with CLion and the Segger Tools.
 |
Ilya Motornyy Java/JavaScript Developer at Vaadin.com DIY Electronics and Embedded Programming Enthusiast |
History
About one and a half years ago I wrote a blog post about using CLion for embedded software development. Long story short, I used an ST demo board (reflashed into SEGGER JLink-compatible probe), STM32CubeMX code generator, GCC ARM toolchain, and SEGGER Ozone on-chip debugger to run some demonstration project. That combo seems to be a working solution, but, on the other hand, there were some complications with the re-flashing probe, with running an external debugger (why would we run one if we already have awesome CLion?), also there were SEGGER license limitations, etc.
Of course, I wasn’t happy having all of those problems and tried to find better solutions. Now it’s time to show what I’ve managed to achieve. Fortunately, during this time, both CLion and CubeMX were improved a lot, made more stable, and, most importantly, CLion now supports remote GDB. Now it’s possible to use OpenOCD (Open On-Chip-Debugger) as a flash probe and as a remote gdb server. This unlocks the possibility to get rid of both SEGGER license limitations and using a commercial debugger in favor of open-source tools. Also, there is no need anymore to reflash any on-board probes, we can use it as-is, even for flashing your production target devices (refer to ST Nucleo or Discovery board user reference).
I managed to run this environment with vanilla CLion, but the project setup was quite complicated and time-consuming, and at some point, it turned into the idea to write my own plugin for CLion, which puts it all together. Now the plugin is in beta stage, published to the JetBrains plugin repository, and I am glad to show how it works. Today we will run a small demo project (It’s gonna be blinking LEDs! Surprise!) using one of the most popular boards – STM32F4-Discovery. The same example, with minimal changes, can be done using any of STM32 board of Nucleo, Discovery or EVAL series, since they all have LEDs onboard.
Required tools
CLion
First of all, you need the IDE itself. You can download it directly from the JetBrains site. Run the installer and follow the instructions. Also, you need a license. The one-month trial license is enough for the first try. To use a toolchain, you need MinGW or Cygwin on Windows, and binutils on Linux. The installation manual is here.
The plugin
Open the Settings dialog, go to the Plugins tab, click Browse Repositories… and find the plugin using the openocd keyword. Click the Install button and restart CLion after the installation.
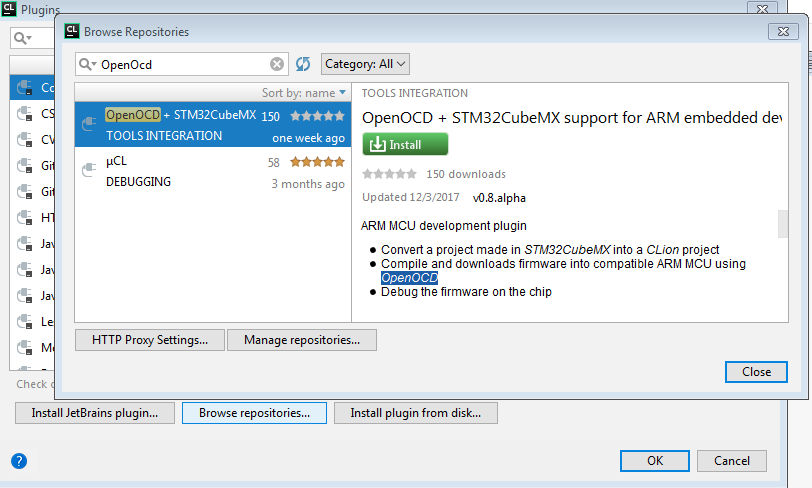
Now CLion has an additional run configuration, two additional menu items in Tools, and one more in the Settings dialog tab.
Toolchain
A toolchain is a set of cross-platform tools to compile and link your program. Cross-platform here means you run them on your PC or Mac, but the result can be only run under the target environment, which is ARM MCU in our case.
There are a number of toolchains for ARM, for instance, Clang and GCC are free and both supported by CLion, and there are a number of other compilers (Keil, IAR, Raisonance, etc). I use GCC; you can download it from here. Note the toolchain must be in the system path after installation. You can check that by running arm-none-eabi-gcc from the command line.
OpenOCD
OpenOCD is an open source on-chip debugger, which supports a number of different hardware in-circuit debuggers and flashers, a huge number of different MCUs, flash chips, etc. So, potentially you can use this guide to develop firmware for a huge number of hardware configurations, not limited to ST products.
There are three key features to be used:
- ST-Link/V2 in-circuit debugger support
- ARM Cortex M series MCU support
- Remote GDB protocol support
OpenOCD is distributed primarily in source form, but there are a couple of unofficial binary distributions. You can find them at http://openocd.org/getting-openocd/. If you use Windows, you also need the ST-LINK/V2 driver installed. The driver is usually shipped with the OpenOCD binary distribution for Windows, but you can download the latest version of the driver together with a rather handy flashing utility from http://www.st.com/en/development-tools/stsw-link004.html.
STM32CubeMX
STM32CubeMX is a free initialization code generator, in which you can define the configuration of both CPU and peripheral devices of our MCU. All that is done with a pretty handy visual interface, you can adjust all the frequencies, pin modes, peripherals. Then the Cube generates the stub of your project, i.e. a bunch of .c and .h files together with specific project files for the supported IDEs (unfortunately, CLion is not one of those IDEs). Cube software contains the program itself and many automatically downloaded “Firmware Packages”, each of which is specific to a certain MCU family. You can download the tool here.
Let’s do an example
For the example, I chose a very popular board – STM32F4-Discovery. It has a powerful MCU STM32F407 on board, an ST-LINK/V2 compatible flash probe, and four user LEDs. There is also a microphone, a sound output, an accelerometer, and a USB interface, but let’s not get ahead of ourselves – the example is going to control only LEDs. If you already have any other STM32-based board, such as Discovery, Eval, or Nucleo series, you can implement the same example with several minimal and quite obvious changes – all of those boards have at least one user LED.
Configure the board
OK, now that we have all the tools installed, let’s try to make “advanced blinky” example from out of our STM32F4-Discovery. First of all, we need to run CubeMX. It will download an actual list of available MCU and demo boards from somewhere, and when it’s done you may choose any of STM32 MCUs, but we are more interested in boards. You can find them on the “Board Selector” tab. Just choose STM32F4DISCOVERY and double-click it.

Now you can configure pin modes, peripherals, and clockings in three of the four tabs, and calculate the estimated energy consumption with the “Power Consumption Calculator” tab.
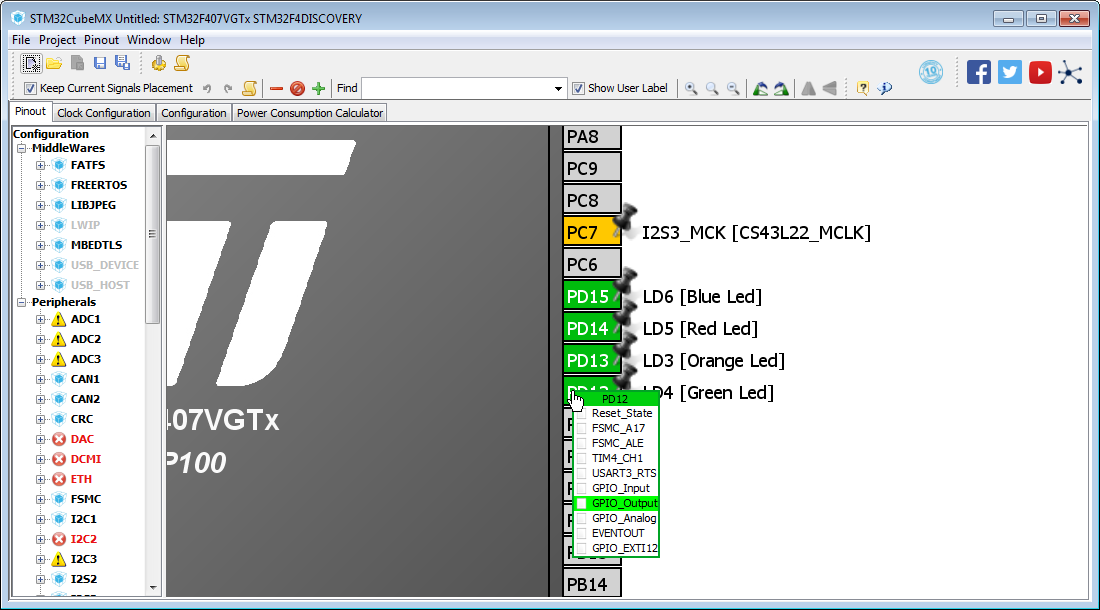
For our very first project, we have all the LED pins already configured as GPIO outputs (we started with the board, but not with a chip alone, if you remember), and those pins have their own names LD3…LD6.
The next step is in the Cube project settings and code generation – you need to choose a base project folder, a project name, and then set Toolchain/IDE to SW4STM32.

Now you can close the dialog and press the gear-looking button. Then close the final dialog. If you need to change your hardware configuration later, just reopen the chip config, make changes, and then regenerate the code.
The next step is to open the project with CLion. Use File -> Import from the main menu, or Import Project from Sources from the Welcome screen. Most probably CLion will ask something and report errors – just ignore that. When the project is open, click Tools->Update CMake project with STM32CubeMX project.

The plugin rewrites the CMakeLists.txt file completely, and, thus, the toolchain is taken into use, and now you can compile the stub of the project. Also, the plugin creates a new run configuration to download the firmware to the chip and debug it.
Setting the plugin parameters
Open the Settings dialog and find the plugin under the Build, Execution, Deployment group.
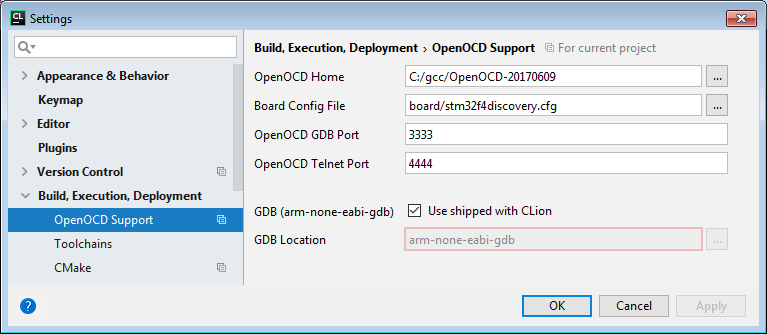
You need to set the OpenOCD location, the plugin tries to find the locations automatically with the system path, but you may provide an explicit one. Most probably, you do not need to touch the ports settings and the gdb location (CLion bundles GDB with the multi-arch support on Windows and Linux, on macOS you have to use custom GDB build).
The very last thing to do is set the board configuration file. Those files are located in the boards folder in OpenOCD distribution. For our project, stm32f4discovery.cfg is obviously the best option. You can use the Choose file dialog to select the file.
Writing the Example
Now we have everything set up and ready, let’s just write some code. Open main.c and add some example code into an endless while loop, see lines 106-111 below:

This code just switches on and off the onboard LEDs randomly every 300 ms.
Also, you can add several #pragma directives (lines 100, 101, and 113) to get rid of CLion warnings – endless loops are not used in “normal” C programs, and the IDE reports that.
Running the example
Now it’s time to set a breakpoint somewhere in the code and run the firmware! CLion will compile the code, then download it to the MCU, then connect the debugger and reset the chip.
Now you can use breakpoints and watch expressions. This video shows how it works:
https://www.youtube.com/watch?v=ERTfYfppbh4
Further Development
Now you have a small example up and running, but how should development be done? Ok, here are some Qs and As.
Q: Which kind of boards are supported?
A: Basically any of STMicroelectronics boards of series STM32 Discovery, Nucleo, or EVAL should work.
Q: How can I change my MCU hardware configuration?
A: Just run STM32CubeMX again, reopen your project, and then rerun the code generation. The plugin will ask you if the whole project should be updated according to your changes. Just say “Yes”.
Q: How can I preserve my code during the code regeneration?
A: Always put your code between comments of type
/* USER CODE BEGIN ??? */
and
/* USER CODE END ??? */.
Cube does not touch those parts of the source code. Do not forget to move CLion’s automatically generated includes into an appropriate unchangeable block. Another option, for big chunks of code, would be to use separate .c/.h files.
Q: I need to include a library in the project, enable FPU, or make some other change to CMakeLists.txt. How do I do that?
A: CMakeLists.txt is always regenerated from a template during project update, and all the changes to it will be lost. The template itself is put into the project folder and named CMakeLists_template.txt. Please change the template and then update the project using Tools->Update CMake project with STM32CubeMX project menu item.
Q: I want to use CLion for my ARM development, but I do not use stm32. Can I use the plugin?
A: Most probably, you can. You need to install the same tools except for Cube, and then make your own CMakeLists.txt (you may use this template), a linker script, and a board configuration file. When you have them, click Tools -> CMake -> Reset Cache and Reload Project and then create your own run configuration of type OpenOCD Download & Run. One of the plugin users reported he managed to run his Atmel SAM E70-based project with the plugin.
Q: I want to use CLion for my development, but I do not use ARM chips. Can I use the plugin?
A: Well, if you have any MCU and a flash probe supported by OpenOCD and GCC, you can at least try. Install a suitable toolchain, and see the answer above.
Q: I can not use any of the existing board configuration files. Can I use separate config files for the interface and for the target?
A: You can combine those into one file and use it. Any of existing board configurations is the example.
Q: I love all this stuff, can I support your work?
A: Sure!
References
- The example https://github.com/elmot/f4-blog
- Plugin page, source repository and issue tracker, usage guideline
- OpenOCD
- Toolchain
- STM32CubeMX
Subscribe to CLion Blog updates


