Arduino Development with CLion: From Hobby to Professional Project. Part I

Many developers are playing with Arduino-based projects these days. Arduino is easy to get started with, and the experience of seeing the outcome of your coding efforts in a light blinking or robot moving is delightful. But most of these Arduino developers don’t move forward. They keep working on their projects as weekend warriors, treating them simply as small hobbies and side projects. In this series of blog posts we’d like to explore how you can bring your pet projects to a more professional level and how IDEs like CLion can help you do that.
What we’re going to build
We’ve set ourselves an ambitious goal for the project. We’re going to build an electronic barograph, which is a device that measures atmospheric pressure and plots it on a chart to predict weather conditions for the next several hours. This is more useful than a classic barometer, as pressure changes are more important to track than the absolute value. The device should be battery-operated, and it should be able to work for several weeks on one charge.
We’ll start by building classic project – a DIY barometer – and we’ll use:
- Bosch BMP085 air pressure sensor. We’ll use a GY-65 module, though it may be replaced with a BMP180 (GY-68).
- Arduino Uno Board. We’re using a DFRduino UNO R3 because of its colorful connectors :)
- Waveshare 4.2inch e-Paper screen.
- Wires, a USB cable, several plastic PCB standoffs, M3 bolts, and nuts.
- IKEA plastic tablet stand, for fastening all the prototype parts together.
Sounding fun yet? Let’s get started!
Starting with a prototype
Electronics setup
We’ve started by drilling several holes in the tablet stand, and we then mounted all the parts on it. One of the bolts holding the Arduino board holds the sensor module, as well.
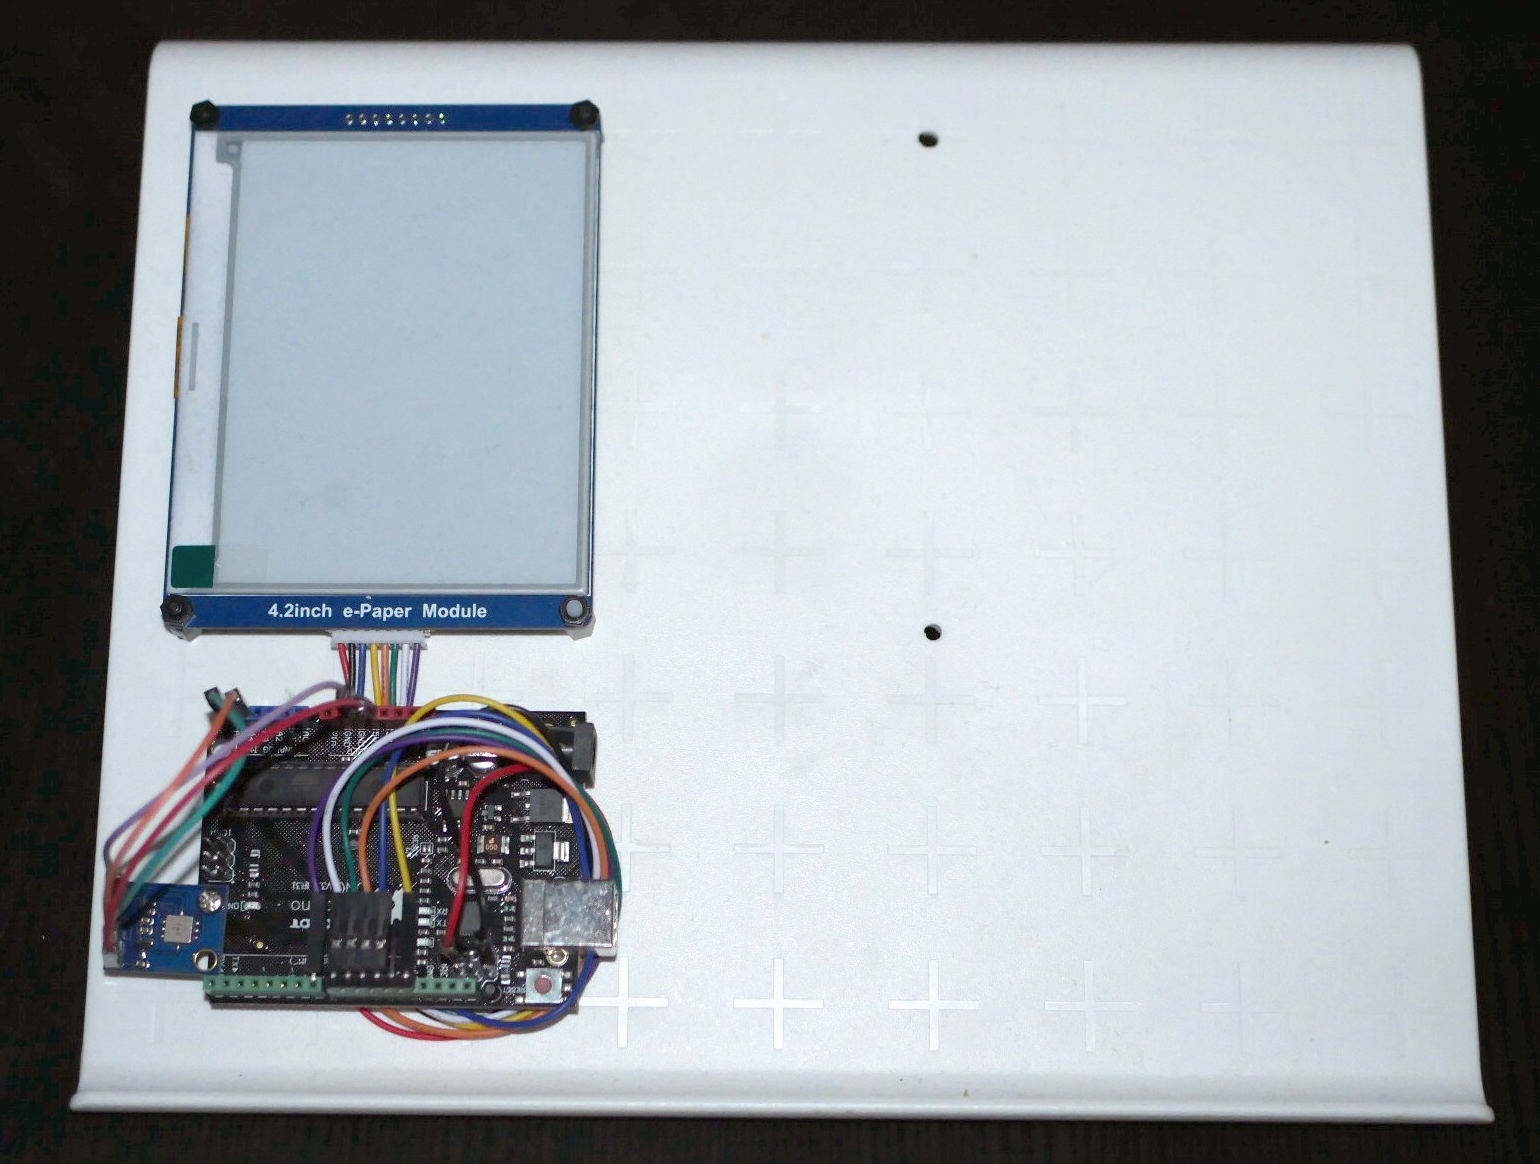
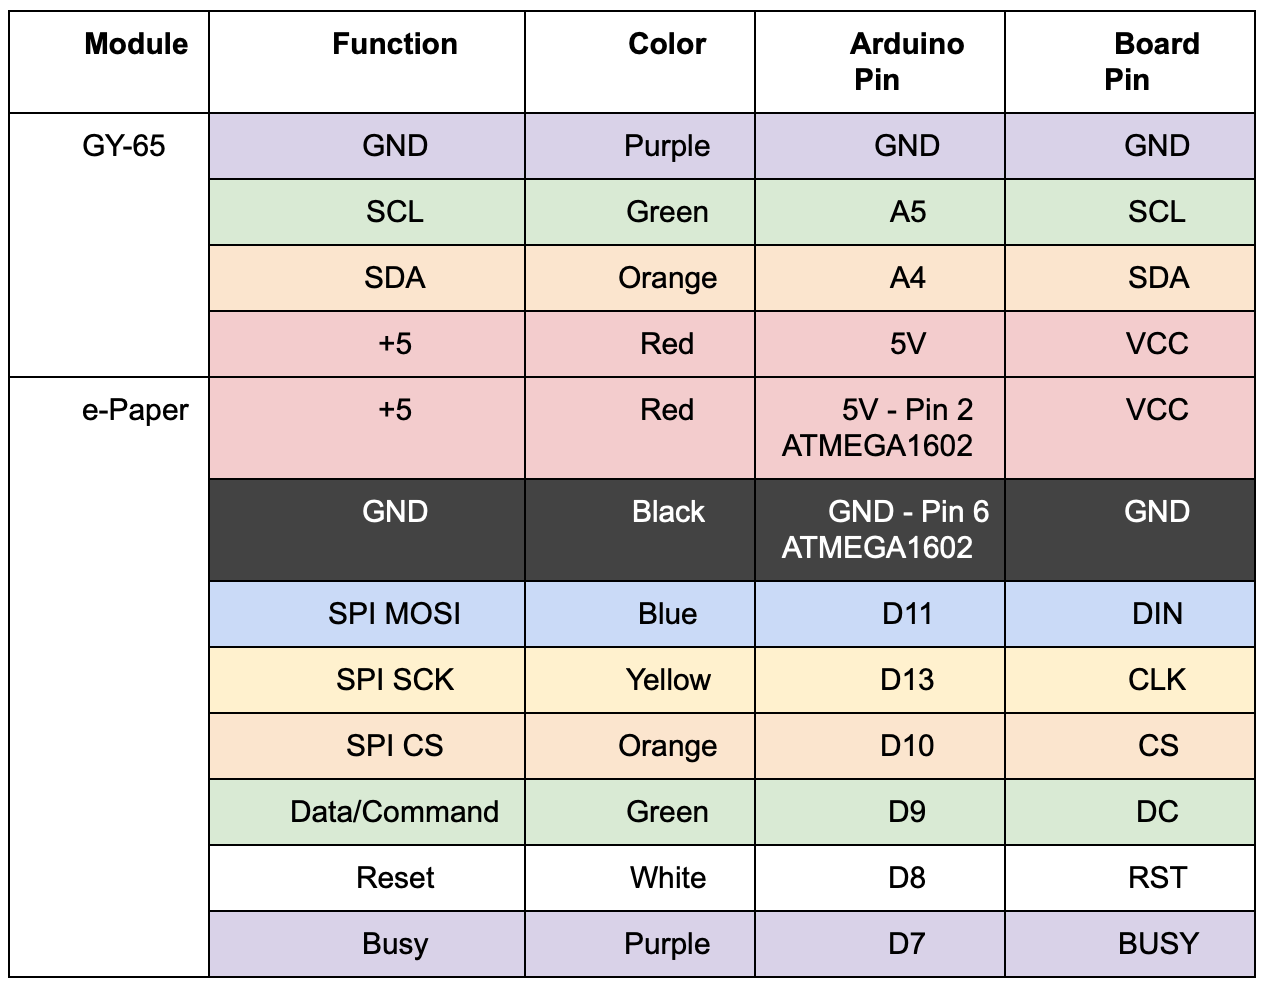
The e-Paper screen module utilises a uni-directional SPI interface (CS, MOSI,SCK), two input control signals (RESET, DC), and a BUSY output signal. The module is shipped together with an 8-wire cable, which I connected to Arduino with the help of the 2.54mm edge pin headers. To minimize the number of headers we need to use, we connect the display power lines to the power pins of the Atmega8 in-circuit serial programming (ICSP) header. The pressure sensor uses an I2C interface (SDA, SCL) and is connected with standard F-M jumper wires.
All the connections are described in the table below:
Now it’s time to code some of our Arduino prototype.
Bring the pressure sensor online
The official Arduino guide explains Arduino sketch development in detail. So we’ll just briefly go through the setup:
- Create a new project and give it a name.
- Then add the Adafruit_BMP085 library with the Sketch -> Include Library… -> Manage Libraries… menu item.
- Now it’s time to add some actual code, like this.
- After that, you can connect your Arduino, upload the sketch, and verify that it works using the Arduino Serial monitor.
Bring the screen online
For this project, I used the code shared by the WaveShare, the screen vendor, on GitHub, and I added some more code to get our screen up and running. You can check out the final project code here. And now let’s run it!

Arduino sketches
“Sketch” is the name that Arduino uses for a program. It’s the unit of code that is uploaded to and run on an Arduino board. The languages used by Arduino sketches are C and C++. More precisely, a set of C/C++ functions can be written, and then it undergoes some preprocessing, as when one or more Arduino-specific #include clauses are added for example. The result is finally passed directly to a C/C++ compiler (avr-g++). You can read about the Arduino build process in the official documentation.
Since ultimately only C++ is being used, any general-purpose C++ IDE can be used to write the code. Using an IDE other than the Arduino one does require some manual steps, which you can extract from the official build process description. But let’s see whether you can get any benefit in return!
How CLion can help
If you are interested in embedded development and you’re looking for a project to try it out, Arduino is a good place to start. It has a huge and welcoming community, a rich infrastructure, and dozens of various code samples and libraries. It’s a perfect fit for someone looking to take their first steps in the embedded world or someone who wants to realize some simple idea. As the project grows, it starts to require more effort, more complicated code, higher embedded processor performance, more MCU memory, and more peripherals. At this point, development tools, such as IDEs, become useful for maintaining the quality of our code and helping us develop more productively. Let’s take a look at how CLion can help.
A smarter code editor with a wide reach
In case you aren’t familiar with it, CLion is a general-purpose cross-platform IDE for C and C++. It understands code in C and C++ and uses this knowledge to provide in-editor actions. Navigation actions, which can search for context usages or jump to a class, file, or symbol in one keystroke, a smart quick documentation popup, and parameter names hints help developers read and understand the code better. Autocompletion, live templates, refactorings (like extract function, parameter or variable, inline, and of course rename and change signature) all help you write your code faster. And when it comes to a code quality, the built-in static analysis tools and dynamic analysis are essential helpers. The cost of a mistake in the embedded development world can be much higher than elsewhere, as mistakes often show up at runtime when the software is running on hardware. Catching bugs right as you’re typing the code, then, obviously reduces the hassle you could face down the line.
Another great opportunity that CLion provides is the ability to debug your code. It lets you follow code execution line-by-line, check the values of variables, watch the content of peripheral registers, and more. This can all be done either in an emulator or right on a real MCU, depending on whether the right emulator exists and what the debugging capabilities of the MCU are.
You can download CLion from our site and follow this Quick Start Guide to easily get started with it. There are also two videos we recommend beginning with – CLion Quick Tour and this more detailed (and thus longer) productivity demo.
You can also learn how to configure CLion on Windows, including the necessary toolchains for compiling and debugging, from this dedicated tutorial. In our Arduino case, you will need to have MinGW installed.
Share your projects with the world
As a hobby project evolves, it usually ends up being shared on GitHub, GitLab, Bitbucket, or somewhere else, which allows more contributors to join in. Publishing on VCS, dealing with pull requests, spreading the work among several branches – all these essential tasks can be done right in CLion. As for editing the code, uncommitted changes are highlighted in the editor, and authors’ annotations are available. All of these features reduce the need to switch contexts, saving you time for working out your new ideas.
There is a nice overview video about VCS support in all IntelliJ-based IDEs, such as CLion.
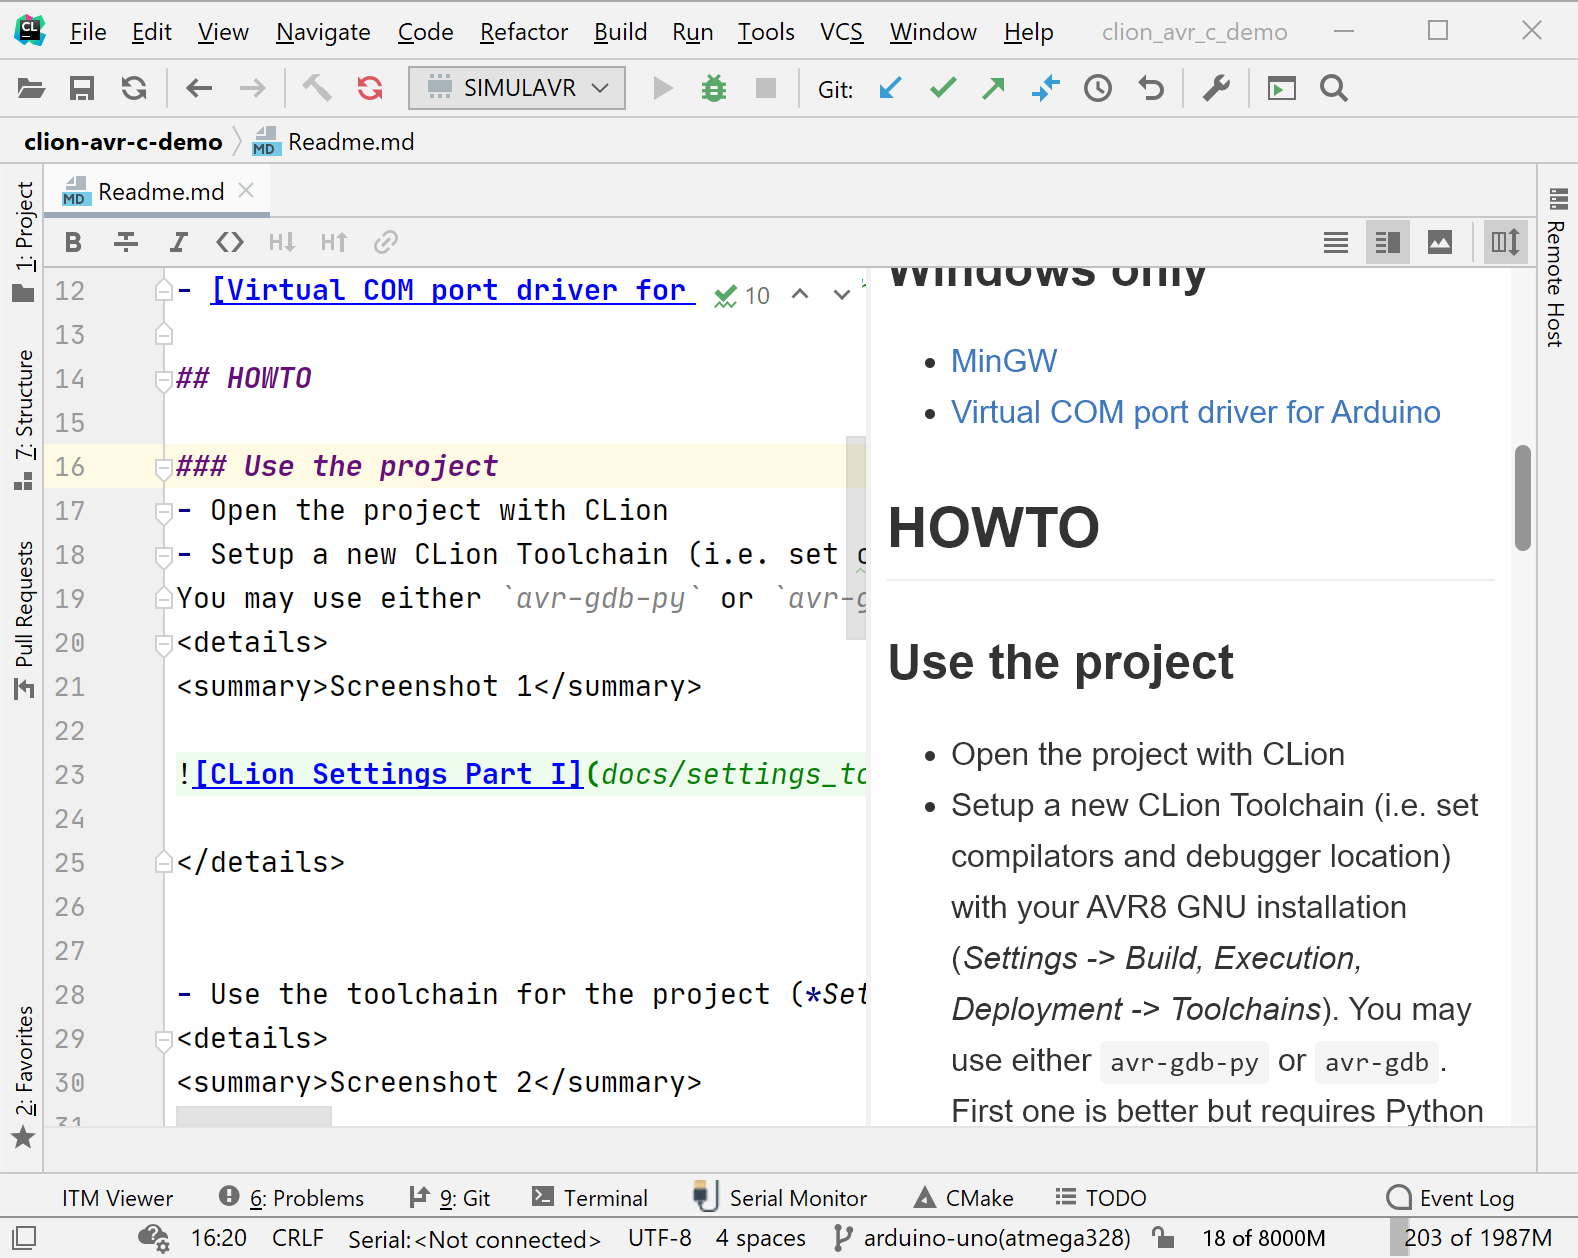
By the way, when publishing to VCS, don’t forget to add a Readme.md file that lets others know what the project is about and that provides details about how to work with it (what setup is required, which toolchain to use, etc.). CLion comes with Markdown support out of the box, so you’ll easily get a preview of your Readme.md file:
Migrate to PlatformIO
PlatformIO.org is a rich ecosystem for embedded development that supports a variety of target hardware types, compilers, and frameworks, including Arduino projects.
Let’s see how you can get started with PlatformIO in CLion:
- First of all, you need to install PlatformIO Core.
- And the PlatformIO plugin for CLion (Settings/Preferences | Plugins).
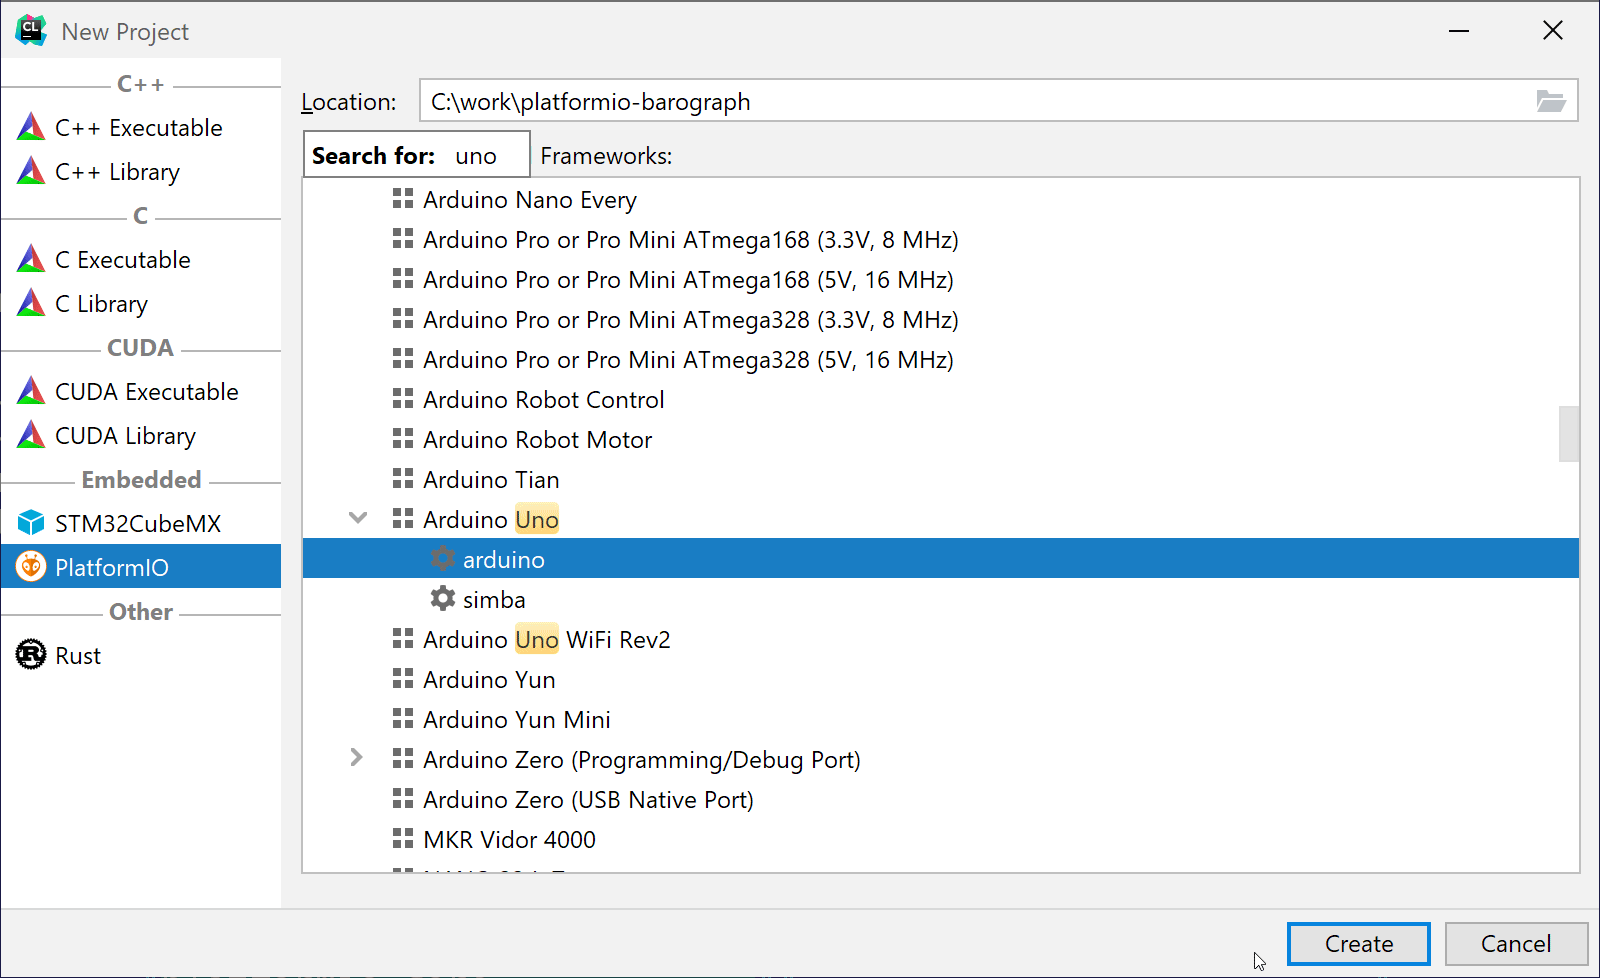
Now we are ready to create a new PlatformIO project, and in our case we’ll choose Arduino Uno. Click File->New Project and select Arduino Uno as a target along with a project location. Since there are a lot of boards on the list, you can start just typing “Uno” and then use the arrow keys to navigate the list of boards. To avoid glitches later, we do not recommend using international characters, special symbols, or spaces in the location.
The next step is to enable our sensor library. Open platformio.ini in the CLion editor and add the line “lib_deps = Adafruit BMP085 Library” to the [env:uno] section, then call Tools | PlatformIO | Re-Init.
Now it’s time to add some code to our project. Copy all the header files from the Arduino sketch folder into the project’s include folder, and copy all source files and .ino files from the Arduino sketch folder into the project’s src folder. You can delete the empty main.c file – we don’t need that.
As we are not relying on the Arduino IDE for Arduino related preprocessor transformations, we need to perform some additional steps manually:
- Convert the sketch into C++. To do this, you can simply Rename (Shift+F6) the main .ino file to .cpp. In this case, CMake files will automatically be updated accordingly by CLion. And afterward you only need to reload the CMake project: Tools | CMake | Reload CMake project.
-
Open arduino-barograph.cpp and add
#include <Arduino.h>to the very beginning of the file.

You can now build the project! Let’s start it.
Connect your electronic device to the computer, then start the Platformio Upload run configuration. The firmware is now flashed to MCU, and our device works again. That was easy!
Let’s take a step back and look at what we’ve managed to achieve so far:
- We started using some additional software (PlatformIO, CLion) to get a more powerful embedded environment and to benefit from the productivity features of the C++ IDE.
- Thanks to the PlatformIO approach, the application can be easily migrated to many other hardware platforms with limited effort.
- We’ve made maintenance of the project lifecycle more convenient by using the VCS integration and Markdown support in CLion.
Taking control of the project
PlatformIO was really helpful, but what if you want to take full control of the project and customize the build steps? We’ll now convert our project into a pure CMake project. This will involve using the CLion IDE, the CMake build system, the GCC for AVR toolchain, and the avrdude flashing utility.
We’ll continue to use the Arduino libraries. The AVR toolchain can be downloaded from the Microchip site, and avrdude utility from Savannah.
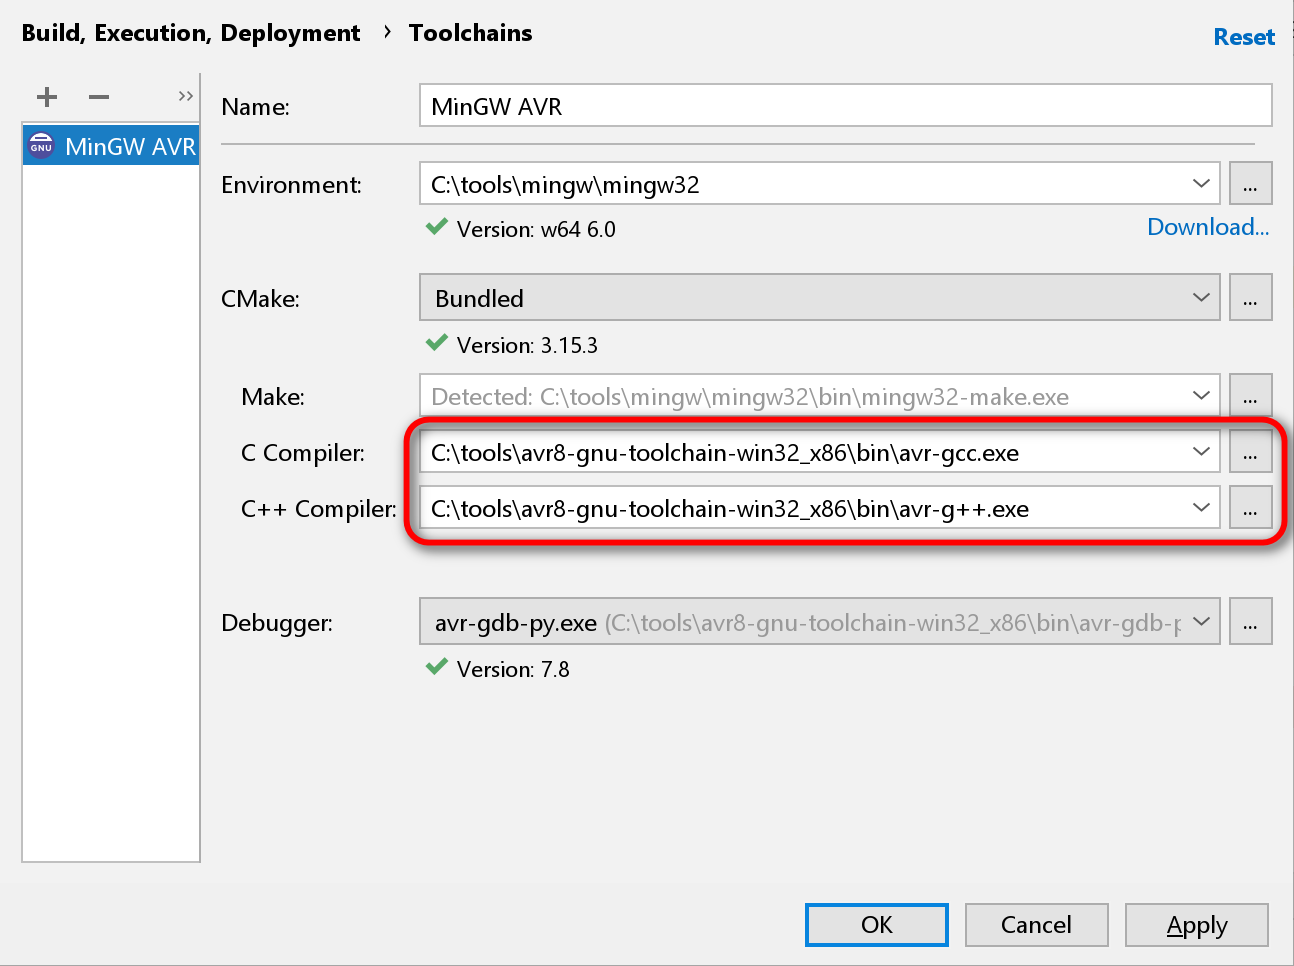
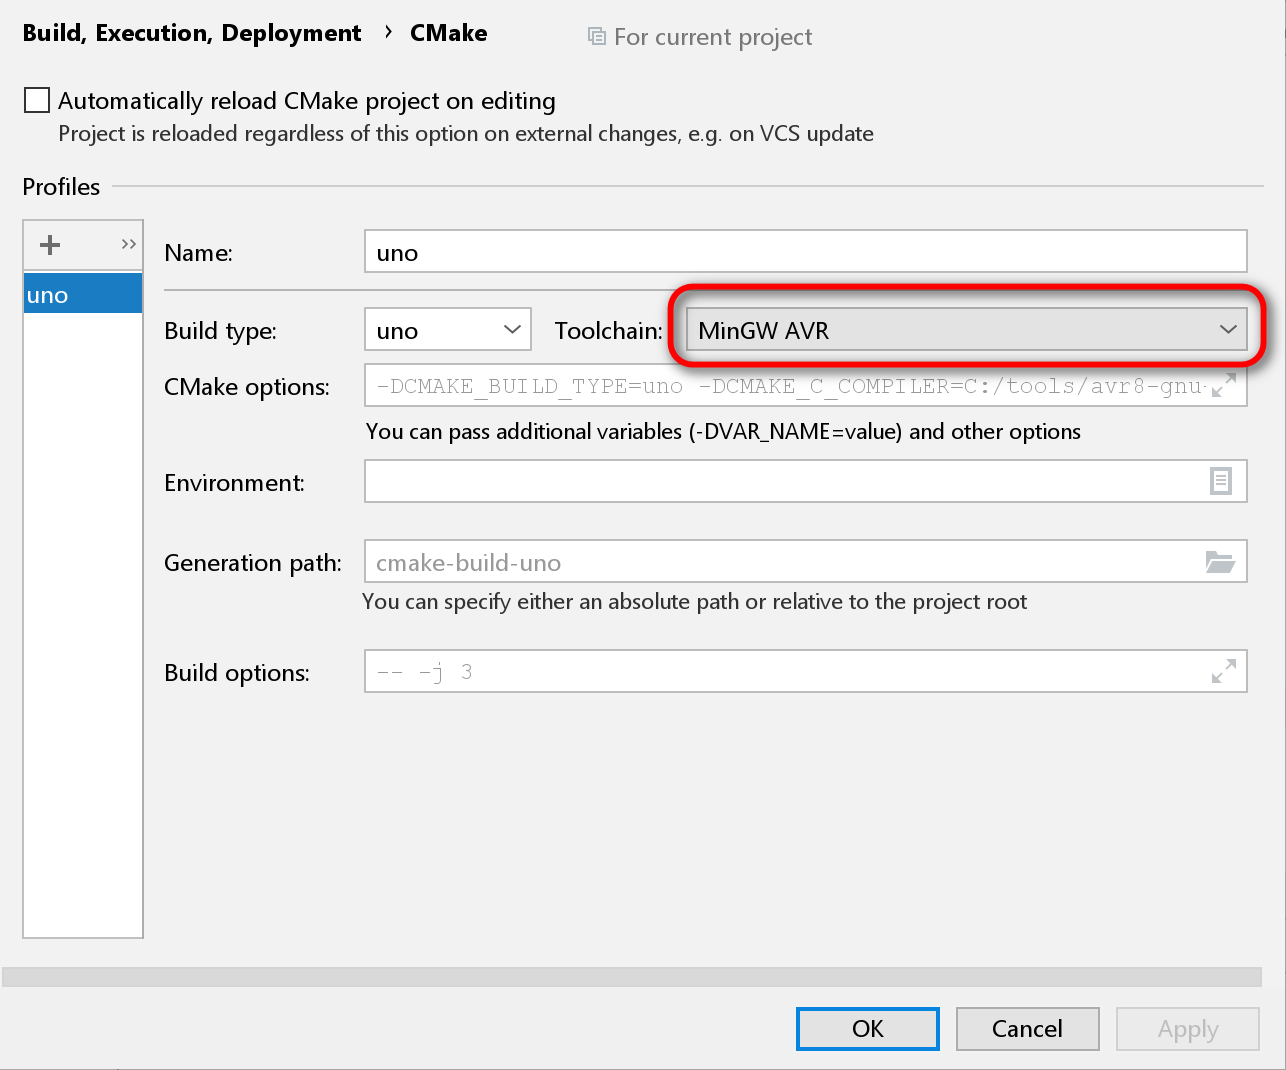
In CLion, the toolchain and CMake profile are configured in the following way:
The code of the project itself can be found on GitHub. It’s the same PlatformIO code with the Arduino libraries manually-copied to the project sources. Feel free to clone and use it. However you should be careful when it comes to these user-dependant parameters in the CMakeLists.txt file:
- avrdude location
- Arduino COM port name
- Special build target FLASH.
When everything is set up correctly, you can trigger the Build action in CLion (not Run!), and it will try to flash your Arduino.
Let’s see how this compares to our previous setup with PlatformIO:
- We need to take care of more settings, like COM port names, avrdude location, etc.
- We are now in full control of the build process and can tune it to our needs.
- The application can be migrated to other hardware platforms (even those that are not supported by PlatformIO).
What’s next
We now have an early prototype up and running that uses the bare minimum number of components and has limited functionally. How can we improve it?
-
Better representation
With this big screen, current weather and time data can be shown using much bigger digits. This requires more ROM memory for fonts. Arduino still has quite a lot of free flash memory, and we can probably implement the larger font with the current hardware setup. -
Pressure chart
Atmospheric pressure is important for predicting the weather, but tracking its change over time is actually even more helpful. We have quite a big screen, and a pressure chart definitely fits onto it. To draw such a chart, we need a real time clock circuit (RTC) because the on-board oscillator is not precise enough to measure time.
Arduino has only 2KB of memory, but a 400*300 black-white screen requires 15KB of memory (400*300/8 = 15KB) for off-screen graphics manipulations. This gives us the idea to replace the MCU. Note that some modern MCUs are really inexpensive and contain both enough RAM and the RTC on-chip. -
Battery power
This kind of device can be optimized for power consumption, and if it’s done well, a very small battery can allow it to work for several months at a time. Unfortunately, Arduino has a USB-UART adapter and a power LED that is always on. So, to decrease consumption, we need either make our own board or do some hardware modding to the board we have already. If we change the electronics, we could switch to another MCU or board that is more power-efficient. AVR MCUs were developed a while ago, and modern electronics technology is much better in terms of power consumption. -
Development process
To support all the enhancements mentioned above, we need to write some additional code. And we definitely need to test it! Arduino and AVR MCUs in general only give us the option to send diagnostics via UART. However, many other MCUs nowadays can suggest more options here. For example, on-chip debugging features allow the developer to follow code execution and variable values while the code is run on the actual MCU.
To be continued…
This series will be continued. Soon we’ll discuss advancing this project further by using another development board and trying to utilize the best of it’s features. So stay tuned! And let us know in comments which aspects embedded development in general and Arduino in particular you’d like us to highlight.
Your CLion team
JetBrains
The Drive to Develop