

PyCharm で パスフレーズジェネレーターを作成する方法

このチュートリアルでは、PyCharm でパスフレーズジェネレーターを作成します。 また、以下の内容も学習します。
- PyCharm Community(または Professional) Edition でのプロジェクトの作成
- Python パッケージのインストールとインポート
- Typer ライブラリを使った Python によるコマンドラインインターフェースの作成
- PyCharm でのコードの実行とデバッグ
- 実行構成の作成と編集
このチュートリアルは、無料の PyCharm Community Edition を使って日常的なタスクを自動化するシンプルな CLI アプリケーションの開発方法を説明することを目的としています。 このチュートリアルの最後には実際に動作するパスフレーズジェネレーターが完成しますが、これはあくまでも学習プロジェクトになります。 このジェネレーターが生成するパスワードを実際のデータを保護する目的で使用することは絶対におやめください。
完全なコードを取得するには、リポジトリをクローンしてください。 クローン操作についての詳細は、PyCharm のドキュメントをご覧ください。
パスフレーズについて
パスフレーズとは?
多くの人はパスワードを日常的に使用しています。 サービスやウェブサイトに登録する際には、数字、特殊文字、大文字などを使った長い一意のパスワードの作成が求められます。
このような要件はすべて、パスワードにブルートフォース攻撃への耐性を持たせるためにあります。 ブルートフォース攻撃とは、基本的には正しいパスワードが分かるまで何度もパスワードを推測して試行することです。 必要となる試行回数や試行時間は、パスワードの長さや複雑さによって決まります。
パスフレーズは複数のランダムな単語で構成されるパスワードです。 意味を持たせたり、文法的に正しくしたりする必要はありません。 パスフレーズには通常 4~5 単語が含まれており、単語数が増えるほど良いとされます。 たとえば、「PhysicianBuiltHotPotatoRegularly」はパスフレーズです。
パスフレーズが優れている理由
「A^1rL#2k2oPiA9H 」は適切かつ強力なパスワードです。 小文字、大文字、数字、特殊文字が含まれており、15 文字の長さです。 とはいえ、記憶するなら「A^1rL#2k2oPiA9H」と「PhysicianBuiltHotPotatoRegularly」のどちらがいいでしょうか? ちなみに、後者は 32 文字です。
パスワードを記憶することの易しさや難しさだけでなく、解読することの易しさや難しさにも注目する必要があります。 以下の表をご覧ください。
| A^1rL#2k2oPiA9H | PhysicianBuiltHotPotatoRegularly | |
|---|---|---|
| 文字の種類の数 | 95 | 52 |
| パスワードの長さ | 15 | 32 |
| 解読に必要な試行回数(?) | 298 | 2182 |
いずれも強力ではありますが、パスフレーズの方が強力であり、はるかに記憶しやすいと言えます。 しかも、パスフレーズに数字と特殊文字を数個追加すれば、必要な平均推測試行回数が 2210 に増え、実質的に解読不可能となります!
まとめ:
- ランダムな単語で構成されるパスフレーズは、ランダムな文字で構成されるパスワードよりも記憶しやすい。
- パスフレーズは概してほとんどのパスワードよりも長いため、ブルートフォース攻撃への耐性がより高く、結果的により安全である。
- パスフレーズは複雑さ要件に合わせて変更可能である。 たとえば、各単語の先頭文字を大文字にして大文字を含めたり、特殊文字や数字を単語の区切り文字として追加したりすることが可能である。
パスフレーズジェネレーターとは
一般に、パスフレーズジェネレーターはランダムな単語を疑似文に組み合わせてパスワードを作成するプログラムです。 このチュートリアルでは、PyCharm と Typer を使用して以下を行うコマンドラインツールを作成します。
- ランダムな 4~5 単語で構成されるパスフレーズを生成する。
- 対応するオプションをオンにしたときにパスフレーズの各単語の先頭を大文字にする。 デフォルトでは単語の先頭文字は大文字になりません。
- 単語の区切り文字として記号を使用する。 デフォルトでは区切り文字は使用されません。
- 5 番目の単語を追加して、より長いパスフレーズを作成する。 デフォルトの長さは 4 単語です。
このツールはパスワードを保存しません。
前提条件
- Python の使用経験
- PyCharm Community(または Professional) Edition 2023.1 以降
- Python(プロジェクト作成中にダウンロード可能)
最初のステップ
Typer で「Hello World」を書く
PyCharm を初めて起動すると「ようこそ」画面が表示されます。 New Project(新規プロジェクト)をクリックします。
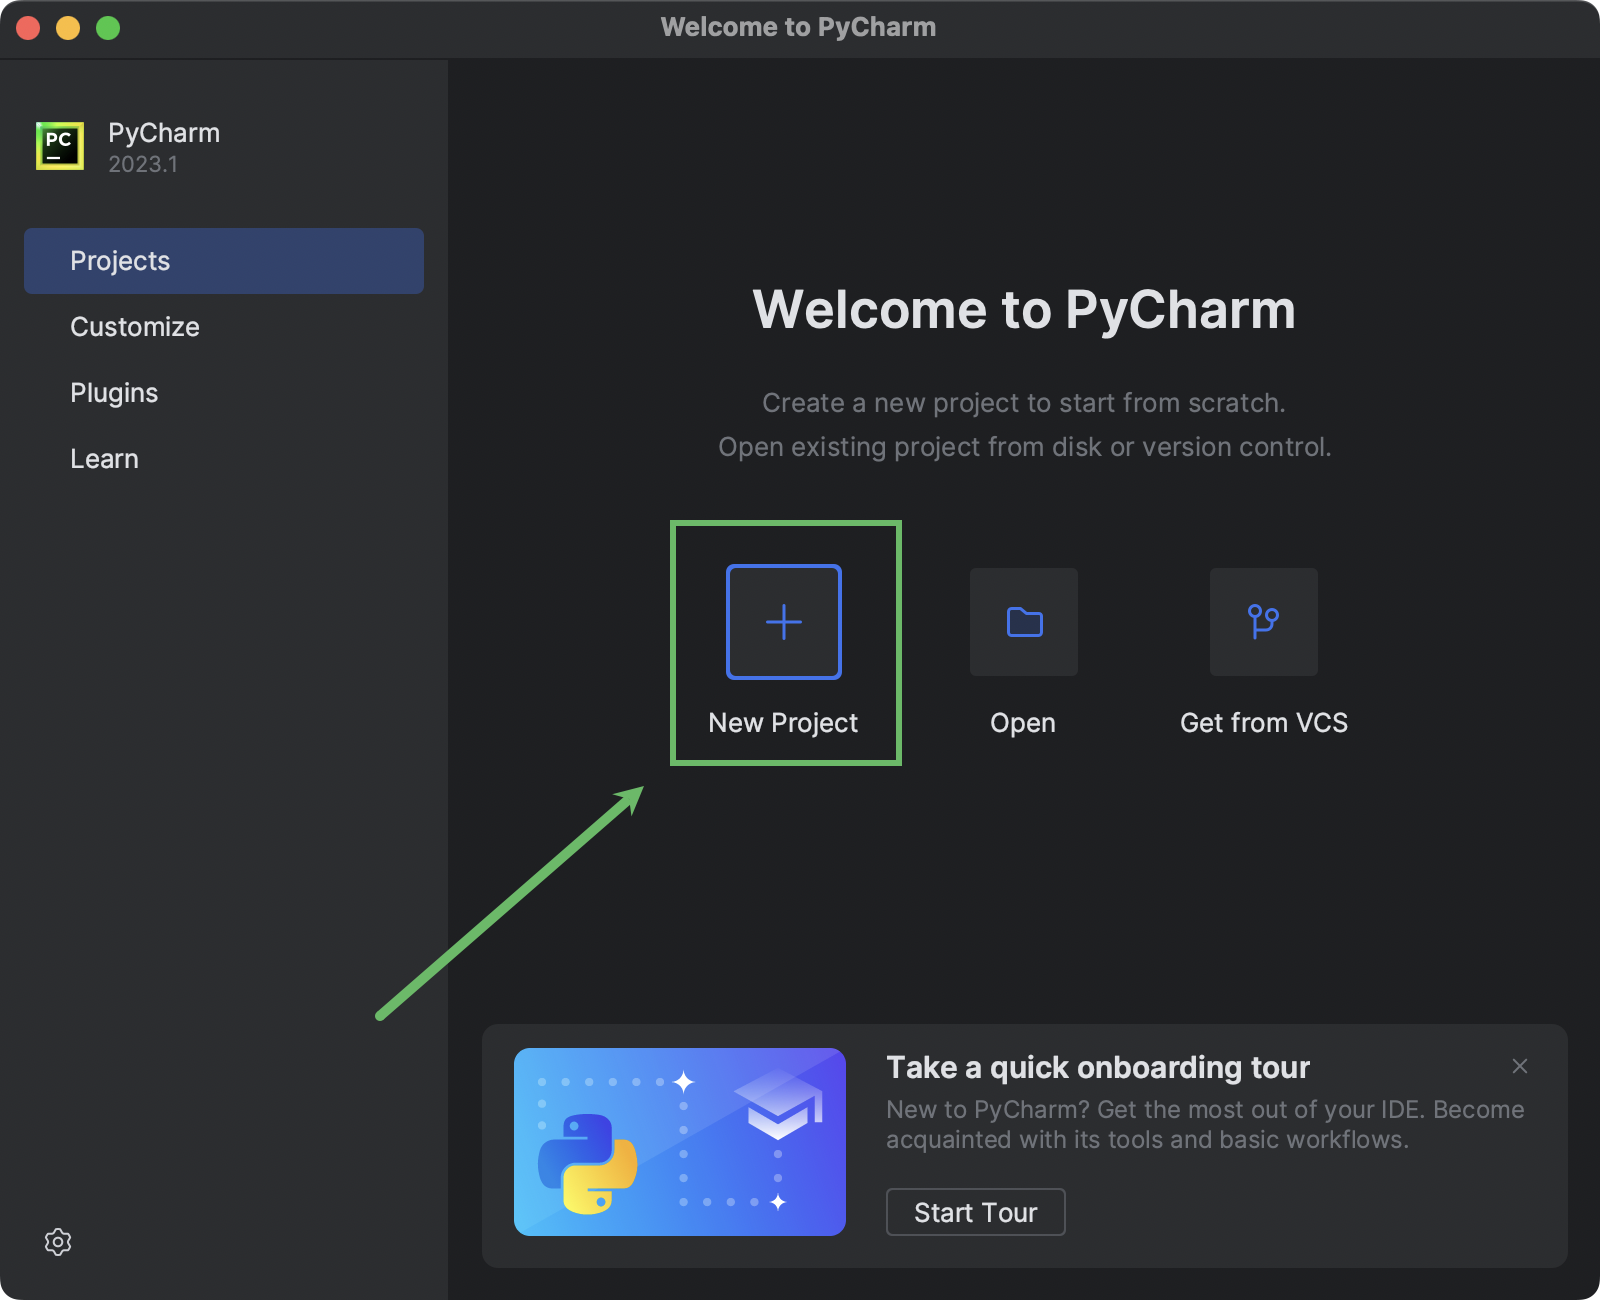
PyCharm がすでに起動している場合は、メインメニューから File| New Project(ファイル | 新規プロジェクト)を選択します。
New Project(新規プロジェクト)ウィンドウが開いたら、上部にある Location(場所)フィールドを使ってプロジェクトのディレクトリを指定します。 このディレクトリ名はプロジェクト名としても使用されます。
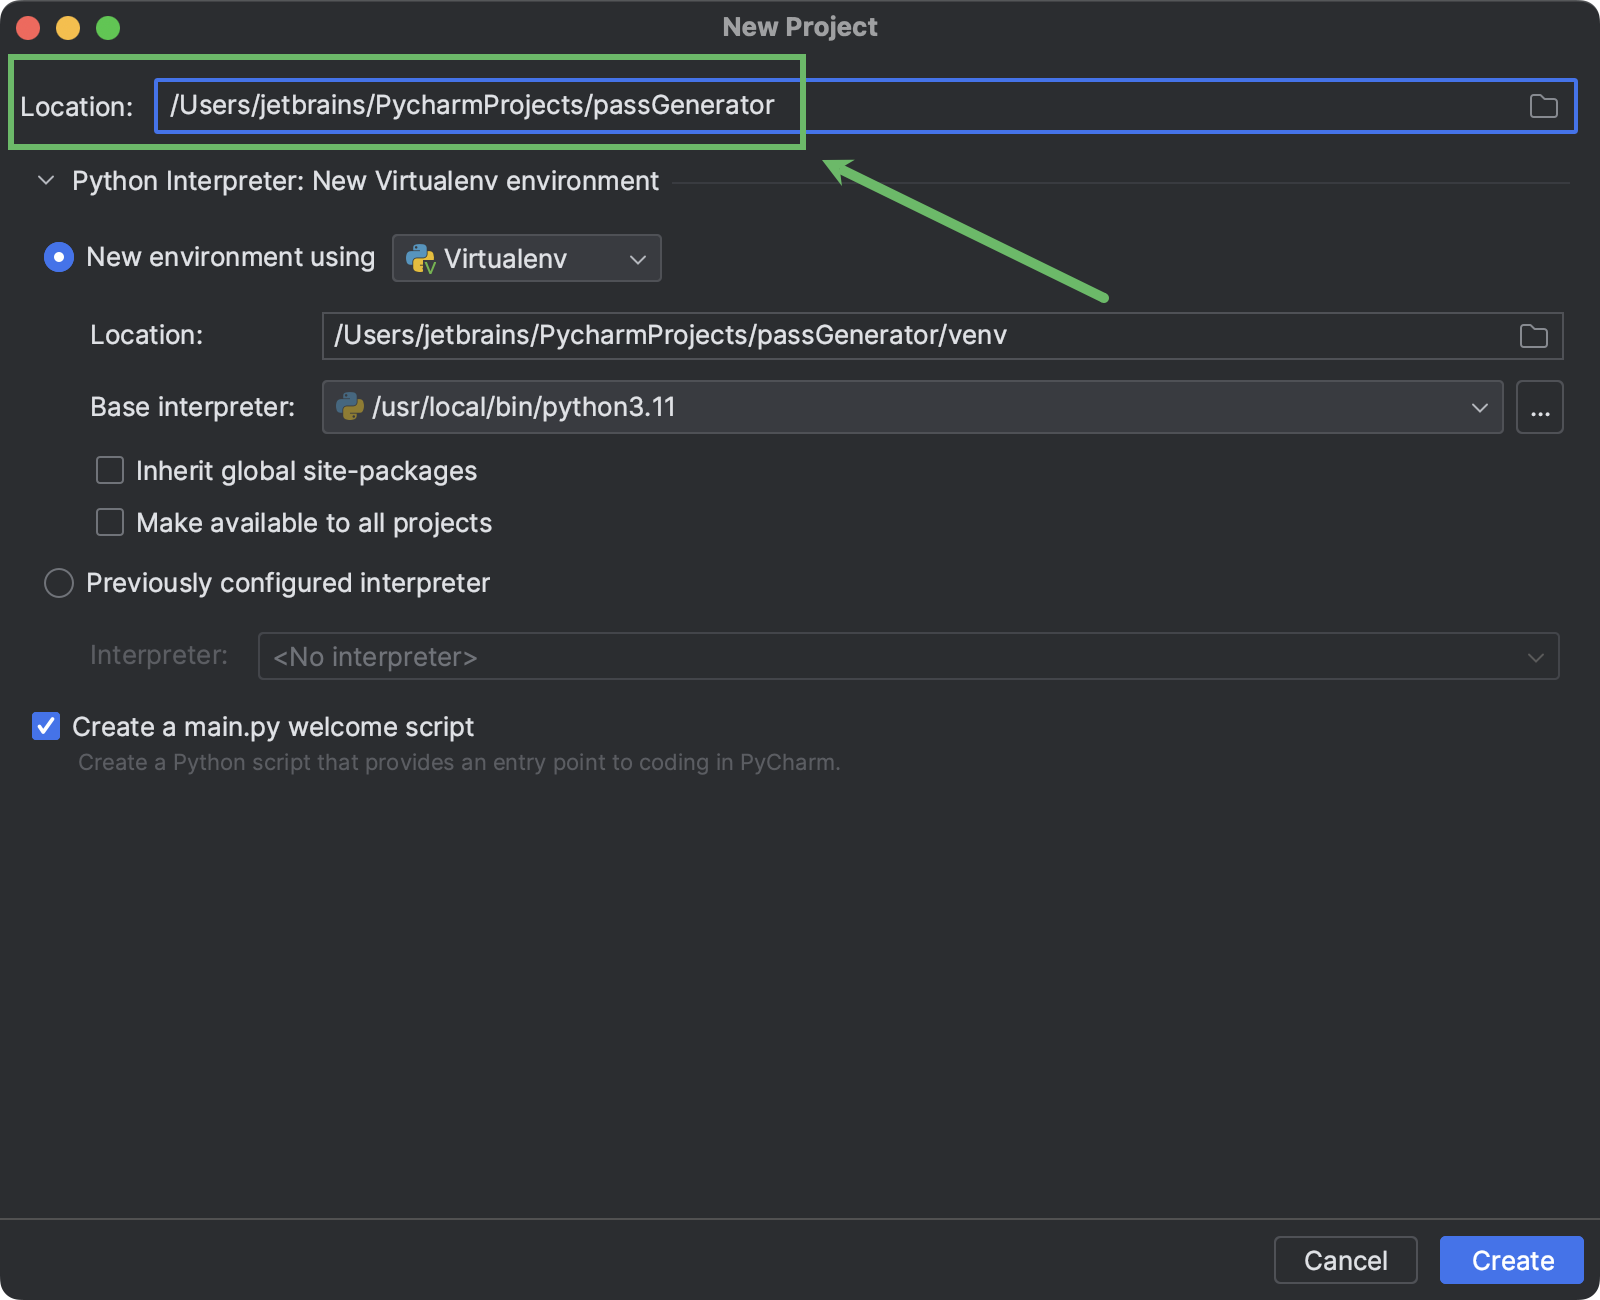
PyCharm がプロジェクトの依存関係をインストールする仮想環境のタイプも選択できます。 また、環境が作成される場所とベース Python インタープリターも選択可能です。
好みの環境タイプを選択してオプションを指定(またはデフォルトを維持)したら、Create(作成)をクリックします。
PyCharm が仮想環境(この例では venv)を含むプロジェクトディレクトリを作成します。 前の手順で Create a main.py welcome script(main.py ウェルカムスクリプトの作成)チェックボックスをオフにしていなかった場合、PyCharm は main.py も作成してエディターで開きます。
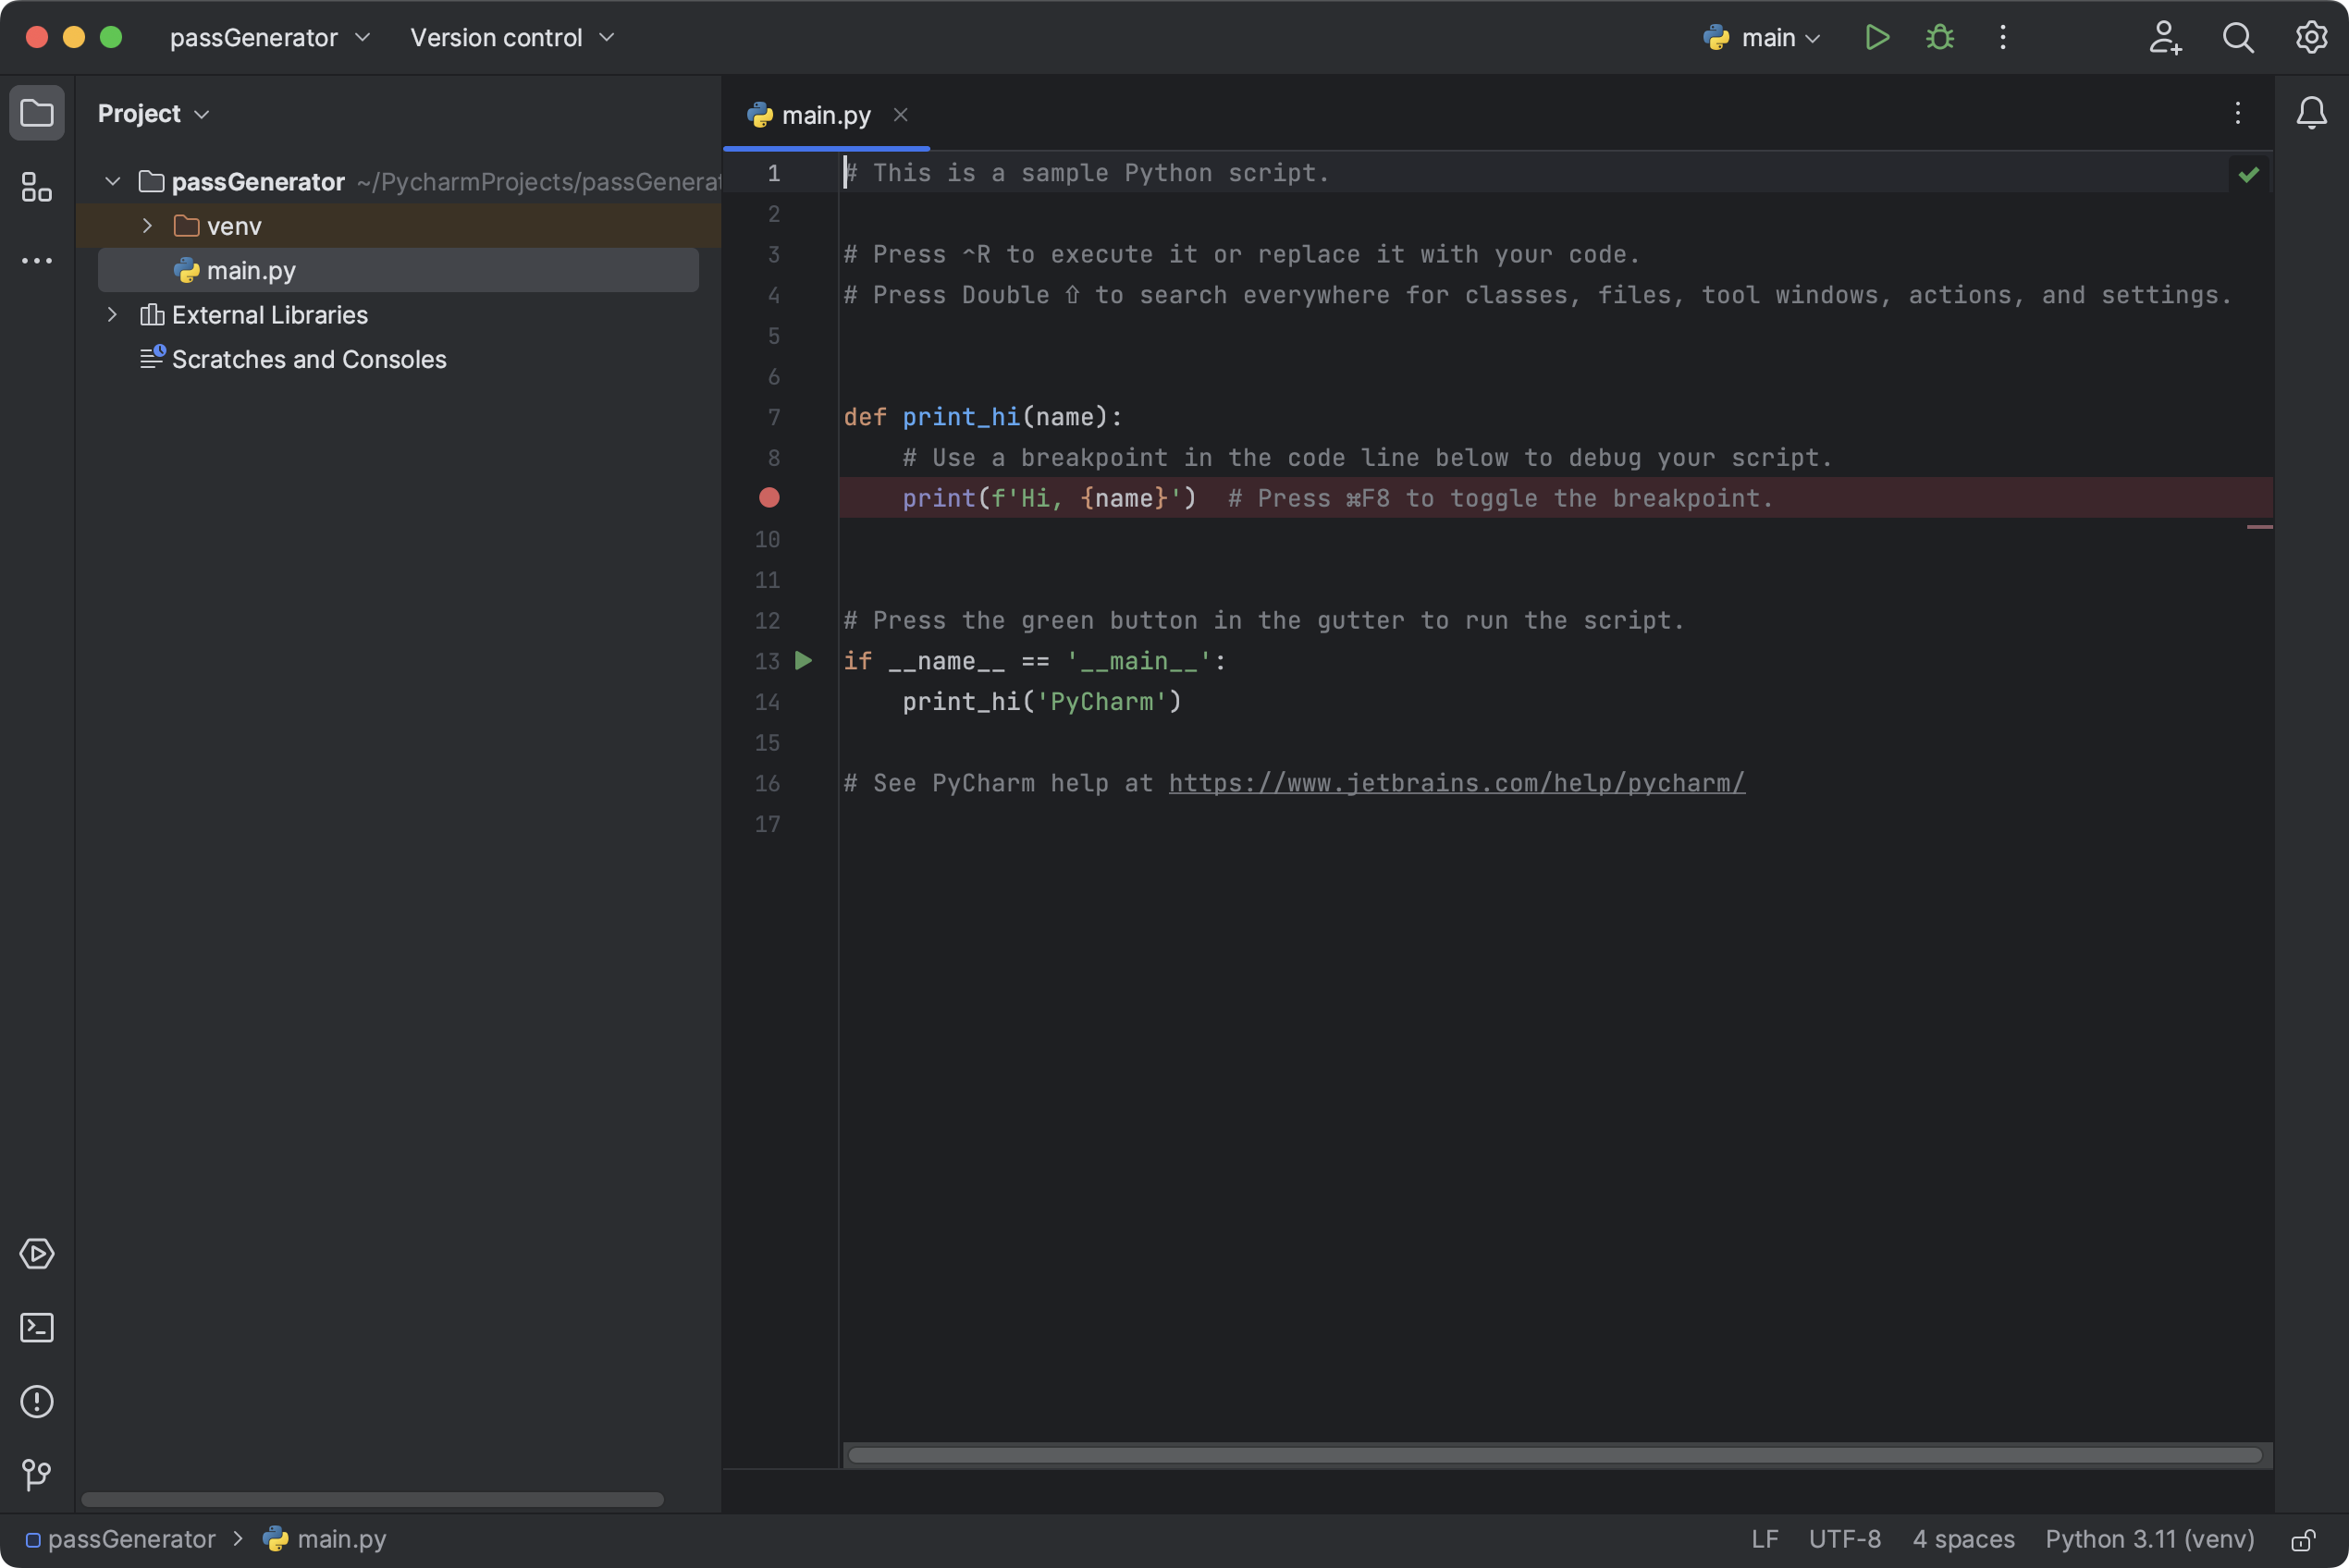
このファイルには基本的な説明が記載された「Hello World」スクリプトが含まれています。 次のコードをクリップボードにコピーします。
def main():
    print("Hello World")


if __name__ == "__main__":
    typer.run(main)
次は PyCharm に移動し、⌘A / Ctrl+A と ⌘V / Ctrl+V を続けて押して main.py の内容を置き換えます。 以下のようになるはずです。
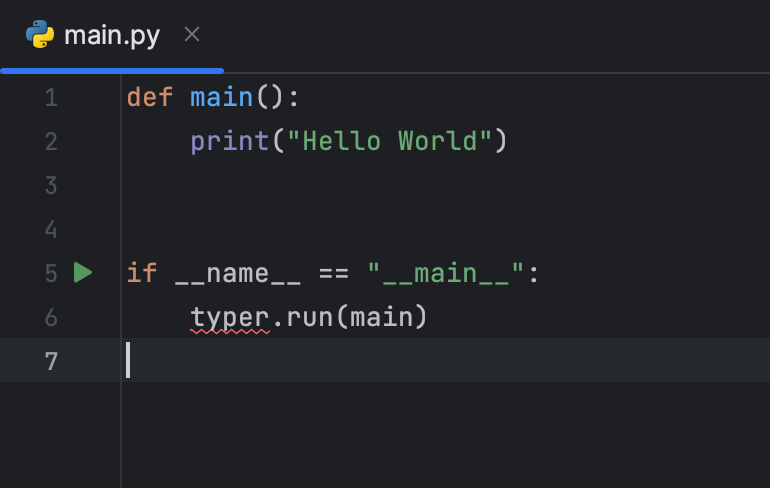
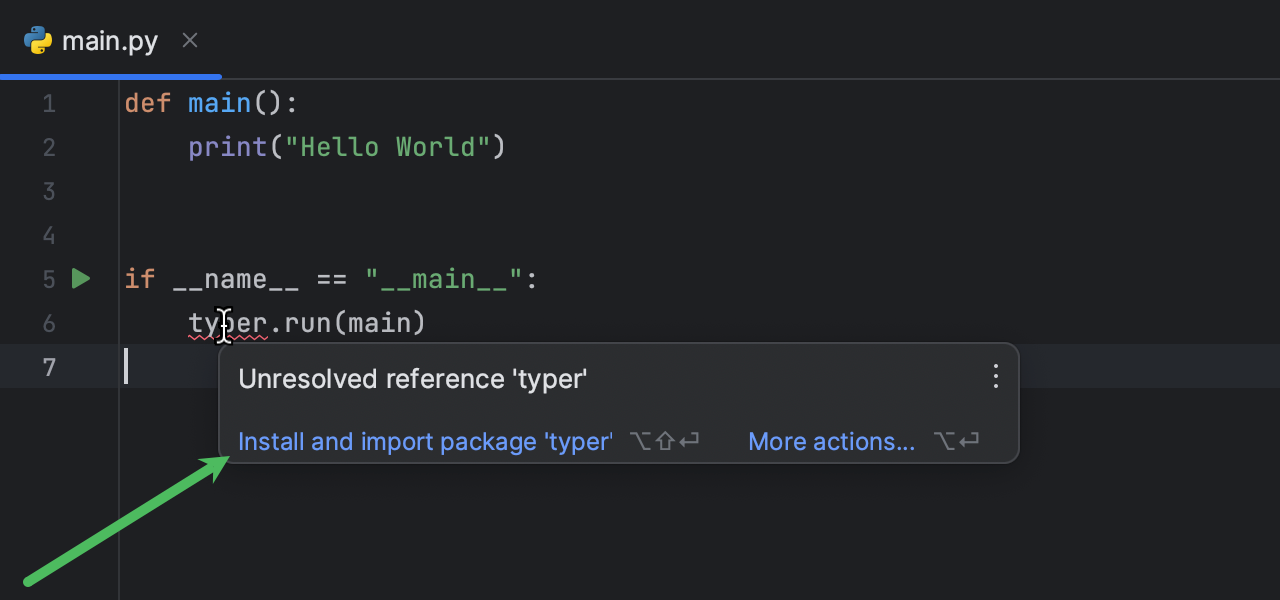
typer に赤い波線が付いているのがわかります。 これは、Python インタープリターが Typer が何であるかを認識していないことを意味します。 このスクリプトを起動するには、このパッケージをインストールして main.py にインポートしなければなりません。
マウスポインターをハイライトされているシンボルに合わせ、ポップアップにある Install and import package ‘typer’(パッケージ ‘typer’ のインストールとインポート)を選択します。
PyCharm が Typer パッケージをプロジェクト環境にインストールして main.py にインポートします。
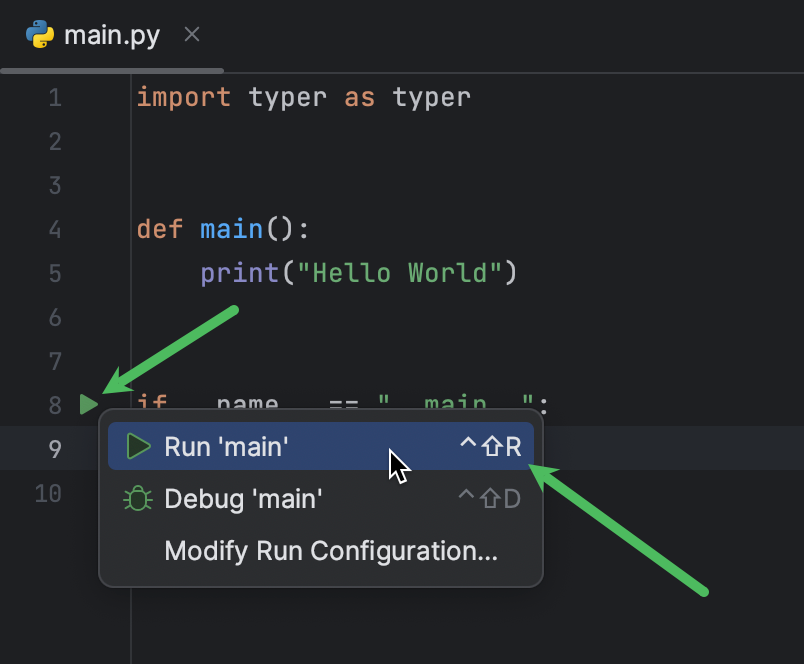
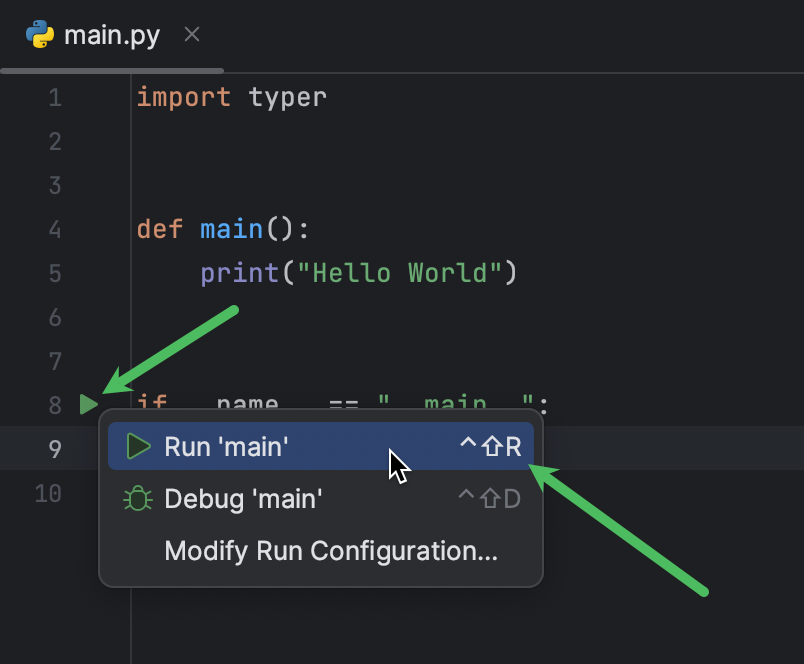
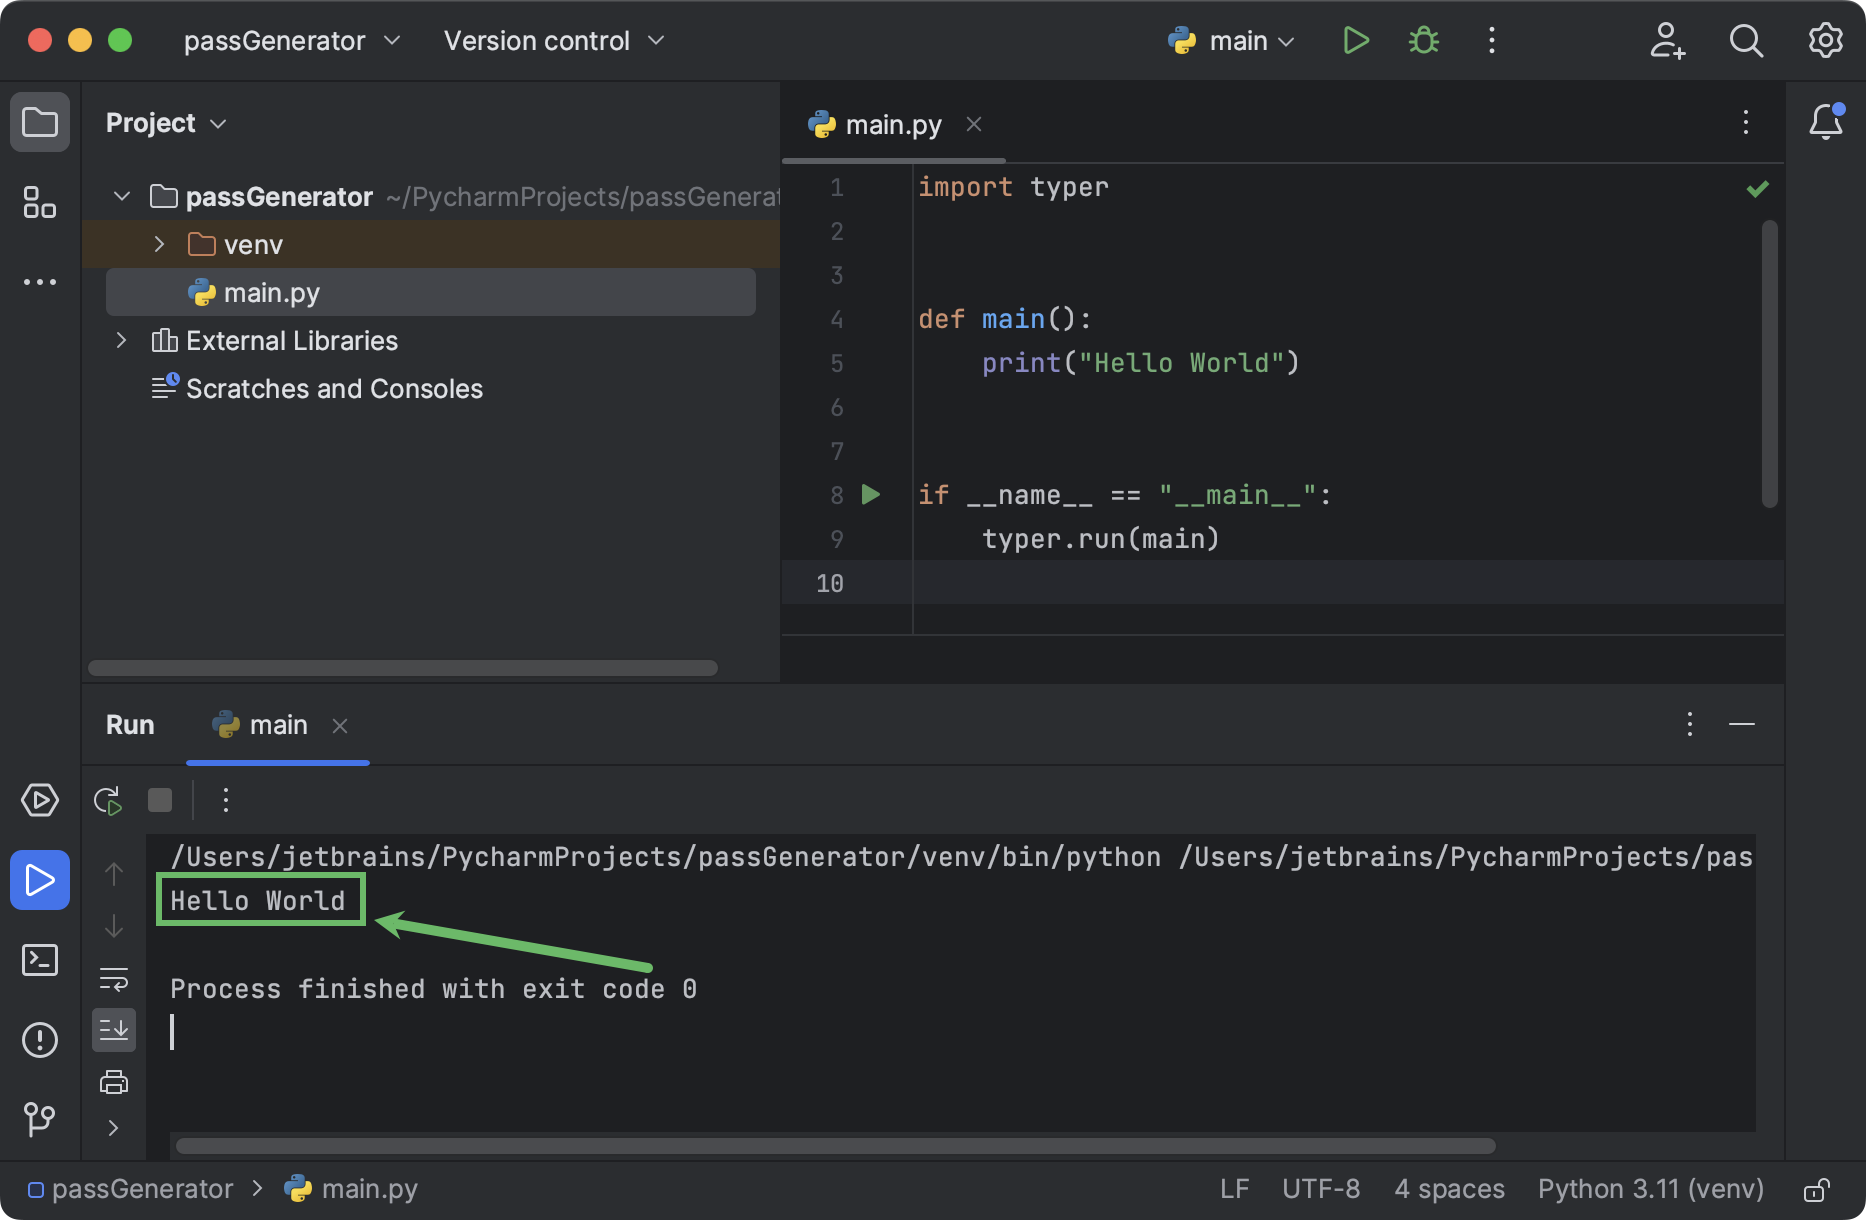
これでスクリプトを実行できるようになりました。 ガターの実行アイコンをクリックし、Run ‘main’(‘main’ の実行)を選択します。
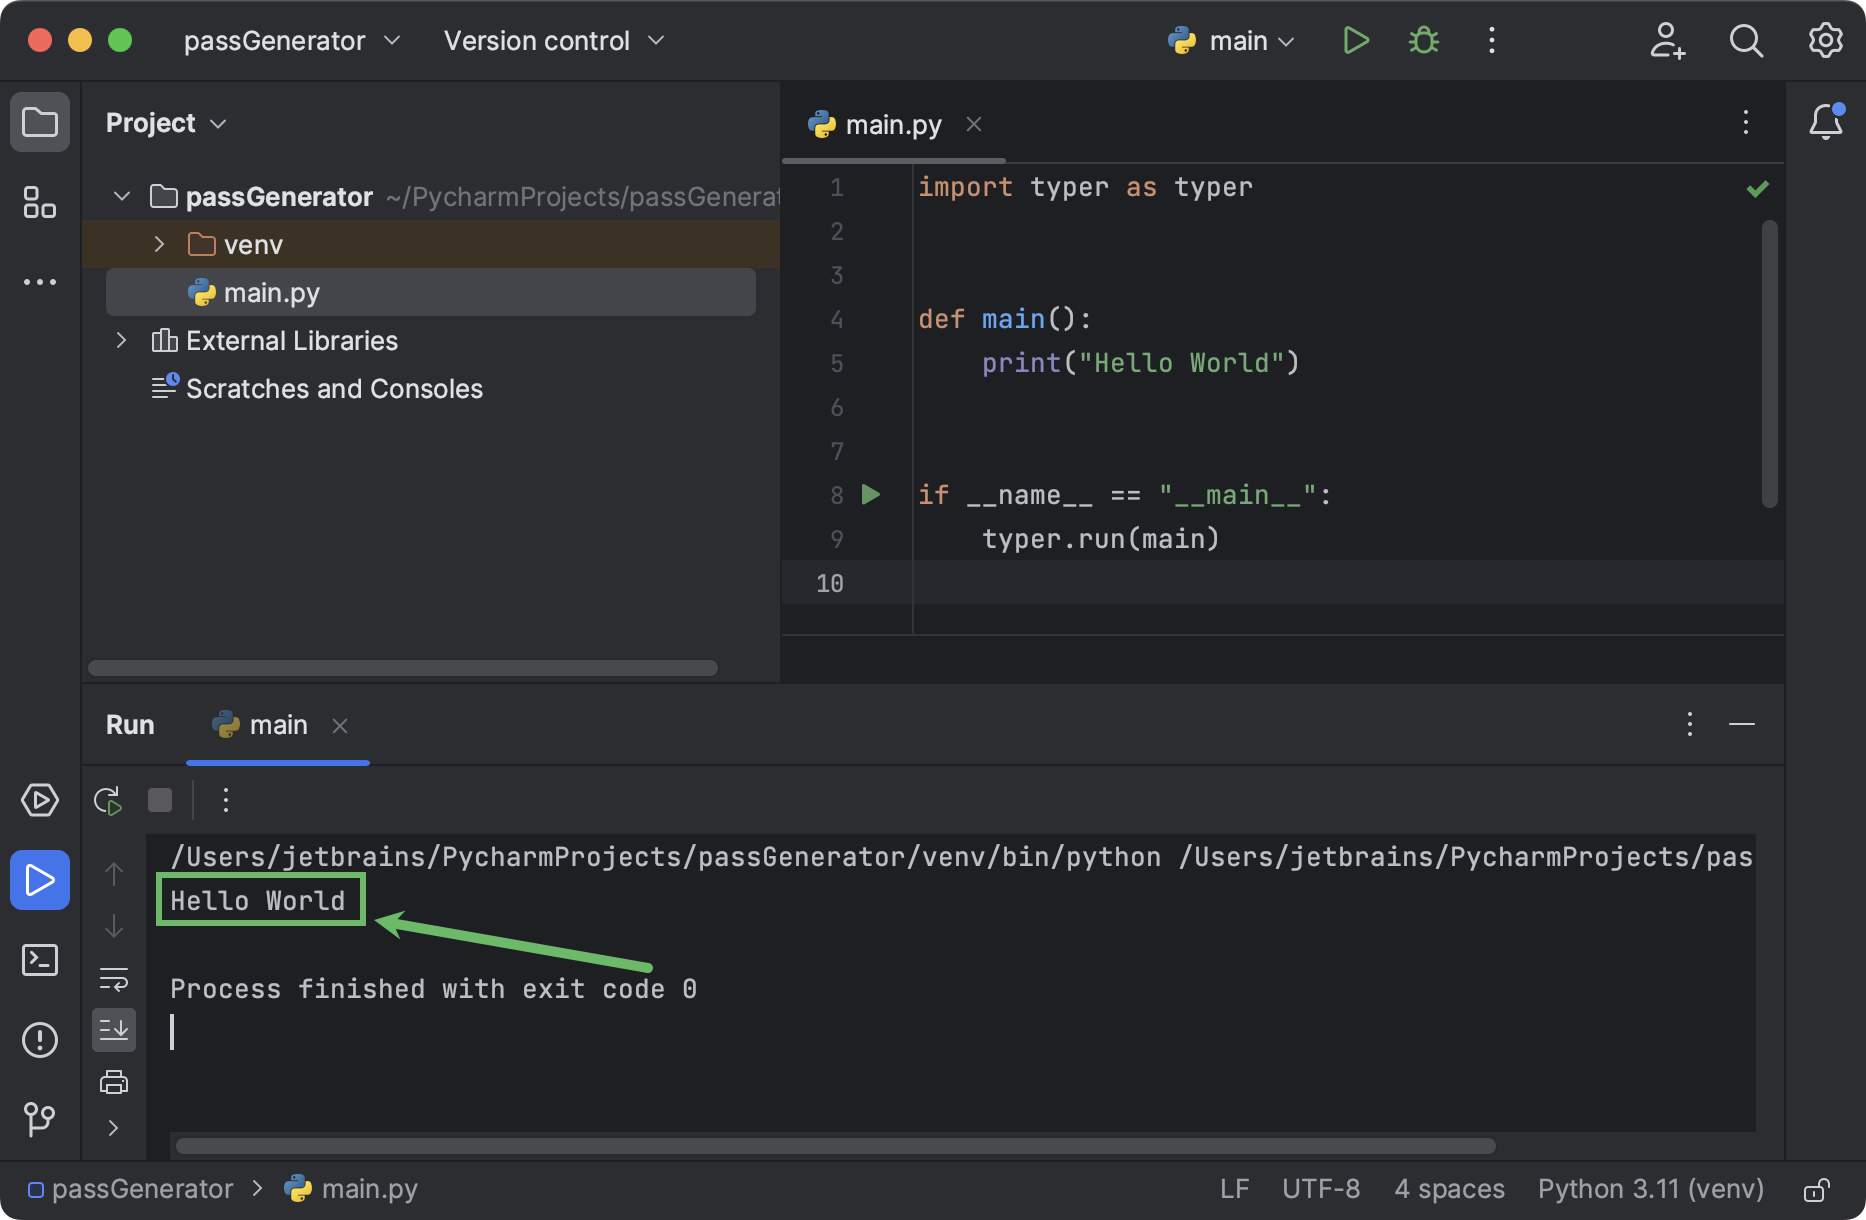
「Hello World」が表示された Run(実行)ツールウィンドウが下に表示されます。
最初のパスフレーズを生成する
このコードを変更して「Hello World」の代わりにパスフレーズが出力されるようにしましょう。 ランダムな単語を選んでフレーズを作成するようにします。 そのため、単語を選び出すための単語リストが最低 1 つは必要になります。 このようなリストは手動で準備することも、入手可能ないずれかの大規模言語モデルを使用して生成することも可能です。
単語リストを作成する際は、必ず安全に保管してください。 悪意のある人物が単語リストにアクセスした場合、わずか数秒でパスワードが解読されてしまいます。
| こちらのリポジトリには、このチュートリアルに掲載しているすべてのコードと複数の単語リストが含まれています。 これらは自己責任で学習のみを目的としてダウンロードし、使用できます。 これらの単語リストに基づいて実際のパスフレーズを生成しないことを強くお勧めします。 |
この段階では以下の 4 つの単語リストが必要です。
- obj_nouns.txt: 生成された疑似文で目的語として機能する名詞が含まれます。
- sub_nouns.txt: 主語として機能する名詞が含まれます。
- verbs.txt: 動詞が含まれます。
- adjectives.txt: 形容詞が含まれます。
各リストの単語数が多いほど、スクリプトが生成できる組み合わせ数も多くなります。 各単語は改行を入れて追加する必要があります。
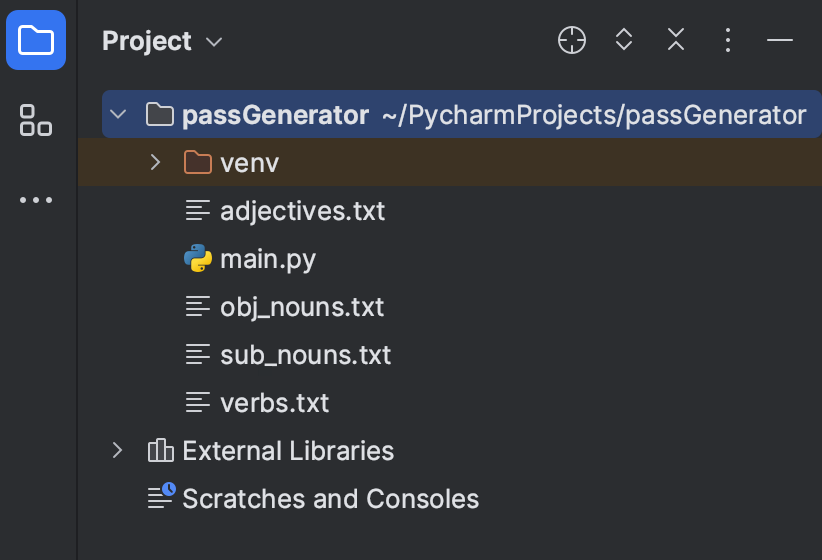
生成された、またはダウンロードした単語リストをプロジェクトのディレクトリにコピーします。 必要な場合は PyCharm で単語リストを手動で作成できます。
- Project(プロジェクト)ツールウィンドウでプロジェクトディレクトリをクリックし、⌘N / Ctrl+N を押します。
- File(ファイル)を選択し、obj_nouns.txt などのファイル名を指定します。
- PyCharm がファイルを作成し、エディターで開きます。
プロジェクトの構造は以下のようになります。
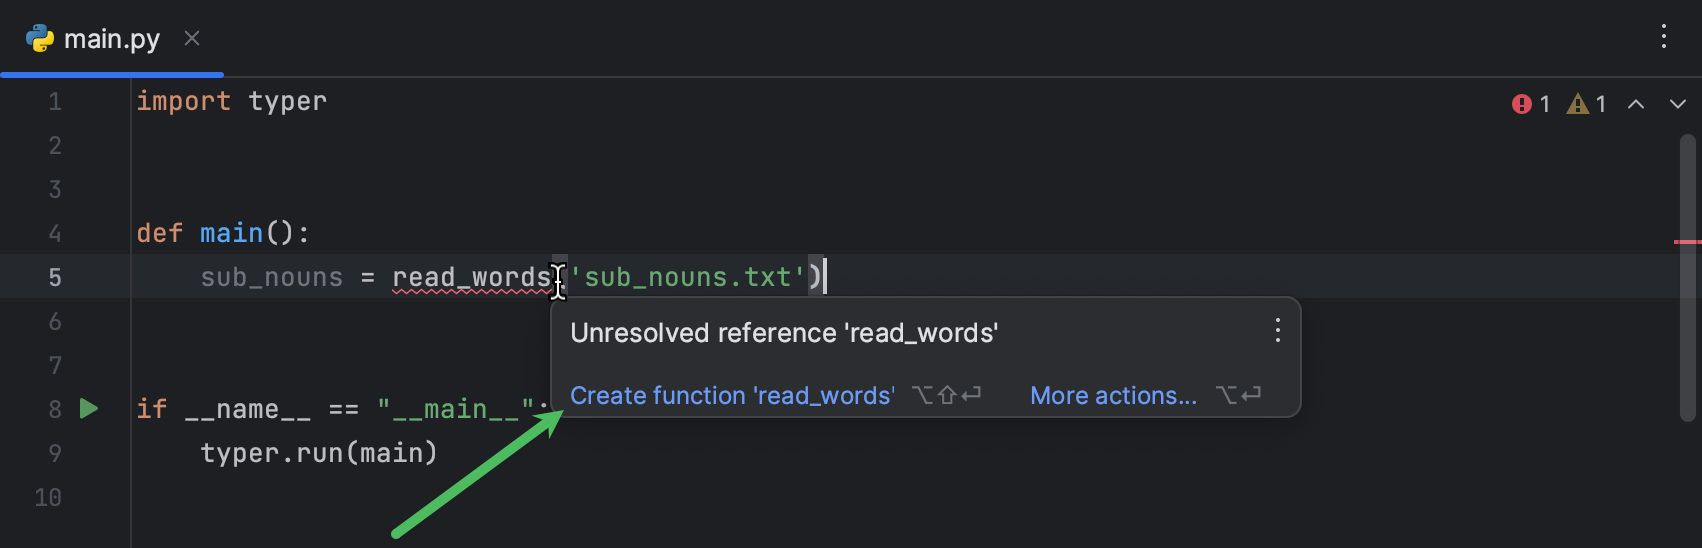
まず、テキストファイルから単語を読み取る必要があります。 print("Hello World") を以下のコードに置き換えましょう。
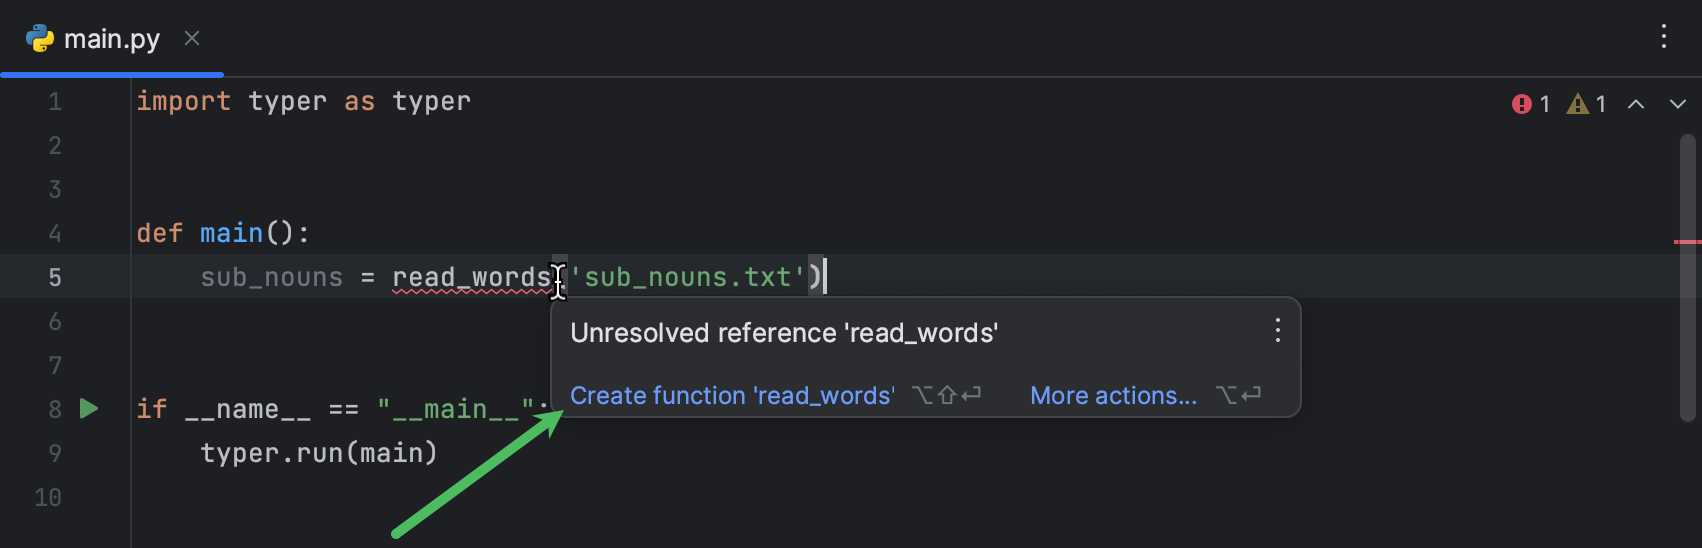
sub_nouns = read_words('sub_nouns.txt')
ここでも read_words に赤い波線が付いています。 この関数を作成しなければなりません。 マウスポインターを read_words に合わせ、ポップアップに記載された Create function ‘read_words’(関数 ‘read_words’ の作成)をクリックします。
PyCharm が関数スタブを作成します。 関数のパラメーターに file_name を指定し、Tab を押して関数のコードを書き始めます。
ハイライトされたコードを関数の本体にコピーできます。
def read_words(file_name):
    with open(file_name, 'r') as f:
        words = f.readlines()
    return words
この関数は、パラメーターとして指定された名前のファイルを開きます。 次に、ファイルの行を要素として含む Python のリストを返す readlines() メソッドを適用します。 このリストは words 変数に格納され、関数によって返されます。
main() 関数に戻り、新たに作成した read_words 関数を使って他の 3 つの単語リストを読み取りましょう。
def main():
    sub_nouns = read_words('sub_nouns.txt')
    verbs = read_words('verbs.txt')
    adjectives = read_words('adjectives.txt')
    obj_nouns = read_words('obj_nouns.txt')
次に、単語リストのリストを作成して word_bank と名付けます。 このリストは、後でパスフレーズに使うランダムな単語を取得する際に反復処理します。
word_bank = [sub_nouns, verbs, adjectives, obj_nouns]
選び出されたランダムな単語をさらに別のリストに格納します。 このリストを phrase_words と名付けて初期化しましょう。
phrase_words = []
次の for サイクルで、word_bank の項目を反復処理します。 word_bank の各項目は単語を含むリストです。 組み込みの random モジュールから SystemRandom() クラスの choice() メソッドを呼び出し、そのリストからランダムな単語を 1 つ選び出します。 次に、その単語を phrase_words に追加します。
    for word_list in word_bank:
        random_word = random.SystemRandom().choice(word_list)
        phrase_words.append(random_word)
random は組み込みのモジュールではありますが、インポートする必要があります。 これに関しては、これまでと同様にエディター内に表示される赤い波線で判断できるかと思います。 マウスポインターを合わせ、Import this name(この名前をインポート)を選択します。
最後に、join を使用してランダムに選び出された単語のリストをフレーズに変換し、その結果を出力しましょう。
    passphrase = ''.join(phrase_words)
    print(passphrase)
この段階では、main() は次のようになります。
def main():
    sub_nouns = read_words('sub_nouns.txt')
    verbs = read_words('verbs.txt')
    adjectives = read_words('adjectives.txt')
    obj_nouns = read_words('obj_nouns.txt')
    word_bank = [sub_nouns, verbs, adjectives, obj_nouns]
    phrase_words = []
    for word_list in word_bank:
        random_word = random.SystemRandom().choice(word_list)
        phrase_words.append(random_word)
    passphrase = ''.join(phrase_words)
    print(passphrase)
このスクリプトを実行して、正しく動作することを確認しましょう。 ガターの Run(実行)アイコンをクリックし、Run ‘main’(‘main’ の実行)を選択すると、以下のようになります。
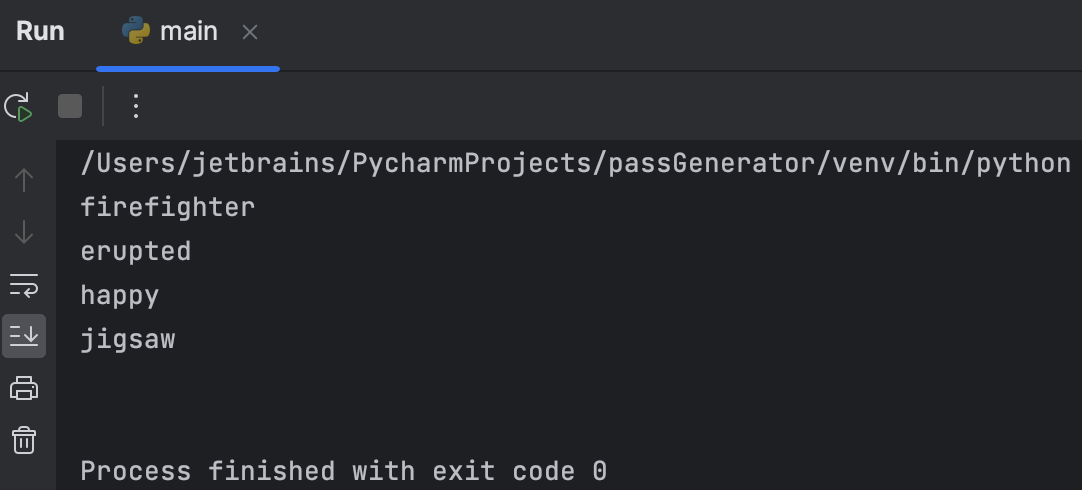
4 つの単語がありますが、明らかにフレーズではありません。 コードが大まかに動いているのに予期しない結果になるなら、デバッグする必要があります。
現在の出力からわかるように、このスクリプトは単語リストからランダムに単語を選び出せています。 うまくいっていないのは、単語を 1 つのフレーズに組み合わせる部分です。 main() の下から 2 行目が怪しそうです。
def main():
    ...
    passphrase = ''.join(phrase_words)
    print(passphrase)
コードの特定の行が生成する結果を確認するため、その行にブレークポイントを置きましょう。 デバッガーはブレークポイントのある行を実行する直前に停止します。 ブレークポイントを設定するには、確認したい行の横のガターをクリックします。
デバッグプロセスを開始するには、前に行ったようにガターの Run(実行)アイコンをクリックしますが、今回は、ポップアップの Debug ‘main’(‘main’ のデバッグ)を選択します。 デバッガーが起動してブレークポイントで実行が停止すると、Debug(デバッグ)ツールウィンドウが下に開きます。
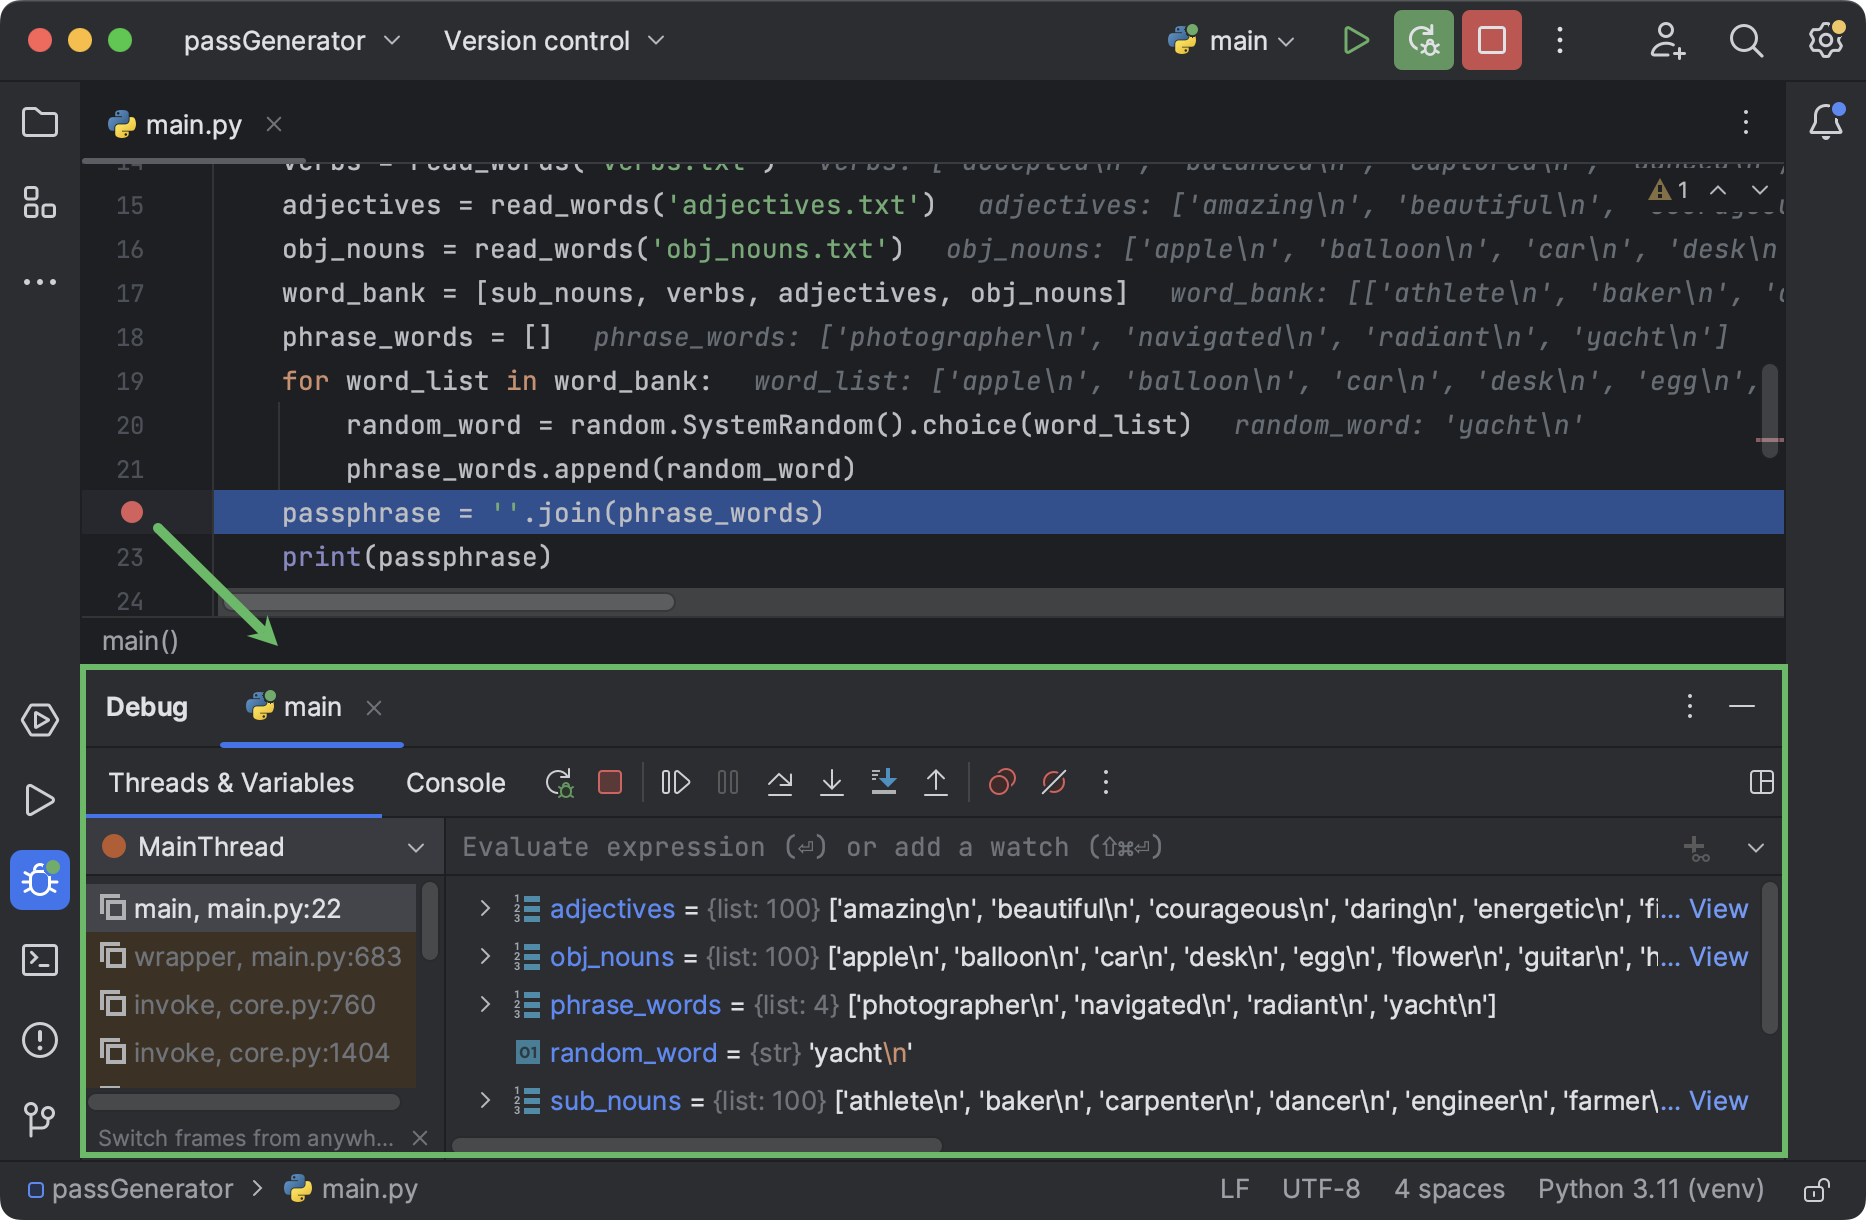
Debug(デバッグ)ツールウィンドウの右側のペインでは、その時点までに代入された変数を確認できます。 phrase_words を展開して中身を確認しましょう。
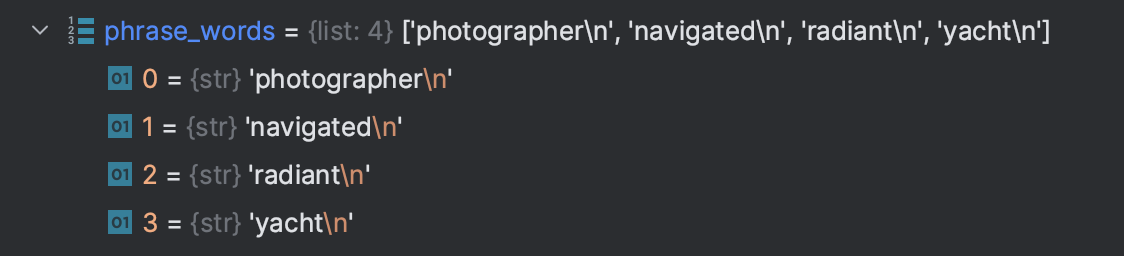
リストには str 型の項目が 4 個あります。 各文字列は改行(‘\n’)で終了しています。 後でこれらの文字列を結合して出力する際、各単語が個別の行に出力されてしまうのはこれが原因です。
adjectives などの他のリストを見てみると、そこでもすべての項目が ‘\n’ で終了しているのがわかります。 これらのリストは read_words 関数から取得しています。 そのため、末尾の ‘\n’ を付けずに単語のリストを返すようにその関数を修正する必要があります。
strip() とリスト内包表記を使用して、リストの各項目を返す前に ‘\n’ を取り除くようにしましょう。
def read_words(file_name):
    with open(file_name, 'r') as f:
        words = f.readlines()
        words = [word.strip() for word in words]
    return words
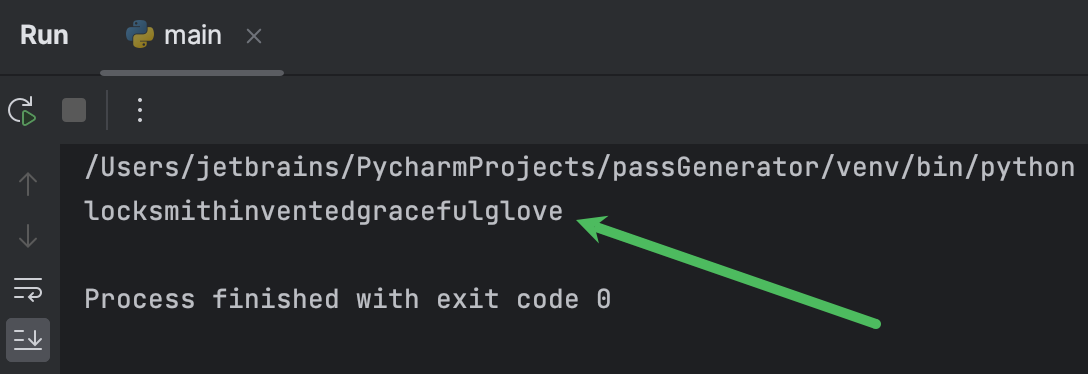
main() に戻り、結果を見てみましょう。
より優れたパスフレーズを作成する
記憶しやすくする
お気づきかもしれませんが、前のステップで生成されたパスフレーズには若干の読みにくさがあります。 各単語の先頭文字を大文字にして、可読性を改善してみてはどうでしょうか?
このアプリケーションでは、単にスクリプトを実行してパスフレーズを取得したくないため、Typer を使用しています。 このスクリプトにさまざまなオプションを渡して生成されるパスフレーズのプロパティを制御できるよう、コマンドラインインターフェースを作成する必要があります。 このようなオプションの 1 つが単語の先頭文字の大文字化です。
main.py を実行すると、次の行が実行されます。
...
if __name__ == "__main__":
    typer.run(main)
このように、typer を使用して main 関数を実行します。 このようにしているのは、Typer がコマンドライン引数を受け入れ、それを関数にパラメーターとして渡せるためです。
main() 関数に capitalize パラメーターを導入し、デフォルトで False にしましょう。
def main(capitalize = False):
    sub_nouns = read_words('sub_nouns.txt')
    ...
    passphrase = ''.join(phrase_words)
    print(passphrase)
Python コーディングのベストプラクティスによると、パラメーターの型を指定する必要があります。 capitalize にキャレットを置き、⌥Enter/ Alt+Enter を押します。 そして、Specify type for the reference using annotation(アノテーションを使用して参照する型を指定)を選択します。 capitalize にはブール値が必要であるため、bool と入力します。
では、capitalize が True の場合に、単語を結合する前に先頭文字を大文字にしてみましょう。 if capitalize: を使用する if ステートメントから始めます。 read_words 関数を修正した時と同じような方法で行いますが、今回はリスト内包表記を手動で書かずにライブテンプレートを使用します。 compl と入力して Enter を押します。 次に、リスト内包表記のすべての要素を指定し、Tab を押して次の要素に移動します。
以下のようになります。
def main(capitalize: bool = False):
    sub_nouns = read_words('sub_nouns.txt')
    verbs = read_words('verbs.txt')
    adjectives = read_words('adjectives.txt')
    obj_nouns = read_words('obj_nouns.txt')
    word_bank = [sub_nouns, verbs, adjectives, obj_nouns]
    phrase_words = []
    for word_list in word_bank:
        random_word = random.SystemRandom().choice(word_list)
        phrase_words.append(random_word)
    if capitalize:
        phrase_words = [phrase_word.capitalize() for phrase_word in phrase_words]
    passphrase = ''.join(phrase_words)
    print(passphrase)
先頭文字の大文字化を正しく動作させるため、main.py を実行する際に capitalize を引数として渡す必要があります。 これを行うため、実行構成を編集しましょう。 IDE ウィンドウの上部にある Run(実行)ウィジェットを見つけましょう。
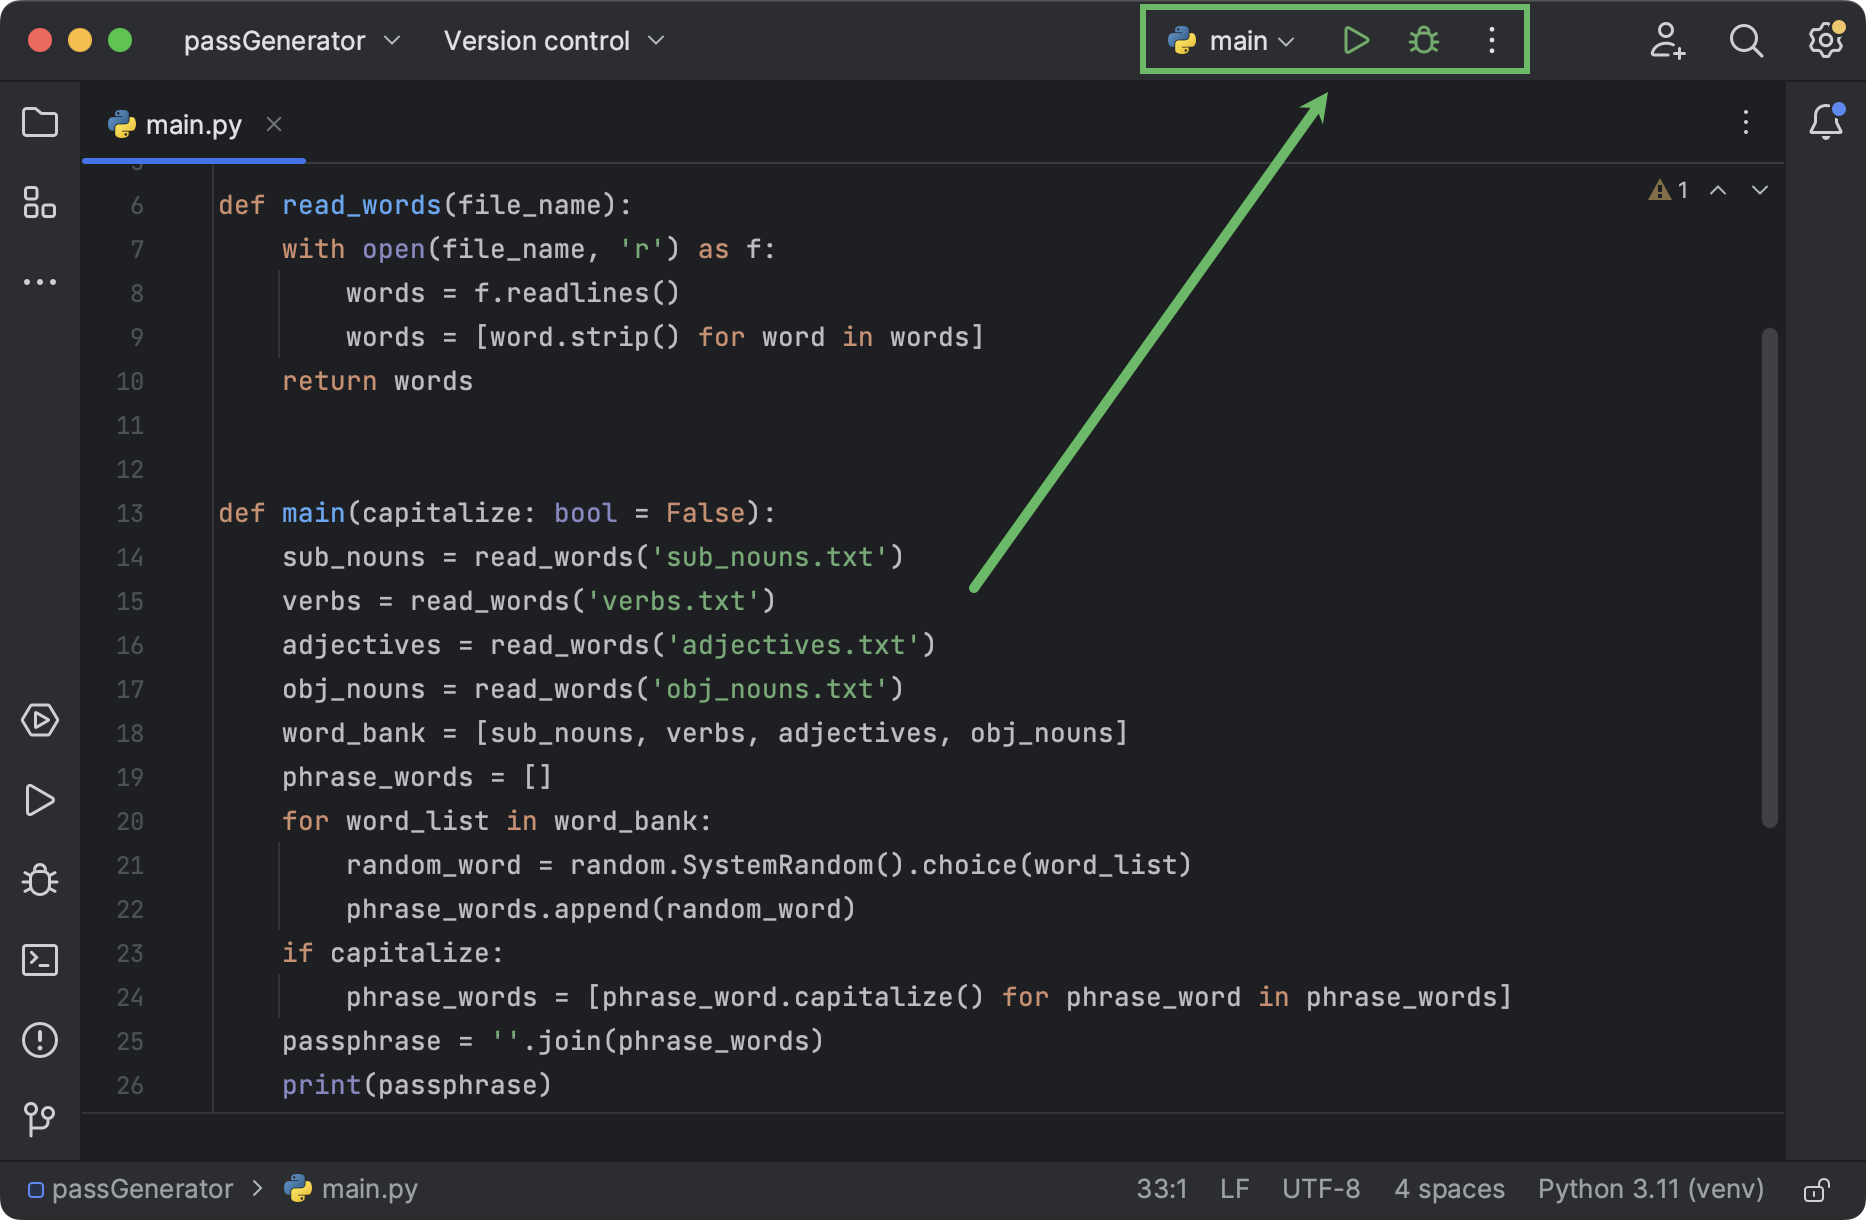
このウィジェットは、希望する実行構成の選択と、実行またはデバッグモードでの起動を選択するのに使用できます。 PyCharm ではガターアイコンをクリックしてスクリプトを起動した時点ですでに main 構成が作成されています。 その構成の名前をクリックしてメニューを開き、Edit configurations(構成の編集)を選択します。
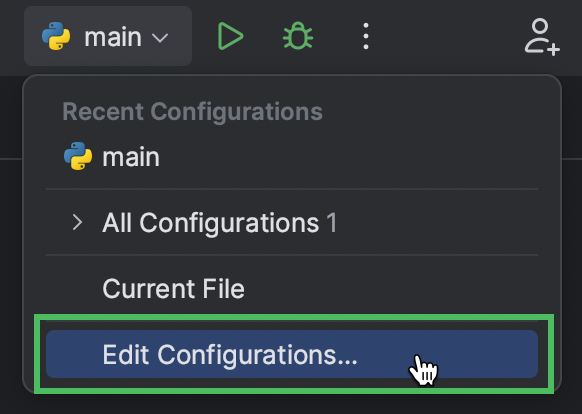
開いたダイアログで、Parameters(パラメーター)フィールドに --capitalize を指定します。
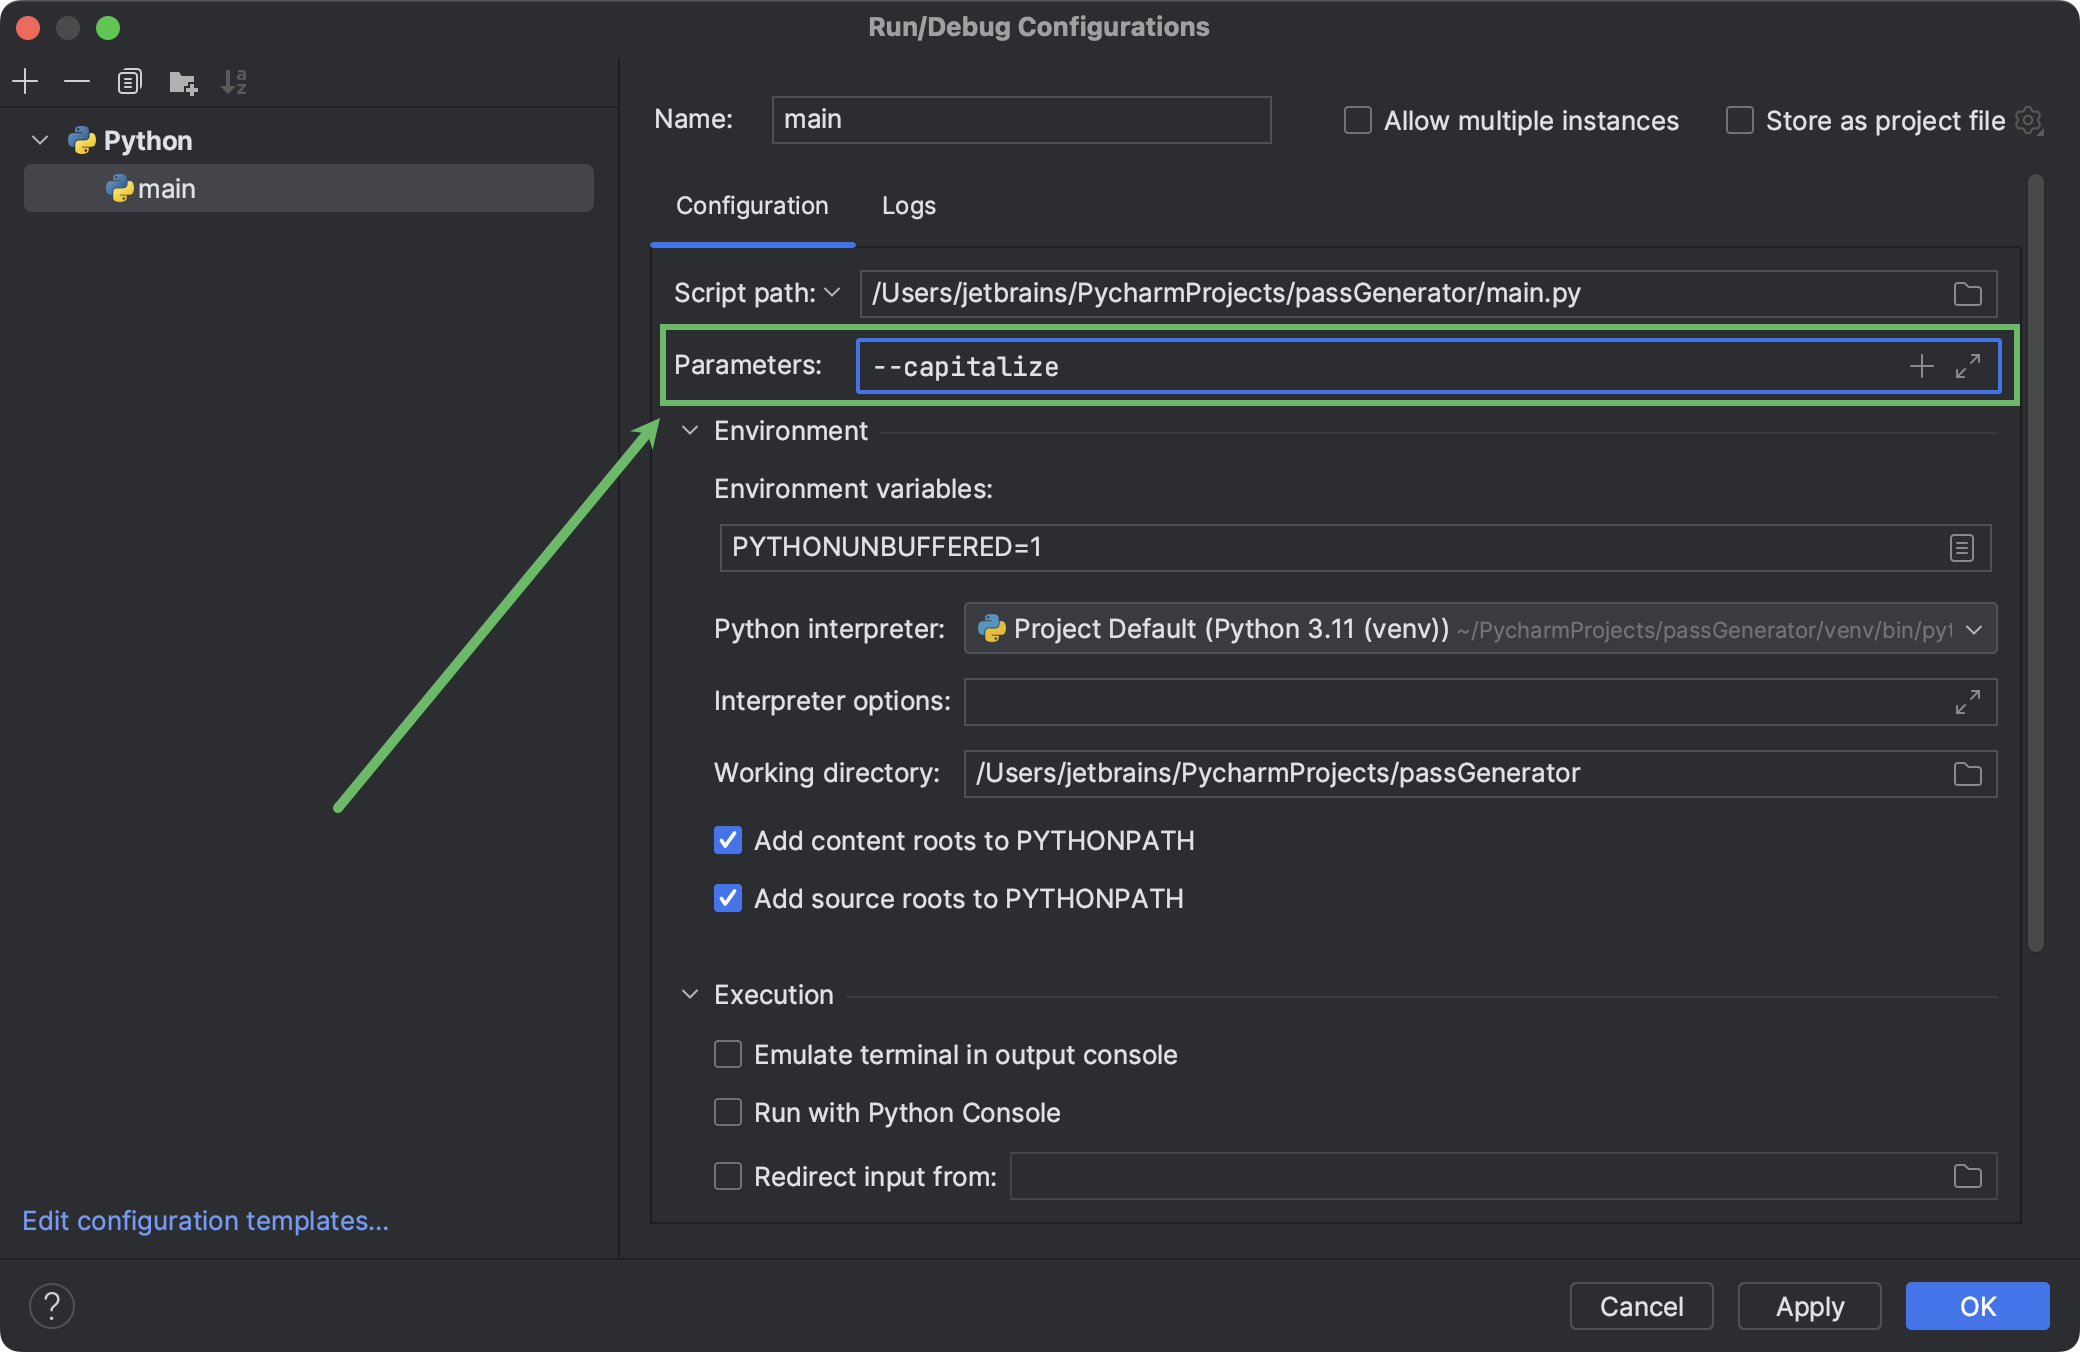
OK をクリックして、更新された構成を保存します。 次に、ウィジェットの実行アイコンをクリックします。
結果は以下のようになります。

可読性を高めるため、パスフレーズの単語を区切ることができます。 特殊文字を区切り文字として使用すると、特定のパスワード複雑さ要件に合ったパスフレーズを生成できるため、2 つの目的を達成できます。
main() 関数の下から 2 行目を以下のように編集します。
def main(capitalize: bool = False):
    ...
    passphrase = separator.join(phrase_words)
この関数には separator パラメーターがまだ存在しないため、PyCharm はこのパラメーターを赤い波線でハイライトします。 その波線にマウスポインターを合わせ、ポップアップの Create parameter ‘separator’(パラメーター ‘separator’ の作成)を選択します。 デフォルトでは区切り文字を追加しないため、‘’ をデフォルト値に指定します。
また、パラメーターの型に str を指定しておきましょう。 以下のようになります。
def main(capitalize: bool = False, separator: str = ''):
    ...
    passphrase = separator.join(phrase_words)
    print(passphrase)
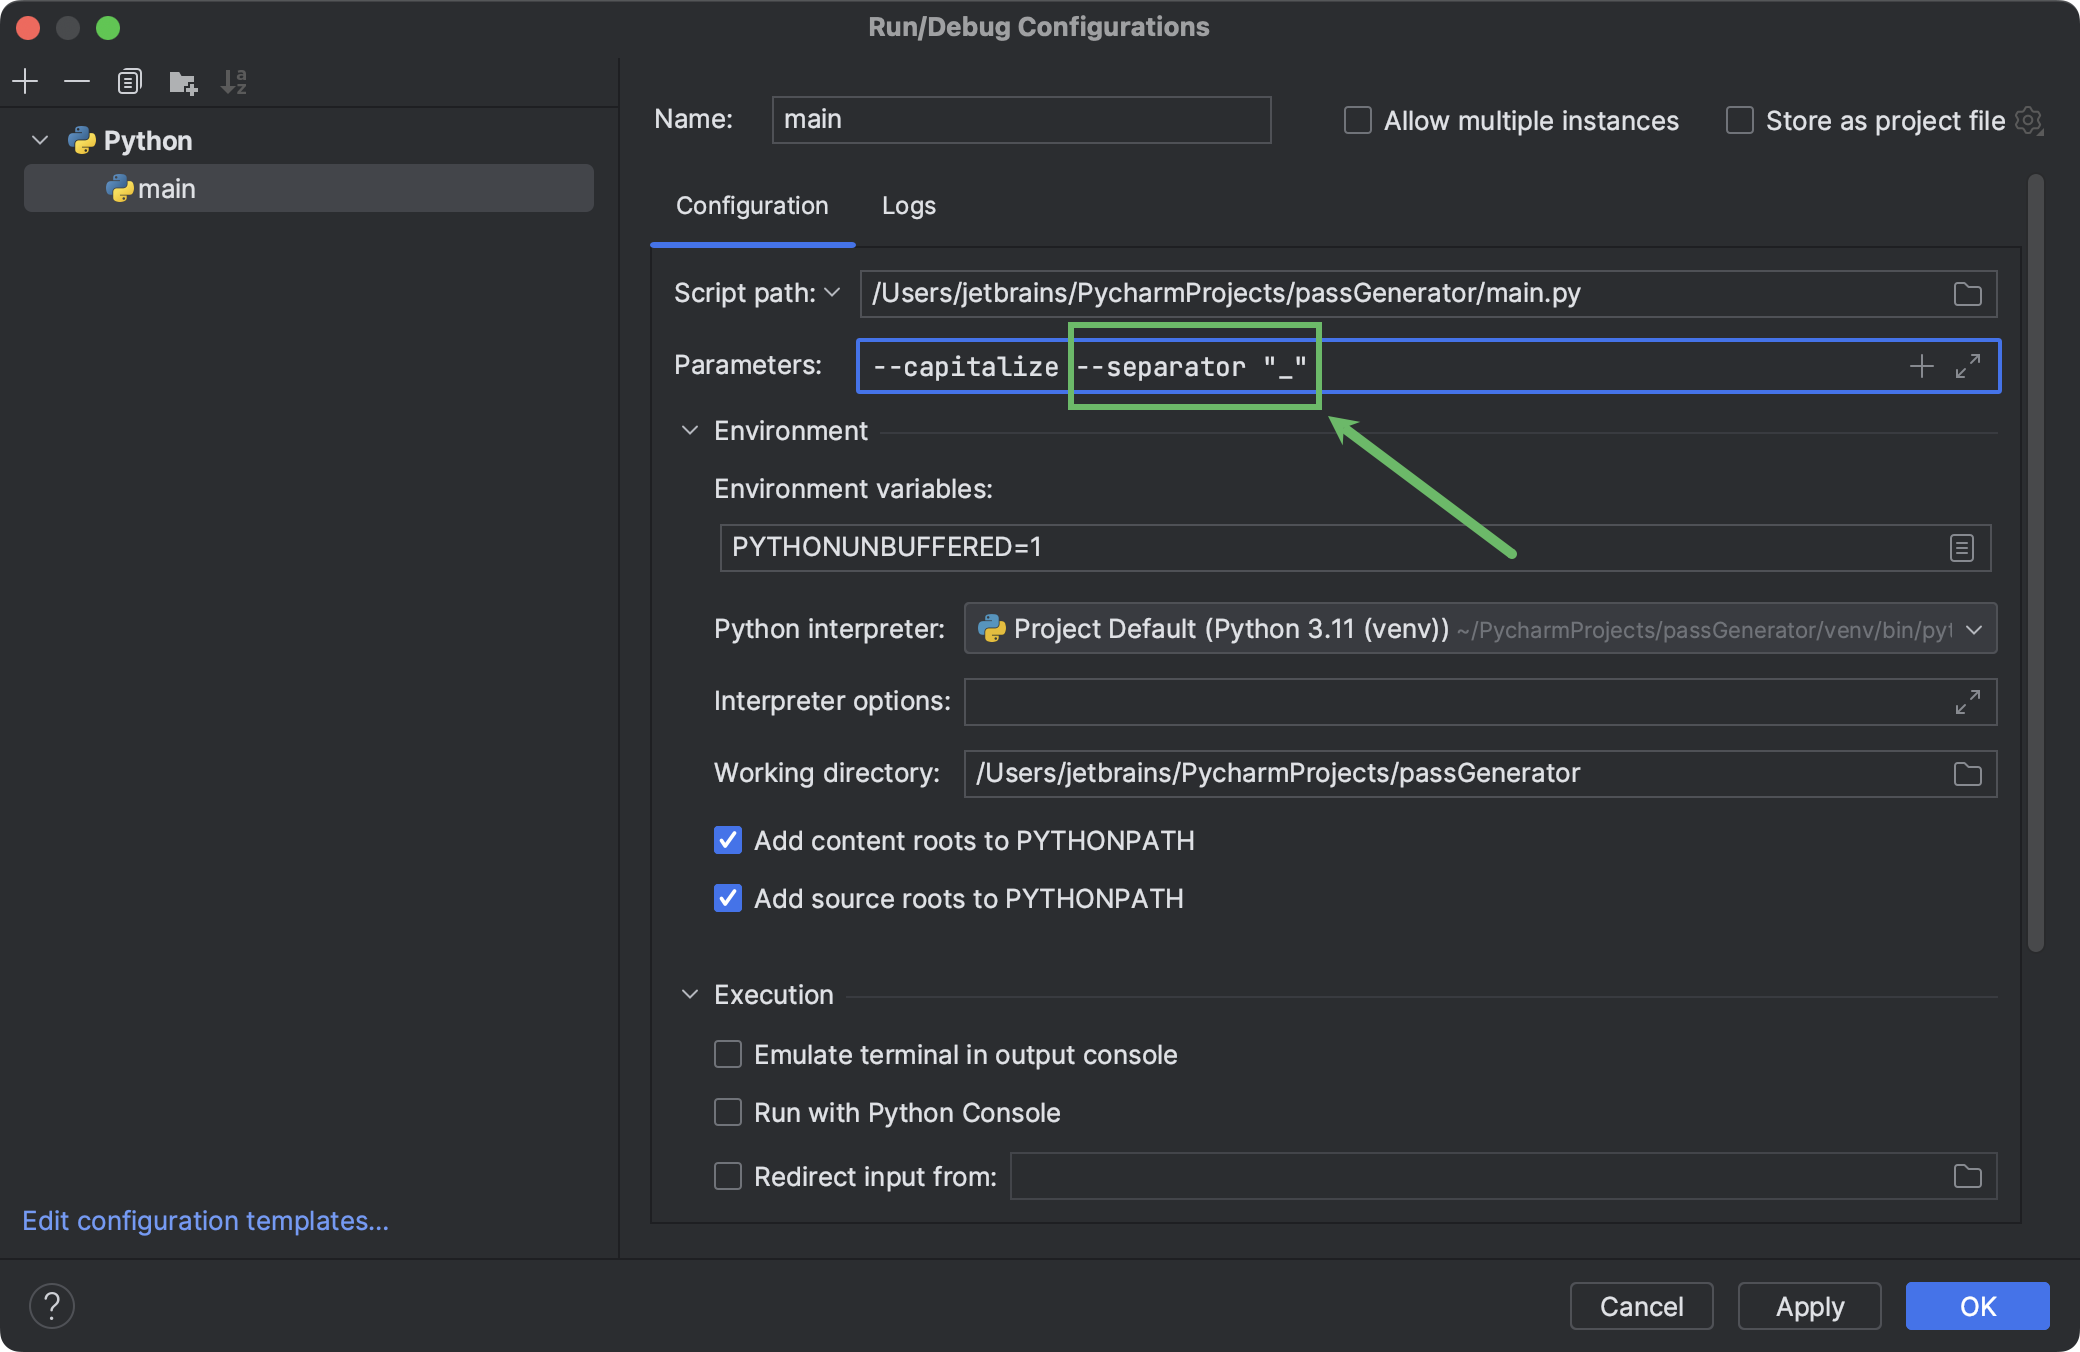
さあ、結果を確認したくなったはずです。 その前に実行構成を更新することを忘れないでください。 Run(実行)ウィジェットをクリックし、Edit configurations(構成の編集)を選択して、Parameters(パラメーター)フィールドに新しいパラメーターを追加します。
構成を実行して結果を確認します。
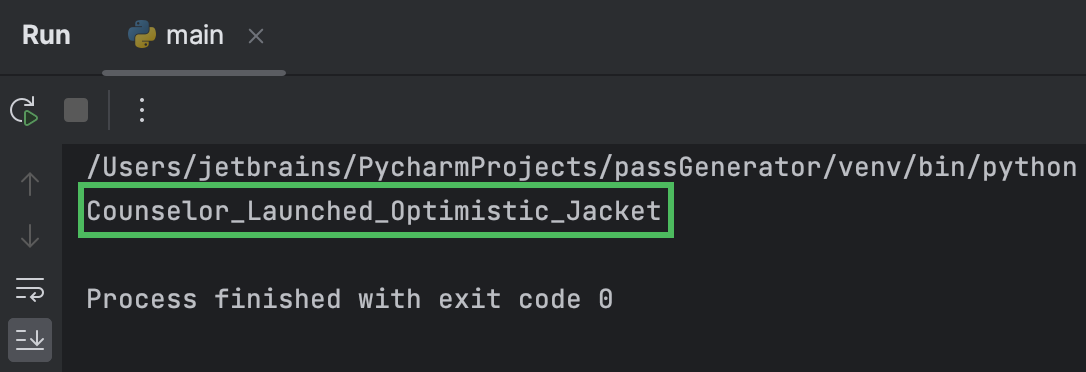
特殊文字と数字でパスフレーズの単語が区切られるようになりました。 さらに、“#4” や “%7” などの複数の記号を使用し、さまざまなウェブサイトが指定するパスワード要件も満たすことができます。
さらに解読しにくくする
パスフレーズが長いほど、ブルートフォース攻撃を成功させるために必要な試行回数も増えます。 パスフレーズに単語をもう 1 つ含められるようにしましょう。
まずは副詞を含む 5 番目の単語リストを準備し、プロジェクトのディレクトリに配置します。 main() 関数のシグネチャーにブール型の long パラメーターを追加します。 このパラメーター(オプションかつデフォルトでは False)に応じて word_bank に単語リストがもう 1 つ追加されます。
def main(capitalize: bool = False, separator: str = '', long: bool = False):
    ...
    word_bank = [sub_nouns, verbs, adjectives, obj_nouns]
    if long:
        adverbs = read_words('adverbs.txt')
        word_bank.append(adverbs)
	...
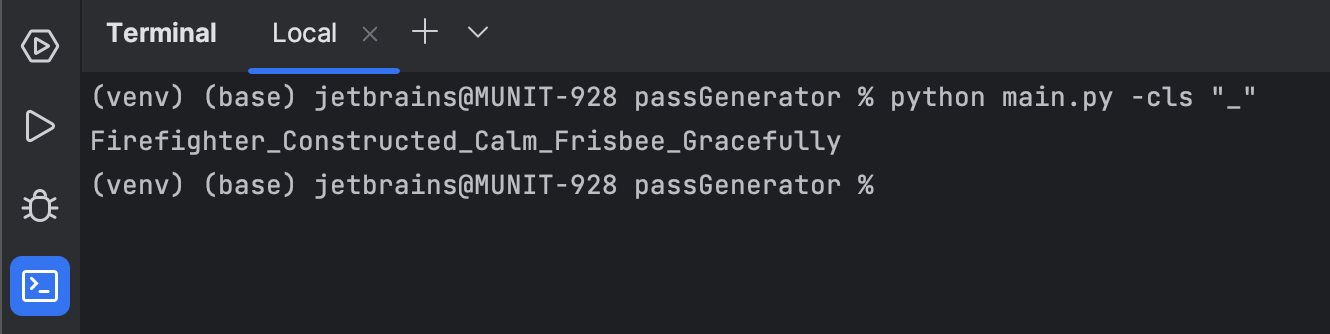
今回は組み込みのターミナルを使ってスクリプトを実行してみましょう。 ⌥F12/ Alt+F12 を押して開いた Terminal(ターミナル)ツールウィンドウに以下のコマンドを入力します。
python main.py --capitalize --separator "1_" --long
以下のように表示されます。

より実用的なツールにするための変更
短いオプション名を定義する
CLI ツールを使用した経験のある方は、通常は 1 文字だけで引数を指定できることをご存知でしょう。 このツールにもその機能を追加しましょう。 コードの可読性を高めるため、関数シグネチャーを整形して各パラメーターを別々の行に分けましょう。
def main(
    capitalize: bool = False,
    separator: str = '',
    long: bool = False
):
...
次に、各パラメーターのデフォルト値を typer.Option(, , ) に置き換えます。
main() のシグネチャーは最終的に以下のようになります。
def main(
    capitalize: bool = typer.Option(False, '--caps', '-c'),
    separator: str = typer.Option('', '--separator', '-s'),
    long: bool = typer.Option(False, '--long', '-l')
):
...
すべてのオプションをまとめて指定できるようになりました。 区切り文字(‘-s’)は後に文字列を書く必要があるため、最後に配置すべきです。
オプションのドキュメントを書く
Typer はデフォルトで --help オプションも追加します。 現時点でどのように機能するか見てみましょう。
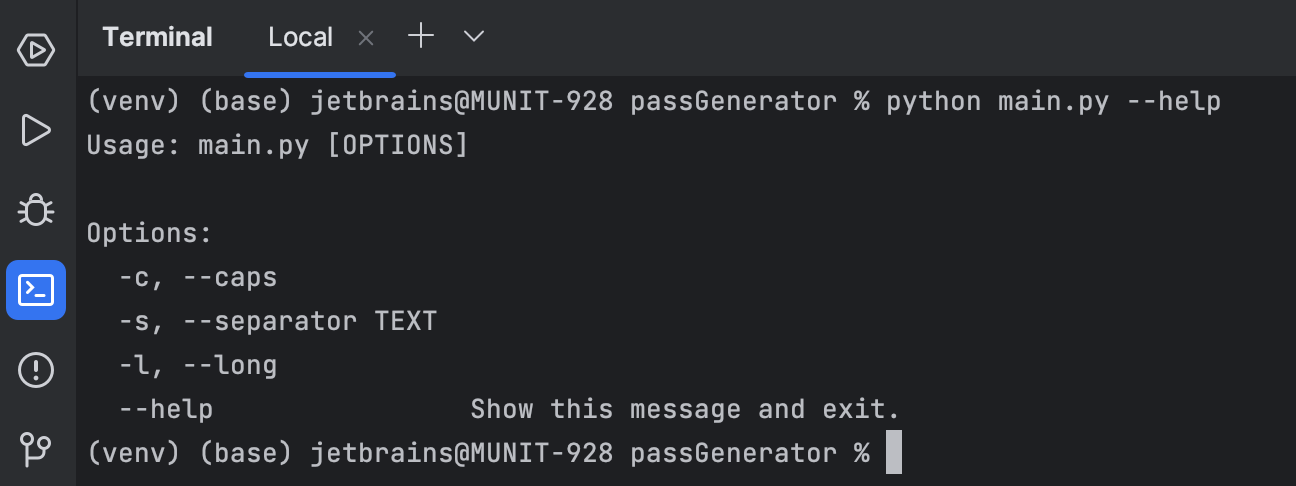
どんなパラメーターが存在し、その正式な名前と短い形式の名前が何であるかがわかります。 実際の動作を説明するコメントを追加してはどうでしょうか? 以下のように、main() の各パラメーターに help を追加します。
def main(
    capitalize: bool = typer.Option(False, '--caps', '-c', help='Capitalize each word.'),
    separator: str = typer.Option('', '--separator', '-s', help='Separate words with the given symbol.'),
    long: bool = typer.Option(False, '--long', '-l', help='Make the passphrase longer by including an adverb.')
):
...
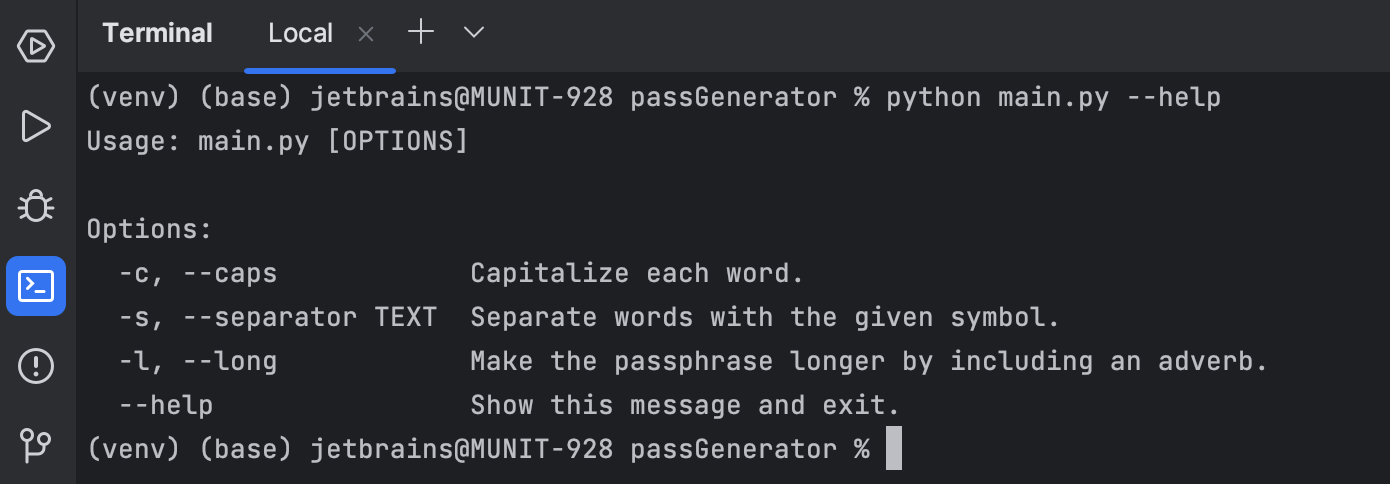
--help がより有用な情報を表示するようになりました。
PyCharm を使わずにシステムのターミナルなどでパスフレーズジェネレーターを使用することもできます。 その場合は、以下のコマンドを使用してシステムインタープリターに Typer をインストールする必要があります。
python3 -m pip install --user typer
まとめ
このチュートリアルでは以下について学習しました。
- PyCharm Community Edition でのプロジェクトの作成
- Python と Typer による使いやすい CLI ツールの作成
- エラーを回避しながらより迅速にコードを書くためのクイックフィックスとライブテンプレートの使用
- コードのデバッグ
- 実行構成とターミナルを使用した PyCharm でのコードの実行
オリジナル(英語)ブログ投稿記事の作者:

Subscribe to PyCharm Blog updates
Discover more


How To Create a Passphrase Generator in PyCharm

In this tutorial, you will create a passphrase generator in PyCharm. You’ll also learn how to:
- Download PyCharm and create a new project.
- Install and import Python packages.
- Use the Typer library to create command line interfaces in Python.
- Run and debug code in PyCharm.
- Create and edit run configurations.
The purpose of the tutorial is to show how you can develop simple CLI applications for automating your everyday tasks by using the free PyCharm Community Edition. Although you’ll get a working passphrase generator by the end of this tutorial, please consider it merely a learning project. Never use the passwords produced by this generator to protect any real data.
To get the full code, you can clone the repository. For information about cloning, see the PyCharm documentation.
About passphrases
What is a passphrase?
We all use lots of passwords every day. Whenever you sign up for a service or a website, it requires you to create a long and unique password with numbers, special characters, uppercase letters, and so on.
All these requirements are meant to make a password resistant to brute force attacks. A brute force attack is basically making a number of attempts to guess the password until one of them eventually gets it right. How many attempts and how much time is required depends on the password’s length and complexity.
A passphrase is a password consisting of several random words. It doesn’t have to make sense or to be grammatically correct. Passphrases usually contain 4 to 5 words – the more, the better. For example, PhysicianBuiltHotPotatoRegularly is a passphrase.
Why is a passphrase better?
A^1rL#2k2oPiA9H is a good, strong password. It contains lowercase and uppercase letters, numbers, special symbols, and is 15 characters long. But what would you rather memorize, A^1rL#2k2oPiA9H or PhysicianBuiltHotPotatoRegularly? By the way, the latter has 32 characters in it.
Apart from how easy or difficult a password is to memorize, we should also pay attention to how easy or difficult it is to crack. Have a look at the following table:
| A^1rL#2k2oPiA9H | PhysicianBuiltHotPotatoRegularly | |
|---|---|---|
| Symbol set size | 95 | 52 |
| Password length | 15 | 32 |
| Attempts required to crack (?) | 298 | 2182 |
Both are strong, but the passphrase is stronger and much easier to remember. What’s more, if you added a couple of numbers and special characters to the passphrase, that would increase the average number of required guessing attempts to 2210 – virtually impossible to crack!
To sum up:
- Passphrases consisting of random words are easier to memorize than passwords consisting of random characters.
- Passphrases are generally longer than most passwords, which makes them more resistant to brute force attacks and thus more secure.
- Passphrases can be modified to comply with complexity requirements. For example, you can capitalize words to include uppercase letters, or add special characters and numbers as separators between the words.
What is a passphrase generator
In general, a passphrase generator is a program that makes passwords by combining random words into pseudo-sentences. In this tutorial, we will use PyCharm and Typer to develop a command line tool that will do the following:
- Generate a passphrase consisting of 4–5 random words.
- Capitalize words in a passphrase if such an option is selected. By default words aren’t capitalized.
- Use any symbol as a separator for words. By default there are no separators.
- Create longer passphrases by adding the fifth word. The default length is four words.
The tool will NOT store your passwords.
Prerequisites
- Some previous experience with Python.
- PyCharm Community Edition 2023.1 or newer.
- Python (can be downloaded during project creation).
First steps
Write “Hello World” with Typer
When you launch PyCharm for the first time, you’ll see the Welcome screen. Click New Project:
If you already have PyCharm running, select File | New Project from the main menu.
When the New Project window opens, look for the Location field at the top and use it to specify the directory for your project. This will also be used as the project name.
You can choose the type of the virtual environment where PyCharm will install the project dependencies. You can also select the location where the environment will be created, as well as the base Python interpreter.
Choose the preferred environment type and specify the options (or keep the defaults), and then click Create.
PyCharm will create the project directory with the virtual environment in it (venv in our case). If you didn’t clear the Create a main.py welcome script checkbox in the previous step, it will also create main.py and open it in the editor:
The file contains a “Hello World” script with some basic instructions. Copy the following code to the clipboard:
def main():
    print("Hello World")


if __name__ == "__main__":
    typer.run(main)
Now, go to PyCharm and replace the contents of main.py by pressing ⌘A / Ctrl+A followed by ⌘V / Ctrl+V. You should get the following:
You can see that typer has a red squiggly line underneath it. This means that the Python interpreter doesn’t recognize what Typer is. We need to install this package and import it into main.py to be able to launch the script.
Hover the mouse pointer over the highlighted symbol, and then select Install and import package ‘typer’ in the popup:
PyCharm will install the Typer package into the project environment and import it in main.py.
Now we can run the script. Click on the run icon in the gutter and then select Run ‘main’:
The Run tool window with “Hello World” will open at the bottom:
Generate your first passphrase
Let’s modify the code so that it prints passphrases instead of “Hello World”. The idea is to pick random words and make phrases out of them. That means we’ll need one or more word lists to pick from. You can prepare such lists manually or generate them by using one of the available large language models.
When you create your word lists, make sure to keep them secure. If a malicious actor gets access to your word lists, they will be able to crack your passwords in a matter of seconds.
| Our repo contains word lists along with the full code for this tutorial. You can download and use them only for learning purposes, and at your own risk. Generating real passphrases based on these word lists is strongly discouraged. |
At this step, you’ll need 4 word lists:
- obj_nouns.txt with nouns that will act as objects in our generated pseudo-sentences.
- sub_nouns.txt with nouns that will act as subjects.
- verbs.txt with verbs.
- adjectives.txt with adjectives.
The more words you have in each list, the more combinations the script will be able to generate. Each word should start with a new line.
Copy the generated or downloaded word lists to the project directory. If you want to create the word lists manually, you can do that in PyCharm:
- Click the project directory in the Project tool window, and then press ⌘N / Ctrl+N.
- Select File and then specify the file name, such as obj_nouns.txt.
- PyCharm will create the file and open it in the editor.
This is what the project structure should look like:
First of all, we need to read the words from the text files. Replace print("Hello World") with the following code:
sub_nouns = read_words('sub_nouns.txt')
Again, read_words has a red squiggly line underneath it. We need to create this function. Hover the mouse over read_words and then click on Create function ‘read_words’ in the popup:
PyCharm will create a function stub. Specify file_name as the function parameter, and then press Tab to start writing the function code:

You can copy the highlighted code into the function body:
def read_words(file_name):
    with open(file_name, 'r') as f:
        words = f.readlines()
    return words
The function opens the file whose name is provided in its parameter. Then it applies the readlines() method, which returns a Python list containing the lines of the file as its elements. That list is saved to the words variable and returned by the function.
Let’s go back to the main() function and use the newly created read_words function to read the other 3 word lists:
def main():
    sub_nouns = read_words('sub_nouns.txt')
    verbs = read_words('verbs.txt')
    adjectives = read_words('adjectives.txt')
    obj_nouns = read_words('obj_nouns.txt')
Now, let’s create a list of word lists and call it word_bank. Later we will iterate through it when picking random words for the passphrase:
word_bank = [sub_nouns, verbs, adjectives, obj_nouns]
The selected random words will be saved into yet another list. Let’s call it phrase_words and initialize it:
phrase_words = []
In the following for cycle, we iterate through the items of word_bank. Each item in word_bank is a list with words. We call the choice() method of the SystemRandom() class from the built-in random module to select a random word from the list. Then we append the selected word to phrase_words:
    for word_list in word_bank:
        random_word = random.SystemRandom().choice(word_list)
        phrase_words.append(random_word)
Although random is a built-in module, we still need to import it. Like before, you can tell that by the red squiggly line in the editor. Hover the mouse over it and select Import this name.
Finally, let’s use join to turn the list with randomly selected words into a phrase and print the result:
    passphrase = ''.join(phrase_words)
    print(passphrase)
Here’s what main() should look like at this stage:
def main():
    sub_nouns = read_words('sub_nouns.txt')
    verbs = read_words('verbs.txt')
    adjectives = read_words('adjectives.txt')
    obj_nouns = read_words('obj_nouns.txt')
    word_bank = [sub_nouns, verbs, adjectives, obj_nouns]
    phrase_words = []
    for word_list in word_bank:
        random_word = random.SystemRandom().choice(word_list)
        phrase_words.append(random_word)
    passphrase = ''.join(phrase_words)
    print(passphrase)
Now we can run the script to check that it works correctly. Click the Run icon in the gutter and select Run ‘main’, and this is what you should get:
OK, there are 4 words, but it’s definitely not a phrase. When code generally works but produces unexpected results, it needs to be debugged.
As we can see from the current output, the script successfully selected random words from the word lists. What it didn’t do was combine the words into one phrase. The second-to-last line of main() appears to be the likely culprit:
def main():
    ...
    passphrase = ''.join(phrase_words)
    print(passphrase)
To see what a specific line of code produces, we should put a breakpoint on that line. The debugger will then stop just before executing the line with the breakpoint. To set a breakpoint, click the gutter next to the line we are interested in checking:
To start the debugging process, click the Run icon in the gutter, like you’ve done before, but this time, select Debug ‘main’ in the popup. The debugger will start and then stop execution at the breakpoint, opening the Debug tool window at the bottom:
In the right-hand pane of the Debug tool window, you can see the variables that have been assigned so far. Expand phrase_words to see what’s inside:
There are 4 items of type str in the list. Each string ends with a new line (‘\n’). That’s why, when we later join these strings together and print them, each word is printed on a separate line.
If you have a look at the other lists, for example, adjectives, you’ll notice that all items in them also end with ‘\n’. We get these lists from the read_words function. That means we need to fix it so that it returns a list of words without a trailing ‘\n’.
Let’s use strip() and list comprehension to get rid of ‘\n’ in each list item before returning it:
def read_words(file_name):
    with open(file_name, 'r') as f:
        words = f.readlines()
        words = [word.strip() for word in words]
    return words
Rerun main() and enjoy the result:
Create better passphrases
Make them easier to memorize
As you may have noticed, the passphrase generated in the previous step is a little hard to read. What about capitalizing each word to improve readability?
We are using Typer in this application because we don’t want to just run the script and get a passphrase. We need to create a command line interface, so that we can pass various options to the script and thus control the properties of the resulting passphrase. One such option is capitalizing the words.
When we run main.py, the following line is executed:
...
if __name__ == "__main__":
    typer.run(main)
So, we’ll use typer to execute the main function. We are doing this because Typer can accept command-line arguments and then pass them to functions as parameters.
Let’s introduce the capitalize parameter in the main() function and make it False by default:
def main(capitalize = False):
    sub_nouns = read_words('sub_nouns.txt')
    ...
    passphrase = ''.join(phrase_words)
    print(passphrase)
According to Python coding best practices, we should specify the parameter type. Place the caret on capitalize and press ⌥Enter/ Alt+Enter. Then select Specify type for the reference using annotation. Type bool, as capitalize should have a Boolean value.
Now, let’s capitalize words before joining them if capitalize is True. Start an if statement with if capitalize:. Let’s do it in a way similar to the one we used when fixing the read_words function, except this time we’ll use a live template instead of writing the list comprehension manually. Type compl and press Enter. Then specify all elements of the list comprehension, and press Tab to move to the next element.
This is what you should get:
def main(capitalize: bool = False):
    sub_nouns = read_words('sub_nouns.txt')
    verbs = read_words('verbs.txt')
    adjectives = read_words('adjectives.txt')
    obj_nouns = read_words('obj_nouns.txt')
    word_bank = [sub_nouns, verbs, adjectives, obj_nouns]
    phrase_words = []
    for word_list in word_bank:
        random_word = random.SystemRandom().choice(word_list)
        phrase_words.append(random_word)
    if capitalize:
        phrase_words = [phrase_word.capitalize() for phrase_word in phrase_words]
    passphrase = ''.join(phrase_words)
    print(passphrase)
To make sure that the capitalization works correctly, we need to pass capitalize as an argument when running main.py. To achieve this, let’s edit the run configuration. Look for the Run widget at the top of the IDE window:
You can use the widget to select the desired run configuration, as well as to launch it in either run or debug mode. PyCharm already created the main configuration when we clicked the gutter icon and launched the script. Click the configuration name to open the menu, and then select Edit configurations:
In the dialog that opens, specify --capitalize in the Parameters field:
Click OK to save the updated configuration. Then click the run icon in the widget.
Here’s the result:
For better readability, we can separate the words in our passphrases. Using special characters as separators will serve a double purpose, as it will let us generate passphrases that comply with specific password complexity requirements.
Edit the second-to-last line of the main() function as follows:
def main(capitalize: bool = False):
    ...
    passphrase = separator.join(phrase_words)
PyCharm highlights separator with a red squiggly line, because the function doesn’t have this parameter yet. Hover the mouse over it and select Create parameter ‘separator’ in the popup. Then specify ‘’ as its default value, because we don’t want to add any separator by default.
Let’s also specify str as the parameter type. Here’s what you should get:
def main(capitalize: bool = False, separator: str = ''):
    ...
    passphrase = separator.join(phrase_words)
    print(passphrase)
Now, you’ll definitely want to check out the result. Don’t forget to update the run configuration first. Click the Run widget, select Edit configurations, and add the new parameter in the Parameters field:
Run the configuration to see the result:
Now you can separate words in your passphrases with special characters and numbers. You can even use several symbols to satisfy the password requirements of various websites, for example “#4” or “%7”.
Make them harder to crack
The longer the passphrase, the more attempts are needed for a successful brute-force attack. Let’s include an extra word in our passphrases.
First, we’ll prepare a fifth word list containing adverbs and put it in the project directory. Add the long parameter of bool type to the signature of the main() function. Depending on this parameter (which is optional and set to False by default), we will add another word list to word_bank:
def main(capitalize: bool = False, separator: str = '', long: bool = False):
    ...
    word_bank = [sub_nouns, verbs, adjectives, obj_nouns]
    if long:
        adverbs = read_words('adverbs.txt')
        word_bank.append(adverbs)
	...
This time, let’s run the script by using the built-in terminal. Press ⌥F12/ Alt+F12 and type the following command in the Terminal tool window that opens:
python main.py --capitalize --separator "1_" --long
You should get something similar to the following:
Prepare the tool for use
Define short option names
If you have used CLI tools before, you know that they usually let the user specify arguments with only one letter. Let’s add this functionality to our tool as well. For better code readability, let’s reformat the function signature, so that each parameter is on a separate line:
def main(
    capitalize: bool = False,
    separator: str = '',
    long: bool = False
):
...
Then replace the default value of each parameter with typer.Option(<default_value>, <long_name>, <short_name>):
Here’s the final signature of main():
def main(
    capitalize: bool = typer.Option(False, '--caps', '-c'),
    separator: str = typer.Option('', '--separator', '-s'),
    long: bool = typer.Option(False, '--long', '-l')
):
...
Now we can specify all options together. The separator (‘-s’) should go last, because it requires a string after it:
Document the options
By default Typer also adds the --help option. Let’s see how it works now:
We can understand which parameters exist and what their long and short names are. How about adding comments to explain what they actually do? Add help for each parameter of main() as follows:
def main(
    capitalize: bool = typer.Option(False, '--caps', '-c', help='Capitalize each word.'),
    separator: str = typer.Option('', '--separator', '-s', help='Separate words with the given symbol.'),
    long: bool = typer.Option(False, '--long', '-l', help='Make the passphrase longer by including an adverb.')
):
...
Now --help produces much more useful information:
You may want to use the passphrase generator without PyCharm, for example in the system terminal. In this case, you should install Typer to your system interpreter by using the following command:
python3 -m pip install --user typer
Summary
In this tutorial, you’ve learned how to:
- Create projects in PyCharm Community Edition.
- Develop user-friendly CLI tools with Python and Typer.
- Use quick-fixes and live templates to write code faster and avoid errors.
- Debug your code.
- Run your code in PyCharm by using run configurations and the terminal.