How To Create a Passphrase Generator in PyCharm

In this tutorial, you will create a passphrase generator in PyCharm. You’ll also learn how to:
- Download PyCharm and create a new project.
- Install and import Python packages.
- Use the Typer library to create command line interfaces in Python.
- Run and debug code in PyCharm.
- Create and edit run configurations.
The purpose of the tutorial is to show how you can develop simple CLI applications for automating your everyday tasks by using the free PyCharm Community Edition. Although you’ll get a working passphrase generator by the end of this tutorial, please consider it merely a learning project. Never use the passwords produced by this generator to protect any real data.
To get the full code, you can clone the repository. For information about cloning, see the PyCharm documentation.
About passphrases
What is a passphrase?
We all use lots of passwords every day. Whenever you sign up for a service or a website, it requires you to create a long and unique password with numbers, special characters, uppercase letters, and so on.
All these requirements are meant to make a password resistant to brute force attacks. A brute force attack is basically making a number of attempts to guess the password until one of them eventually gets it right. How many attempts and how much time is required depends on the password’s length and complexity.
A passphrase is a password consisting of several random words. It doesn’t have to make sense or to be grammatically correct. Passphrases usually contain 4 to 5 words – the more, the better. For example, PhysicianBuiltHotPotatoRegularly is a passphrase.
Why is a passphrase better?
A^1rL#2k2oPiA9H is a good, strong password. It contains lowercase and uppercase letters, numbers, special symbols, and is 15 characters long. But what would you rather memorize, A^1rL#2k2oPiA9H or PhysicianBuiltHotPotatoRegularly? By the way, the latter has 32 characters in it.
Apart from how easy or difficult a password is to memorize, we should also pay attention to how easy or difficult it is to crack. Have a look at the following table:
| A^1rL#2k2oPiA9H | PhysicianBuiltHotPotatoRegularly | |
|---|---|---|
| Symbol set size | 95 | 52 |
| Password length | 15 | 32 |
| Attempts required to crack (?) | 298 | 2182 |
Both are strong, but the passphrase is stronger and much easier to remember. What’s more, if you added a couple of numbers and special characters to the passphrase, that would increase the average number of required guessing attempts to 2210 – virtually impossible to crack!
To sum up:
- Passphrases consisting of random words are easier to memorize than passwords consisting of random characters.
- Passphrases are generally longer than most passwords, which makes them more resistant to brute force attacks and thus more secure.
- Passphrases can be modified to comply with complexity requirements. For example, you can capitalize words to include uppercase letters, or add special characters and numbers as separators between the words.
What is a passphrase generator
In general, a passphrase generator is a program that makes passwords by combining random words into pseudo-sentences. In this tutorial, we will use PyCharm and Typer to develop a command line tool that will do the following:
- Generate a passphrase consisting of 4–5 random words.
- Capitalize words in a passphrase if such an option is selected. By default words aren’t capitalized.
- Use any symbol as a separator for words. By default there are no separators.
- Create longer passphrases by adding the fifth word. The default length is four words.
The tool will NOT store your passwords.
Prerequisites
- Some previous experience with Python.
- PyCharm Community Edition 2023.1 or newer.
- Python (can be downloaded during project creation).
First steps
Write “Hello World” with Typer
When you launch PyCharm for the first time, you’ll see the Welcome screen. Click New Project:
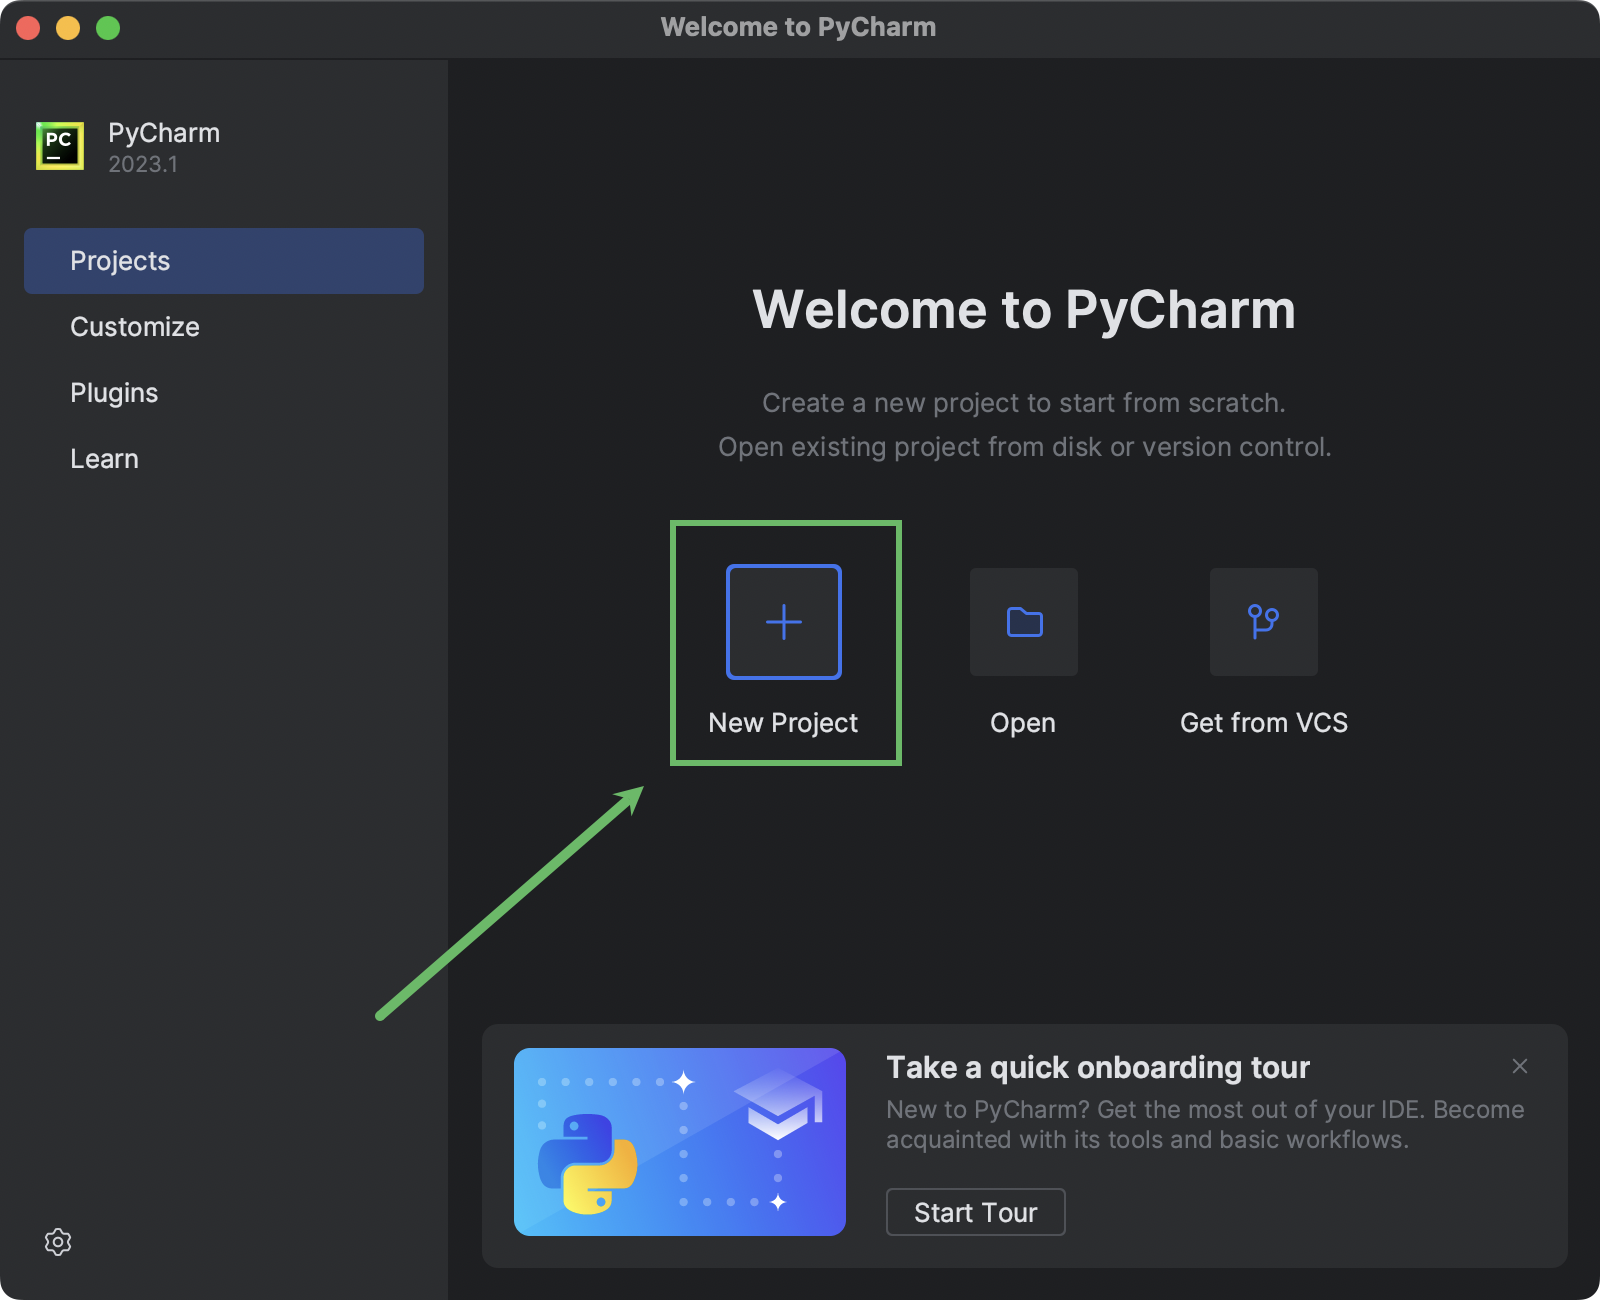
If you already have PyCharm running, select File | New Project from the main menu.
When the New Project window opens, look for the Location field at the top and use it to specify the directory for your project. This will also be used as the project name.
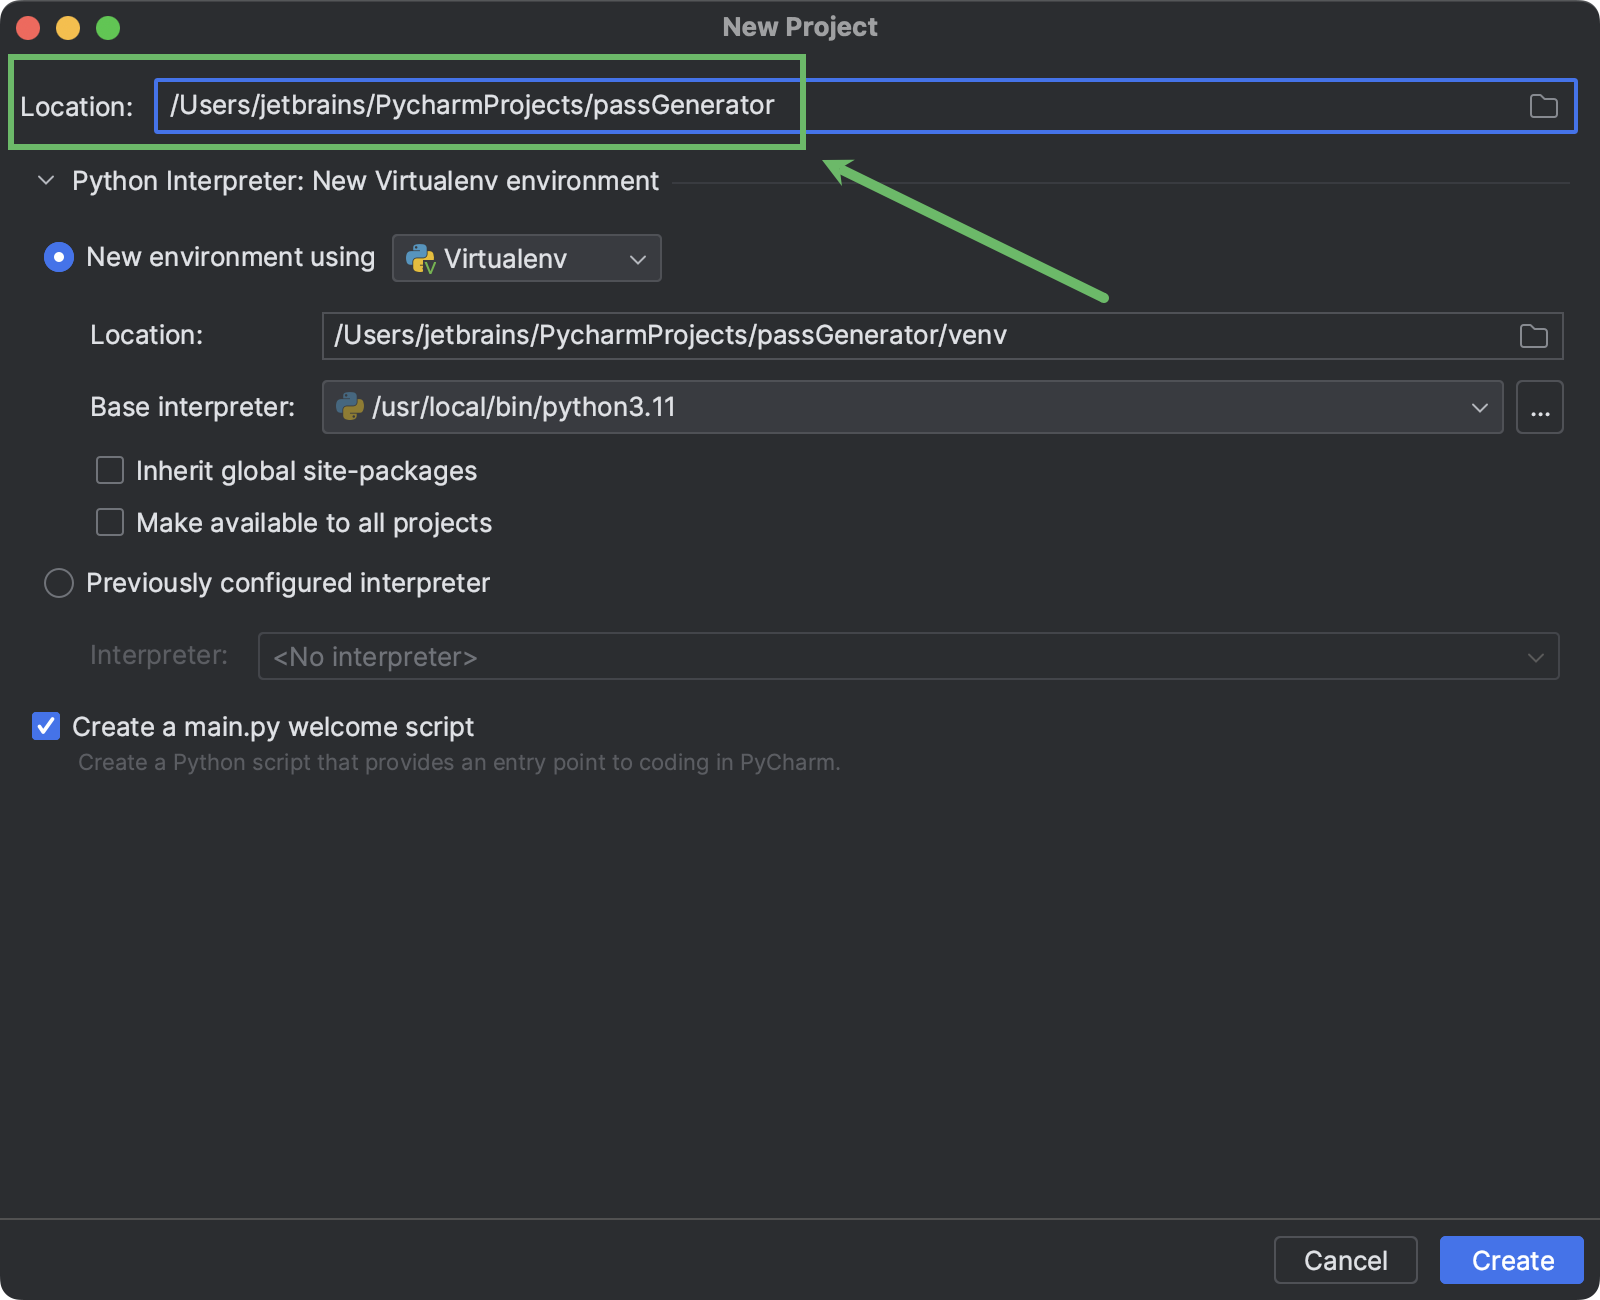
You can choose the type of the virtual environment where PyCharm will install the project dependencies. You can also select the location where the environment will be created, as well as the base Python interpreter.
Choose the preferred environment type and specify the options (or keep the defaults), and then click Create.
PyCharm will create the project directory with the virtual environment in it (venv in our case). If you didn’t clear the Create a main.py welcome script checkbox in the previous step, it will also create main.py and open it in the editor:
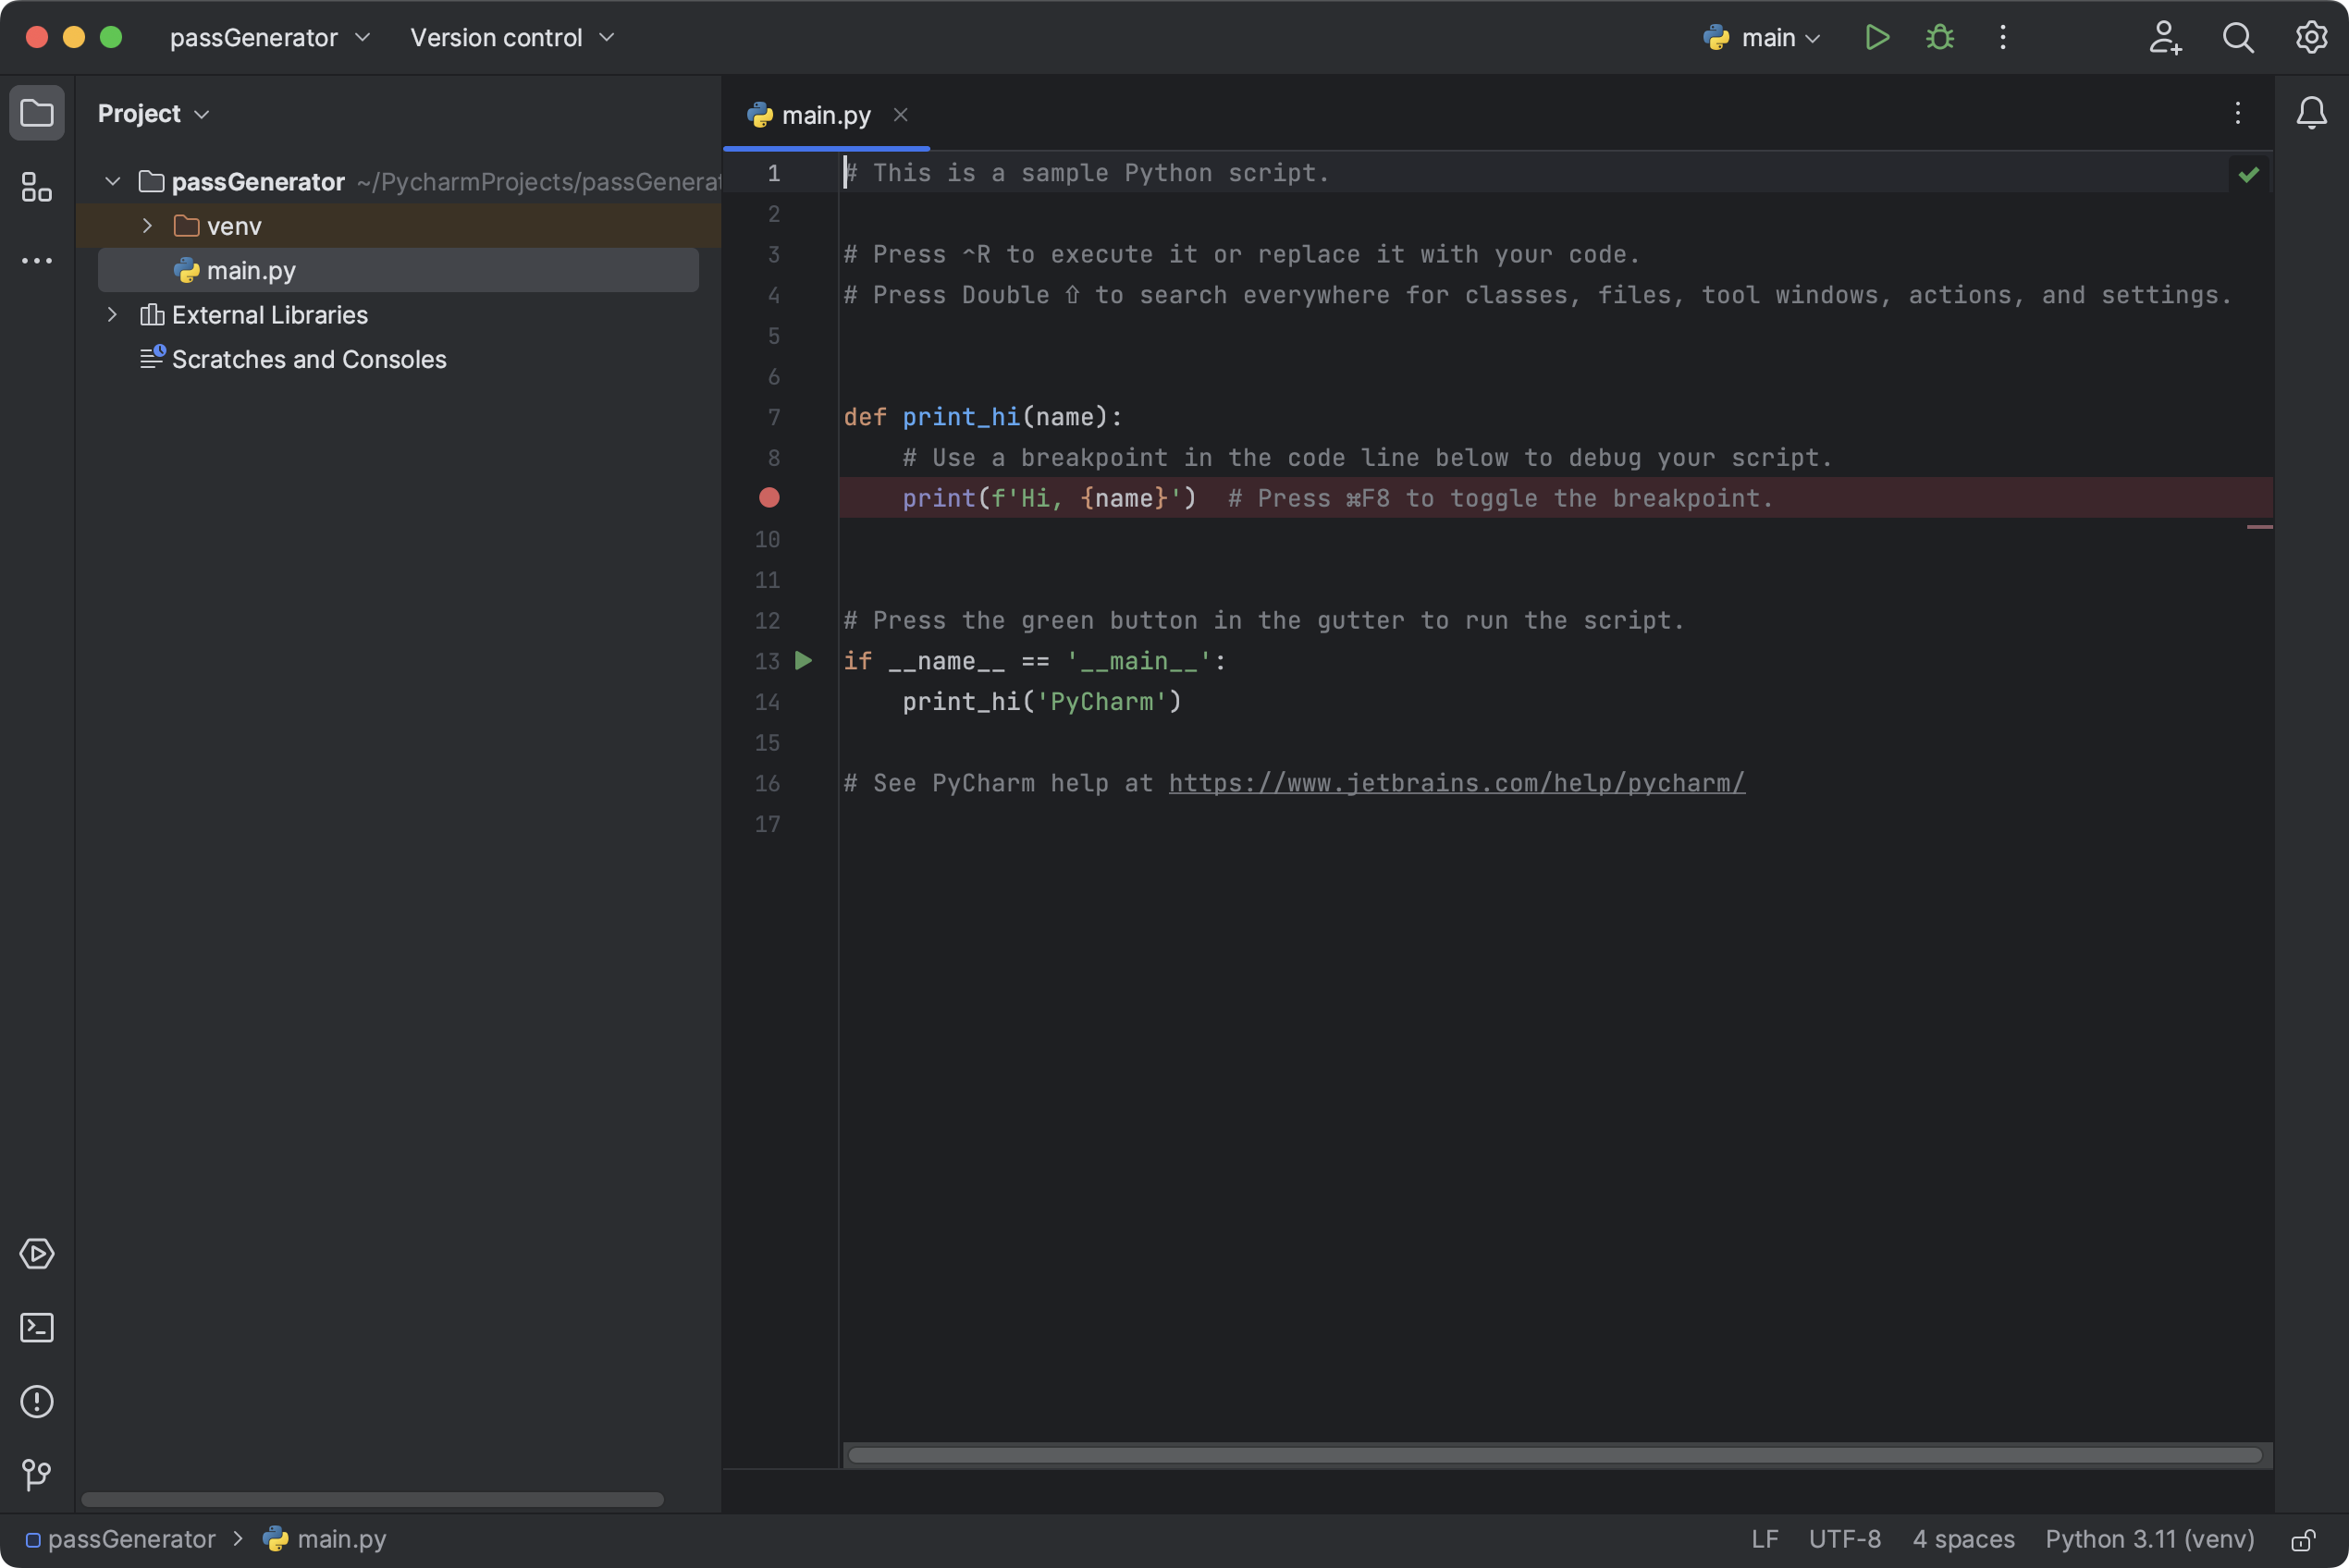
The file contains a “Hello World” script with some basic instructions. Copy the following code to the clipboard:
def main():
    print("Hello World")


if __name__ == "__main__":
    typer.run(main)
Now, go to PyCharm and replace the contents of main.py by pressing ⌘A / Ctrl+A followed by ⌘V / Ctrl+V. You should get the following:
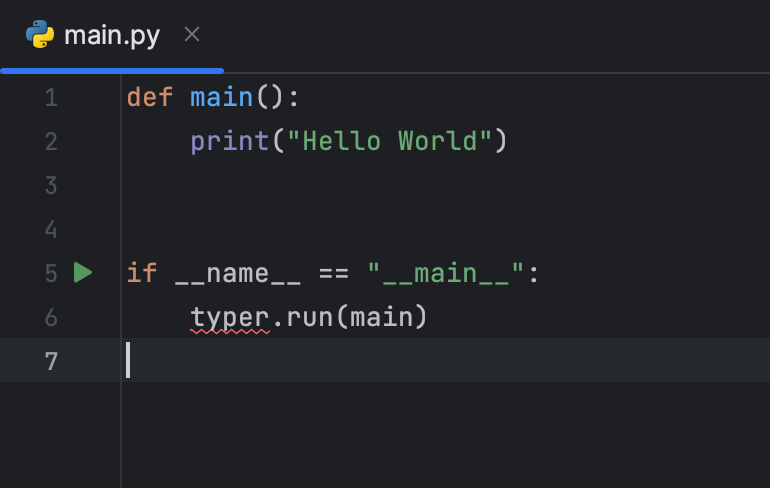
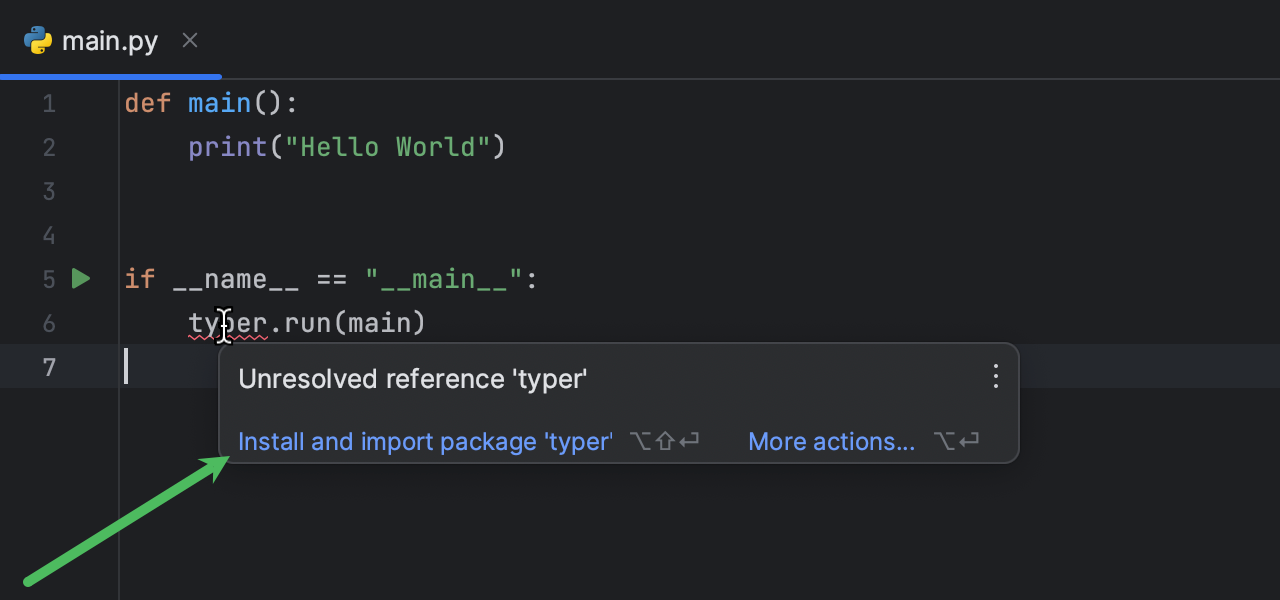
You can see that typer has a red squiggly line underneath it. This means that the Python interpreter doesn’t recognize what Typer is. We need to install this package and import it into main.py to be able to launch the script.
Hover the mouse pointer over the highlighted symbol, and then select Install and import package ‘typer’ in the popup:
PyCharm will install the Typer package into the project environment and import it in main.py.
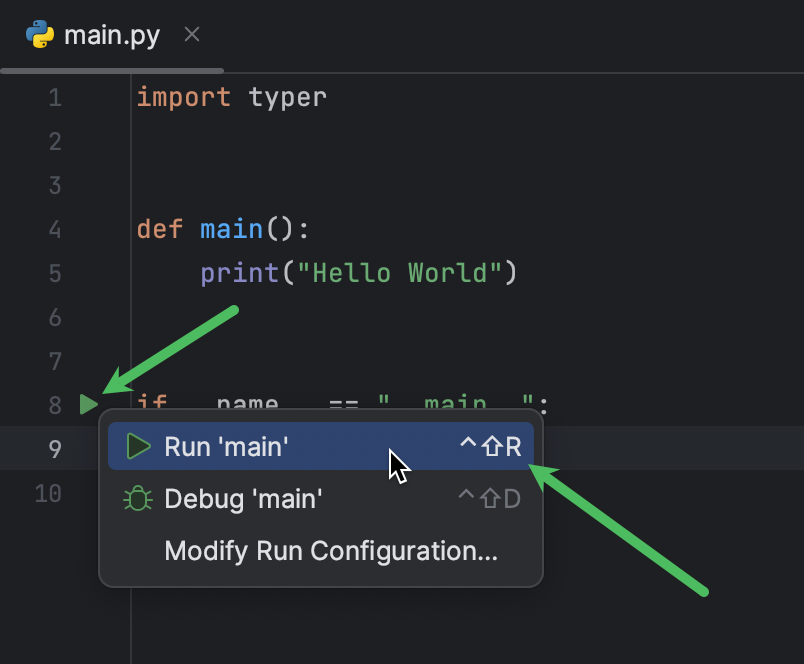
Now we can run the script. Click on the run icon in the gutter and then select Run ‘main’:
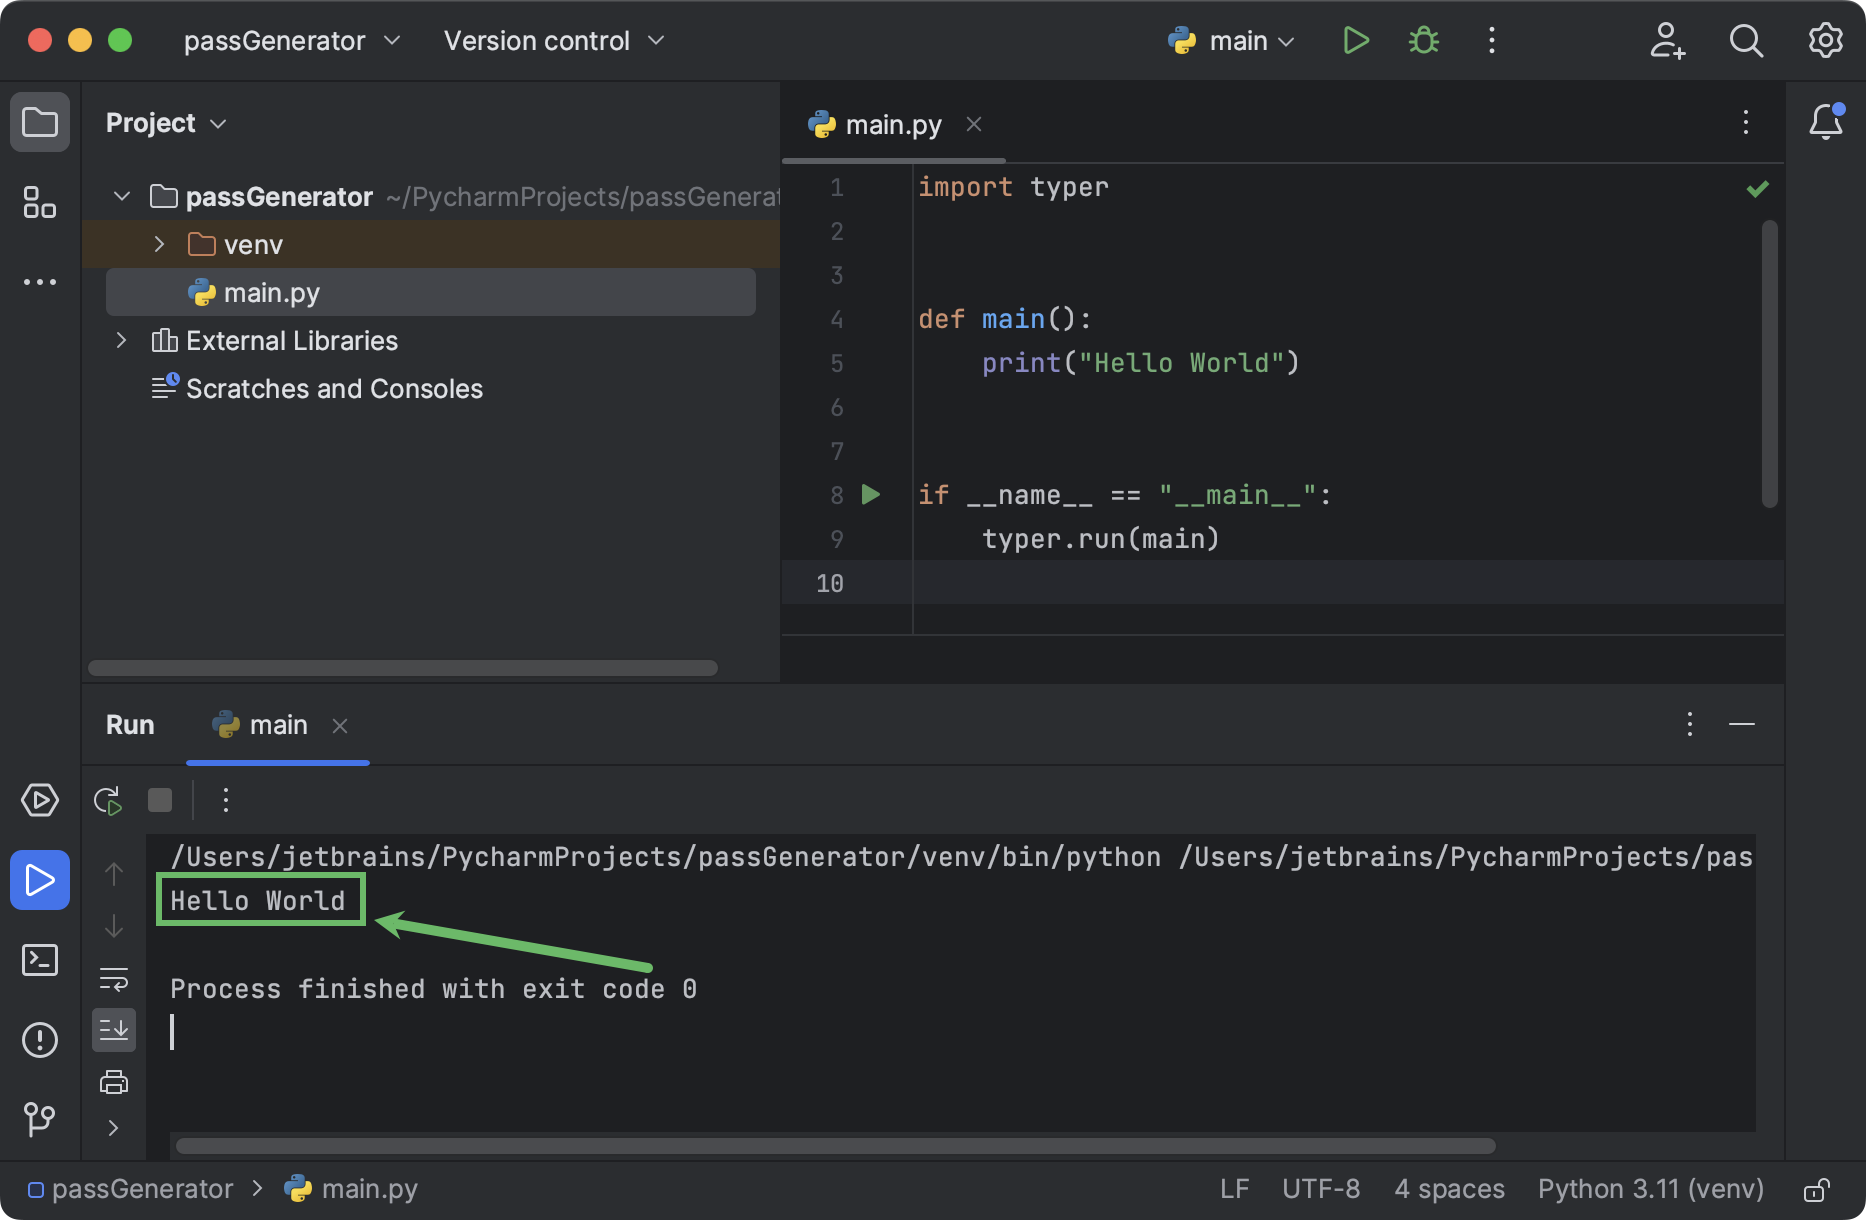
The Run tool window with “Hello World” will open at the bottom:
Generate your first passphrase
Let’s modify the code so that it prints passphrases instead of “Hello World”. The idea is to pick random words and make phrases out of them. That means we’ll need one or more word lists to pick from. You can prepare such lists manually or generate them by using one of the available large language models.
When you create your word lists, make sure to keep them secure. If a malicious actor gets access to your word lists, they will be able to crack your passwords in a matter of seconds.
| Our repo contains word lists along with the full code for this tutorial. You can download and use them only for learning purposes, and at your own risk. Generating real passphrases based on these word lists is strongly discouraged. |
At this step, you’ll need 4 word lists:
- obj_nouns.txt with nouns that will act as objects in our generated pseudo-sentences.
- sub_nouns.txt with nouns that will act as subjects.
- verbs.txt with verbs.
- adjectives.txt with adjectives.
The more words you have in each list, the more combinations the script will be able to generate. Each word should start with a new line.
Copy the generated or downloaded word lists to the project directory. If you want to create the word lists manually, you can do that in PyCharm:
- Click the project directory in the Project tool window, and then press ⌘N / Ctrl+N.
- Select File and then specify the file name, such as obj_nouns.txt.
- PyCharm will create the file and open it in the editor.
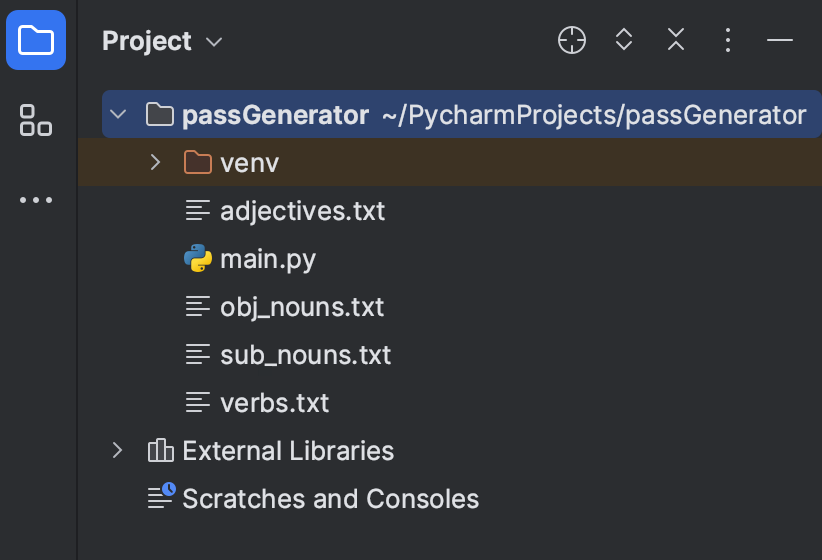
This is what the project structure should look like:
First of all, we need to read the words from the text files. Replace print("Hello World") with the following code:
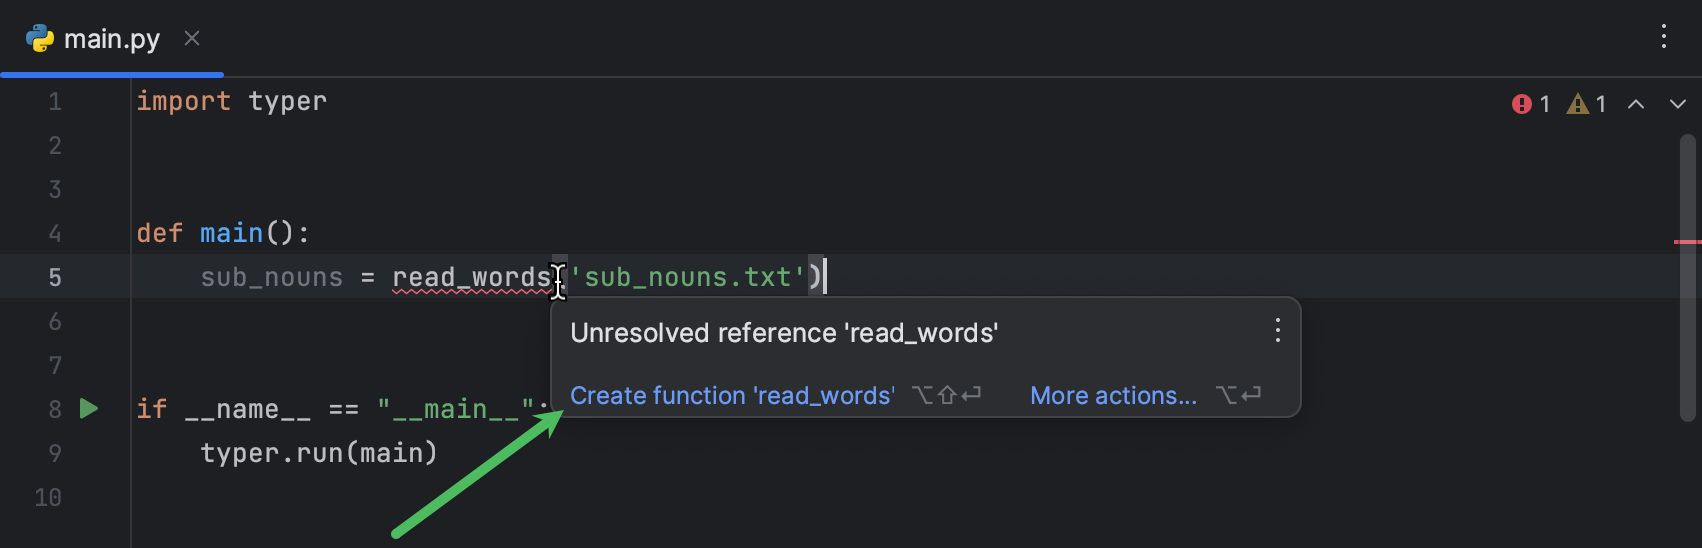
sub_nouns = read_words('sub_nouns.txt')
Again, read_words has a red squiggly line underneath it. We need to create this function. Hover the mouse over read_words and then click on Create function ‘read_words’ in the popup:
PyCharm will create a function stub. Specify file_name as the function parameter, and then press Tab to start writing the function code:

You can copy the highlighted code into the function body:
def read_words(file_name):
    with open(file_name, 'r') as f:
        words = f.readlines()
    return words
The function opens the file whose name is provided in its parameter. Then it applies the readlines() method, which returns a Python list containing the lines of the file as its elements. That list is saved to the words variable and returned by the function.
Let’s go back to the main() function and use the newly created read_words function to read the other 3 word lists:
def main():
    sub_nouns = read_words('sub_nouns.txt')
    verbs = read_words('verbs.txt')
    adjectives = read_words('adjectives.txt')
    obj_nouns = read_words('obj_nouns.txt')
Now, let’s create a list of word lists and call it word_bank. Later we will iterate through it when picking random words for the passphrase:
word_bank = [sub_nouns, verbs, adjectives, obj_nouns]
The selected random words will be saved into yet another list. Let’s call it phrase_words and initialize it:
phrase_words = []
In the following for cycle, we iterate through the items of word_bank. Each item in word_bank is a list with words. We call the choice() method of the SystemRandom() class from the built-in random module to select a random word from the list. Then we append the selected word to phrase_words:
    for word_list in word_bank:
        random_word = random.SystemRandom().choice(word_list)
        phrase_words.append(random_word)
Although random is a built-in module, we still need to import it. Like before, you can tell that by the red squiggly line in the editor. Hover the mouse over it and select Import this name.
Finally, let’s use join to turn the list with randomly selected words into a phrase and print the result:
    passphrase = ''.join(phrase_words)
    print(passphrase)
Here’s what main() should look like at this stage:
def main():
    sub_nouns = read_words('sub_nouns.txt')
    verbs = read_words('verbs.txt')
    adjectives = read_words('adjectives.txt')
    obj_nouns = read_words('obj_nouns.txt')
    word_bank = [sub_nouns, verbs, adjectives, obj_nouns]
    phrase_words = []
    for word_list in word_bank:
        random_word = random.SystemRandom().choice(word_list)
        phrase_words.append(random_word)
    passphrase = ''.join(phrase_words)
    print(passphrase)
Now we can run the script to check that it works correctly. Click the Run icon in the gutter and select Run ‘main’, and this is what you should get:
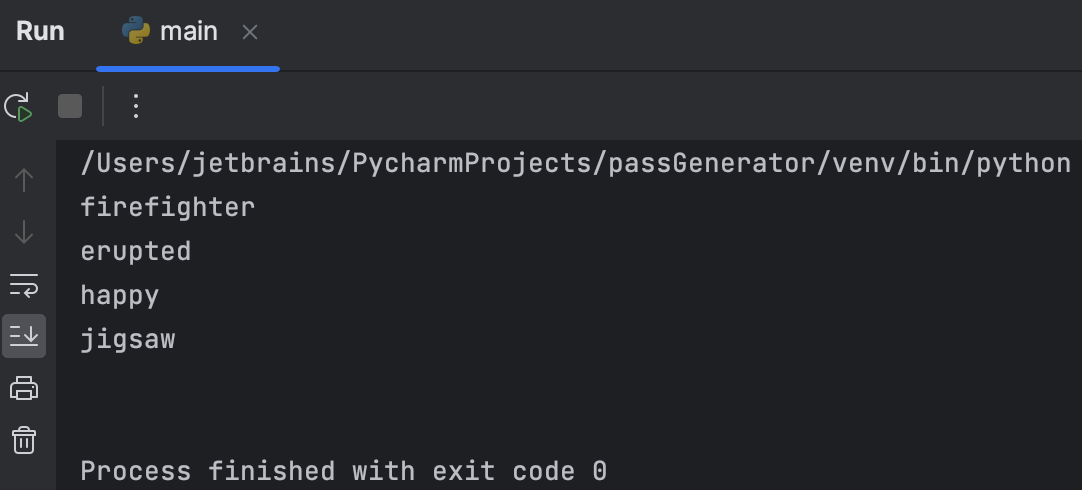
OK, there are 4 words, but it’s definitely not a phrase. When code generally works but produces unexpected results, it needs to be debugged.
As we can see from the current output, the script successfully selected random words from the word lists. What it didn’t do was combine the words into one phrase. The second-to-last line of main() appears to be the likely culprit:
def main():
    ...
    passphrase = ''.join(phrase_words)
    print(passphrase)
To see what a specific line of code produces, we should put a breakpoint on that line. The debugger will then stop just before executing the line with the breakpoint. To set a breakpoint, click the gutter next to the line we are interested in checking:
To start the debugging process, click the Run icon in the gutter, like you’ve done before, but this time, select Debug ‘main’ in the popup. The debugger will start and then stop execution at the breakpoint, opening the Debug tool window at the bottom:
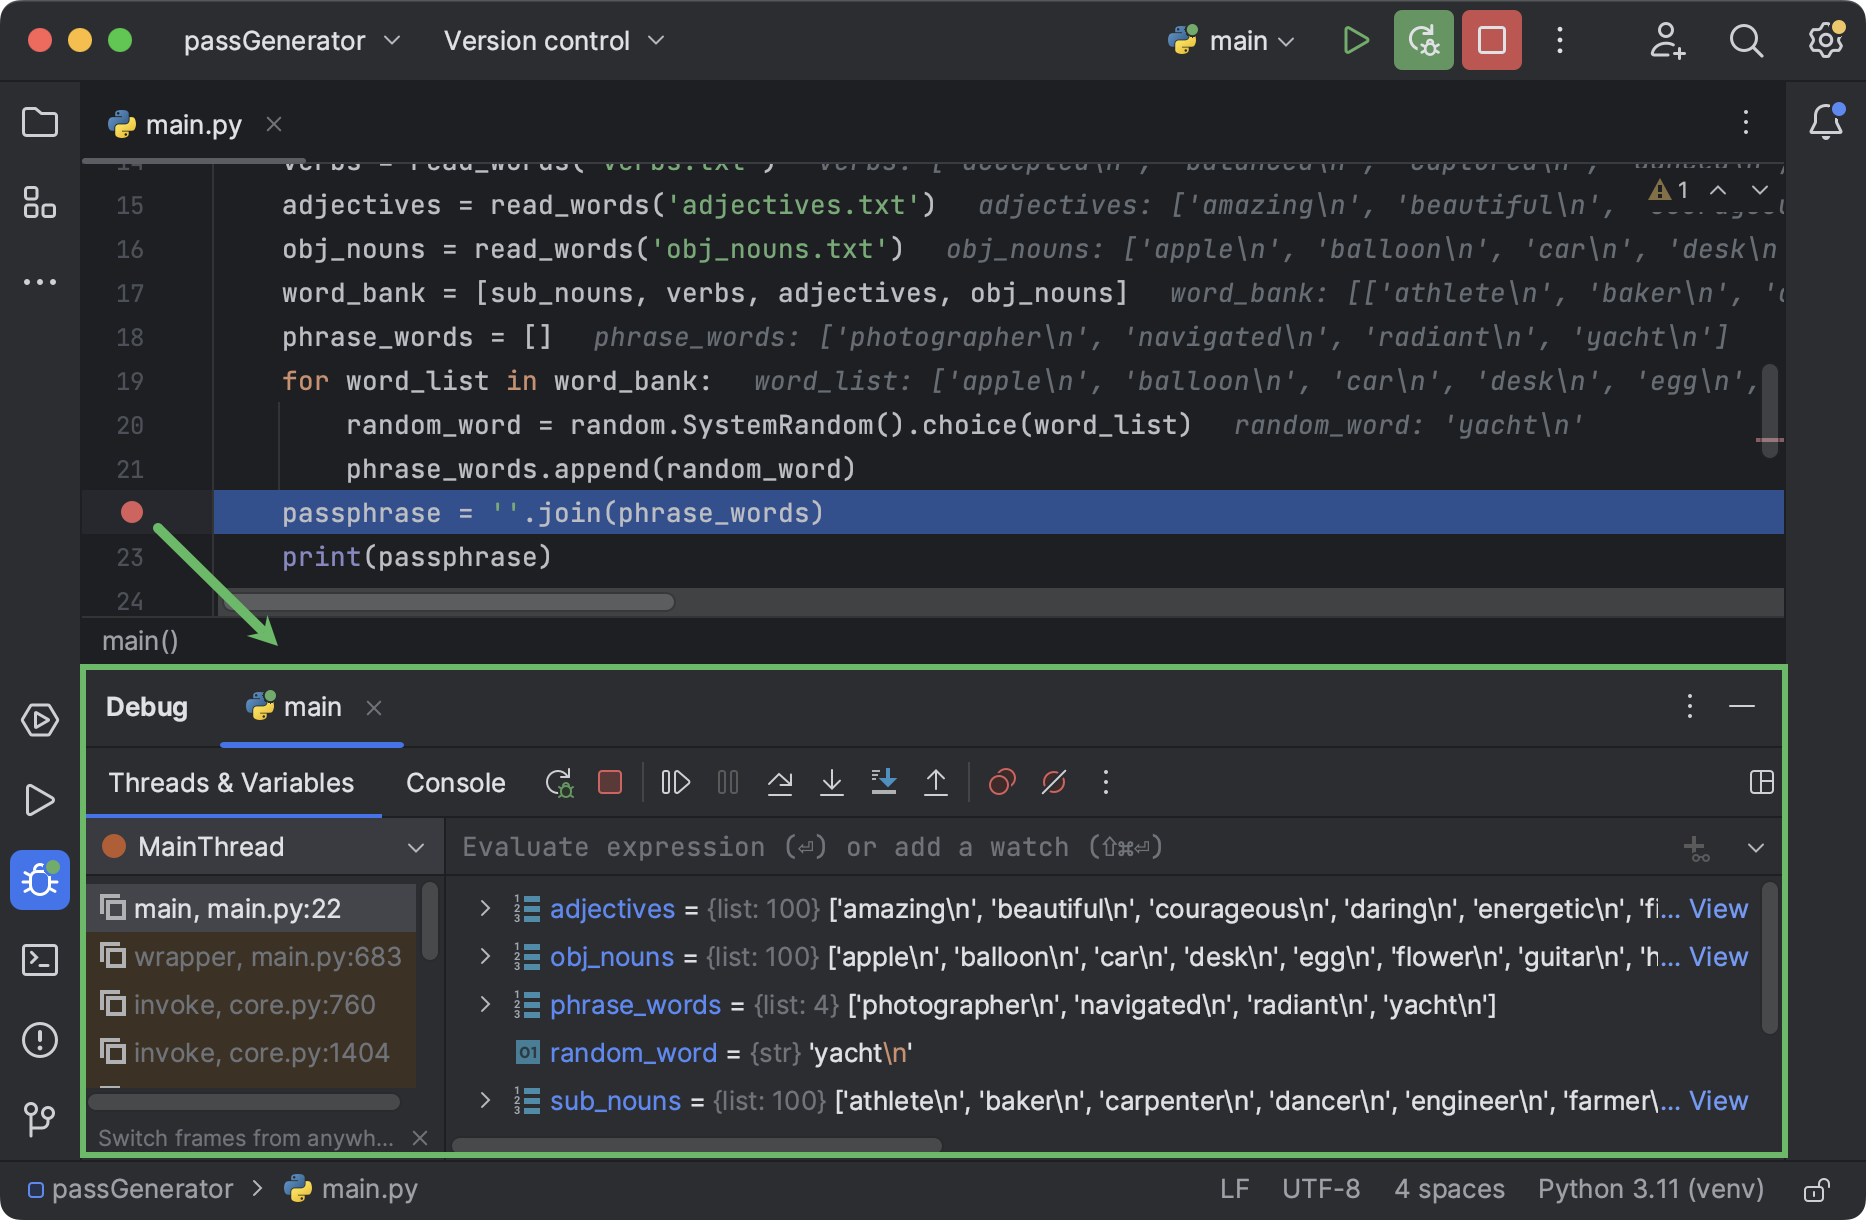
In the right-hand pane of the Debug tool window, you can see the variables that have been assigned so far. Expand phrase_words to see what’s inside:
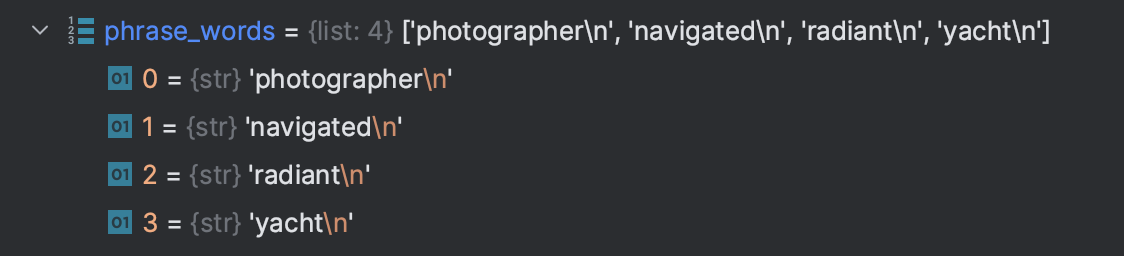
There are 4 items of type str in the list. Each string ends with a new line (‘\n’). That’s why, when we later join these strings together and print them, each word is printed on a separate line.
If you have a look at the other lists, for example, adjectives, you’ll notice that all items in them also end with ‘\n’. We get these lists from the read_words function. That means we need to fix it so that it returns a list of words without a trailing ‘\n’.
Let’s use strip() and list comprehension to get rid of ‘\n’ in each list item before returning it:
def read_words(file_name):
    with open(file_name, 'r') as f:
        words = f.readlines()
        words = [word.strip() for word in words]
    return words
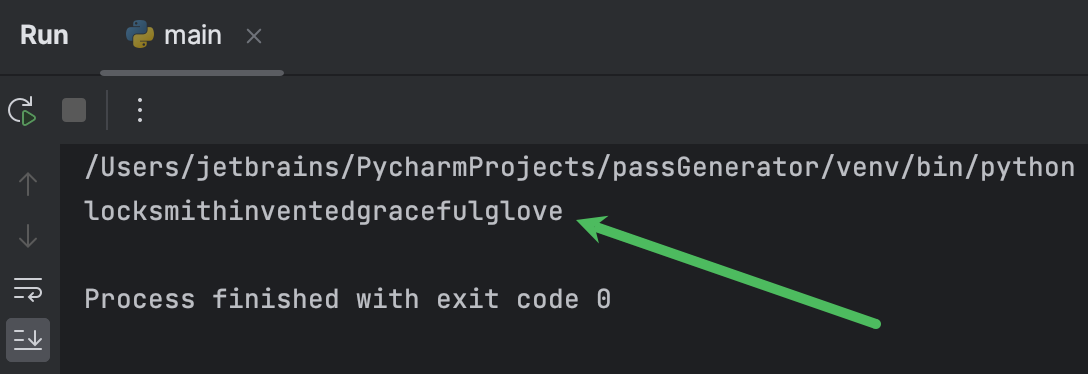
Rerun main() and enjoy the result:
Create better passphrases
Make them easier to memorize
As you may have noticed, the passphrase generated in the previous step is a little hard to read. What about capitalizing each word to improve readability?
We are using Typer in this application because we don’t want to just run the script and get a passphrase. We need to create a command line interface, so that we can pass various options to the script and thus control the properties of the resulting passphrase. One such option is capitalizing the words.
When we run main.py, the following line is executed:
...
if __name__ == "__main__":
    typer.run(main)
So, we’ll use typer to execute the main function. We are doing this because Typer can accept command-line arguments and then pass them to functions as parameters.
Let’s introduce the capitalize parameter in the main() function and make it False by default:
def main(capitalize = False):
    sub_nouns = read_words('sub_nouns.txt')
    ...
    passphrase = ''.join(phrase_words)
    print(passphrase)
According to Python coding best practices, we should specify the parameter type. Place the caret on capitalize and press ⌥Enter/ Alt+Enter. Then select Specify type for the reference using annotation. Type bool, as capitalize should have a Boolean value.
Now, let’s capitalize words before joining them if capitalize is True. Start an if statement with if capitalize:. Let’s do it in a way similar to the one we used when fixing the read_words function, except this time we’ll use a live template instead of writing the list comprehension manually. Type compl and press Enter. Then specify all elements of the list comprehension, and press Tab to move to the next element.
This is what you should get:
def main(capitalize: bool = False):
    sub_nouns = read_words('sub_nouns.txt')
    verbs = read_words('verbs.txt')
    adjectives = read_words('adjectives.txt')
    obj_nouns = read_words('obj_nouns.txt')
    word_bank = [sub_nouns, verbs, adjectives, obj_nouns]
    phrase_words = []
    for word_list in word_bank:
        random_word = random.SystemRandom().choice(word_list)
        phrase_words.append(random_word)
    if capitalize:
        phrase_words = [phrase_word.capitalize() for phrase_word in phrase_words]
    passphrase = ''.join(phrase_words)
    print(passphrase)
To make sure that the capitalization works correctly, we need to pass capitalize as an argument when running main.py. To achieve this, let’s edit the run configuration. Look for the Run widget at the top of the IDE window:
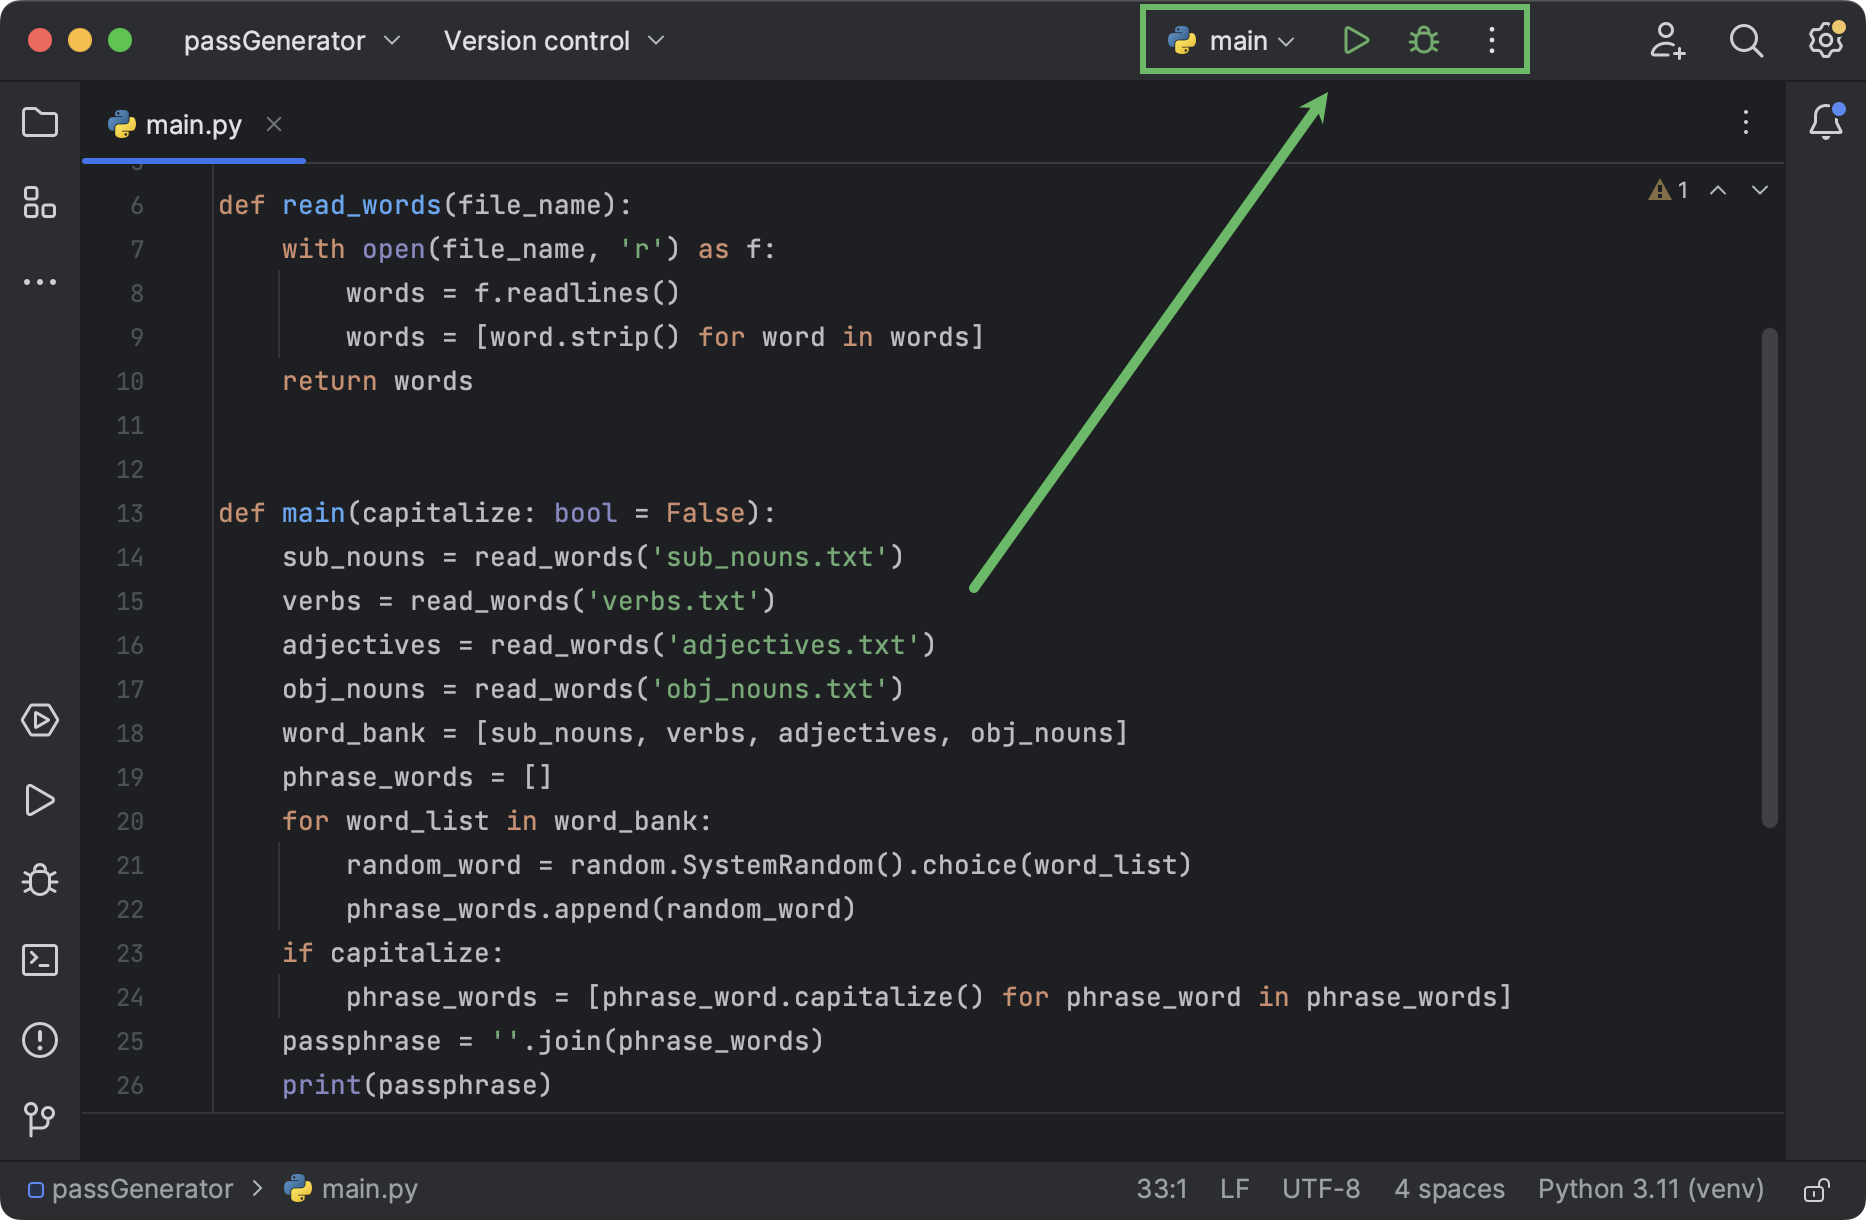
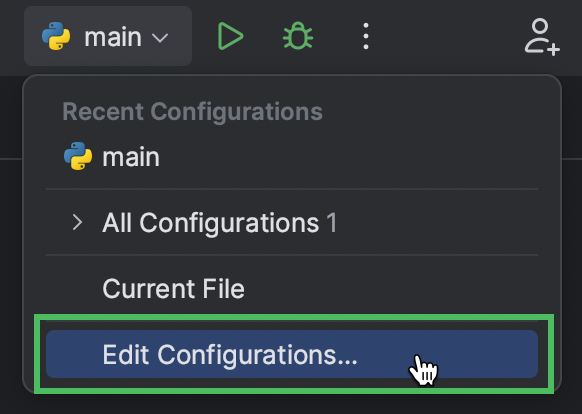
You can use the widget to select the desired run configuration, as well as to launch it in either run or debug mode. PyCharm already created the main configuration when we clicked the gutter icon and launched the script. Click the configuration name to open the menu, and then select Edit configurations:
In the dialog that opens, specify --capitalize in the Parameters field:
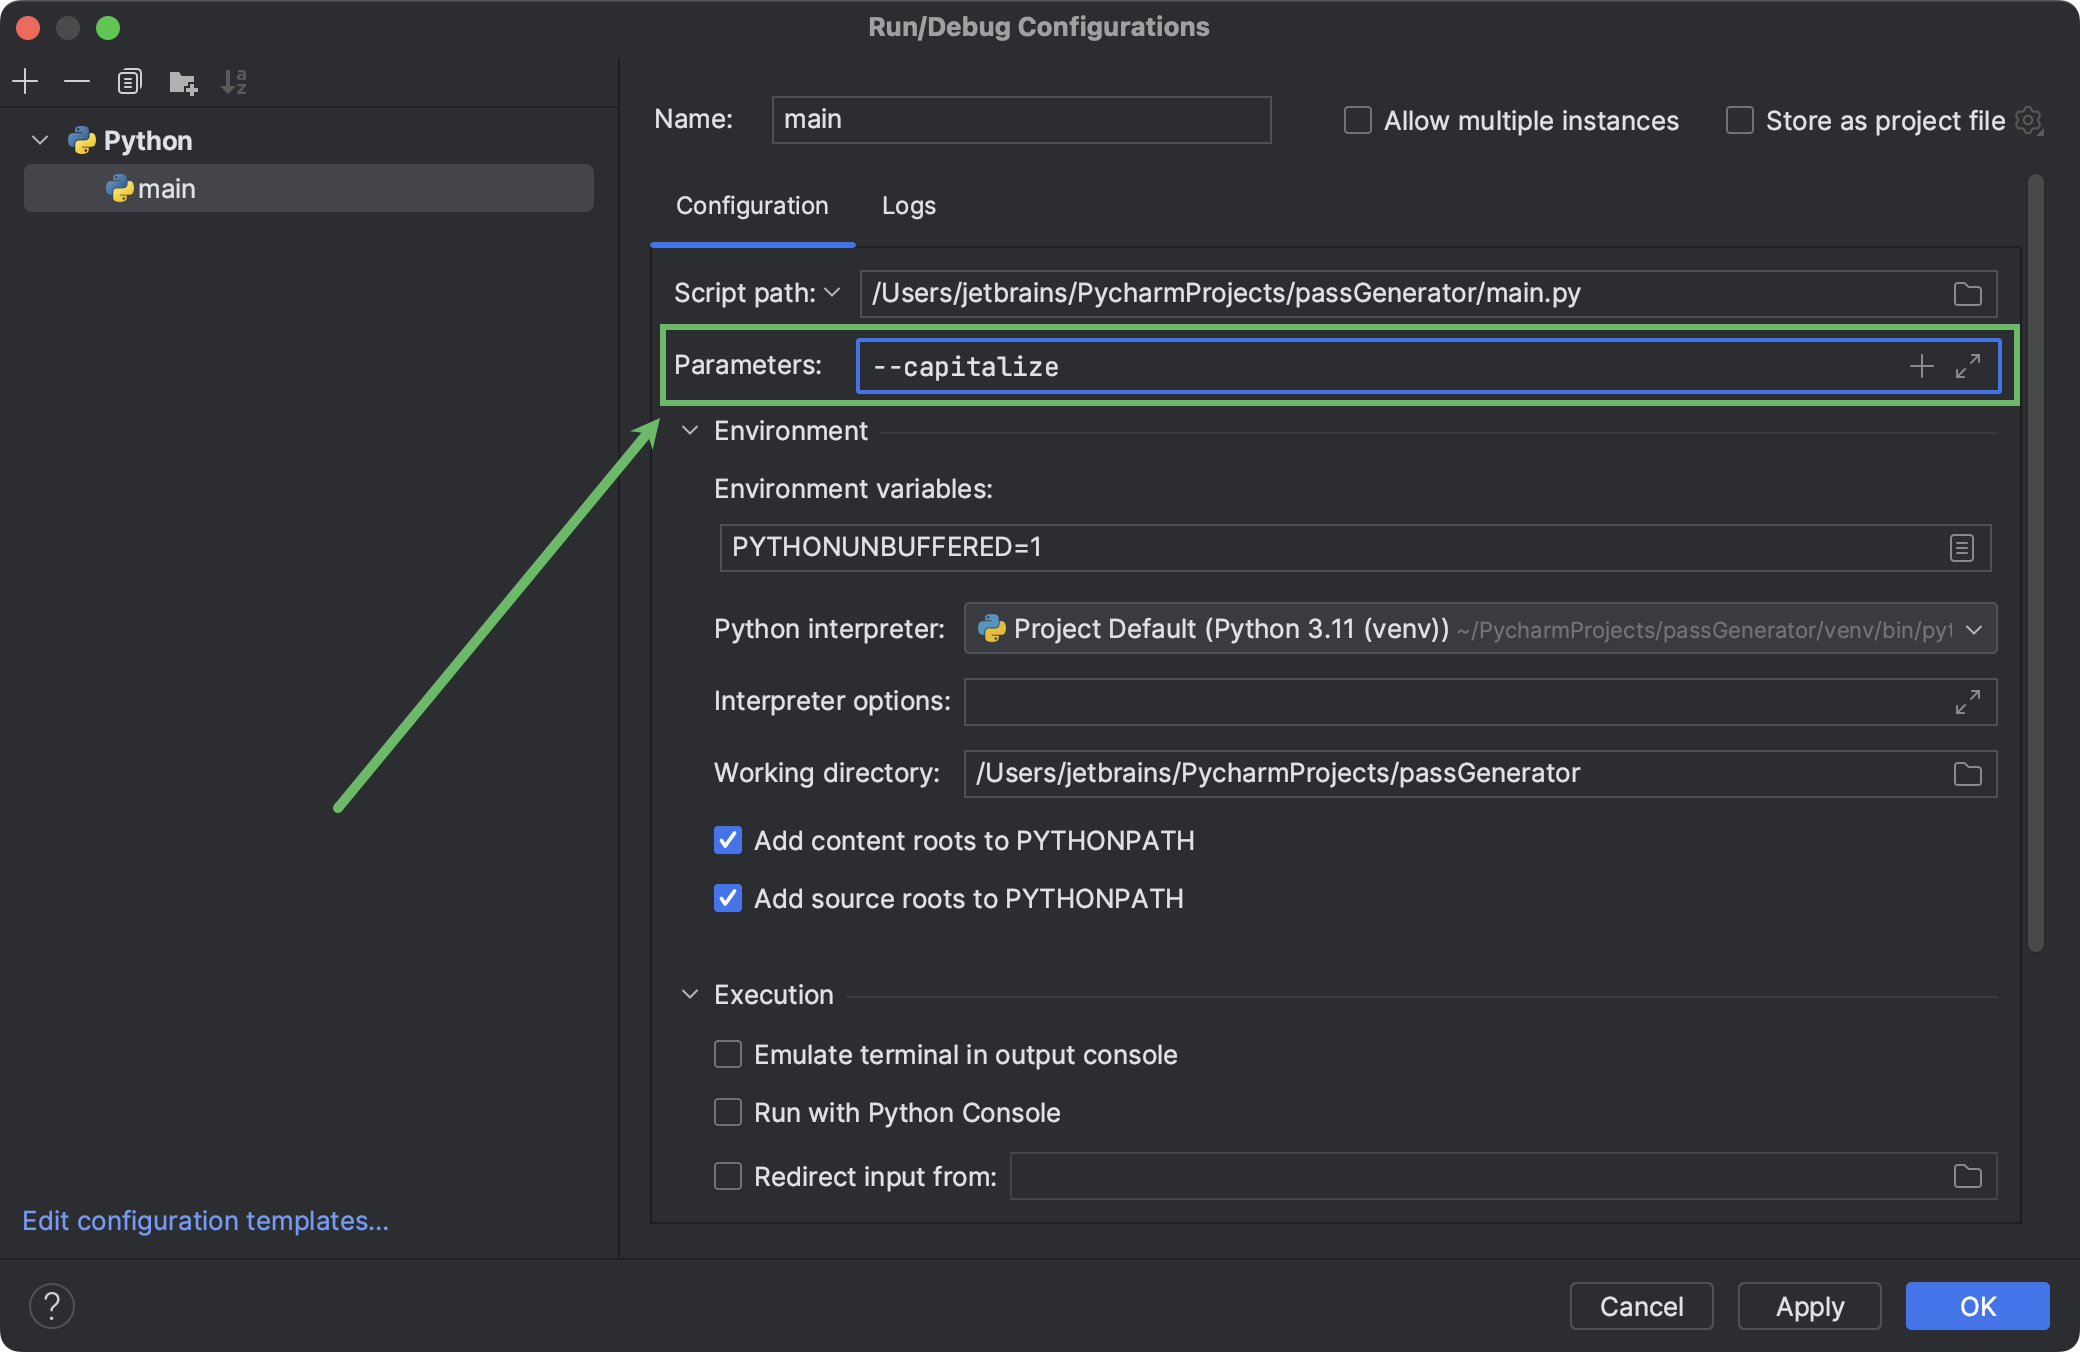
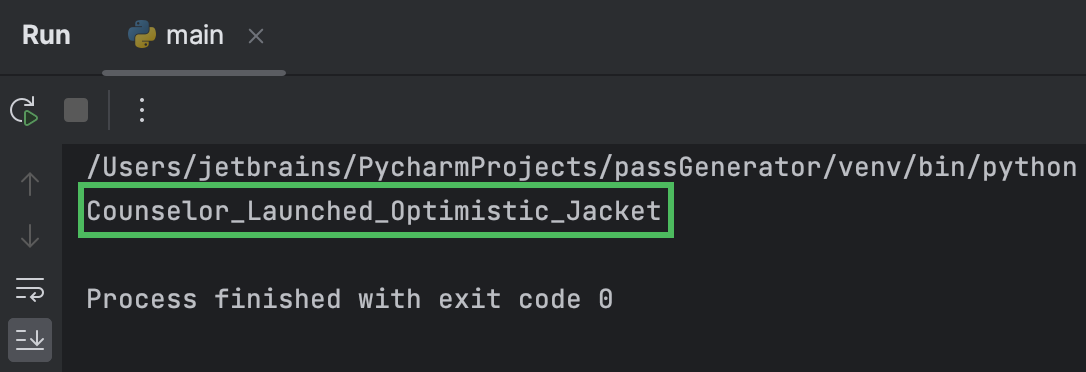
Click OK to save the updated configuration. Then click the run icon in the widget.
Here’s the result:

For better readability, we can separate the words in our passphrases. Using special characters as separators will serve a double purpose, as it will let us generate passphrases that comply with specific password complexity requirements.
Edit the second-to-last line of the main() function as follows:
def main(capitalize: bool = False):
    ...
    passphrase = separator.join(phrase_words)
PyCharm highlights separator with a red squiggly line, because the function doesn’t have this parameter yet. Hover the mouse over it and select Create parameter ‘separator’ in the popup. Then specify ‘’ as its default value, because we don’t want to add any separator by default.
Let’s also specify str as the parameter type. Here’s what you should get:
def main(capitalize: bool = False, separator: str = ''):
    ...
    passphrase = separator.join(phrase_words)
    print(passphrase)
Now, you’ll definitely want to check out the result. Don’t forget to update the run configuration first. Click the Run widget, select Edit configurations, and add the new parameter in the Parameters field:
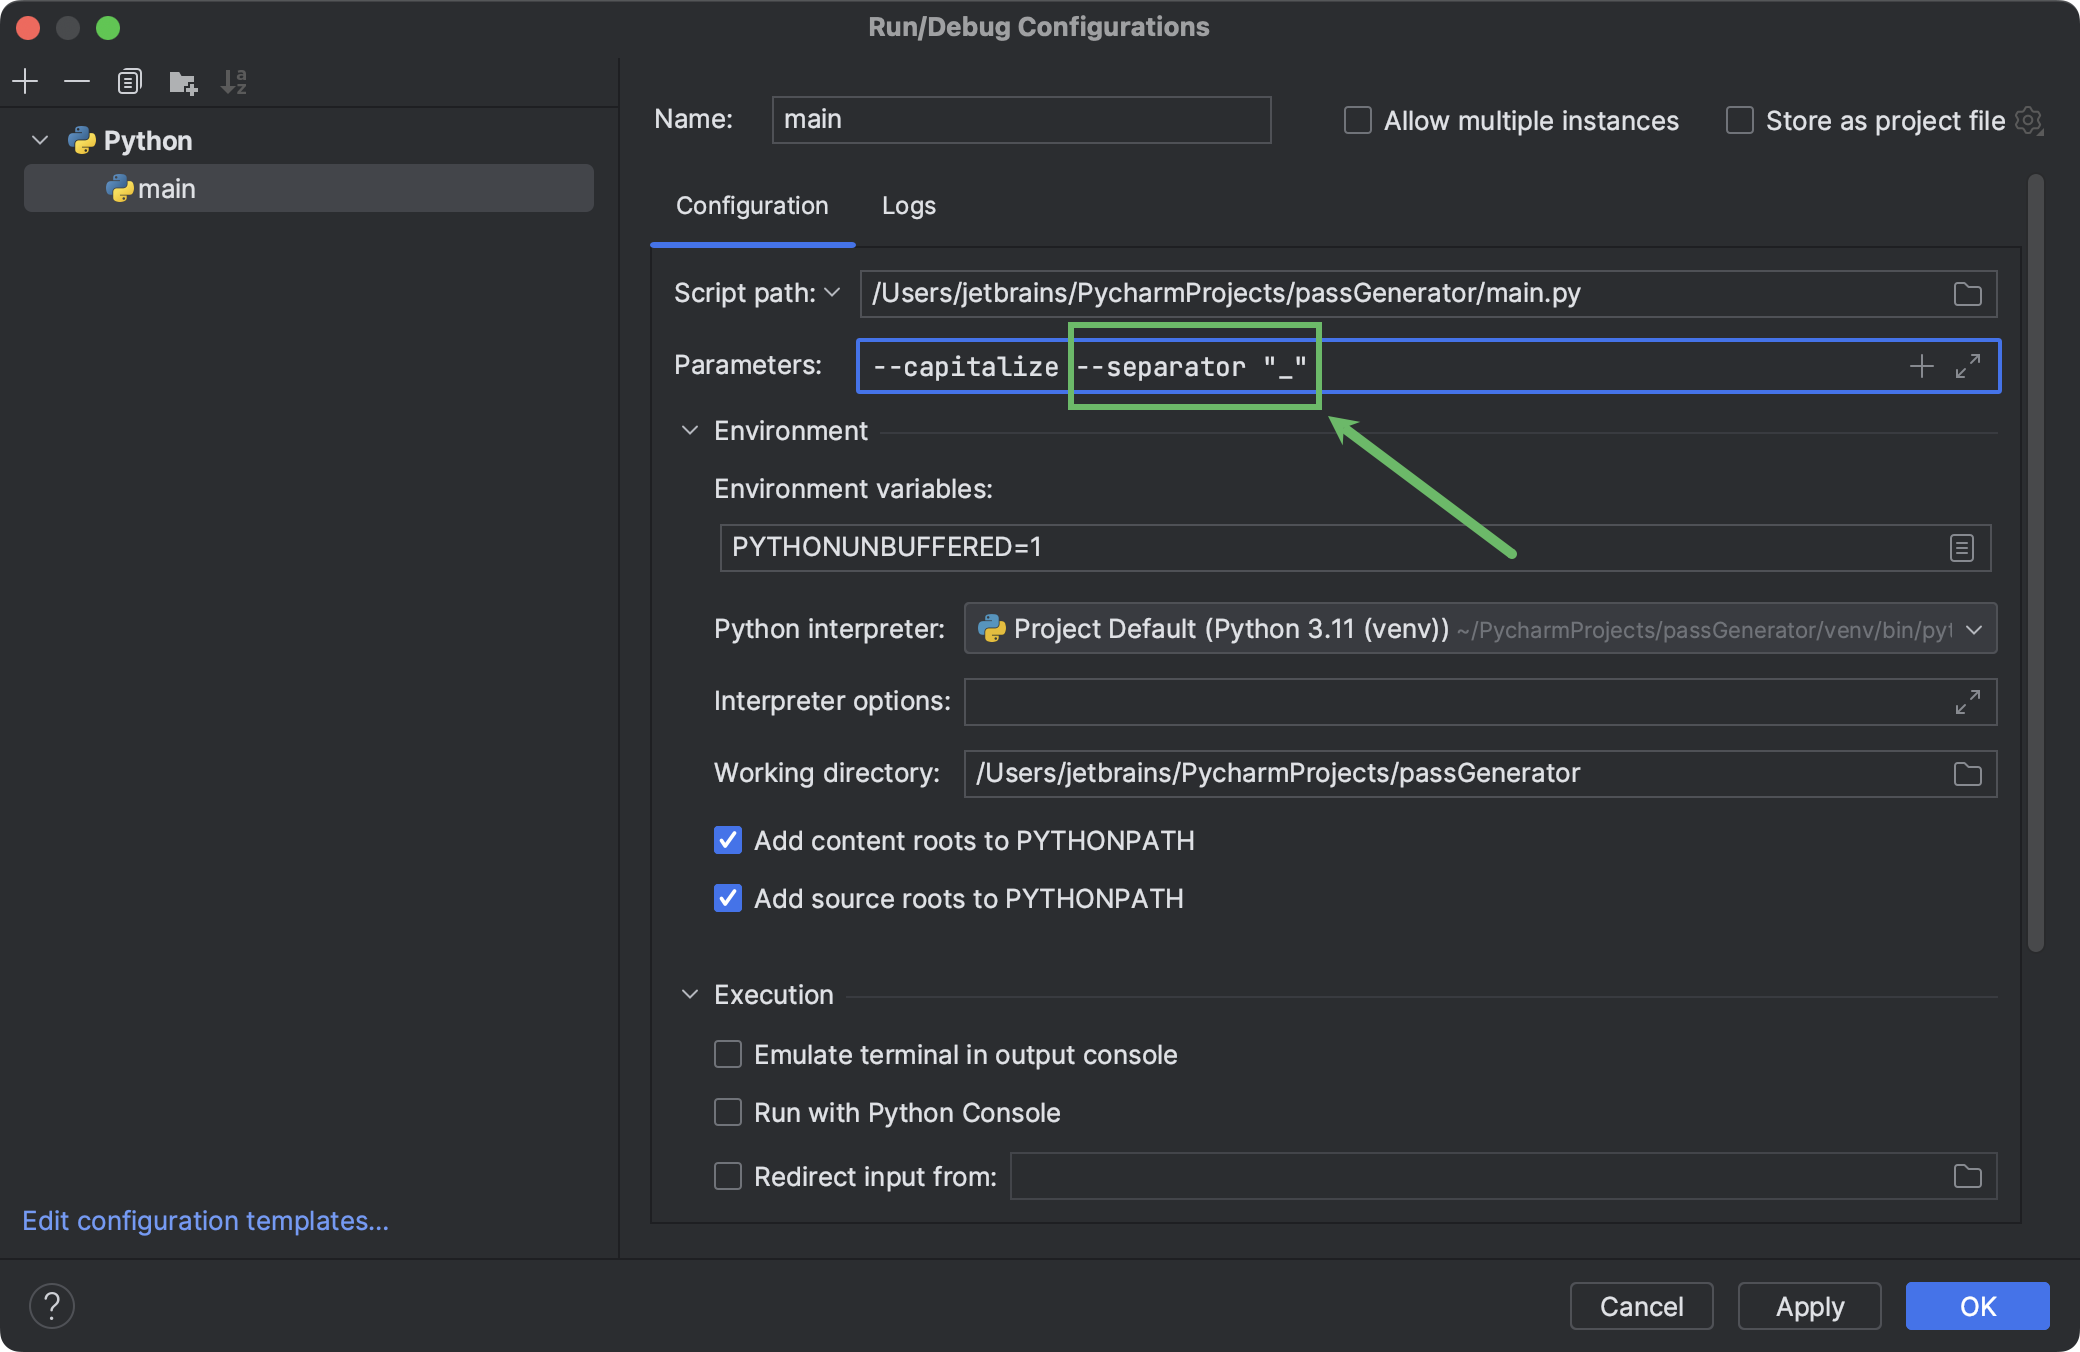
Run the configuration to see the result:
Now you can separate words in your passphrases with special characters and numbers. You can even use several symbols to satisfy the password requirements of various websites, for example “#4” or “%7”.
Make them harder to crack
The longer the passphrase, the more attempts are needed for a successful brute-force attack. Let’s include an extra word in our passphrases.
First, we’ll prepare a fifth word list containing adverbs and put it in the project directory. Add the long parameter of bool type to the signature of the main() function. Depending on this parameter (which is optional and set to False by default), we will add another word list to word_bank:
def main(capitalize: bool = False, separator: str = '', long: bool = False):
    ...
    word_bank = [sub_nouns, verbs, adjectives, obj_nouns]
    if long:
        adverbs = read_words('adverbs.txt')
        word_bank.append(adverbs)
	...
This time, let’s run the script by using the built-in terminal. Press ⌥F12/ Alt+F12 and type the following command in the Terminal tool window that opens:
python main.py --capitalize --separator "1_" --long
You should get something similar to the following:

Prepare the tool for use
Define short option names
If you have used CLI tools before, you know that they usually let the user specify arguments with only one letter. Let’s add this functionality to our tool as well. For better code readability, let’s reformat the function signature, so that each parameter is on a separate line:
def main(
    capitalize: bool = False,
    separator: str = '',
    long: bool = False
):
...
Then replace the default value of each parameter with typer.Option(<default_value>, <long_name>, <short_name>):
Here’s the final signature of main():
def main(
    capitalize: bool = typer.Option(False, '--caps', '-c'),
    separator: str = typer.Option('', '--separator', '-s'),
    long: bool = typer.Option(False, '--long', '-l')
):
...
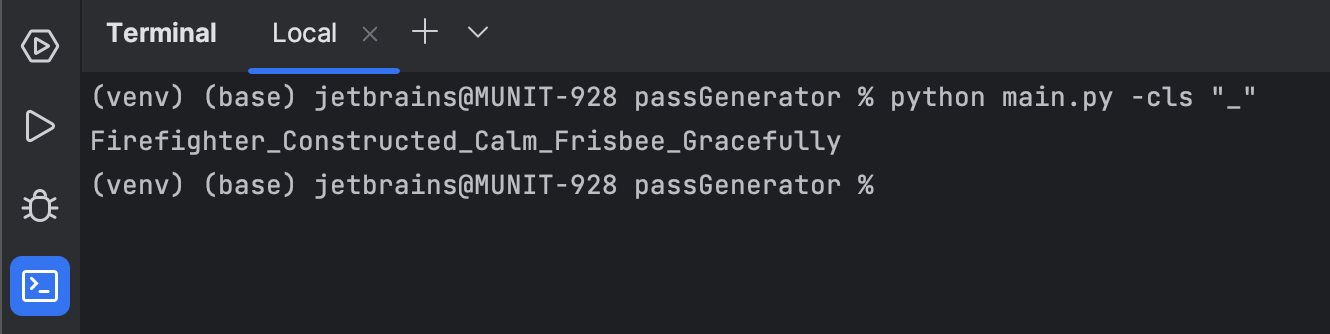
Now we can specify all options together. The separator (‘-s’) should go last, because it requires a string after it:
Document the options
By default Typer also adds the --help option. Let’s see how it works now:
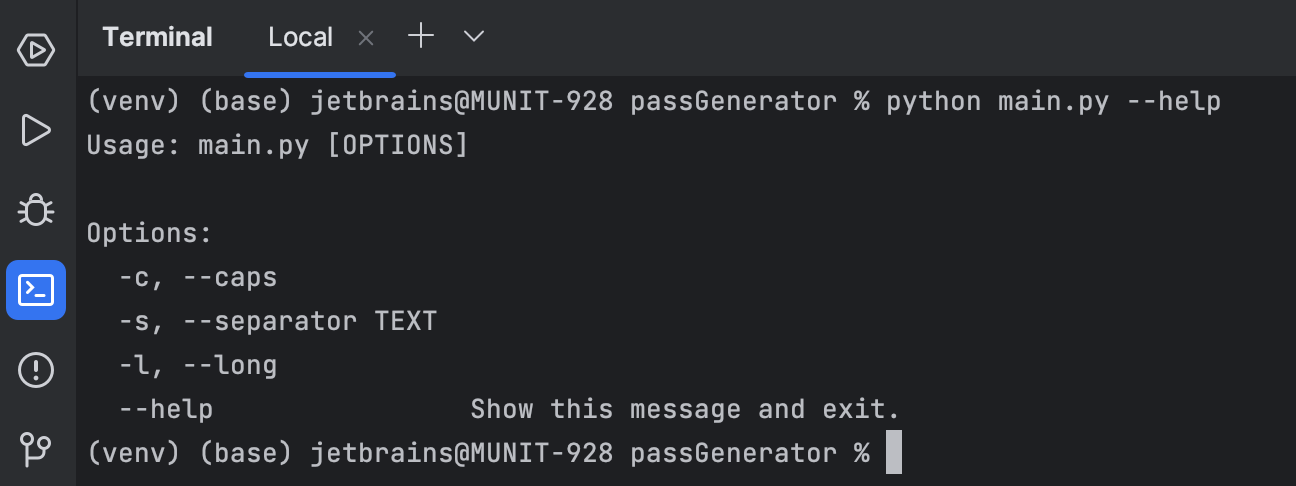
We can understand which parameters exist and what their long and short names are. How about adding comments to explain what they actually do? Add help for each parameter of main() as follows:
def main(
capitalize: bool = typer.Option(False, '--caps', '-c', help='Capitalize each word.'),
separator: str = typer.Option('', '--separator', '-s', help='Separate words with the given symbol.'),
long: bool = typer.Option(False, '--long', '-l', help='Make the passphrase longer by including an adverb.')
):
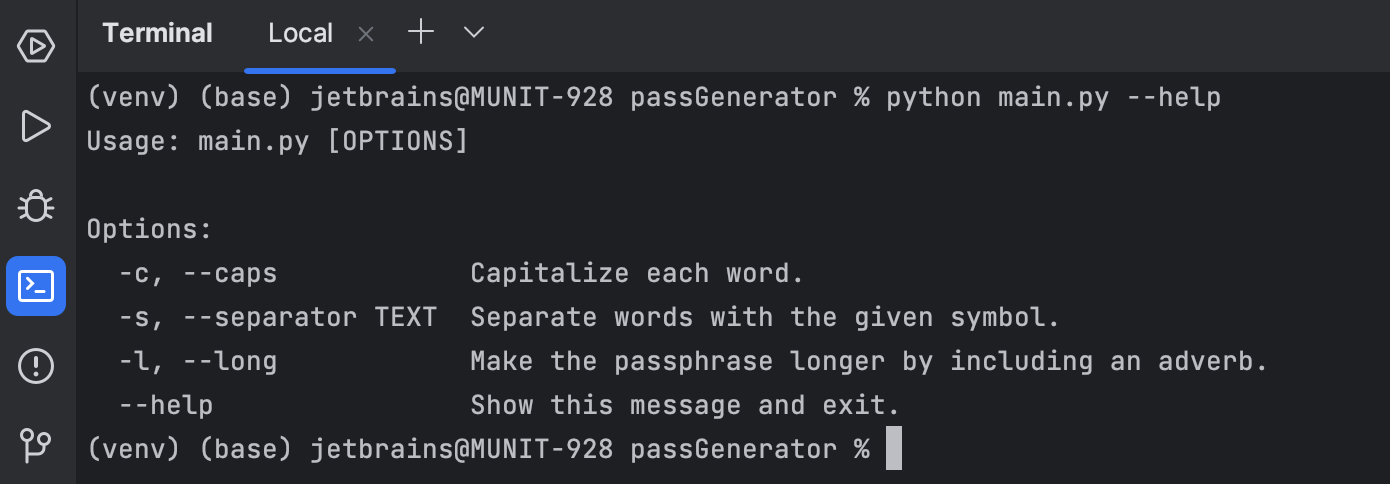
...
Now --help produces much more useful information:
You may want to use the passphrase generator without PyCharm, for example in the system terminal. In this case, you should install Typer to your system interpreter by using the following command:
python3 -m pip install --user typer
Summary
In this tutorial, you’ve learned how to:
- Create projects in PyCharm Community Edition.
- Develop user-friendly CLI tools with Python and Typer.
- Use quick-fixes and live templates to write code faster and avoid errors.
- Debug your code.
- Run your code in PyCharm by using run configurations and the terminal.