SSH Agent: Simplify SSH keys

Security is important, and that’s why we all use key pairs when authenticating to our servers. And as is best practice, we also protect our private key with a passphrase, don’t we? Ideally the passphrase is long and complicated, and therefore a massive pain to type.
So how can we be lazy while still maintaining security? SSH Agent is the answer! Rather than typing the passphrase to your key individually for every connection, we can type it only once when we turn the computer on, and then SSH agent will keep the decrypted key safe in memory.
Let’s have a look how to do this on Windows, Mac, and Linux. Feel free to skip ahead to the section that’s relevant for your OS. At the very end I’ll show how to setup PyCharm to connect using the key in SSH Agent, which is the same on all platforms.
On Windows
The default tool for SSH connections on Windows is PuTTY. Let’s walk through generating a key and then using it with PuTTY.
When you download PuTTY, you don’t just get PuTTY, you get various other tools as well. We’ll use one of those to generate a key to use with SSH later. Open PuTTYgen, and click the generate button to start creating a key:
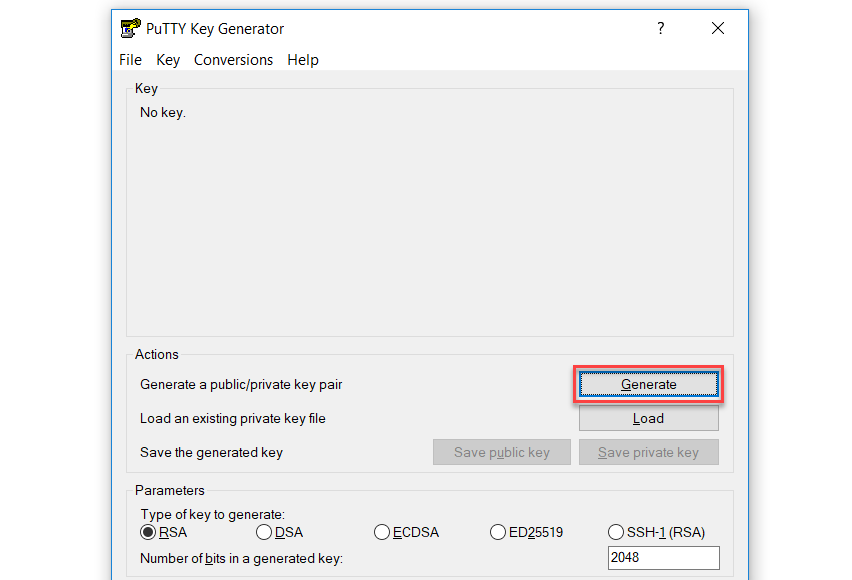
After simulating an earthquake with your mouse, you should have a shiny new SSH key.
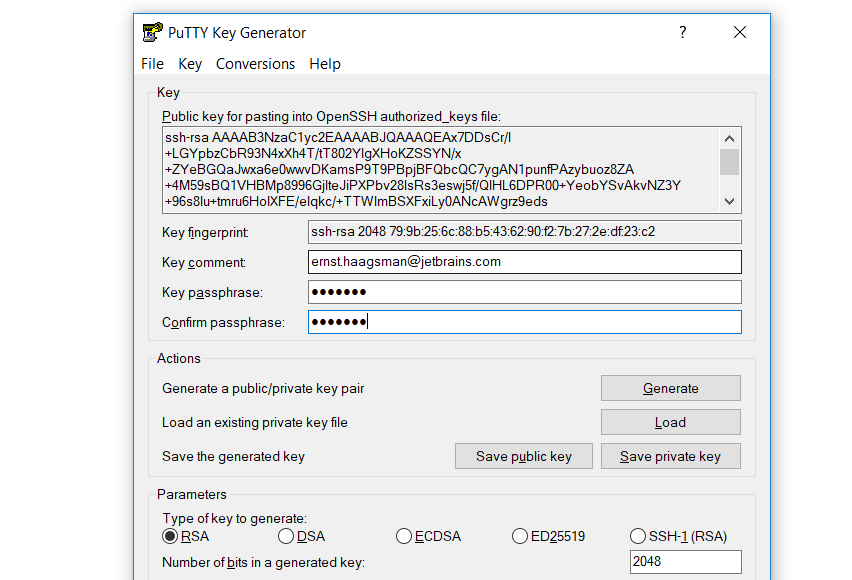
Give it a secure passphrase, and then save the private key somewhere safe. At this point you should copy the public key to the ~/.ssh/authorized_keys file on the computer you’d like to connect to. If you’d like a computer to try this with, you can create a VM using the Vagrantfile here. If you’re using the VM, choose ‘Save public key’ to overwrite key.pub in the files subfolder, and then run vagrant up to create the virtual machine.
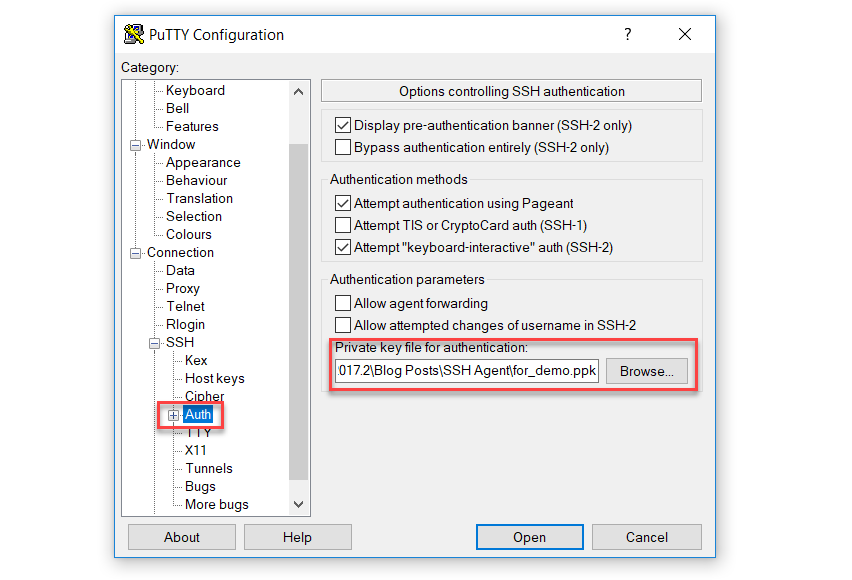
Now that we have a Linux machine with the public key installed, let’s connect to it. To manually use the key, we can configure PuTTY to connect to our box. We will connect to localhost, on port 2222 (the port that Vagrant exposes SSH to by default). And then in the menu on the left select SSH, and then Auth. In the settings you can configure a key file to use:
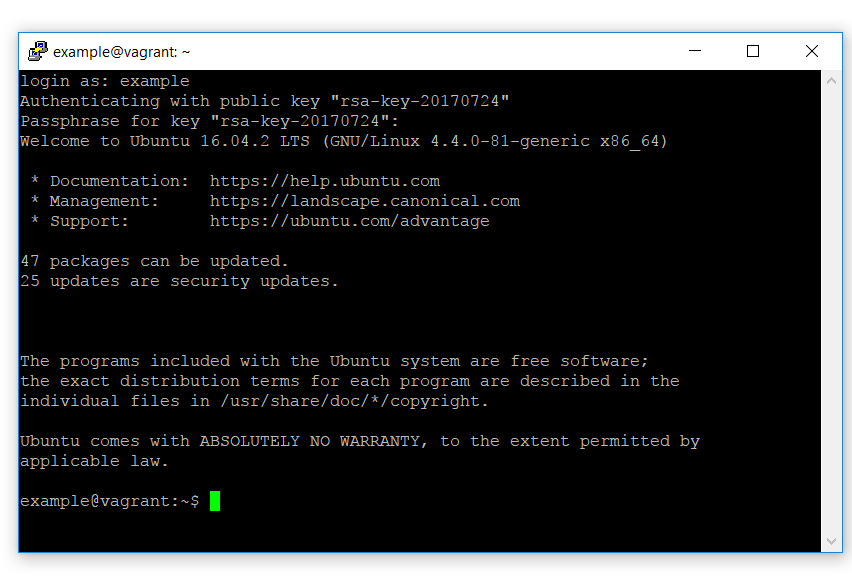
When you click open now, you should be prompted for the username you’d like to log in as. If you’re using the sample box, the username is ‘example’. At this point you’ll need to enter the passphrase for the private key:
If you right-click the title bar, and choose Duplicate Session, you’ll need to re-enter the passphrase. Let’s see if we can make this a little more efficient.
A tool that comes with PuTTY is Pageant. What this does is hold your private key, and as long as it’s running, it can provide the unlocked private key to PuTTY (and other tools like PyCharm). After you start Pageant, you may notice that nothing seems to happen. Pageant lives in the Windows task bar on the bottom right of your screen. Right-click Pageant’s icon, and you can choose ‘Add Key’ to add your key to Pageant:
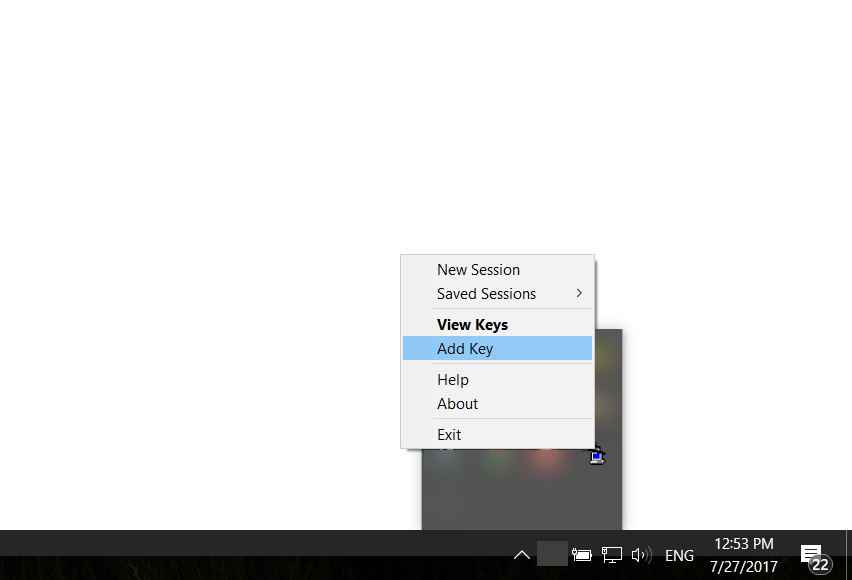
After finding your key on the filesystem, you’ll need to enter the key’s passphrase. However, after this is done, you won’t need to enter it again until Pageant is stopped (for example, when you shutdown your computer).
So when we duplicate our session, we can see that we don’t need to enter a passphrase anymore:

Although it’s possible to configure Pageant to start with Windows, it might be more interesting to use another tool: KeeAgent. If you’re already using KeePass to store your passwords, you can use the KeeAgent plugin to make KeePass work just like Pageant. And then when you unlock your KeePass workspace, your private key will automatically be unlocked as well. Read how to set it up here.
On macOS
To create a key on macOS, open a Terminal window, and run:
ssh-keygen -t rsa -f <name of file>
Make sure to add a passphrase for your key.
After this finishes you’ll have both the private key file, and the public key file (with a .pub extension). Let’s get a Linux computer to try our new key with. Clone this repository, copy the .pub file over key.pub in the files subdirectory, and then run vagrant up to create a VM (you’ll need Vagrant for this).
When the VM has started, we can use ssh to connect to it:
ssh -i <your private key file> -p 2222 -o NoHostAuthenticationForLocalhost=yes example@localhost
We need to disable host key checking, as otherwise SSH will see a mismatch between your computer’s key and the VM’s key. When you run this command, you’ll be prompted for the key’s passphrase. So let’s see if we can get rid of this prompt.
macOS comes with a Keychain application which stores your passwords in the background. To see the stored passwords, use the Keychain Access application. We can store the passphrase there by using:
ssh-add -K <private key file>
On version of macOS before Sierra, you’re done now. On macOS Sierra and later, you’ll need to do some additional steps: see this answer on StackOverflow.
After adding it to your Keychain, you should see that whenever you run the SSH command again, it’ll take the passphrase from your Keychain.
On Linux
On Linux you can use the ssh-add command, after running it once and entering your passphrase, you won’t have to re-enter your passphrase until you log out:
ssh-add
Without any parameters this will add the key in ~/.ssh/id_rsa. If you get an error ‘Could not open a connection to your authentication agent’, start ssh-agent by running: eval $(ssh-agent -s). To make this easier, you could add it to your ~/.bashrc, or see if your distribution or desktop environment has a tool that support SSH Agent. For example GNOME Keyring supports ssh-agent.
Using Your Key in PyCharm Professional Edition
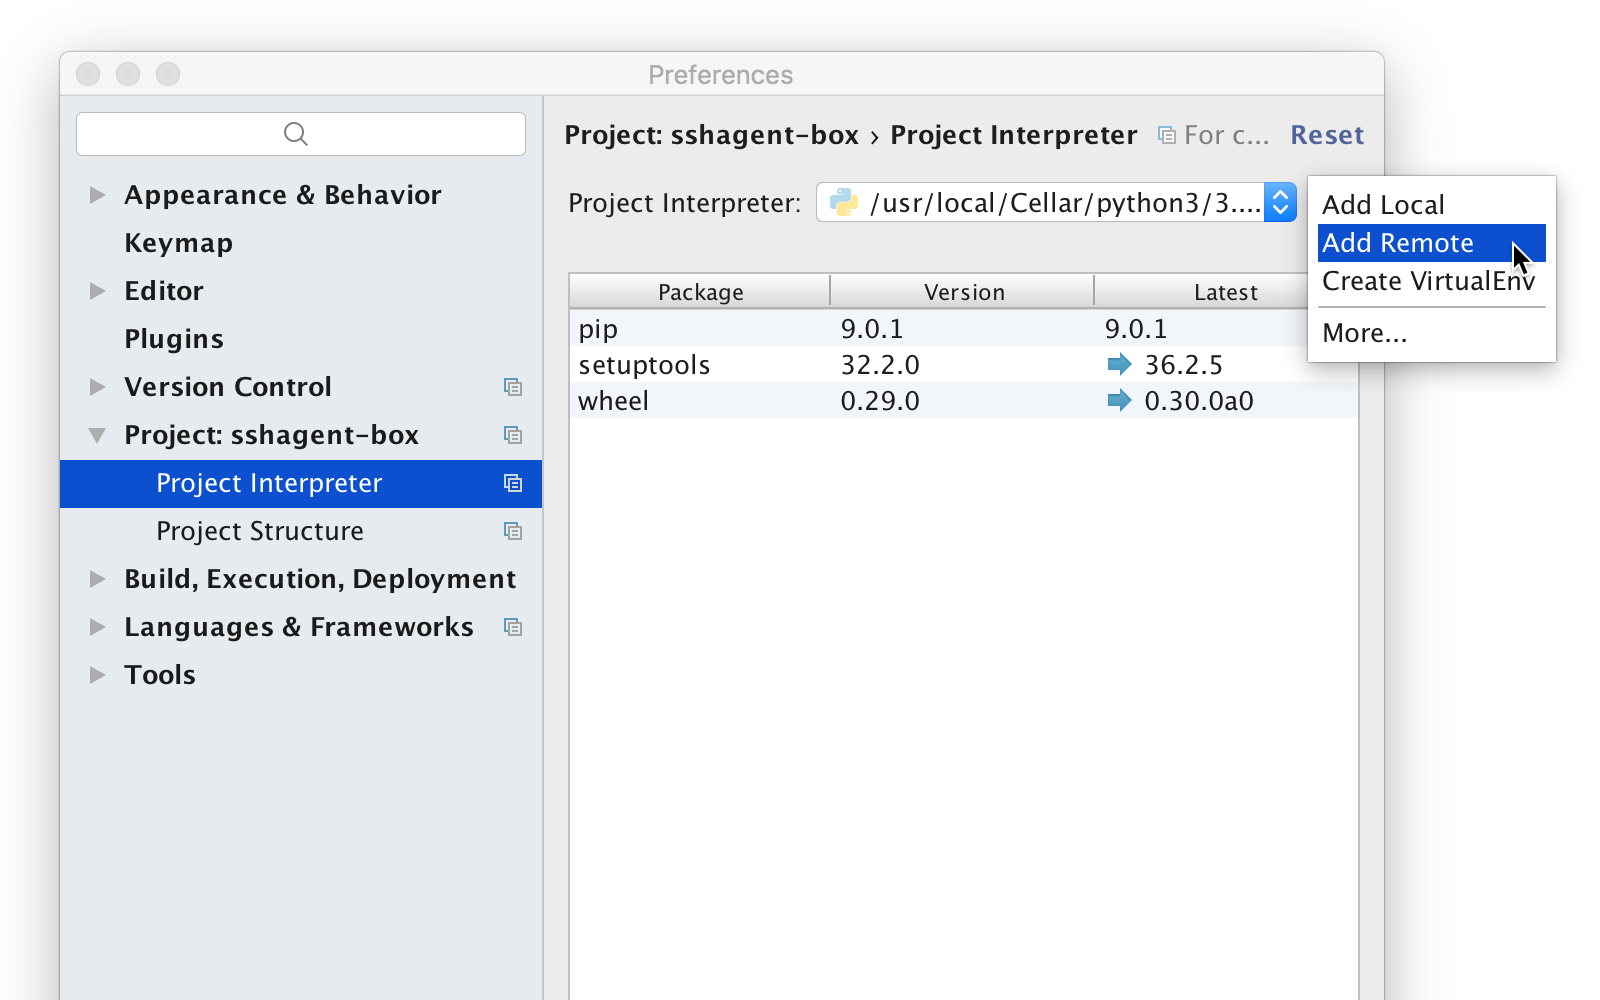
After storing your key in SSH Agent (or a compatible tool), you can connect to a Python interpreter on a remote machine using that key for authentication. Please keep in mind that remote interpreters are only available in PyCharm Professional Edition. So let’s open up PyCharm, and go to the interpreter settings (File | Settings | Project Interpreter). Then use the gear icon, and choose ‘Add Remote’.
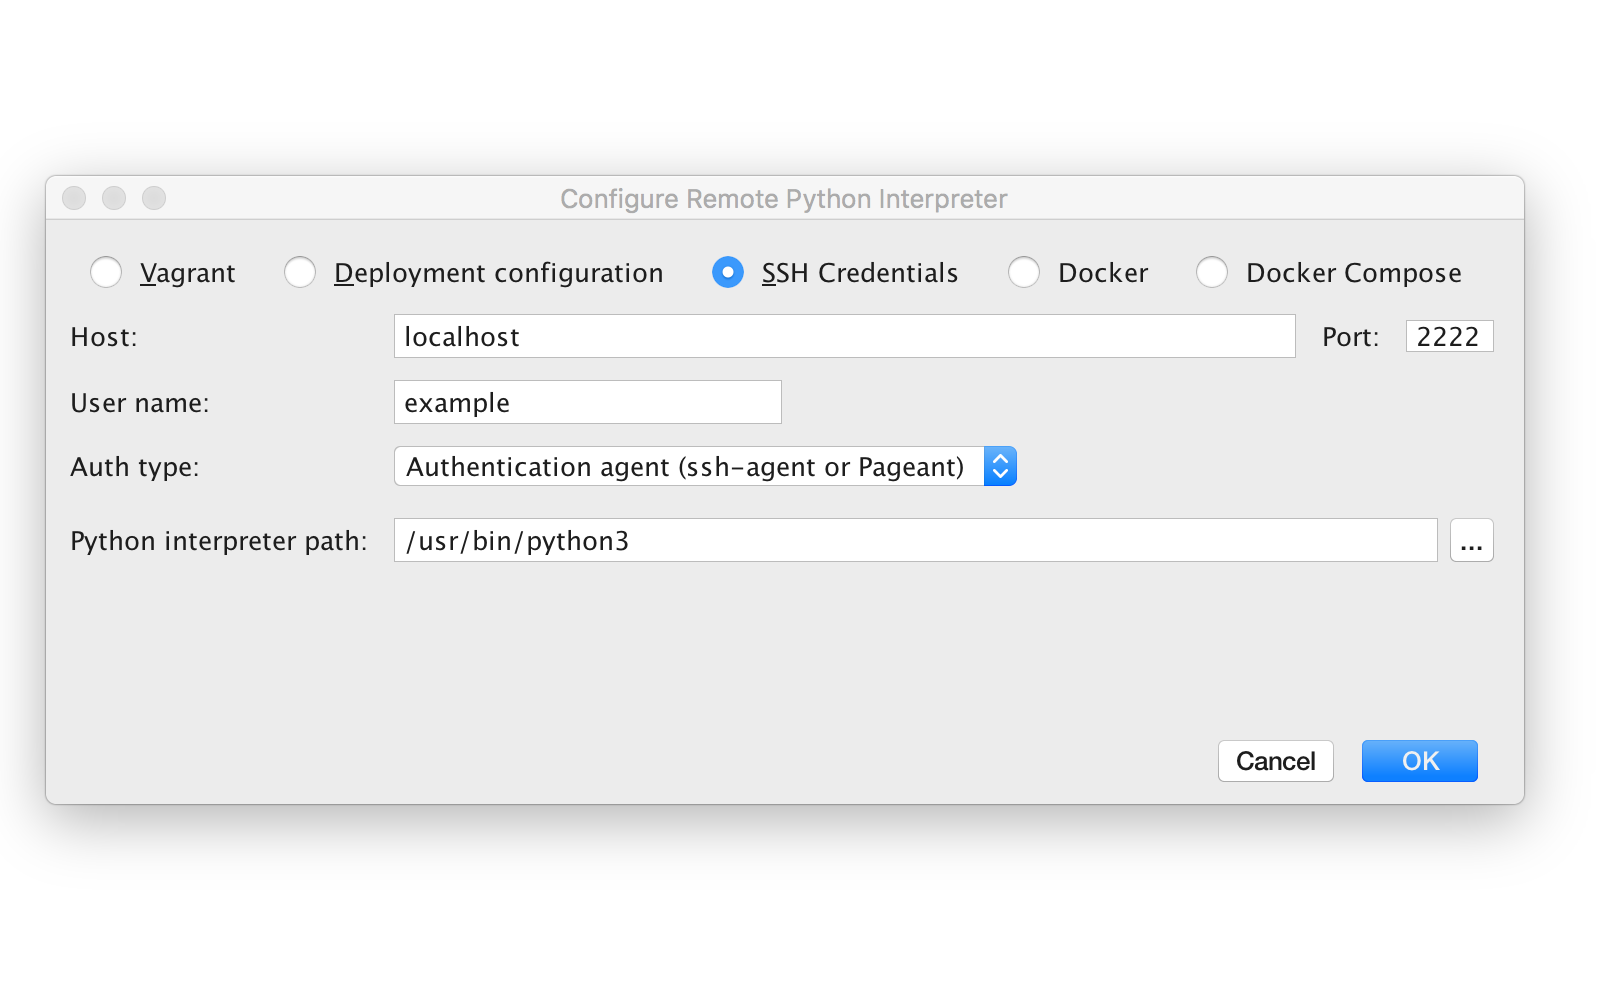
Then choose “SSH Credentials”, enter the hostname, port, and username. By setting authentication method to ‘Authentication agent’ you’re instructing PyCharm to take the credentials from SSH Agent or a compatible tool.
Finally, just click OK to connect, and you’ll be using the Python interpreter on the machine or VM you’re connecting to.

Subscribe to PyCharm Blog updates