Building APIs With Django REST Framework

In this Django REST framework tutorial, you will create a rental platform API. The tutorial demonstrates how to use Python and Django REST framework in PyCharm to develop APIs.
By the time you complete the tutorial, you will be able to answer the following questions:
- What are Django REST framework serializers and how do I create them out of Django models?
- How do I write concise and idiomatic views with the help of Django REST framework?
- How do I test APIs by using PyCharm’s Endpoints tool window and the built-in HTTP Client?
- What is the browsable API?
- How do I set up authentication and permissions for an API?
Prerequisites
To successfully complete the Django REST framework tutorial, you’ll need the following:
- PyCharm Professional (a free 30-day trial is available). This tutorial has been created in PyCharm Professional 2023.2.1
- General understanding of the concept of RESTful APIs
- Previous experience with Python and Django (you can start with our Django tutorial)
You can find the full code of the project in this repository.
Setting up a project
Click New Project on PyCharm’s Welcome screen or select File | New Project from the main menu. When the New Project window opens, choose Django as the project type in the left-hand pane and do the following:
- Specify the project directory, which will also be used as the project name (apiTutorial in our example).
- Choose the type of virtual environment for your project (we will use virtualenv).
- Expand the More Settings section and provide the application name (rental).
You also need to disable the Enable Django admin checkbox. We will create the admin user manually later.
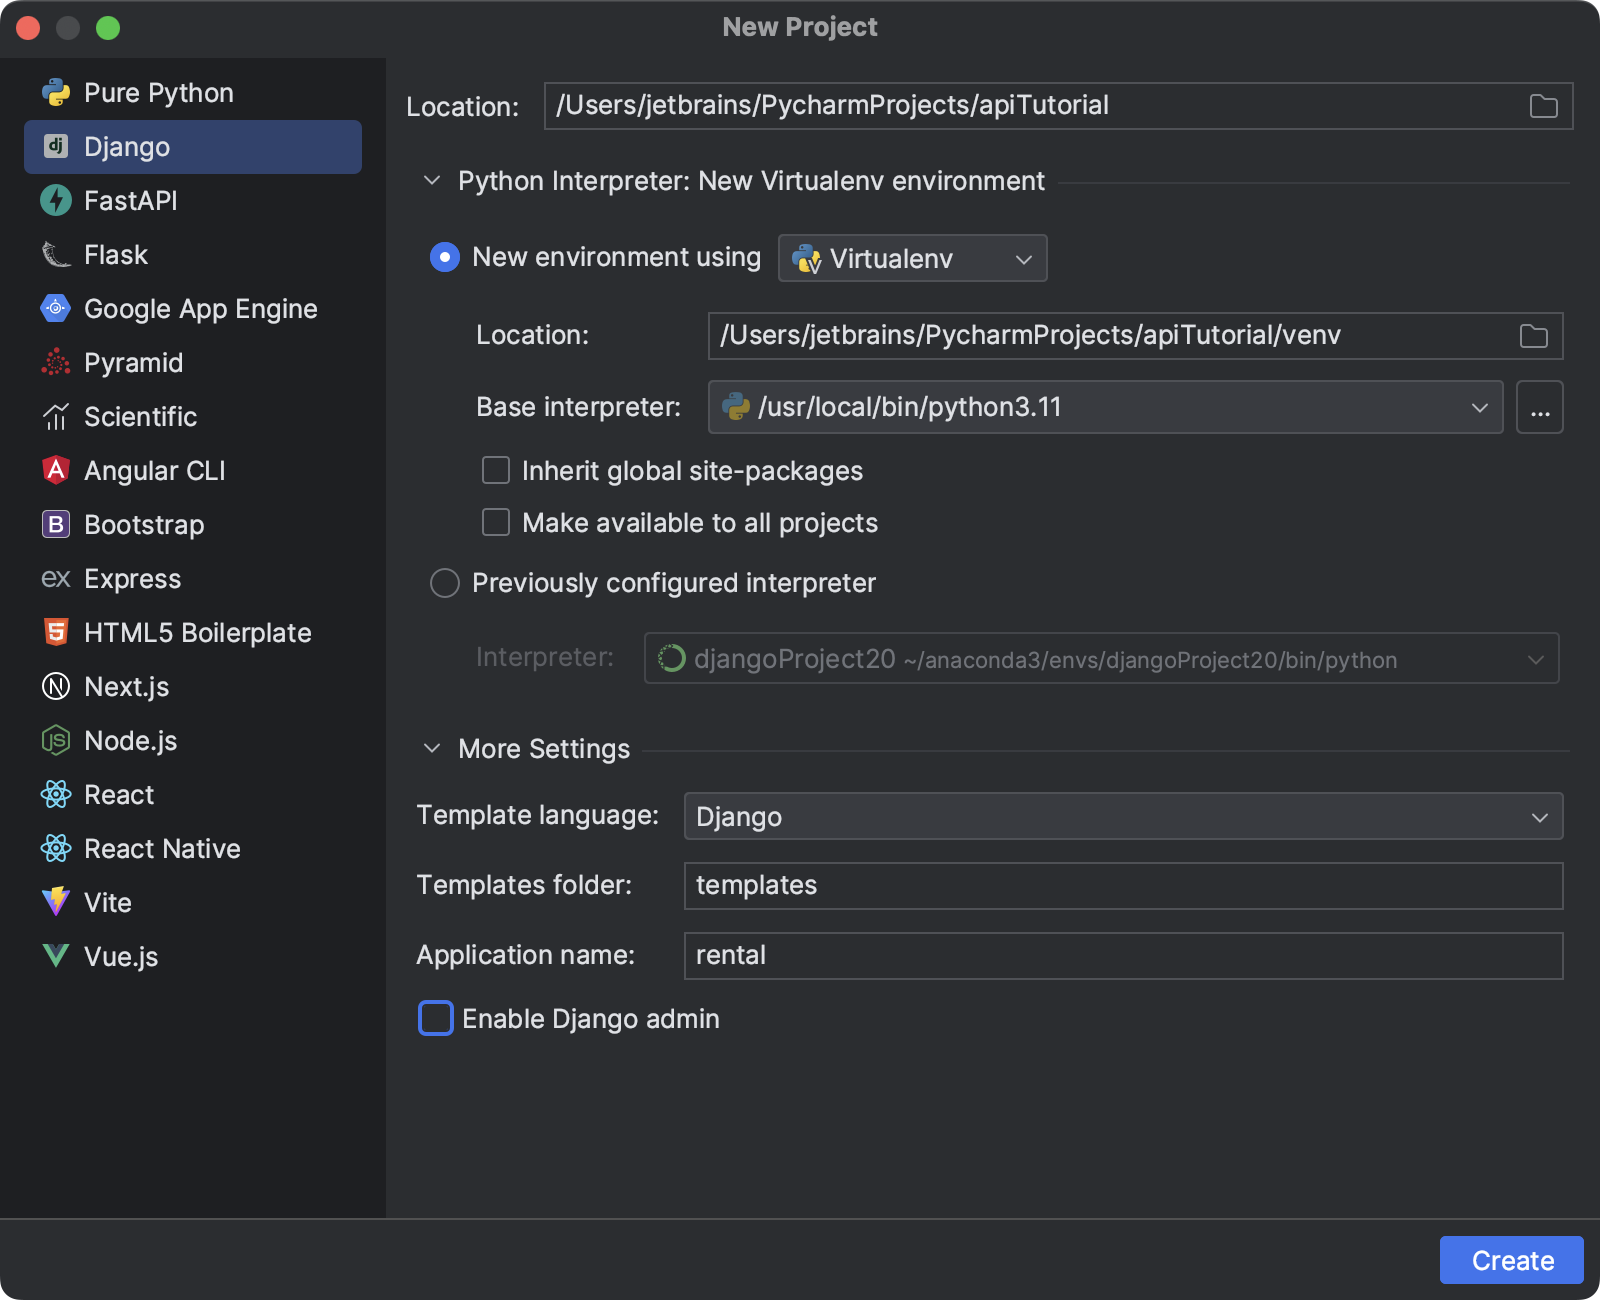
When you click Create, PyCharm will set up the project and install Django in the project environment.
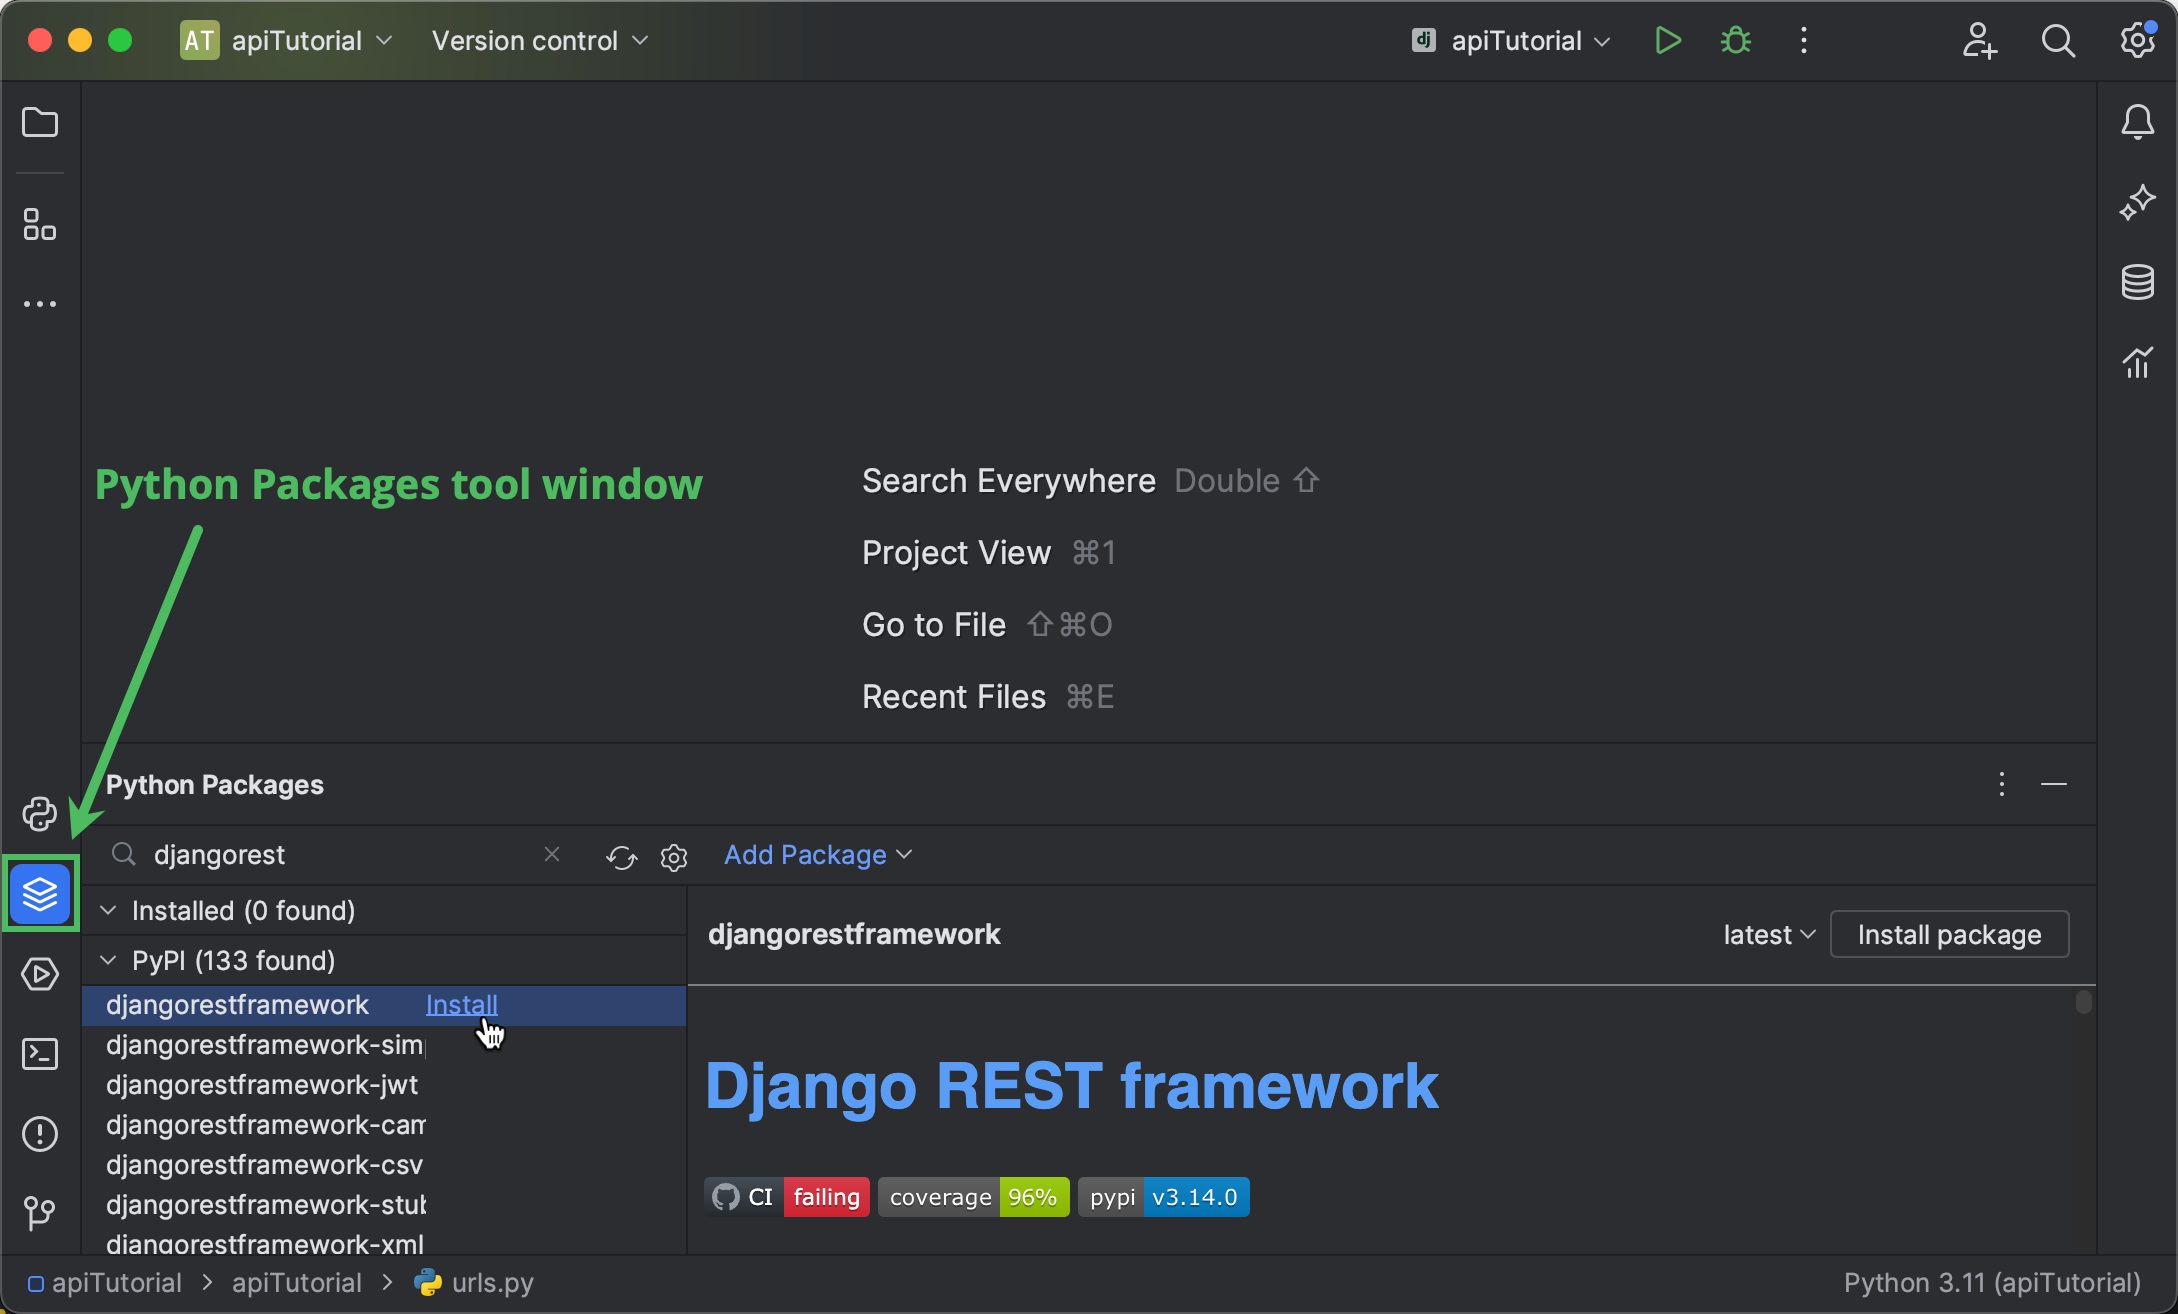
The Django REST framework package needs to be installed manually. Open the Python Packages tool window by clicking its icon on the left. Search for the djangorestframework package and install the latest version. In this tutorial, we’ve used version 3.14.0.
Now we need to update INSTALLED_APPS in settings.py. Here’s PyCharm’s shortcut for that:
- Open Search Everywhere by pressing ⇧ (Shift) twice.
- Press Tab several times until you’re on the Symbols tab.
- Type the first letters of the desired symbol (variable, class, etc.) to find it, for example, “insapp”.
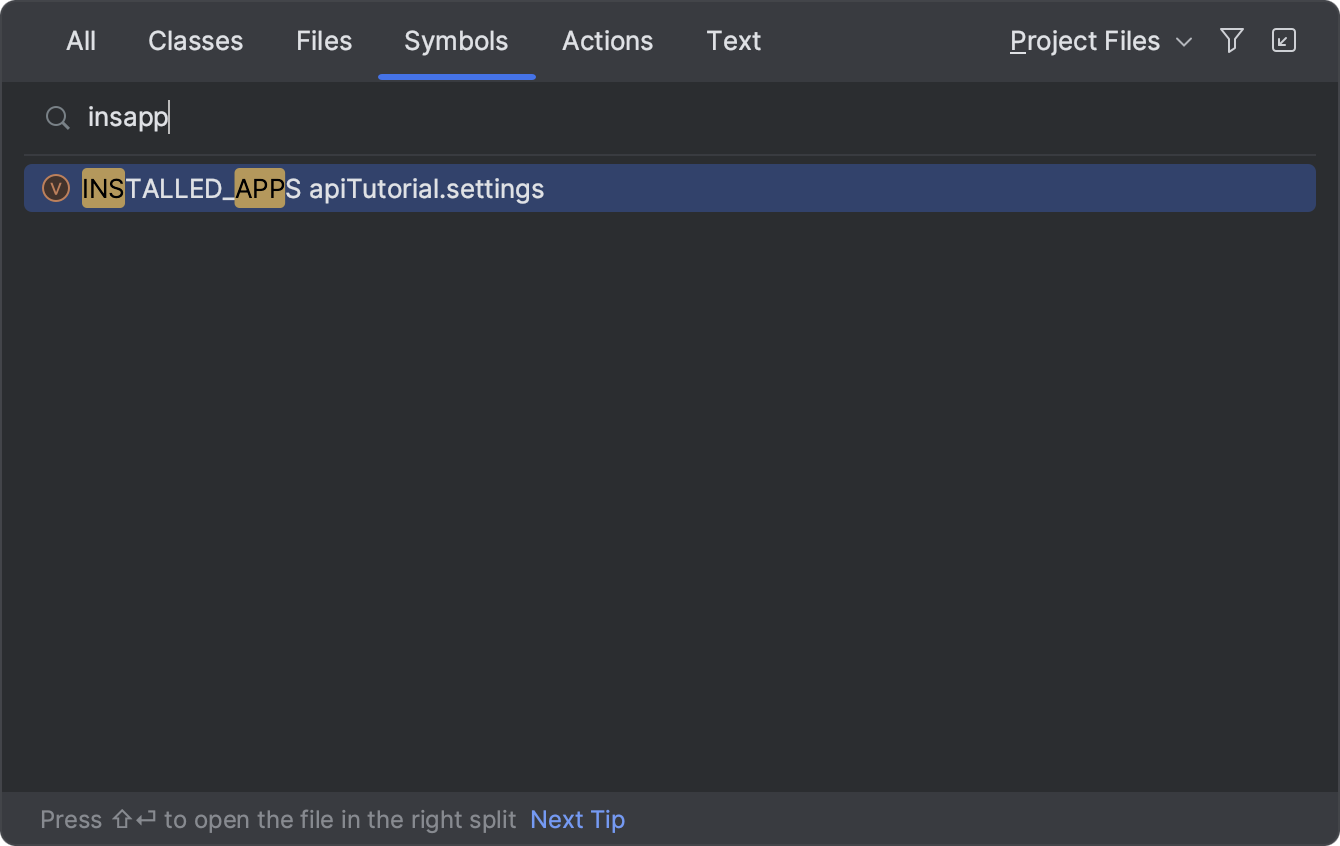
- Press Enter to jump to the desired symbol and add ‘
rest_framework’ toINSTALLED_APPS.

Creating serializers
What are Django REST framework serializers?
In general, serializers are used to “translate” Django model instances or querysets into other formats, usually JSON or XML, so that they can be sent in the body of an HTTP response. Serializers also provide deserialization when text data from an HTTP request is parsed, validated, and converted into a model instance.
The processes of serialization and deserialization are crucial for any API, and Django REST framework can take it over completely. Thanks to its ModelSerializer class, we can generate a serializer for any model in just two lines of code.
But we still need to create a model. Let’s do that.
Writing a model-based serializer
Use Search Everywhere (double Shift) or the Project tool window (⌘1 / Alt+1) to open rental/models.py, and copy the following code into the editor:
from django.db import models

SIZE_CHOICES = [
    ('ST', 'Studio'),
    ('1BR', '1 bedroom'),
    ('2BR', '2 bedrooms'),
    ('3BR', '3 bedrooms'),
    ('MBR', '3+ bedrooms'),
]
TYPE_CHOICES = [
    ('H', 'house'),
    ('APT', 'apartment'),
]


class Offer(models.Model):
    created = models.DateTimeField(auto_now_add=True)
    address = models.CharField(max_length=100, blank=True, default='')
    size = models.CharField(choices=SIZE_CHOICES, default='1BR', max_length=100)
    type = models.CharField(choices=TYPE_CHOICES, default='APT', max_length=100)
    price = models.PositiveIntegerField(default=0)
    sharing = models.BooleanField(default=False)
    text = models.TextField(default='')

    class Meta:
        ordering = ['created']
Note that all fields of the Offer model have defaults, which means that we can create an instance without providing any field values. Additionally, we’ve provided choices for the size and type fields.
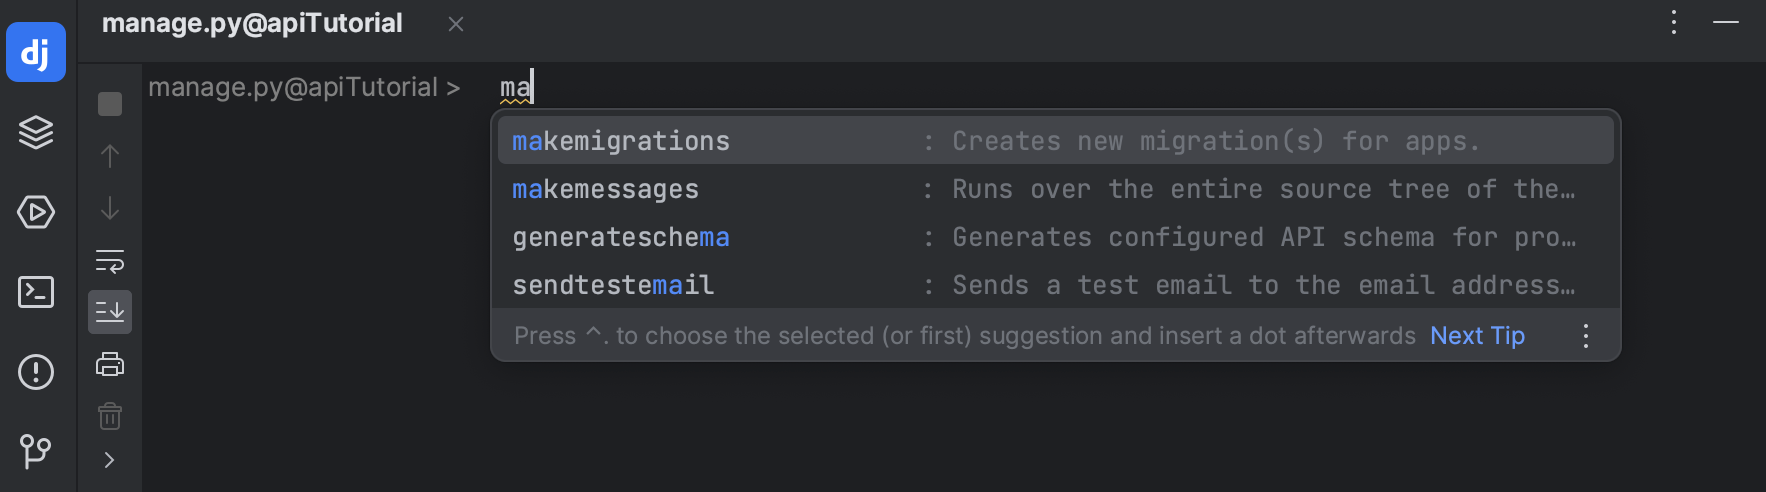
Now let’s run migrations. Open PyCharm’s manage.py console by pressing ⌥R/ Ctrl+Alt+R and type “makemigrations” followed by “migrate”. Code completion is available, so you don’t need to type out the whole commands.
We need to create serializers.py in the rental directory. Select the directory in the Project tool window (⌘1 / Alt+1), press ⌘N / Alt+Insert, select Python File, and specify “serializers” as the file name.
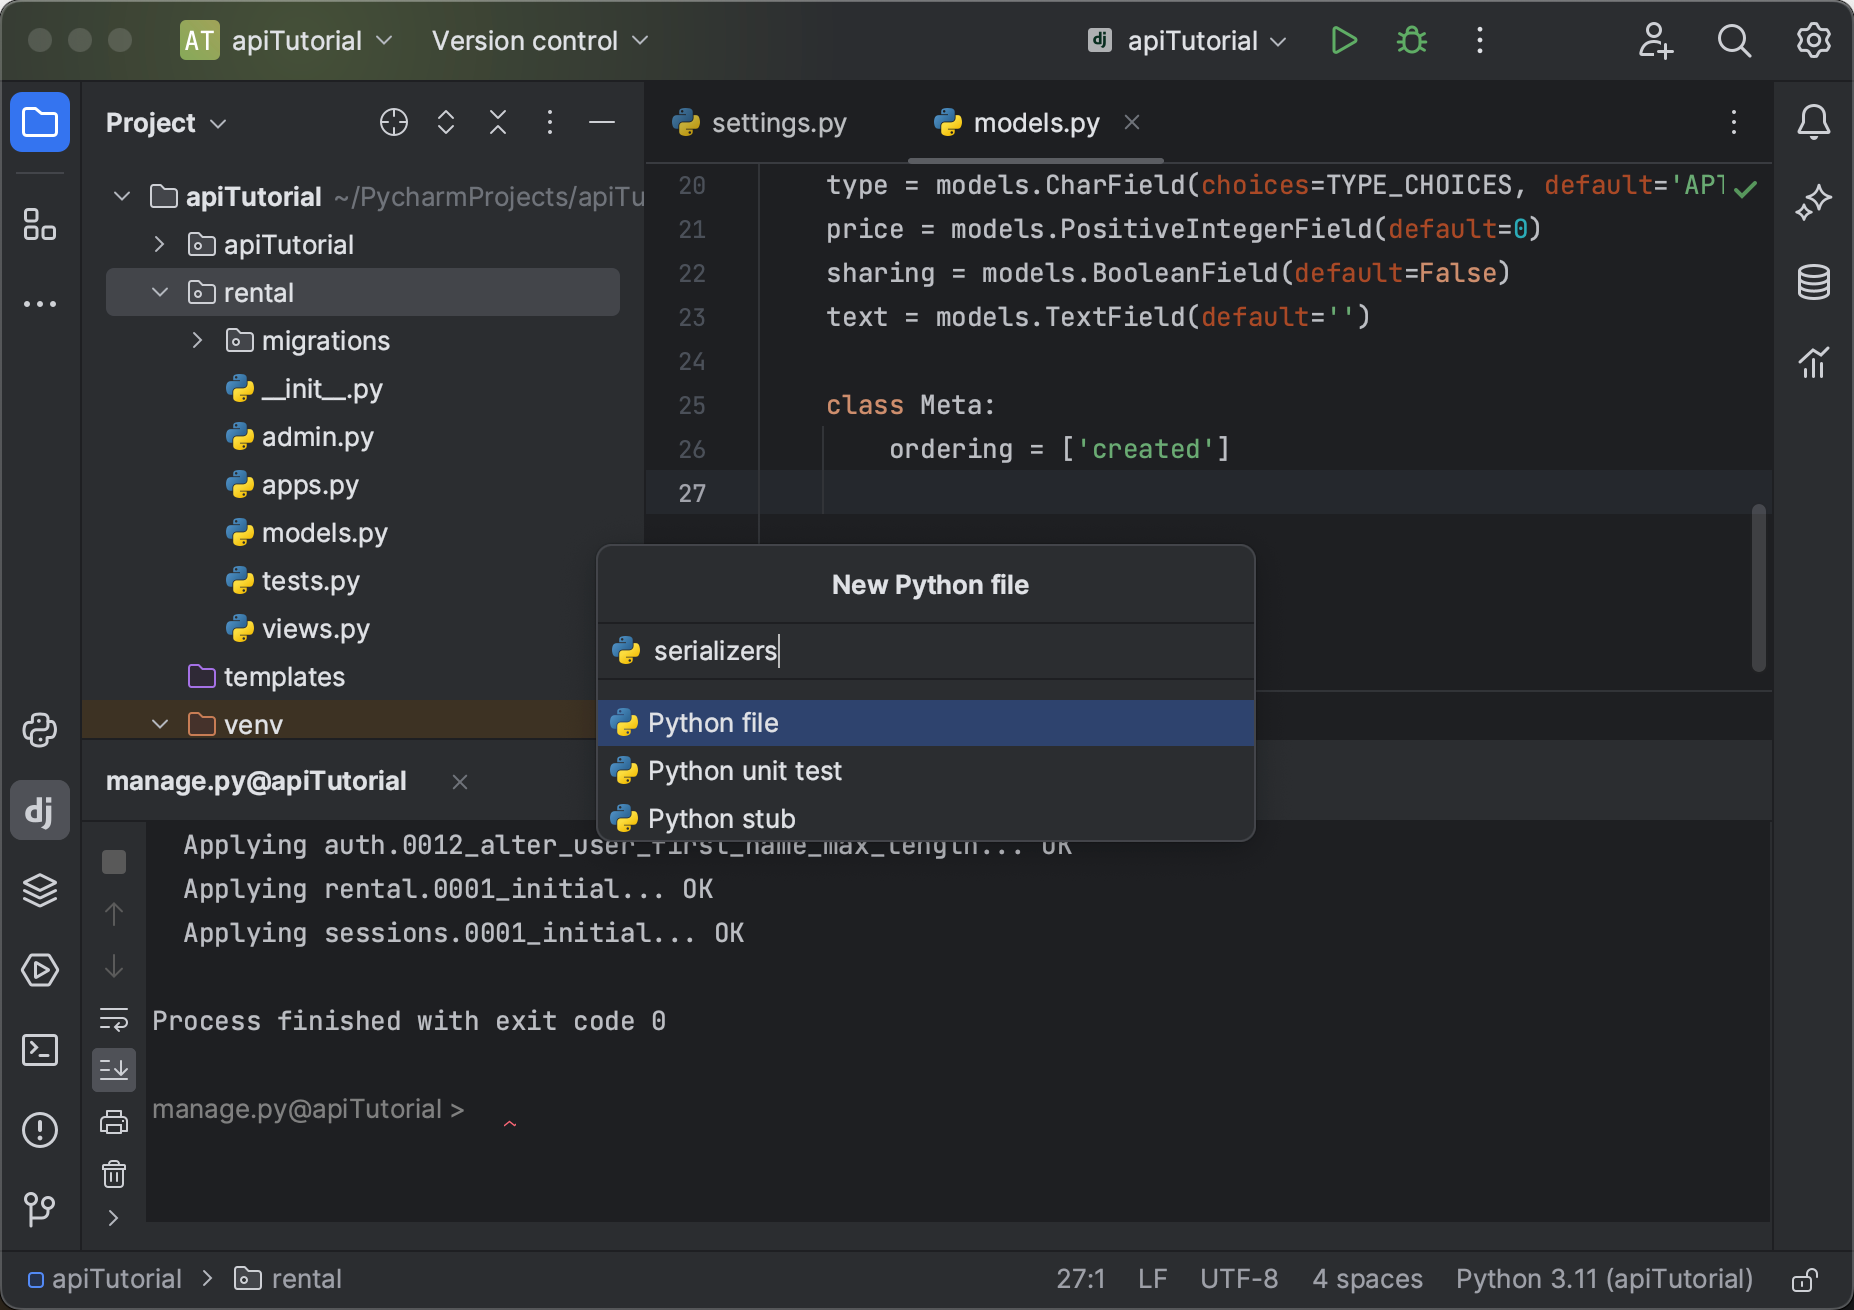
The newly created file opens in the editor. Fill it with the following code:
from rest_framework import serializers
from rental.models import Offer


class OfferSerializer(serializers.ModelSerializer):
    class Meta:
        model = Offer
        fields = ['id', 'address', 'size', 'type', 'price', 'sharing', 'text']
As you can see, OfferSerializer inherits from the ModelSerializer provided by Django REST framework and is defined with only two lines of code. On line 7 we’ve specified the base model (which is imported from rental/models on line 2), while line 8 contains the list of model fields to be serialized.
For more information about Django REST framework serializers, see https://www.django-rest-framework.org/api-guide/serializers/.
Using the serializer to save data
Let’s use the newly created serializer to add data into the database. Open the Python console by clicking the corresponding icon on the left and run the following code in it:
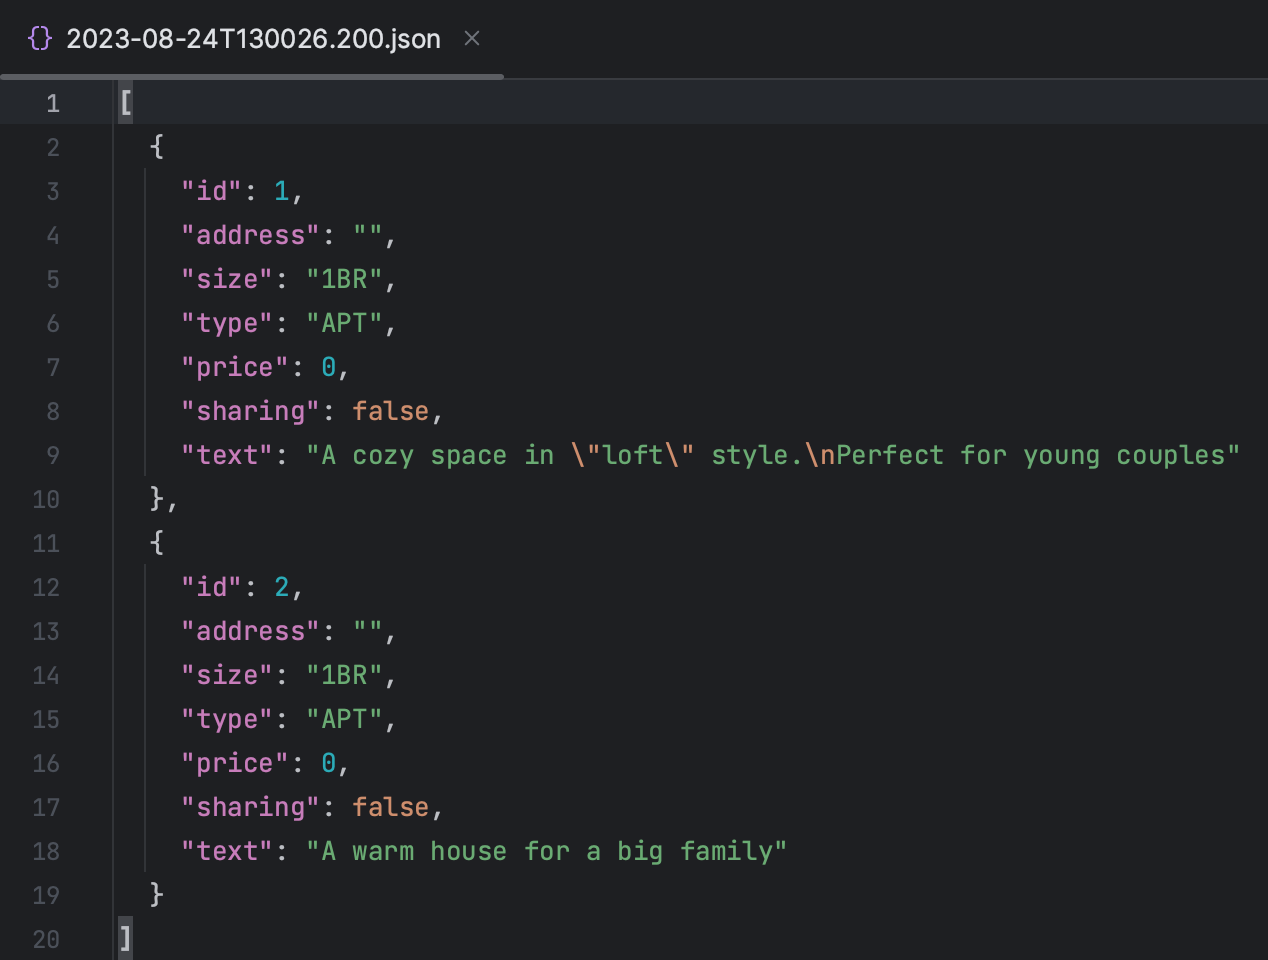
from rental.models import Offer
offer = Offer(text='A cozy space in "loft" style.\nPerfect for young couples')
offer.save()
offer = Offer(text='A warm house for a big family')
offer.save()
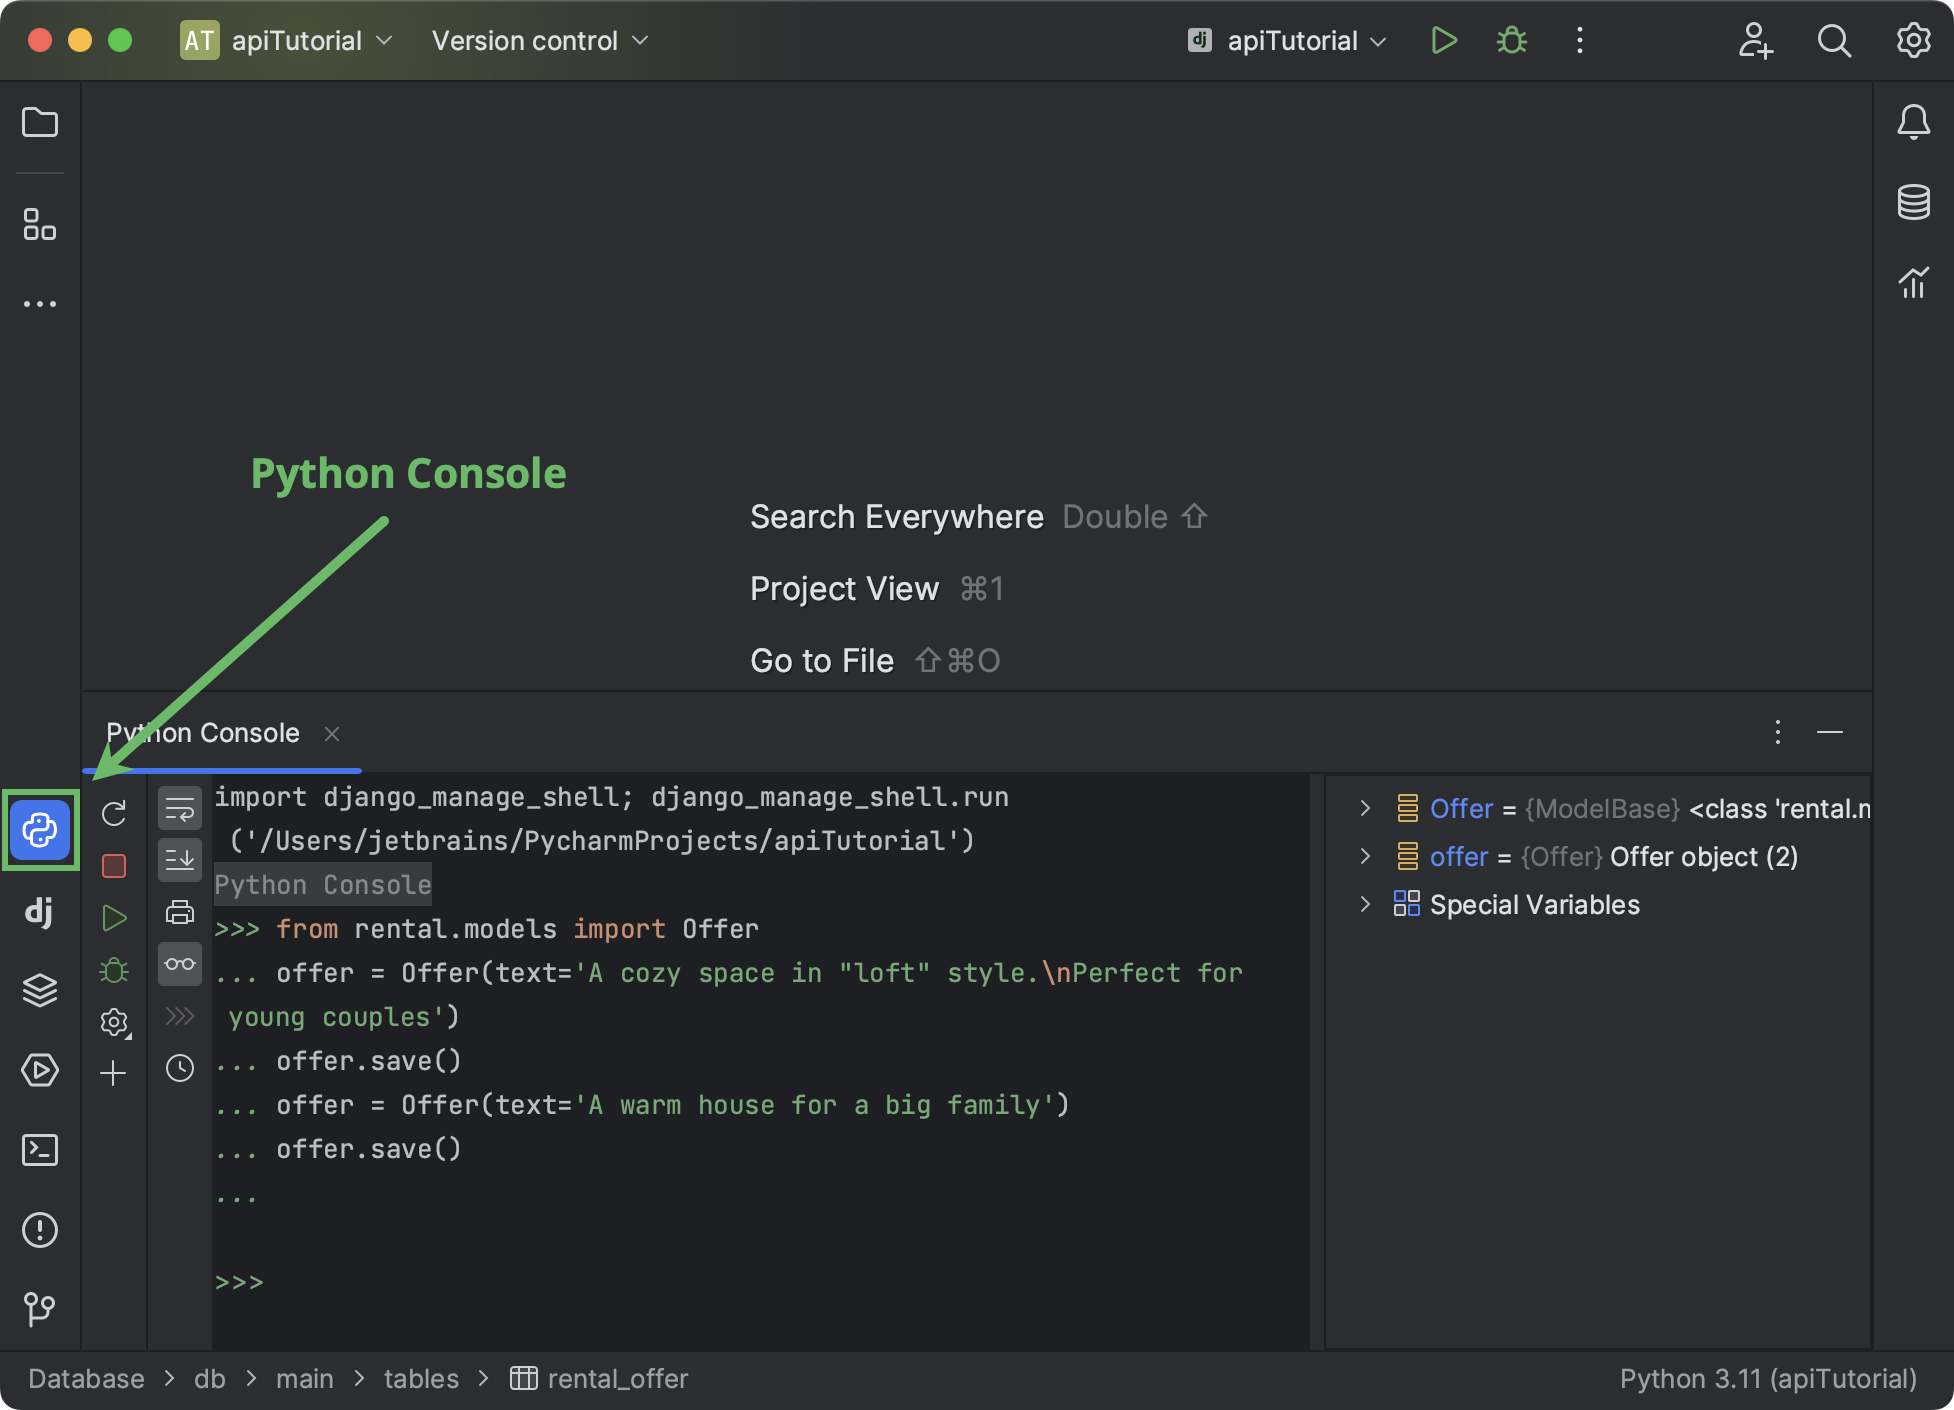
We’ve created two instances of the Offer model and saved them into the database by using the built-in save() method.
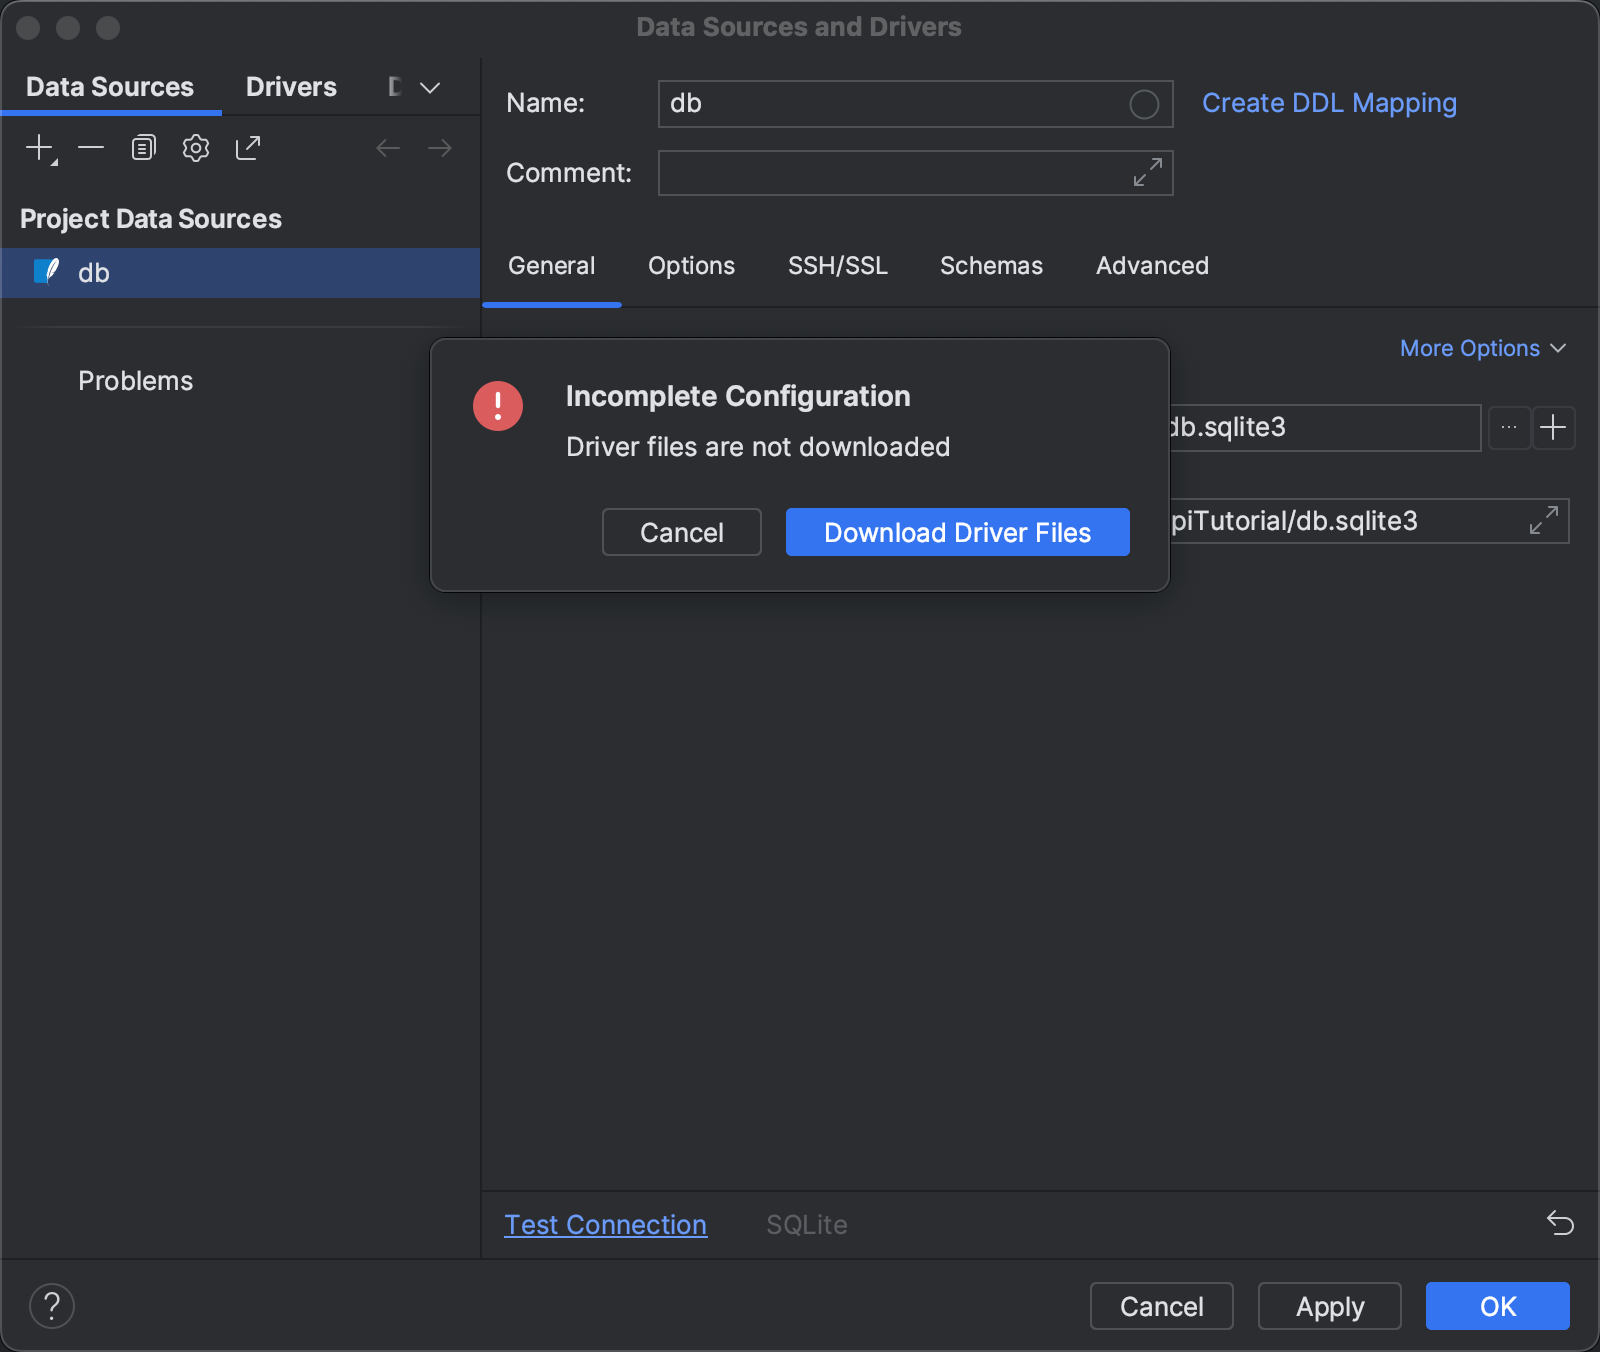
Now let’s open the database. Your project contains db.sqlite3, which can be opened either from the Project tool window or by using Search Everywhere. When you open the database for the first time, PyCharm will register it as the project data source. The Data Sources and Drivers window will open.
Click Test Connection. If you see a warning saying that you need to install, update, or switch the database driver, perform the required action. Then click OK to finish adding the data source to the project.
When the Database tool window opens, expand the structure of the db data source until you see the rental_offer table.
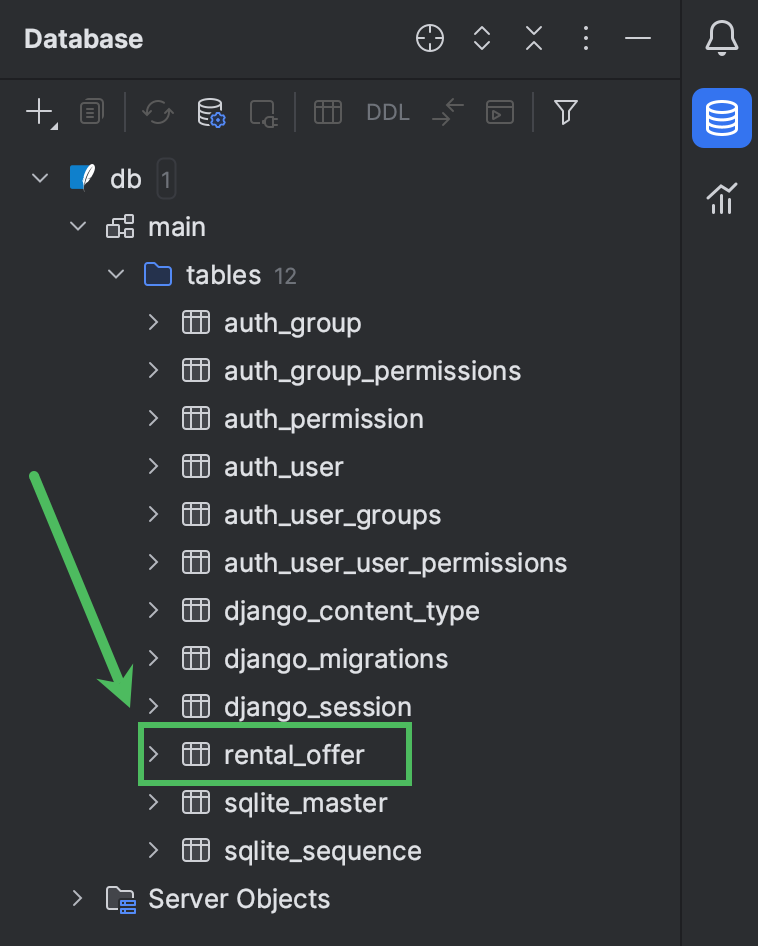
Click it to browse its contents in the editor.

As you can see, there are two records in the database table now. We didn’t provide values in any of the fields except text, which is why the default values from the model definition have been used.
Providing REST API logic
Writing function-based views
We’ve successfully added two rental offers manually, but we want the API to be able to do that automatically based on the incoming requests. Let’s start creating the API’s logic in rental/views.py. Open the file and fill it with the following code:
from rest_framework import status
from rest_framework.decorators import api_view
from rest_framework.response import Response
from rental.models import Offer
from rental.serializers import OfferSerializer


@api_view(['GET', 'POST'])
def offer_list(request):
    if request.method == 'GET':
        offers = Offer.objects.all()
        serializer = OfferSerializer(offers, many=True)
        return Response(serializer.data)

    elif request.method == 'POST':
        serializer = OfferSerializer(data=request.data)
        if serializer.is_valid():
            serializer.save()
            return Response(serializer.data, status=status.HTTP_201_CREATED)
        return Response(serializer.errors, status=status.HTTP_400_BAD_REQUEST)
We’ve added a function-based view called offer_list. It will be used to provide information about available rental offers, as well as to add new offers to the database. Here’s what’s inside:
@api_view(line 8) is the Django REST framework decorator for function-based views.GETandPOSTare the methods accepted by this view.- If the request method is
GET, a queryset with all offers in the database is created (line 11) and serialized (line 12). In this case, the body of the response contains data about all available offers in JSON form. The response is sent with the default status code (200 OK). - If the request method is
POST,OfferSerializeris used to deserialize data from the request (line 16). If the data is validated successfully (line 17), it’s saved to the database (line 18). The response contains the saved data and has the status code201 Created(line 19). - If validation fails, the API will return the error info with the status
400 Bad Request.
It would also be useful if we could obtain information about any specific offer, edit that information, and remove offers from the database. Let’s add another view and call it offer_detail:
@api_view(['GET', 'PUT', 'DELETE'])
def offer_detail(request, pk):
    try:
        offer = Offer.objects.get(pk=pk)
    except Offer.DoesNotExist:
        return Response(status=status.HTTP_404_NOT_FOUND)

    if request.method == 'GET':
        serializer = OfferSerializer(offer)
        return Response(serializer.data)

    elif request.method == 'PUT':
        serializer = OfferSerializer(offer, data=request.data)
        if serializer.is_valid():
            serializer.save()
            return Response(serializer.data)
        return Response(serializer.errors, status=status.HTTP_400_BAD_REQUEST)

    elif request.method == 'DELETE':
        offer.delete()
        return Response(status=status.HTTP_204_NO_CONTENT)
This view accepts three methods (GET, PUT, and DELETE) and works as follows:
- First of all, it checks whether the offer whose ID has been specified in the
pkparameter exists in the database (line 4). If it doesn’t,404 Not Foundis returned. - For
GETrequests, the API serializes the offer data (line 9) and returns it in the response body. - For
PUTrequests, the API serializes the offer data from the database and merges it with the data from the request body (line 13). If the validation is successful (line 14), the updated offer is saved to the database (line 15) and returned in the response body (line 16). Otherwise, the error info is returned with the400 Bad Request status. - Finally, for
DELETErequests, the API deletes the offer and returns204 No Content.
Now that we’ve defined the API’s logic, we have only one step left before we can use our API. We need to define Django URLs, also known as API endpoints.
Defining and testing API endpoints
Let’s start by creating urls.py in the app directory and filling it with the following code:
from django.urls import path
from rental import views

urlpatterns = [
    path('offers/', views.offer_list),
    path('offers/<int:pk>/', views.offer_detail),
]
We’ve defined two endpoints for our two views. Don’t forget to include rental/urls.py in the project’s urls.py file:
from django.urls import path,include

urlpatterns = [
    path('', include('rental.urls')),
]
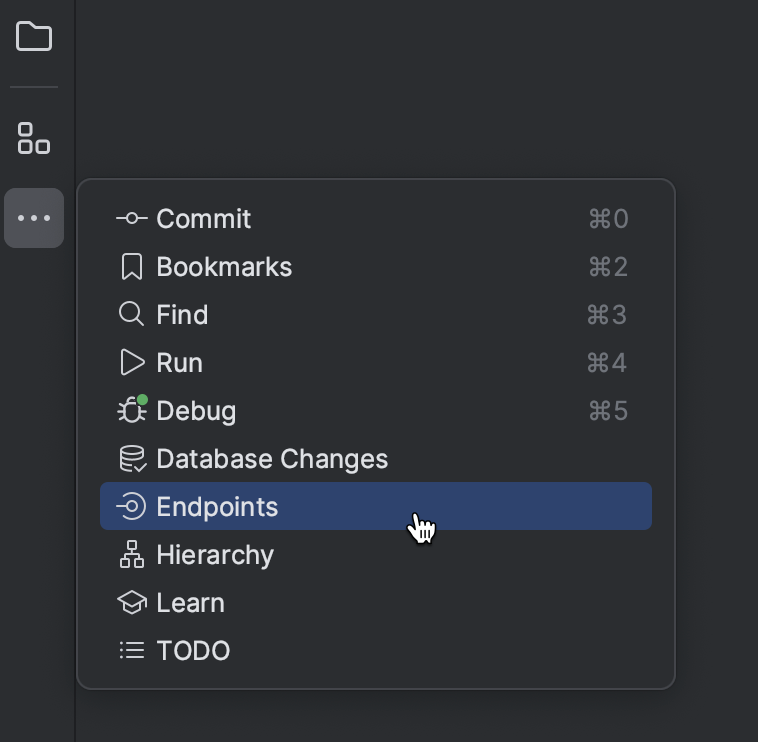
Let’s open the Endpoints tool window. In case you haven’t used it before, you can find it under the meatball menu on the left.
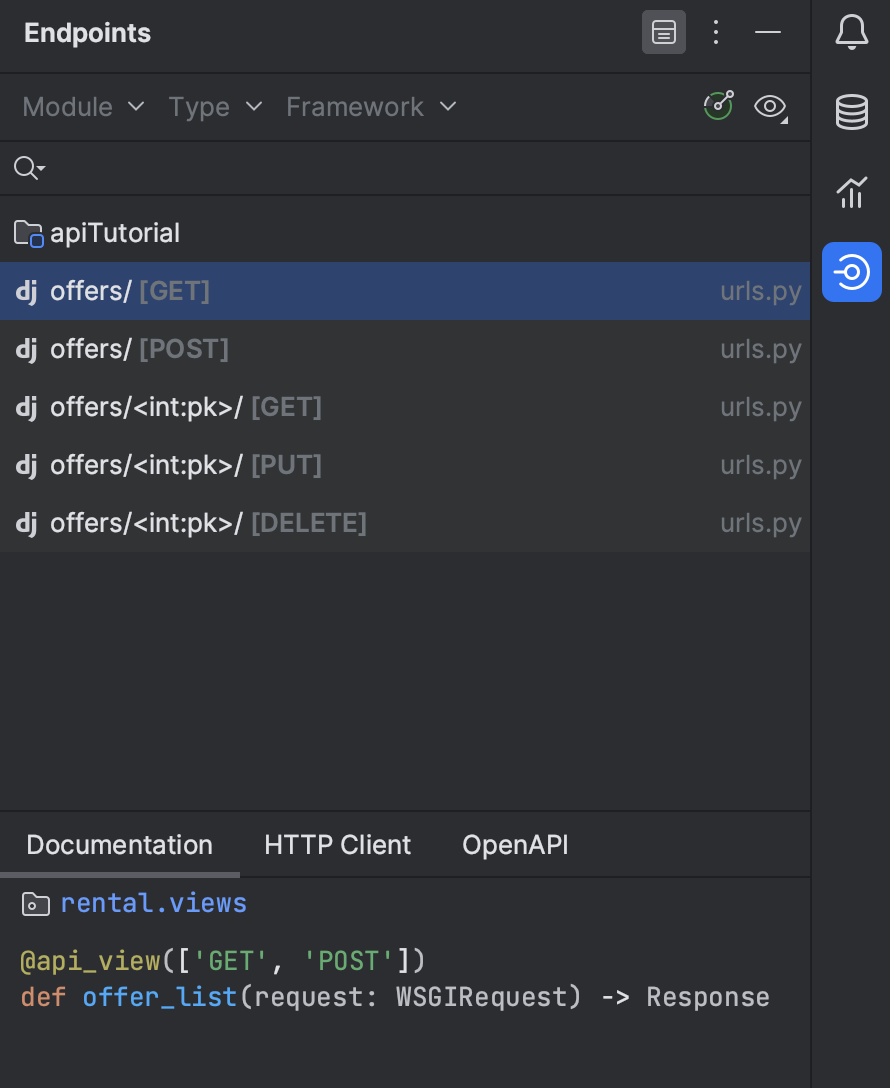
The tool window displays all available endpoints and methods.
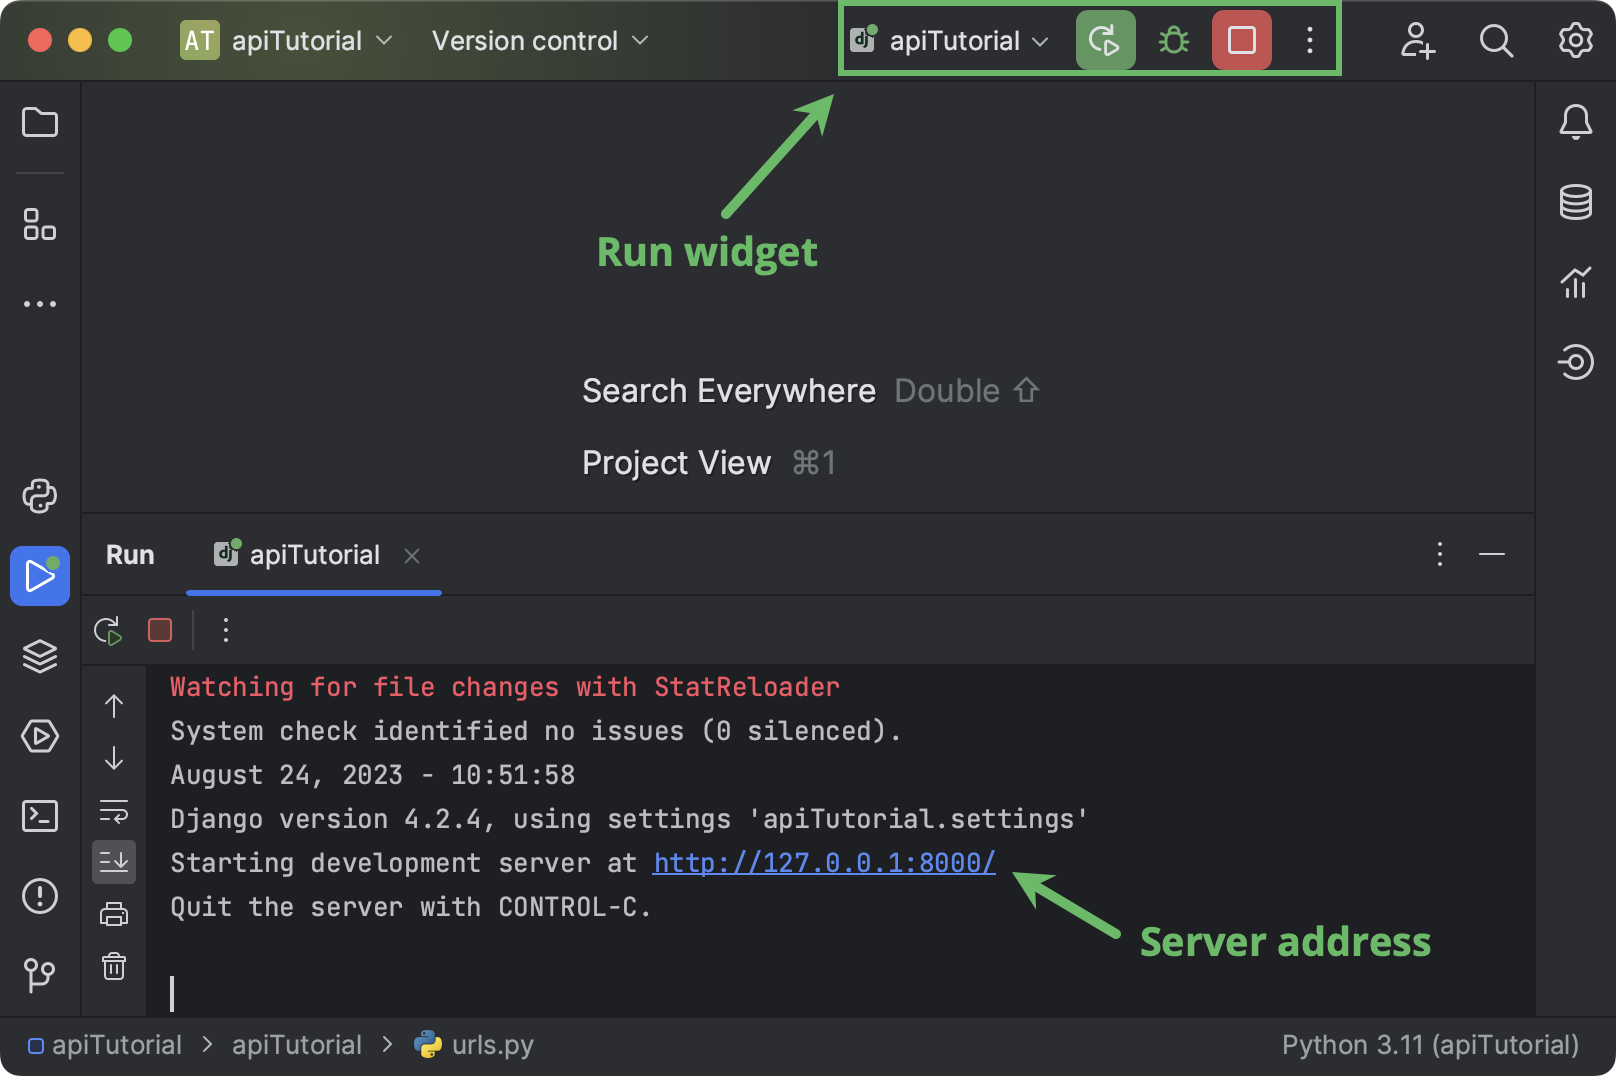
Before testing the API, make sure that the Django server is running. On project creation, PyCharm automatically set up the run configuration. Just launch it from the Run widget in the window header. Note the server address (usually, localhost) and port number in the Run tool window that opens.
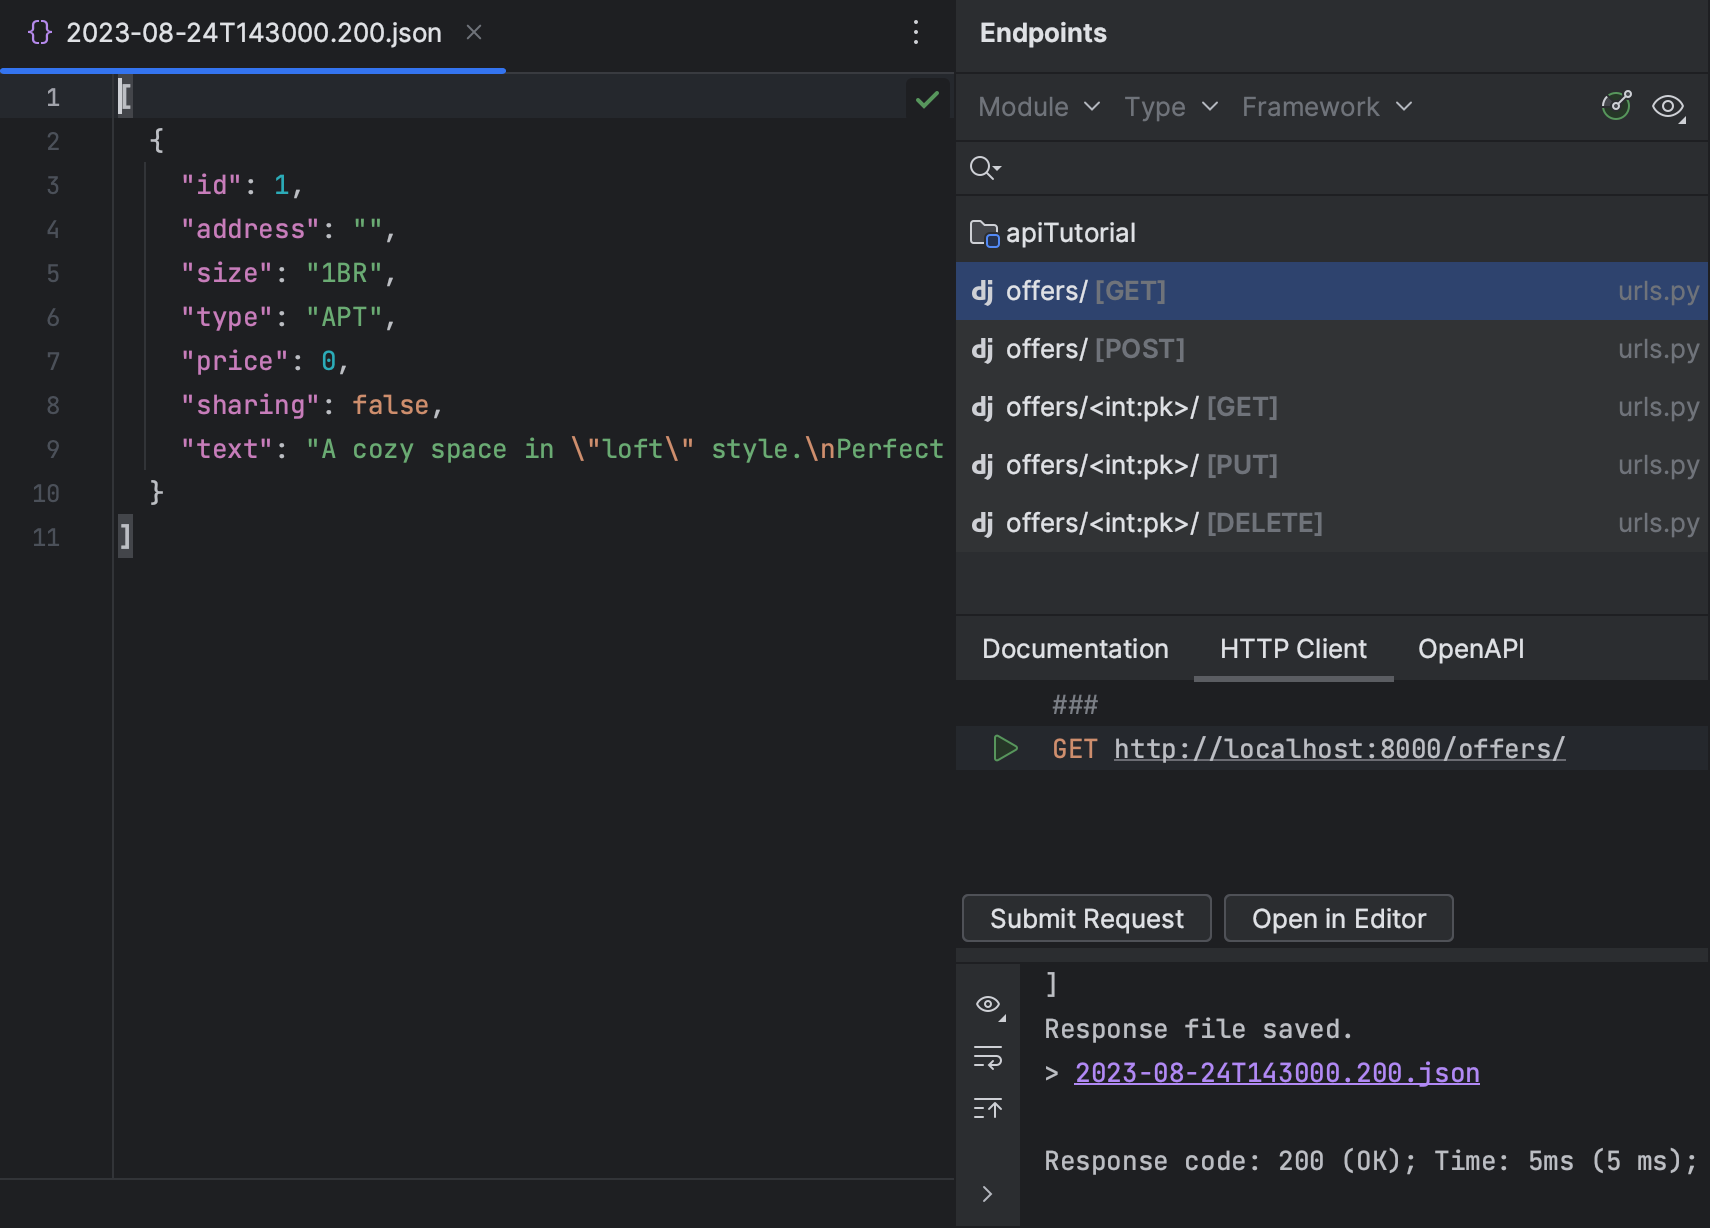
Let’s go back to the Endpoints tool window. Select offers/GET in the list and switch to the HTTP Client tab at the bottom. Edit the port number if needed and then click Submit Request.
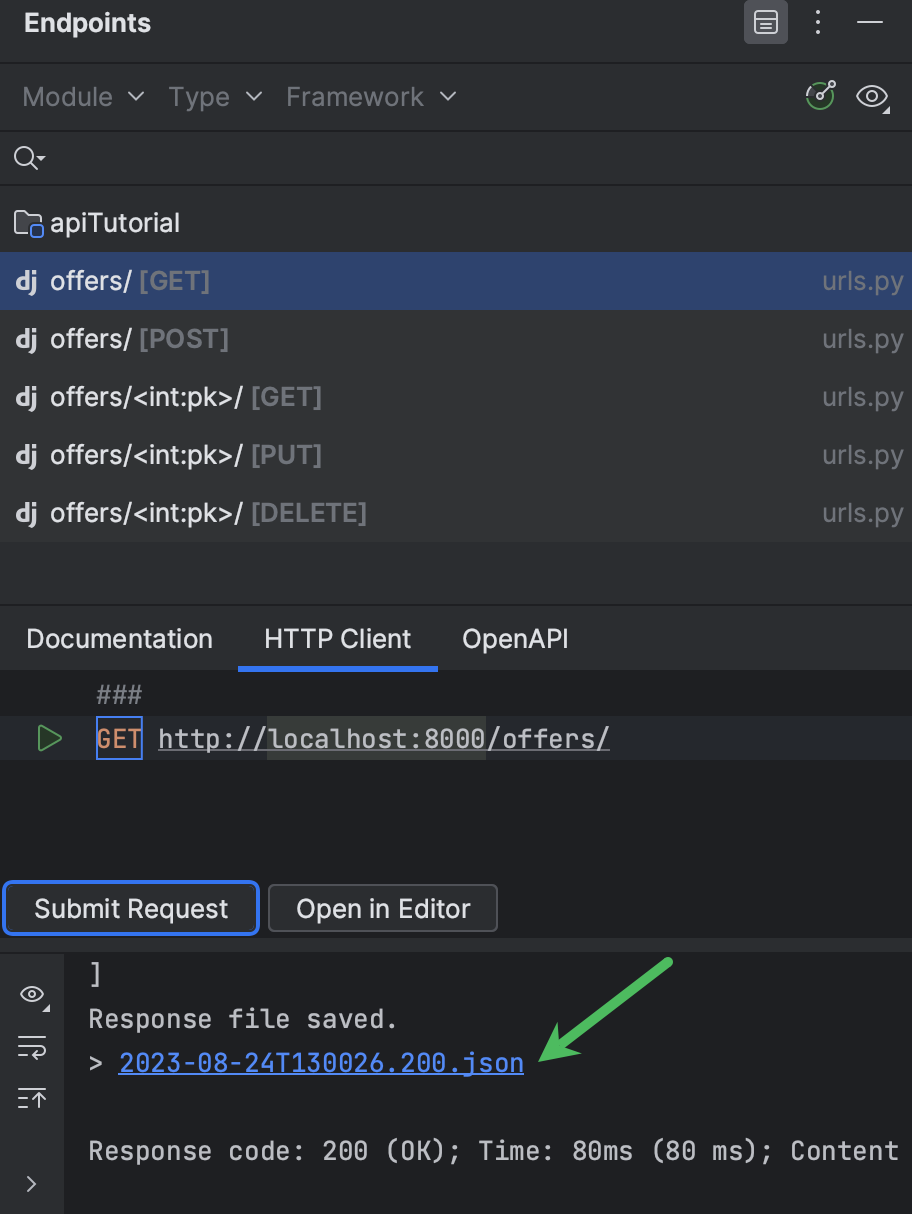
PyCharm runs the request and saves the response body to a file. You can either scroll up to explore the response or click the link to open the file in the editor.
Let’s submit a DELETE request to remove the second offer (DELETE http://localhost:8000/offers/2/) and then submit another request for the list of available offers. Now only one offer is available.
Another amazing feature of Django REST framework is its browsable API. Opening http://127.0.0.1:8000/offers/ in your browser brings you to a page where you can view the list of available offers and add new ones.

Implementing generic class-based views
When speaking about the amazing features of Django REST framework, it’s impossible not to mention generic class-based views. Let’s use them to rewrite the code in rental/views.py:
from rest_framework import generics
from rental.models import Offer
from rental.serializers import OfferSerializer


class OfferList(generics.ListCreateAPIView):
    queryset = Offer.objects.all()
    serializer_class = OfferSerializer


class OfferDetails(generics.RetrieveUpdateDestroyAPIView):
    queryset = Offer.objects.all()
    serializer_class = OfferSerializer
Now each view is just three lines of code! You only need to worry about choosing the right generic class to inherit from. As we’re not using feature-based views anymore, we need to update rental/urls.py:
urlpatterns = [
    path('offers/', views.OfferList.as_view()),
    path('offers/<int:pk>/', views.OfferDetails.as_view()),
]
Will the API work now? Let’s check. This time, we’ll attempt to submit invalid data to see how validation works.
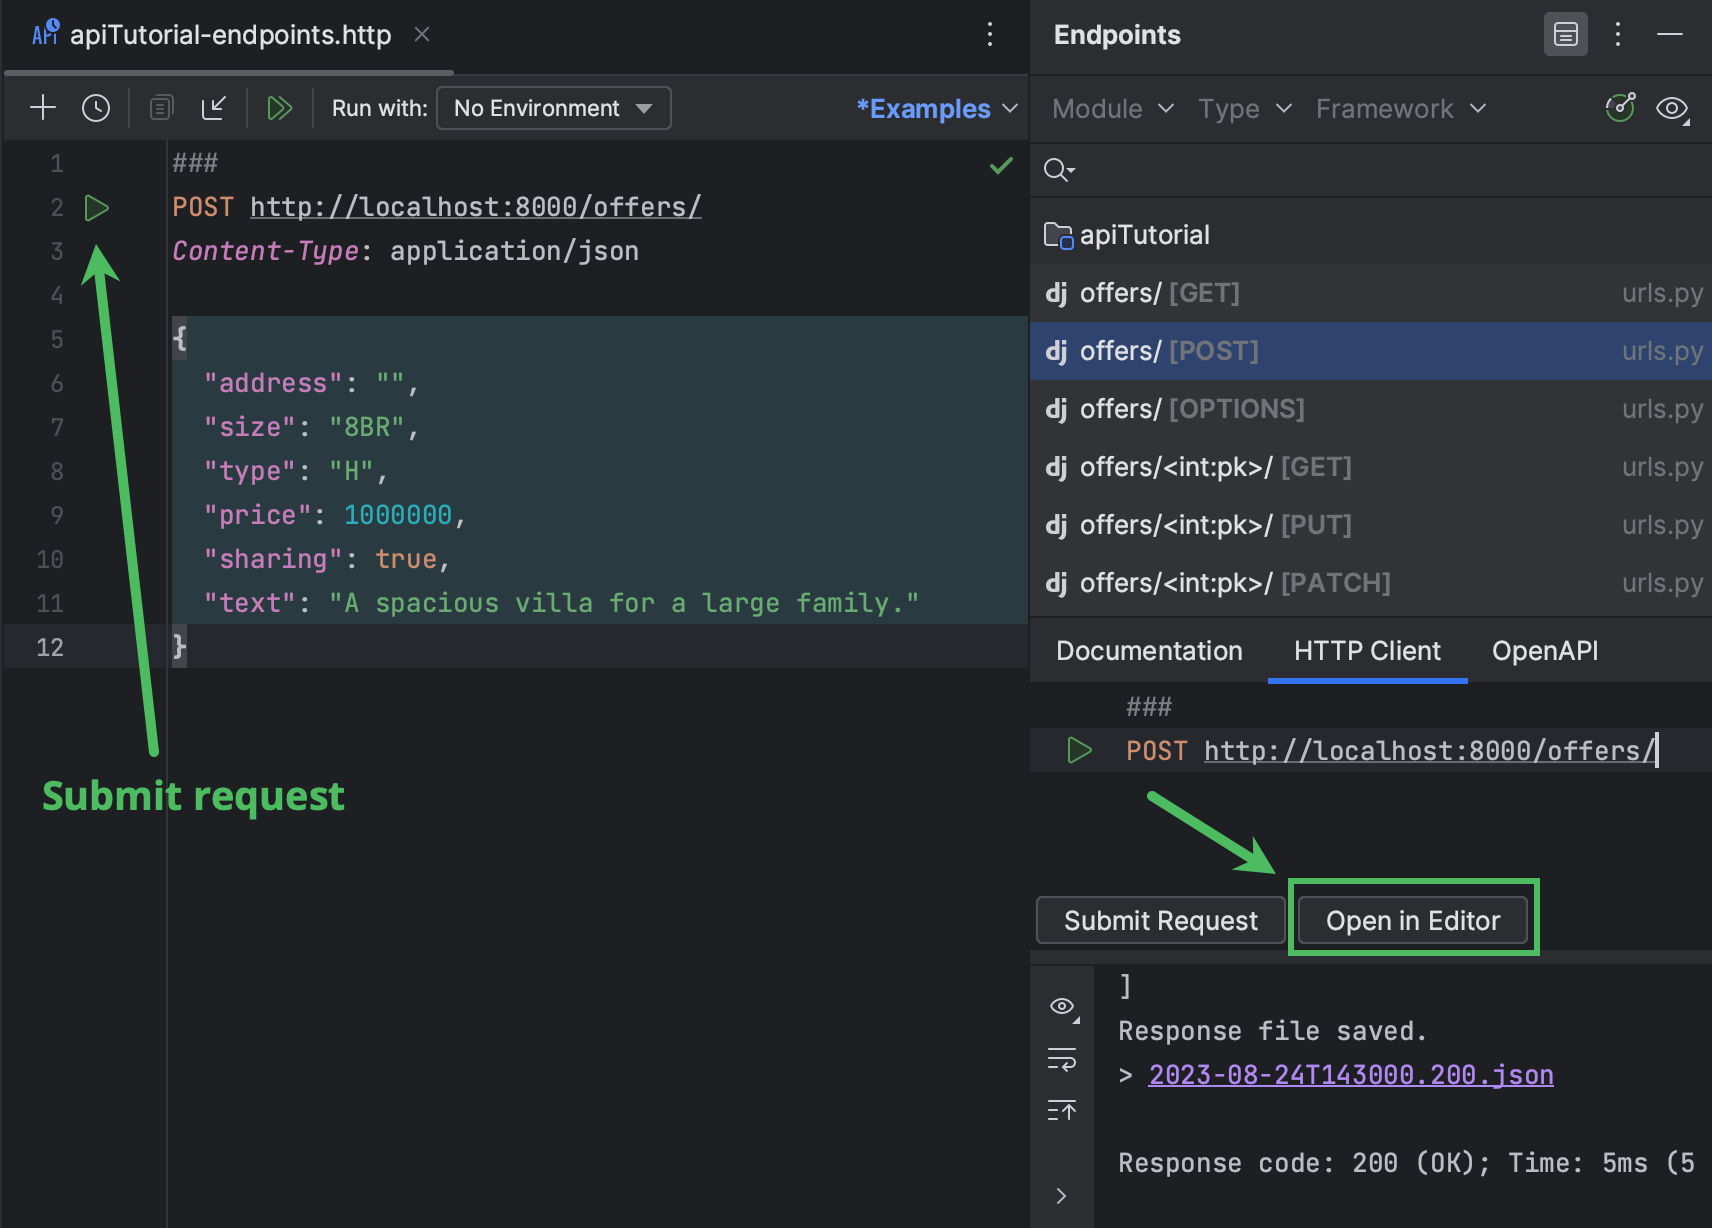
Go to the Endpoints tool window. Now there are additional OPTIONS and PATCH methods, which come from generic views. Select offers/[POST] from the list of endpoints and click Open in Editor. PyCharm creates an .http file and copies the endpoint into it. Provide the request body in JSON format and submit the request.
POST http://localhost:8000/offers/
Content-Type: application/json

{
  "address": "",
  "size": "8BR",
  "type": "H",
  "price": 1000000,
  "sharing": true,
  "text": "A spacious villa for a large family."
}
In the Services tool window that opens, you’ll notice that the response has the 400 Bad Request status. Click the link to open the JSON file with the response.
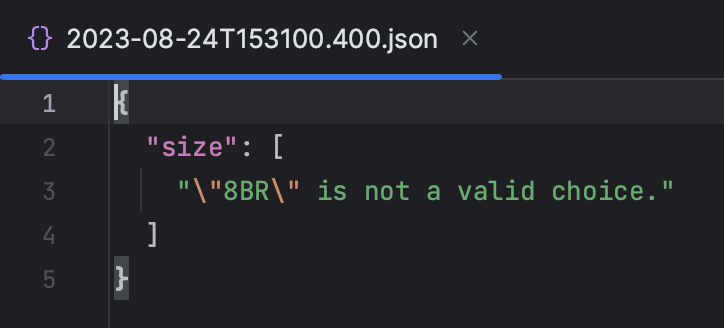
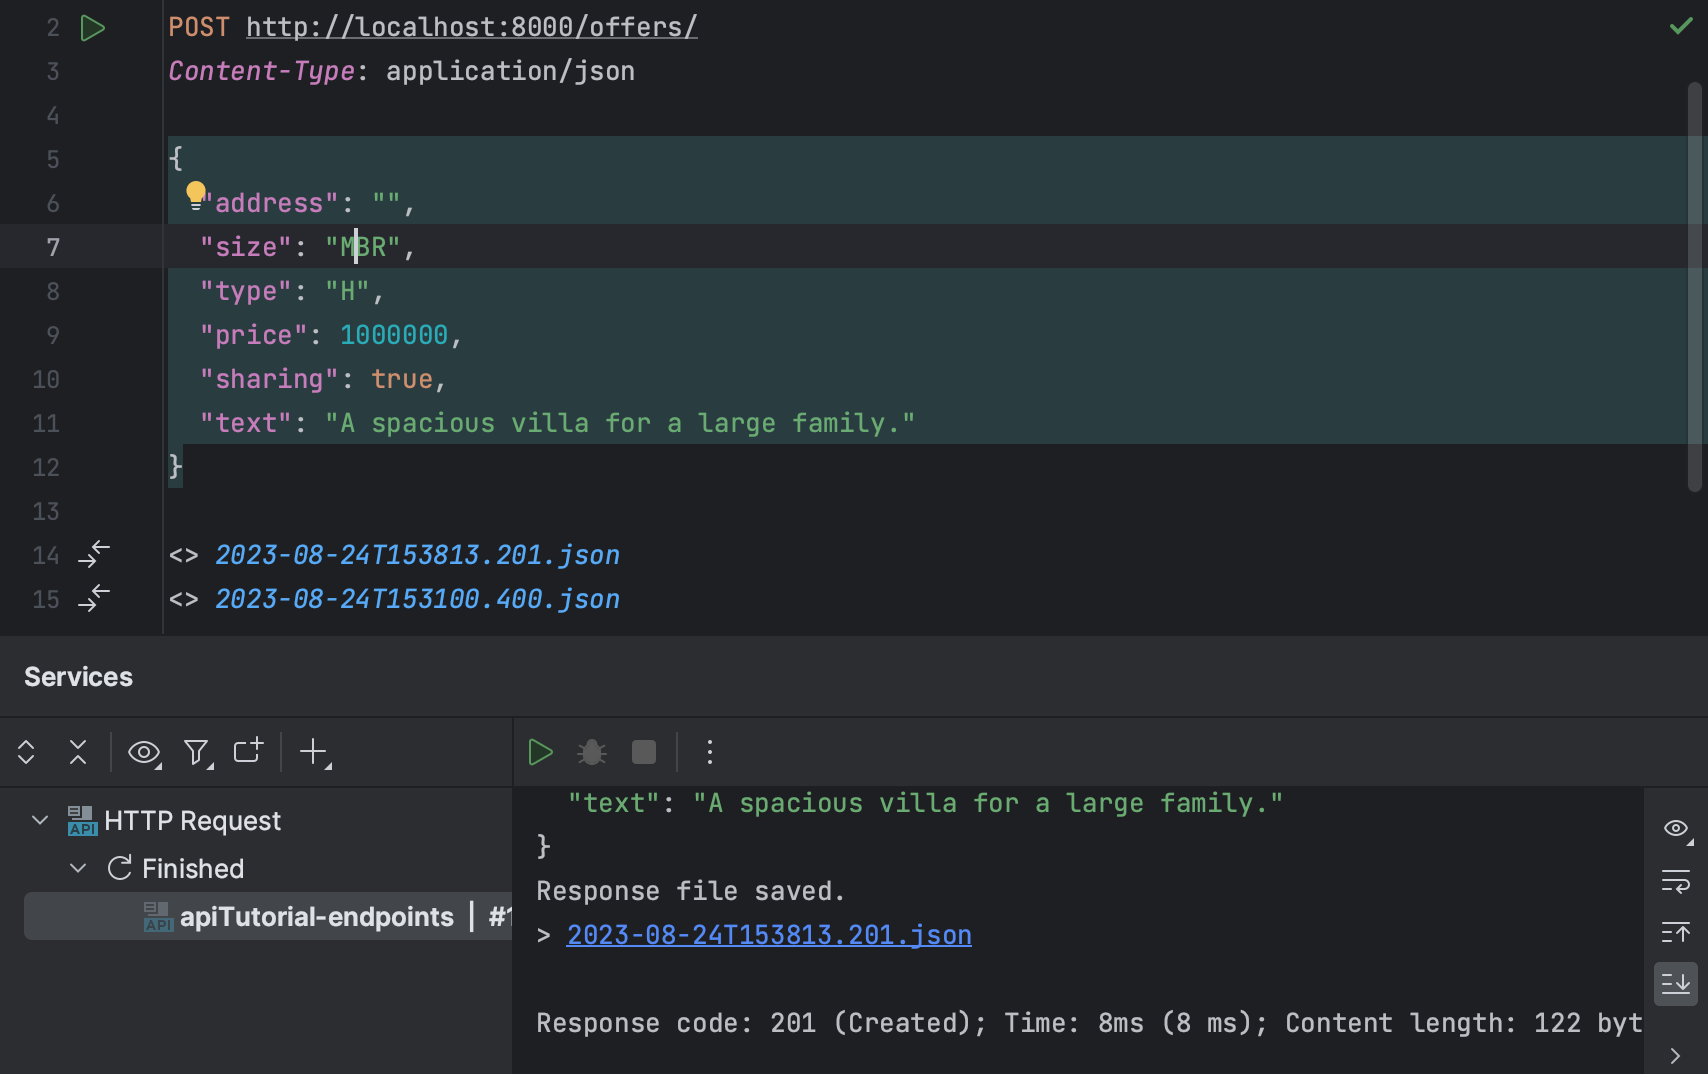
As you can see, the offer hasn’t been added, because we specified the wrong value in size. According to the Offer model, we should use MBR when there are more than 3 bedrooms. Let’s edit the request and submit it again.
Enabling authentication and permissions
At the moment, anyone who knows the endpoint address can add, edit, and remove offers. This is not a normal situation in the real world. Normally, you’d like to have control over who can do what with your API. That can be achieved by implementing authentication and permissions.
Introducing users
First of all, we need to introduce the concept of users. Let’s start by adding the author field to the Offer model:
author = models.ForeignKey('auth.User', related_name='offers', on_delete=models.CASCADE)
This field has the ForeignKey type, which means that it’s used to represent the relationships between offers and the users who create them.
As we’ve updated the model, we need to reset the database and recreate the rental_offer table in it, now with the author field. To achieve this, perform the following steps:
- Open the manage.py console ( ⌥R / Ctrl+Alt+R ) and run the following commands one at a time:
> flush
> migrate rental zero
- In the rental/migrations directory, remove all migrations, keeping only __init__.py.
- Then continue in the manage.py console:
> makemigrations
> migrate
To make sure that you are ready to proceed, go to the Database tool window and open the rental_offer table. It should have the author_id column.
Then open rental/serializers.py and add UserSerializer. We will use Django’s built-in authentication system, so we will just import the existing User model:
from django.contrib.auth.models import User
...

class UserSerializer(serializers.ModelSerializer):
    offers = serializers.PrimaryKeyRelatedField(many=True, queryset=Offer.objects.all())

    class Meta:
        model = User
        fields = ['id', 'username', 'offers']
Update OfferSerializer to comply with the newly added author field:
class OfferSerializer(serializers.ModelSerializer):
    author = serializers.ReadOnlyField(source='author.username')

    class Meta:
        model = Offer
        fields = ['id', 'address', 'size', 'type', 'price', 'sharing', 'text', 'author']
We also need to define two new views in rental/views.py: one for managing the list of all users and another one for user details. The User model should be imported here, too, and don’t forget to import the newly created UserSerializer from serializers.py as well.
from rental.serializers import OfferSerializer, UserSerializer
...
from django.contrib.auth.models import User
...

class UserList(generics.ListAPIView):
    queryset = User.objects.all()
    serializer_class = UserSerializer


class UserDetails(generics.RetrieveAPIView):
    queryset = User.objects.all()
    serializer_class = UserSerializer
Update the OfferList class to override the default perform_create() method so that the additional author field is passed when creating an offer:
class OfferList(generics.ListCreateAPIView):
    queryset = Offer.objects.all()
    serializer_class = OfferSerializer

    def perform_create(self, serializer):
        serializer.save(author=self.request.user)
Add the following endpoints for users to rental/urls.py:
urlpatterns = [
    path('offers/', views.OfferList.as_view()),
    path('offers/<int:pk>/', views.OfferDetails.as_view()),
    path('users/', views.UserList.as_view()),
    path('users/<int:pk>/', views.UserDetails.as_view()),
]
Making authentication required
Now we need to ensure that only authenticated users are able to add offers through the API. Update both the OfferList and OfferDetails views with the following properties to set permissions. Authenticated users will be able to add and edit offers, and others will be able to view them:
...
from rest_framework import permissions


class OfferList(generics.ListCreateAPIView):
    queryset = Offer.objects.all()
    serializer_class = OfferSerializer
    permission_classes = [permissions.IsAuthenticatedOrReadOnly]

    def perform_create(self, serializer):
        serializer.save(author=self.request.user)


class OfferDetails(generics.RetrieveUpdateDestroyAPIView):
    queryset = Offer.objects.all()
    serializer_class = OfferSerializer
    permission_classes = [permissions.IsAuthenticatedOrReadOnly]
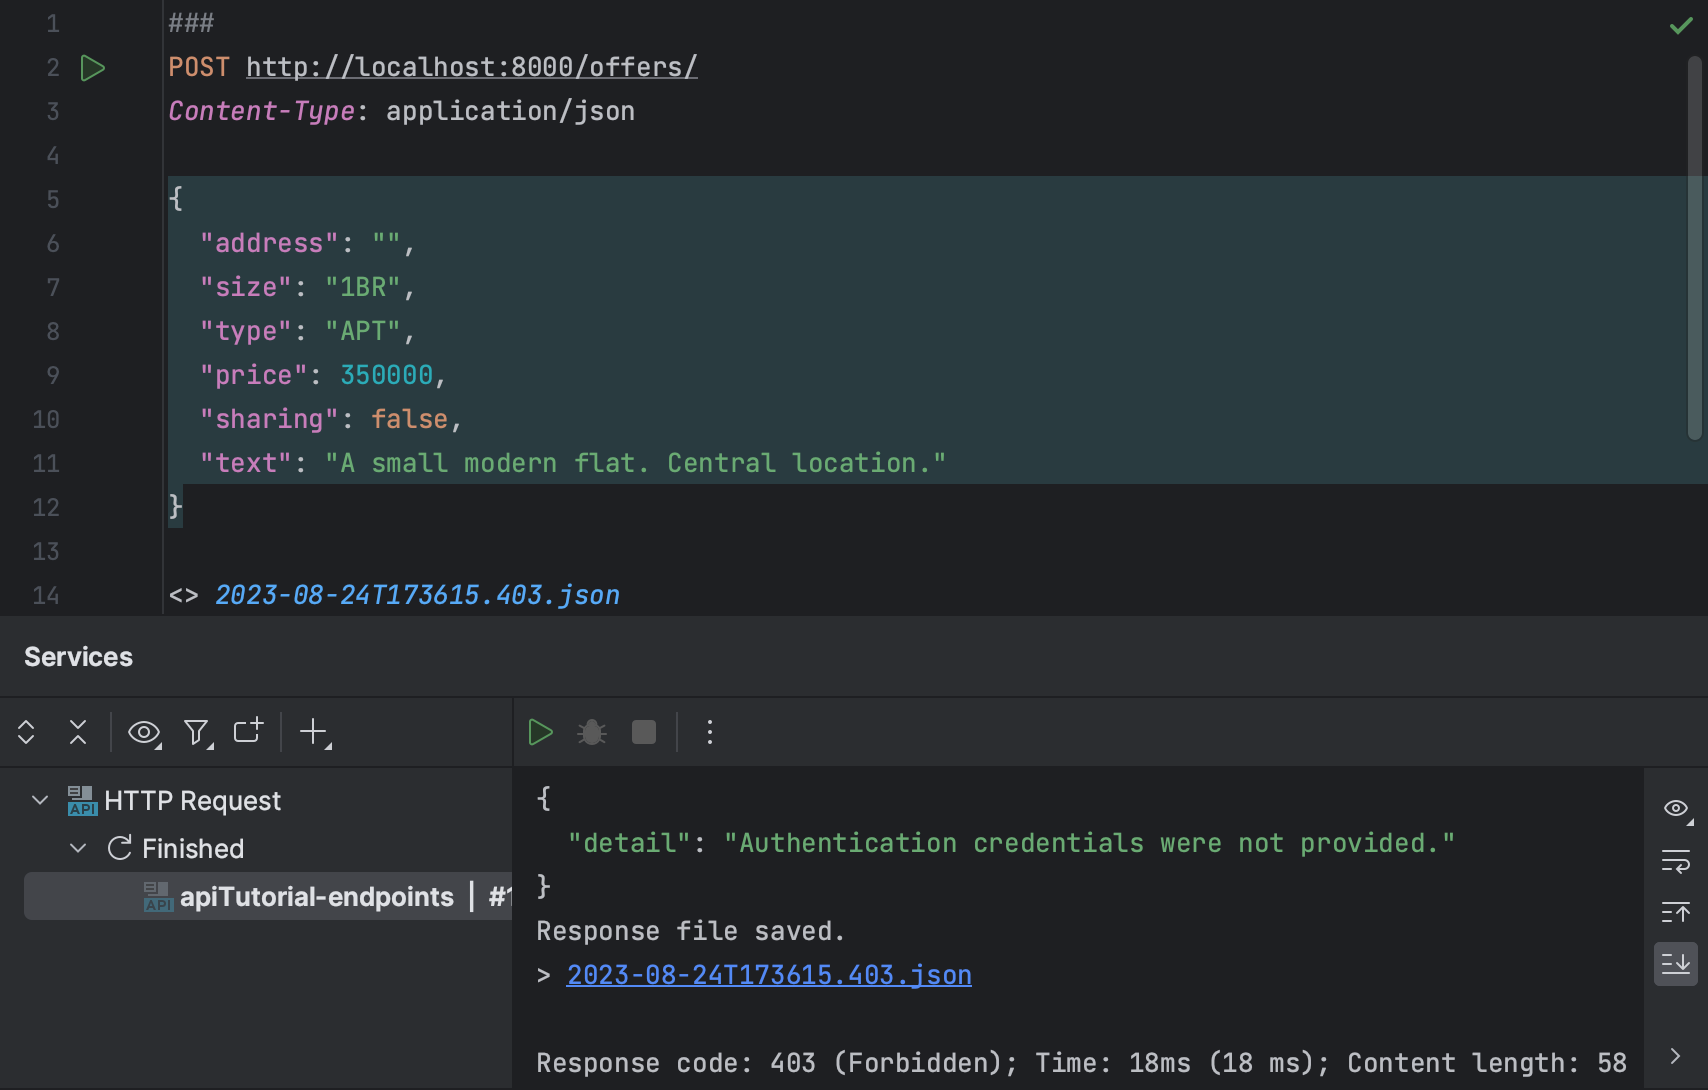
To make sure that things work as expected, let’s run a POST request without authentication:
POST http://localhost:8000/offers/
Content-Type: application/json

{
  "address": "",
  "size": "1BR",
  "type": "APT",
  "price": 350000,
  "sharing": false,
  "text": "A small modern flat. Central location."
}
You should get a 403 Forbidden response.
Let’s create users. Go to the manage.py console and run the createsuperuser command. Remember the username and password you provide.
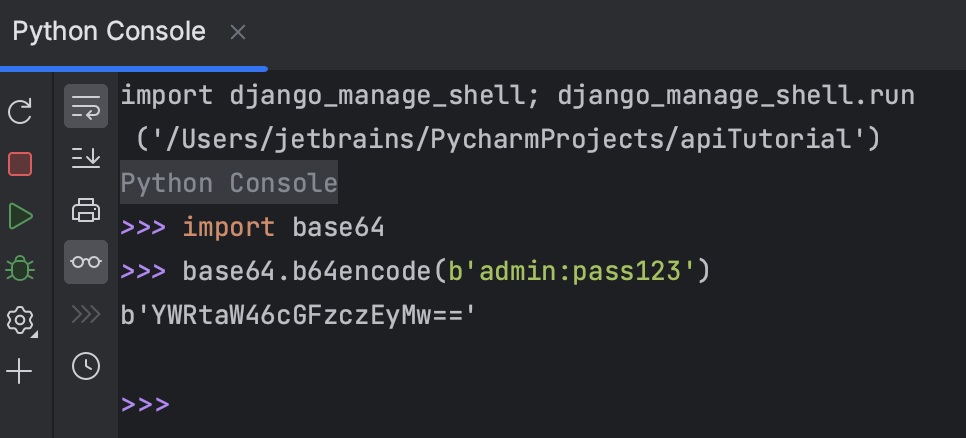
Before proceeding to the next step, you’ll need the Base64-encoded string consisting of the username and password joined by a single colon. For example, we’ve created ‘admin’ with the password ‘pass123’ (merely as an example; in real life, you should always use a much stronger password). Open the Python console and run the following, replacing ‘admin:pass123’ with your user credentials:
>>> import base64
>>> base64.b64encode(b'admin:pass123')
Now let’s run the same request but with the Authorization header.
POST http://localhost:8000/offers/
Authorization: Basic YWRtaW46cGFzczEyMw==
Content-Type: application/json

{
  "address": "",
  "size": "1BR",
  "type": "APT",
  "price": 350000,
  "sharing": false,
  "text": "A small modern flat. Central location."
}
You should get a 201 Created response.
Elaborating on permissions
At the moment, any authenticated user can edit any offer. Let’s set up permissions so that offers can only be edited by their authors.
Create rental/permissions.py and fill it with the following code:
from rest_framework import permissions


class IsAuthorOrReadOnly(permissions.BasePermission):
    def has_object_permission(self, request, view, obj):
        return request.method in permissions.SAFE_METHODS or obj.author == request.user
The IsAuthorOrReadOnly class is subclassed from the Django REST framework BasePermission class. Permission is unconditionally granted if the request method is one of the SAFE_METHODS, which are GET, HEAD, and OPTIONS. Otherwise, the requesting user must be the offer’s author in order to get permission.
Go to views.py, import the newly created permission, and update permission_classes in OfferDetails:
from rental.permissions import IsAuthorOrReadOnly
...

class OfferDetails(generics.RetrieveUpdateDestroyAPIView):
    queryset = Offer.objects.all()
    serializer_class = OfferSerializer
    permission_classes = [
        permissions.IsAuthenticatedOrReadOnly,
        IsAuthorOrReadOnly
    ]
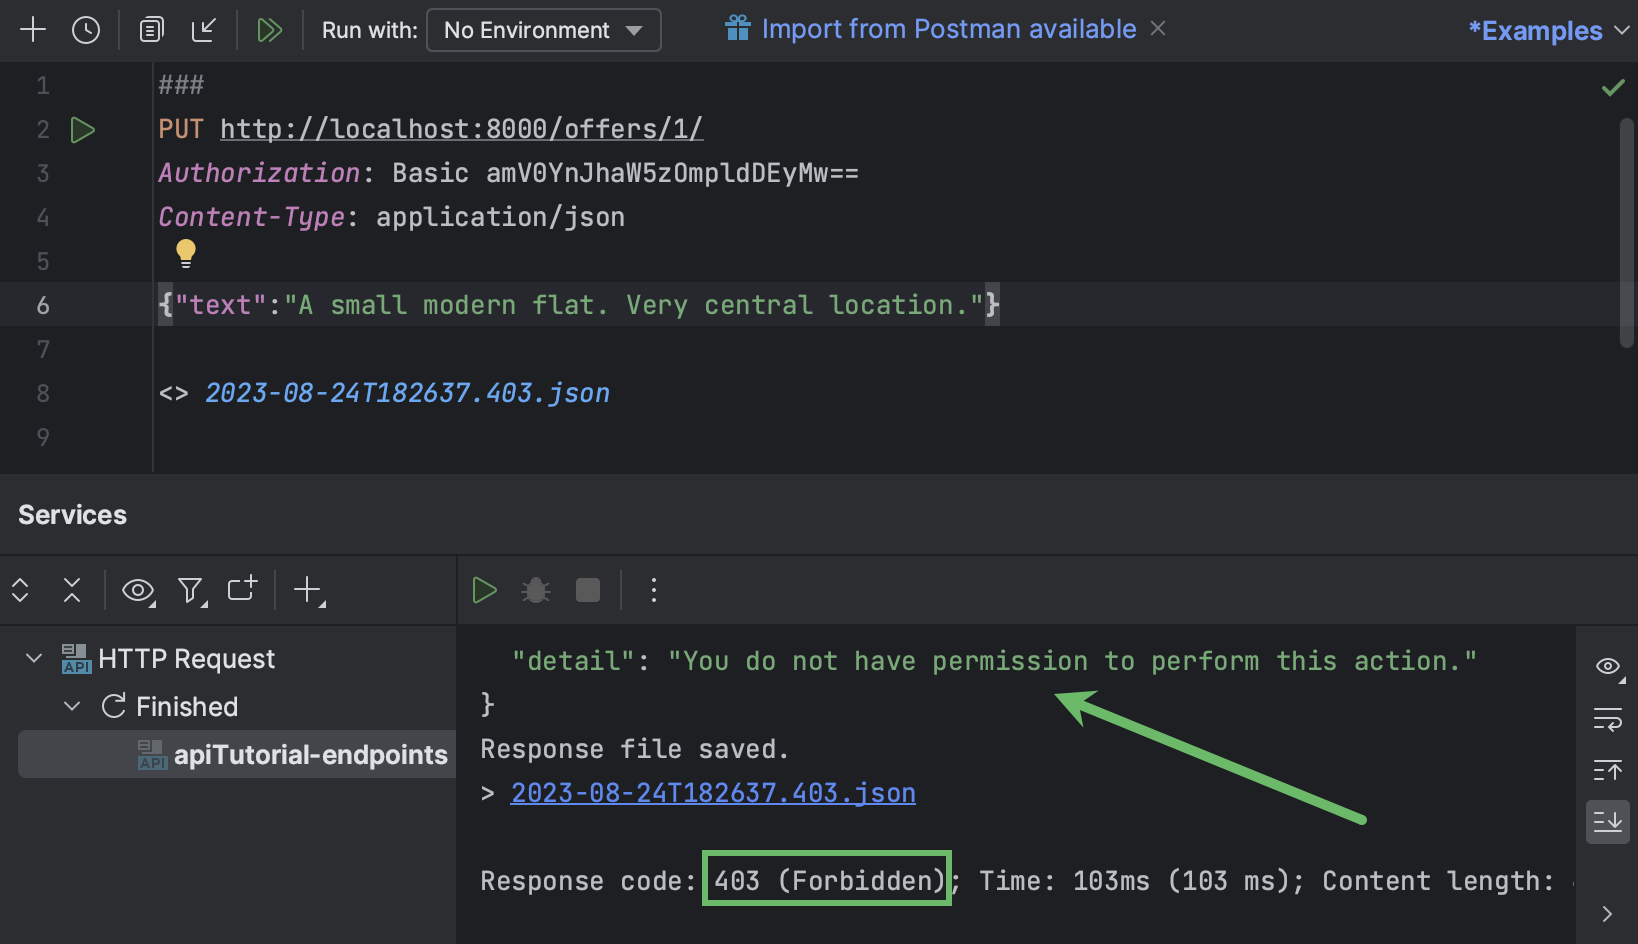
Now create another user by running createsuperuser in the manage.py console (we’ll use ‘jetbrains:jet123’). Then submit the following request to update the offer with ID 1 (created by the admin user):
PUT http://localhost:8000/offers/1/
Authorization: Basic amV0YnJhaW5zOmpldDEyMw==
Content-Type: application/json

{"text":"A small modern flat. Very central location."}
You should get 403 Forbidden with “You do not have permission to perform this action” in the response details.
Then try the same but with admin’s credentials:
PUT http://localhost:8000/offers/1/
Authorization: Basic YWRtaW46cGFzczEyMw==
Content-Type: application/json

{"text":"A small modern flat. Very central location."}
You should get 200 OK.
Do we now also have authentication in the browsable API? Let’s see. Open http://127.0.0.1:8000/offers/1/ in the browser. There’s no longer a form associated with the POST method, and the DELETE button is gone as well. We need to enable the login page to be able to use browsable API for such operations.
Go to the project’s project urls.py and update it as follows:
from django.urls import path, include

urlpatterns = [
    path('', include('rental.urls')),
    path('api-auth/', include('rest_framework.urls')),
]
Now update the page in the browser. You should see Log in in the upper right corner. Click it and enter credentials of one of the previously created users to be able to perform actions on offers.
Conclusion
By completing this tutorial, you have learned to implement the following features of Django REST framework:
ModelSerializerfor creating serializers based on models.- Generic class-based views for writing API logic in a concise and idiomatic way.
- Browsable API for easy visualization of available endpoints and data.
- Django authentication system for configuring user permissions.
Developing Django APIs in PyCharm Professional is smooth and easy thanks to the following:
- Manage.py and Python consoles with code completion.
- Endpoints toolwindow with the list of defined endpoints and available methods.
- Built-in HTTP Client that lets you submit requests and view the history of responses.
The support of the Django REST framework in PyCharm will be further extended. You can follow the issues in our task tracker to stay updated.
Useful links
PyCharm for Django development
PyCharm documentation
- Django support in PyCharm
- Creating a Django project in PyCharm
- Endpoints tool window in PyCharm
- Manage.py console in PyCharm
Other sources
- Download PyCharm Professional
- Repository with the project code
- Create a Django App in PyCharm tutorial
- Django REST framework documentation