Create a Django App in PyCharm

The core idea of Django is to let developers build their applications quickly. When you master this framework, the path from concept to production-ready web application will be a short one. However, if you want to go even faster, you can learn to create Django apps in PyCharm.
This tutorial will guide you through all of the steps to create a simple Django application that shows the current air temperature at your location. To bring in some interactivity, the app also lets you browse weather conditions at other random locations.
In this tutorial, you will learn how to:
- Create a Django project in PyCharm.
- Write models, views, and templates.
- Make API calls and process responses.
- Connect to databases and fill them with data.
To get the full application code, you can clone the repository. For information about cloning, see the PyCharm documentation.
Prerequisites
This tutorial is intended for developers who already have a few years’ experience with Python. Therefore, we assume that you have Python installed on your computer. If this is not the case, don’t worry! You can download and install your desired Python version when you start creating your first project in PyCharm.
As support for Django is a professional feature, you will need PyCharm Professional. There’s a free 30-day trial period for new users, and if you are a student or a teacher, you can apply for a free educational license. This tutorial was created in PyCharm 2023.1 with the new UI enabled.
For more information and installation instructions for different operating systems, please see the PyCharm documentation.
Kick-start your app
Let’s take our first steps. There aren’t many, and by the end, you will have the app running at the basic level.
Create a Django project in PyCharm
To create your project, launch PyCharm and click New Project. If PyCharm is already running, select File | New Project from the main menu.
In the New Project window that opens, specify the following:
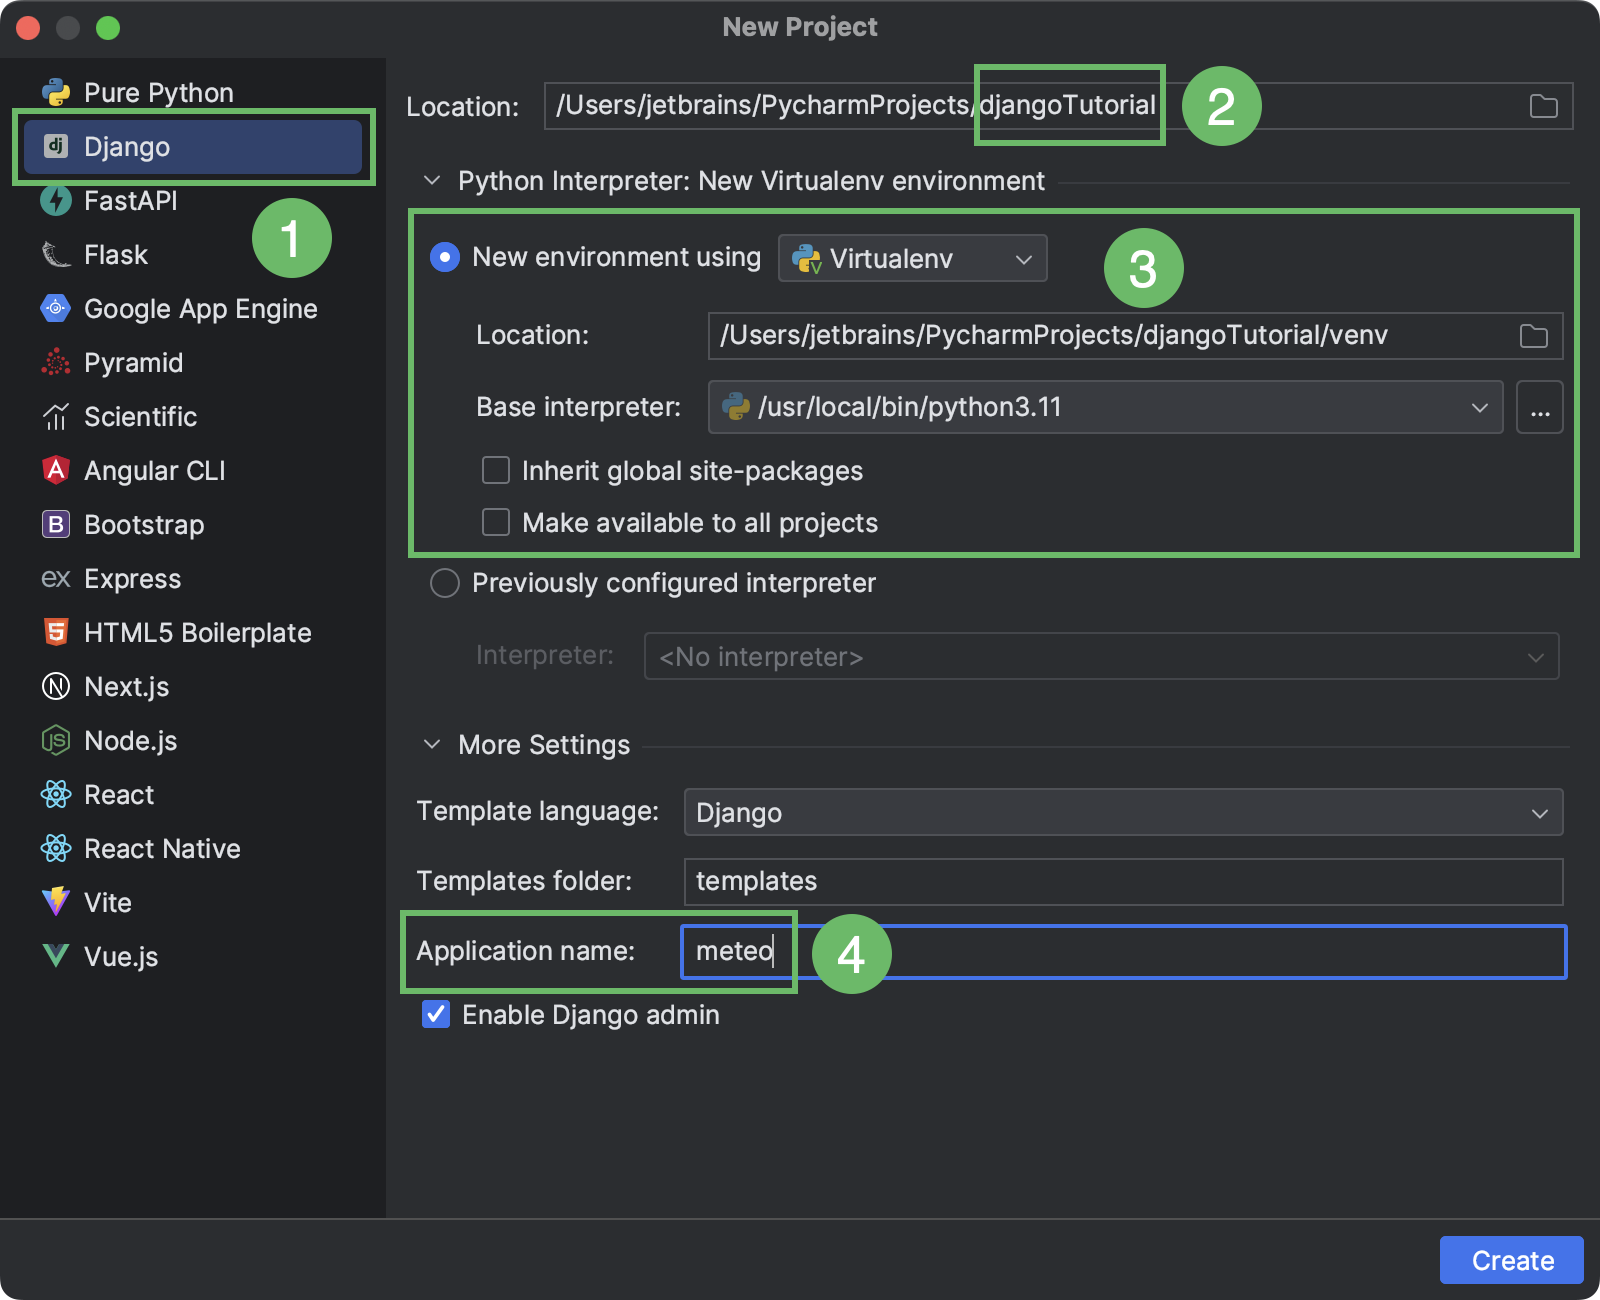
- Choose Django as your project type.
- Type the name of the directory where your project will be located. This will also be used as your project name.
- Create a virtual environment for your new Django project where PyCharm will install your dependencies. For the purpose of this tutorial, we will select the virtualenv option.
- PyCharm lets you create a Django application within your project right away. Be sure to name the application here.
Click Create when you are ready. PyCharm creates the file structure, and installs Django and other required dependencies.
Click the Run icon at the top of the window to start the Django server:
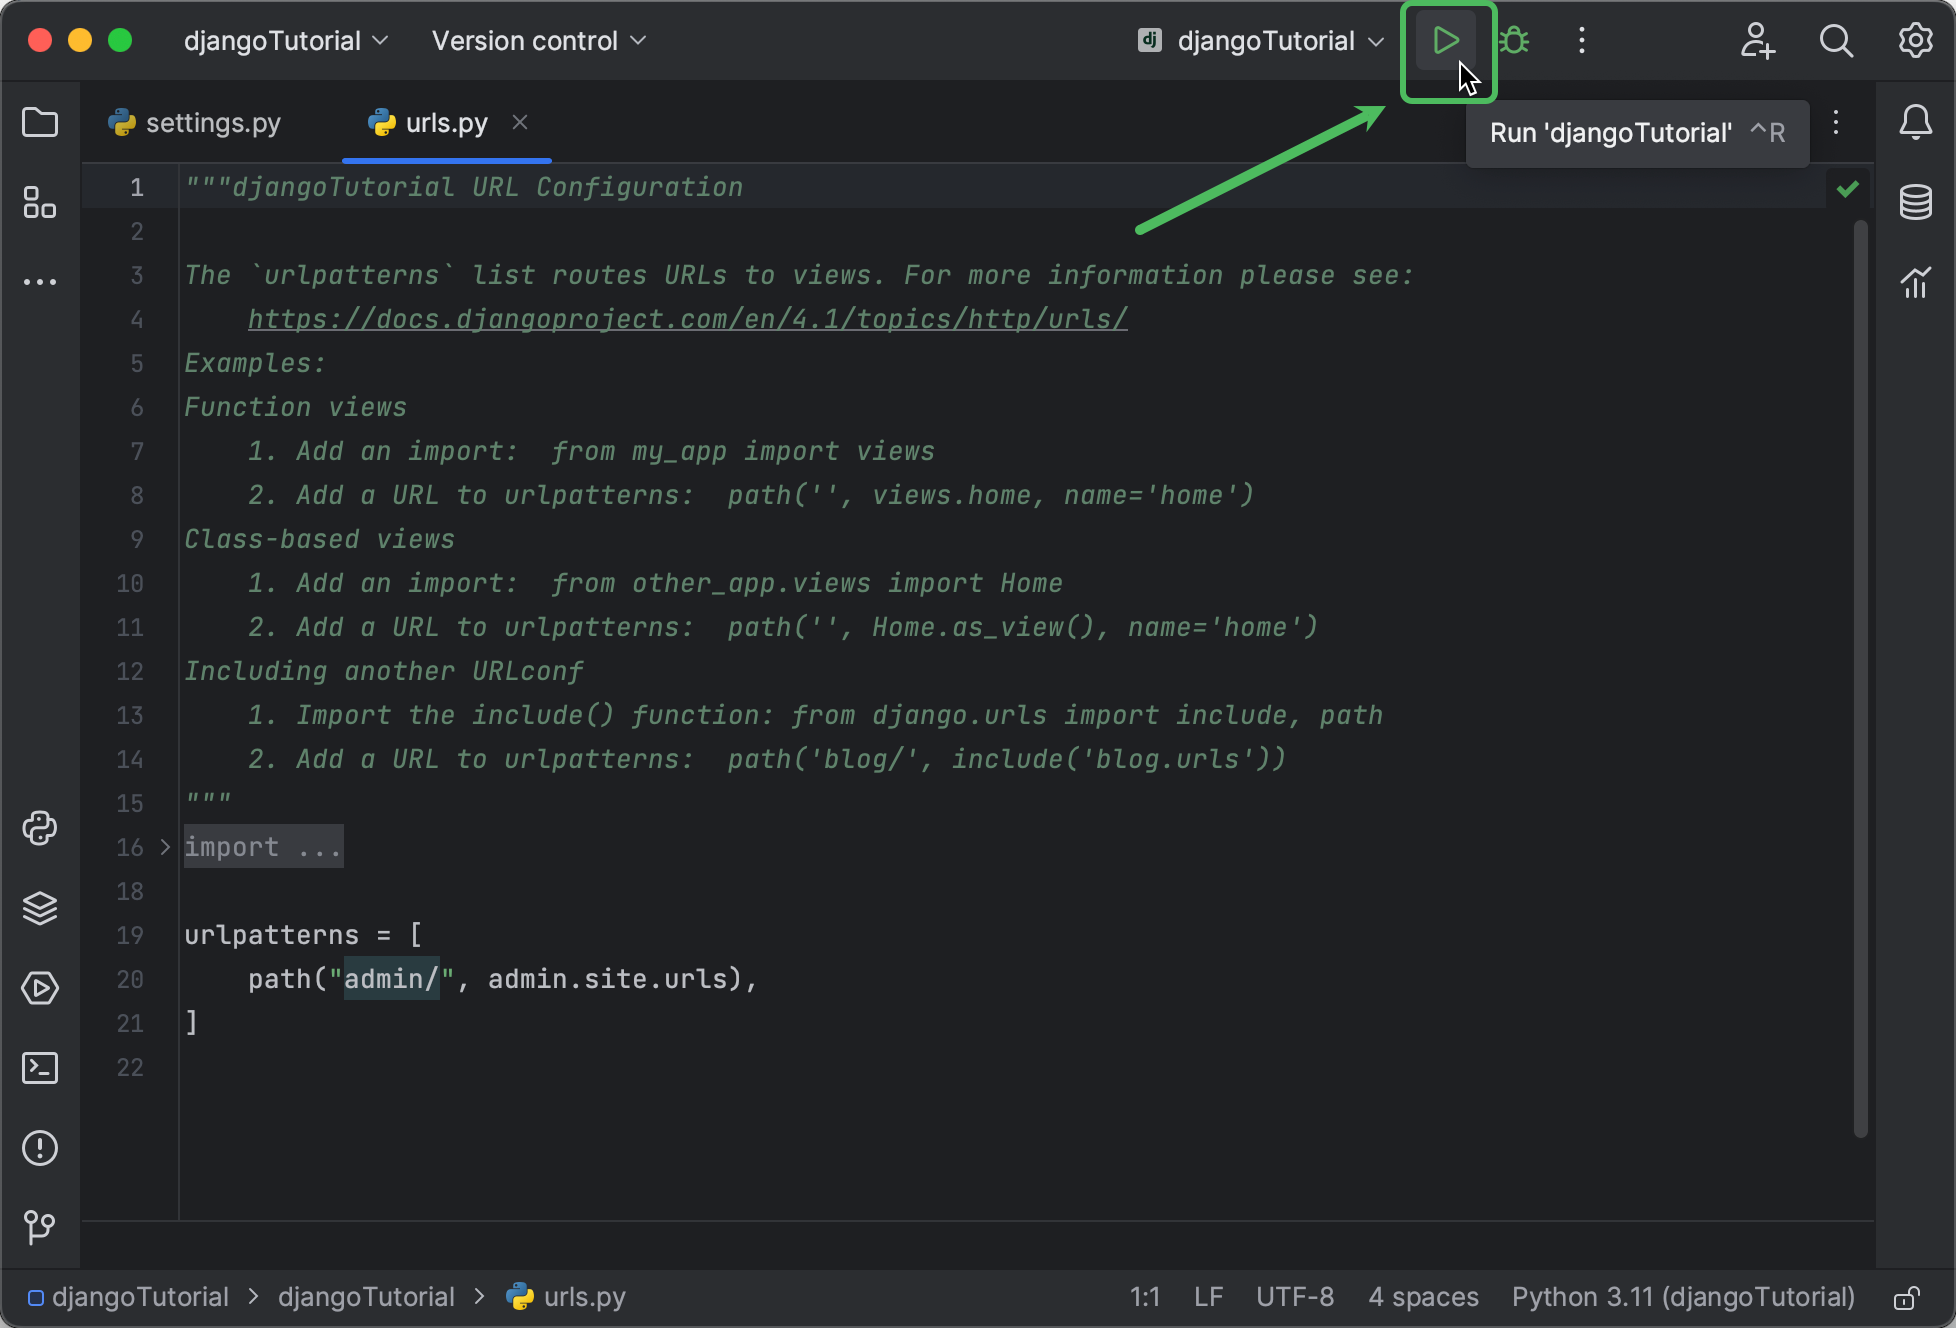
The Run tool window will now open. Follow the link to open the browser window:
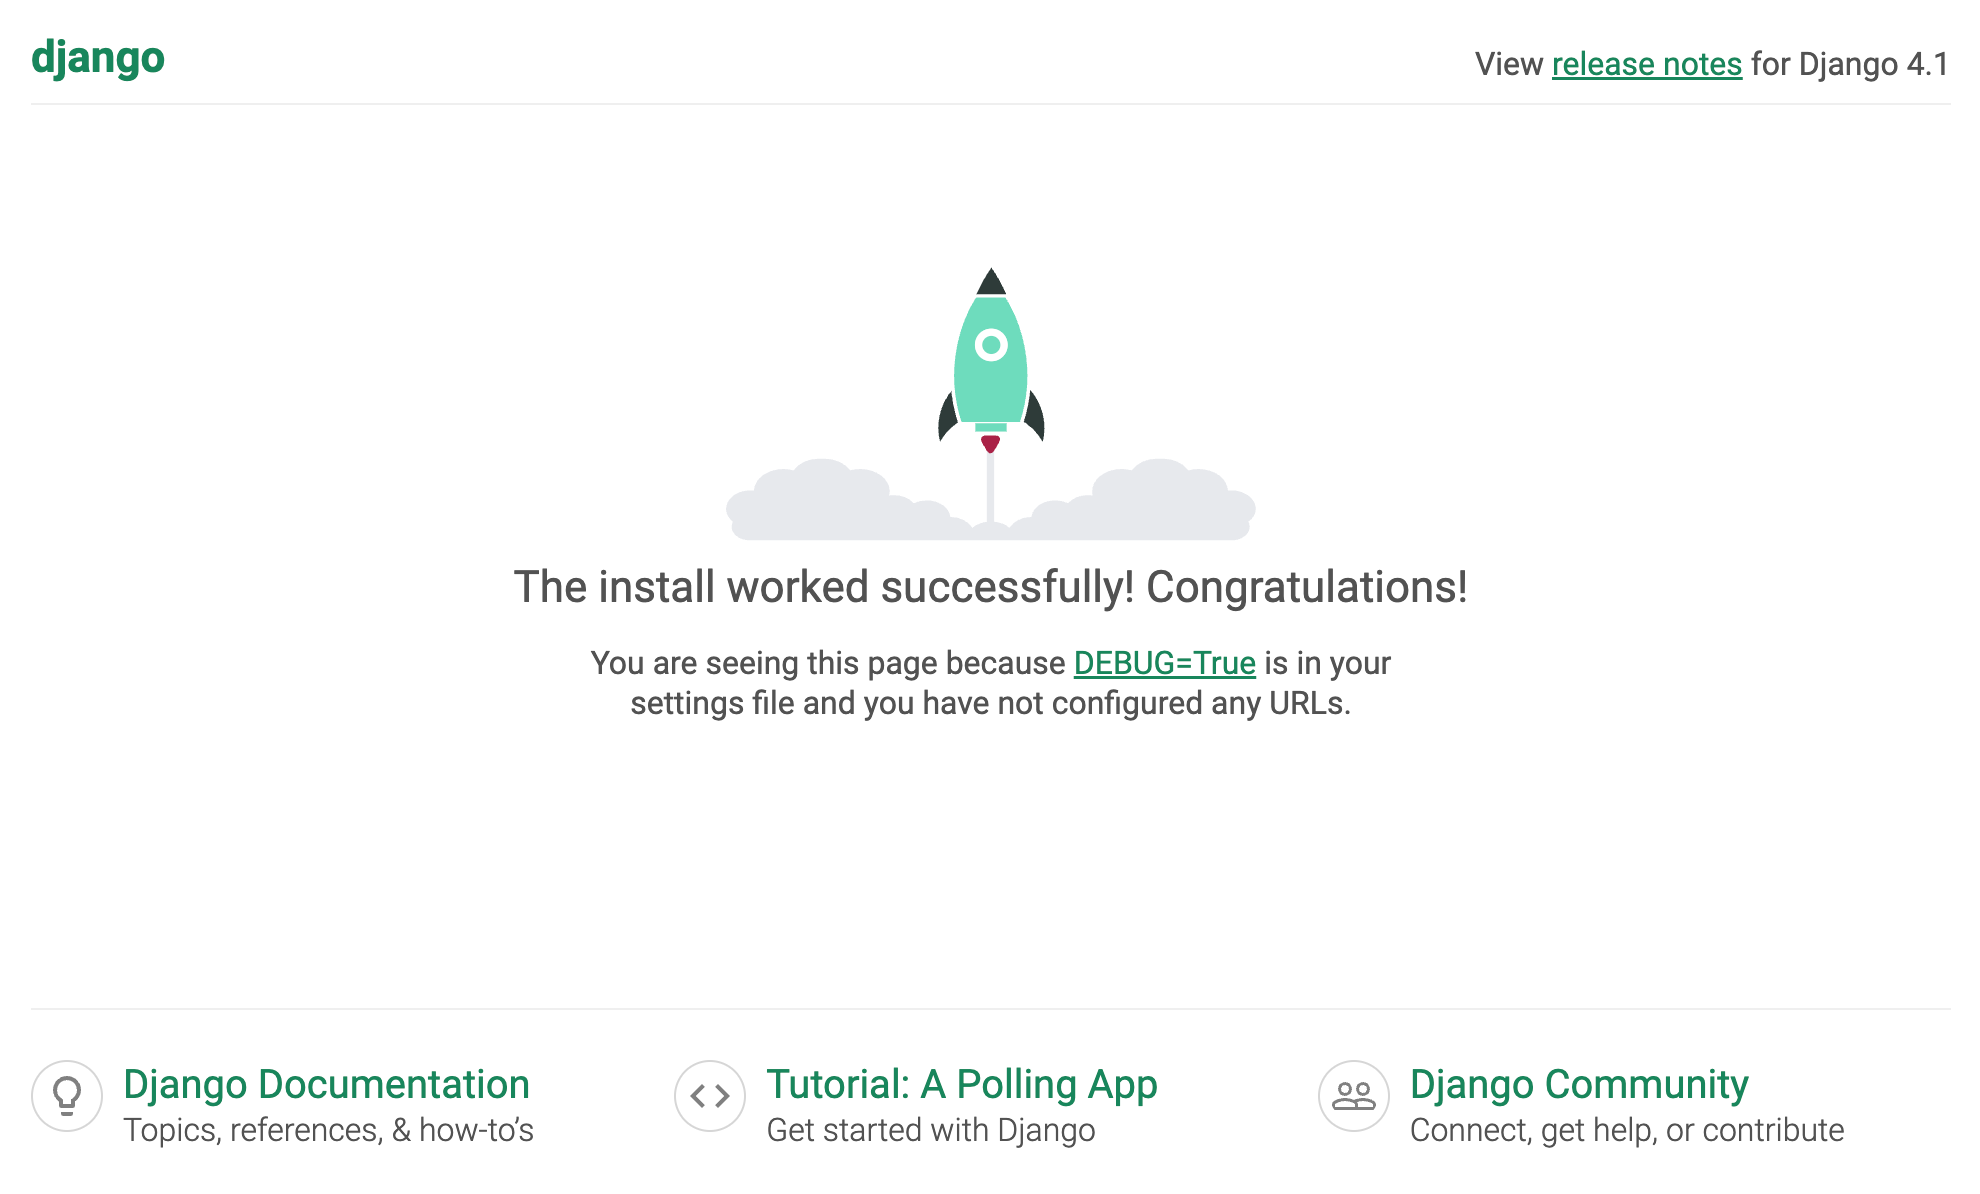
It only took a couple of minutes to get a Django server running in PyCharm. That’s a good start, but the best things are still ahead.
Write your first view
It’s now time to start creating the application logic. In Django, that’s done by writing classes or functions in views.py.
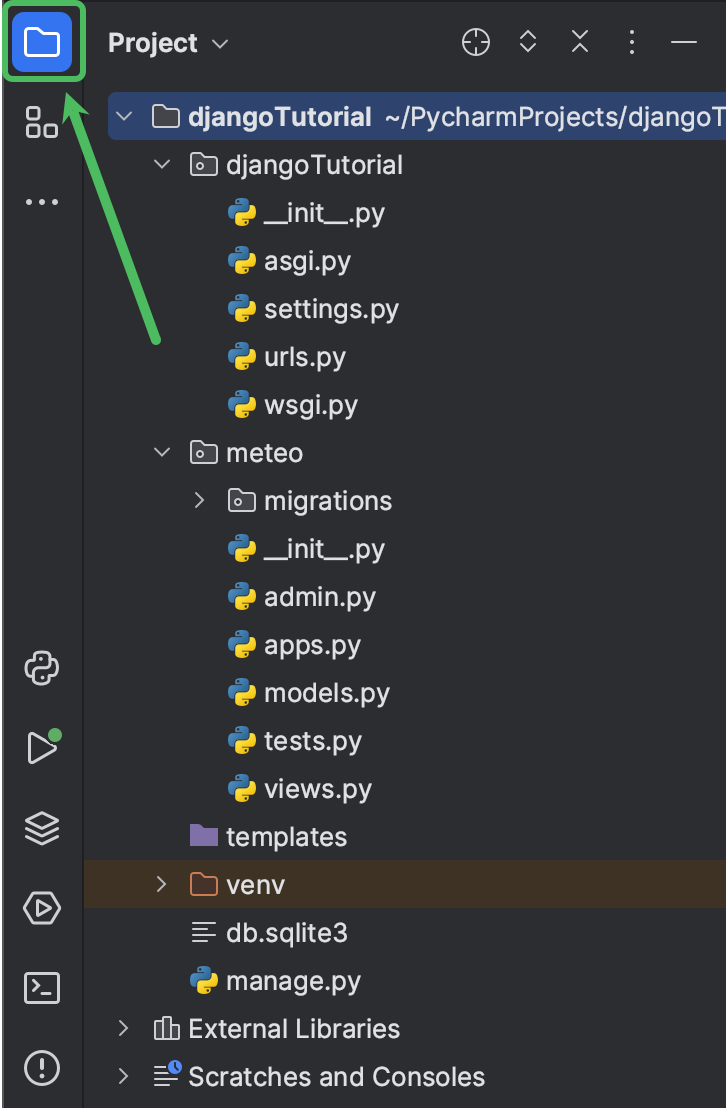
You can explore the structure of your project at any time either by clicking the folder icon in the upper left corner of the PyCharm window or by pressing ⌘1 / Alt+1:
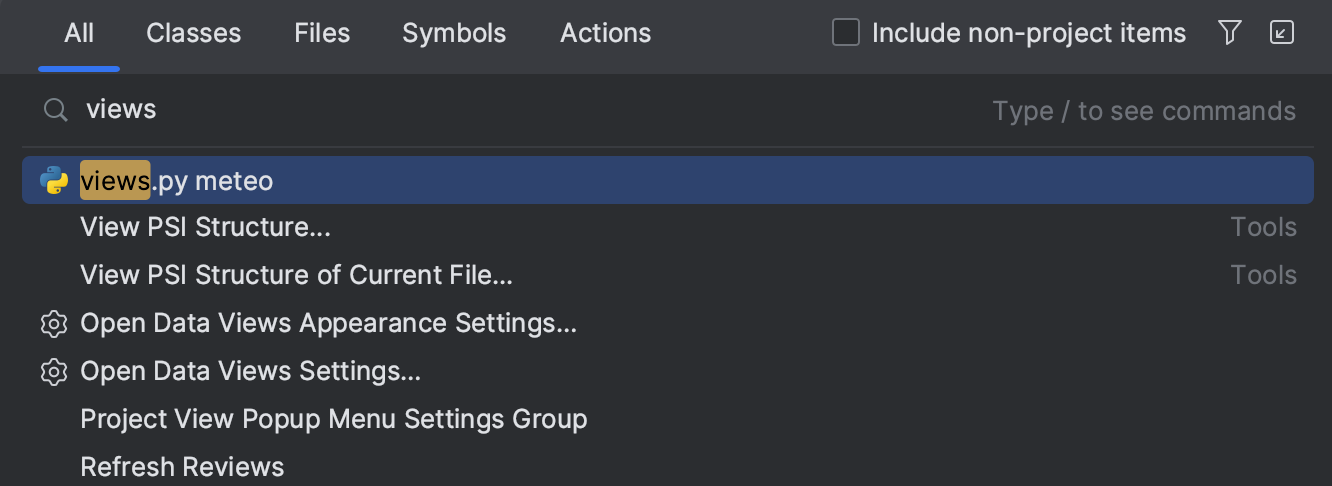
This tutorial provides shortcuts that save a lot of time, such as pressing ⇧ (Shift) twice to open the Search Everywhere window. This shortcut lets you find literally anything, including your project files, settings, and actions.
Let’s use it to quickly open views.py.
Type views, move the cursor to views.py at meteo, and press Enter:
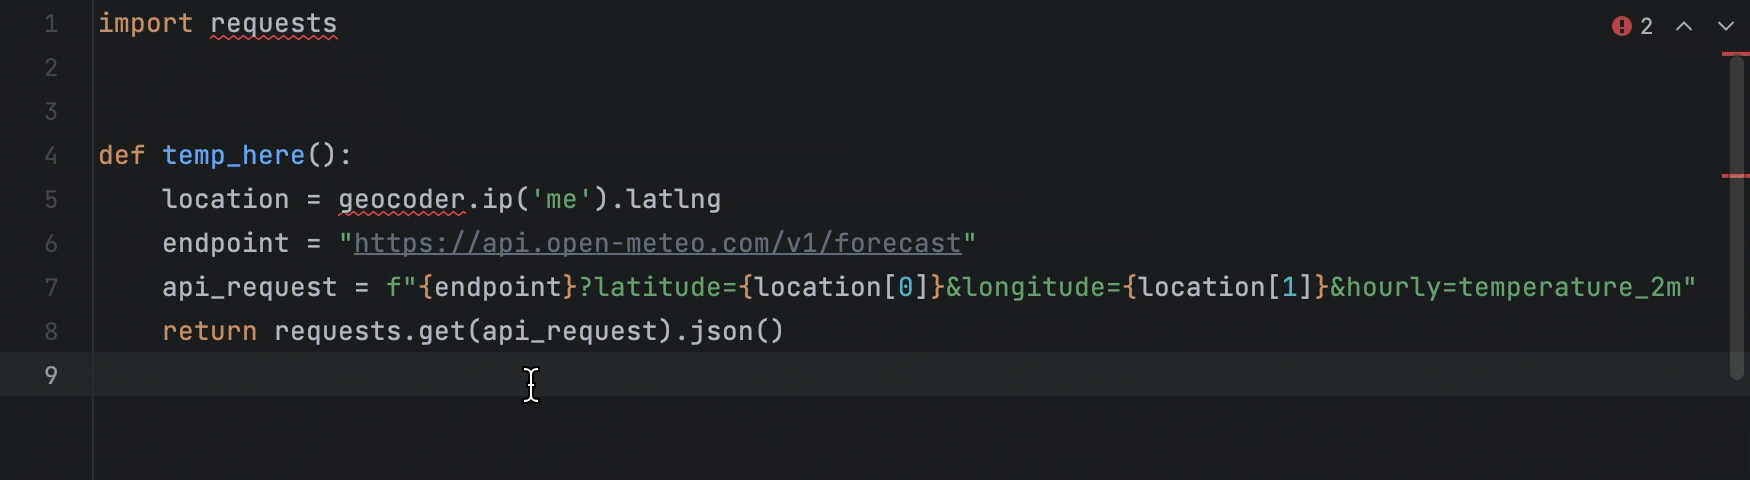
An editor tab with views.py will open. Let’s start with writing a temp_here function, which will return the current temperature at our location.
Paste the following code in the editor:
import requests


def temp_here():
    location = geocoder.ip('me').latlng
    endpoint = "https://api.open-meteo.com/v1/forecast"
    api_request = f"{endpoint}?latitude={location[0]}&longitude={location[1]}&hourly=temperature_2m"
    return requests.get(api_request).json()
What’s happening here? First of all, we are importing the requests library which is required to make API calls. If there’s a red squiggly line in the import statement, it means that the package isn’t available in the selected Python interpreter.
Hover the cursor over it and select Install package requests.
To obtain the current temperature, temp_here makes a call to the Weather Forecast API. It’s a free API that doesn’t require an API key. All we need to know is the endpoint (https://api.open-meteo.com/v1/forecast) and the coordinates. For the latter, we’ll use Geocoder – a very simple Python library that lets you retrieve coordinates of various locations.
Place the caret over geocoder, which is highlighted with a red squiggly line, and press ⌥Enter / Alt+Enter to see the available quick fixes. Select Install and import package ‘geocoder’:
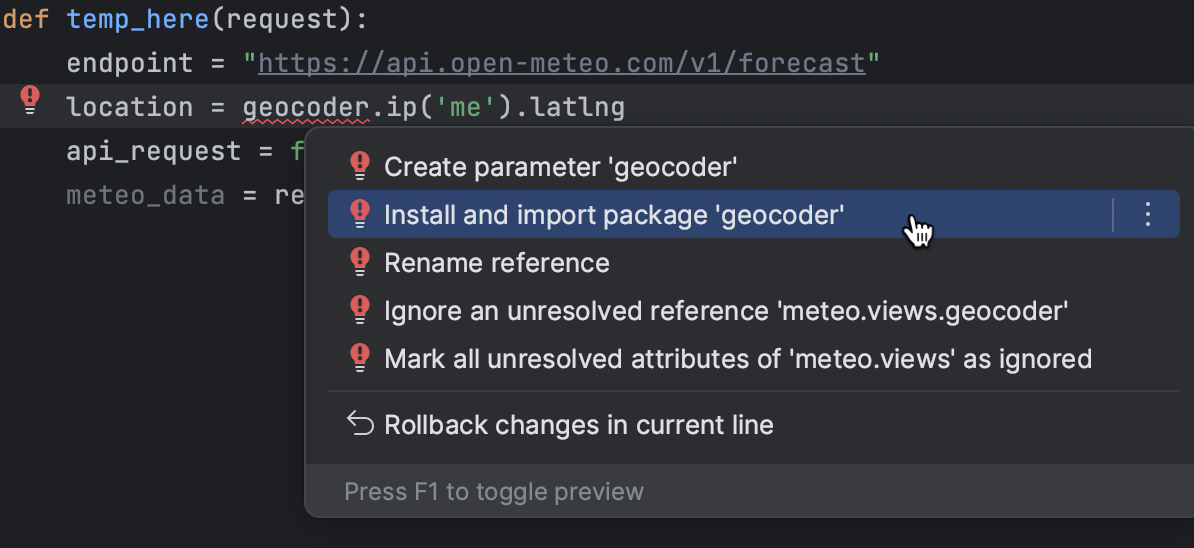
PyCharm installs the package and adds the import statement to the beginning of the file.
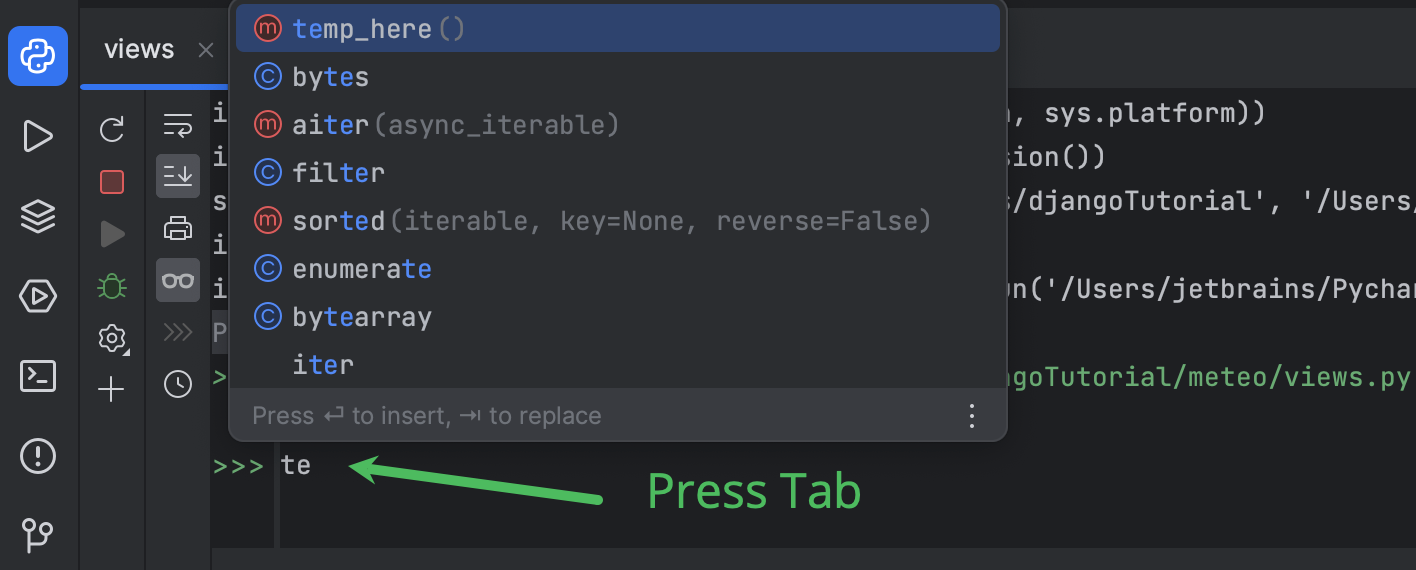
What about making a test request to make sure that everything works as expected? The simplest way to do this is to invoke the function in the Python console.
Let’s use another time saver – Find action. Instead of mousing through menus or memorizing dozens of shortcuts, just press ⇧⌘A / Ctrl+Shift+A and search for Run File in Python Console.
You don’t need to type out whole words. You can use a phrasing like 'rufipy' and still get the desired result:

As you run the command, PyCharm loads the imports and function definition into the console. Now, call temp_here. You can press Tab for code completion:
Examine the API response from the console output. It’s a very long string, but you can find an illustrative representation below.
If you want to explore the response yourself, follow these steps:
- Click the console output 3 times and copy it to the clipboard by pressing ⌘C / Ctrl+C.
- Create a scratch file by pressing ⇧⌘N / Ctrl+Alt+Shift+Insert, and select the JSON file type (just start typing 'js…').
- Paste the response and apply the Reformat Code action. You can use Find action or press ⌥⌘L / Ctrl+Alt+L.
The required information is contained in the hourly element under the temperature_2m key. This key points to a list of values.
To get the current temperature, we must pass the current hour as the index. For example, if it’s 14:30 now, we’ll take the 14th item of the list.
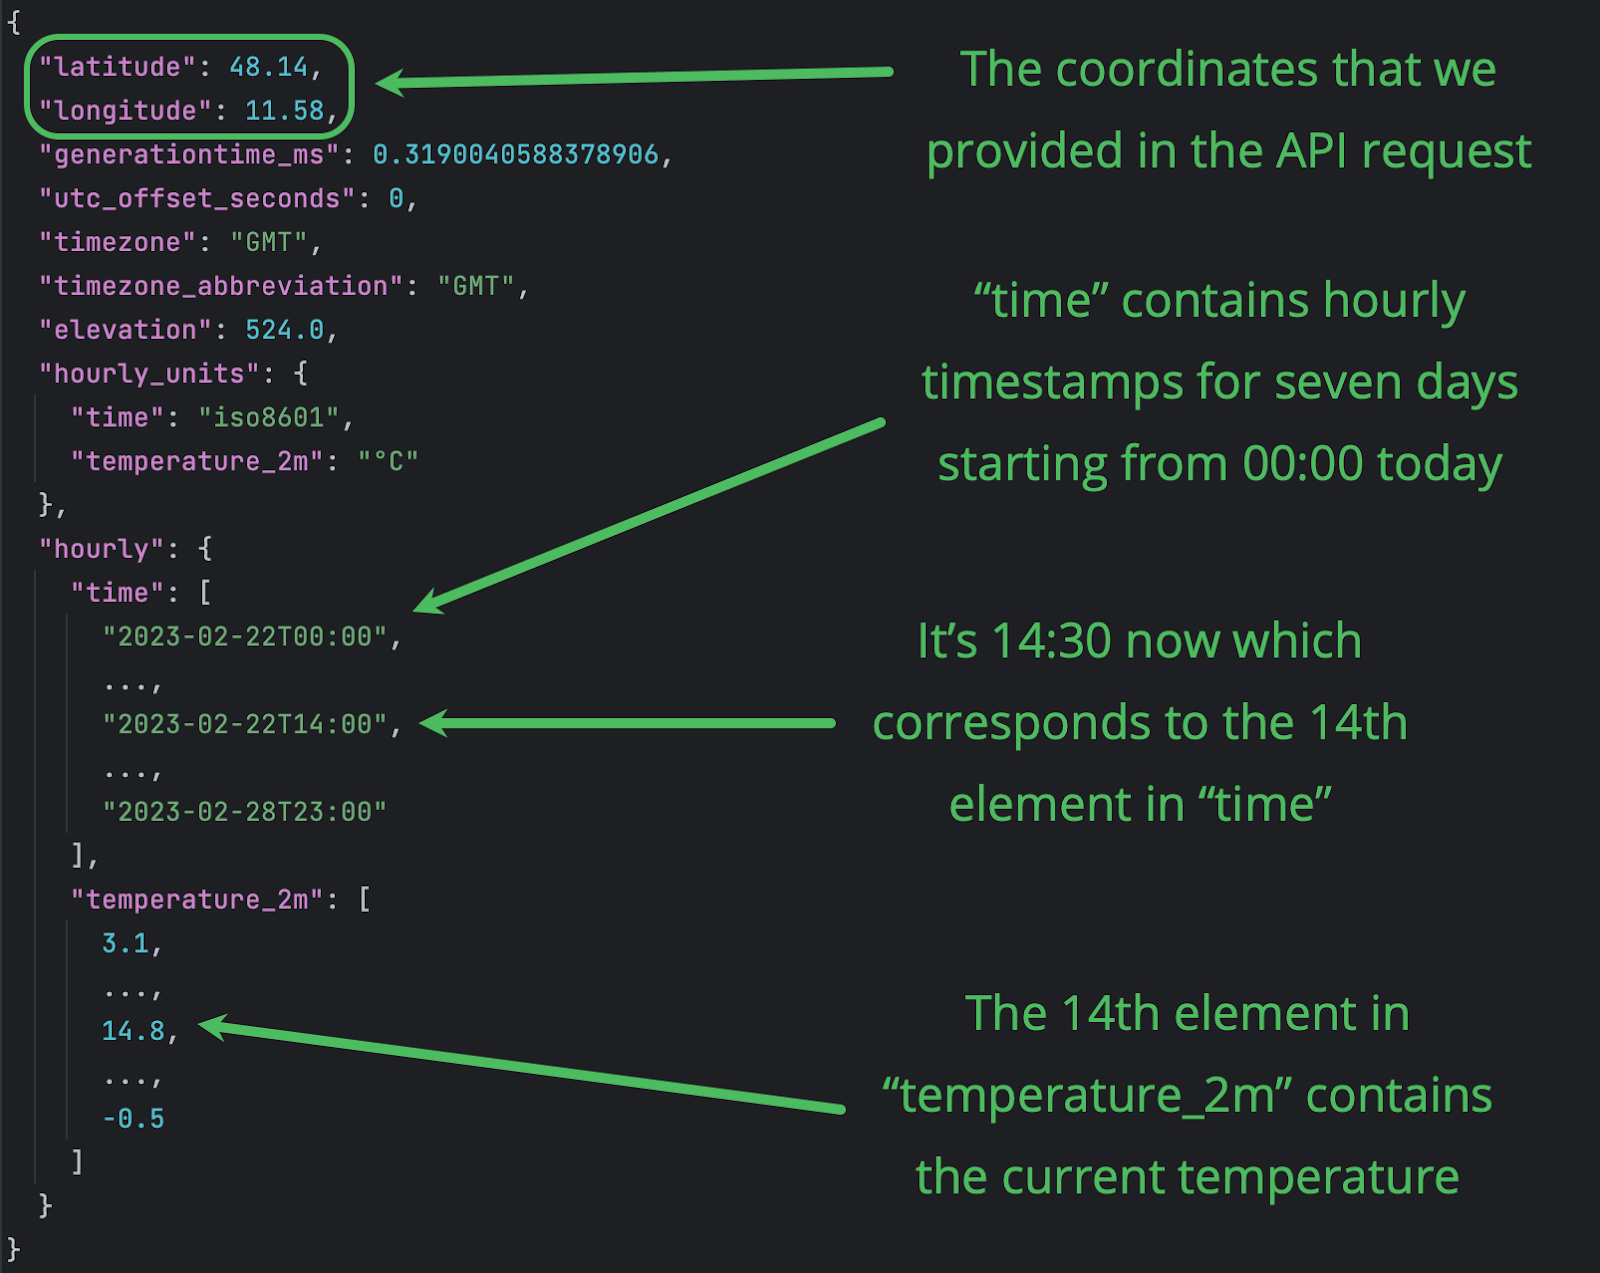
Let’s check if temp_here()['hourly']['temperature_2m'][14] provides the required information.
Replace '14' according to your current time and type the code in the console:
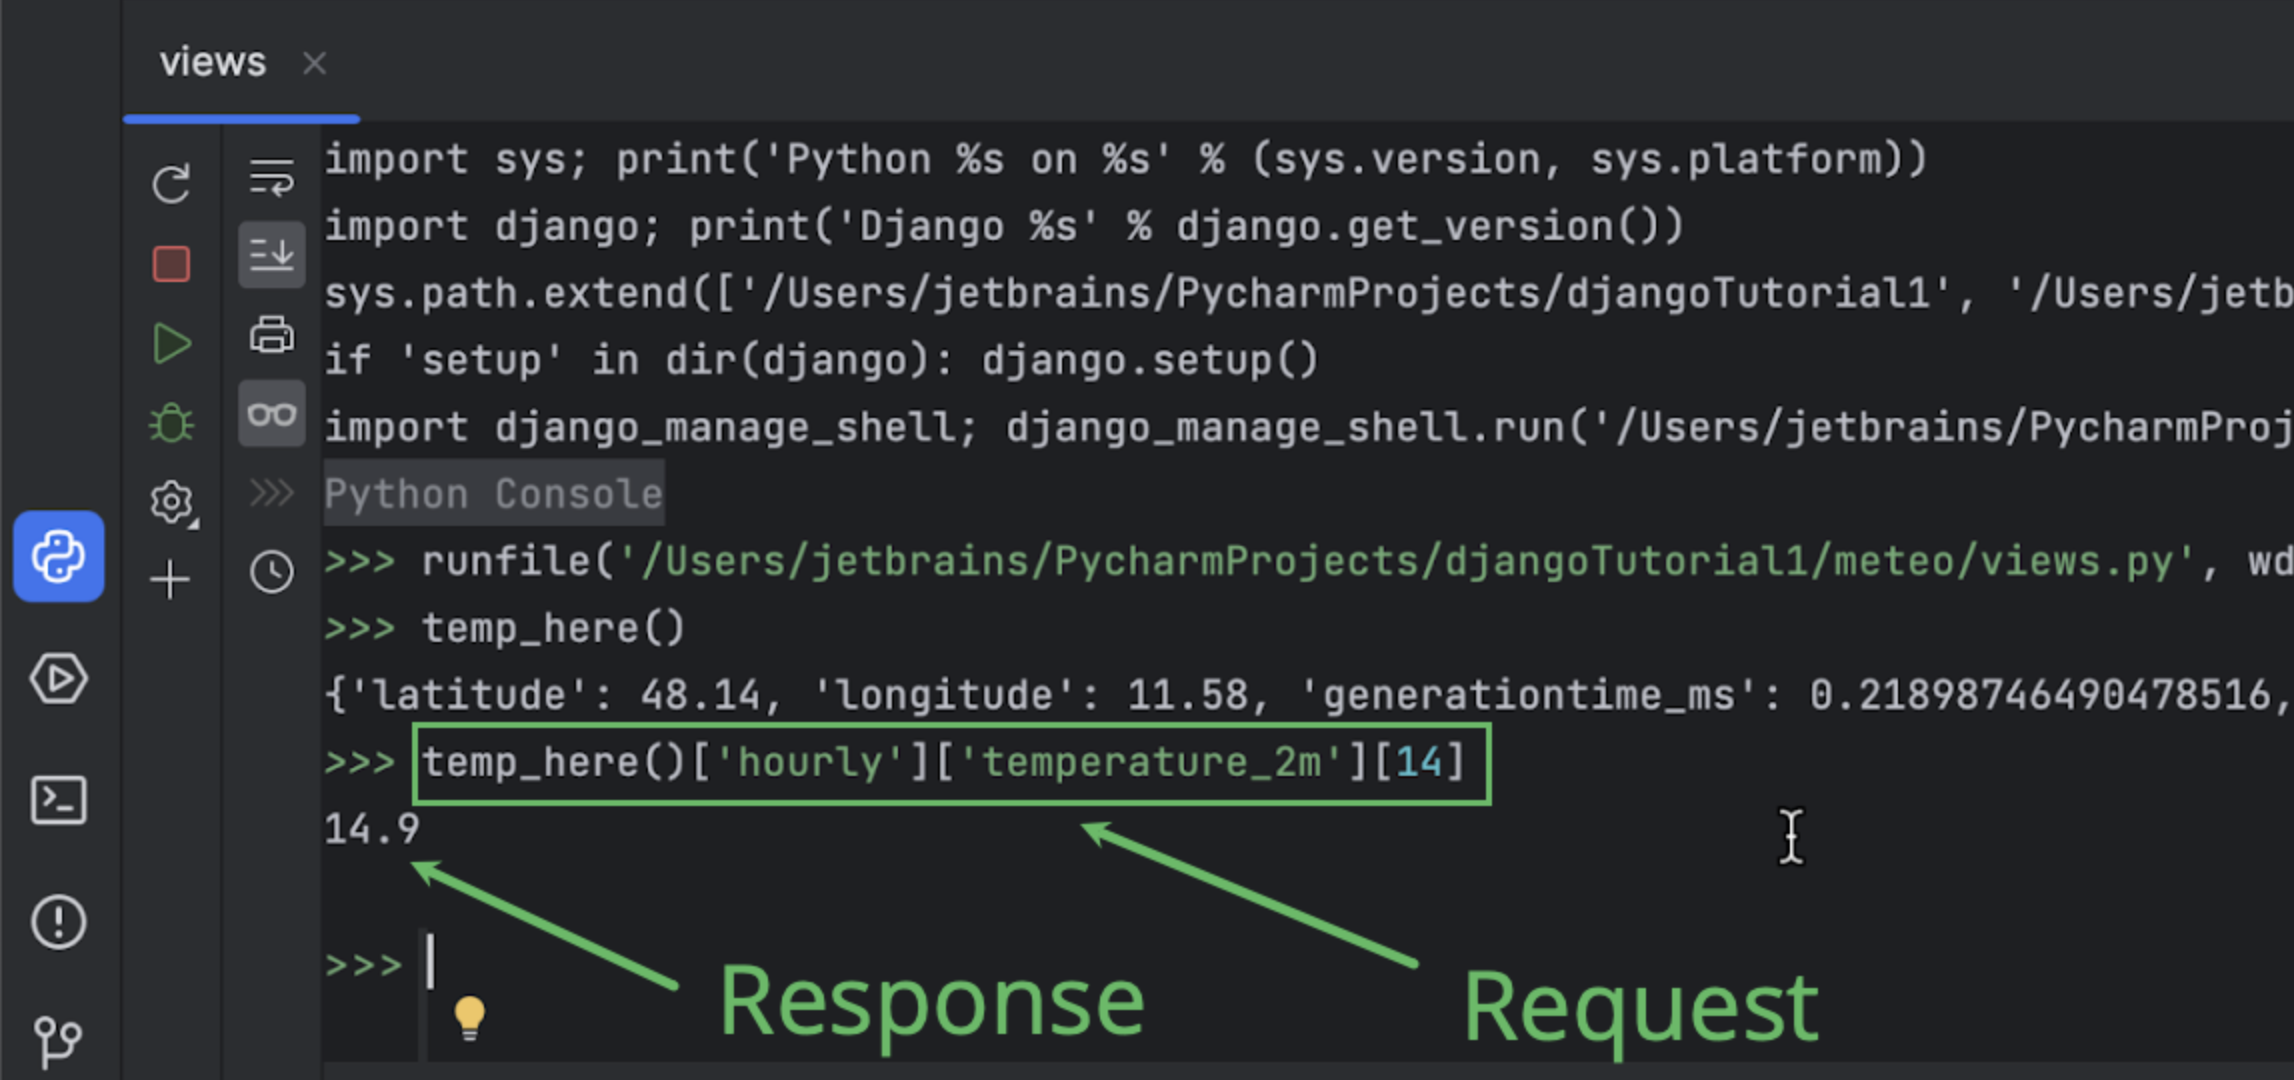
14.9 °C is the current temperature at our location. What about yours?
Let’s modify the function so that it extracts the current temperature from the API response:
def temp_here():
    location = geocoder.ip('me').latlng
    endpoint = "https://api.open-meteo.com/v1/forecast"
    api_request = f"{endpoint}?latitude={location[0]}&longitude={location[1]}&hourly=temperature_2m"
    now = datetime.now()
    hour = now.hour
    meteo_data = requests.get(api_request).json()
    temp = meteo_data['hourly']['temperature_2m'][hour]
    return temp
Don’t forget to import datetime:
Click Rerun in the upper left corner of the Python console toolbar to reload the updated function definition, and then call temp_here again:
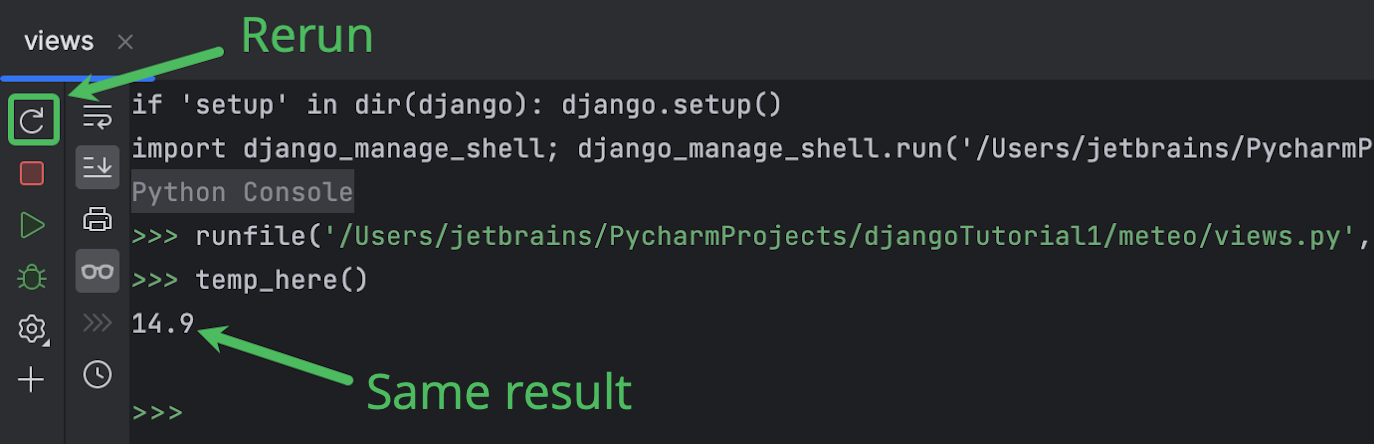
If the result is different from the one you got before changing the code of the temp_here function, this could be because of a wrong TIME_ZONE value in settings.py.
For more information, check out the Django documentation.
For quick access to this setting, press ⇧ (Shift) twice, switch to Symbols by pressing Tab a few times, and then start typing 'time…'.

Let’s now turn temp_here into a view function. To be recognized by Django as a view, the function must accept an HttpRequest object as its first parameter, which is typically named request. It should also return an HttpResponse object.
Here’s what views.py should look like:
from datetime import datetime

import geocoder
import requests
from django.http import HttpResponse


def temp_here(request):
    location = geocoder.ip('me').latlng
    endpoint = "https://api.open-meteo.com/v1/forecast"
    api_request = f"{endpoint}?latitude={location[0]}&longitude={location[1]}&hourly=temperature_2m"
    now = datetime.now()
    hour = now.hour
    meteo_data = requests.get(api_request).json()
    temp = meteo_data['hourly']['temperature_2m'][hour]
    return HttpResponse(f"Here it's {temp}")
As you can see, we didn’t change much: temp_here now accepts request as an argument and returns HttpResponse with a string.
If you prefer to use Fahrenheit instead of Celsius, this is very easy to achieve by adding the temperature_unit parameter to the API request:
api_request = f"{endpoint}?latitude={location[0]}&longitude={location[1]}&hourly=temperature_2m&temperature_unit=fahrenheit"
If you prefer using Celsius, just skip this modification.
Configure URLs
To configure how our app will be accessed from the browser, update urls.py. Press Shift twice and type urls to find and open it as described above.
Add the following line to urlpatterns. You can use the Reformat Code action ⌥⌘L / Ctrl+Alt+L to easily restore the indents after pasting:
path("", include('meteo.urls')),
Don’t forget to import include from django.urls.include.
'meteo.urls' is now marked as an unresolved reference with a yellow squiggly line because the file doesn’t exist yet. That will be fixed in the following step.
Django projects often contain more than one app. Even if that’s not currently the case, consider the future development of the project. That’s why we create urls.py for each application in the corresponding folder and then include them all into the urls.py of the project.
So, let’s create urls.py in the folder of the meteo application.
Right-click the meteo directory in the Project tool window.
Select New > Python File and type urls.
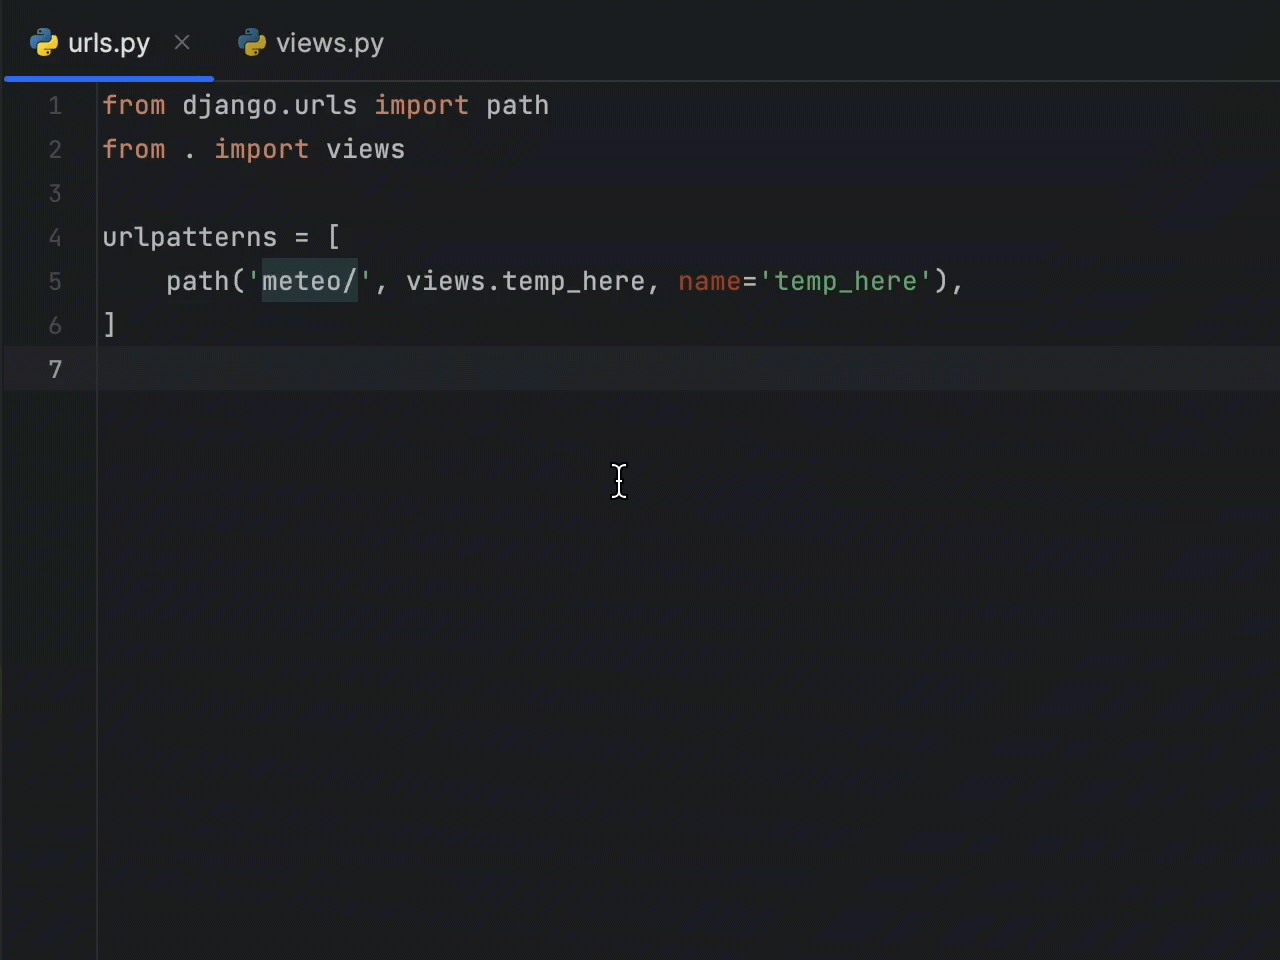
The newly created file will open. Fill it with the following code:
from django.urls import path
from . import views


urlpatterns = [
    path('meteo/', views.temp_here, name='temp_here'),
]
When we now go to <server_address>/meteo in the browser, the temp_here function from views.py will be called, and the browser will render whatever the function returns.
It’s alive!
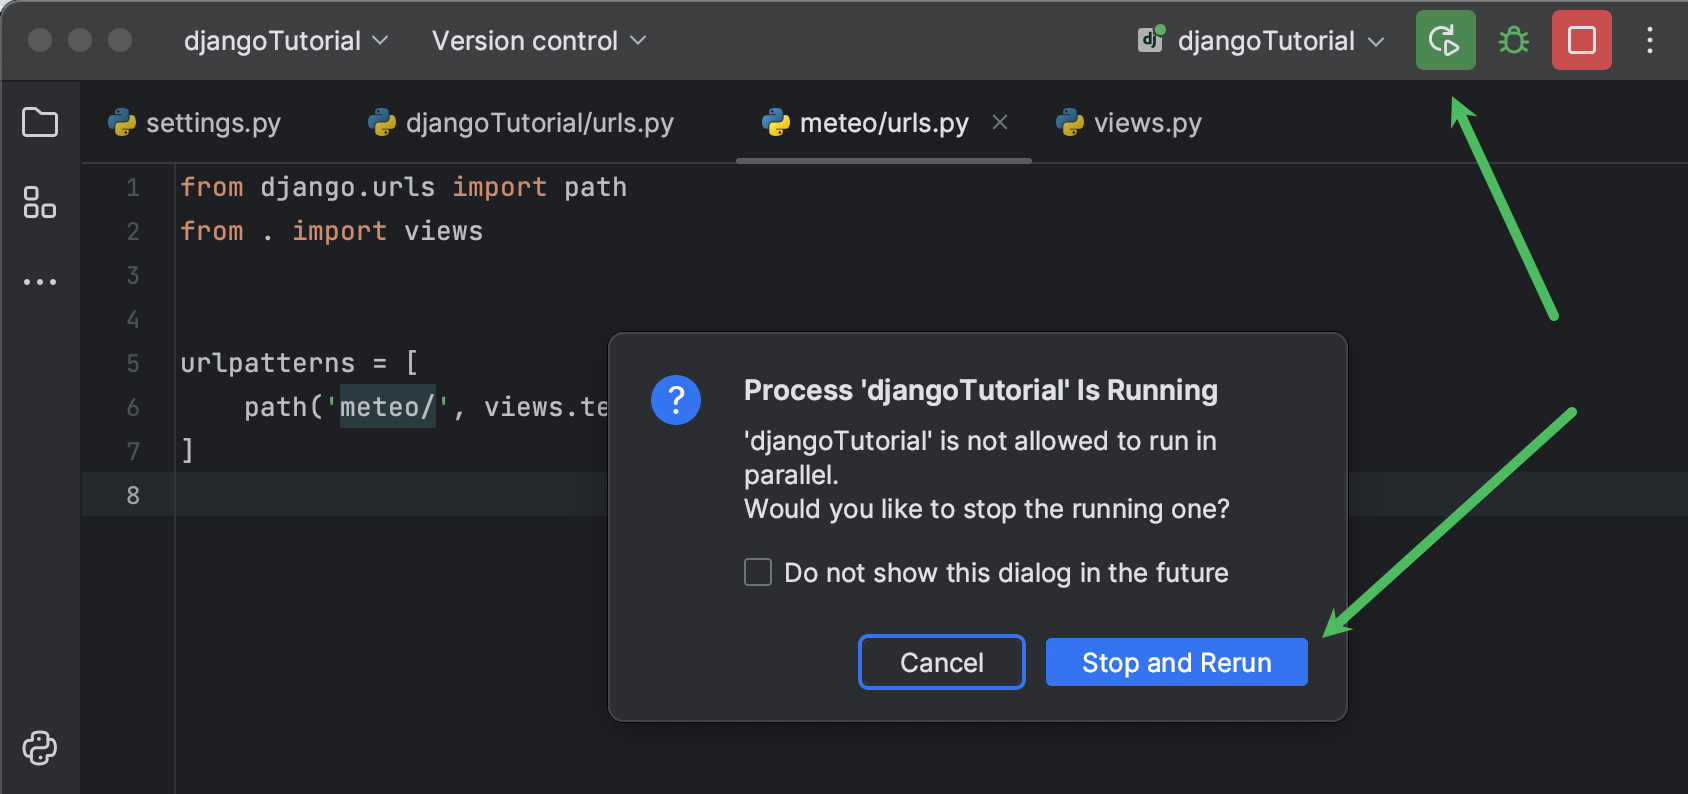
Rerun the Django server by clicking the Rerun button in the upper right corner and confirm the action:
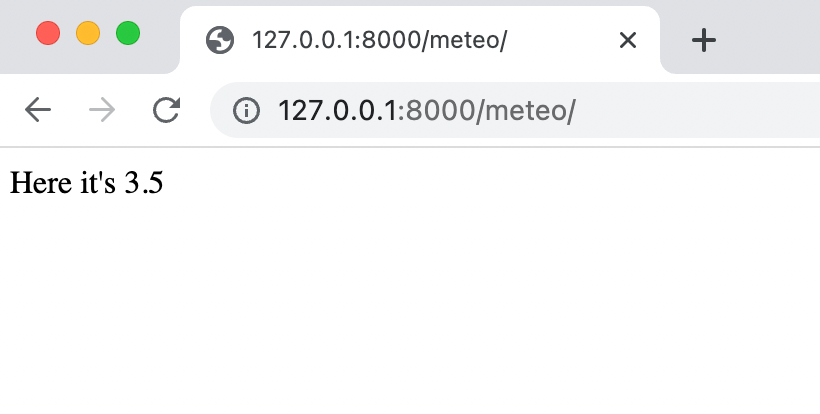
Open http://127.0.0.1:8000/meteo/ in your browser. You should see something similar to the following:
If you don’t want to open the browser and type the address, or refresh the page manually every time you restart the Django server, you can configure PyCharm to do that for you.
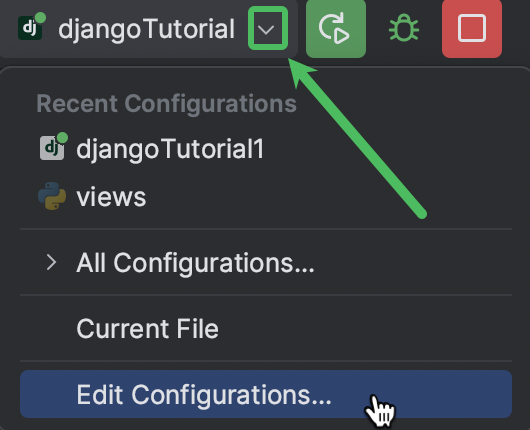
Open the drop-down list in the Run widget and select Edit configurations:
Select your project’s configuration in the left pane, enable the Run browser checkbox, and add meteo to the url:
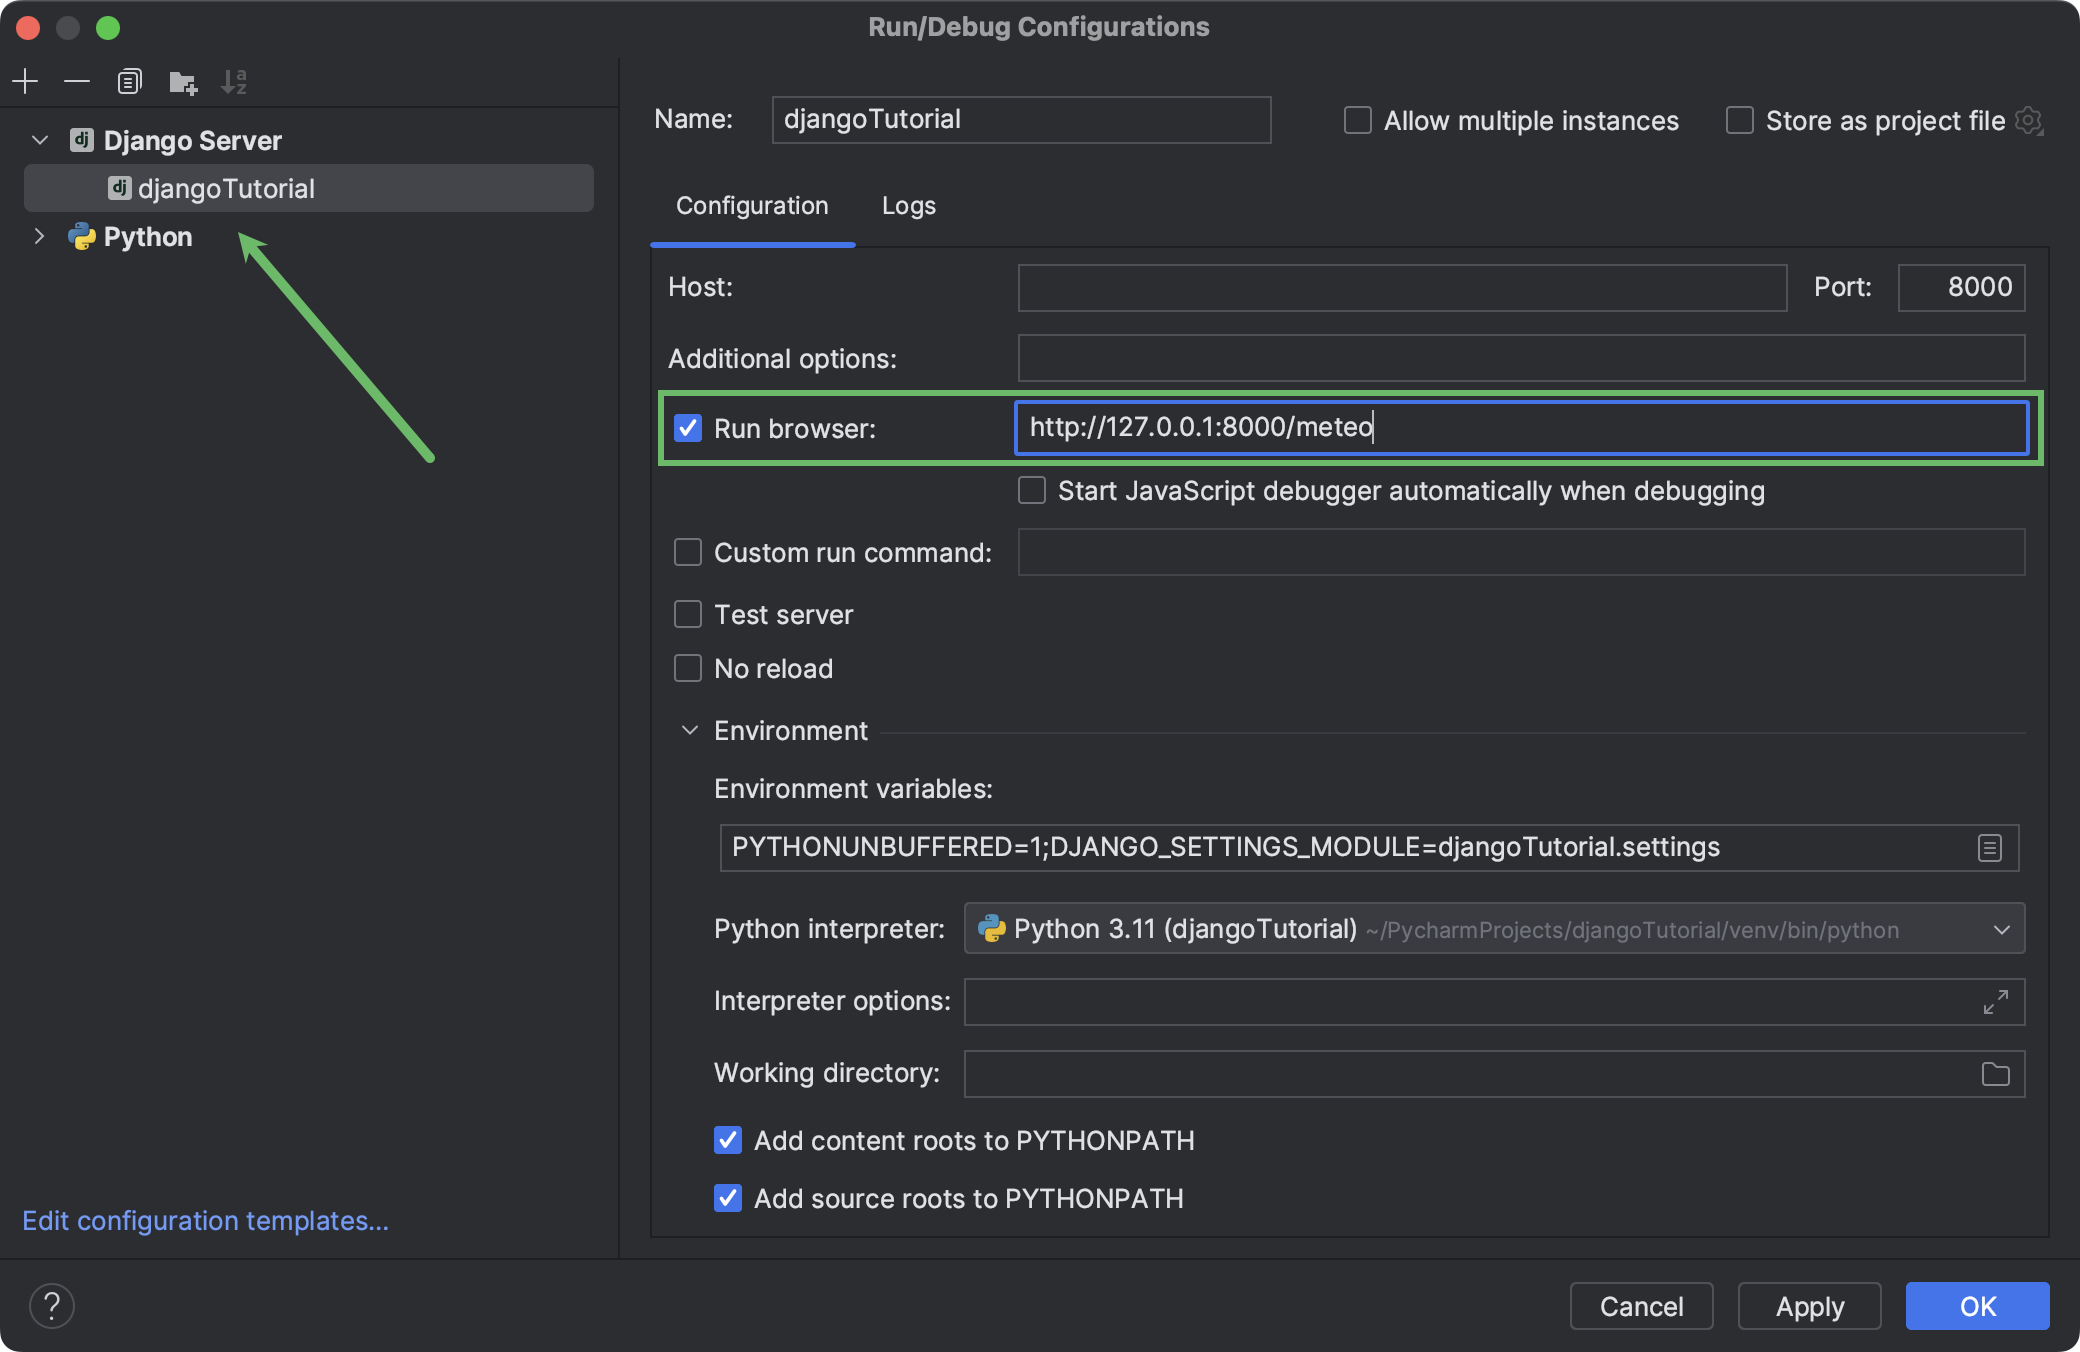
Click OK to apply the changes.
Technically, the app now works. But it doesn’t look nice in the browser, and still doesn’t have the “weather at random location” feature. In the following steps, we’ll introduce a template and import data to resolve these issues.
Improve the experience
Add a template
Let’s go back to views.py and modify the temp_here function again. If you’re still in meteo/urls.py, you can navigate there in no time. Hold ⌘ / Ctrl, hover the mouse over temp_here, and click it when it turns into a hyperlink:
Start a new line before the return statement and type ‘template = loader’.
Press ⌥Enter/ Alt+Enter and use a quick-fix to import loader from django.template.loader:
Then, use get_template() to load index.html as a template:
template = loader.get_template('index.html')
Now, replace the return statement with the following two lines:
    context = {'temp': temp}
    return HttpResponse(template.render(context, request))
Index.html is highlighted with a yellow squiggly line because it doesn’t exist yet. Hover the cursor over it and select Create template index.html.
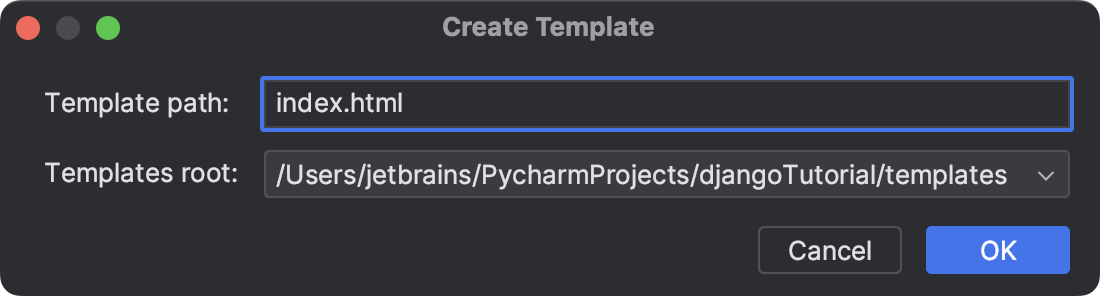
Click OK. PyCharm will create index.html and open it for editing.
The file is now empty. Let’s use a Live Template to fill it with template html code. Type html:5 and press Tab:
The visible content of an html page is located between the <body></body> tags.
Insert the following code there:
<h1>Temperature at your location:</h1>
<h2>{{ temp }} ℃</h2>
Here, temp is a variable that is passed to the template from views. The names and values of variables should be saved into a dictionary and passed when rendering a template. That is what we’ve done by assigning {‘temp’ : temp} to the context variable in views.py above.
The Unicode representation of the Celsius degrees symbol is ℃. For Fahrenheit, use ℉.
Now, rerun the Django server to see the changes and make sure that the app works as expected. If you have edited the run configuration as explained above, the browser window should open automatically:

Create a database and a model
To get temperature data for random locations from the API, we need to provide the coordinates of those locations.
Let’s use the World cities database by Juanma Hernández licensed under CC BY 4.0 for that purpose. Download the database and extract worldcities.csv from the archive. You’ll have to register at Kaggle, if you don’t already have an account there.
We also need to add the db.sqlite3 database, which was automatically created by Django, to our PyCharm project.
To do that:
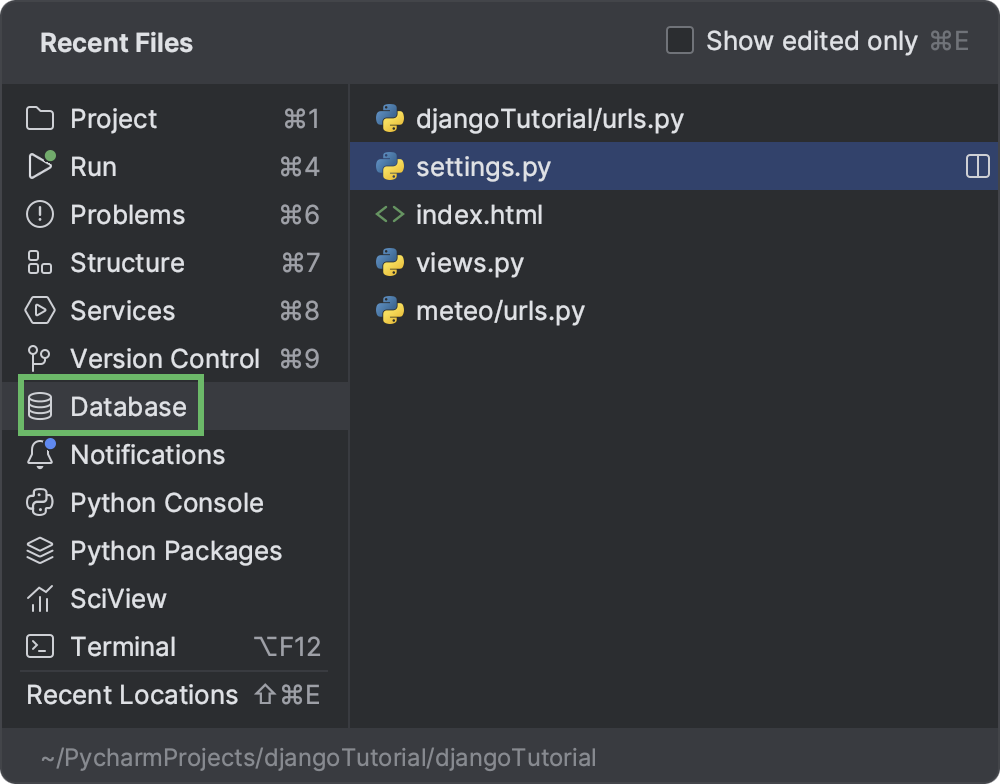
- Open the Database tool window by clicking the database icon on the right. You can also access all tool windows by pressing ⌘E / Ctrl+E:
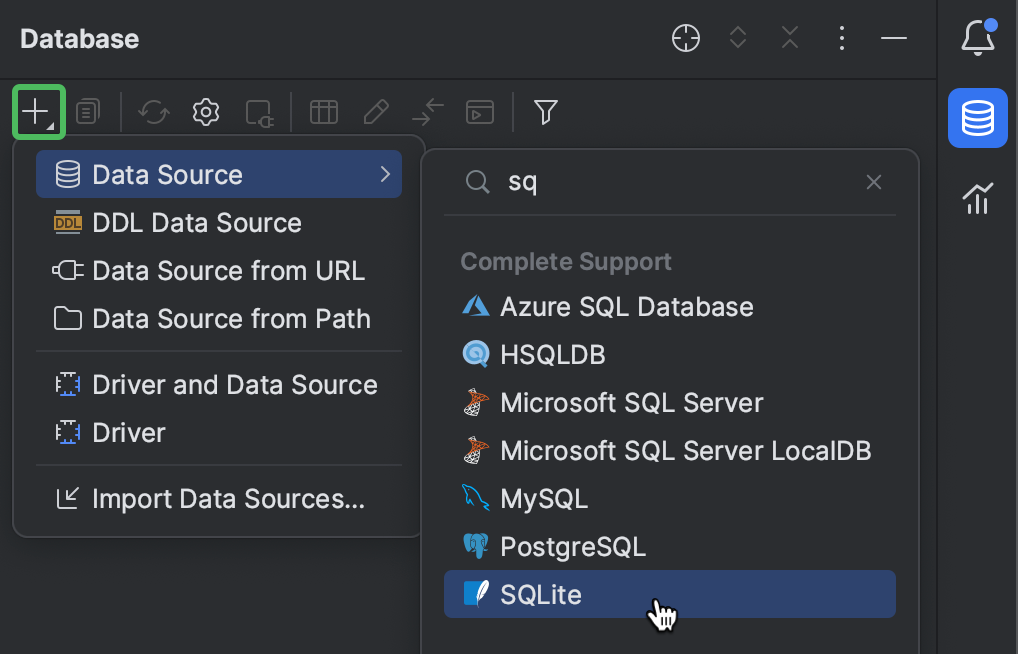
- Click + in the upper-left corner of the tool window, and then select Data Source > SQLite. You can start typing 'sq…' to get to the required option faster:
- Click … next to the File field and browse for the db.sqlite3 file in your project folder.
- You may need to install, update, or switch the database driver. If there’s a warning at the bottom of the window, click the link to perform the required action:
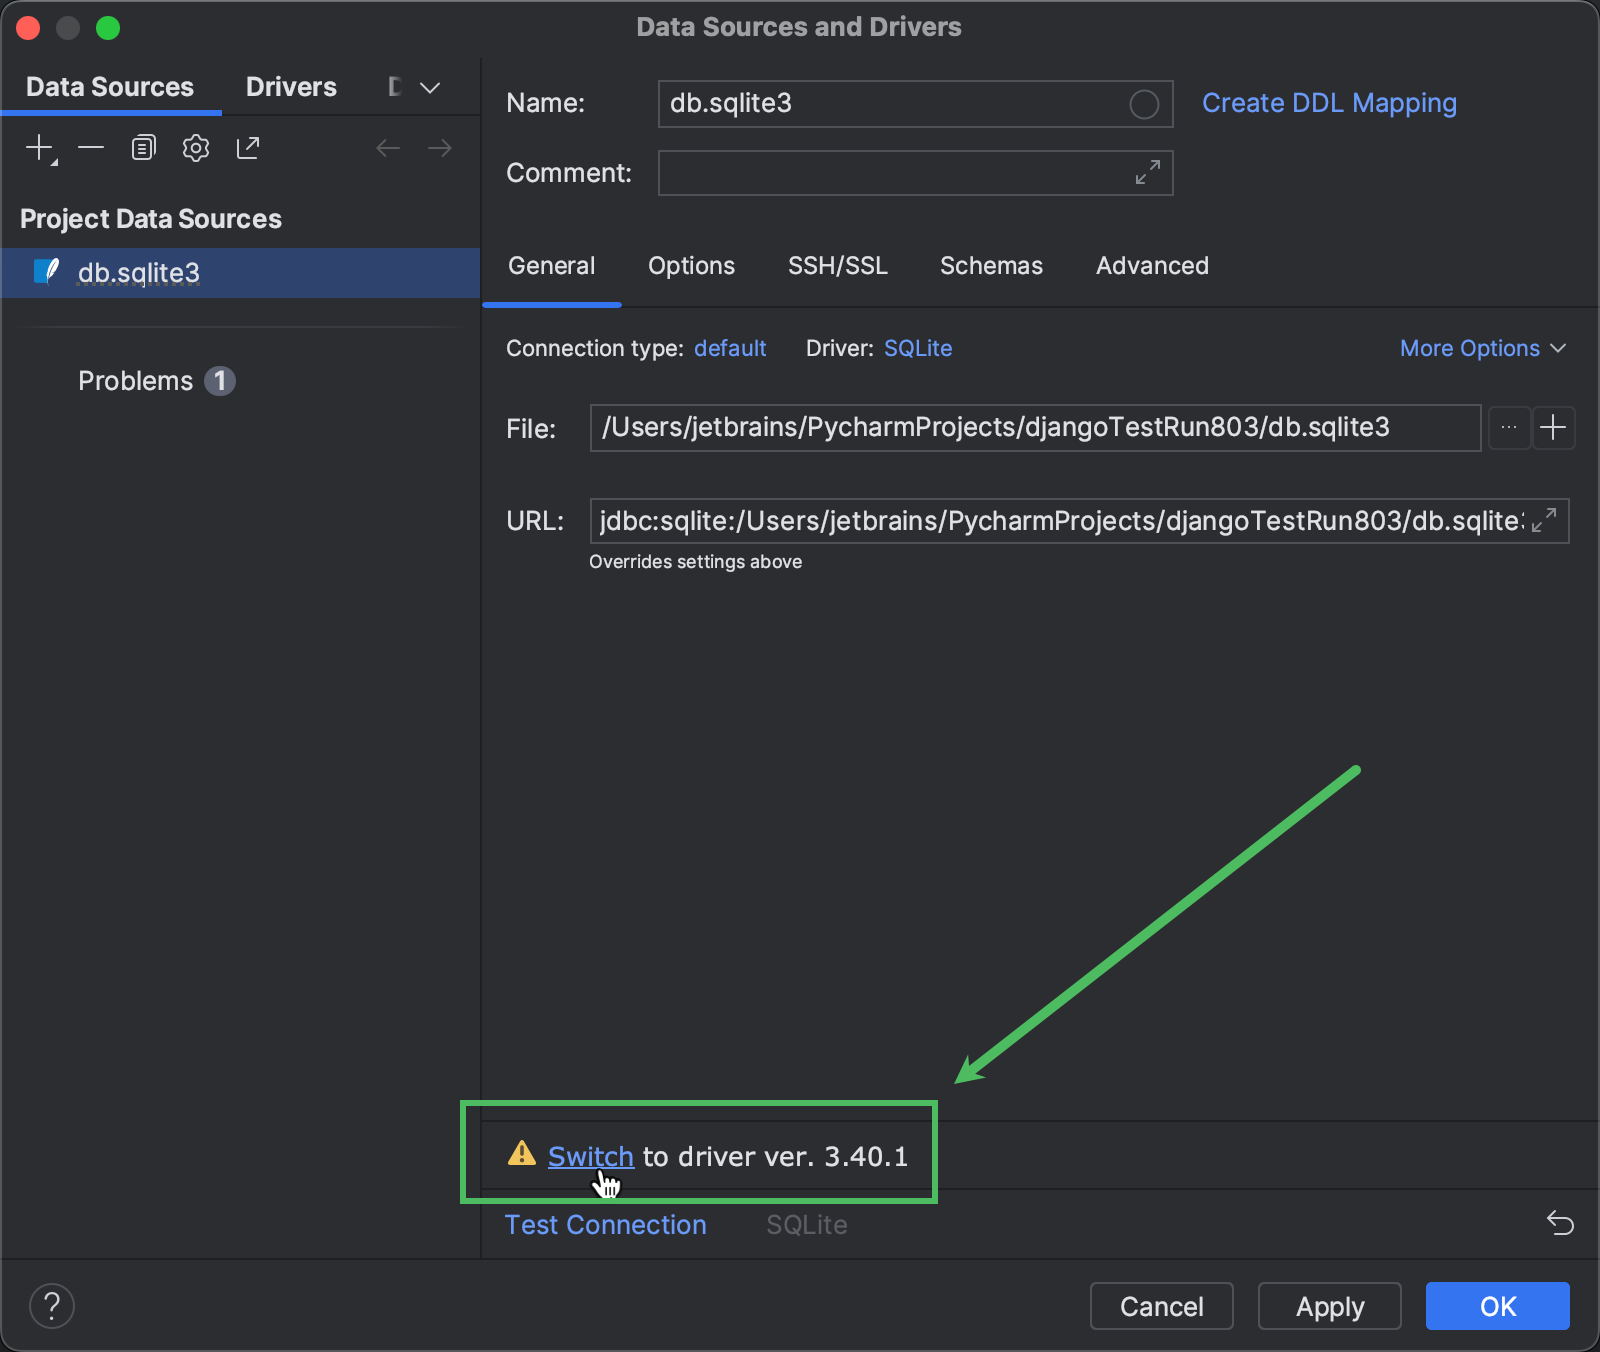
- Click OK.
To import data into the database, drag and drop worldcities.csv to db.sqlite3 in the Database tool window. In the dialog that opens, remove the unnecessary columns keeping only city, lat, lng, country, and id:
Now the db.sqlite3 database contains the worldcities table:
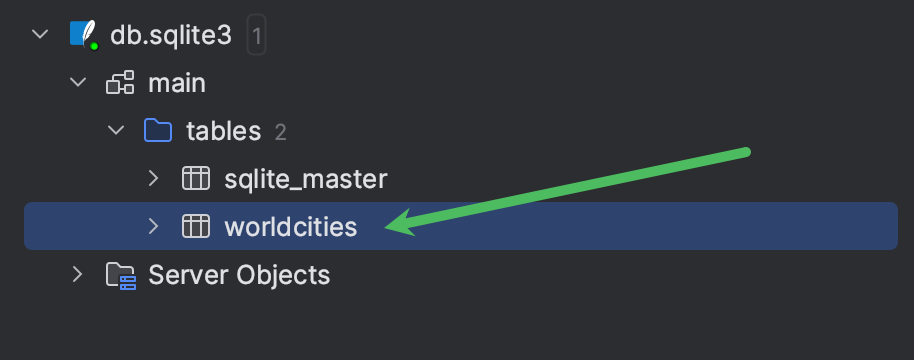
You can double-click it to view its content in the editor.
Django uses models to interact with databases. Let’s create a model to enable reading data from the worldcities table.
- Launch the manage.py task console by pressing ⌥R / Ctrl+Alt+R.
- Type inspectdb worldcities and press Enter.
- Copy the
Worldcitiesclass from the console output to meteo\models.py. - Replace
null=Truewithprimary_key=Truefor the id field.
Here’s what it should look like:
from django.db import models


class Worldcities(models.Model):
    city = models.TextField(blank=True, null=True)
    lat = models.FloatField(blank=True, null=True)
    lng = models.FloatField(blank=True, null=True)
    country = models.TextField(blank=True, null=True)
    id = models.IntegerField(blank=True, primary_key=True)

    class Meta:
        managed = False
        db_table = 'worldcities'
Add features
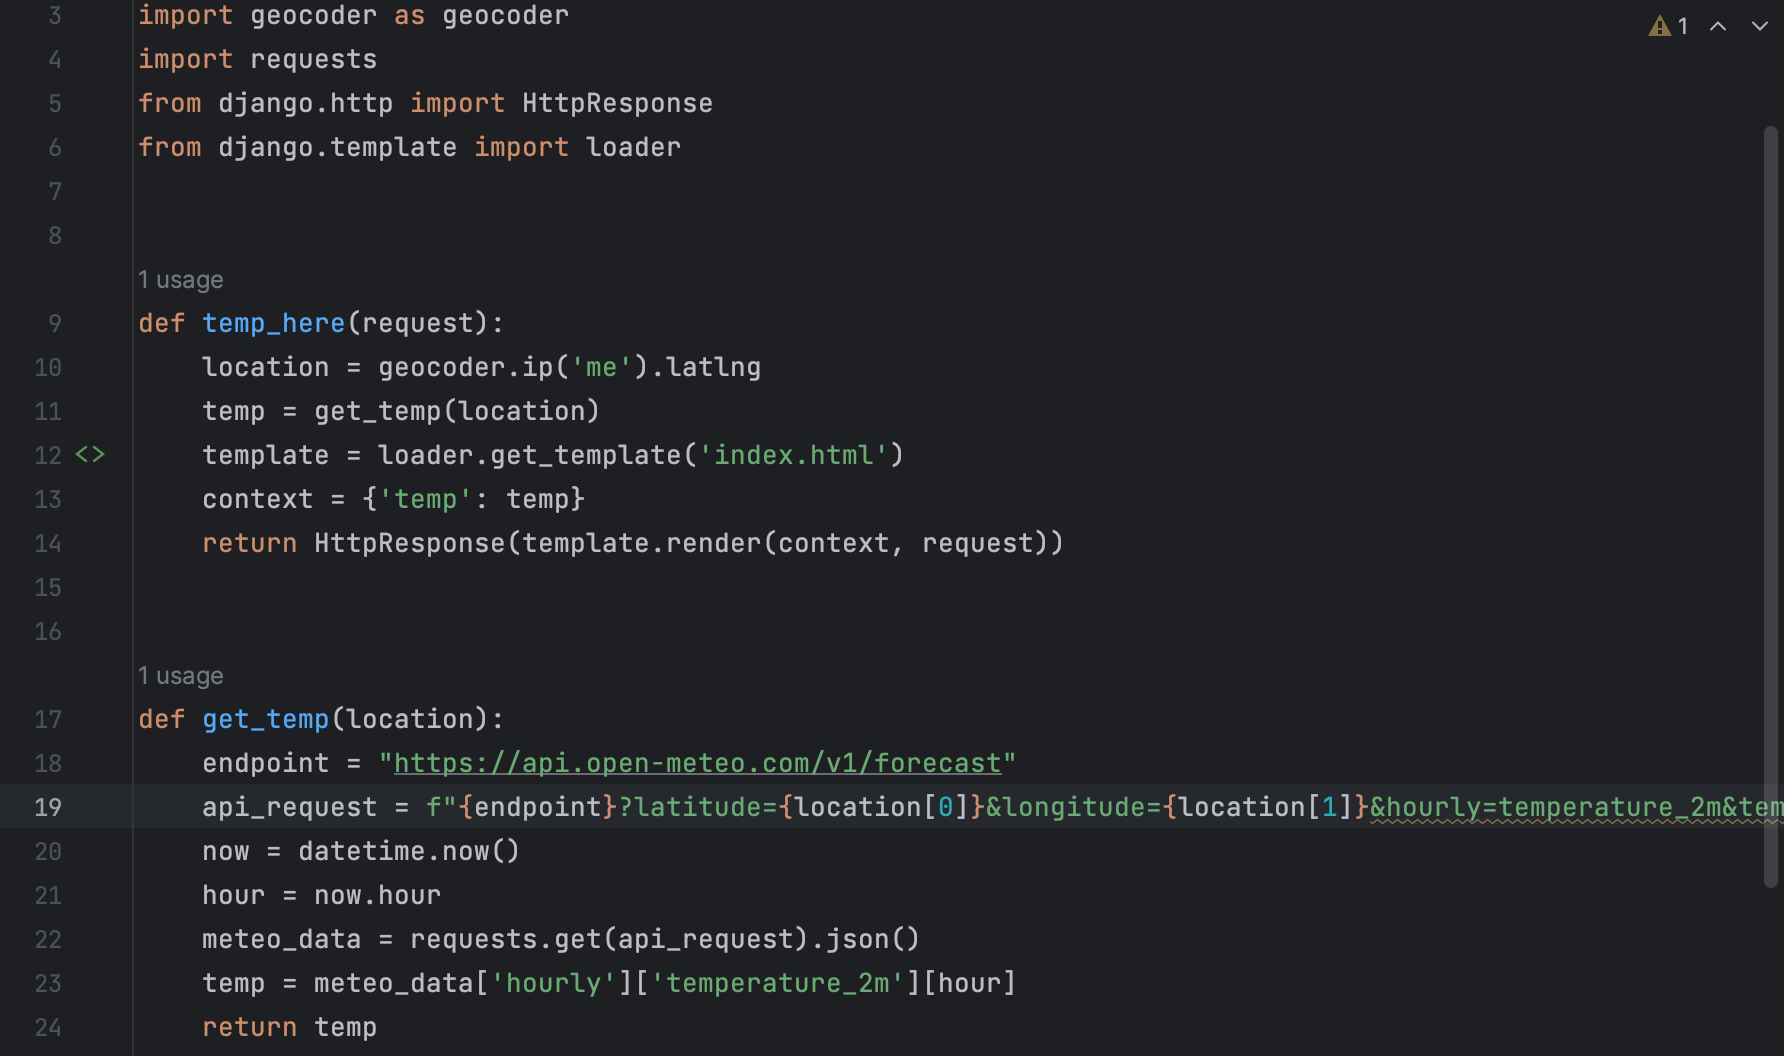
So far, we’ve had only one function (temp_here) in views.py which returns information about the current temperature at your location. Let’s add another function to show the temperature at a random location. It also needs to get the current temperature data from the API, so according to Python best practices, we should move that functionality to a separate function.
In PyCharm, that can be easily done with the help of the Extract method refactoring.
Select the lines that should be moved to a separate function and press ⌥⌘M / Ctrl+Alt+M. Alternatively, use Find Action:
Specify get_temp in the Method name field and click OK. We now have a get_temp function that accepts location as the sole parameter.
The temp_here function calls it to receive the temperature at the current location.
Let’s create the temp_somewhere function. It should pass the coordinates of a random city to get_temp.
First, let’s do some prototyping in the Python console. Open it and paste the following code (if ImportError occurs, close and reopen the console):
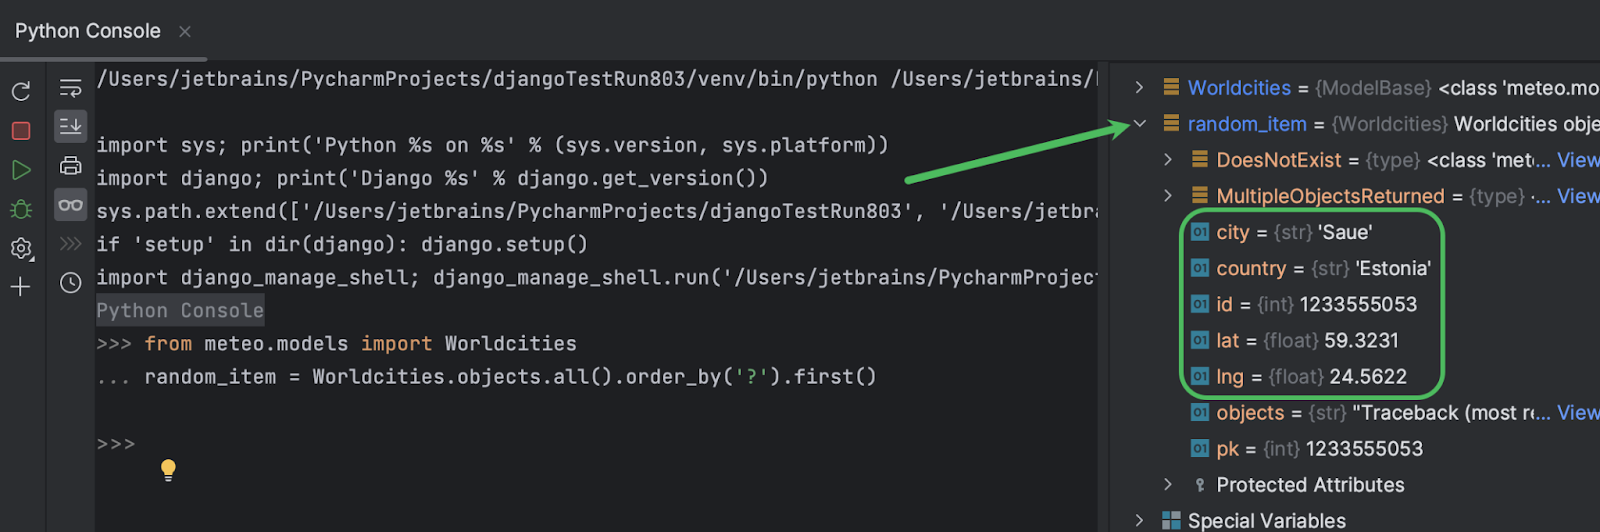
from meteo.models import Worldcities
random_item = Worldcities.objects.all().order_by('?').first()
We need to obtain data from the worldcities table. As that is done by means of models, we import the Worldcities model from models.py.
Then, we randomize all objects with order_by(‘?’) and get the first object with first(). On the right side of the Python console tool window, there is the Variables tab. Expand the random_item node to check out the content of random_item:
The complete code of the temp_somewhere function should look as follows:
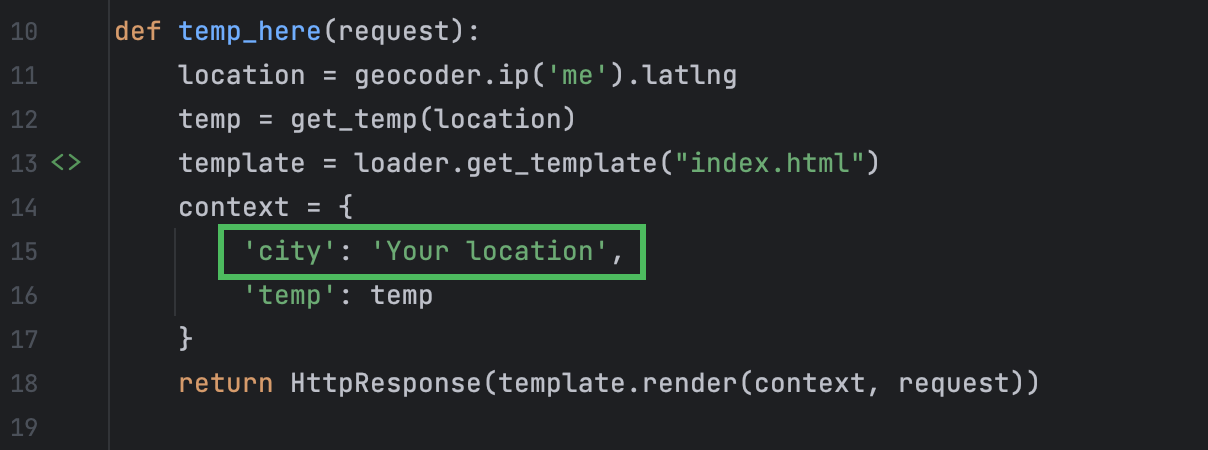
def temp_somewhere(request):
    random_item = Worldcities.objects.all().order_by('?').first()
    city = random_item.city
    location = [random_item.lat, random_item.lng]
    temp = get_temp(location)
    template = loader.get_template("index.html")
    context = {
        'city': city,
        'temp': temp
    }
    return HttpResponse(template.render(context, request))
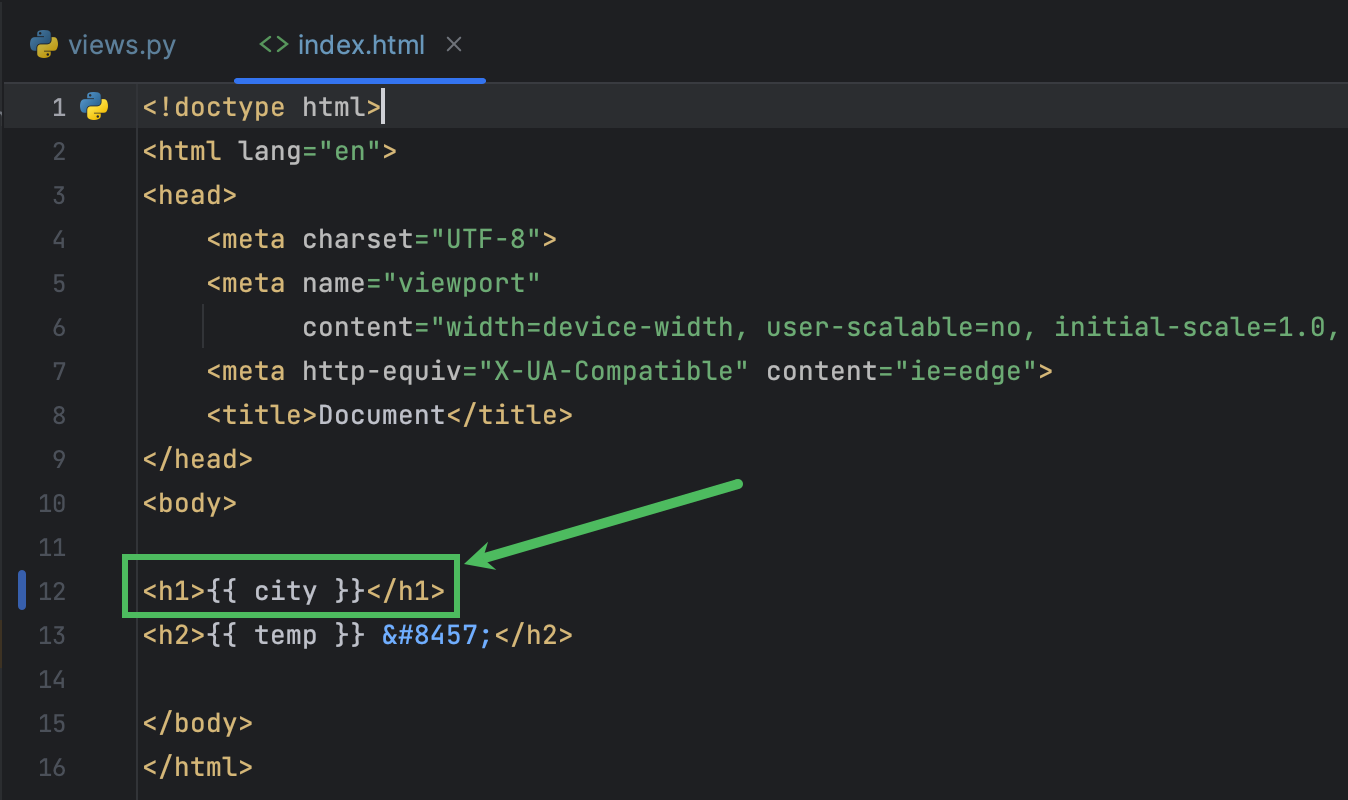
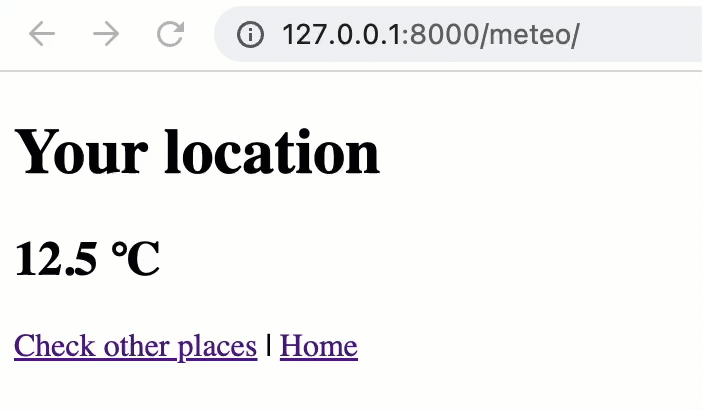
In addition to the temperature, context now contains the city name. Let’s edit the template so that it renders this information too.
You might have noticed the <> icon in the gutter. Click it to quickly switch to index.html:
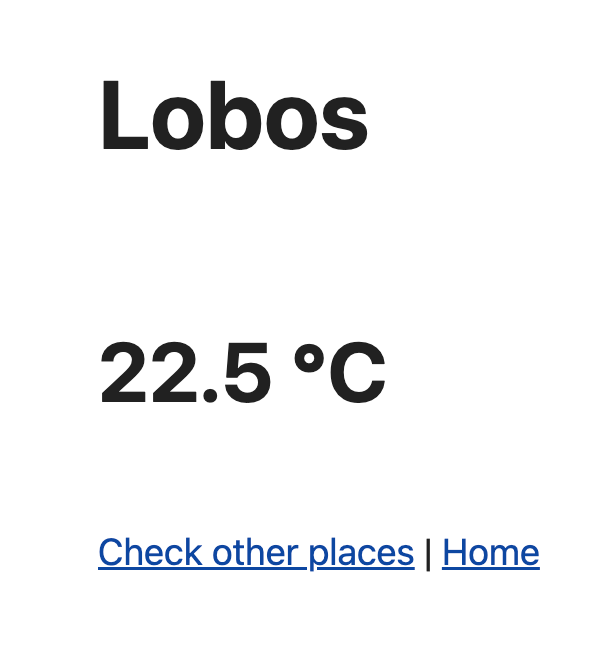
Replace the text between the <h1></h1> tags with {{ city }}:
Click the gutter icon for quick access to the temp_here function:
We need to modify it so that it also passes the city variable:
The temp_here function is called when the https://127.0.0.1/meteo page is opened in the browser, which we’ve configured in meteo/urls.py.
Let’s go back there and specify that temp_somewhere should be called when https://127.0.0.1/meteo/discover is accessed:
urlpatterns = [
    path('meteo/', views.temp_here, name='temp_here'),
    path('meteo/discover', views.temp_somewhere, name='temp_somewhere'),
]
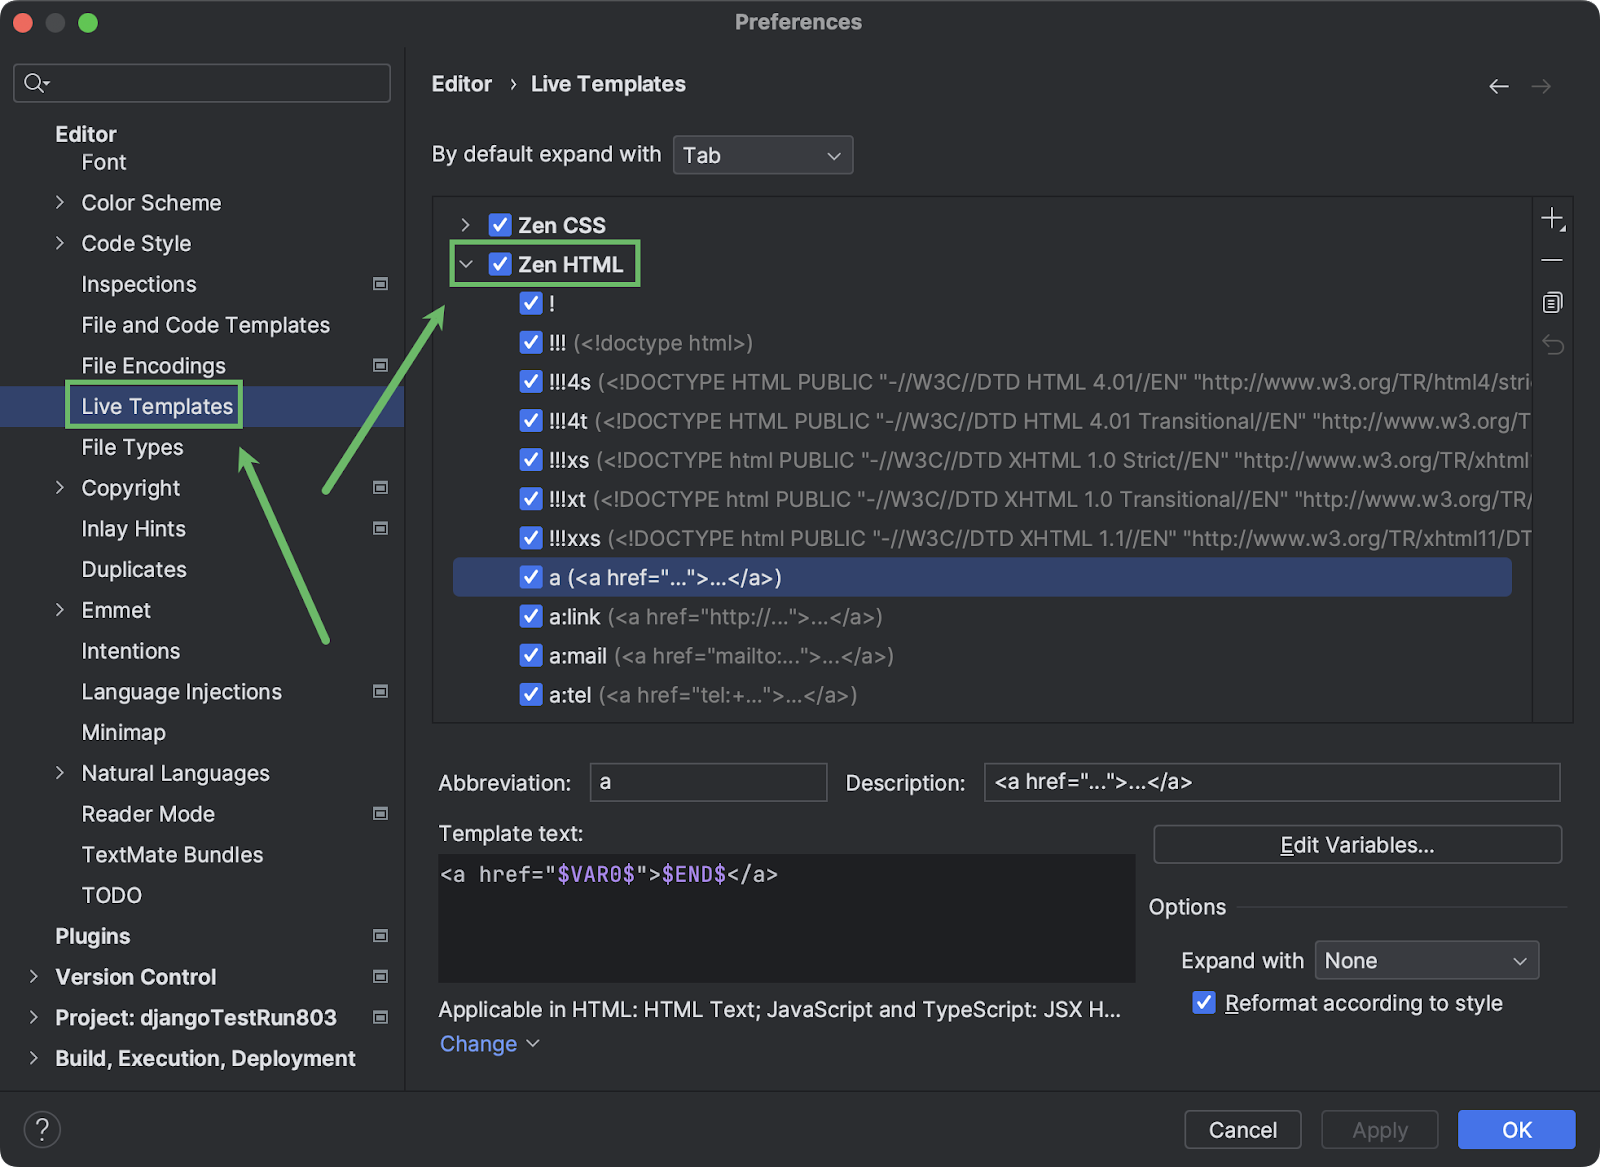
Go back to index.html and add links to the /discover page and homepage. The latter will always show the temperature at the current location. Live templates and code completion save lots of time here:
To use live templates for paragraphs and links in html files, just type 'p' or 'a' respectively, and then press Tab.
To see the full list of available live templates, open settings (⌘ / Ctrl+Alt+S), go to Editor > Live Templates, and then expand the Zen HTML node in the right pane:
You can rerun the server and play around with the application:
Don’t stop
The app now works, but there’s room for improvement. The most obvious thing is its visual appearance, but extra features can also be added.
Use CSS
CSS is the fastest and simplest way to make your Django application look better. For example, you can use Simple.CSS.
Put the following line anywhere between the <head></head> tags in index.html:
<link rel="stylesheet" href="https://cdn.simplecss.org/simple.min.css">
Here’s the new look:
Replacing links with buttons will also improve the look and feel:
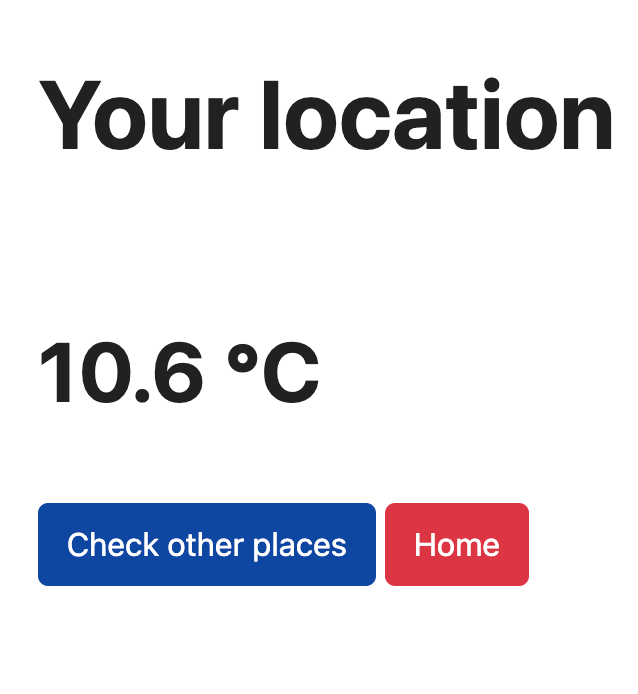
To achieve this, replace the links between <p></p> tags in index.html with the following html code:
<div style="display: flex;">
<form action="./discover">
<input type="submit" value="Check other places"/>
</form>
<form action=".">
<input style="background: #dc3545" type="submit" value="Home"/>
</form>
</div>
You can see the results of editing index.html without switching from PyCharm to a browser. Hover the mouse over the upper-right corner of the editor window and select Built-in Preview:
Use Bootstrap
Bootstrap is a powerful and free frontend toolkit. To quickly apply it to your Django app, edit index.html as follows (for more information, see Bootstrap quick start guide):
- Add the
linktag to the html head (replace the simple.css one from the previous steps):
<link href="https://cdn.jsdelivr.net/npm/bootstrap@5.3.0-alpha1/dist/css/bootstrap.min.css" rel="stylesheet" integrity="sha384-GLhlTQ8iRABdZLl6O3oVMWSktQOp6b7In1Zl3/Jr59b6EGGoI1aFkw7cmDA6j6gD" crossorigin="anonymous">
2. Add the code inside <body></body> tags with the following:
<div class="container text-center">
<h1>{{ city }}</h1>
<h2>{{ temp }} ℃</h2>
<div class="btn-group" role="group">
<button type="button" class="btn btn-outline-primary" onclick="location.href='./discover'">Check other places
</button>
<button type="button" class="btn btn-danger" onclick="location.href='.'">Home</button>
</div>
</div>
<script src="https://cdn.jsdelivr.net/npm/bootstrap@5.3.0-alpha1/dist/js/bootstrap.bundle.min.js" integrity="sha384-w76AqPfDkMBDXo30jS1Sgez6pr3x5MlQ1ZAGC+nuZB+EYdgRZgiwxhTBTkF7CXvN" crossorigin="anonymous"></script>
Check out the result:
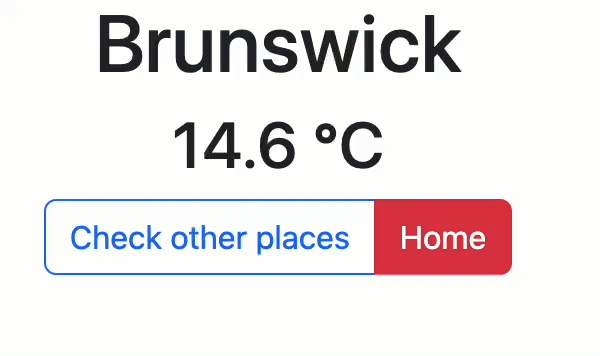
Bootstrap provides numerous ways of customizing the appearance of your apps. You can find all the necessary information in the documentation.
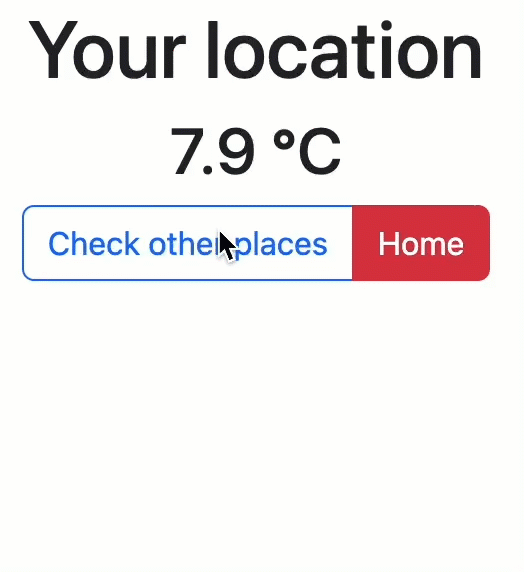
Check yourself
We’ve added the country field from the worldcities database to the Worldcities model, but didn’t use that data anywhere in the app. Now, you can test your skills by making the app show countries in addition to city names. As a result, you should get something similar to this:
Summary
In this tutorial, we’ve learned how to:
- Create Django projects in PyCharm.
- Write views and create templates.
- Make API calls and process responses.
- Connect databases and import data.
- Improve the app’s visual appearance by applying CSS and Bootstrap.