Deploying Django Apps in Kubernetes

As an open-source container orchestration platform that automates deployment, scaling, and load balancing, Kubernetes offers unparalleled resilience and flexibility in the management of your Django applications.
Whether you’re launching a small-scale project or managing a complex application, Kubernetes provides a robust environment to enhance your Django application, ensuring it’s ready to meet the demands of modern web development.
By automating the deployment, scaling, and operation of containerized applications, Kubernetes (or K8s) provides numerous benefits for organizations in the fast-paced tech industry.
Whether you’re a Django developer looking to enhance your deployment skills or a Kubernetes enthusiast eager to explore Django integration, this guide has something for everyone.
The introduction to this tutorial explores the symbiotic relationship between Django and Kubernetes, enabling you to seamlessly containerize your web application, distribute workloads across clusters, and ensure high availability.
Django
The Django framework, a high-level Python web framework, stands as a beacon of efficiency and simplicity in the world of web development. Born out of the need to create rapid, robust, and maintainable web applications, Django has become a go-to choice for developers and organizations.
At its core, Django embraces the “batteries-included” philosophy, offering an extensive array of built-in tools, libraries, and conventions that facilitate the development process. It simplifies complex tasks like URL routing, database integration, and user authentication, allowing developers to focus on building their applications.
One of Django’s foremost benefits is its adherence to the “Don’t repeat yourself” (DRY) principle, reducing redundancy and enhancing code maintainability. It also follows the model-view-controller (MVC) architectural pattern, making applications structured and easy to manage.
Django also prioritizes security, making it less prone to common web vulnerabilities. It includes features like cross-site scripting (XSS) and cross-site request forgery (CSRF) protection out of the box. Offering a potent combination of speed, simplicity, and security, Django is an ideal choice for developers looking to create robust, feature-rich web applications with minimal effort.
Container orchestrators
Container orchestrators are essential tools for managing and automating the deployment, scaling, and operation of containerized applications. There are several container orchestrators available on the market, the most popular of which include:
1. Kubernetes, the top open-source container orchestration platform, offers a robust and adaptable environment for handling containerized applications. It automates tasks such as scaling, load balancing, and container health checks, with a broad extension ecosystem.
2. Docker Swarm is a container orchestration solution provided by Docker. Designed to be simple to set up and use, it’s a good choice for smaller applications or organizations already using Docker as it uses the same command-line interface and API as Docker.
3. OpenShift is an enterprise Kubernetes platform developed by Red Hat. It adds developer and operational tools on top of Kubernetes, simplifying the deployment and management of containerized applications.
4. Nomad, developed by HashiCorp, is a lightweight and user-friendly orchestrator capable of managing containers and non-containerized applications.
5. Apache Mesos is an open-source distributed system kernel, and DC/OS (data center operating system) is an enterprise-grade platform built on Mesos. DC/OS extends Mesos with additional features for managing and scaling containerized applications.
Software teams primarily work with managed platforms offered by well-known cloud providers such as AWS, Google Cloud Platform, and Azure. These cloud providers offer services like Amazon EKS, Google GKE, and Azure AKS, all of which are managed Kubernetes solutions. These services streamline the setup, expansion, and administration of Kubernetes clusters and seamlessly integrate with the respective cloud environments, ensuring efficient container orchestration and application deployment.
Creating a Django Application in PyCharm
In this tutorial, we’ll start by generating a minimal Django application. We’ll then containerize the application and, in the final step, deploy it to a local Kubernetes cluster using Docker Desktop.
If you’re new to working with the Django framework but are eager to create a Django application from scratch, read this blog post.
You can access the source code used in this tutorial here.
Let’s begin by creating a new Django application in PyCharm.
To create your project, launch PyCharm and click New Project. If PyCharm is already running, select File | New Project from the main menu.
Furnish essential details such as project name, location, and interpreter type, utilizing either venv or a custom environment.
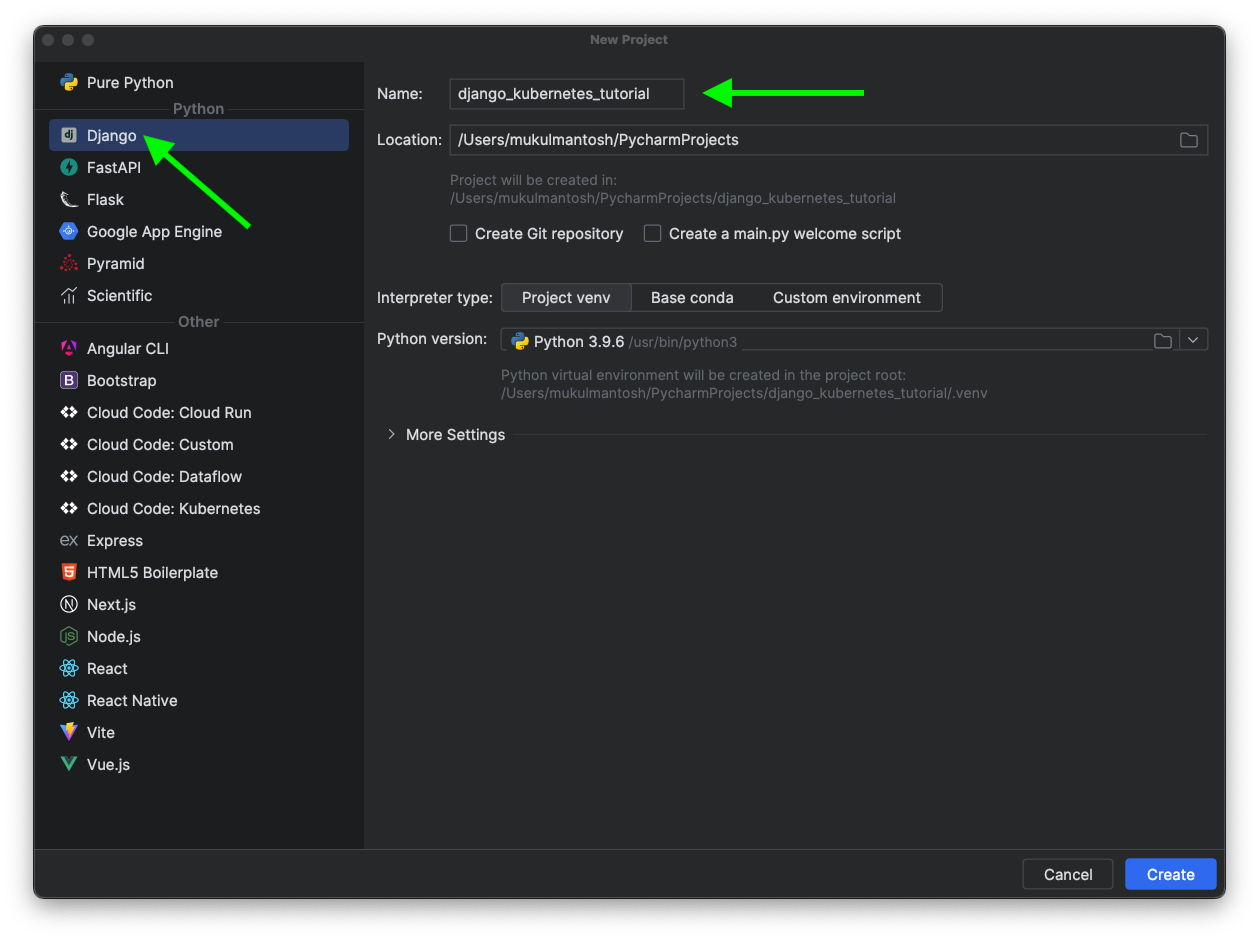
Then, click Create.
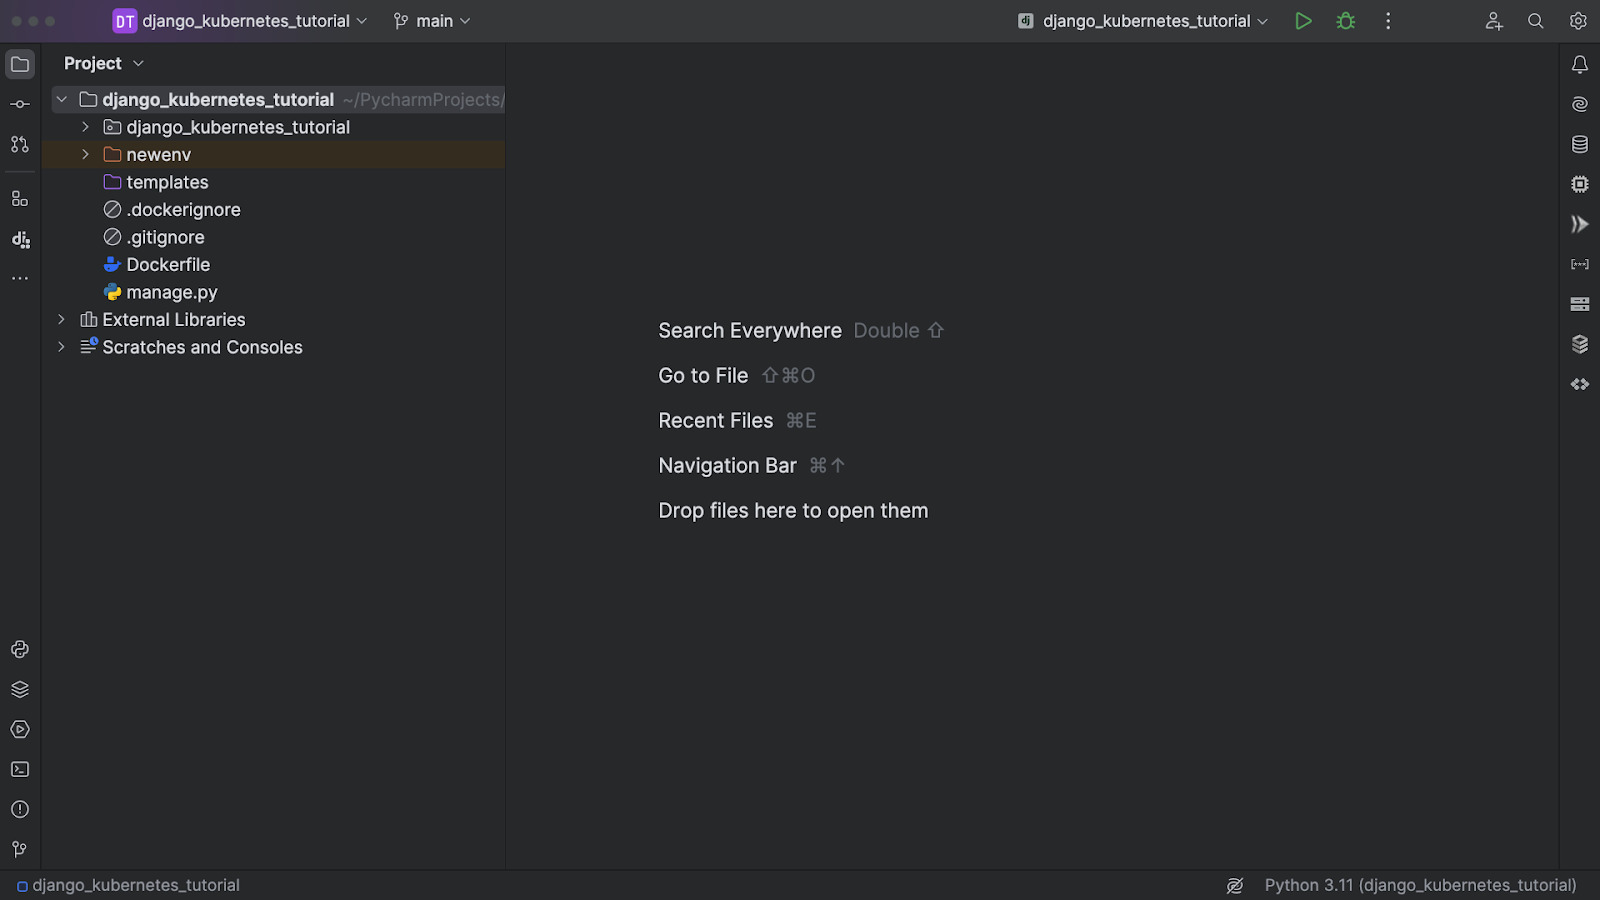
PyCharm will do the heavy lifting by setting up your project and creating the virtual environment.
Gunicorn
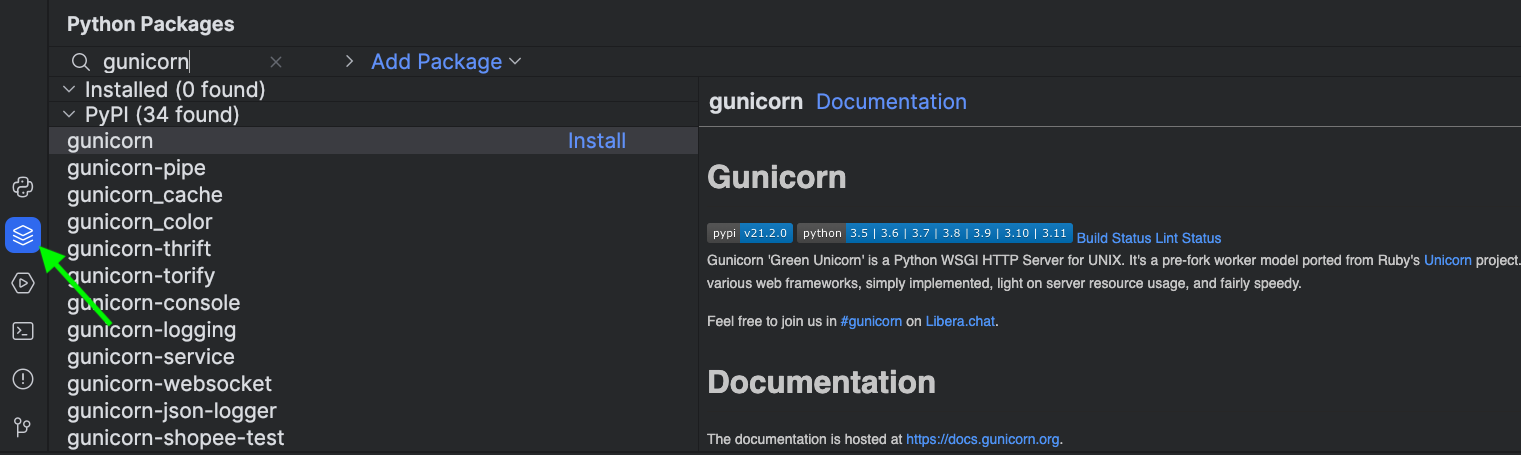
Once the project has been created, install Gunicorn – a popular Python web server gateway interface (WSGI) HTTP server. A pre-fork worker model web server used to serve Python web applications, Gunicorn is often used in combination with web frameworks like Django, Flask, and others to deploy web applications and make them accessible over the internet.
The Python Packages tool window provides the quickest and easiest way to preview and install packages for the currently selected Python interpreter.
You can open the tool window via View | Tool Windows | Python Packages.
Psycopg 2
Psycopg 2 is a Python library used to connect to and interact with PostgreSQL databases. It provides a Python interface for working with PostgreSQL, one of the most popular open-source relational database management systems. Psycopg 2 allows Python developers to perform various database operations, such as inserting, updating, and retrieving data, as well as executing SQL queries, and managing database connections from within Python programs.
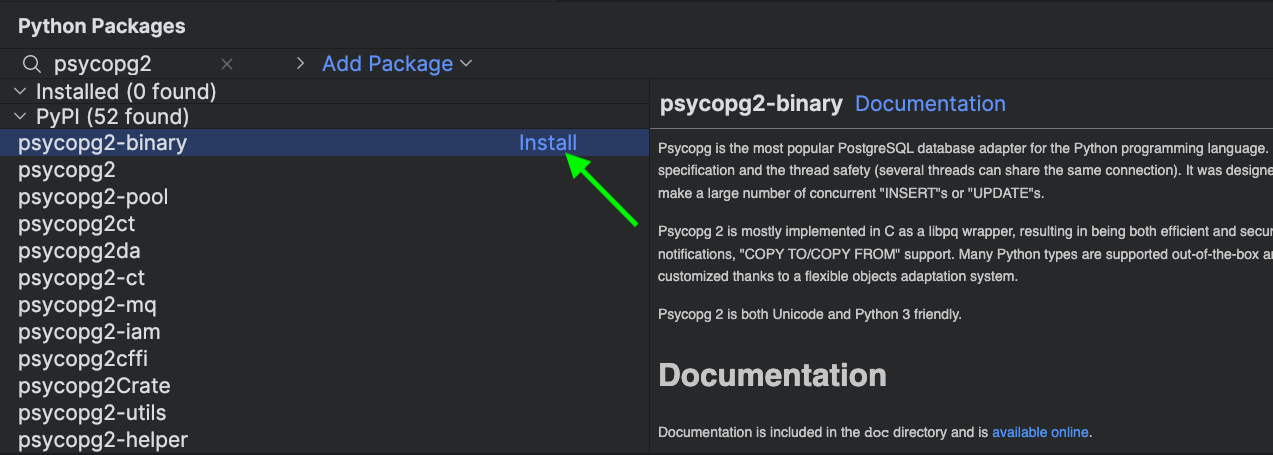
Before installing psycopg2, you need to install the system-level dependencies, brew install libpq for macOS, and apt-get install libpq-dev for Linux.
Reference: postgresql.org/docs/16/libpq.html
libpq is the client library for PostgreSQL. It’s a C library that provides the necessary functionality for client applications to connect to, interact with, and manage PostgreSQL database servers.
After completing the particular modifications, update the section within settings.py related to DATABASES.
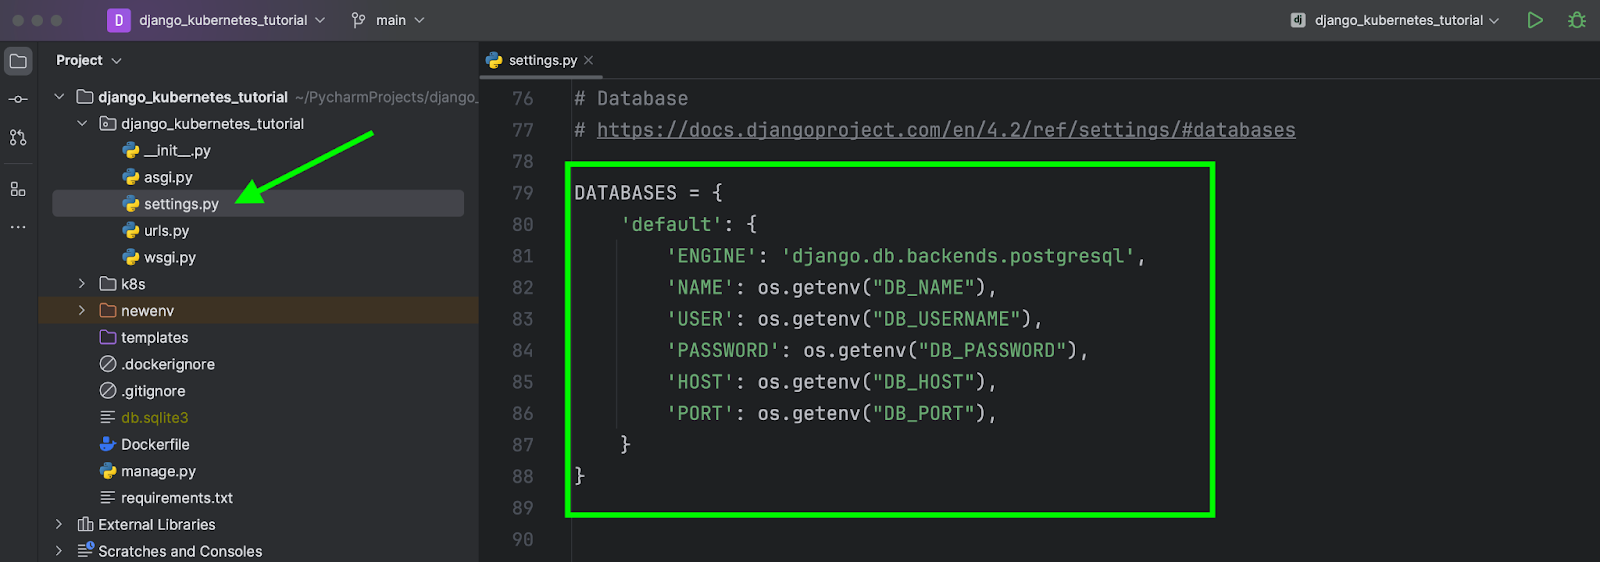
Always make sure to pass your secret credentials through environment variables.
STATIC_ROOT
In Django, STATIC_ROOT is a configuration setting used to specify the absolute file system path where collected static files will be stored when you run the collectstatic management command. Static files typically include CSS, JavaScript, images, and other assets used by your web application. The STATIC_ROOT setting is an essential part of serving static files in a production environment.
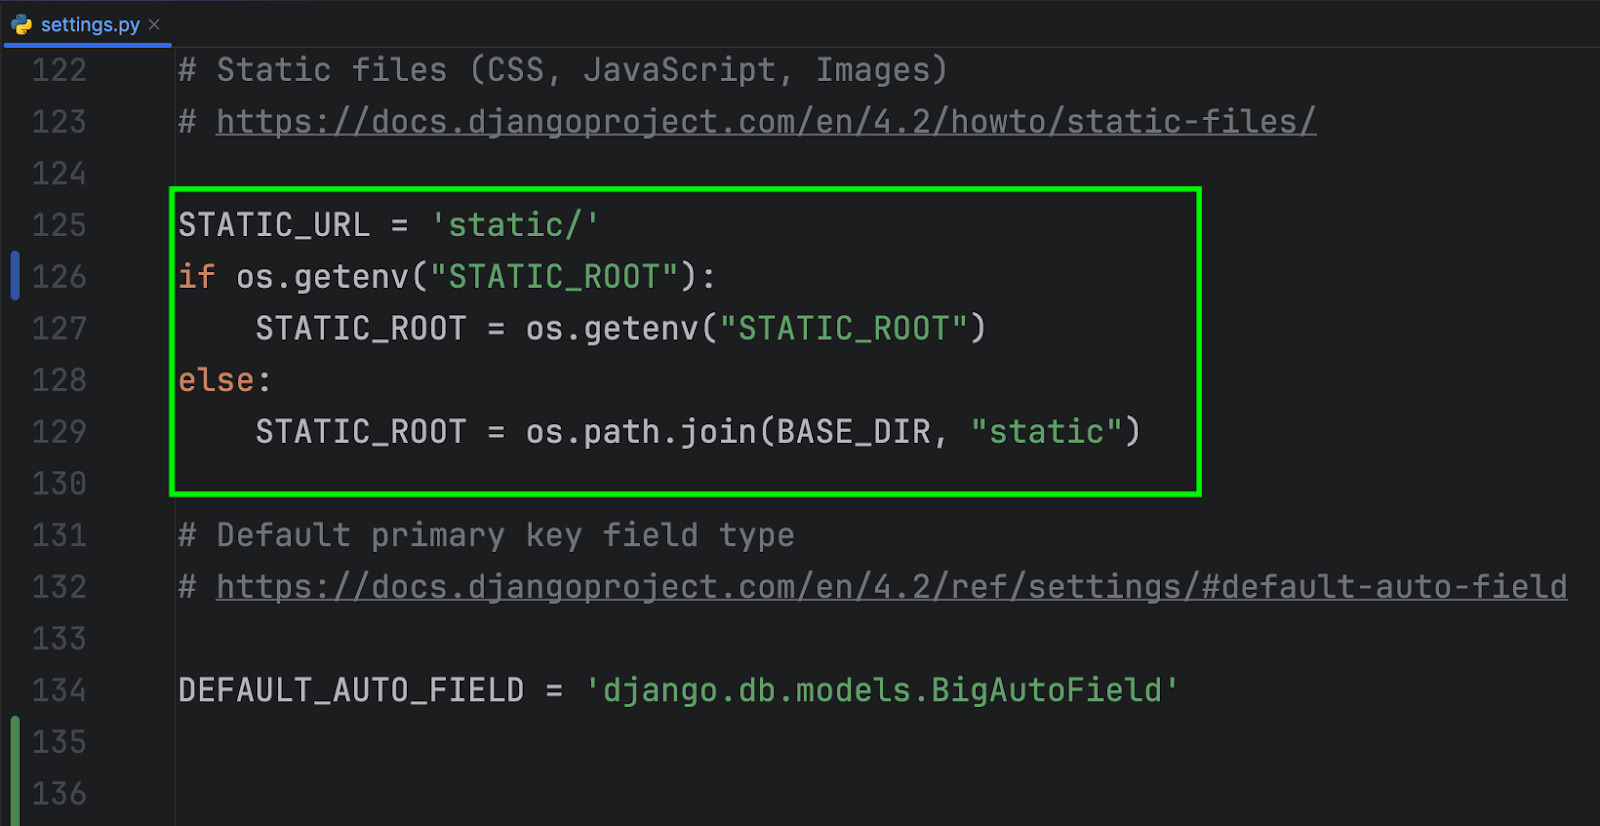
Set an environment variable for STATIC_ROOT at line 127. This variable will point to a file path that leads to a Kubernetes persistent volume. I’ll explain later how to configure this setup.
To collect static files, run the following command:
python manage.py collectstatic
This command will gather the static files and place them in the STATIC_ROOT directory. You can then serve these assets directly through an NGINX or Apache web server – a more efficient approach for production environments.
Dockerfile
A Dockerfile is a straightforward textual document containing directives for constructing Docker images.
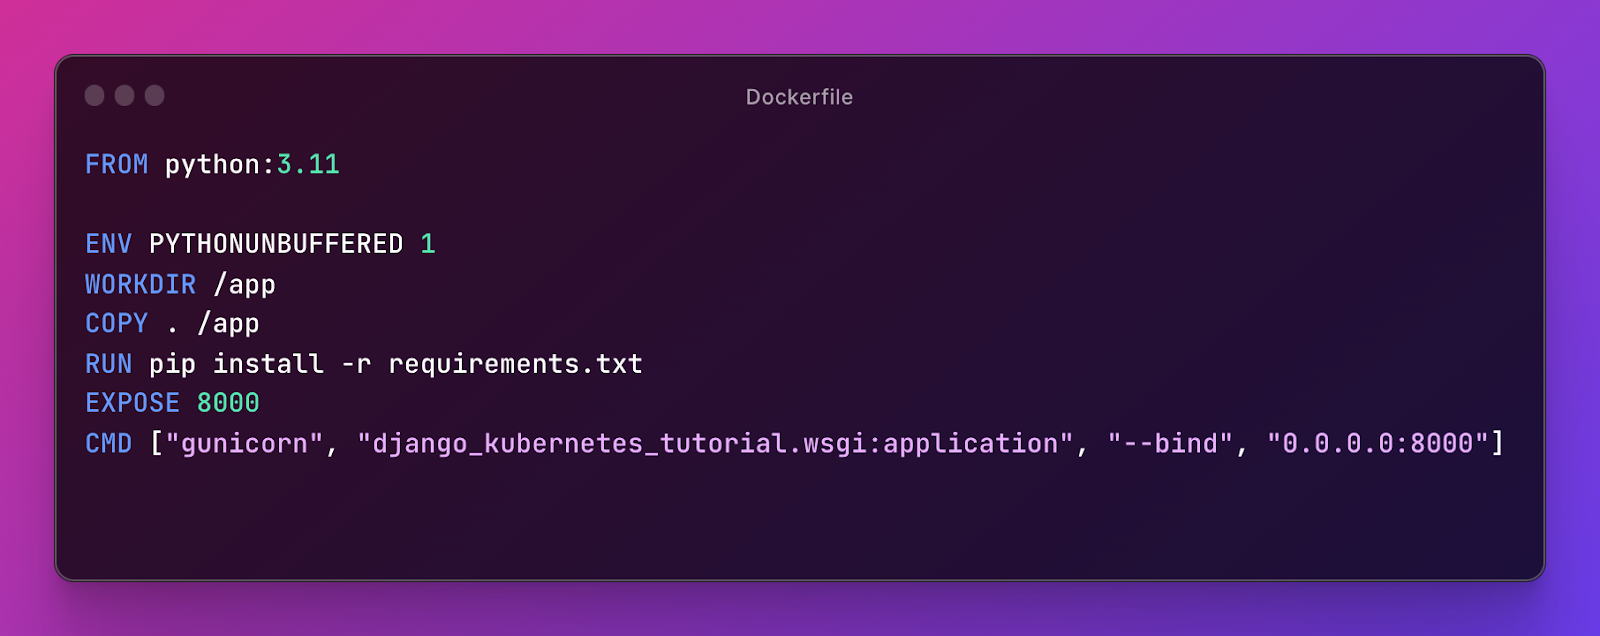
1. FROM python:3.11: This line specifies the base image for the Docker image using the official Python 3.11 image from Docker Hub. The application will be built and run on top of this base image, which already has Python pre-installed.
2. ENV PYTHONUNBUFFERED 1: This line sets an environment variable PYTHONUNBUFFERED to 1. It’s often recommended to set this environment variable when running Python within Docker containers to ensure that Python doesn’t buffer the output. This helps in getting real-time logs and debugging information from the application.
3. WORKDIR /app: This line sets the working directory within the Docker container to /app. All subsequent commands will be executed in this directory.
4. COPY . /app: This line copies the contents of the current directory (the directory where the Dockerfile is located) to the /app directory within the container. This includes your application code and any files needed for the Docker image.
5. RUN pip install -r requirements.txt: This line runs the pip install command to install the Python dependencies listed in a requirements.txt file located in the /app directory. This is a common practice for Python applications as it allows you to manage the application’s dependencies.
6. EXPOSE 8000: This line informs Docker that the container listens on port 8000. It doesn’t actually publish the port. It’s a metadata declaration to indicate which ports the container may use.
7. CMD ["gunicorn", "django_kubernetes_tutorial.wsgi:application", "--bind", "0.0.0.0:8000"]: This line specifies the default command to run when the container starts. It uses Gunicorn to serve the Django application and binds Gunicorn to listen on all network interfaces (0.0.0.0) on port 8000 using the WSGI application defined in django_kubernetes_tutorial.wsgi:application.
DockerHub
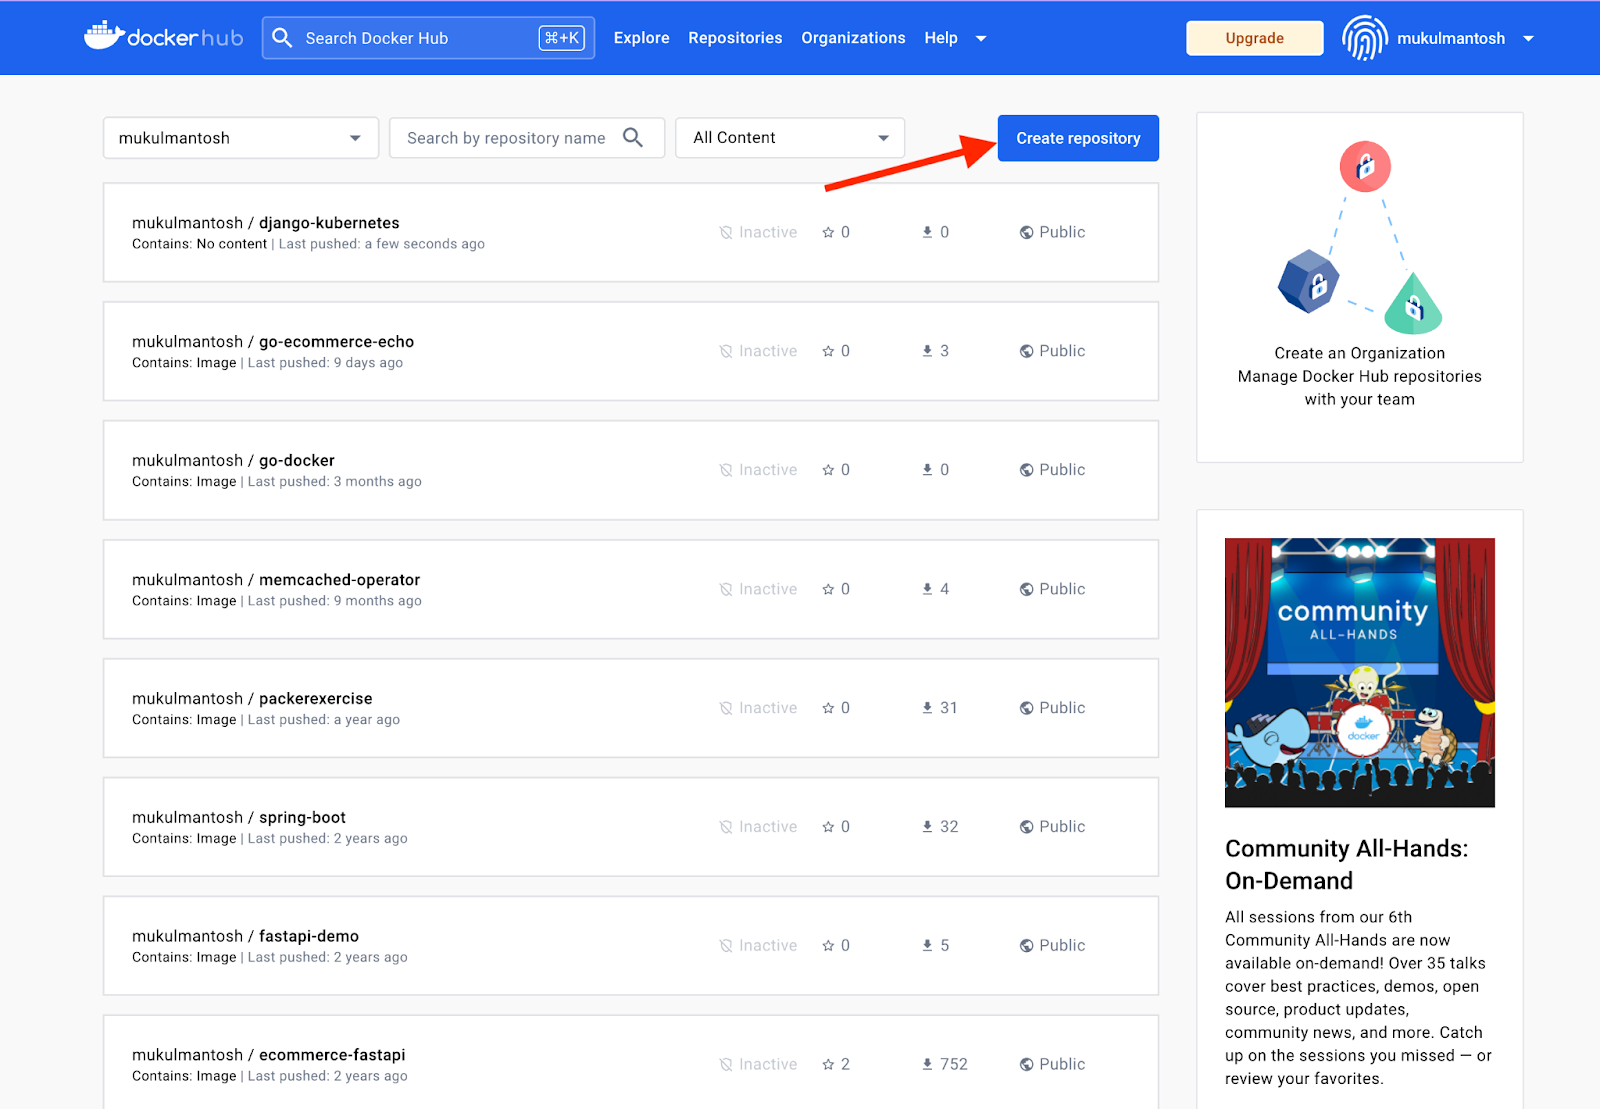
Visit hub.docker.com and proceed to either log in or sign up on the platform.
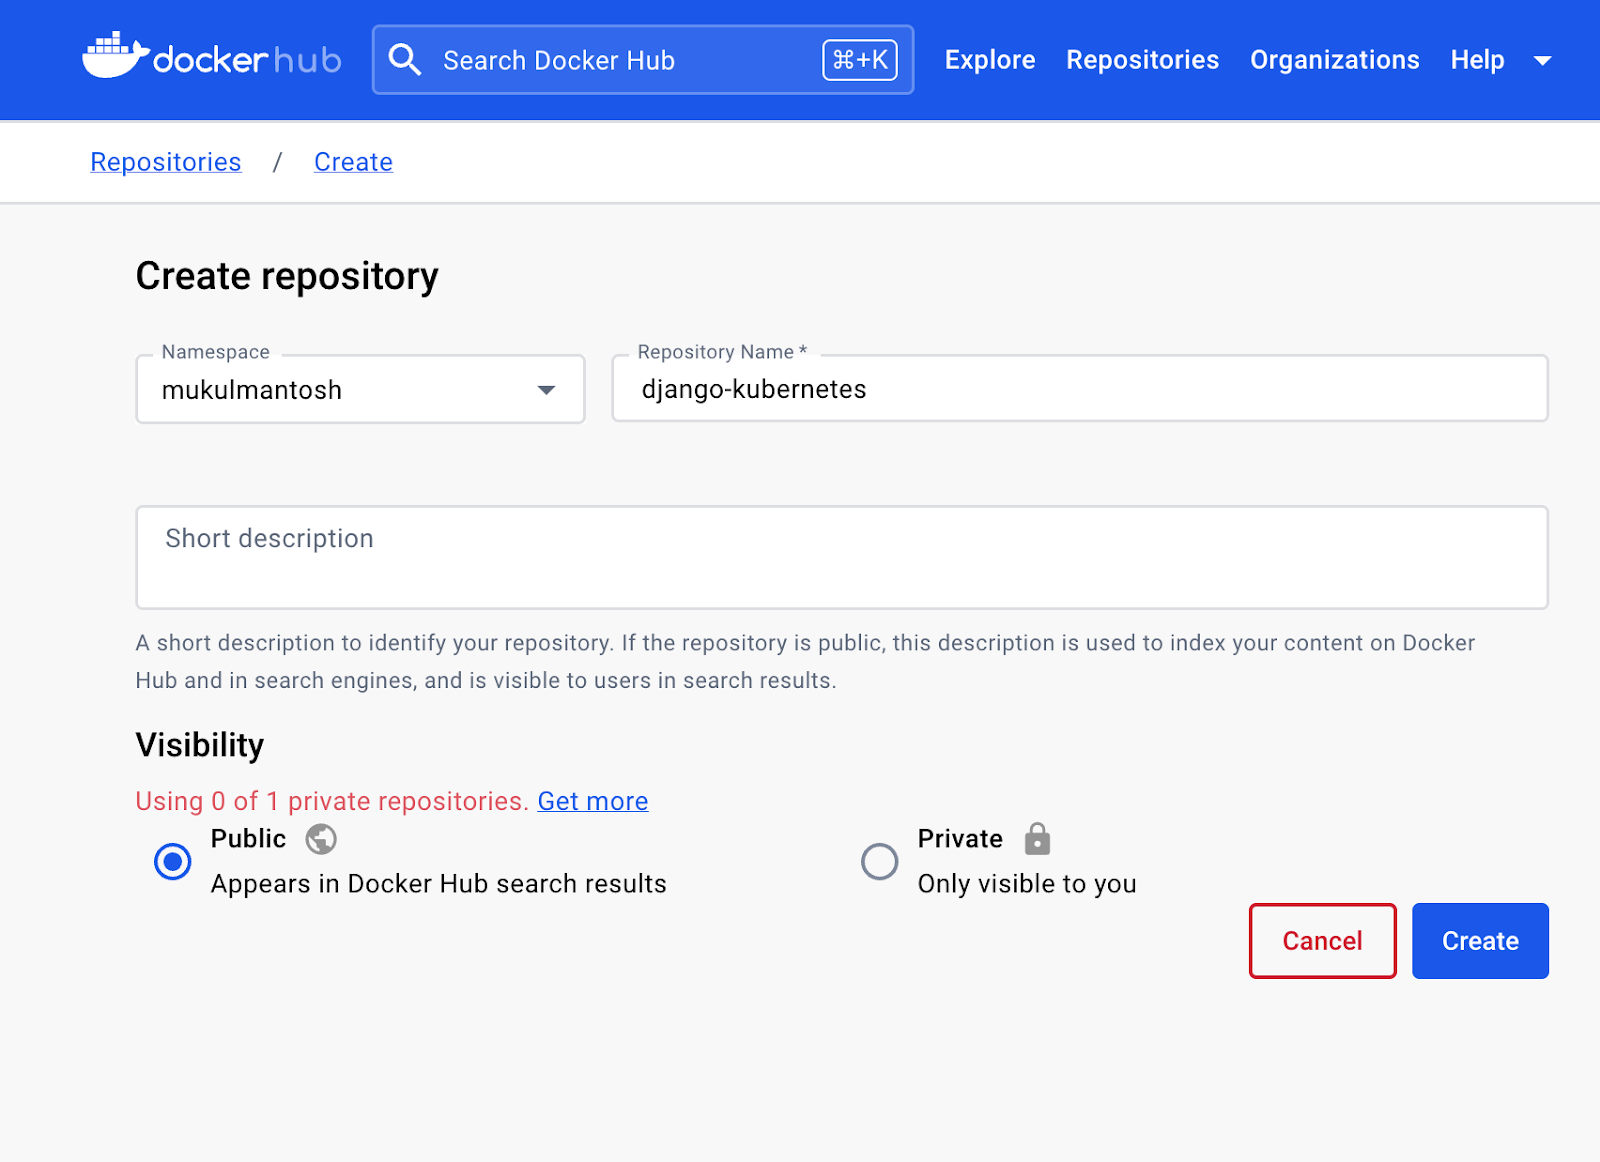
Click on Create repository.
Next, provide the repository name and make the visibility public. If you’re working with sensitive or confidential information, set the visibility to Private.
Once the repository has been created, you need to build the docker image and then push the image to the registry.
Before executing the command, ensure that your requirements.txt file is current by running the following command:
pip freeze > requirements.txt
To construct an image, execute the following command:
docker build -t mukulmantosh/django-kubernetes:1.0 .
docker build -t <USERNAME>/django-kubernetes:1.0 .
This command will vary depending on your specific circumstances, and you will need to utilize your personal username.
You then need to authenticate with Docker Hub to push the image to the registry.
Type the following command in the terminal:
docker login
Enter your username and password. Once they have been successfully authenticated, you can push the image by running:
docker push mukulmantosh/django-kubernetes:1.0
docker push <USERNAME>/django-kubernetes:1.0
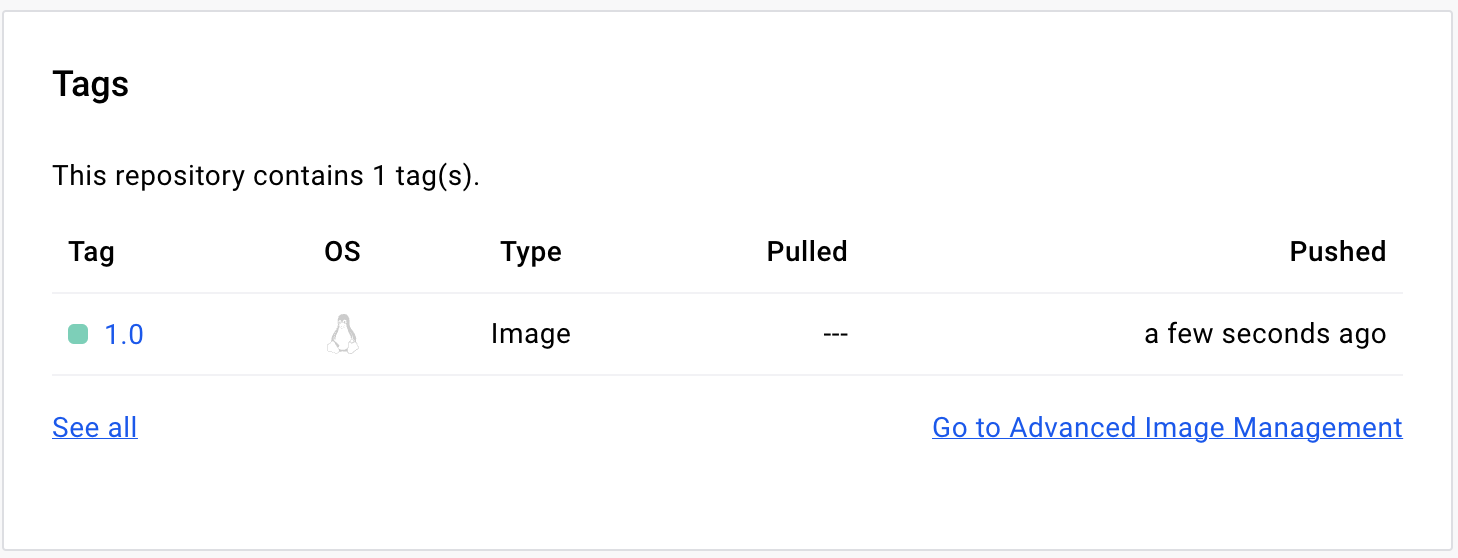
Once the image has been successfully pushed, you can observe changes in Docker Hub.
If you don’t plan to push any more images to the registry, you can log out by running the following command:
docker logout
If you want to pull this image locally, visit hub.docker.com/r/mukulmantosh/django-kubernetes.
Kubernetes Configuration: Writing YAML Files
This section of the tutorial describes the deployment of applications to local Kubernetes clusters.
For this tutorial, we will be using Docker Desktop, but you could also use minikube or kind.
Namespaces
In Kubernetes, namespaces is a virtual partition within a cluster that is used to group and isolate resources and objects. It’s a way to create multiple virtual clusters within a single physical cluster.
You can create and manage namespaces using kubectl, the Kubernetes command-line tool, or by defining them in YAML manifests when deploying resources.
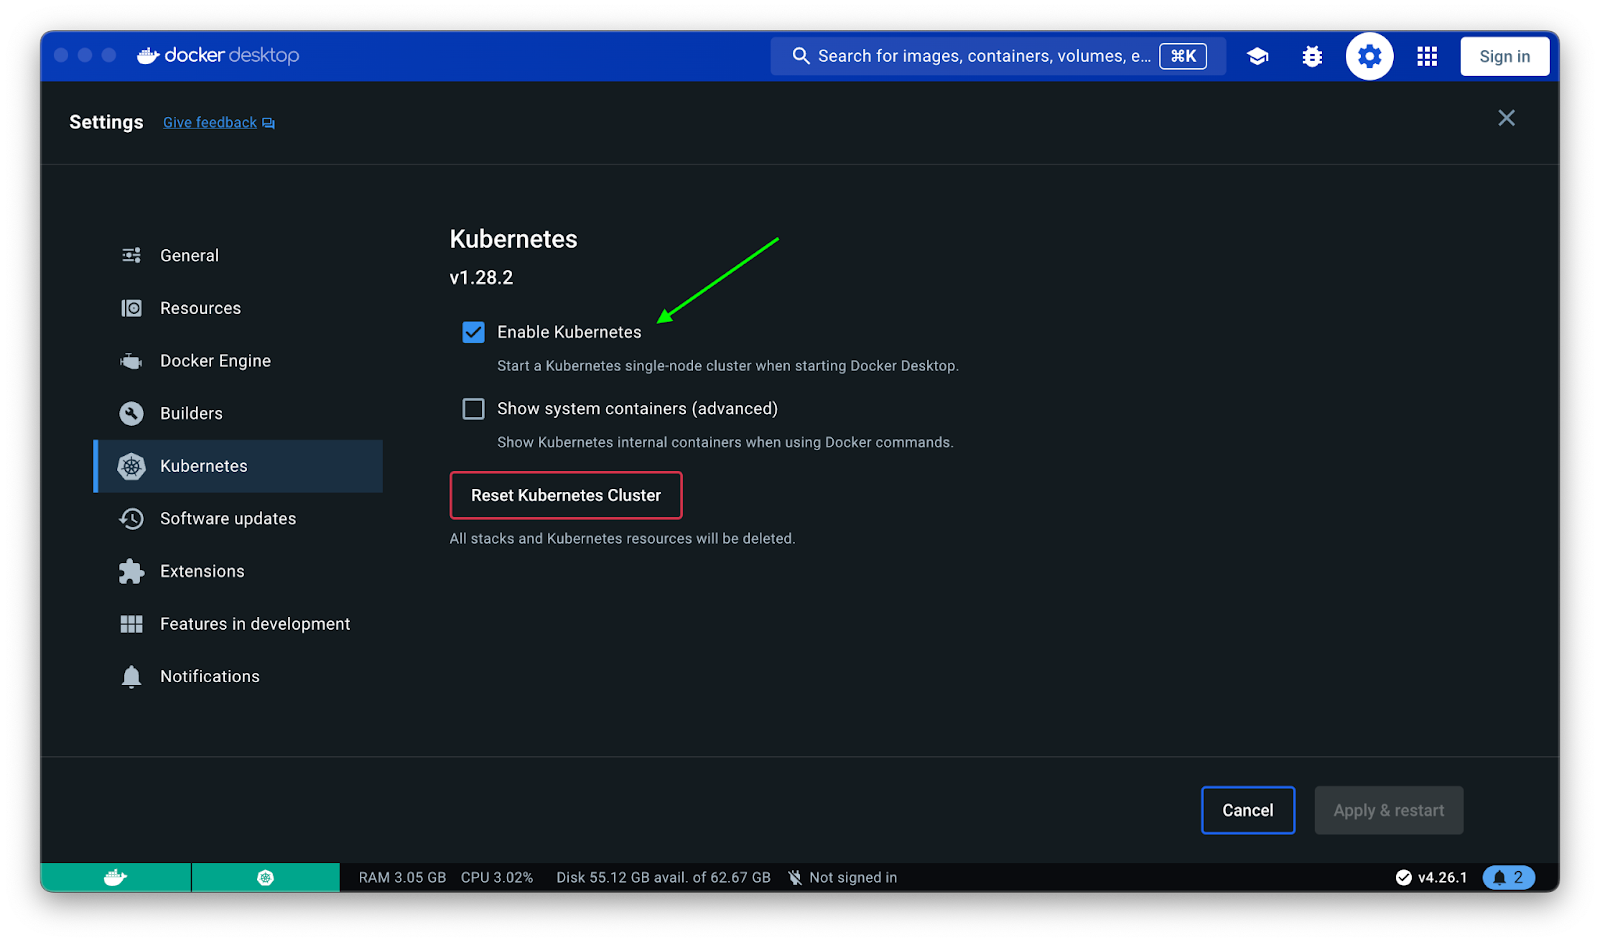
- If you’ve chosen Docker Desktop as your preferred platform for running Kubernetes, be sure to enable Kubernetes in the settings by clicking the Enable Kubernetes checkbox.
Run the following command in the terminal to create namespace:
kubectl create ns django-app
Deploying databases with K8s
To begin, let’s establish a PostgreSQL instance in our Kubernetes cluster on the local environment.
PersistentVolume
In Kubernetes, a persistent volume (PV) is a piece of storage in the cluster that an administrator has provisioned. By storing data in a way that is independent of a pod’s life cycle, PVs allow for a more decoupled and flexible management and abstraction of storage resources. This means data can persist even if the pod that uses it is deleted or rescheduled to a different node in the cluster.
Let’s create a persistent volume and name it pv.yml.
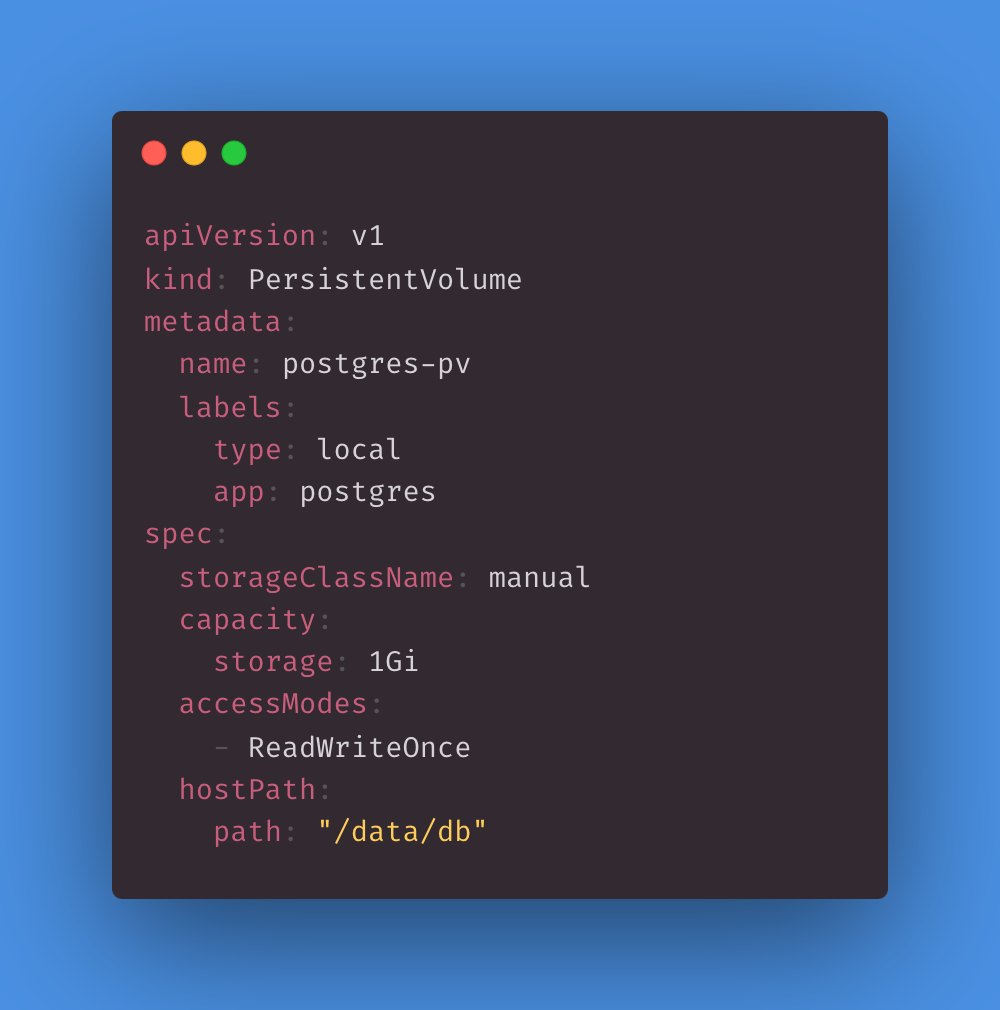
This YAML configuration defines a PersistentVolume resource named postgres-pv with a capacity of 1 gigabyte, mounted using the ReadWriteOnce access mode, and provided by a local path on the node’s file system located at /data/db. This PV can be used to provide persistent storage for pods that need access to a directory on the node’s file system and is suitable for applications like PostgreSQL or other stateful services that need persistent storage.
For production, we recommend either using cloud solutions like AWS RDS or Google CloudSQL, or use Kubernetes StatefulSets.
PersistentVolumeClaim
In Kubernetes, a PersistentVolumeClaim (PVC) is a resource object used by a pod to request a specific amount of storage with certain properties from a PV. PVCs act as a way for applications to claim storage resources without needing to know the details of the underlying storage infrastructure.
By creating and using PVCs, Kubernetes provides a way to dynamically allocate and manage storage resources for applications while abstracting the underlying storage infrastructure, making it easier to work with and manage stateful applications in containerized environments.
Let’s create a PVC and name it pvc.yml.
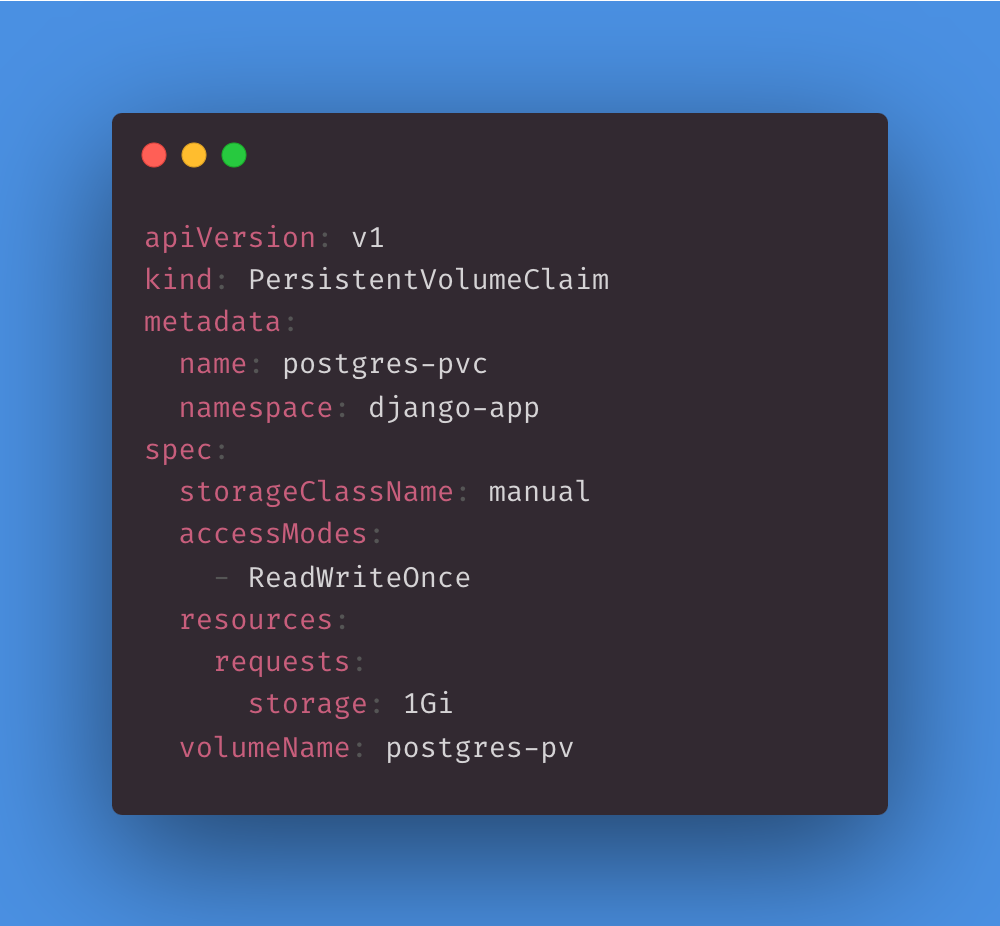
A PVC requests storage resources and is bound to a PV that provides the actual storage.
This YAML configuration defines a PersistentVolumeClaim named postgres-pvc within the django-app namespace. It requests a gigabyte of storage with the ReadWriteOnce access mode, and it explicitly specifies the manual StorageClass. This PVC is intended to be bound to an existing PV with the name postgres-pv, effectively reserving that volume for use by pods within the django-app namespace that reference this PVC.
ConfigMap
In Kubernetes, a ConfigMap is an API object that is used to store configuration data in key-value pairs. ConfigMaps provides a way to decouple configuration data from the application code, making it easier to manage and update configurations without modifying and redeploying containers. They are especially useful for configuring applications, microservices, and other components within a Kubernetes cluster.
Let’s create a ConfigMap and name it cm.yml.
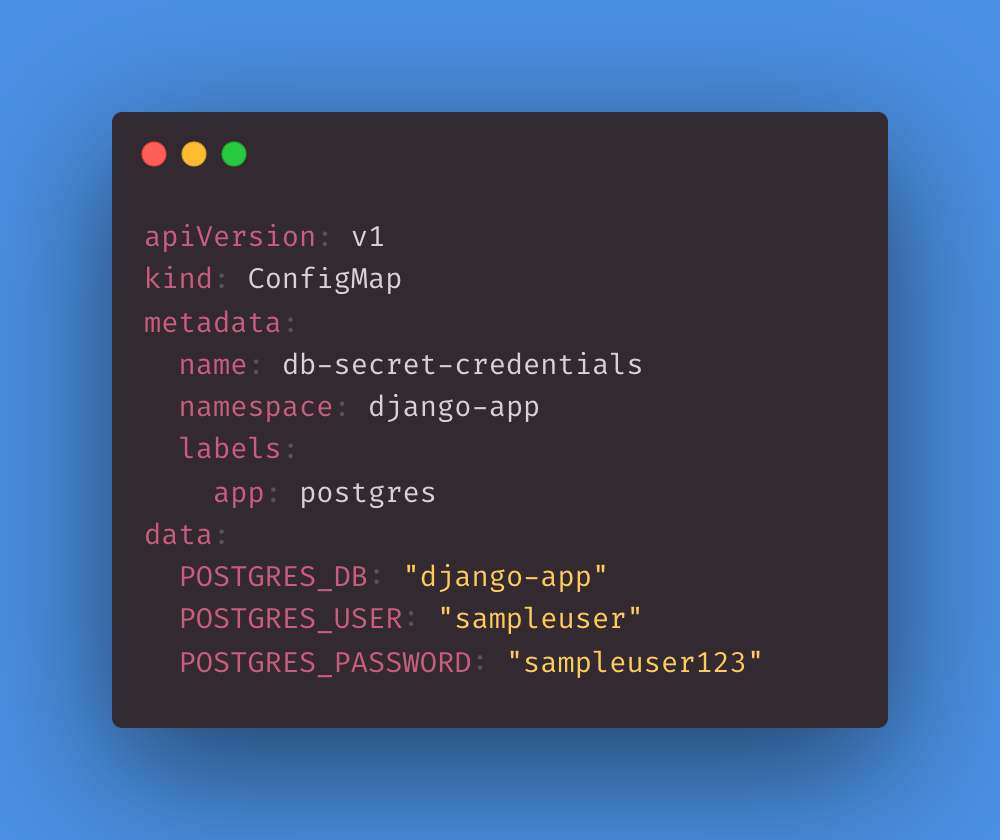
Although this tutorial uses ConfigMaps, for security considerations, it’s recommended to store sensitive credentials in Kubernetes Secrets or explore alternatives like Bitnami Sealed Secrets, AWS Parameter Store, or HashiCorp Vault.
Deployment
In Kubernetes, a Deployment is a resource object used to manage the deployment and scaling of applications. It’s part of the Kubernetes API group and provides a declarative way to define and manage the desired state of your application.
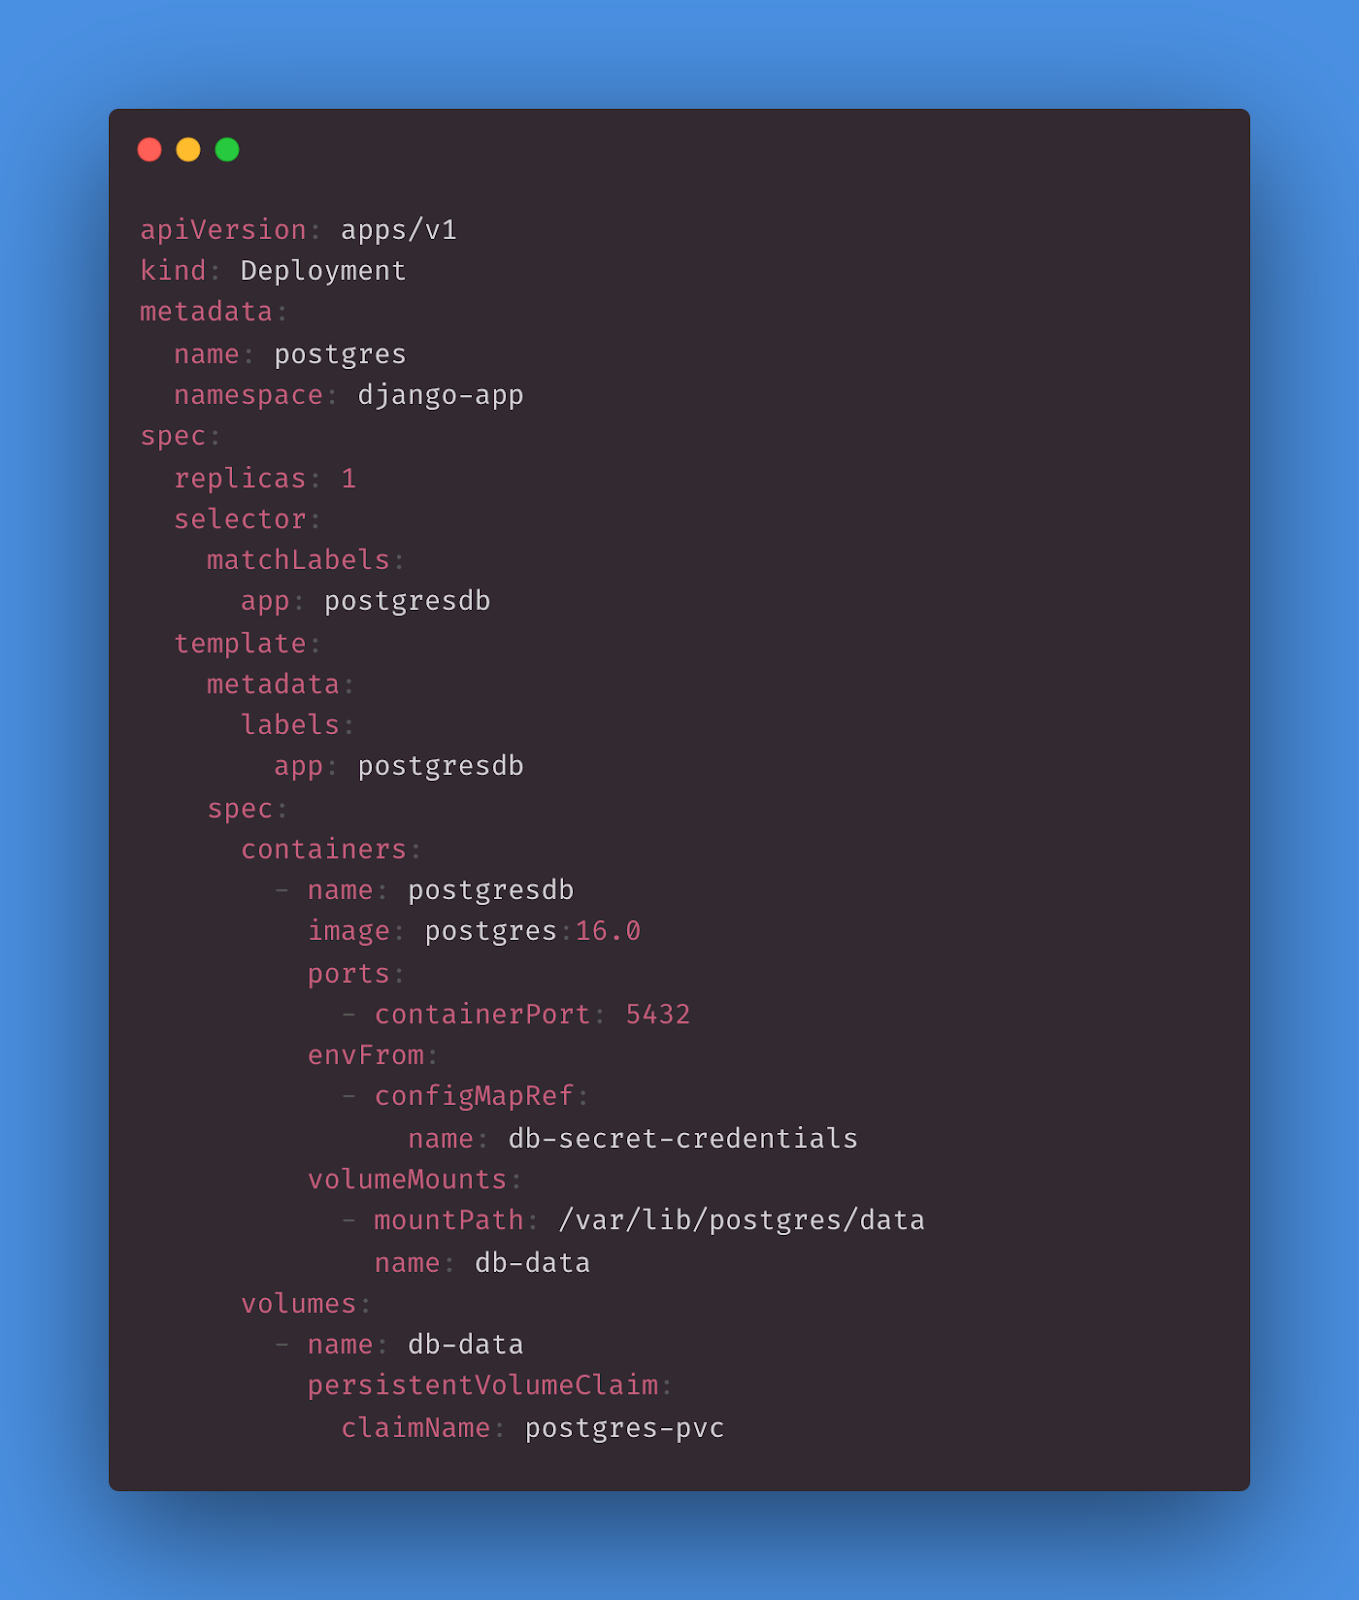
A Deployment is a higher-level Kubernetes resource used for managing and scaling application pods.
This YAML configuration defines a Deployment named postgres in the django-app namespace. It deploys a single replica of a PostgreSQL database (version 16.0) with persistent storage. The database pod is labeled as app: postgresdb, and the storage is provided by a PVC named postgres-pvc. Configuration and credentials for the PostgreSQL container are provided via a ConfigMap named db-secret-credentials.
Service
In Kubernetes, a Service is a resource object used to expose a set of pods as a network service. Services enable network communication between different parts of your application running in a Kubernetes cluster and provide a stable endpoint for clients to access those parts. Services abstract the underlying network infrastructure, making it easier to connect and discover the components of your application.
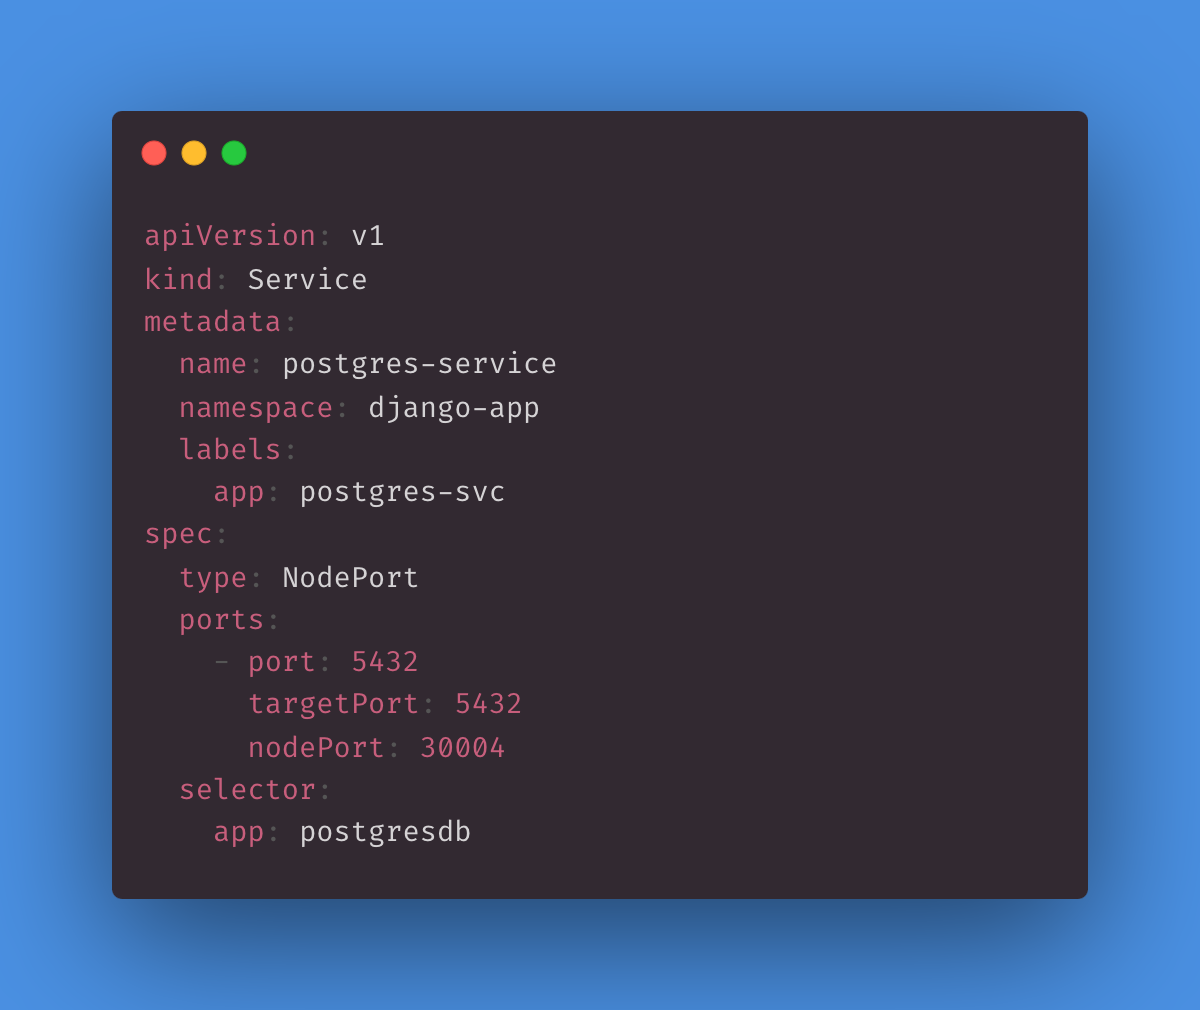
This YAML configuration defines a NodePort Service named postgres-service within the django-app namespace. It exposes the PostgreSQL service running in pods labeled with “app: postgresdb” on port 5432 within the cluster. External clients can access the Service on any node’s IP address using port 30004. This Service provides a way to make the PostgreSQL database accessible from outside the Kubernetes cluster.
Creating YAML configurations for a Django application
PersistentVolume
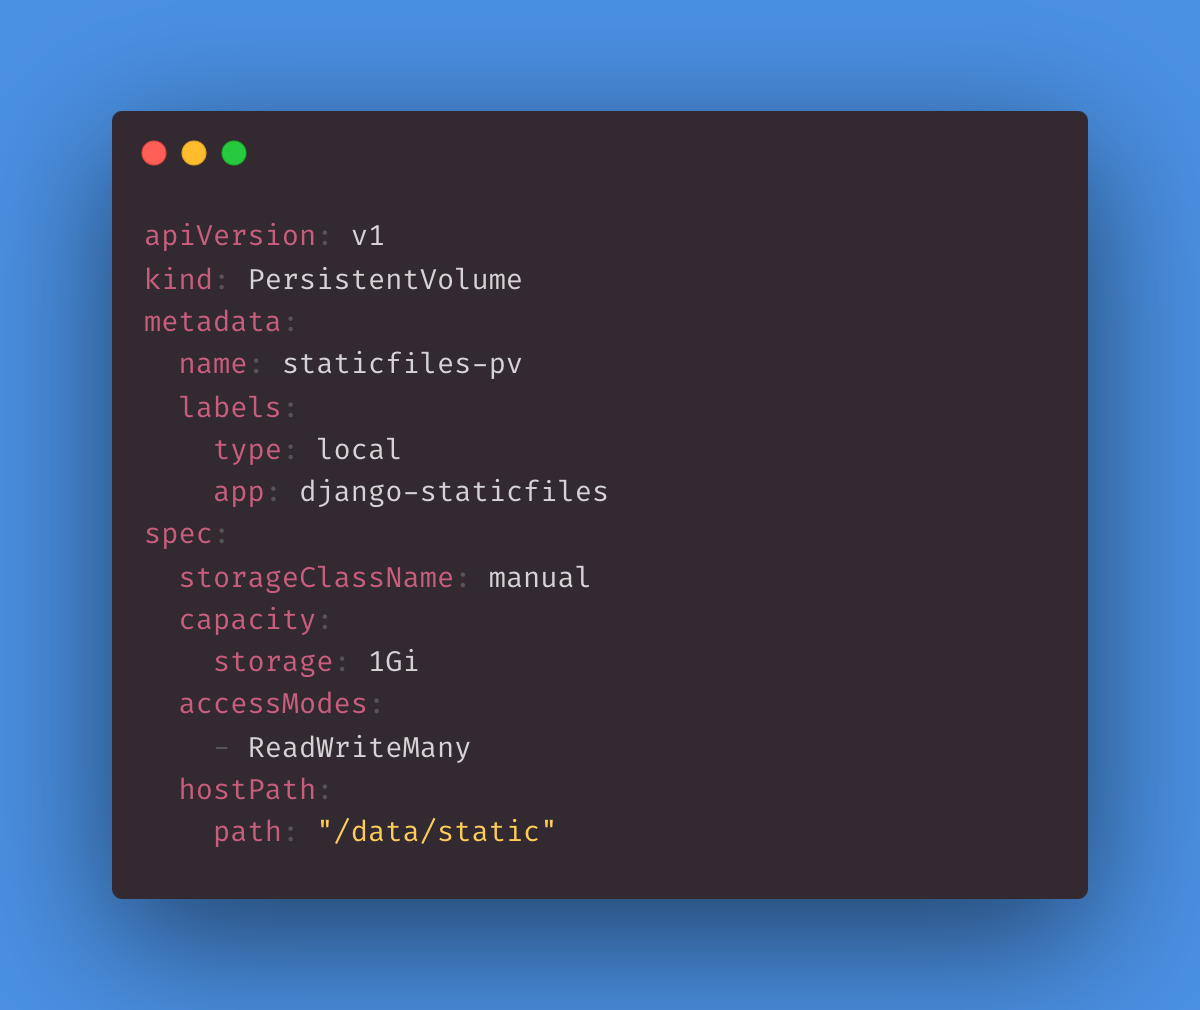
This YAML defines a PersistentVolume named staticfiles-pv with a 1 GB storage capacity, allowing multiple pods to read and write to it simultaneously. The storage is provided by a local host path located at /data/static. The Django static files will be stored at this location.
PersistentVolumeClaim
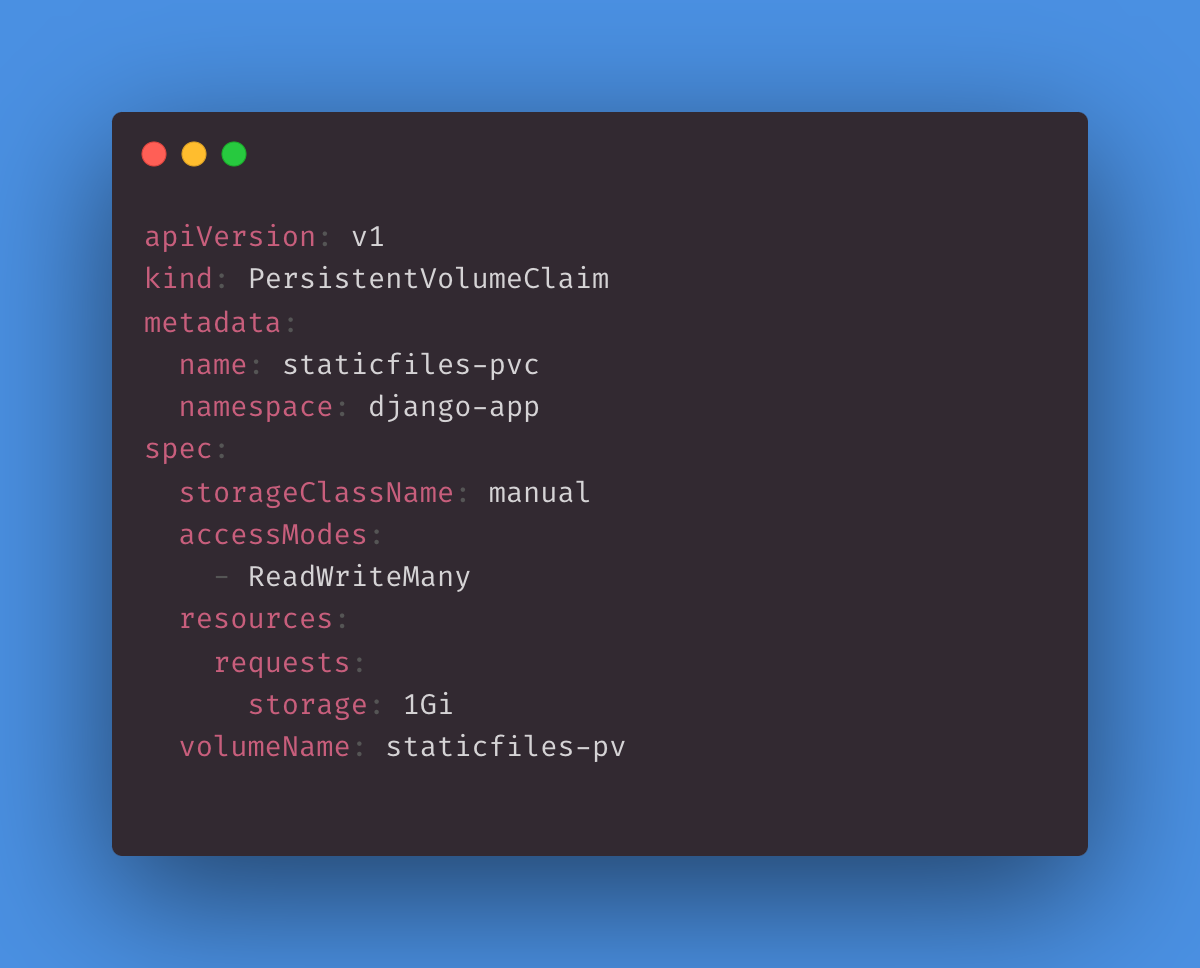
This YAML defines a PVC named staticfiles-pvc in the django-app namespace. It requests storage with a capacity of at least 1 GB from a PV with the “manual” StorageClass, and it specifies that it needs ReadWriteMany access. The claim explicitly binds to an existing PV named staticfiles-pv to satisfy its storage needs. This allows pods in the django-app namespace to use this PVC to access and use the storage provided by the associated PV.
ConfigMap
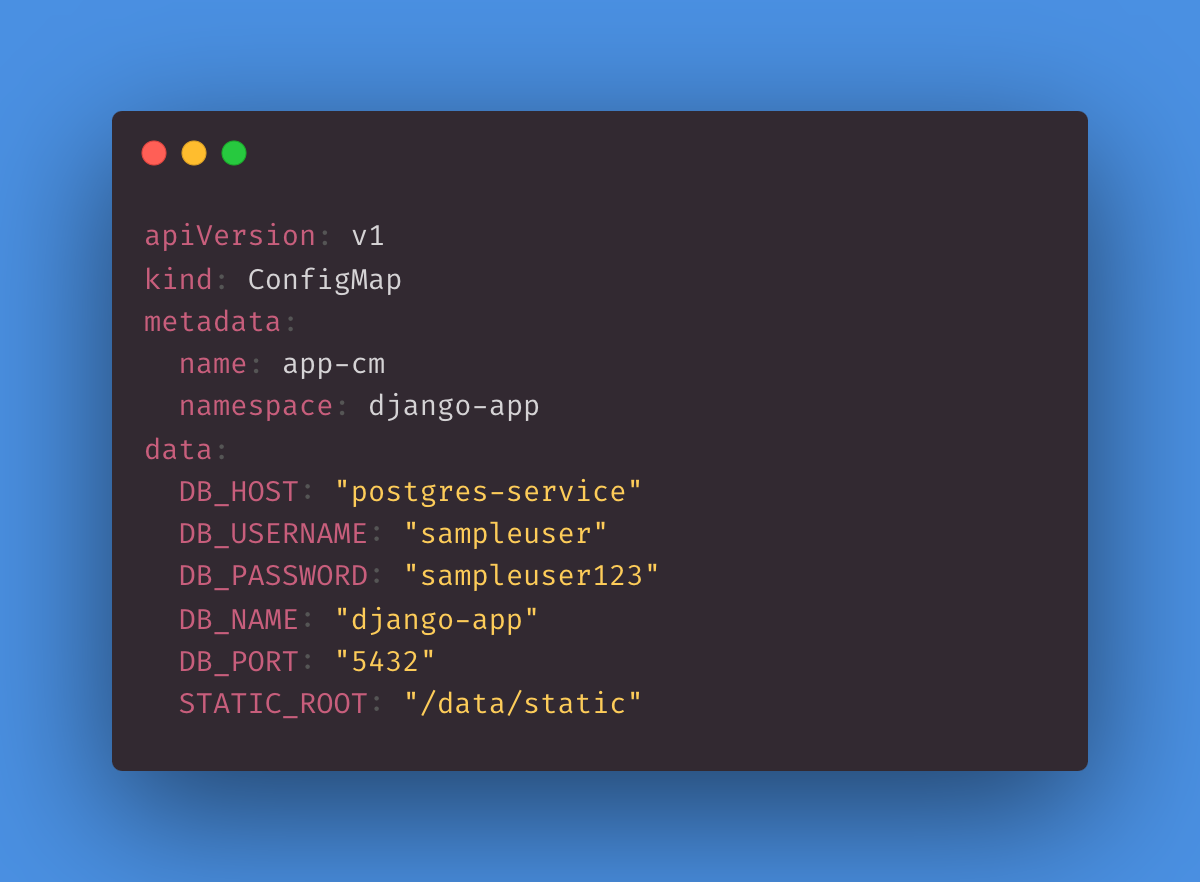
This YAML defines a ConfigMap named app-cm in the django-app namespace, and it contains various key-value pairs that store configuration data. This ConfigMap can be used by pods or other resources within the django-app namespace to access configuration settings, such as database connection information and static file paths.
Deployment
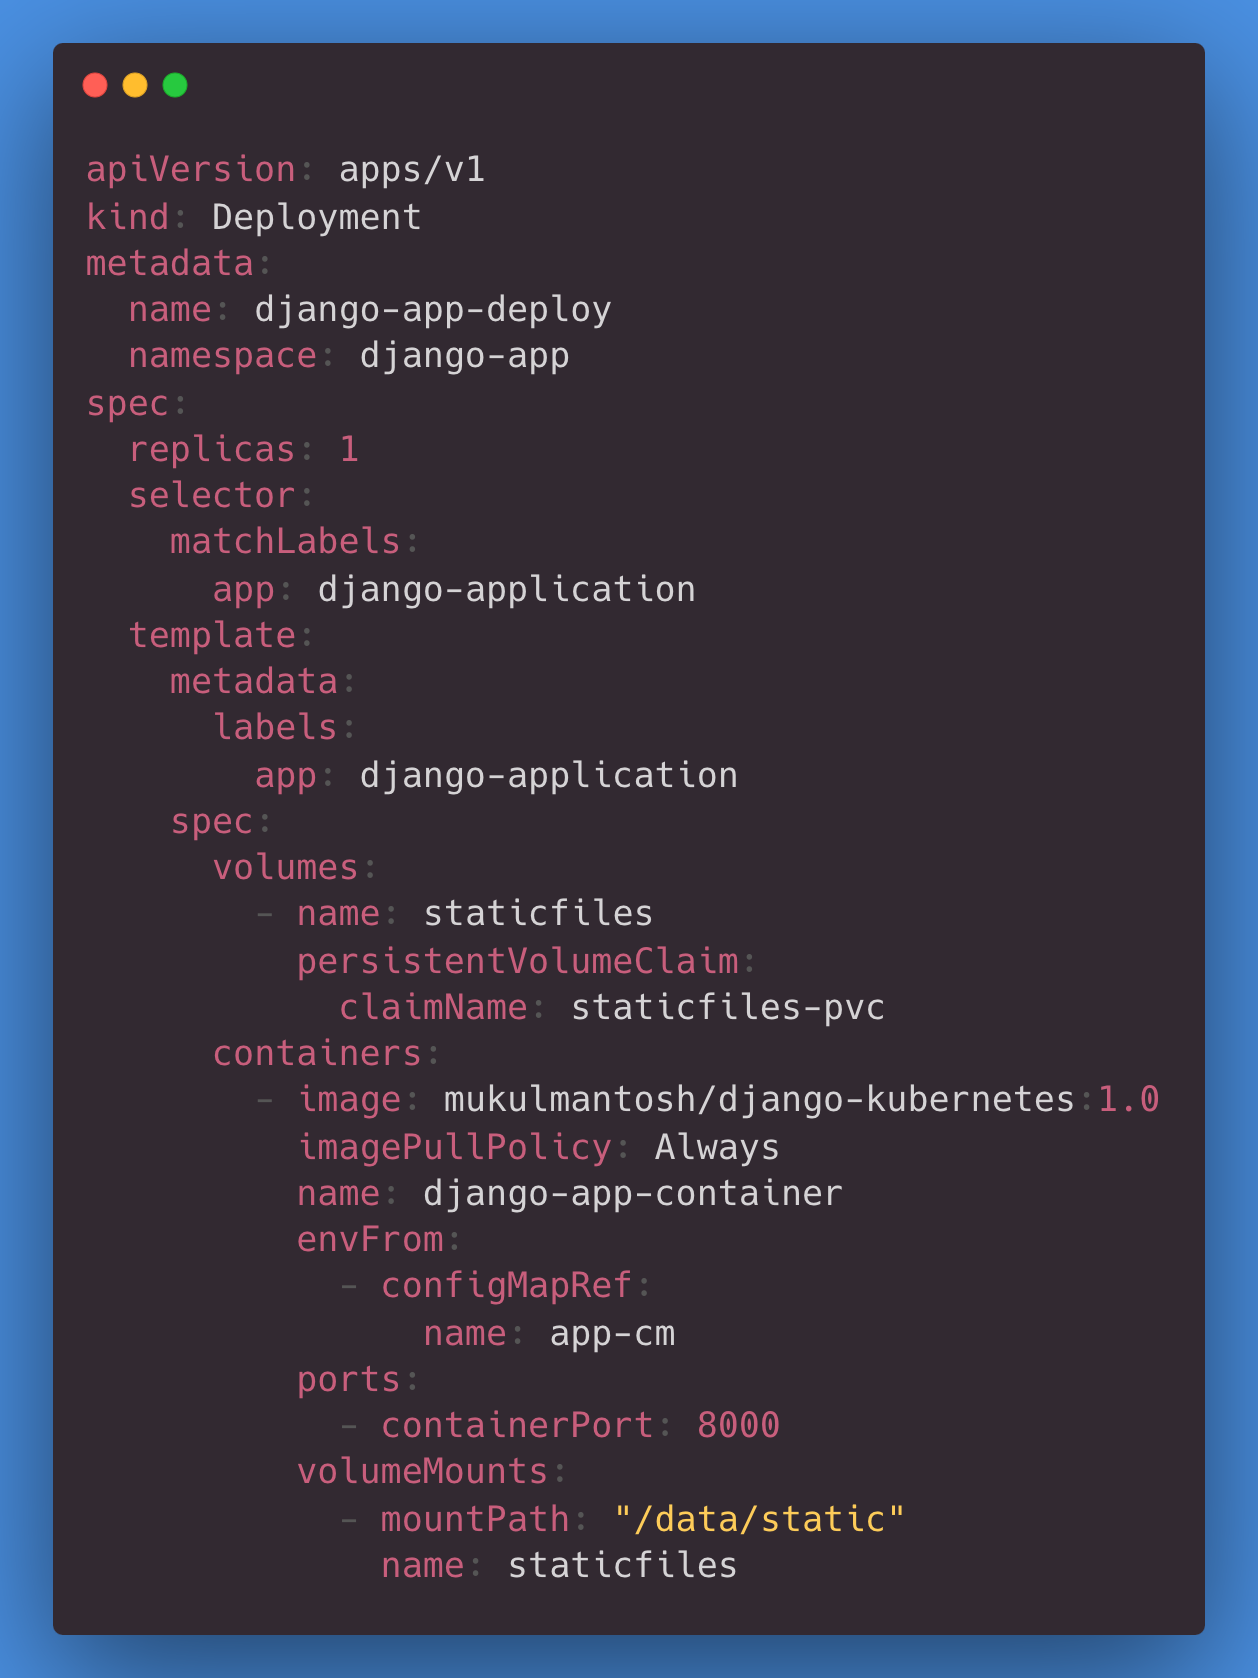
This YAML defines a Deployment named django-app-deploy in the django-app namespace. It creates one replica (pod) running a container with a specific Docker image and configuration. The pod is associated with two volumes, postgres-db-storage and staticfiles, which are backed by PVCs. The container is configured to use environment variables from a ConfigMap named app-cm and listens on port 8000. The volumes are mounted at specific paths within the container to provide access to database storage and static files. This Deployment is a common way to run a Django application using Kubernetes.
If you are interested in pulling images from a private registry, then read here.
Service
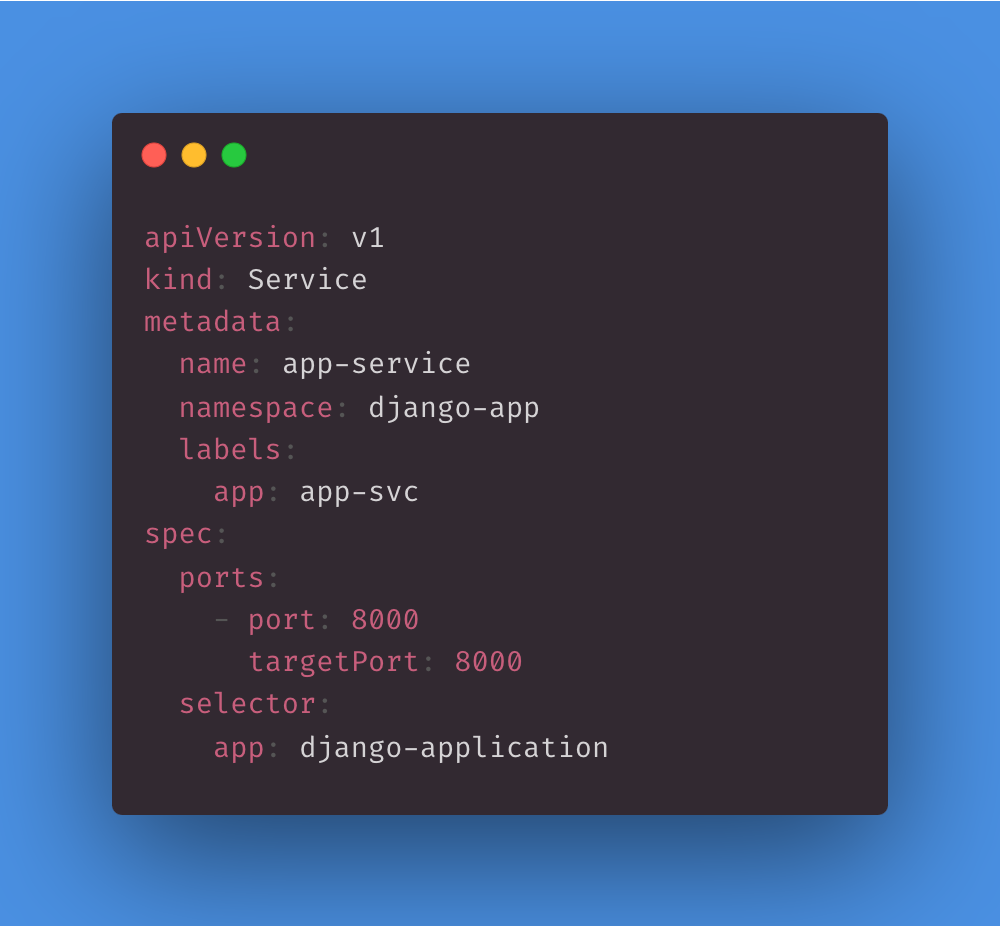
The Service listens on port 8000 and directs incoming traffic to pods labeled with app: django-application. This is a common configuration for exposing and load-balancing web applications in a Kubernetes cluster where multiple instances of the same application are running. The Service ensures that traffic is distributed evenly among them.
NGINX
NGINX is a high-performance web and reverse proxy server known for its speed, reliability, and scalability. It efficiently handles web traffic, load balancing, and content delivery, making it a popular choice for serving websites and applications.
ConfigMap
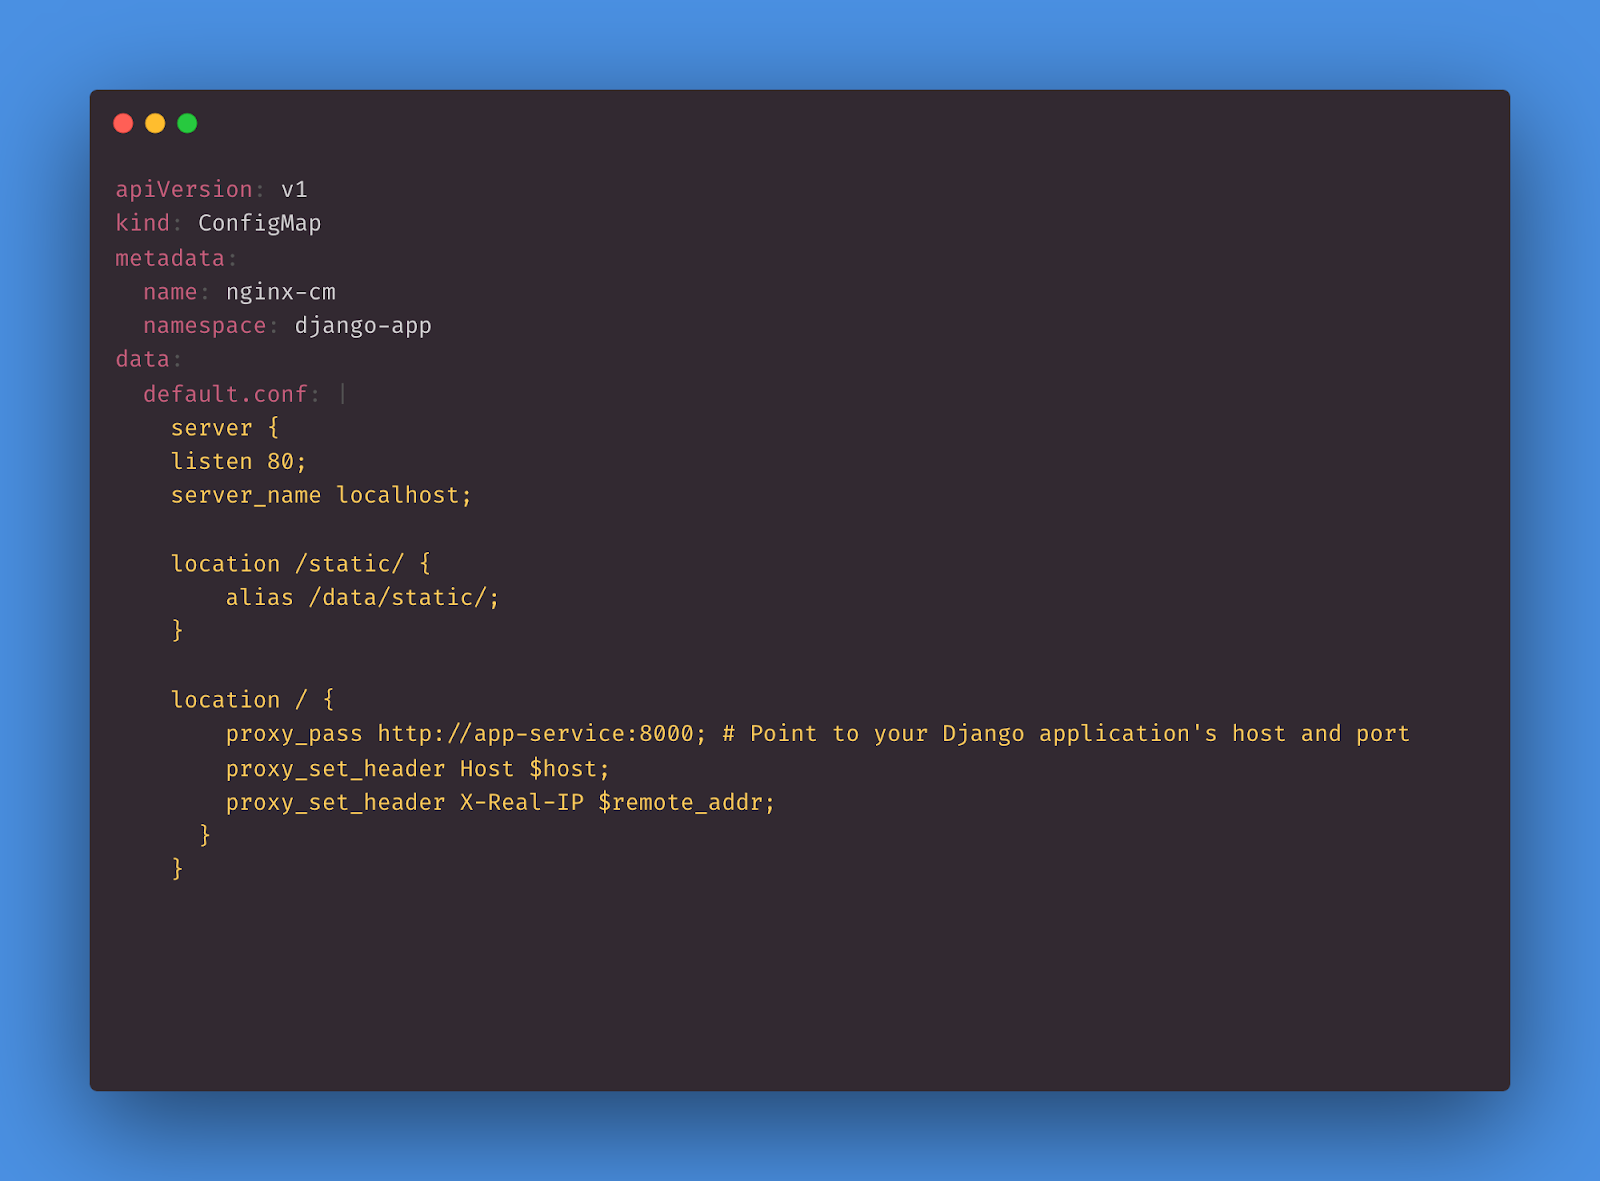
This YAML defines a Kubernetes ConfigMap named nginx-cm in the django-app namespace, and it contains a key-value pair where the key is default.conf and the value is a multiline NGINX configuration file that proxies the request to the backend server.
Deployment
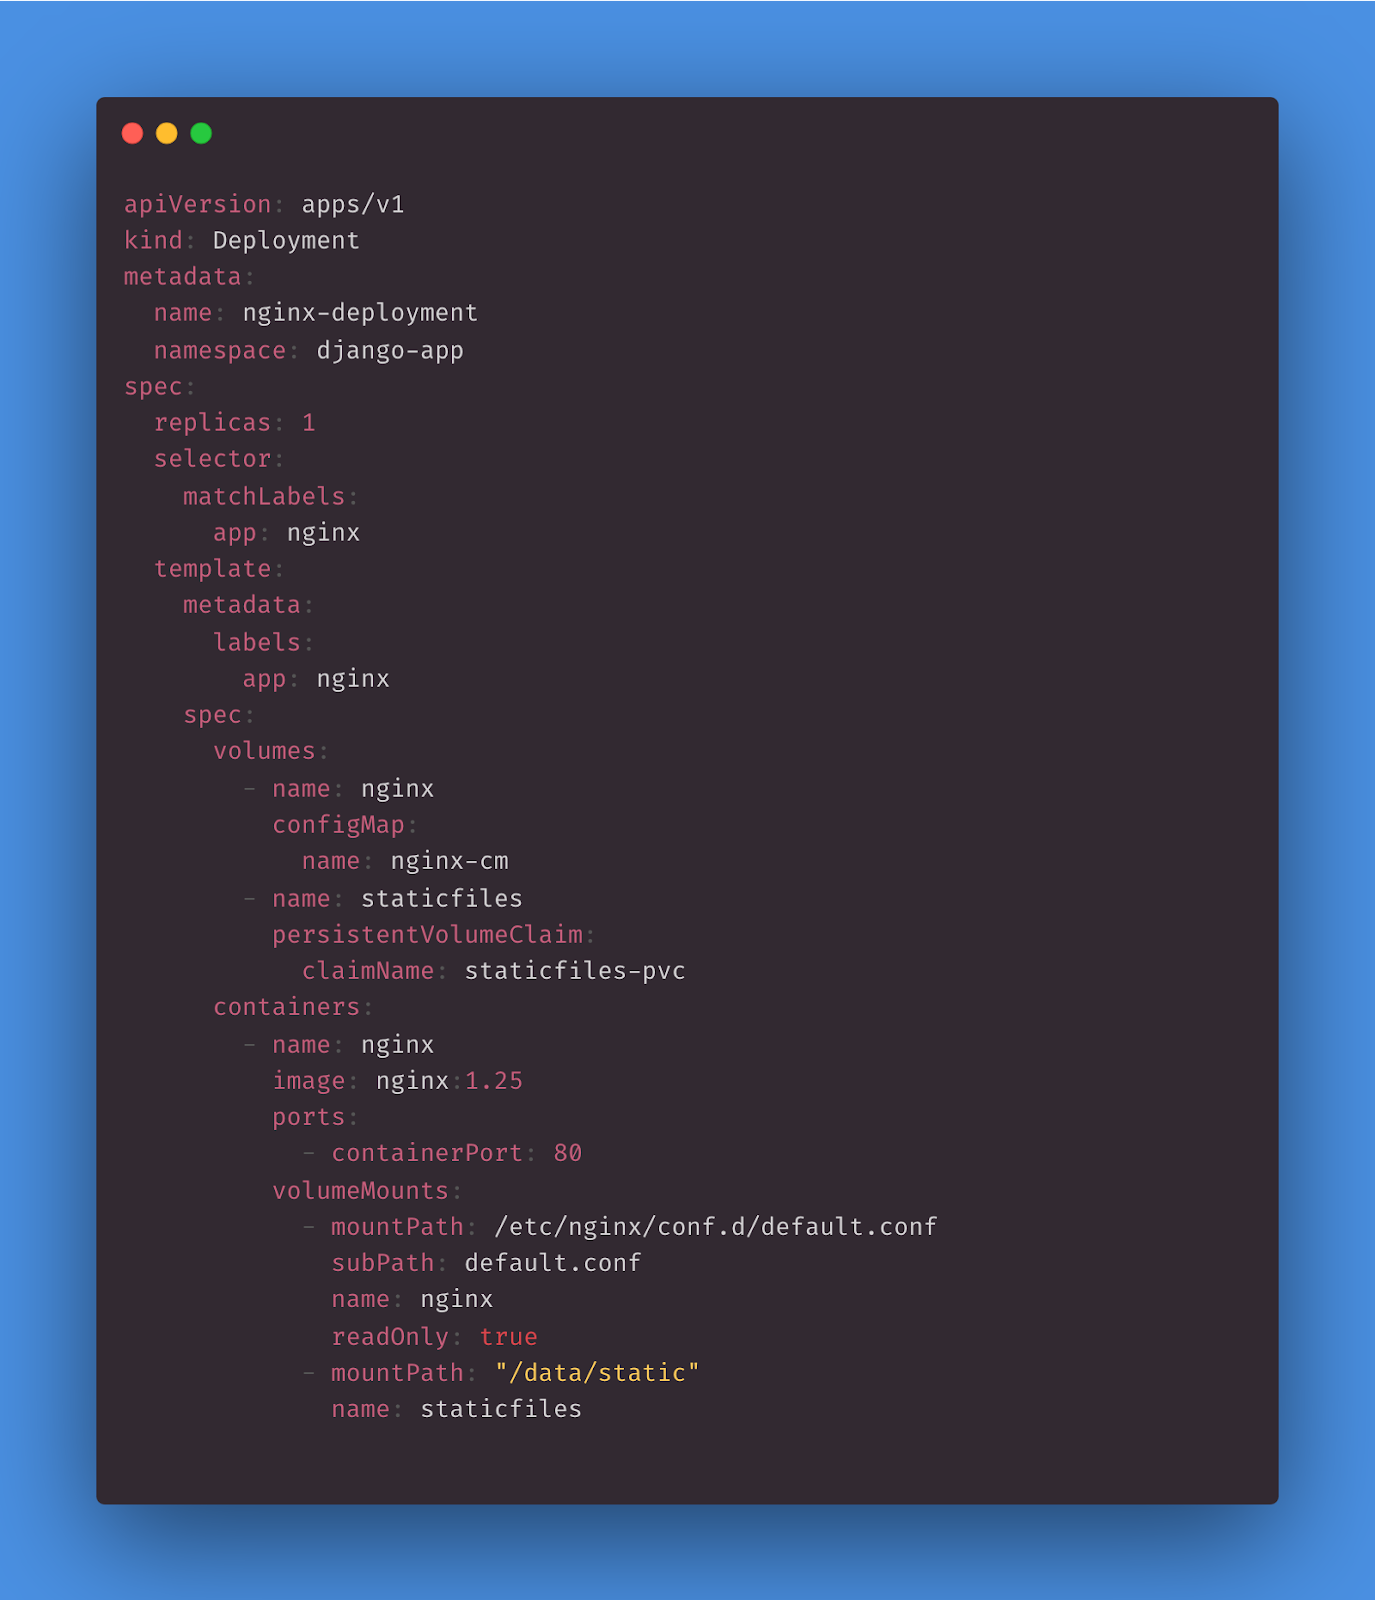
This YAML defines a Deployment that creates and manages pods running an NGINX container with specific volumes and configurations. The Deployment ensures that one replica of this pod is always running in the django-app namespace. It also overrides the default NGINX configuration by replacing it with the nginx-cm ConfigMap.
Service
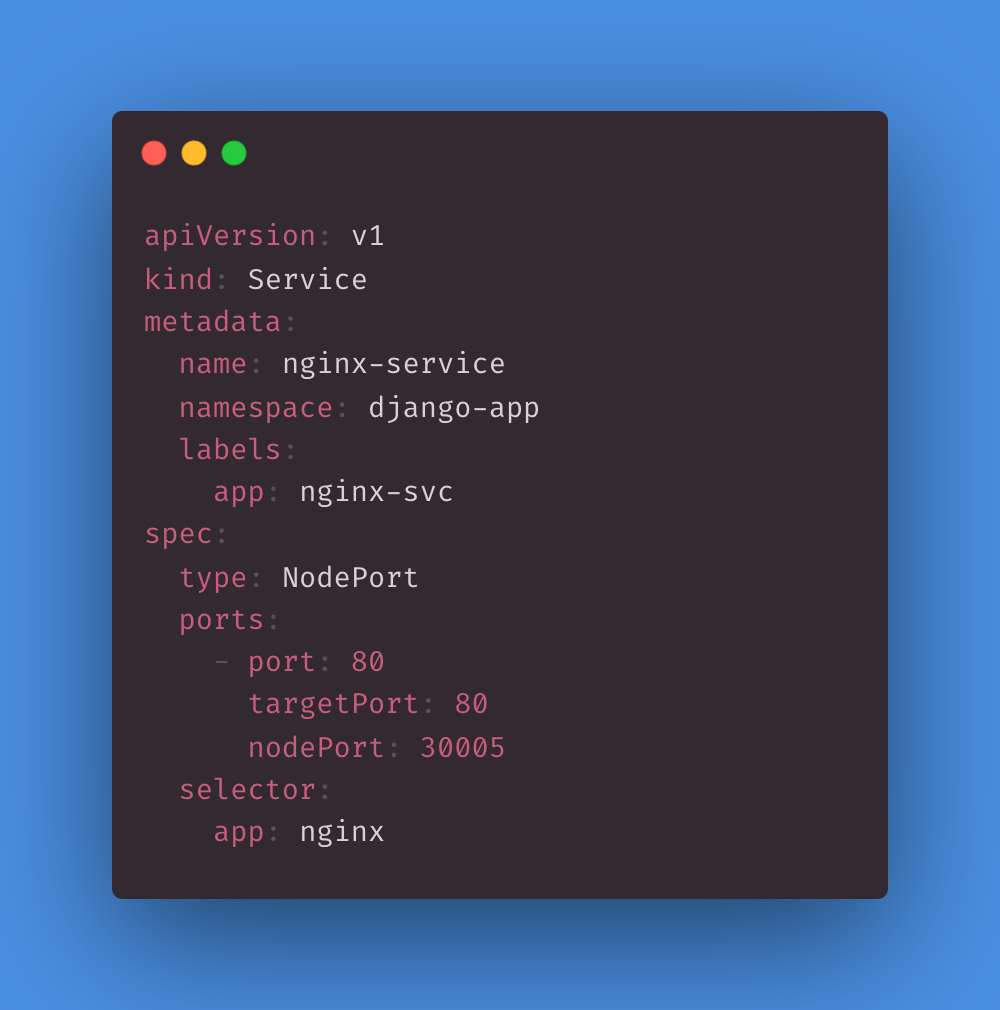
This YAML configuration creates a Kubernetes Service named nginx-service in the django-app namespace. It exposes pods with the label app:nginx on port 80 within the cluster and also makes the Service accessible on NodePort 30005 on each cluster node. This allows external traffic to reach the pods running the NGINX application via the NodePort service.
Managing batch workloads with Kubernetes jobs
In Kubernetes, a Job is a resource object that represents a single unit of work or a finite task. Jobs are designed to run tasks to completion, with a specified number of successful completions.
Database migration
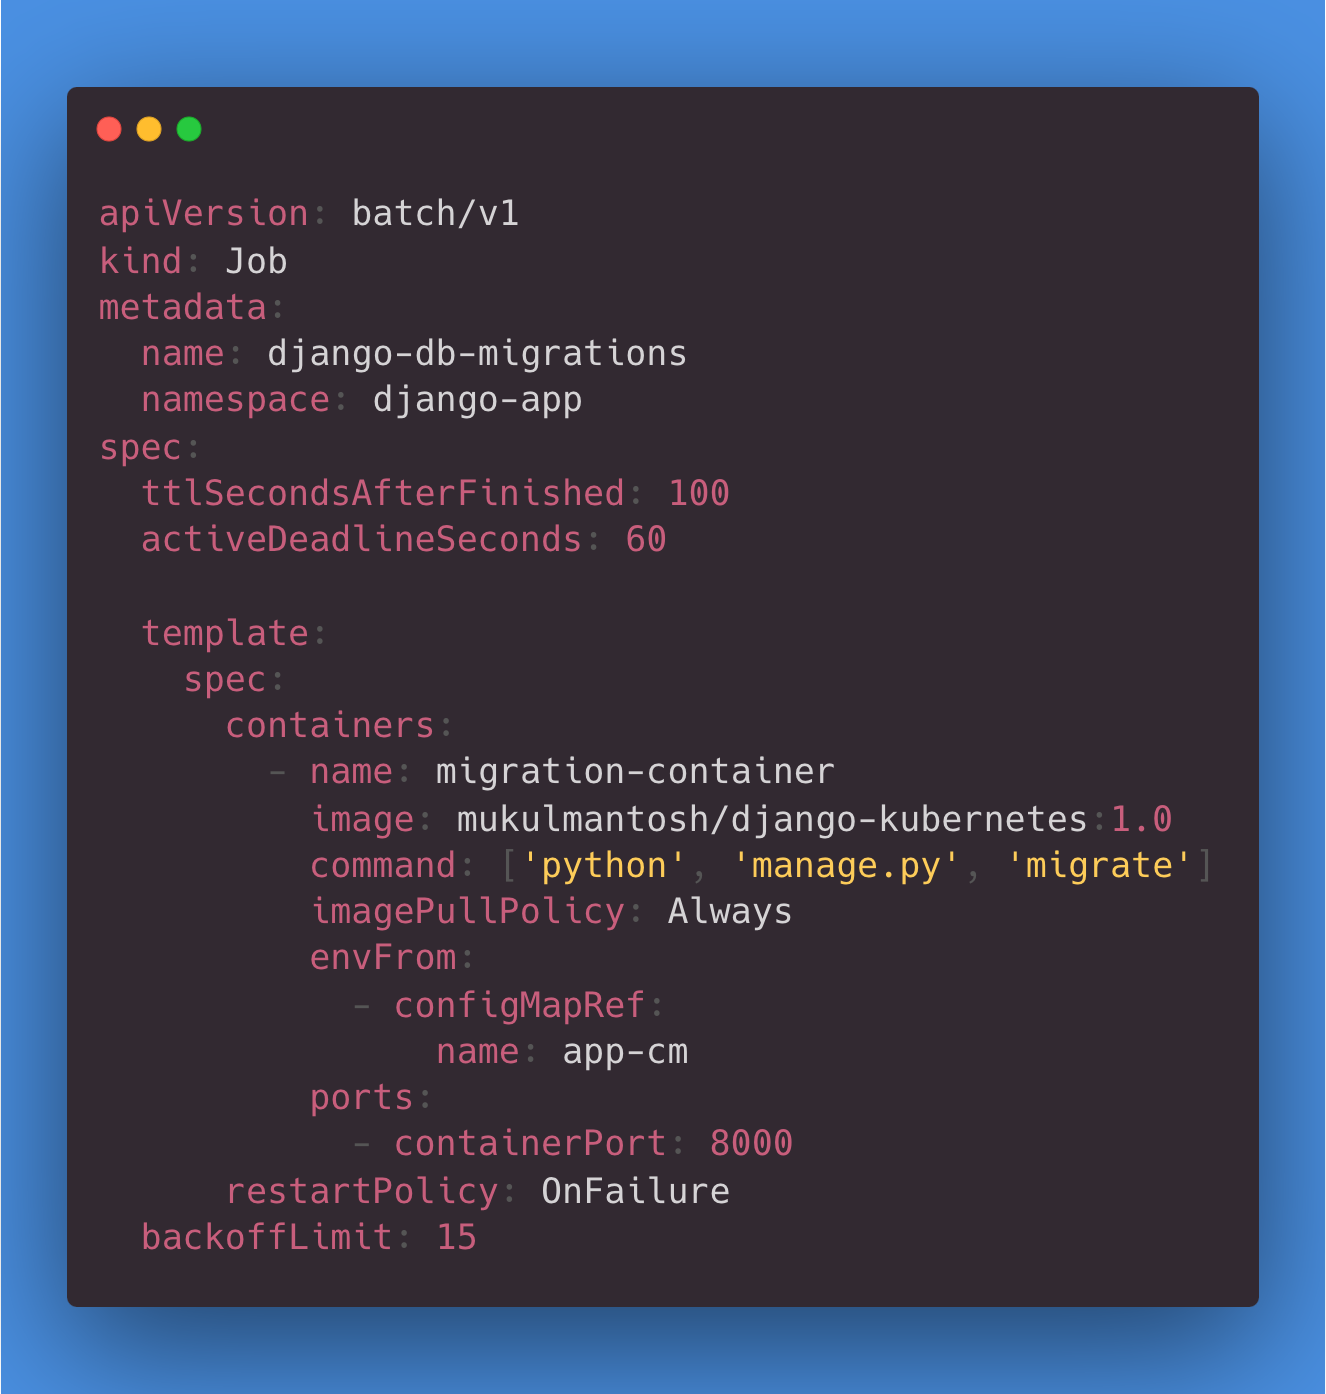
This YAML configuration defines a Kubernetes Job named django-db-migrations in the django-app namespace. The Job runs a container using a custom Docker image for Django migrations and mounts a PVC to provide storage for database-related files. If the Job fails, it can be retried up to 15 times, and it will retain its pod for 100 seconds after completion. This Job will create new tables in PostgreSQL.
Static files
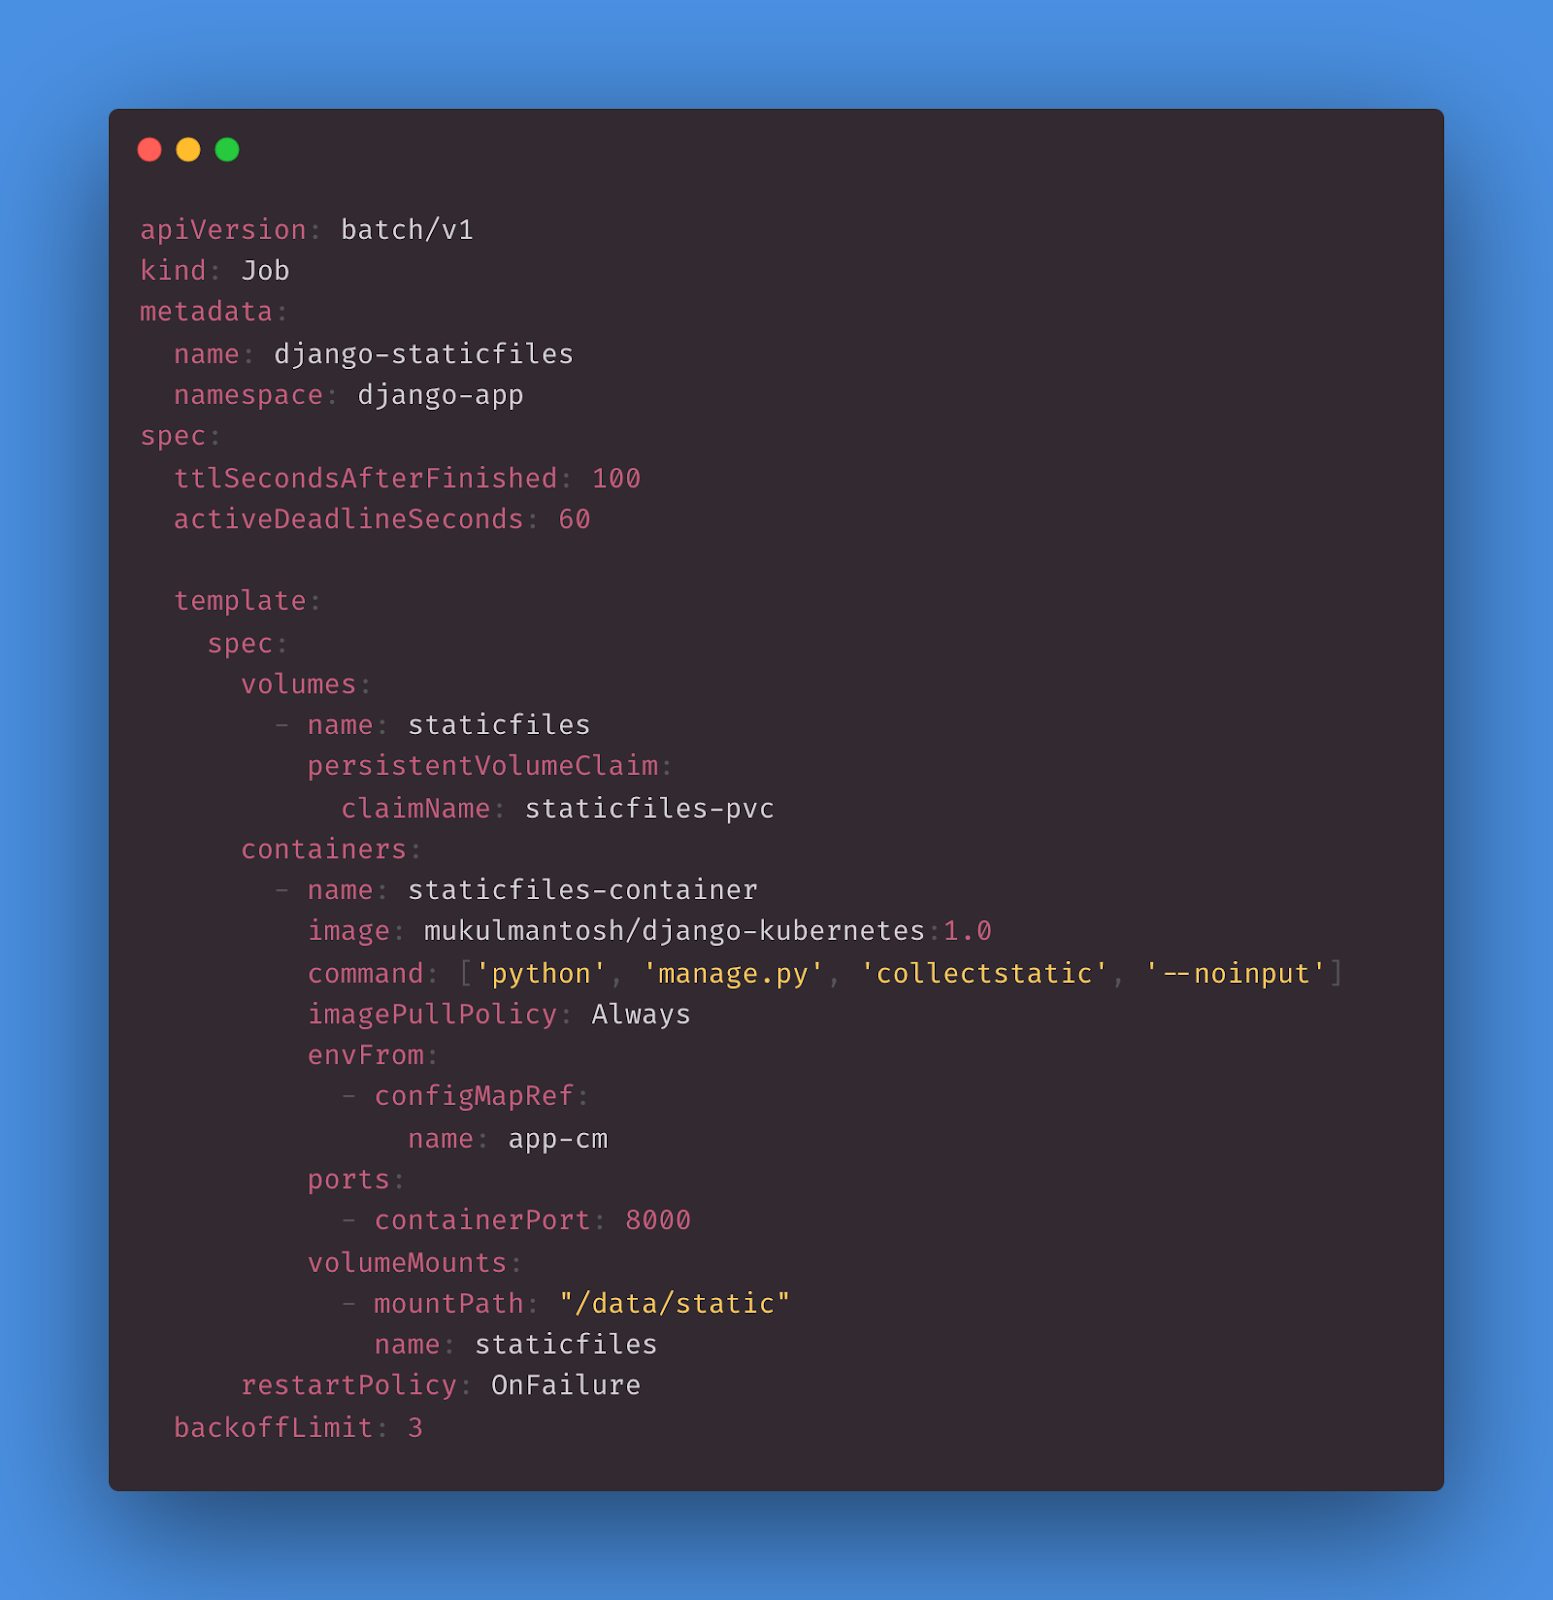
This YAML configuration defines a Kubernetes Job named django-staticfiles in the django-app namespace. The Job runs a container using a custom Docker image for collecting static files for a Django application and mounts a PVC to provide storage for the static files. If the Job fails, it can be retried up to three times, and it will retain its pod for 100 seconds after completion for debugging purposes. This Job will copy the static files to the mountPath, which is /data/static.
Launching the Application
To launch the application, navigate to the k8s directory and execute the following command:
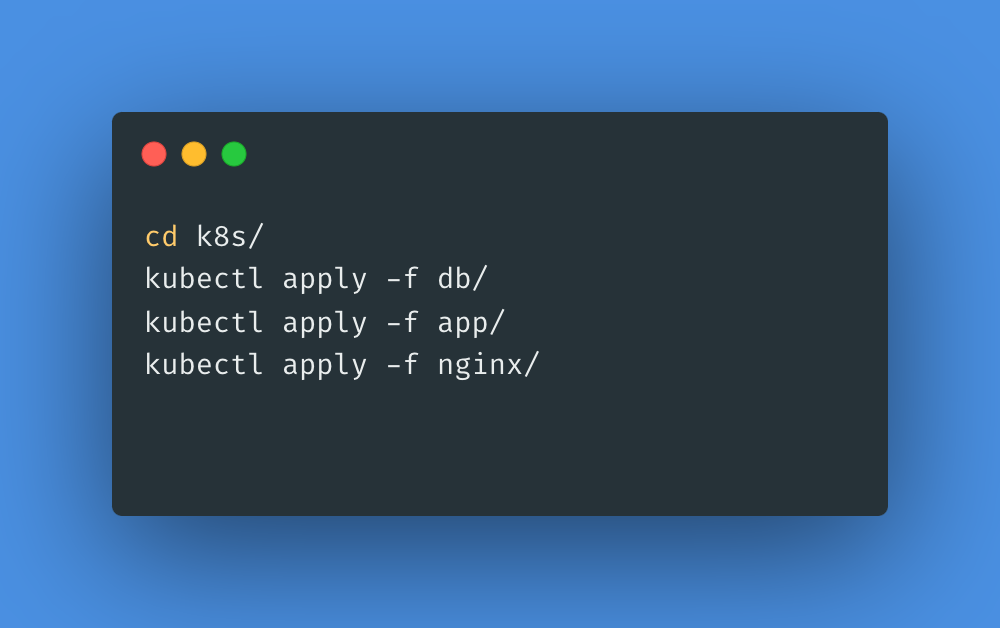
After deploying the application, use the following command to verify the status of running pods:
kubectl get pods -n django-app -w

Creating a superuser in Django
Once all your applications are up and running, create a superuser to login into the Django admin.
Run the following command to get the list of running pods:
kubectl get pods -n django-app
To get inside the container shell, run:
kubectl exec -it <POD_NAME> -n django-app -- sh
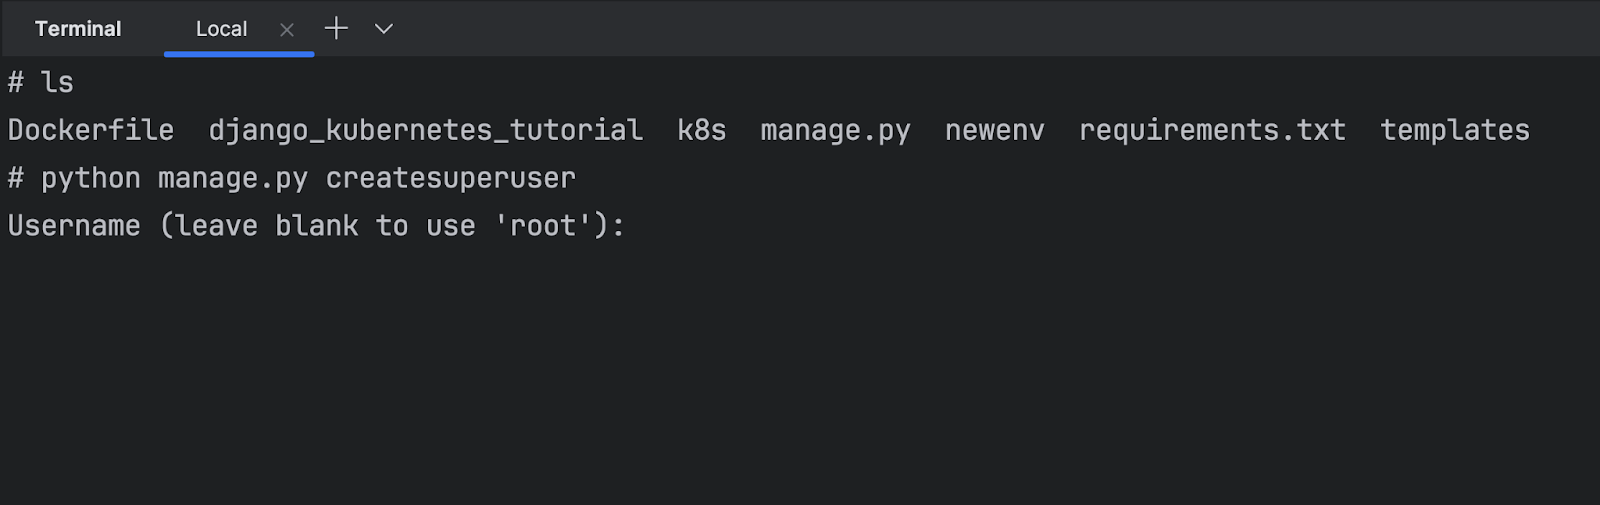
Then, run:
python manage.py createsuperuser
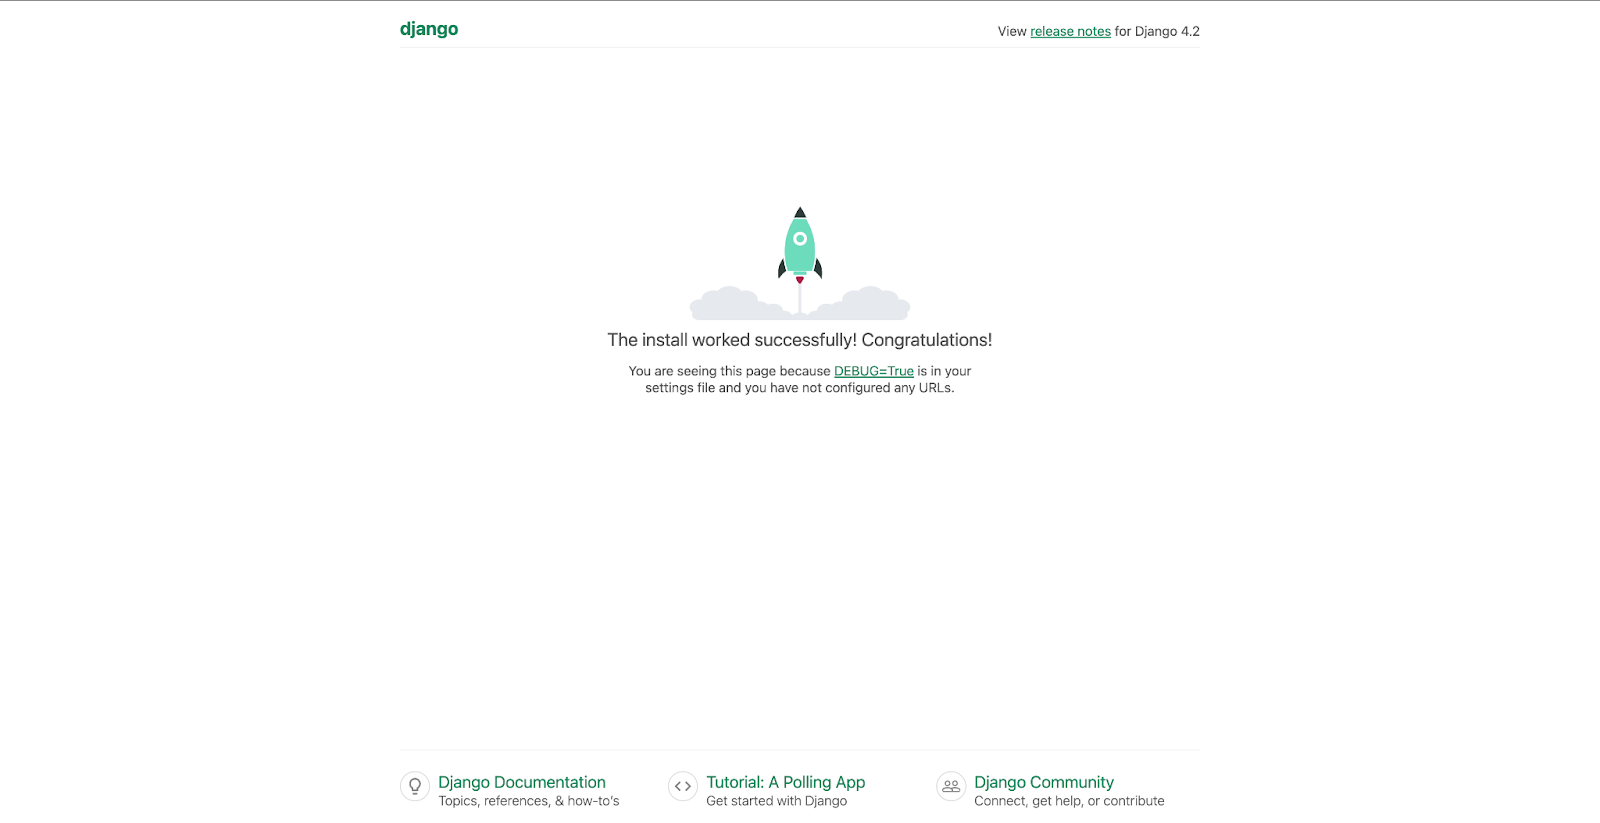
Once you’ve successfully created the superuser, open http://127.0.0.1:30005 in a browser. You will be directed to the default welcome page.
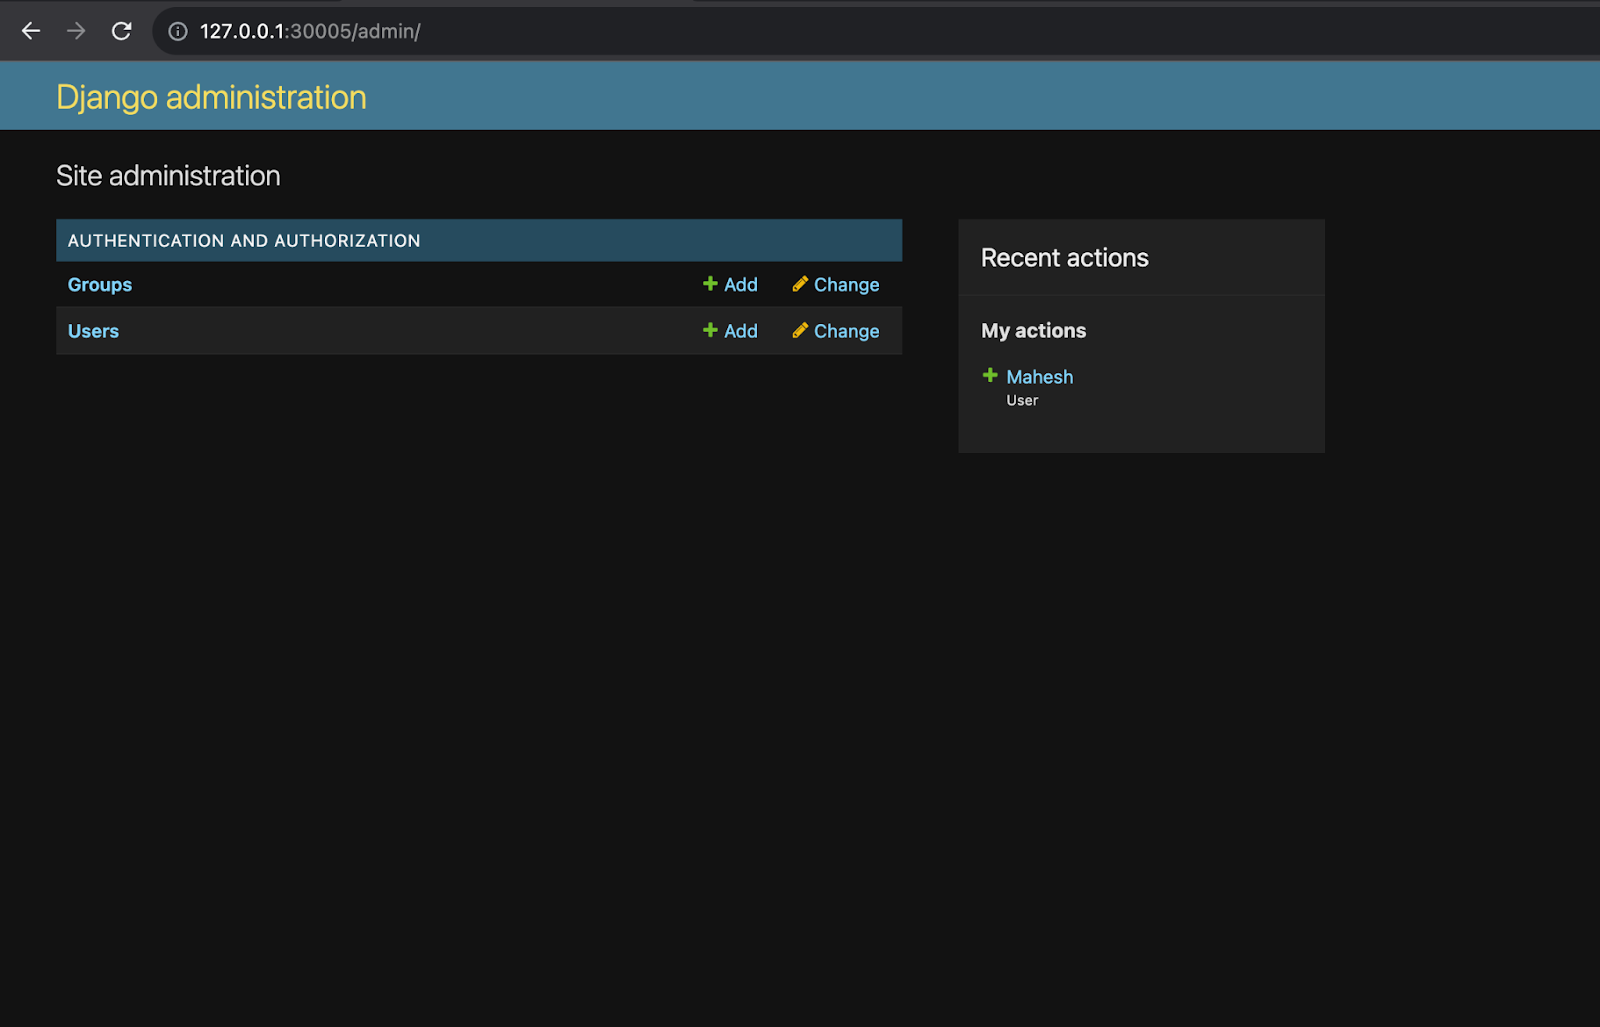
Then, head over to the Django admin via http://127.0.0.1:30005/admin.
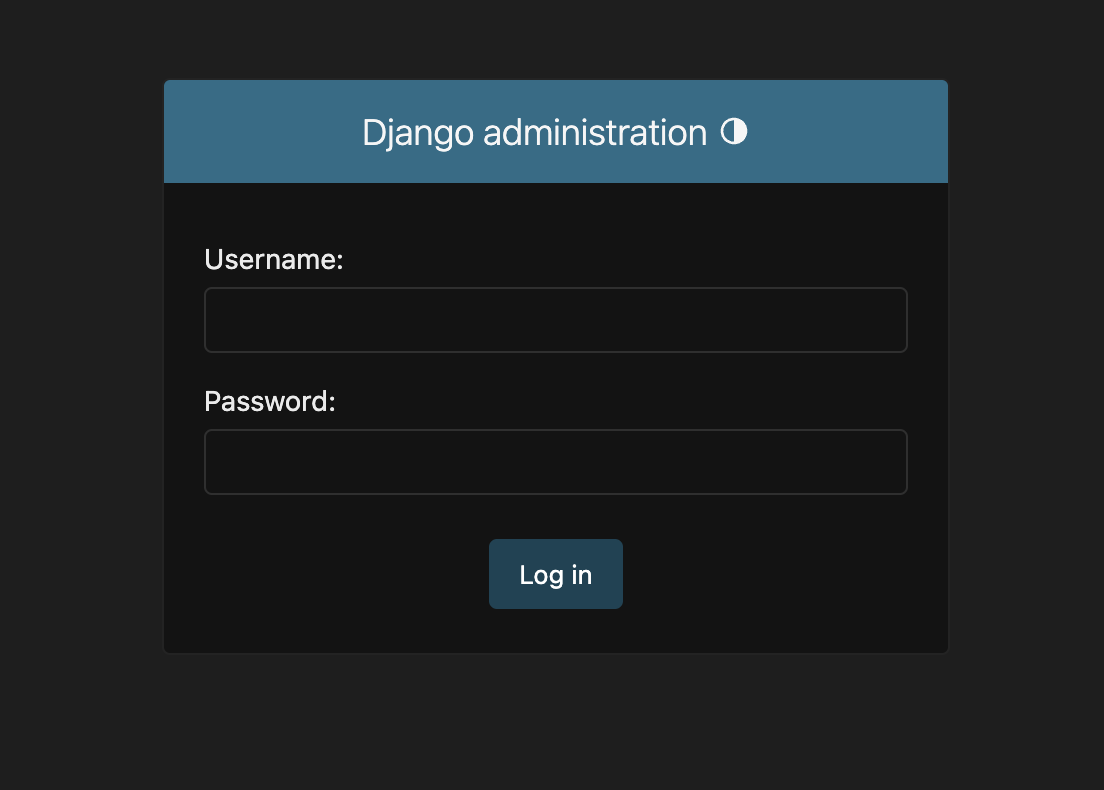
Enter the username and password that you’ve just created.
Once authenticated, you will be redirected to the Django administration page.
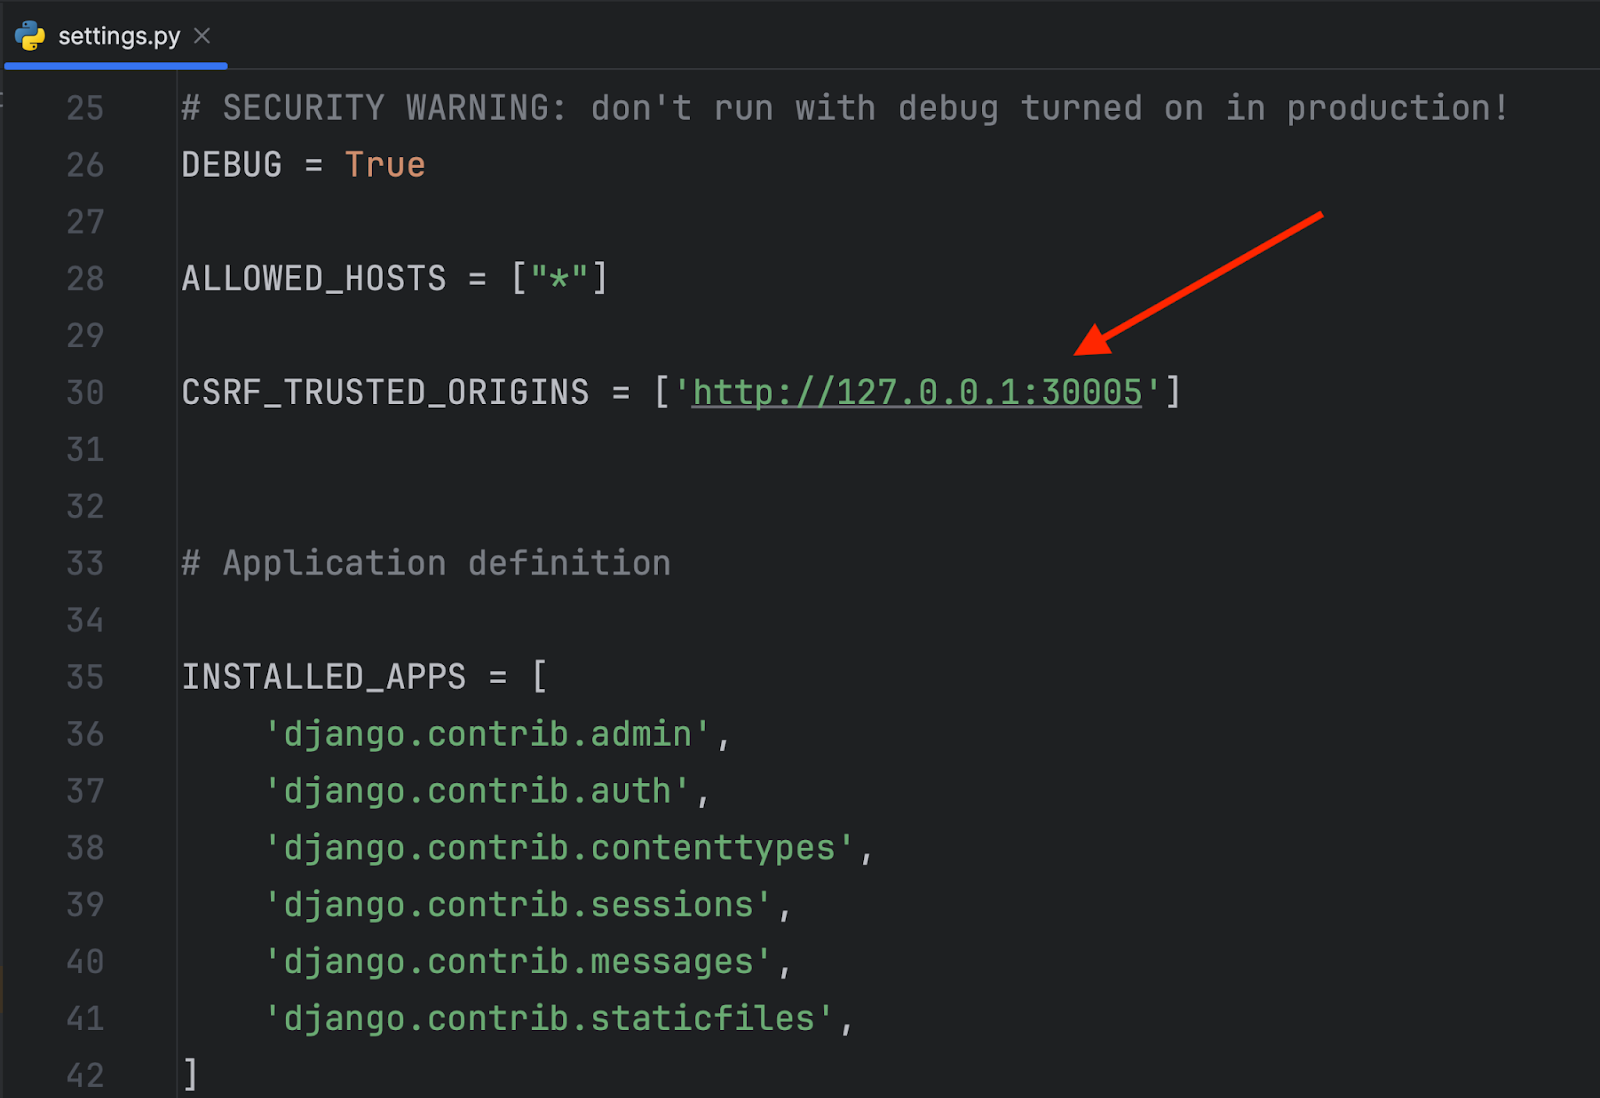
If you try logging through localhost:30005/admin, you might receive a 403 Forbidden (CSRF) error.
You can resolve this in the settings.py file under CSRF_TRUSTED_ORIGINS.
CSRF_TRUSTED_ORIGINS is a setting in Django that is used to specify a list of trusted origins for cross-site request forgery (CSRF) protection. CSRF is a security vulnerability that can occur when an attacker tricks a user into unknowingly making an unwanted request to a web application. To prevent this, Django includes built-in CSRF protection.
CSRF_TRUSTED_ORIGINS allows you to define a list of origins (websites) from which CSRF-protected requests are accepted. Any request originating from an origin not included in this list will be considered potentially malicious and duly blocked.
This setting can be used to allow certain cross-origin requests to your Django application while maintaining security against CSRF attacks. It’s particularly helpful in scenarios where your application needs to interact with other web services or APIs that are hosted on different domains.
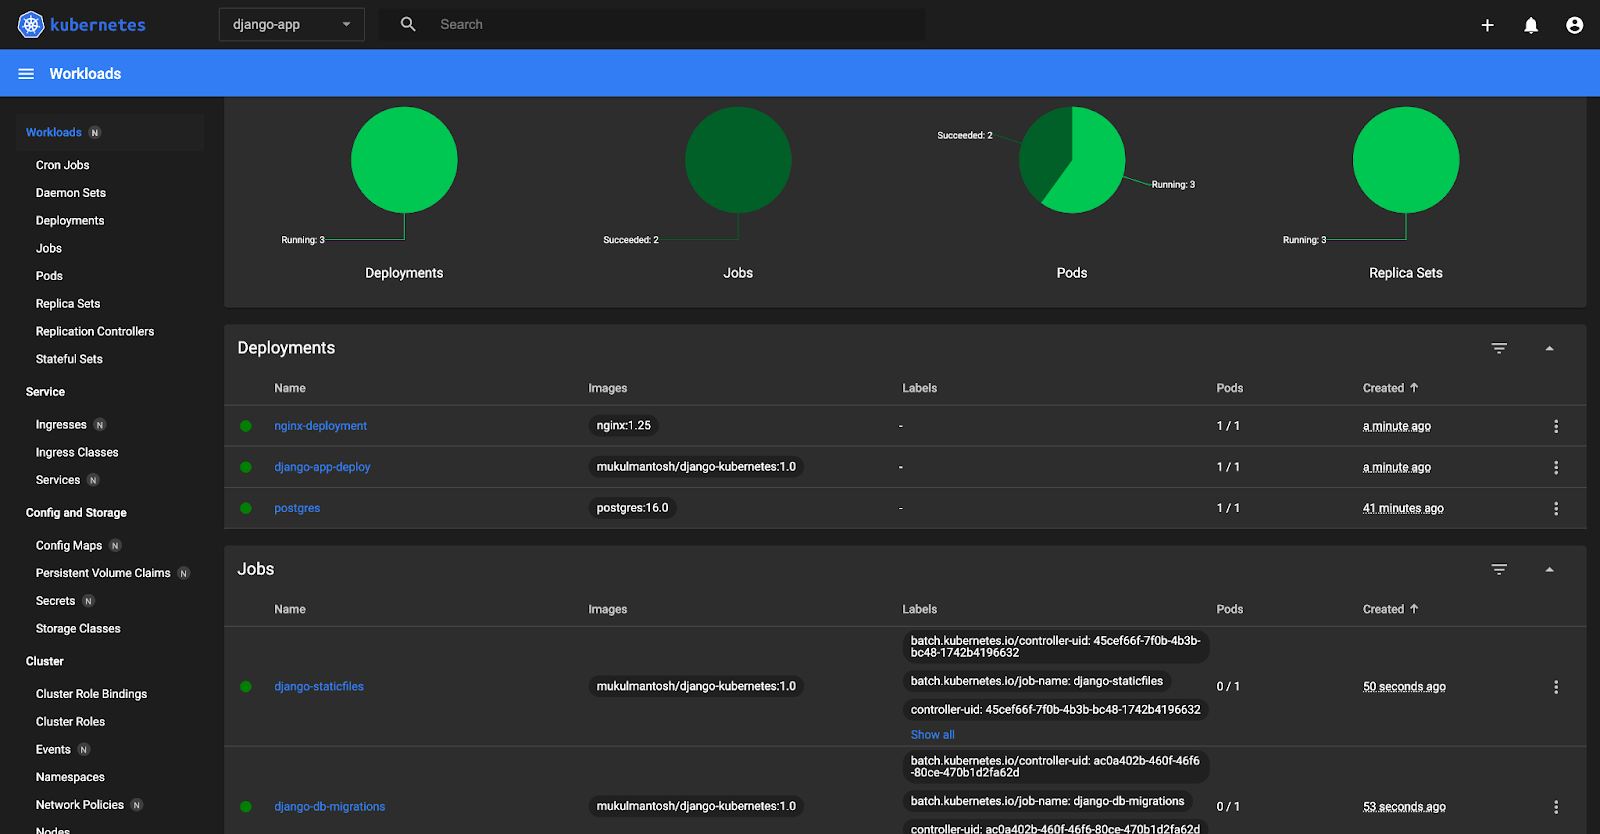
If you are using GUI tools like Kubernetes Dashboard, you can easily visualize your running pods, deployments, persistent volumes, etc.
TL;DR
- Django templates are Django’s built-in way to render dynamic HTML while keeping presentation separate from business logic.
- The Django Template Language (DTL) uses simple syntax with variables, filters, and tags to control logic like loops, conditionals, and inheritance.
- Template inheritance allows you to define base layouts and reuse them across your site, improving consistency and maintainability.
- Common template tags such as {% if %}, {% for %}, {% block %}, {% include %}, and {% url %} cover most everyday templating needs.
- Django’s admin interface is fully template-driven and can be customized by overriding or extending admin templates.
- URL templates and the {% url %} tag help generate dynamic, maintainable links without hardcoding paths.
- Jinja2 is a popular alternative template engine that offers a more expressive syntax, better performance for complex templates, and advanced features like macros.
- Following best practices such as keeping logic out of templates, reusing components, and profiling performance leads to cleaner, more scalable Django projects.
Kubernetes Support in PyCharm
PyCharm offers an enhanced editor and runtime support tailored for Kubernetes, bringing a host of features to streamline your Kubernetes management, including:
- Browsing cluster objects, extracting and editing their configurations, and describing them.
- Viewing events.
- Viewing and downloading pod logs.
- Attaching the pod console.
- Running shell in pods.
- Forwarding ports to a pod.
- Applying resource YAML configurations from the editor.
- Deleting resources from the cluster.
- Completion of ConfigMap and Secret entries from the cluster.
- Configuring paths to
kubectl. - Configuring custom
kubeconfigfiles globally and per project. - Switching contexts and namespaces.
- Using API schema (including CRD) from the active cluster to edit resource manifests.
Watch this video to learn more about working with Kubernetes in PyCharm Professional.
Try PyCharm for your Kubernetes tasks for free!
References
Already have a solid understanding of Kubernetes? Then, take the next step in your programming journey by exploring cloud solutions, and check out our tutorials on AWS EKS and Google Kubernetes Engine.