TeamCity
Powerful CI/CD for DevOps-centric teams
Configuration as Code, Part 1: Getting Started with Kotlin DSL

Configuration as code is a well-established practice for CI Servers. The benefits of this approach include versioning support via VCS repository, a simplified audit of the configuration changes, and improved portability of the configurations. Some users may also prefer code to configuring the builds with point-and-click via UI. In TeamCity, we can use Kotlin DSL to author build configurations.
The possibility to use Kotlin for defining build configurations was added in TeamCity 10. In TeamCity 2018.x Kotlin support was greatly improved for a more pleasant user experience.
In this series of posts, we are going to explain how to use Kotlin to define build configurations for TeamCity. We will start with the basics on how to get started with configuration-as-code in TeamCity. We will then dive into the practicalities of using Kotlin DSL for build configurations. Finally, we will take a look at advanced topics such as extending the DSL.
- Getting started with Kotlin DSL
- Working with configuration scripts
- Creating build configurations dynamically
- Extending Kotlin DSL
- Using libraries
- Testing configuration scripts
The demo application
In this tutorial, we are going to use the famous spring-petclinic project for demonstration. Spring Petclinic is a Java project that uses Maven for the build. The goal of this post is to demonstrate an approach for building an existing application with Kotlin DSL.
It is best to add a Kotlin DSL configuration to an existing project in TeamCity. First, create a new project in TeamCity by pointing to a repository URL. For our demo project, TeamCity will detect the presence of the Maven pom.xml and propose the required build steps. As a result, the new project will include one VCS root and a build configuration with a Maven build step and a VCS trigger.

The next step for this project is transitioning to configuration-as-code with Kotlin DSL. To do that, we have to enable Versioned Settings in our project.
WARNING! Once you enable Versioned Settings for the project, TeamCity will generate the corresponding files and immediately commit/push them into the selected repository.
Enable Versioned Settings
To start using Kotlin build scripts in TeamCity the Versioned Settings have to be enabled. Regardless of whether you are starting from scratch or you have an existing project. In the project configuration, under Versioned Settings, select the Synchronization enabled option, select a VCS root for the settings, and choose Kotlin format.
The VCS root selected to store the settings can be the same as the source code of the application you want to build. For our demo, however, we are going to use a specific VCS root dedicated to only the settings. Hence, there will be 2 VCS roots in the project: one for source code of the application and the other for build settings.

In addition to this, it is possible to define which settings to take when the build starts. When we use Kotlin DSL and make changes to the scripts in our favorite IDE, the “source of truth” is located in the VCS repository. Hence, it is advised to enable the use settings from VCS option. The changes to the settings are then always reflected on the server.
Once the Versioned Settings are enabled, TeamCity will generate the corresponding script and commit to the selected VCS root. Now we can pull the changes from the settings repository and start editing.
Opening the configuration in IntelliJ IDEA
The generated settings layout is a .teamcity directory with two files: settings.kts and pom.xml. For instance, the following are the files checked in to version control for the spring-petclinic application.
Clone the demo repository:
git clone https://github.com/antonarhipov/spring-petclinic-teamcity-dsl.git
Open the folder in IntelliJ IDEA, you will see the following layout:

Essentially, the .teamcity folder is a Maven module. Right-click on the pom.xml file and select Add as Maven Project – the IDE will import the Maven module and download the required dependencies.

pom.xml
The TeamCity specific classes that we use in the Kotlin script are coming from the dependencies that we declare in the pom.xml as part of the Maven module. This is a standard pom.xml file, besides that, we have to pay attention to a few things.
The DSL comes in a series of packages with the main one being the actual DSL which is contained in the configs-dsl-kotlin-{version}.jar file. Examining it, we can see that it has a series of classes that describe pretty much the entire TeamCity user interface.

The other dependencies that we see in the list are the Kotlin DSL extensions contributed by TeamCity plugins.

Some of the dependencies are downloaded from JetBrains’ own Maven repository. However, the plugins you have installed on your TeamCity instance may provide the extensions for the DSL, and therefore our pom.xml needs to pull the dependencies from the corresponding server. This is why you can find an additional repository URL in the pom.xml file.
The source directory is also redefined in this pom.xml since in many cases there will be just one settings.kts file. There is not much use for the standard Maven project layout here.
settings.kts
kts is a Kotlin Script file, different from a Kotlin file (.kt) in that it can be run as a script. All the code relevant to the TeamCity configuration can be stored in this file, but it can also be divided into several files to provide a better separation of concerns. Imports omitted, this is how the settings.kts for our demo project looks:

version indicates the TeamCity version, and project() is the main entry point to the configuration script. It is a function call, which takes as a parameter a block that represents the entire TeamCity project. In that block, we compose the structure of the project.
The vcsRoot(...) function call registers a predefined VCS root to the project. The buildType(...) function registers a build configuration. As a result, there is one project, with one VCS root, and one build configuration declared in our settings.kts file.
The corresponding objects for VCS root and the build configuration are declared in the same script.
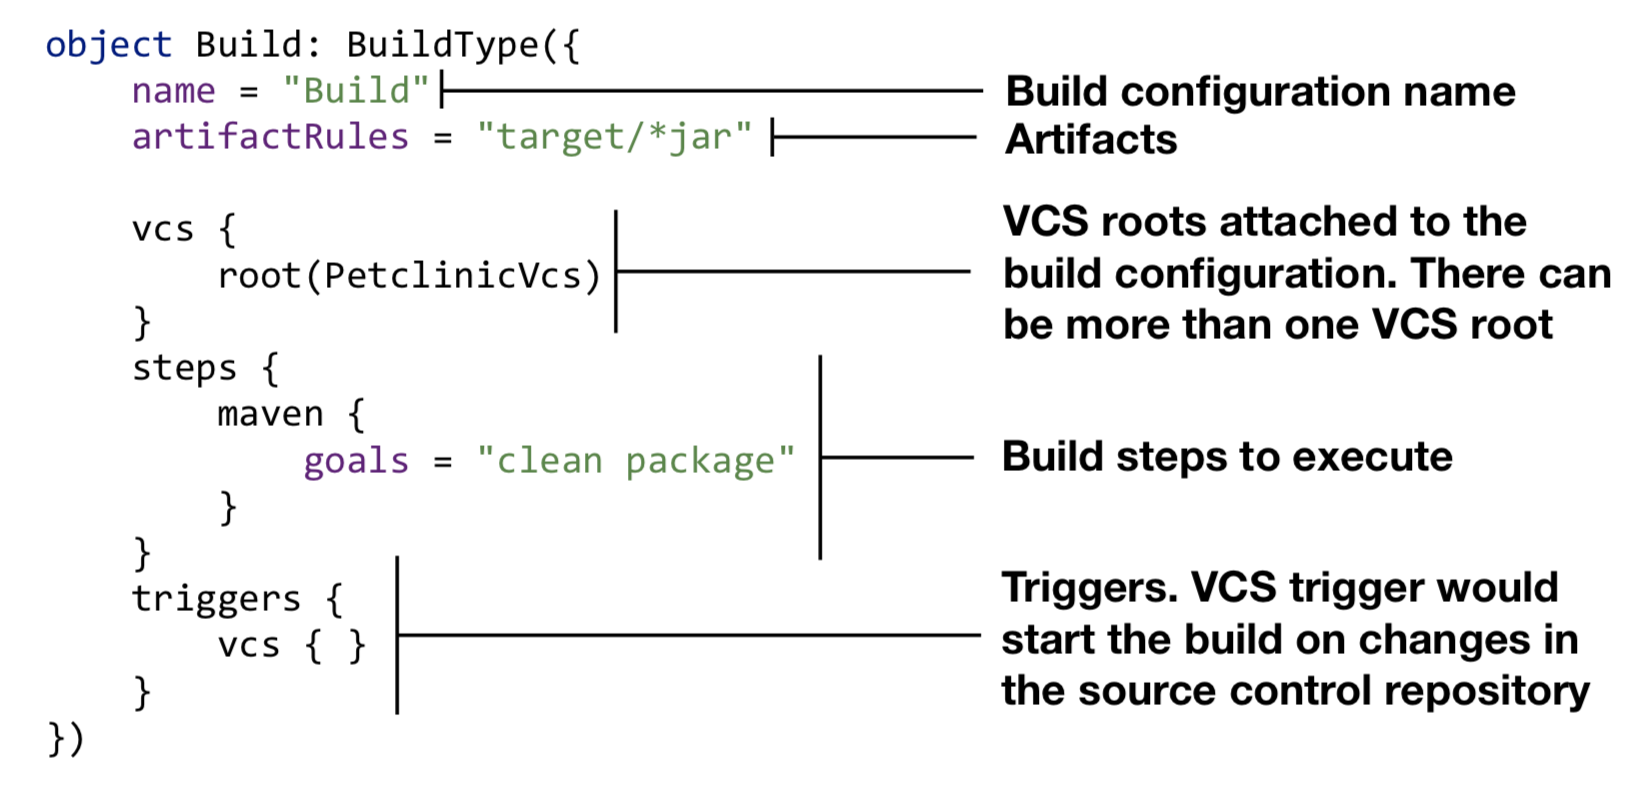
Build configuration
The Build object inherits from the BuildType class that represents the build configuration in TeamCity. The object is registered in the project using a buildType(...) function call.
The declarations in the object are self-explanatory: you can see the name of the build configuration, artifact rules, the related VCS root, build steps, and triggers. There are more possibilities that we can use, which we will cover in further posts.
VCS root
The VCS root object, PetclinicVcs, is a very simple one in our example. It has just two attributes: the name, and the URL of the repository.

The parent type of the object, GitVcsRoot, indicates that this is a git repository that we’re going to connect to.
There are more attributes that we can specify for the VCS root object, like branches specification, and authentication type if needed.
Import project with the existing Kotlin script
It is possible to import existing Kotlin settings. When creating the project from a repository URL, TeamCity will scan the sources. If existing Kotlin settings are detected, the wizard will suggest importing them.

You can then decide if you want to just import the project from the settings, import and enable the synchronization with the VCS repository, or proceed without the import.
Summary
In this part of the series, we’ve looked at how to get started configuring the builds in TeamCity with Kotlin DSL. We explored the main components of a TeamCity configuration script and its dependencies. In part two, we’ll dive a little deeper into the DSL, modify the script, and see some of the benefits that Kotlin and IntelliJ IDEA already start providing us with in terms of guidance via code assistants.