On Writer's Side
Intelligent tools for writers and new ways to write better
Collaborating on Docs: Best Practices and Strategies From JetBrains Writers
Our first blog post on Git sparked discussions among different communities of tech writers. Many questioned the described workflow and highlighted that having to collaborate on the same file, pull and rebase changes daily, and resolve conflicts may be a sign of organizational and content management issues.
Some writers believe that multiple people having to contribute to the same file may signify the following problems:
- The document is too long as it describes several features owned by different writers. A solution would be to break it up into several smaller articles.
- Areas of responsibility aren’t clearly defined.
Although this may indeed be a sign that you should revisit your content organization and roles, I could easily provide a few examples when such collaboration is justified.
- Apart from actual content files, a project may contain a bunch of configuration files, for example, a file that defines a table of contents. Even if there are several writers on a team each responsible for an isolated product area, they would all still add new topics, move content around, and remove obsolete topics, resulting in changes to the same configuration file.
- We have many sections in our docs that are shared between multiple publications. This happens because we have a dozen products based on the same platform, and any documentation covering language-agnostic features of an IDE, such as editor features, version control, and general settings, would be reused. Such content is the responsibility of the team of IntelliJ IDEA technical writers, and once it’s finalized, an automatic workflow creates issues for the writers responsible for other JetBrains IDEs who then customize and adjust it for their products. In our case, this involves a dozen different authors and often happens a few days before the release. Taking turns to edit the same file is not an option – and here is where conflict resolution and merge tools come to the rescue.
- There are developers who may want to make minor updates to the docs instead of filing an issue with a tech writer. These developers are a rare and highly valued species – and you don’t want to put them off by locking files for editing or introducing another process around contribution to docs.
Last but not least, we believe that owning content doesn’t mean acting as a gatekeeper. We try to remove the barriers and encourage any member of the team to contribute to docs, which comes at the price of having to resolve the odd conflict.
So, here are our tips on collaborating within a documentation project with Git, all of which have been forged through our own journey of trial, error, and resolution.
Use branches for work in progress
Following the docs-as-code approach means continuously testing and deploying (publishing) updated content. So, if you’re documenting a big new feature or reworking a section of your docs, you want to avoid the interim results going into production while letting the other members of your team continuously publish their updates.
Authoring tools provide different workarounds for this – you can mark a topic as a draft, exclude it from your table of contents map, or even prepare new content as a draft in Google Docs and only incorporate it into your sources after it’s been finalized.
If we use developer terminology here, this way you can perform unit testing of your docs, but you will then need to perform integration testing when you incorporate new or updated content into your source base. Using Git branches helps to avoid isolating the piece you’re working on from the rest of your docs and review and test it as an integral part of your online help portal.
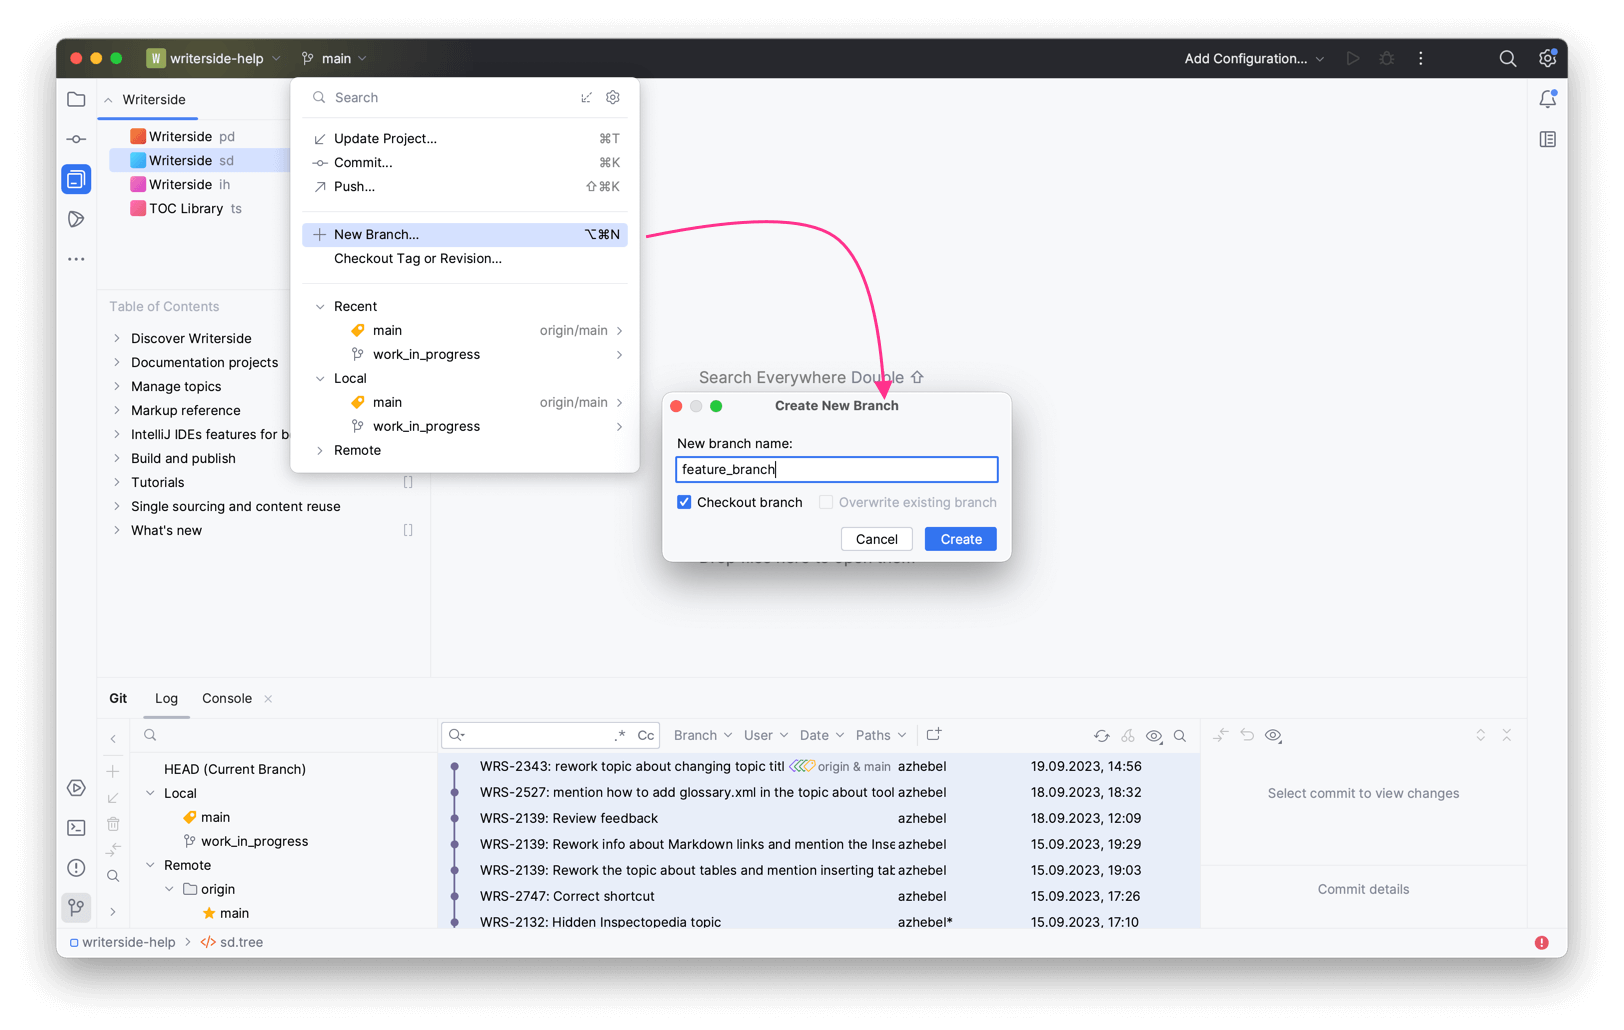
Step 1.
Create a new branch from the branch where most content development takes place:
Step 2.
Update your project daily using the ⌘T / Ctrl+T shortcut. The Git Update command in JetBrains IDEs and Writerside is a convenient shortcut for fetching and subsequently applying changes to your local copy of the repository, which would be two separate commands if you’re using a command-line prompt or another Git GUI.
Step 3.
Rebase your temporary branch onto the main branch where most of the content authoring takes place:
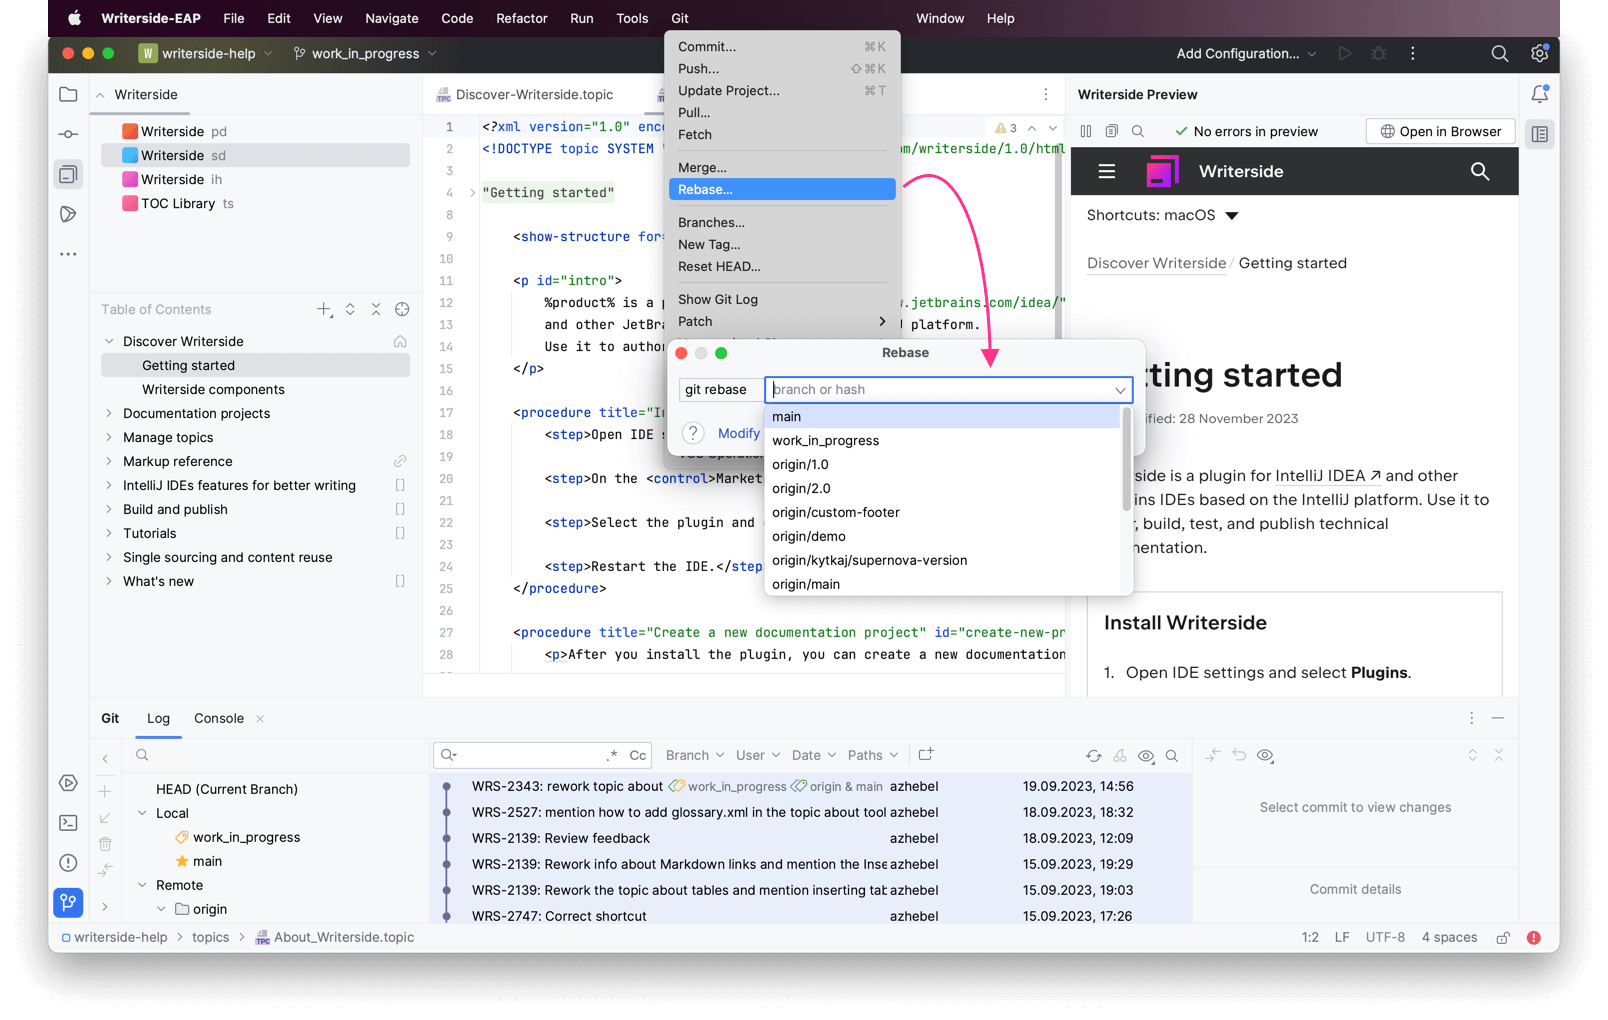
With rebasing, you can avoid merge conflicts when you finally incorporate your changes into the main branch, especially if the content you’re working on takes days or even weeks to finish. With rebase, your feature branch is recreated on top of the latest commit in the main branch. Now, your branch contains all the changes made since you created it or last rebased it.
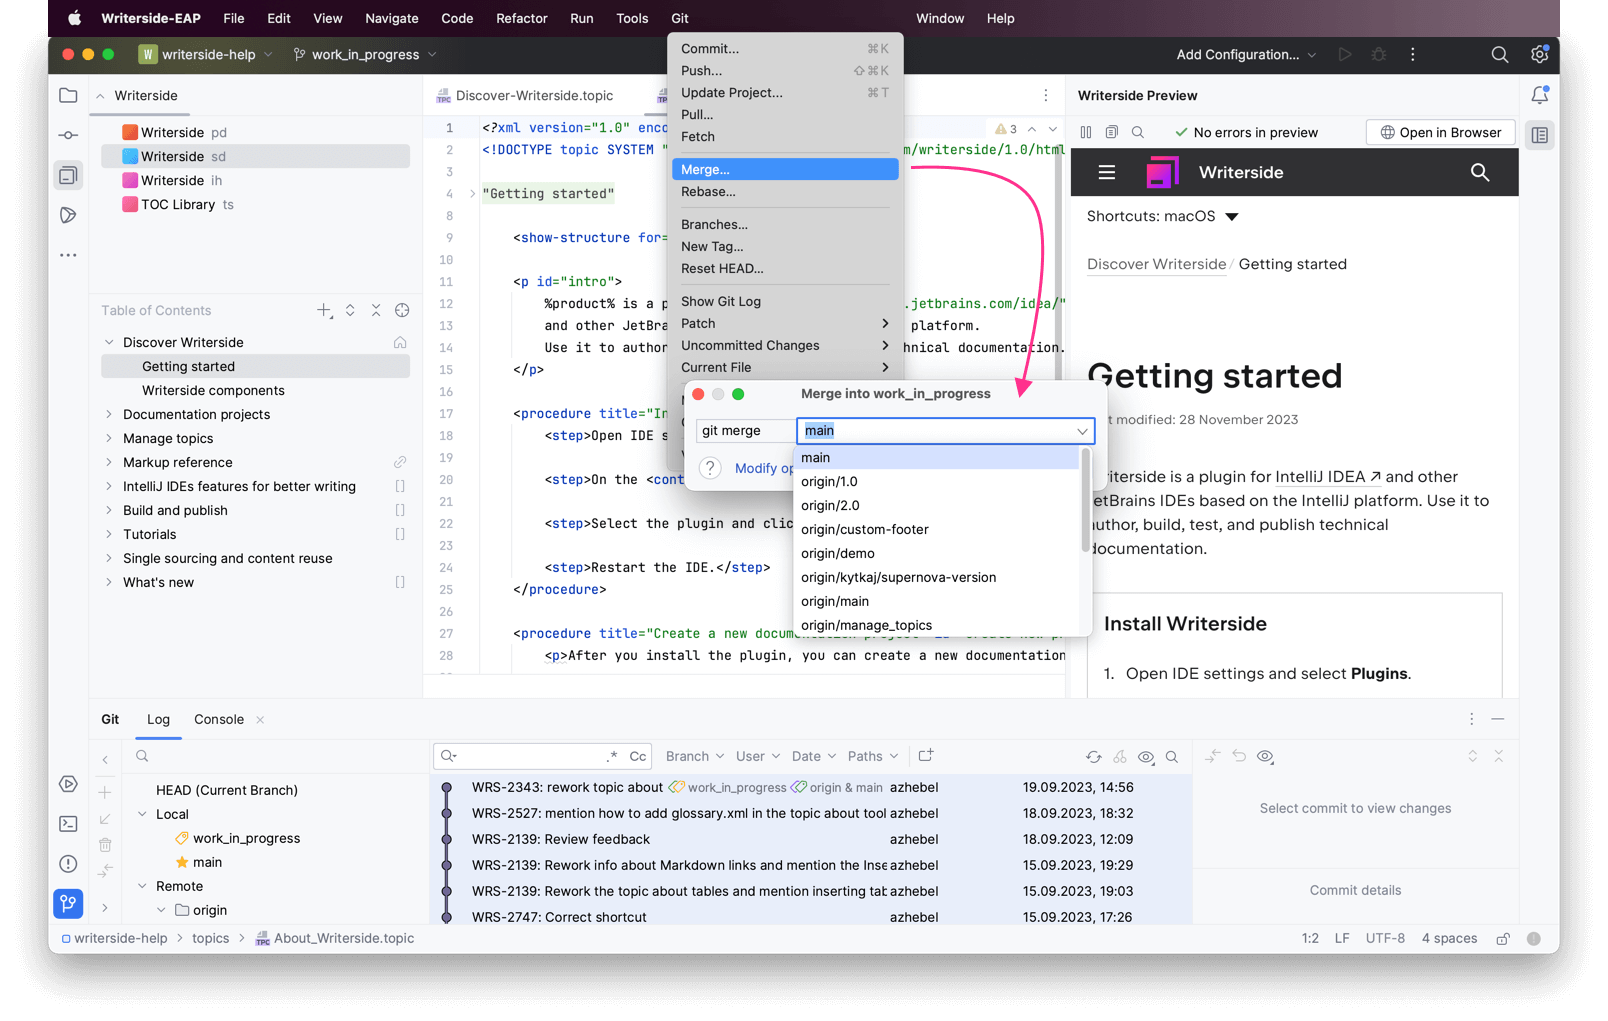
Step 4.
When you’re happy with your updates and want them to go into production, you can merge your branch into the main branch:
Resolve conflicts
If you are not a solo writer or if there are other team members contributing to the docs, it’s likely that they also made changes to the source files while you were working on a feature branch.
If these changes affected the files you didn’t touch, count yourself lucky as you won’t need to do anything during the merge.
However, if someone made updates to the same files, you’ll be prompted to resolve conflicts:

If you’re confident that you want to override any incoming changes with your branch, you can choose the Accept Yours option. In most cases however, you’d want to review and merge them.
Clicking Merge… opens the diff dialog that’s split into three: the left pane shows your version, the right one shows the version from the repository, and the middle pane is a fully functional editor where you can merge changes from both sides and edit them as you see fit:
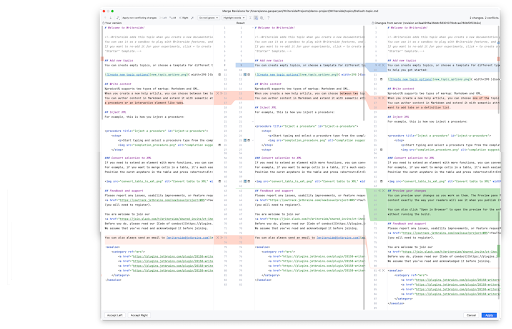
Blue highlighting indicates modified lines, green highlighting shows newly added content, and red highlighting marks lines that were changed both in your branch and the branch you’re merging into.
You can deal with the blue and green texts by clicking Apply non-conflicting changes on the toolbar, but the red lines are what will require your attention. Click X to discard changes from one side and >> to accept them. Just make sure the resulting text in the middle pane looks good to you! Click Apply when you’re done to merge all changes.
Cherry-pick changes
Convenient as it is, the conflict resolution and merge tools may still scare you off, so the good news is that there’s a workaround.
Instead of rebasing your branch often and then merging it into the main branch, you can apply specific commits one by one – referred to as cherry-picking in Git. If your feature branch history is long, applying each commit separately would require more keyboard strokes or mouse clicks, but at least you won’t have to deal with a bunch of conflicts in one go.
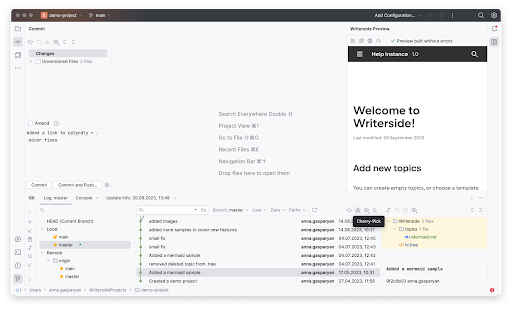
Switch to the target branch, filter the Git log to display commits from the feature branch, select the commit you want to apply, and click Cherry-pick:
Mastering Git is like rocket science, and I’m just a tech writer
Tech writers have to become experts in many different areas and products to be able to deliver content that’s useful to their readers. Embrace the change and don’t let yourself be scared off by the unknown! Mastering new tools and technologies is what you do every day as a documentarian.
Git is a tool, and like any tool, you can learn how to use it. As I pointed out in my first post, you don’t need to learn all of the commands and become a real expert to get started with Git. You just need to become confident with the basic workflows I described before. I’ll cover some of the advanced features in the next post, so subscribe to our blog to stay tuned!
In the meantime, here are a few useful resources to help you get started with Git:
- There’s an excellent book on Git by Anna Skoulikari. Unlike many other books on the topic, Learning Git: A Hands-On and Visual Guide to the Basics of Git isn’t written just for developers but also for other people that use Git, including us tech writers, with their workflows and pains in mind.
- You can also use this playground to get some hands-on experience with Git branching. It’s a safe way to experiment without breaking your real project.
- There’s even an interactive online game that visualizes Git concepts and helps you immediately see the results of your actions. Learning Git can be fun, just be warned – it can be addictive!
Of course, Git is not a silver bullet if your content management is in chaos, but it can be a powerful tool for tech writers and foster teamwork, collaboration, and efficient content versioning. On top of that, working with Git makes you look even cooler in the developers’ eyes! 🤓