YouTrack
Powerful project management for all your teams
Using YouTrack 5.1 as Your Help Desk
Update: With the YouTrack 5.2 we introduced the enhanced Help Desk workflow that allows you to support multiple customers in a single ticket/issue. Please refer to the Helpdeskers, Support Multiple Customers in a Single YouTrack Thread blog post for the Help Desk configuration and setup instructions.
It’s been a while since we added mailbox integration in YouTrack. Mailbox integration is a key feature that allows you to create an issue from email and add replies as comments, in effect turning YouTrack into a help desk.
With YouTrack 5.1 we made great changes to our help desk support. Now you can involve your customers in your issue tracking process without the necessity to create user accounts for them in YouTrack. We made this possible with the help of a brand new workflow called NotifyUnregisteredUsers, comes with YouTrack 5.1.
Use Case
We want to have a project in which YouTrack will create issues from emails from our customers, but we don’t want to register every customer in our YouTrack. Yet we want to be able to notify these unregistered users about their requests, and hold a conversation with them in YouTrack. How can we do this?
Step-by-step Configuration for YouTrack Help Desk
Our help desk configuration contains the following parts:
- Checking/Configuring system-wide email notification settings.
- Creating and configuring a help desk project.
- Attaching workflow to the project.
- Configuring mailbox integration for the help desk project.
Quick note before we begin:
You must have low-level administration permissions to follow the described procedure.
Part I: Configuring System Email Notifications
First of all, we need to make sure that email notifications are enabled and configured correctly on our server.
If you are using YouTrack InCloud edition and haven’t change the default settings, you can skip this part and move on to the Part II. In this case we have already enabled and configured sending email notifications for you.
If you are using YouTrack InCloud edition and have change the default settings or if you are using YouTrack Standalone edition, you need to make sure that sending email notifications is enabled and working properly.
- Open Administration > Settings, and scroll down to the ‘Email’ section.
- Select the ‘Email’ check-box to enable sending email notifications.
- Provide SMTP server configuration and test the connection.
Important Note About Using Google Mail:
If you are using Google mail server for sending email notifications, please make sure that the email address you use for the notifications is the same address you use for the help desk notifications. Google does not allow substituting sender’s email addresses. Thus, the per-project address you provide for a help desk project will not work if differs from the system-wide email notifications address.
When sending notifications is enabled and configured, you are ready to proceed to the Part II of the help desk configuration.
Part II: Creating and Configuring Your Help Desk Project
Create a new project, which you will use for the help desk:
- Open Administration > Projects and click the link Create new project.
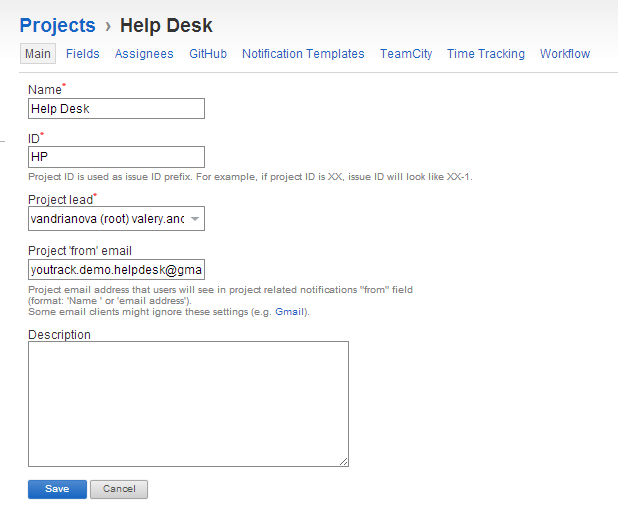
- Set the project’s name (‘Help Desk’), ID, and select a project lead.
- Assign an email address for the Help Desk project.
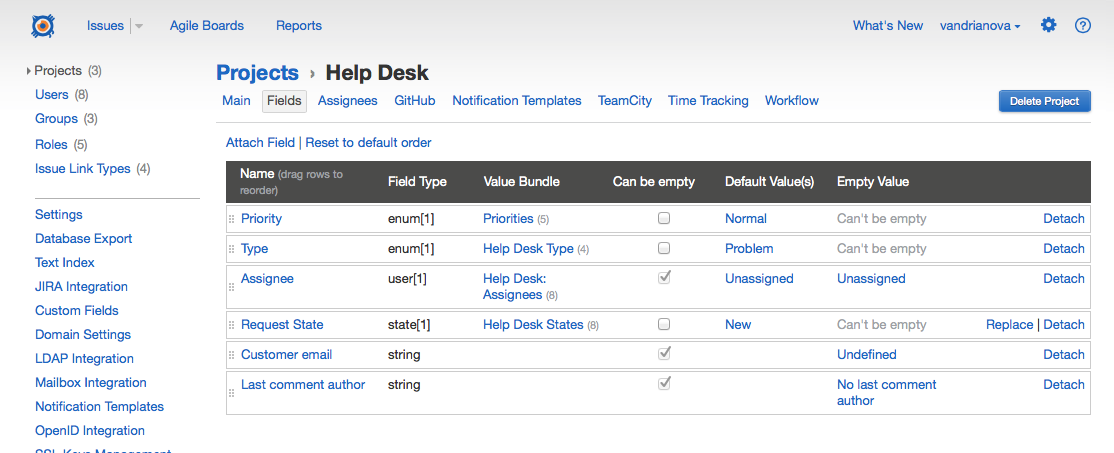
Please pay attention to this step: To keep conversation with our users in YouTrack, we need a separate, unique email address for our project, so our customers get notifications from and reply to this particular email address. Typically this would be your support/feedback email address. - Configure issue fields the new project ‘Help Desk’: Add assignees, remove unrelated default fields, configure remaining related fields. In our case, we decided to leave only four fields: Type, Priority, Assignee and State (we renamed it to ‘Request State’).
Part III: Attaching the Workflow to the Help Desk Project
Attach the default NotifyUnregisteredUsers workflow to the Help Desk project. This configuration step is also important because this particular workflow implements sending notifications to your customers.
- Switch to Projects > Help Desk > Workflow tab and click the link Attach Workflow.
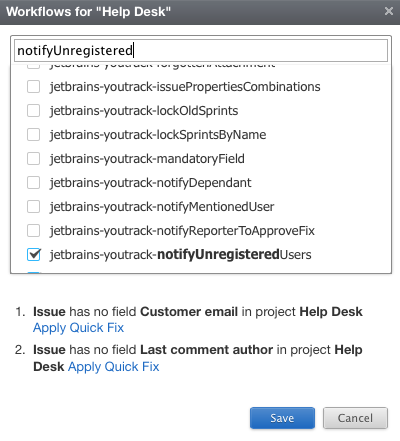
- In the ‘Workflows for Help Desk’ dialog box, select the workflow ‘jetbrains-youtrack-notifyUnregisteredUsers’.
Important! Another key point in our configuration: When you select the workflow, YouTrack will suggest two Quick-Fixes to add a couple of additional fields to the project:
- Customer Email — the field that will contain actual email address of the requester, hence allowing your customers to receive notifications without registering in your tracker.
- Last comment author — the field that will allow your customers not to receive excessive notifications (as unregistered users they can’t configure their notifications, so in a way we will do this for them).
Please make sure you have applied these quick-fixes! Otherwise the workflow won’t work correctly for the help desk project.
Before we proceed to the next part of the configuration, let’s check the current list of issue fields in the project just to make sure all necessary fields are in place:
Okay, all fields are in place, so we can now set up Mailbox integration.
Part IV: Configuring Mailbox Integration
- Open Administration > Mailbox Integration page.
- Add the mailbox for your project’s email (the one you provided as “Project ‘from’ email” while creating the Help Desk project. In our case we used ‘youtrack.demo.helpdesk@gmail.com’).
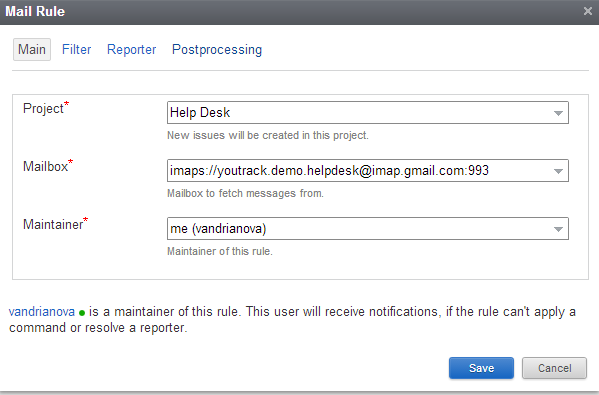
- Add mail processing rule: click the Add Rule link and set up the following parameters:
- On the Main tab select project-Help Desk, Mailbox (the one we have just created), and Maintainer:
- Switch to the Filter tab, click the Folder drop-down list and select the folder from which we will fetch the emails. We used INBOX for our IMAP account.
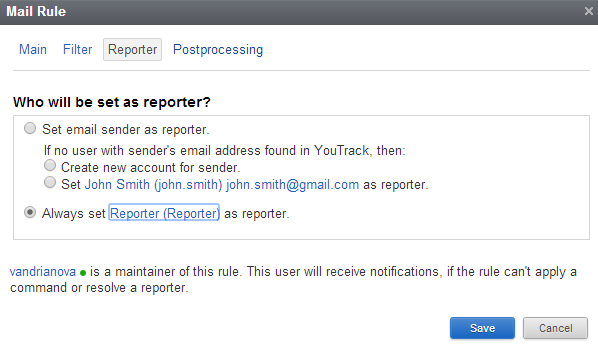
- In the Reporter tab, select the option ‘Always set <username> as reporter’ and select the user who will be the reporter of all issues created from collected emails. This is what guarantees that YouTrack will not create a user account for each new customer who sends you a request.
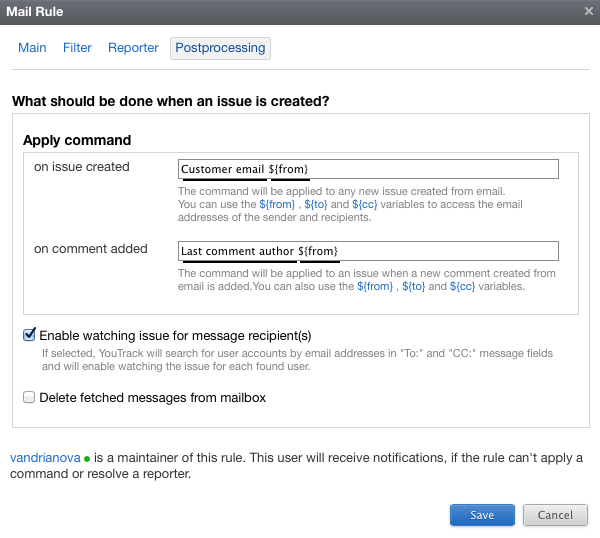
- In the Postprocessing tab, provide the following commands:
- In the field “on issue created”,
Customer email ${from}. This command will be applied to each new issue in the Help Desk project created from email. It actually assigns the ‘from’ email address—your customer’s email address—to the field ‘Customer email.’ - In the field “on comment created”,
Last comment author ${from}command, which will be applied to each new comment created from email in the Help Desk project created from email.
Providing these commands is another key point in configuring your help desk system.
- In the field “on issue created”,
After saving the new mailbox integration rule, your configuration is finalized. Now your tracker is ready to start serving as your help desk system and handling email requests from your customers.
Summary of Configuration Key Points
Here we’d like to list once again the key points of the help desk configuration that you should keep in mind:
- When creating a project, make sure to set the “Project ‘from’ email” to your feedback/support email. Thus the notifications will be sent to your unregistered customers from this email, and they will reply to the correct address.
- Attach the
notifyUnregisteredUsersdefault workflow to your help desk project. - Make sure to apply the quick-fixes suggested by the workflow to add these two fields to your project: “Customer email”and “Last comment author”.
If you somehow missed the quick-fix, you can create and/or add these fields manually. Just keep in mind that both of these fields must be attached to your project in order to make the help desk work. - The mailbox integration should be set for the same feedback/support email address as the Project ‘from’ email.
- Use the Always set User as reporter option to exclude the possibility of creating new user accounts automatically.
- Make sure to specify these two commands to apply during the post-processing of an email:
- “
Customer email ${from}” command for each new issue created from the email. - “
Last comment author ${from}” command for each new comment created from the email.
- “
How the Process Will Look to Your Customers
So we’ve just configured YouTrack to function as a help desk. To give you an idea of how the conversation between a customer and a support team looks like in such a help desk, here is a sample of typical processing of a customer request:
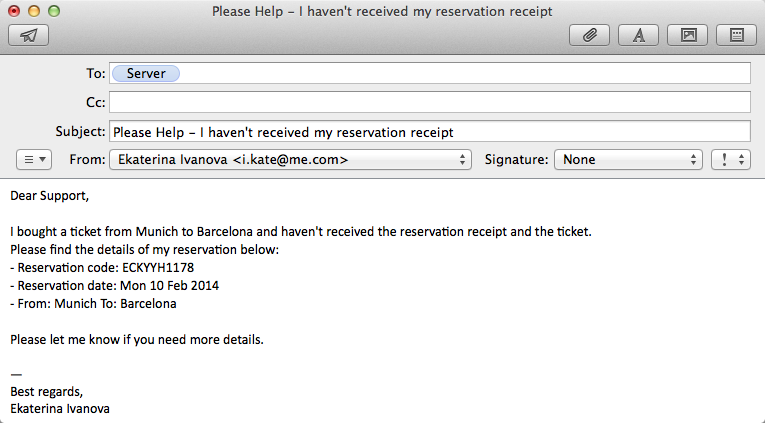
- Your customer sends an email to your help desk address:
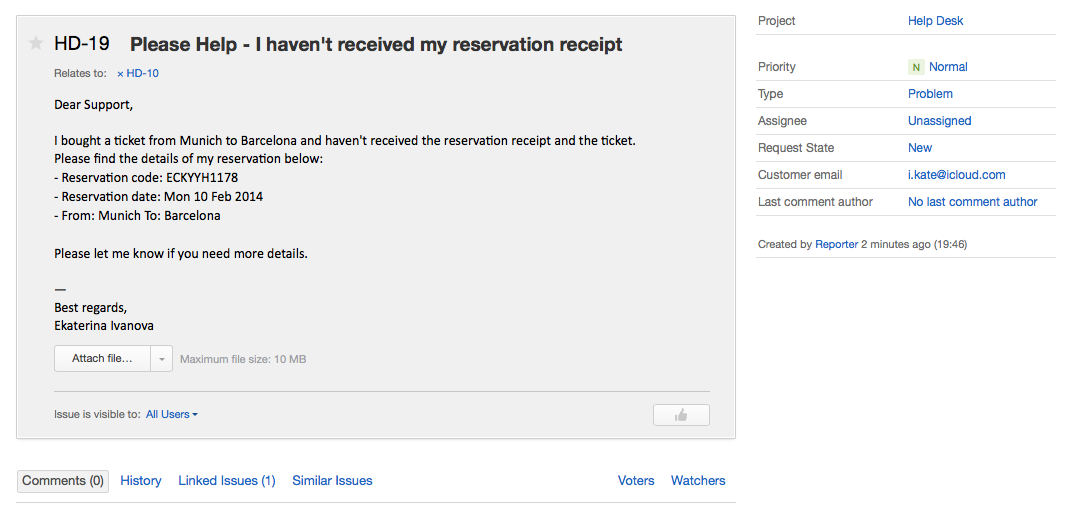
- From the original email a new issue is created in YouTrack:
The customer’s email is stored in the issue.
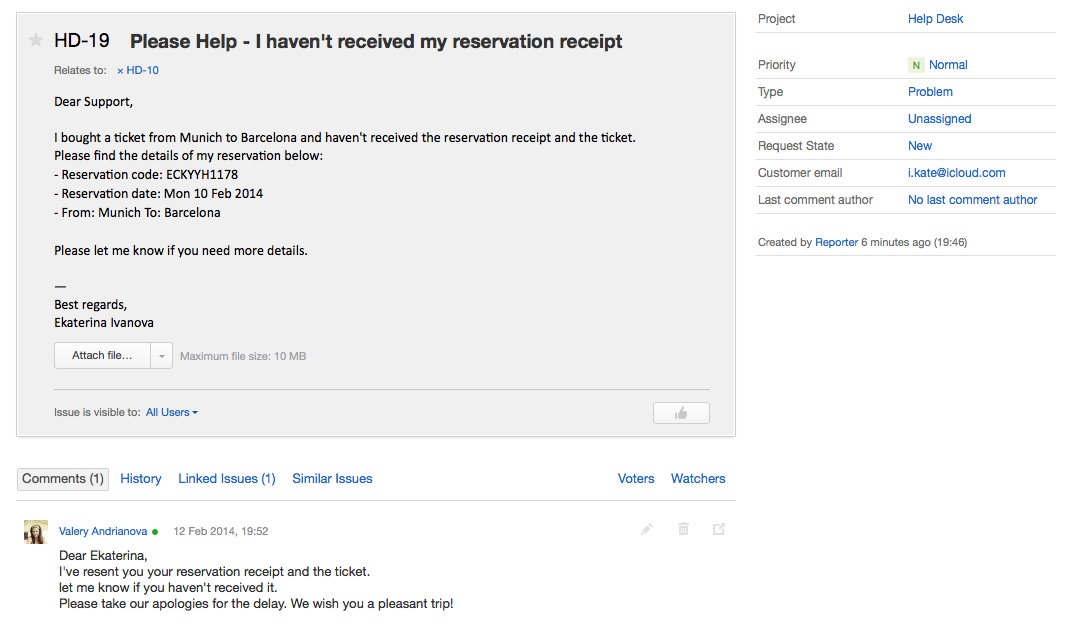
- A support engineer adds a comment to the issue, replying to the customer request:
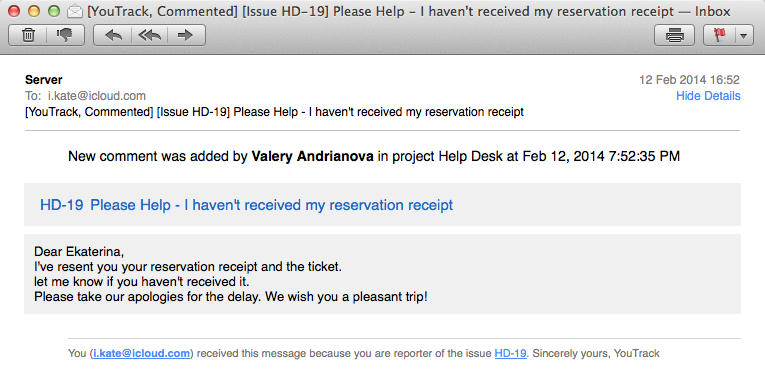
- Customer receives a notification with the comment:
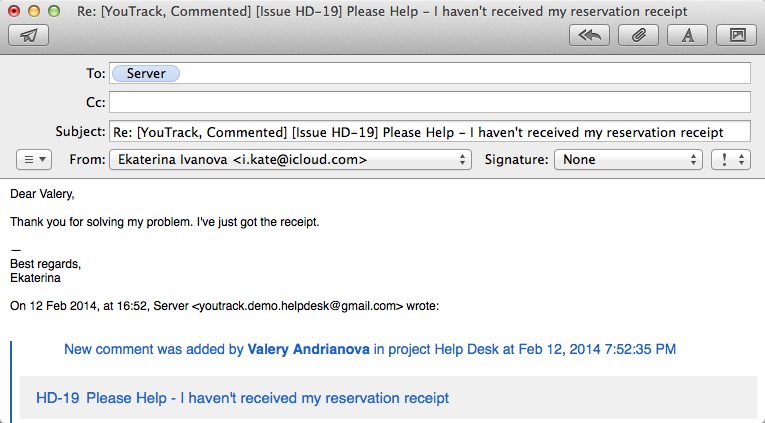
- The customer replies to the received notification in email:
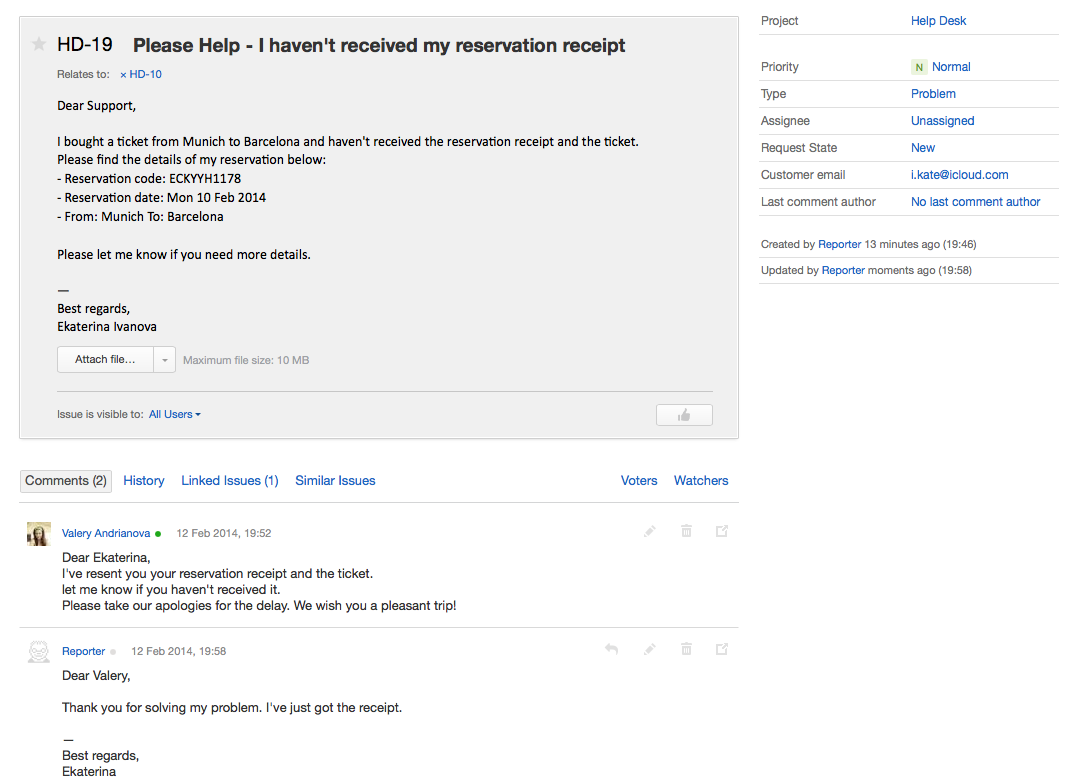
- From the customer’s reply email, YouTrack adds a new comment to the original issue:
As you can see, for the customer this is nothing more than exchanging emails with your support team. For the support team, it comes down to simple commenting an issue. Plus, you get all the advantages of the tracking system. And, of course, you can enhance the help desk configuration and tweak it to match your support routine. For instance, you can apply additional commands to new issues in Mailbox Integration, or you can attach other default workflows to notify the project lead about unresolved issues.
Upgrading
Get YouTrack 5.1 and start using it as your help desk today.
NOTE: If you’re using YouTrack InCloud, your site will be upgraded to v5.1 automatically, according to our Maintenance Calendar.
Going Forward
This is the first in a series of posts demonstrating how YouTrack can be used as something more than an issue tracker, and showcasing the powers of YouTrack customization. Coming up next in this series will be Using YouTrack for Payment Management. Stay tuned to our news @youtrack.
We hope this post was useful for you and we look forward to receiving your feedback and ideas!
Track with pleasure,
YouTrack Team
