

Connecting DataGrip to MS SQL Server

Some specific needs of SQL developers like connecting to SQL Server from OSX and even using Windows authentication can be covered by DataGrip. Since releasing DataGrip, we’ve received lots of comments about connecting to SQL Server. It appears it’s not straightforward as with other databases, requiring a couple of extra steps beforehand. Here is a small guide describing the main problems you may face and how to solve them.
Configure the SQL Server Configuration Manager
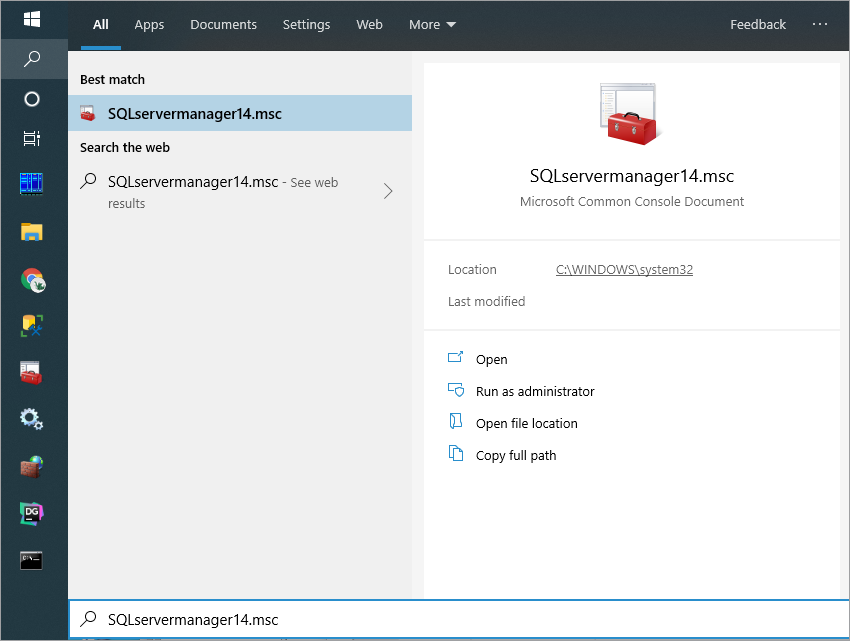
To open SQL Server Configuration Manager, open the Search dialog on Windows and type SQLServerManager14.msc (for Microsoft SQL Server 2017). Double-click the found result. If you use other versions of Microsoft SQL Server, change the second digit before .msc:
-
SQLServerManager13.mscfor SQL Server 2016 -
SQLServerManager12.mscfor SQL Server 2014 -
SQLServerManager11.mscfor SQL Server 2012
Run the SQL Server Browser
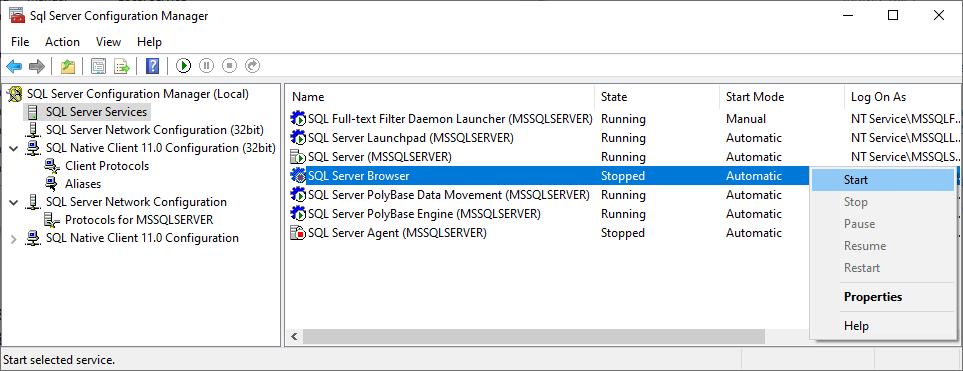
SQL Server Browser listens for incoming requests and provides information about Microsoft SQL Server instances on the computer. For more information about SQL Server Browser, see SQL Server Browser in the Microsoft documentation.
If the SQL Server Browser menu items are disabled, try to enable the SQL Server Agent service.
-
In the SQL Server Configuration Manager, click SQL Server Services.
-
In the right pane that lists server services, right-click SQL Server Browser and select Start.
Enable SQL Server Agent
If the SQL Server Browser is running, you can skip this procedure.
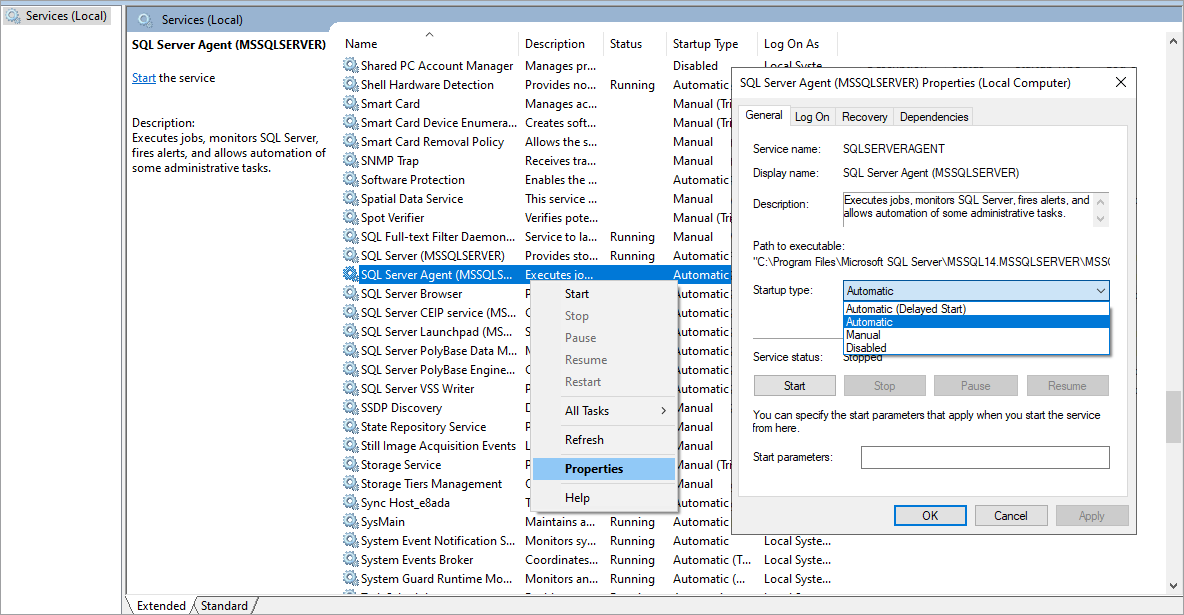
SQL Server Agent is a Microsoft Windows service that executes scheduled administrative tasks. For more information about these services, see SQL Server Agent in the official Microsoft documentation. Ensure that SQL Server Agent is running and starts automatically. After the change, a restart might be required.
-
Navigate to .
-
In the Services window, right-click SQL Server Agent(<server_name>) and select Properties. For this tutorial, <server_name> is MSSQLSERVER.
-
From the Startup type list, select Automatic and click Start.
Enable the TCP/IP connection
-
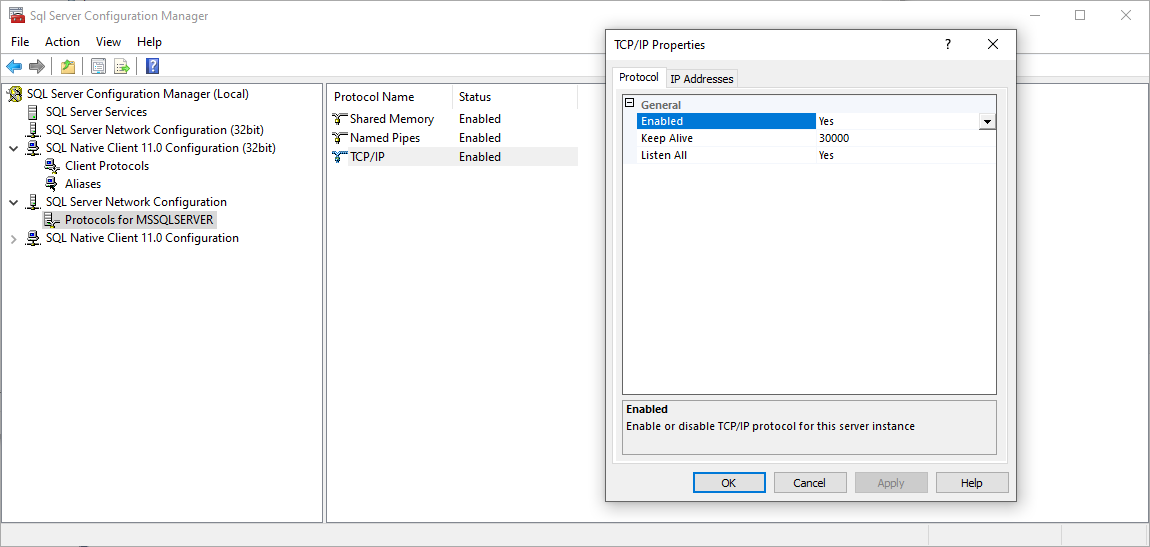
In the SQL Server Configuration Manager, expand SQL Server Configuration and click Protocols for MSSQLSERVER, where MSSQLSERVER is a name of the Microsoft SQL Server instance.
-
In the list of protocol names, right-click TCP/IP and select Properties.
-
On the Protocol tab, from the Enabled list, select Yes.
-
On the IP Addresses tab, find the interface that your workstation uses and see the connection port. By default, the port is 1433. Verify that other running applications do not use the same port.
If you changed any settings, restart the server. For most situations, the restart resolves connection problems.
Connect to Microsoft SQL Server with DataGrip
We’ll describe configuration of DataGrip on Windows, macOS, and Linux. Note that the Use Windows domain authentication checkbox is available only on Windows. To configure Windows domain authentication on macOS and Linux, see Connect by using Windows domain authentication.
Connect by using SQL Server authentication
-
Navigate to
-
In the Data Sources and Drivers dialog, click the Add icon (
 ) and select Microsoft SQL Server.
 -
At the bottom of the data source settings area, click the Download missing driver files link. Alternatively, you can specify user drivers for the data source. For more information about user drivers, see Add a user driver to an existing connection.
-
In Host, Instance, and Port fields, specify your connection details.
-
Clear the Use Windows domain authentication checkbox.
-
In User and Password fields, specify your credentials.
-
To ensure that the connection to the data source is successful, click Test Connection.

Connect by using single sign-on for Microsoft SQL Server
If you run DataGrip on Windows in the same domain as the Microsoft SQL Server database, you can use the Single-Sign On (SSO).
-
Navigate to
-
In the Data Sources and Drivers dialog, click the Add icon (
 ) and select Microsoft SQL Server.
 -
At the bottom of the data source settings area, click the Download missing driver files link. Alternatively, you can specify user drivers for the data source. For more information about user drivers, see Add a user driver to an existing connection.
-
From the Authentication list, select Windows credentials.
-
To ensure that the connection to the data source is successful, click Test Connection.

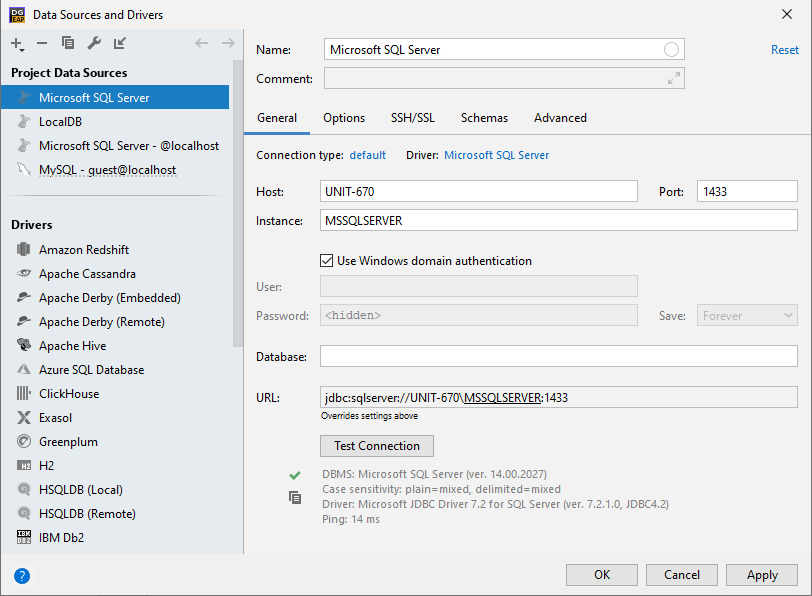
Connect by using Windows domain authentication
Windows
-
Navigate to
-
In the Data Sources and Drivers dialog, click the Add icon (
) and select Microsoft SQL Server. -
At the bottom of the data source settings area, click the Download missing driver files link. Alternatively, you can specify user drivers for the data source. For more information about user drivers, see Add a user driver to an existing connection.
-
In Host, Instance, and Port fields, specify your connection details.
-
Ensure that the Use Windows domain authentication checkbox is selected.
-
To ensure that the connection to the data source is successful, click Test Connection.
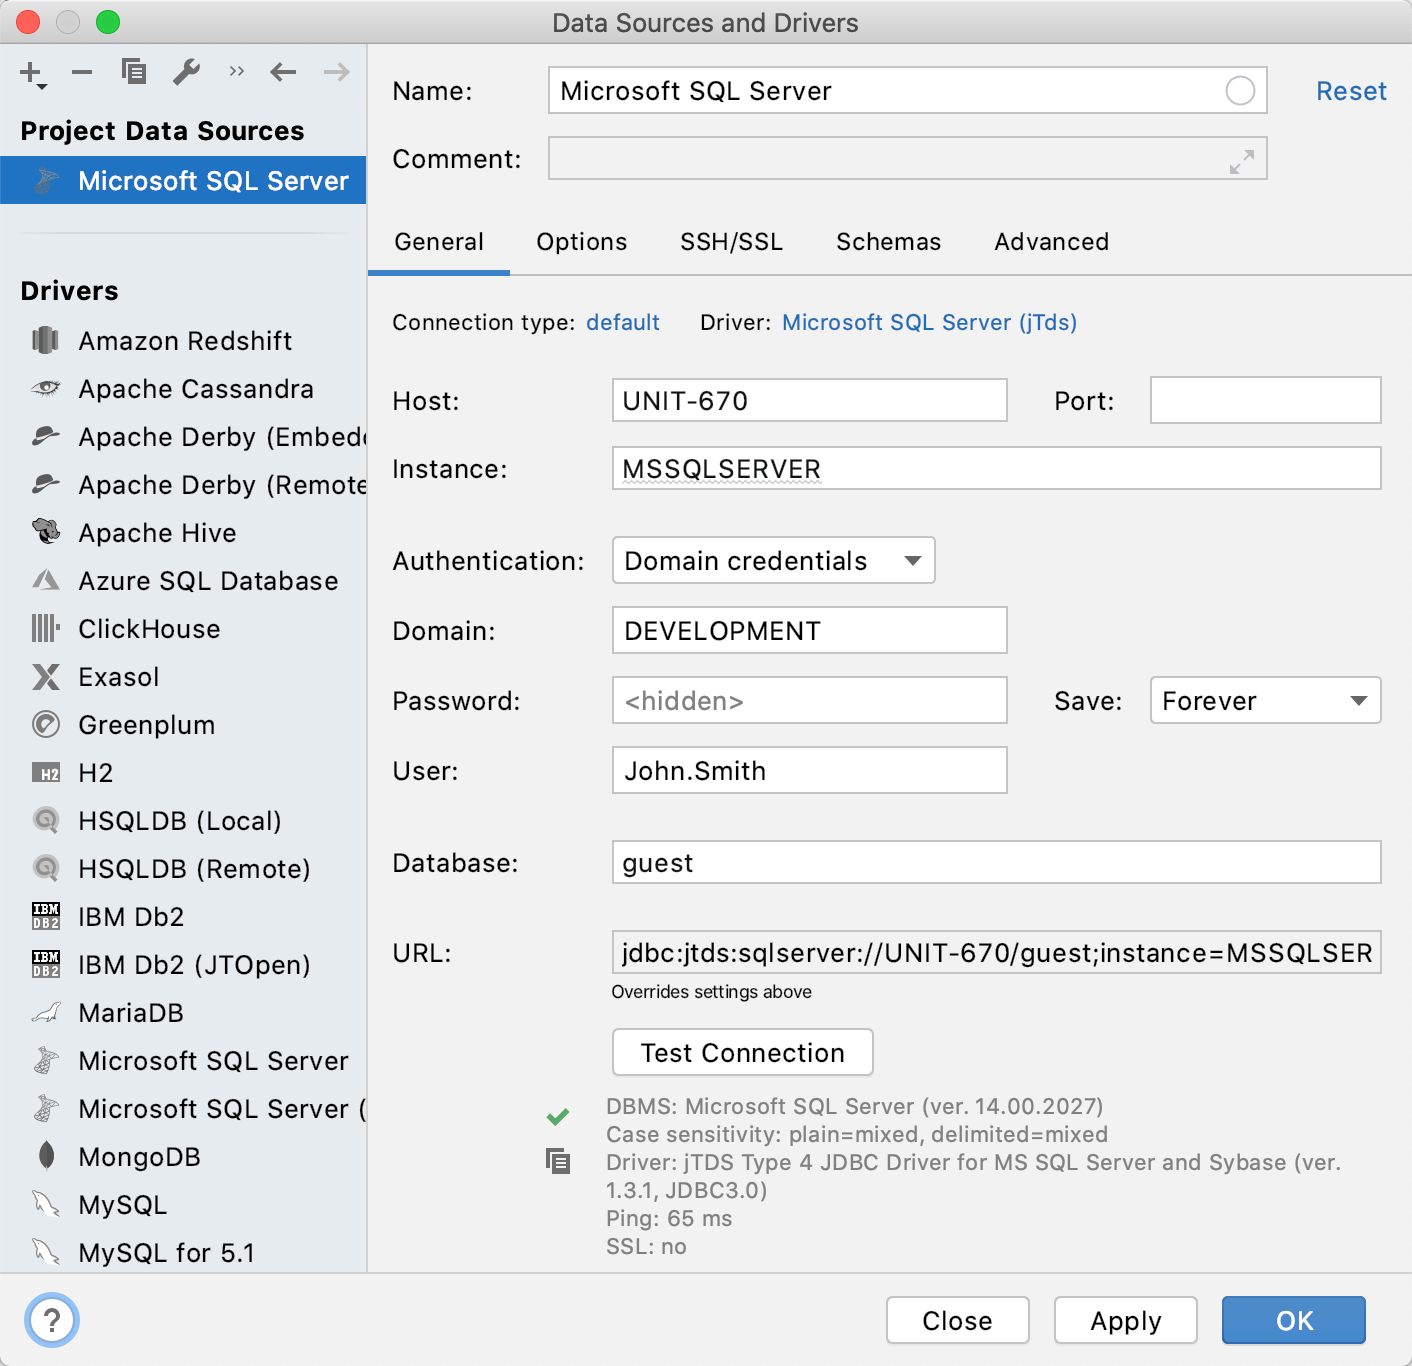
macOS and Linux
-
Navigate to
-
In the Data Sources and Drivers dialog, click the Add icon (
) and select Microsoft SQL Server. -
From the Driver list, select Microsoft SQL Server (jTds).
-
At the bottom of the data source settings area, click the Download missing driver files link. Alternatively, you can specify user drivers for the data source. For more information about user drivers, see Add a user driver to an existing connection.
-
In Host, Instance, and Port fields, specify your connection details.
-
From the Authentication list, select Domain credentials.
-
In the Domain field, specify the domain (for example,
DEVELOPMENT). -
In User and Password fields, specify your domain credentials. In the User field, type your domain user without the domain prefix (for example,
John.Smithinstead ofDOMAIN\John.Smith).Alternatively, on the General tab, specify the connection string. Consider the following example of a full connection string:
jdbc:jtds:sqlserver://UNIT-670:1433;domain=DEVELOPMENT;instance=MSSQLSERVER;databaseName=guest; -
To ensure that the connection to the data source is successful, click Test Connection.
Choose databases and schemas
If you want to check which particular databases or schemas are shown in the database view, go to the Schemas tab in data source properties:

Or click on the n of m text area near the data source name in the database explorer.

All selected databases and schemas will appear in the database view.
That’s it! If you are experiencing any other problems, please tweet @ us or create an issue in our youtrack.
Also, you may be interested in our blog-post caled Transition from SSMS to DataGrip.
Your DataGrip Team
The Drive to Develop
Subscribe to DataGrip Blog updates


