DataSpell 2022.3 EAP 2 Is Out!
The second EAP build for DataSpell 2022.3 contains some exciting new features, including two highly requested additions: the ability to configure a remote interpreter using SSH and debugging for Jupyter notebooks running on remote machines. In addition, we’ve greatly expanded the options for working with DataFrames, including by making improvements to how you can display and export your data. Finally, we’ve added enhancements to help with coding, such as autocompletion for pandas column names when using Python scripts and Data Vision, which displays helpful in-line information about variables.
Due to ongoing changes we are making to Conda support in DataSpell, Conda interpreters are not supported in this EAP. We strongly recommend that Conda users skip this EAP due to this issue. Virtual environments and system interpreters are not affected.
Please give the new functionality a try and let us know what you think!

The Toolbox App is the easiest way to get the EAP builds, and keep your stable and EAP versions up to date. You can also manually download the EAP builds from our website.
Configuring a remote interpreter using SSH
You asked, and we’ve delivered! It is now possible to set up an interpreter on a remote machine using SSH in DataSpell.
To set up a remote interpreter for an attached directory, right click on the directory and select Interpreter | On SSH…. Enter the IP address for your remote server under Host and the username under Username, leaving Port as the default 22. Enter the password on the next screen. You can now either use an existing interpreter on your remote machine or create a new virtual environment. Files that you create in your local workspace will also be synced with your remote machine, so you can also select a folder to write them to using Sync folders.
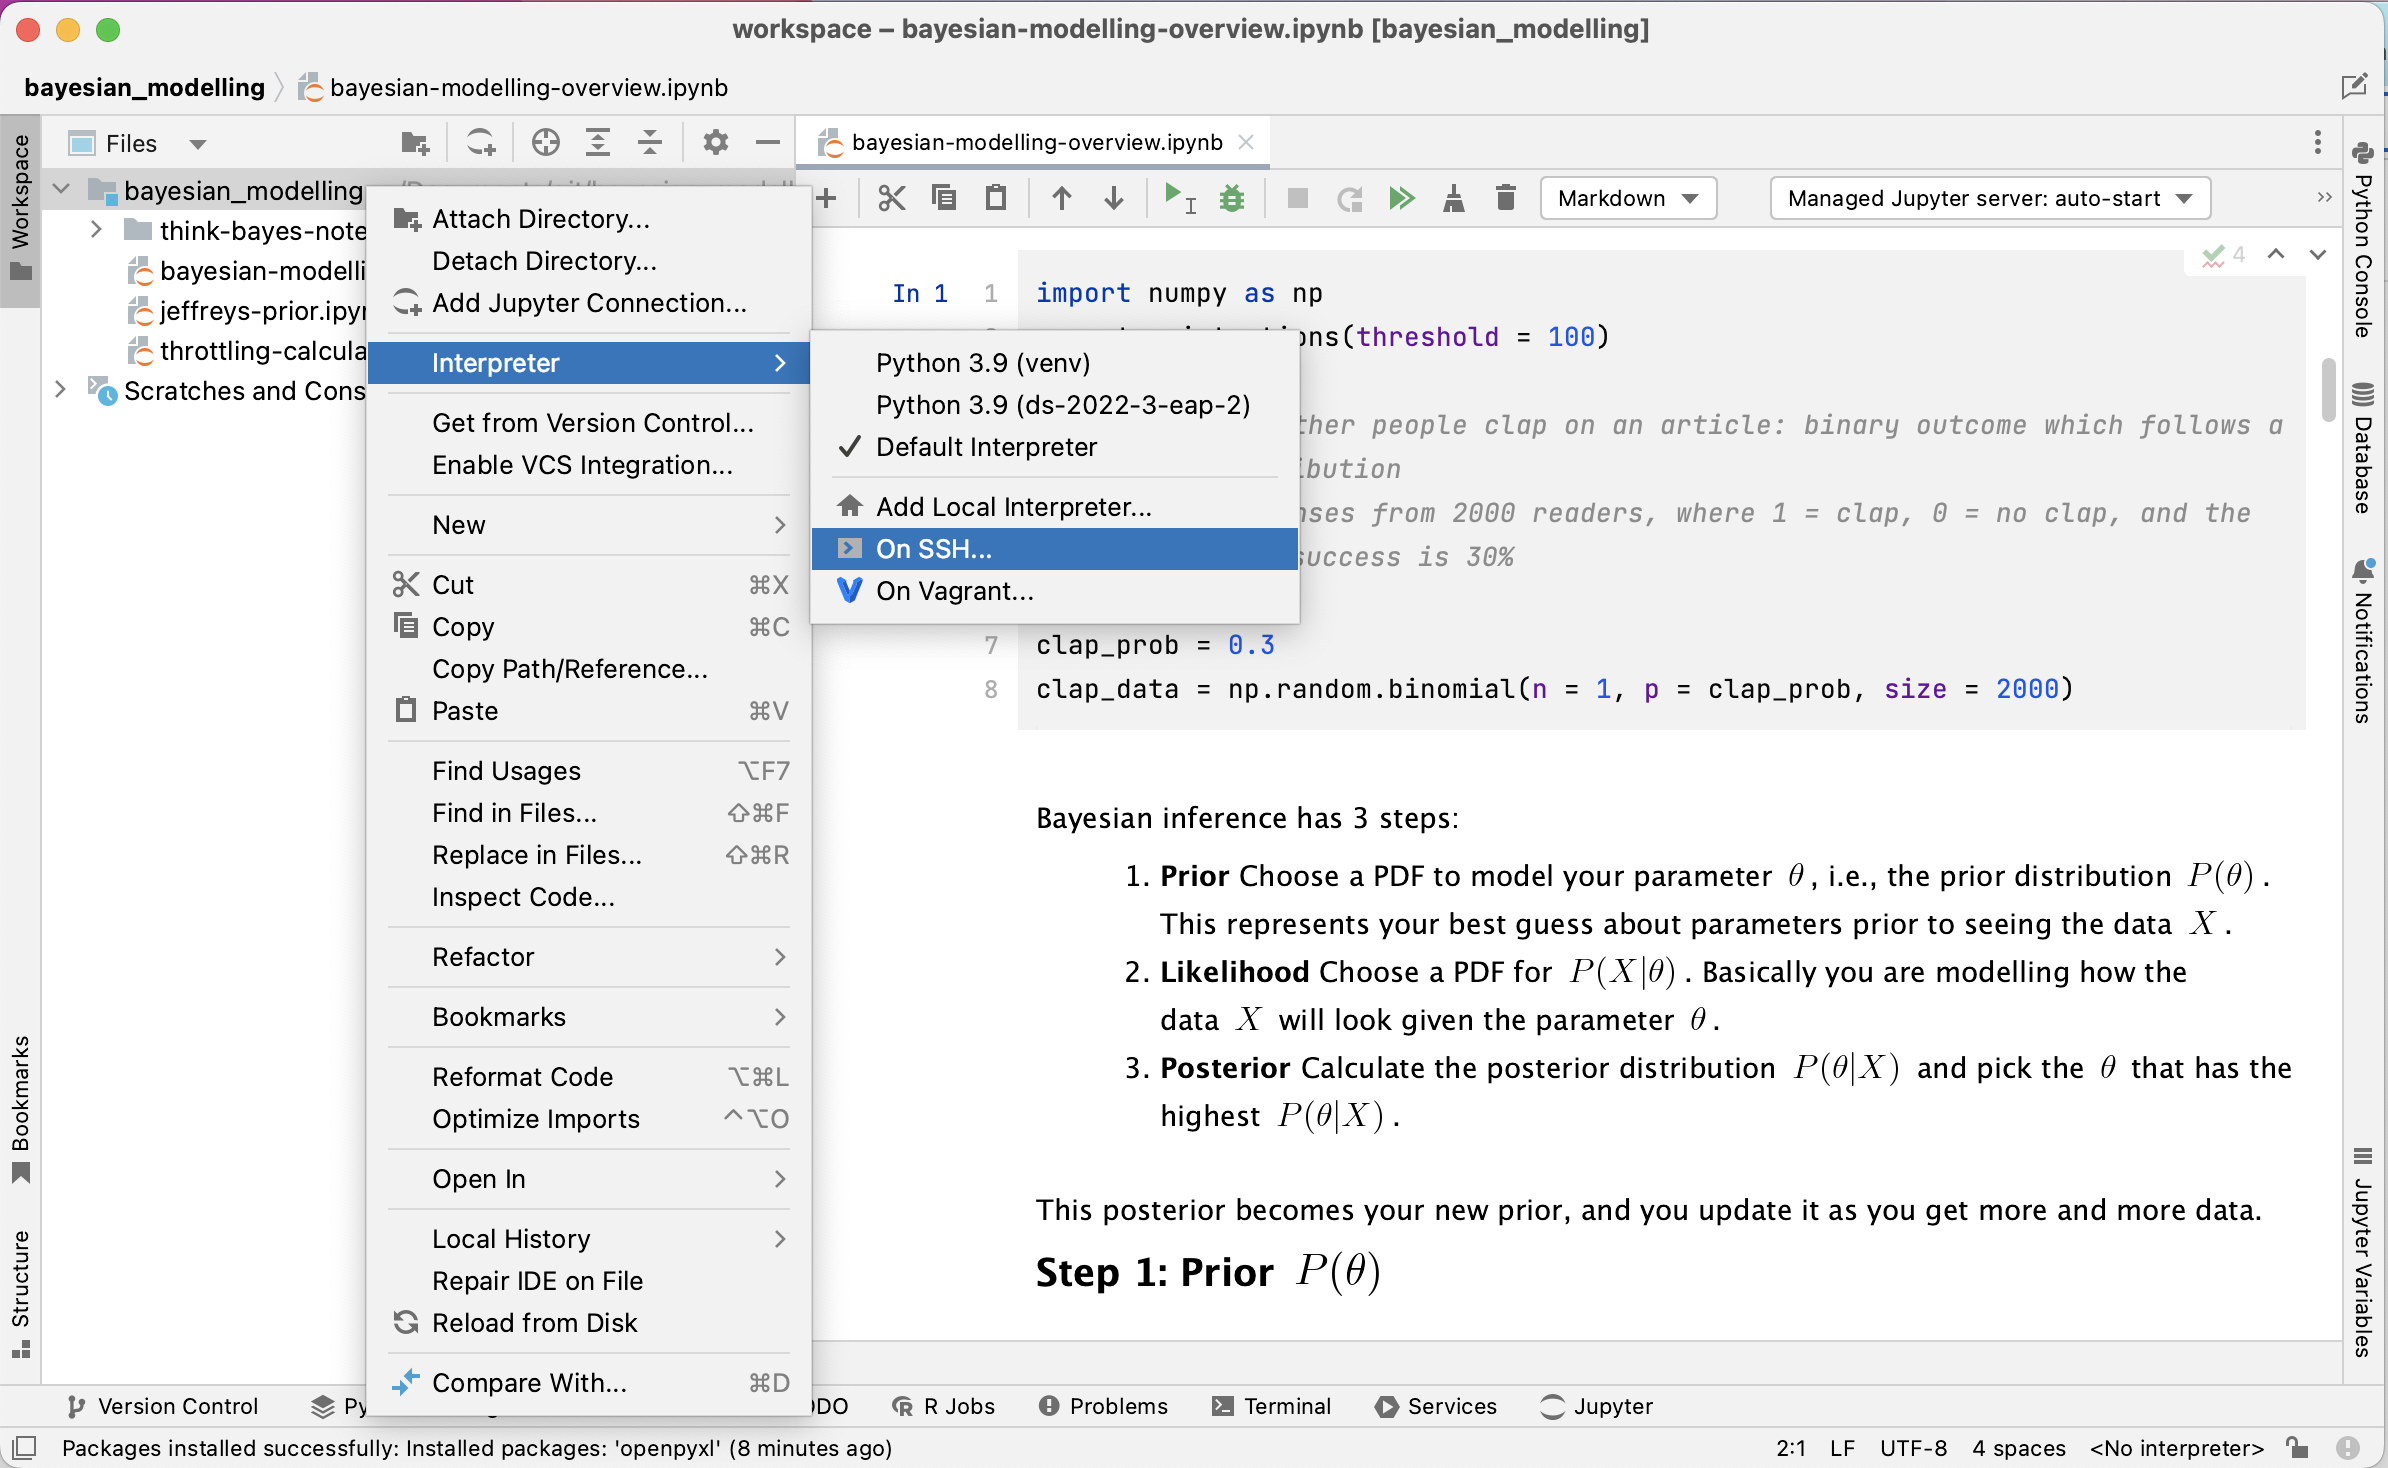
Once you’ve configured your remote interpreter, you have the option to run both Python scripts and Jupyter notebooks. When you run your Jupyter notebooks using the remote interpreter, a managed server will be automatically started on your remote machine.
You can also manage the dependencies associated with your remote interpreter by going to Settings/Preferences | Project: workspace and selecting the workspace you are running on the remote machine. You can then add packages by clicking the Install (+) button, searching for the desired packages, and clicking Install Package. Conversely, you can remove dependencies by selecting the package from the list and clicking the Uninstall (-) button.
Remote debugging on Jupyter servers
DataSpell has now extended its Jupyter debugging capabilities to notebooks hosted on remote Jupyter servers.
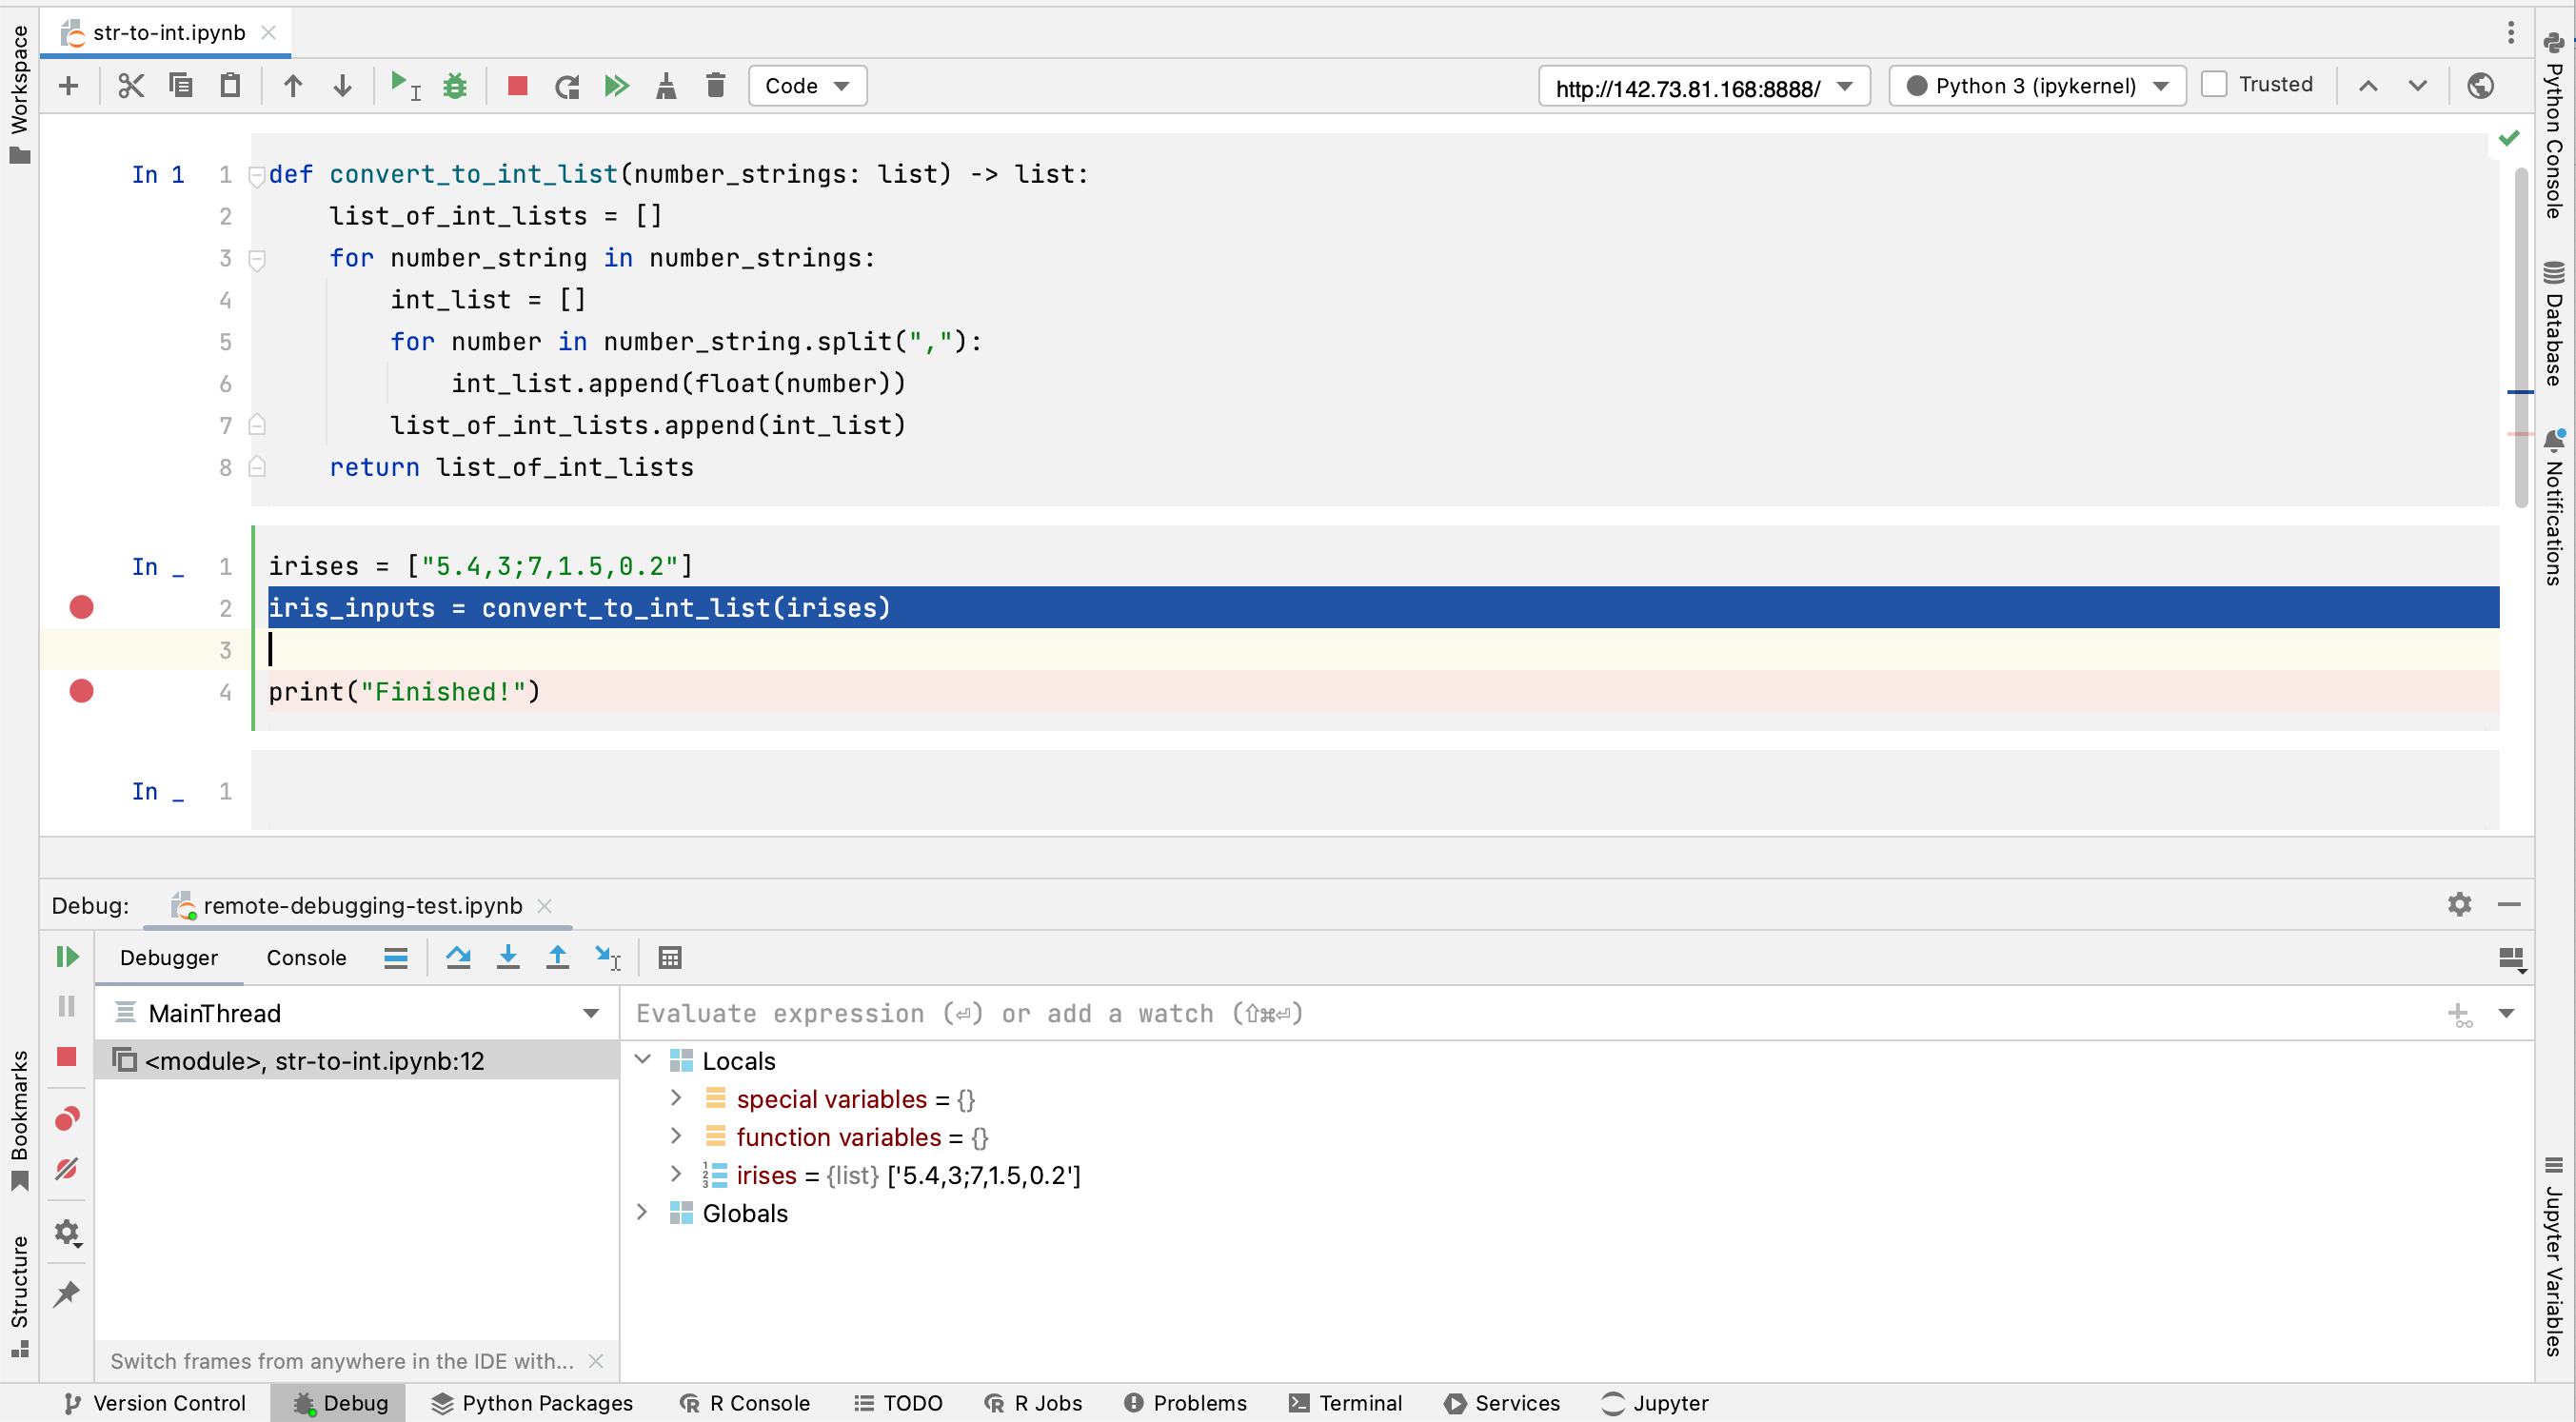
In order to take advantage of this, first attach your remote Jupyter server to the IDE by going to File | Add Jupyter Connection…, and then enter the URL of the server under Connect to Jupyter server using URL. Don’t forget to include the authentication token if one is required! Your Jupyter server will then be attached as a workspace in DataSpell.
In order to debug code in a cell, add a breakpoint in the gutter next to the code, right click within the cell, and select Debug Cell. This will bring up the Debug tab, which will display all variables that have been generated within the cell prior to the breakpoint under Locals. You can now navigate through the code in this cell using the Step Into and Step Over functions in the Debug tab, and take advantage of the ability to add multiple breakpoints per cell.
Enhanced DataFrame interactivity in Jupyter notebooks and consoles
We’ve added more features that make exploring DataFrames easier and quicker in both Jupyter notebooks and interactive Python consoles. DataFrames are now more consistent with tables in DataGrip, complementing our existing functionality from DataGrip for working with databases in DataSpell.
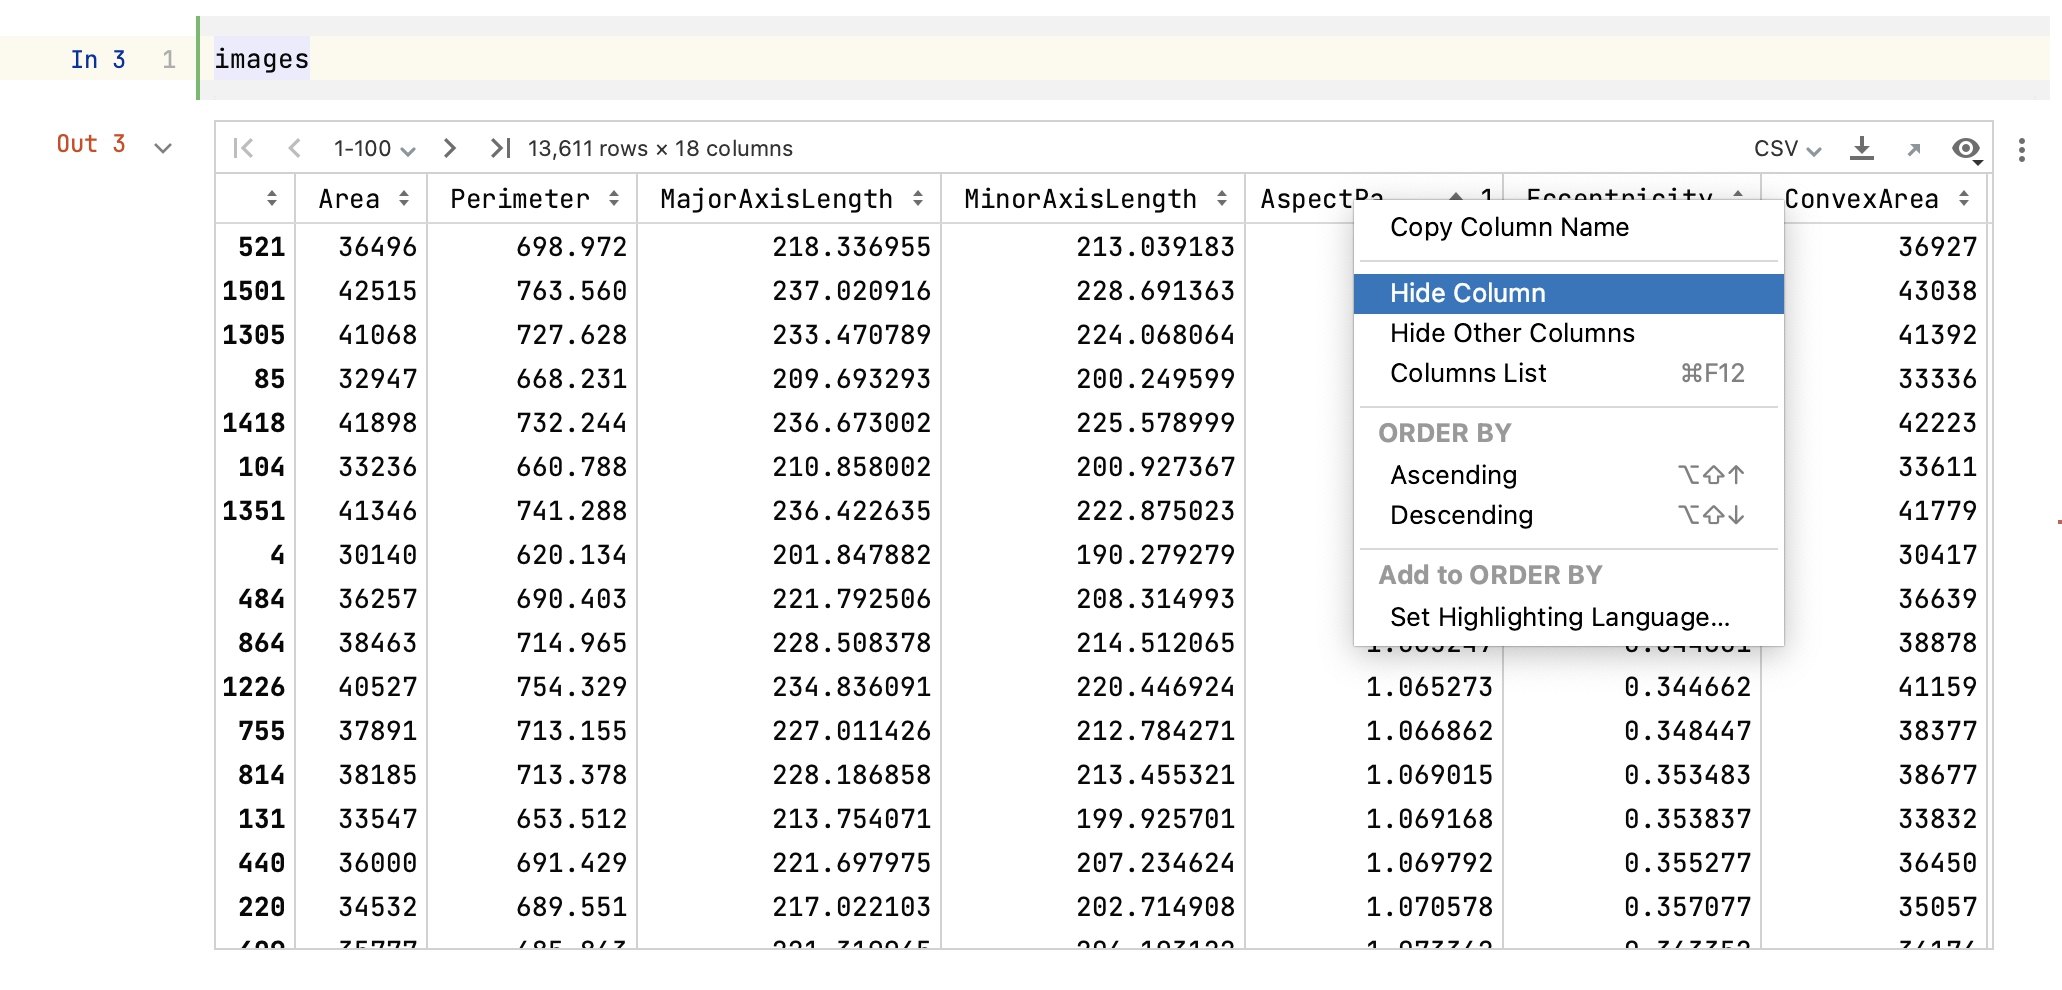
Once a DataFrame is displayed, you can right-click on a column’s name to apply a number of new actions to it. Columns can be hidden to make tables easier to navigate. You can hide either the target column by selecting Hide Column, or all other columns by selecting Hide Other Columns. Column visibility can be toggled by selecting Columns List, then selecting the name of the target column and pressing the spacebar.
We now have a much wider range of options for viewing DataFrames. By clicking on View as in the top-right corner of the DataFrame, you can now toggle between three viewing modes: Table, Tree, and Text. Table is the default DataFrames viewing mode, which presents the data in cells that are the intersection of rows and columns. Tree displays the data as a key-value table, and is suited for JSON and array data. Finally, Text displays the data in raw text; for example, CSV files will be displayed as lines of comma-separated values. Additionally, you can also choose to Transpose your DataFrame under View as, switching the rows and columns.
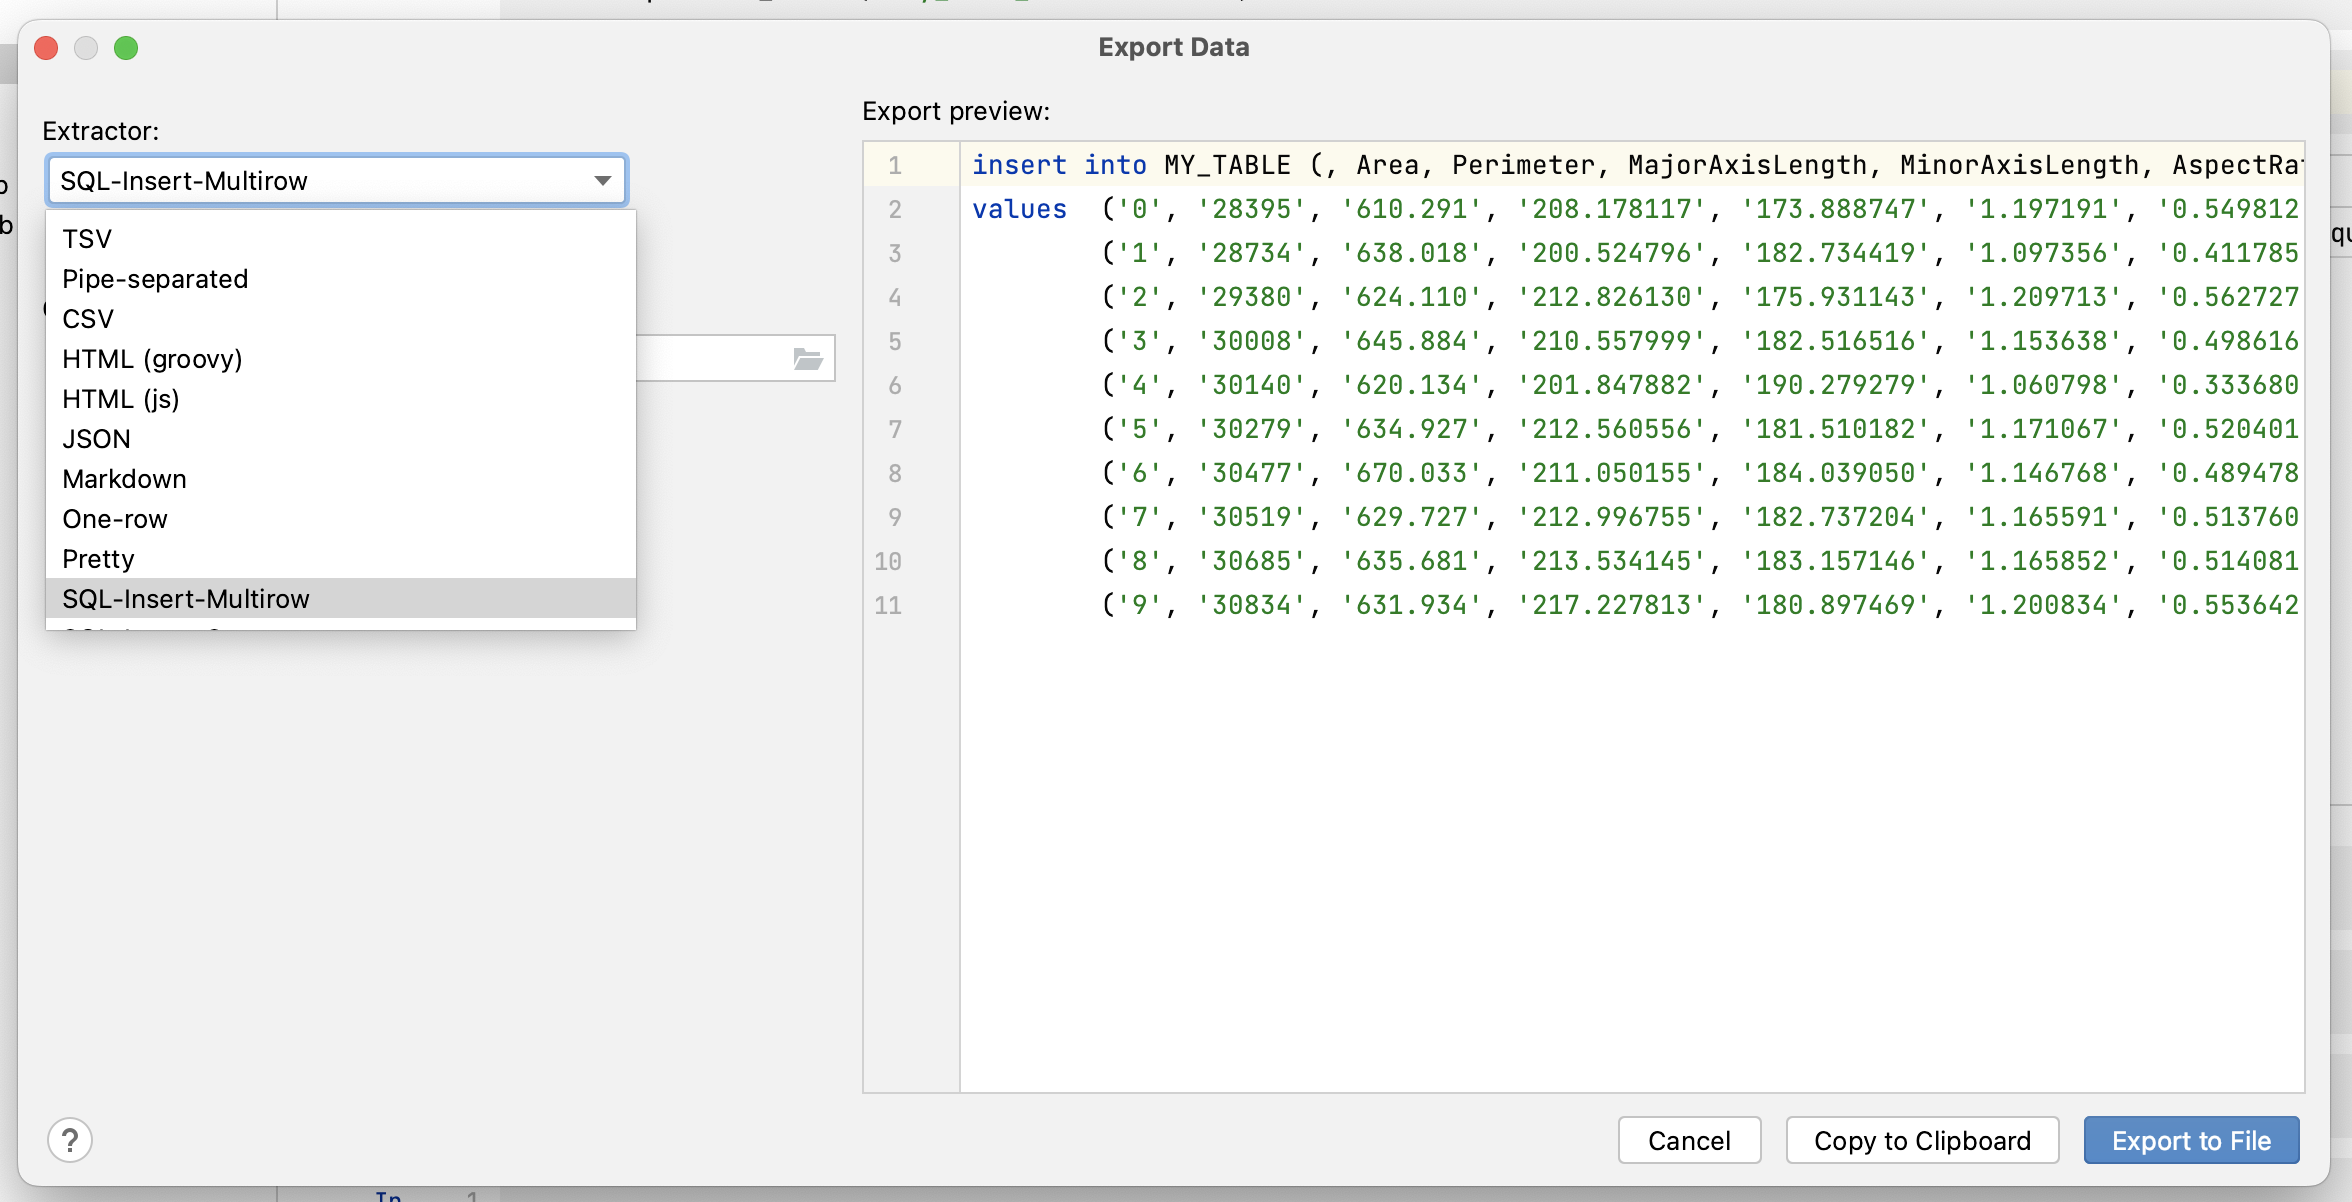
We’ve also greatly expanded the options for exporting DataFrames, making it possible to use a wide variety of formats, including Excel, JSON, HTML, XML, Markdown tables, and SQL Insert statements. The delimiter for CSV files is also now configurable. If you don’t find the export type you need, you can script your own custom extractor using Groovy or JavaScript! In order to select your export type, simply click Export Data to File in the top right-hand corner of the DataFrame.
Finally, pagination has been added to the DataFrame view, allowing you to skip through chunks of rows by using the arrows at the top left-hand corner of the DataFrame. You can click on the Page Size control and select different page sizes, or alternatively, load all rows.
Data Vision
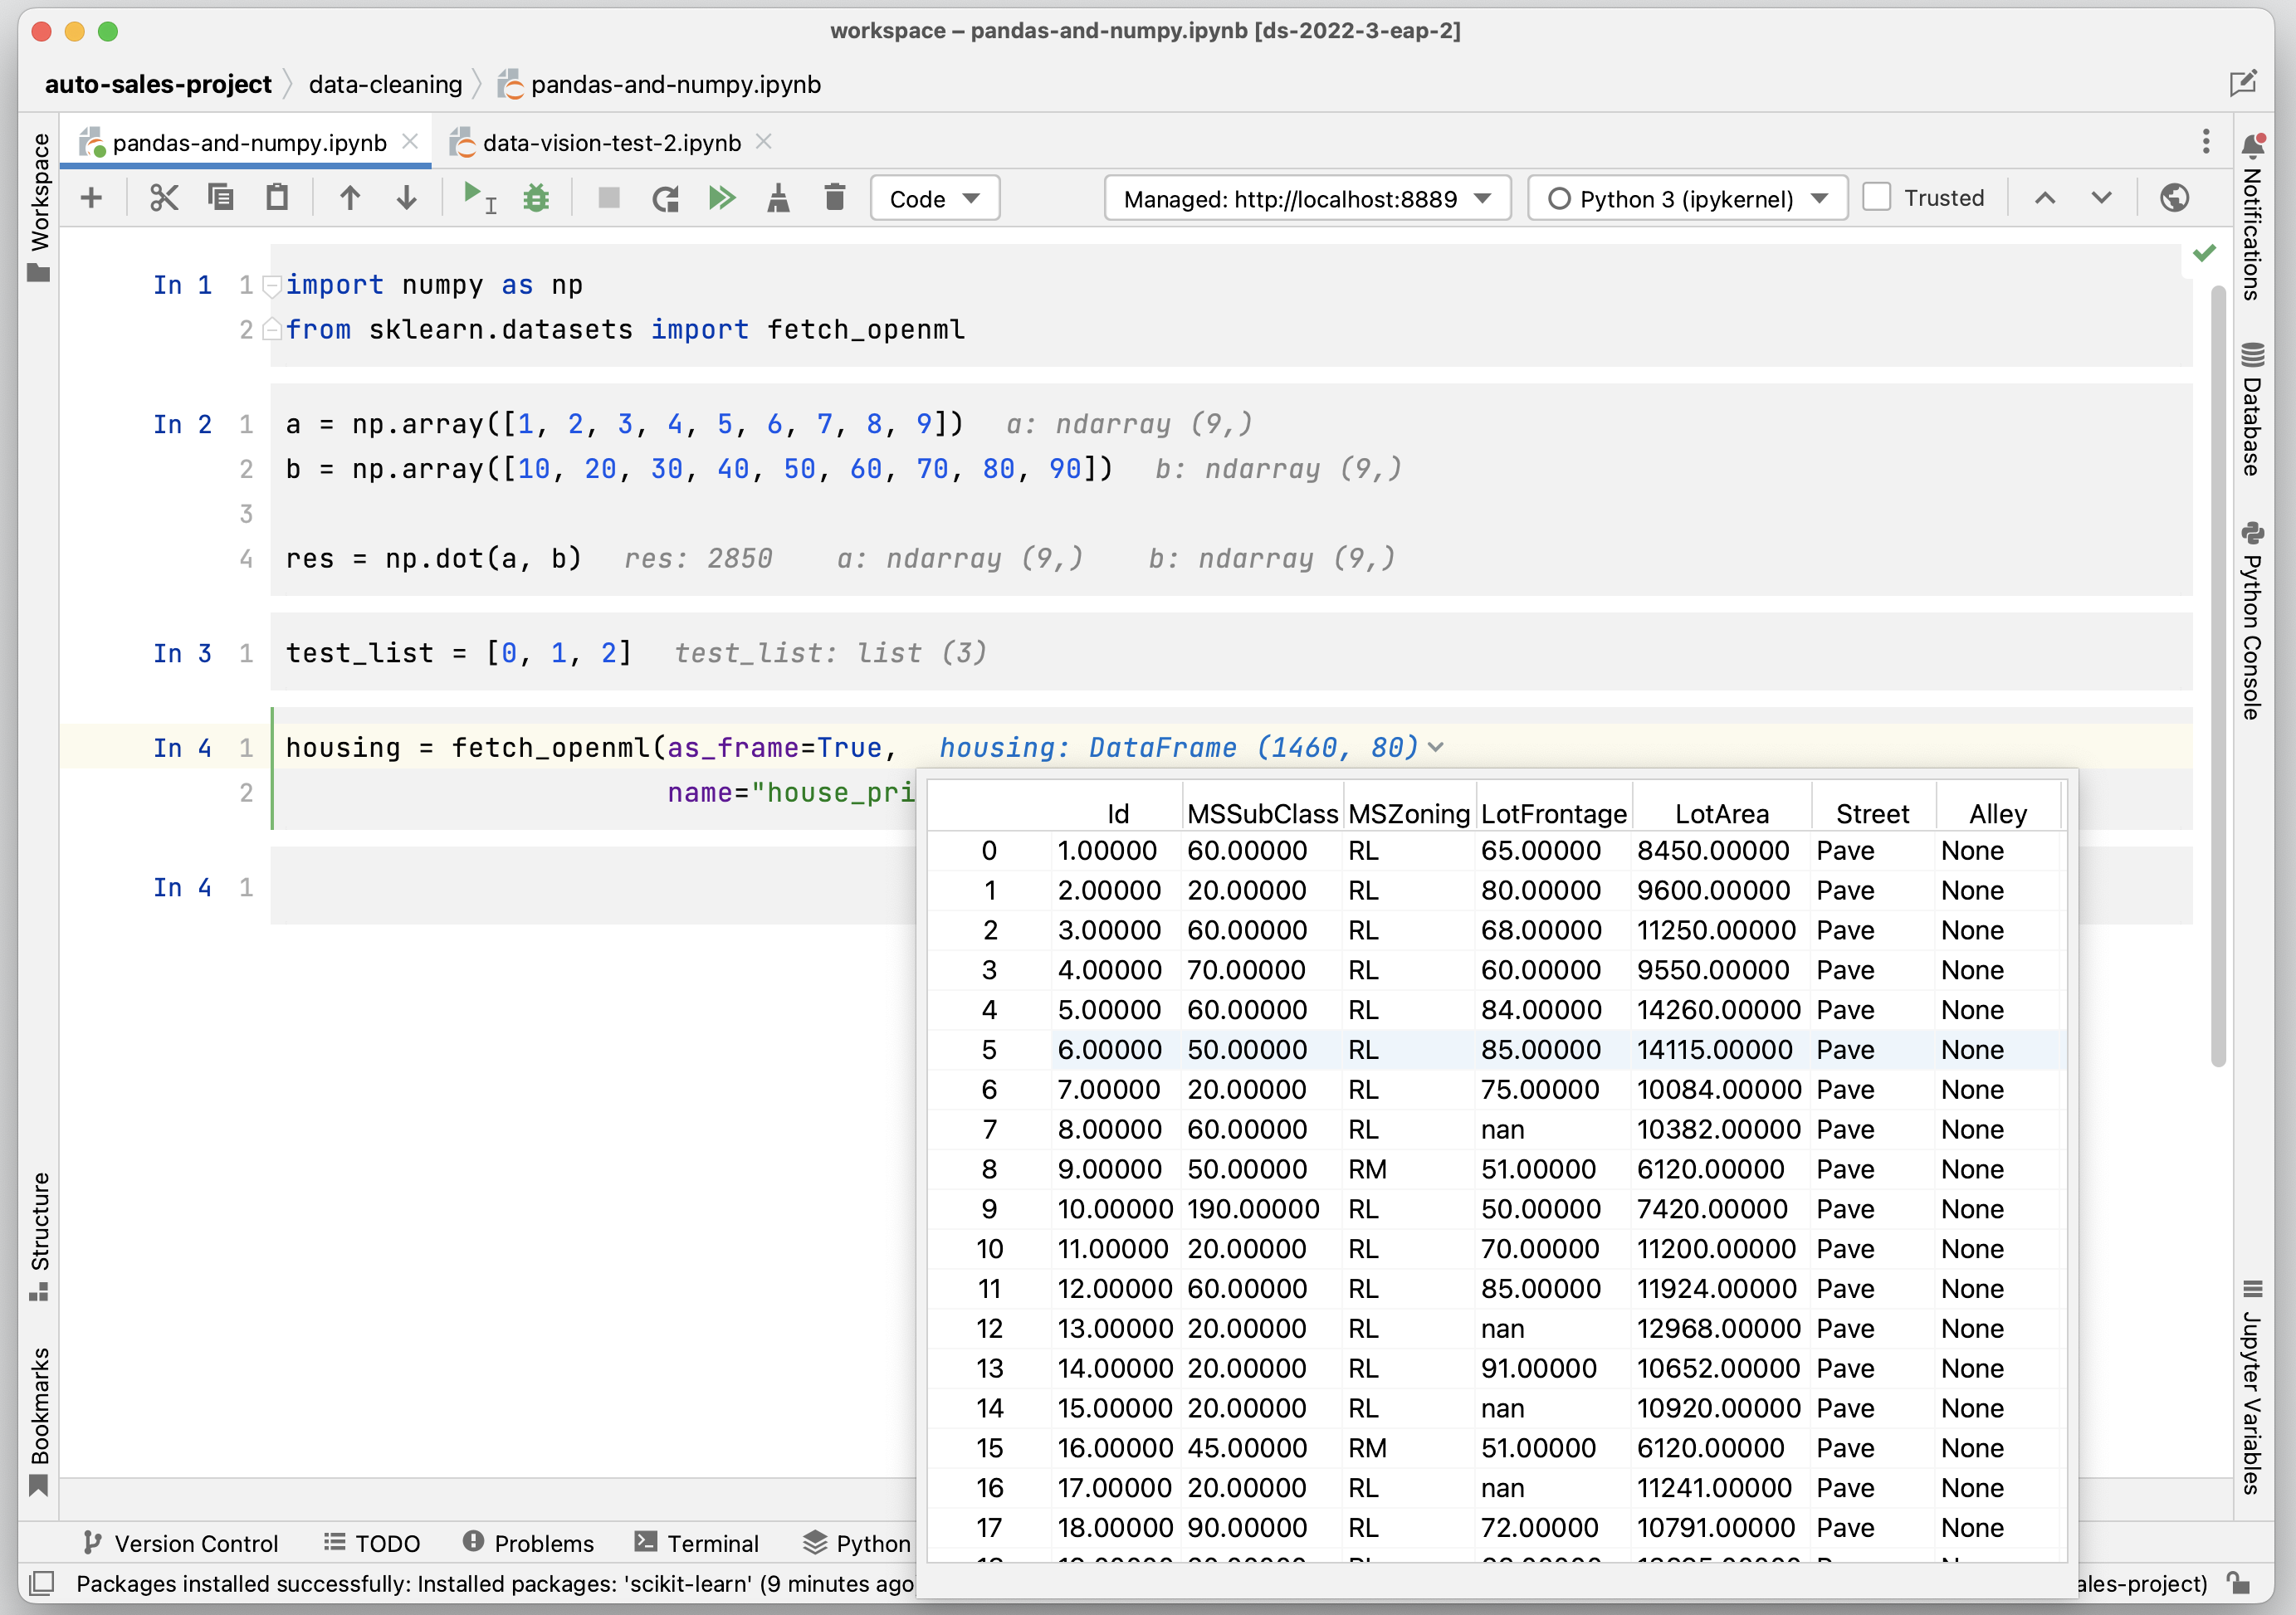
It’s now possible to inspect Jupyter variables directly within your notebook. Once you’ve executed a cell and a variable has been created, Data Vision will allow you to get useful information about that variable whenever it is used in a cell. For example, for pandas DataFrames and NumPy arrays, Data Vision will display their shape and also allow you to display and scroll through their contents.
Data Vision is an optional feature that can be enabled by going to Settings/Preferences | Languages & Frameworks | Jupyter and selecting Show inline values in editor.
Column name code completion in Python scripts
We’ve been working hard to make code completion more consistent across file types. In this release, code completion is now available when using pandas column names in Python scripts. In order to enable column name code completion, create a DataFrame in a Python script and execute your code against an interactive Python console by making sure that New Console is selected under Run in: to the top right of the Python script (the default for executing Python scripts). Column names will now be suggested for that DataFrame when using both the period and the bracket notation. This even works when referencing columns in lambdas, such as when using the `assign` method on a DataFrame.
Please try out the changes introduced in this build and share your feedback with us! If you have any questions or comments, you can either use the comments section below or reach out to us on Twitter. If you find a bug while using the EAP, please report it to our issue tracker. We’re excited to hear what you think!
The DataSpell team
Subscribe to DataSpell Blog updates


