.NET Tools
Essential productivity kit for .NET and game developers
ReSharper SDK Adventures Part 6 — Read-only inteface generator
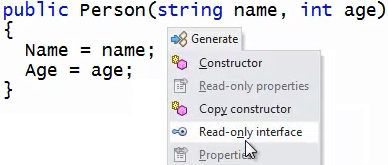
 Welcome to another instalment of the ReSharper SDK Adventures! In this part of the series, we are going to talk about code generation and, specifically, about extending the Generate menu with your own actions. As an example, we are going to go through a step-by-step process of creating an action that would generate a read-only interface.
The full source code for the generator action is available here.
Read-only interfaces? In C#?
Indeed! Of course, C# does not have any built-in immutability mechanisms, but that won’t be a problem. Consider a simple Person class:

Let’s say we want to pass this Person into a method that’s not allowed to modify the instance being passed in. How can we do it? Well, one of the ways is to make properties private set;, but what if there are cases when we do want Person to be modifiable? The solution is to define a read-only interface similar to

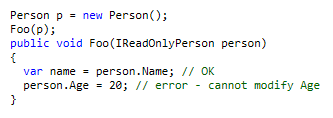
Notice how the interface properties only have get; and not set;? The Person class can now implement this interface and be passed into methods that aren’t allowed to change it:

So now that we know what we want, let’s see how one would go about adding such an item to ReSharper’s Generate menu.
Generate item provider
We’ll start with the simplest possible construct: a generator item provider. This is a class that is decorated with the [GeneratorProvider] attribute and it implements the IGenerateActionProvider interface. Its purpose is to provide one or more generator workflows through a single method called CreateWorkflow(). In the context of generators, a workflow is a set of steps that involve both showing the generator UI (in our case, we’ll let the user pick which properties make it into the interface) as well as generating the actual code.
Our implementation of the generate item provider is rather simple:

The above code is one of the places where an IDataContext is available, which is a great place to grab hold of the PsiIconManager and get the icon for our generated item. In this case, for obvious reasons we’ll go with the Interface icon. This icon, once acquired, is simply passed into the constructor of our workflow, which we’ll discuss very soon.
Generate action
It is sometimes benefitial to invoke generators as actions. This allows, among other things, to bind a Generate action directly to a keyboard shortcut. To implement this, we need to create an action, i.e. a class decorated with the [ActionHandler] attribute. There’s also a special base class, GenerateActionBase<T>, that is used for providing generator actions. The T variable relates to the provider class we made earlier. So, for our generator, we’ll define an action as follows:

In the above, we specify a textual representation of the action, as well as indicate that a menu should be shown even if our action is the only one in it. The critical piece of information is the argument passed to the ActionHandler: this is the action ID, and it is used in the workflow definition that follows.
Action workflow
The workflow class is a kind of glue that binds things together and allows us to indicate two main things: the action id (as we’ve just defined it) as well as the generator builder where all the generator action actually happens. Please note that the generator builder is referred to by name or, more precisely, by kind. Here is the definition of our workflow:

Just to reiterate, in the above,
-
The
"ReadOnlyInterface"string refers to the generator builder (we’ll meet it in a moment). -
The
"Generate.ReadOnlyInterface"is the action ID.
Other entries are used to provide textual information as well as specify the action group where our action belongs – in this case, a group related to CLR languages.
Generator builder
The generator builder is the part that makes explicit which elements and options appear in the generator dialog, and what code actually gets generated. Our implementation of a read-only interface consists of these steps:
-
Find all suitable class properties and present a dialog box for user to pick them
-
Create the new interface and insert it into the same file
-
Ensure our original class implements the interface
The generator builder is just a class that is decorated with the [GeneratorBuilder] attribute that indicates the generator kind and also the language the builder corresponds to, e.g.:

This class is expected to override only one method called Process() where generation takes place after the user presses the Ok button on the Generate dialog. I’ll use CPS (continutation passing style) here to better demonstrate the sequence of operations as we build the interface. Let’s start with the outline:

In the above, ReadOnlyInterfaceBuilderWorkflow is a static class that uses the CPS paradigm. Its Start() method performs a rudimentary check and then sends us off to create the new interface:

We create an empty interface to begin with…

… and before adding its members we add it to the containing namespace:

Now that the interface has been added to the file we’re in, we can take each of the properties the user selected and add the appropriate member. I’ve cleverly omitted the process of gathering those properties to begin with because that will appear in the subsequent section – for now, we just assume that the CSharpGeneratorContext that we’ve been taking through all our method calls contains an InputElements property that has all the items the user selected.
Thus, we add properties to the type as follows:

And, finally, the easy part — making sure that the original class implements the interface:

And that’s it! As you can see, we’ve used context.ClassDeclaration to get at the original class, which sure makes manipulating things easier! This is almost it for the generator, but where did those properties in context.InputElements come from?
Generator element providers
The items that appear as check boxes in the Generate UI and subsequently appear in context.InputElements are supplied by generator element providers. Such a provider is a class decorated with the [GeneratorElementProvider] attribute and inheriting from GeneratorProviderBase<TGeneratorContext> where TGeneratorContext depends on the language. In our case, the provider looks as follows:

This class has only one important method called Populate(). This method gets a CSharpGeneratorContext as a parameter, and can use that context both to get at the object of our code generation efforts (i.e., the class we’re working with) as well as exposing the ProvidedElements collection that we can populate with, in our case, all suitable properties.
The type of each element is IGeneratorElement. This interface has a number of concrete implementors (e.g., for XAML events). The type we’ll use is a simple GeneratorDeclaredElement<T> where T is the type of declared element that we’ll be providing. Since generators typically provide a wide variety of members, and not just properties, we may as well use something very wide-ranging, such as e.g. ITypeOwner. All that matters is that we can correctly supply the declared element of the member.
So here’s what the implementation of Populate() looks like. First, we do a few rudimentary checks:

And subsequently we go through each of the available property declarations, filter out unsuitable ones, wrap the rest in GeneratorDeclaredElement entities and add them to the ProvidedElements collection:

Now, how does the generator builder know to use this item provider? It’s all in that kind string that we decorated both the builder and element provider classes with. That’s what made the magic happen.
Conclusion
Making a generator item is not that difficult, though it is perhaps a bit more convoluted than a simple context action. The possibilities for code generation are truly limitless, so you can simply take the source code, tweak it and you’ll be making your own generators in no time at all. Good luck!
Subscribe to a monthly digest curated from the .NET Tools blog:


